Composting Tips
• Keep the moisture level damp, not soggy.
• Once the active “Start” batch begins to heat
up, rotate the bin 5 to 10 times every few days to
provide aeration.
• Use the composter on a level surface. If it’s on
an angle, a full batch can be very difficult to turn.
• If cold weather arrives before your batch has
finished cooking, it may be left inside the Compost
Tumbler until spring returns. To start it up again,
add Super Hot or Energy Buttons (see Ordering
Information) and some leaves, food scraps and grass
clippings, and water as needed.
• Do not put meats, pet waste, fats, bones, sh,
dairy products, trash or plastic into the Compost
Tumbler. These do not break down easily and can
attract rodents and other unwanted pests to your
yard.
For more information about the basic principles of
composting, visit us online at www.gardeners.com.
Ordering Information
#39-652...................... Dual Batch Compost Tumbler
#38-189...........................Super Hot Compost Starter
#07-219.................................. Energy Buttons, 5 Lbs.
#38-193................................ Compost Thermometer
#37-561 ....................................Coir Bricks, set of 10
To place an order, please call us or visit our web site for current prices.
PHONE ORDERS: 1-800-427-3363 CUSTOMER SERVICE: 1-800-876-5520
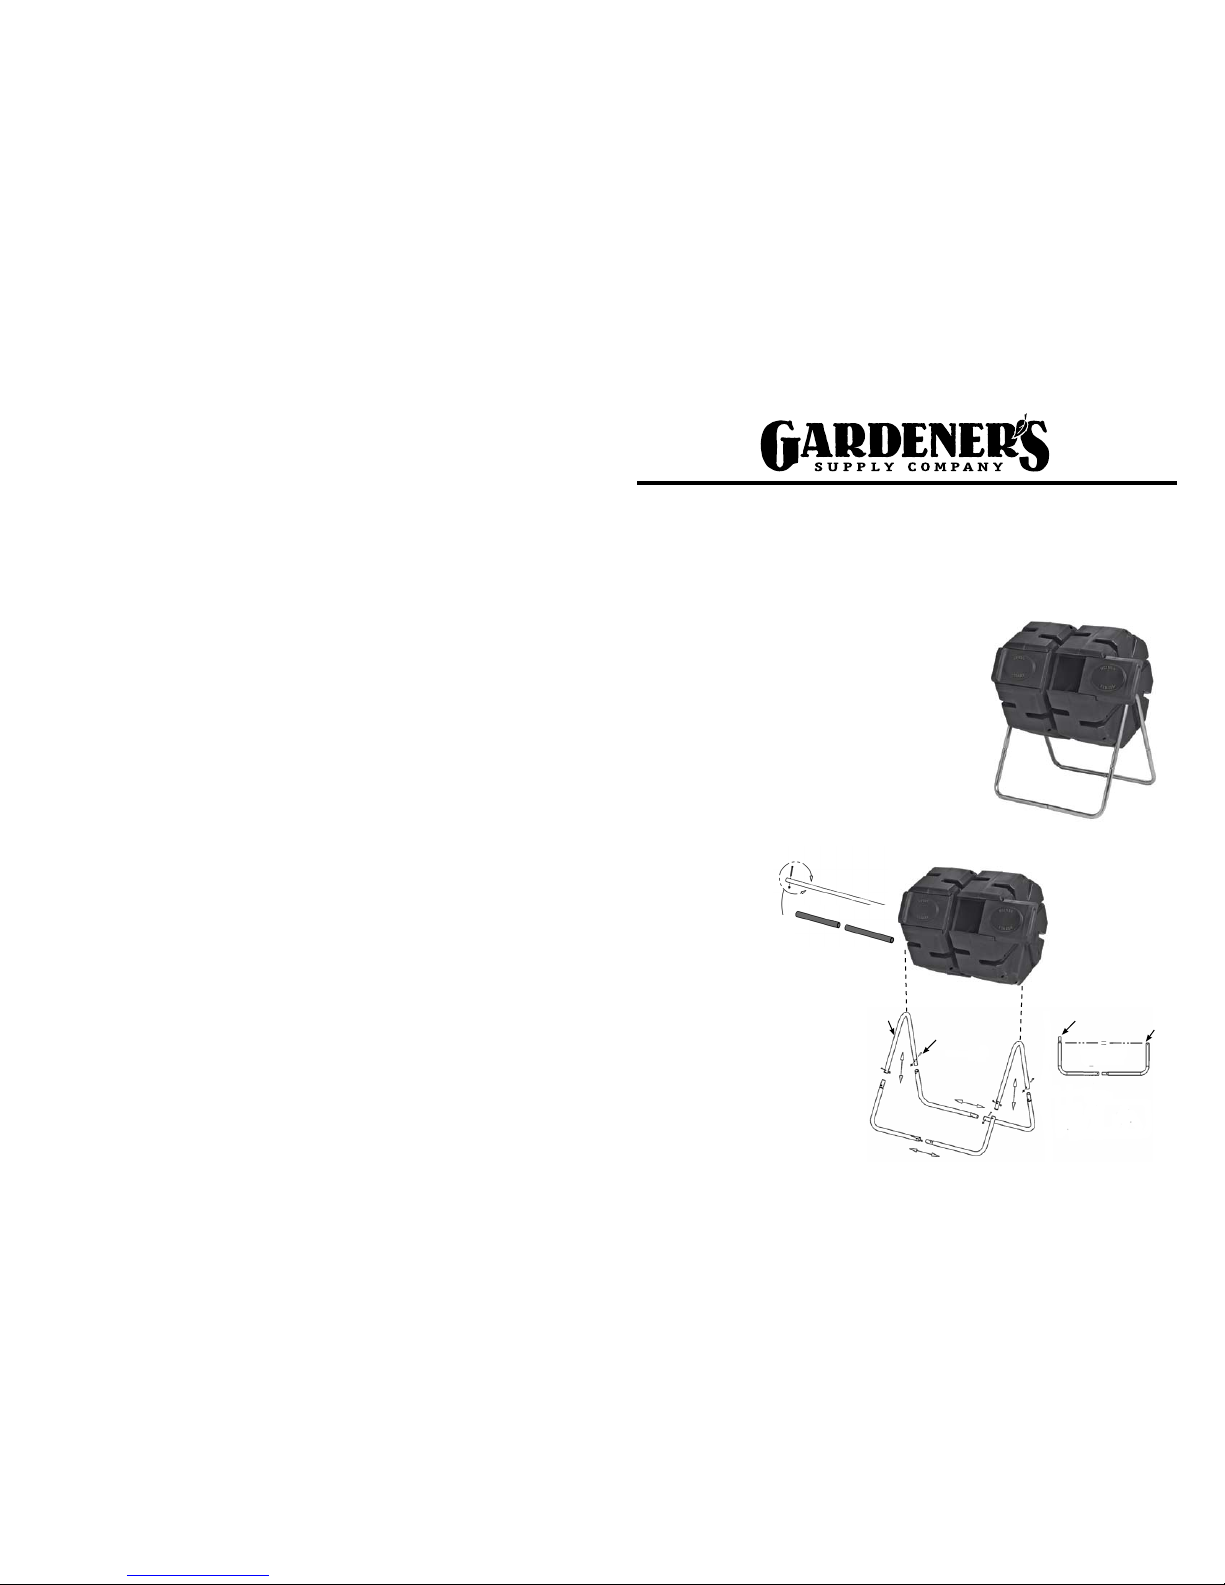
Step 4. Make sure that the frame is resting on a flat
and level surface. Slide the Steel Axle through the
center hole of each bin, while also sliding the Axle
Covers onto the Axle from inside each bin (Figure 2).
The Bolt holes in each end of the Axle should be vis-
ible on both sides of the composter.
Step 6. Insert a long Axle Bolt through the hole in
each end of the Axle.
Step 7. With a second person to help, carefully lift
the composter by each end of the Axle, directing the
bolts into the pre-drilled holes in the top of each
Shoulder Frame (Figure. 2). Tighten a nut onto each
bolt from underneath. Check that all nuts are fully
tightened on the composter and that the composter
bins rotate freely. Insert an Axle Cap into each end of
the Axle (not shown).
Step 8. Slide the Doors into place (Figure 3). The as-
sembly is now complete and your composter is ready
to use.
Batch Composting
Add green materials such as garden trimmings and
food waste and brown materials such as dried leaves
and coir bricks in a 1 to 3 ratio (green to brown).
Adding an activator, such as our Super Hot Compost
Starter, will also help break down the compost mate-
rials. Super Hot includes an energizer (high nitrogen-
enriched peanut meal) and activator (alfalfa, micro-
organisms, cocoa meal, and other ingredients). With
the right blend of shredded ingredients and some
practice you can make compost in just 4 to 8 weeks.
When the “Start” Bin is full and the composting ac-
tion has begun, slide the Door out and switch it with
the “Finish” Door.
Loading Your Composter
1. Layer 4 to 6 inches of dry, shredded leaves, dry
garden trimmings and/or straw in the bottom of the
composter. For easiest tumbling, avoid heavy materi-
als like sod, clumps of wet grass, soil or fresh manure.
2. Sprinkle some of the Super Hot mixture on top
of this first layer. Add a 2- to 3-inch layer of grass clip-
pings, kitchen scraps and other nitrogen-rich materi-
als. Sprinkle lightly with water. The correct moisture
content is very important—the material should be
moist (like a well-wrung sponge) but not wet.
3. Repeat the layering process described above,
adding the Super Hot mixture to each layer. Fill the
composter to within 10 inches of the top, add water
as needed to each layer. “Tumble” the composter
a few times to mix the ingredients. The molded
ridges inside help break up materials and the air
holes provide aeration.
Checking the Progress
After two or three days, check the temperature
at the center of your mix with a compost thermo-
meter or by touch. Temperatures between 120 and
160 degrees F indicate the beneficial organisms are
multiplying and doing their job decomposing
materials. Turning the composter 5 to 10 times every
two or three days will mix the materials, incorporate
fresh oxygen, and keep the process active.
If the compost is not heating up, check the
moisture content to ensure materials are not drying
out. This can happen quickly during the summer.
Squeeze a handful of compost to see if it feels like a
damp sponge. If it does, the water level is fine. If
it feels dry, add a little more water (be careful not
to add too much) and turn the composter to mix
well. Continue turning the composter every two or
three days.
Depending on the type of material you added,
how finely it was shredded and other conditions such
as air temperature and moisture content, the compost
should be ready in 4 to 8 weeks.
Finished Compost
To remove the finished compost, slide off the
“Finish” cover, rotate the composter and empty the
contents through the opening. You may need to use
a hand trowel at first, then rotate the unit over to
empty it completely.
Finished compost will contain a mix of fine and
coarse material. The compost can be sifted for use in
potting mixes. Use the coarser compost as a nutri-
tious top-dressing around outdoor plantings, put it
directly into the garden, or add it to your next batch
of compost.
Figure 3.