manuals.online logo
Brands
  1. Home
  2. •
  3. Brands
  4. •
  5. Gardenline
  6. •
  7. Blower
  8. •
  9. Gardenline GLBV 2501 User manual

Gardenline GLBV 2501 User manual

Electric Blower
Shredder Vac
Now you have purchased a
Gardenline®product you can rest
assured in the knowledge that as
well as your 3 year parts and
labour guarantee you have the
added peace of mind of dedicated
helplines and web support
AFTER SALES SUPPORT
www.einhell.co.uk
0151 649 1500
(Charged at local rates)
GB
1890 946 6244
IRE
8027, 08/2011
Introduction
General Information & Safety Instructions
Assembly and Parts List
Instructions
Other Useful Information
03
04
08
10
17
Contents Welcome Section 1
You have made an excellent choice with the purchase of this quality
Gardenline®product.
By doing so you now have the assurance and peace of mind which
comes from purchasing a product that has been manufactured to the
highest standards of performance and safety, supported by the high
quality standards of Aldi.
We want you to be completely satisfied with your purchase so this
Gardenline®product is backed by a comprehensive manufacturer’s
3 year warranty and an outstanding after sales service through our
dedicated Helpline.
We hope you will enjoy using your purchase for many years to come.
If you require technical support or in the unlikely event that your
purchase is faulty please telephone our Helpline for immediate
assistance. Faulty product claims made within the 3 year warranty
period will be repaired or replaced free of charge provided that you
have satisfactory proof of purchase (keep your till receipt safe!).
This does not affect your statutory rights. However, be aware that
the warranty will become null and void if the product is found to
have been deliberately damaged, misused or disassembled.
AFTER SALES SUPPORT
MODEL NUMBER: 8027, 08/2011, GLBV 2501 02
www.einhell.co.uk
GB 0151 649 1500
(Charged at local rates)
1890 946 6244
IRE www.einhell.co.uk
GB 0151 649 1500
(Charged at local rates)
1890 946 6244
IRE
AFTER SALES SUPPORT
MODEL NUMBER: 8027, 08/2011, GLBV 2501 03
AFTER SALES SUPPORT
MODEL NUMBER: 8027, 08/2011, GLBV 2501 04
www.einhell.co.uk
GB 0151 649 1500
(Charged at local rates)
1890 946 6244
IRE www.einhell.co.uk
GB 0151 649 1500
(Charged at local rates)
1890 946 6244
IRE
AFTER SALES SUPPORT
MODEL NUMBER: 8027, 08/2011, GLBV 2501 05
General instructions
Read the complete operating manual with due care. Acquaint yourself
with the controls and how to use the tool.
All people (including children) who, for reasons of physical,
sensory or mental ability or inexperience or lack of knowledge,
are not in a position to be able to use this device safely, should
not use the device unsupervised or without instruction by or
from a responsible person.
Children must always be supervised in order to ensure that they do
not play with the device.
Never allow children to use the tool.
Never allow other people, who are not familiar with the operating
instructions use the tool.
Safety information
Never use the tool when there are people – particularly children
– or pets nearby.
The user is responsible for any accidents or hazards suffered by
third parties or their property.
Preparation
Always wear sturdy footwear and long trousers when using the tool.
Never wear loose fitting clothes or jewellery. They may get drawn
into the suction opening. Rubber gloves and non-slip shoes are
recommended when working outdoors. Wear a hair net if you have
long hair.
Wear eye protection while you work.
Use a dust mask when working on dusty jobs
Always check the tool, the power cable and the extension cable
before using the tool. Only operate the tool when it is in good
working order and is not damaged in any way. Damaged parts
have to be replaced immediately by a qualified electrician.
Never use the tool if any of its safety devices or guards are
damaged or if any safety attachments such as deflectors and/or
grass catching devices are missing.
When working outdoors, use only extension cables which are
approved for outdoor use. Extension cables must have a
minimum cross section of 1.5 mm2. The plug connections must be
splash-proof.
Operation
Always trail the power cable behind the tool.
If the power cable or extension cable is damaged, pull the plug
out of the socket. NEVER TOUCH THE CABLE BEFORE THE
PLUG HAS BEEN PULLED OUT OF THE SOCKET.
When using the equipment, a few safety
precautions must be observed to avoid
injuries and damage.
Please read the complete operating manual with due
care. Keep this manual in a safe place, so that the
information is available at all times. If you give the
equipment to any other person, please also give them
these operating instructions.
We accept no liability for damage or accidents which
arise due to non-observance of these instructions
and the safety information.
General Information
& Safety Instructions 2
•
•
•
•
•
•
•
•
•
•
•
•
AFTER SALES SUPPORT
MODEL NUMBER: 8027, 08/2011, GLBV 2501 06
www.einhell.co.uk
GB 0151 649 1500
(Charged at local rates)
1890 946 6244
IRE www.einhell.co.uk
GB 0151 649 1500
(Charged at local rates)
1890 946 6244
IRE
AFTER SALES SUPPORT
MODEL NUMBER: 8027, 08/2011, GLBV 2501 07
Do not carry the tool by its power cable.
Always pull out the power plug:
When the tool is not being used, when it is being
transported or when you leave it unsupervised.
When you are checking the tool, cleaning it or removing
blockages.
When you want to carry out cleaning or maintenance work
on the tool or replace accessories.
After the tool impacts with foreign bodies or you notice
unusual vibrations.
Use the tool only in broad daylight or in well-lit conditions.
Do not underestimate the forces involved. Make sure you stand
squarely and keep your balance at all times.
If possible, avoid using the tool on wet grass.
Ensure that you maintain a steady foothold particularly while
working on slopes.
Never run carrying the equipment.
Always keep the ventilation opening clean.
Never direct the vacuum/blow hole at people or animals.
The machine may only be used at reasonable times of the day,
i.e. not in the early morning or late evening when it will be a
nuisance to other people. Permitted times of use specified by
local authorities must be observed.
The machine must be run at the lowest possible motor speed
required to carry out the work.
Remove all foreign objects with a rake and brush before starting
any blowing or vacuuming work.
Where conditions are dusty, dampen the surface a little or use a
sprinkler attachment.
Use the full-length blower nozzle extension so that the air
current can work near to the ground.
Watch out for children, pets, open windows etc. and blow the
foreign objects safely away from them.
Maintenance and storage
Check that all nuts, bolts and screws are securely tightened in
order to be sure that the machine is in a safe working condition.
Frequently check the debris bag for signs of wear and deformation.
Use only genuine accessories and spare parts. To order
replacement bags call the after sales helpline on 0151 649 1500 or go
to www.einhell.co.uk.
For your own safety, replace worn or damaged parts without delay.
Electric tools should be kept in a dry place when not in use.
If the mains cable for this device is damaged, it must be replaced
by the manufacturer or its after-sales service or similarly trained
personnel to avoid danger.
The tool can be plugged into any socket-outlet (with 230 V AC) that is
equipped with a 10A fuse or higher. The socket-outlet has to be
safeguarded by an earthleakage circuit breaker (e.l.c.b.). The
operating current must not exceed 30 mA.
CAUTION!
Read all safety regulations and instructions.
Any errors made in following the safety regulations and instructions
may result in an electric shock, fire and/or serious injury. Keep all
safety regulations and instructions in a safe place for future use.
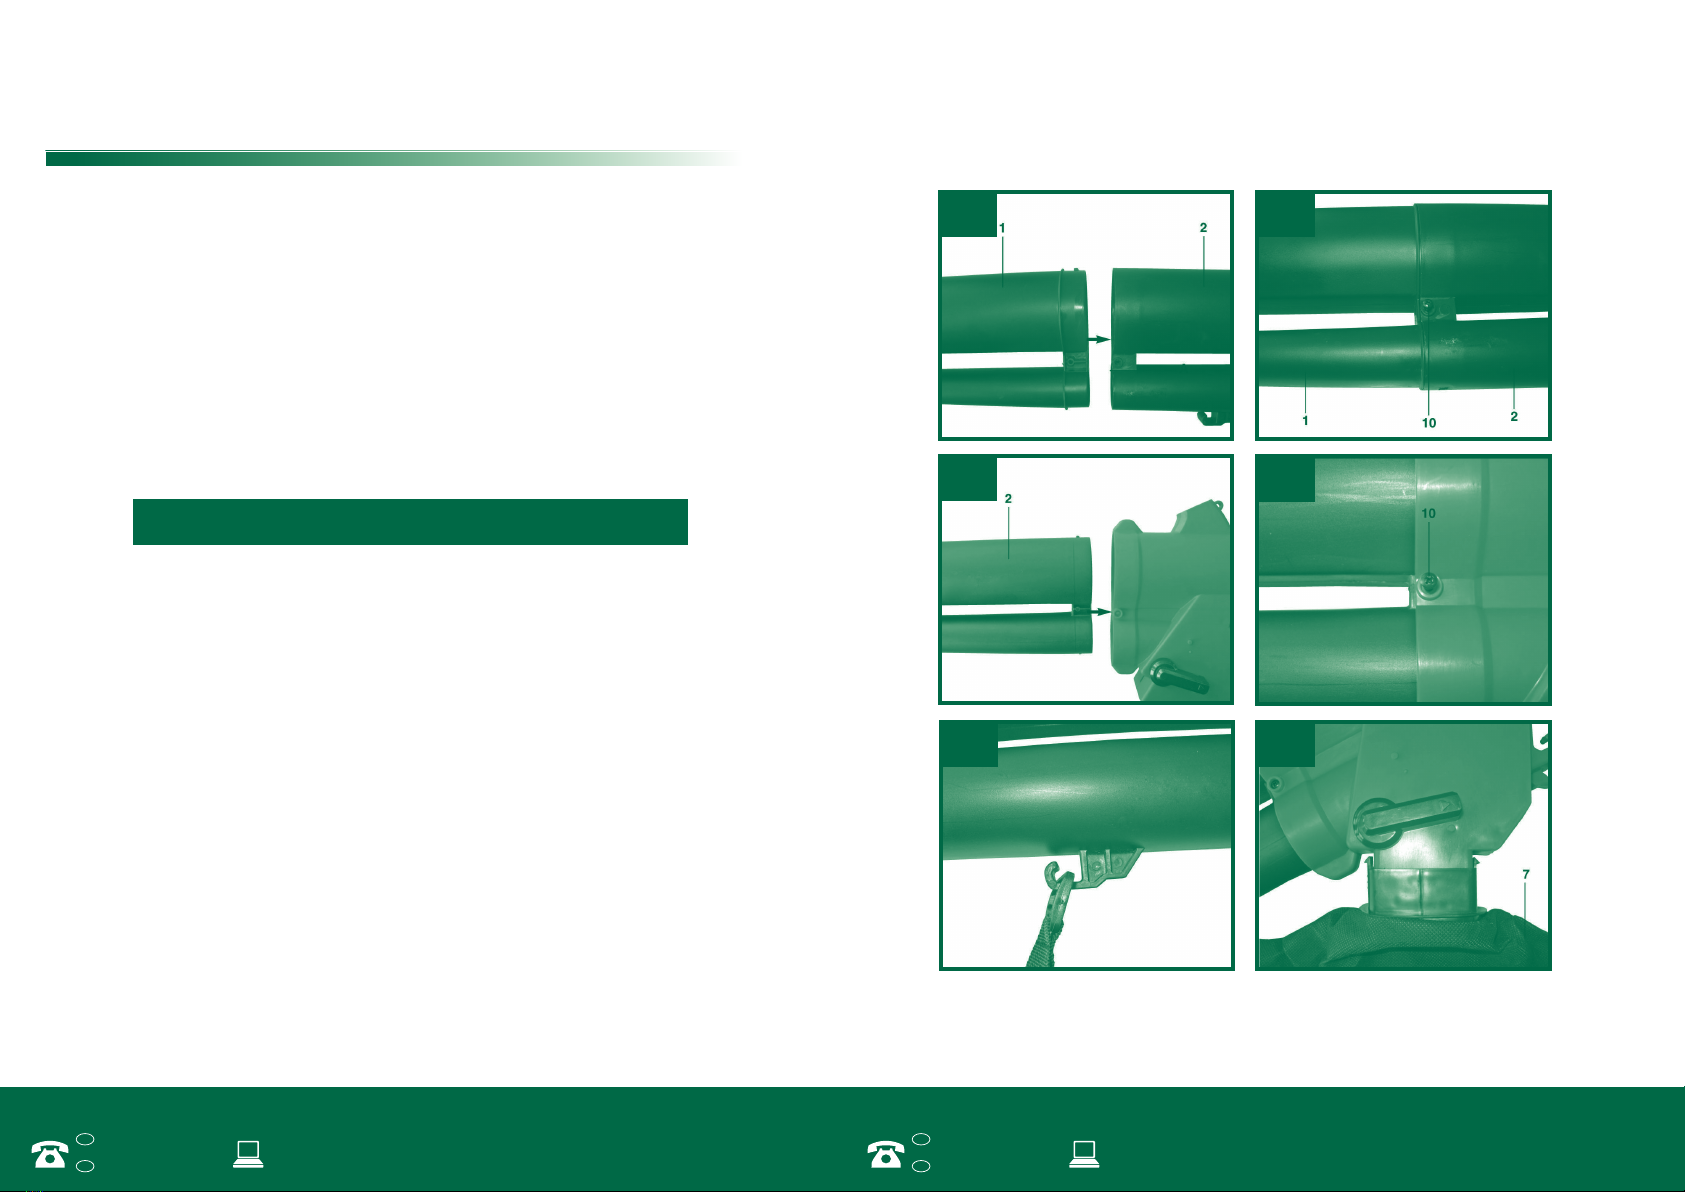
Explanation of the warning signs on the equipment (see Fig. 8)
1. Read the directions for use before operating the tool.
2. Do not use the tool in rain or snow. Do not expose the tool to
wet conditions.
3. Keep all other people away from the working areas.
4. Wear eye protection and ear defenders.
5. Switch off the tool and pull out the power plug before carrying
out any cleaning or maintenance work.
6. Rotating parts. Keep your hands and feet away from all openings.
7. Any damage done inside the machine by vacuuming foreign objects
such as sharp stones and metal objects, will void the warranty.
•
•
•
•
•
•
•
•
•
•
•
•
•
•
•
•
•
•
•
•
•
•
•
•
•
AFTER SALES SUPPORT
MODEL NUMBER: 8027, 08/2011, GLBV 2501 08
www.einhell.co.uk
GB 0151 649 1500
(Charged at local rates)
1890 946 6244
IRE www.einhell.co.uk
GB 0151 649 1500
(Charged at local rates)
1890 946 6244
IRE
AFTER SALES SUPPORT
MODEL NUMBER: 8027, 08/2011, GLBV 2501 09
1. Front suction tube
2. Rear suction tube
3. Handle
4. Carrying strap
5. ON/OFF switch
6. Power cord
7. Debris bag
8. Selector switch for vacuum/blower
9. Guide roller
10. Screws for suction tube assembly
11. Speed controller
Layout (Fig.1/1a & fig 2)
Proper use
The garden blower vac is designed to handle only foliage and garden
refuse such as grass and small branches. Any other use is prohibited.
The equipment is to be used only for its prescribed purpose. Any other
use is deemed to be a case of misuse. The user / operator and not the
manufacturer will be liable for any damage or injuries of any kind
caused as a result of this.
Please note that our equipment has not been designed for use in
commercial, trade or industrial applications. Our warranty will be
voided if the machine is used in commercial, trade or industrial
businesses or for equivalent purposes.
1
2
Assembly & Parts List 31a
AFTER SALES SUPPORT
MODEL NUMBER: 8027, 08/2011, GLBV 2501 10
www.einhell.co.uk
GB 0151 649 1500
(Charged at local rates)
1890 946 6244
IRE www.einhell.co.uk
GB 0151 649 1500
(Charged at local rates)
1890 946 6244
IRE
AFTER SALES SUPPORT
MODEL NUMBER: 8027, 08/2011, GLBV 2501 11
3a
3c
3b
3f3e
3d
Instructions 4
Before starting the equipment
Before you connect the equipment to the mains supply make sure that
the data on the rating plate are identical to the mains data.
Always disconnect the power before making adjustments to the
equipment.
5.1 Fitting the suction tube (Fig. 3a-3d.)
First plug together the front suction tube (1) and the rear suction tube
(2). (Fig. 3a). Screw the two pipes together with the special screw (Fig.
3b/Item 10). Then insert the suction tube into the motor housing (Fig.
3c) and screw together with the special screw (Fig. 3d/Item 10).
Note: Do not disassemble the suction tube any more once it has
been assembled.
5.2 Fitting the debris bag (Fig. 3e-3g)
First, hang the eyelet up on the appropriate hook on the suction tube
(Fig. 3e). Then slip the debris bag (Fig. 3f/Item 7) over the port on the
motor housing. Ensure that there is an audible click when they
engage. Hang the second eyelet on the hook in the housing (Fig. 3g)
AFTER SALES SUPPORT
MODEL NUMBER: 8027, 08/2011, GLBV 2501 12
www.einhell.co.uk
GB 0151 649 1500
(Charged at local rates)
1890 946 6244
IRE www.einhell.co.uk
GB 0151 649 1500
(Charged at local rates)
1890 946 6244
IRE
AFTER SALES SUPPORT
MODEL NUMBER: 8027, 08/2011, GLBV 2501 13
3g
3i
3h
5
7
6
4
3k
5.3 Assembly of carrying strap (Fig. 3h)
Fasten the carrying strap (Fig. 2/Item 4) as shown in Fig. 3h
5.4 Assembly of wheels
Push the wheels (Fig. 3i/Item 9) over the front vacuum hose (Fig.
3i/Item 1) and fasten with the screw (Fig 3k/Item A).
5.5 Assembly of handle
Insert the handle (Fig. 4/Item 3) into the recess in the housing. Ensure
that there is an audible click when they engage.
Start up the tool only after it is fully assembled. Always inspect the
tool power cord for damage before starting up. The tool may only be
used if the cord is in flawless condition.
AFTER SALES SUPPORT
MODEL NUMBER: 8027, 08/2011, GLBV 2501 14
www.einhell.co.uk
GB 0151 649 1500
(Charged at local rates)
1890 946 6244
IRE www.einhell.co.uk
GB 0151 649 1500
(Charged at local rates)
1890 946 6244
IRE
AFTER SALES SUPPORT
MODEL NUMBER: 8027, 08/2011, GLBV 2501 15
6.4 Emptying the debris bag and pre-screen (Fig. 1)
Empty the debris bag (7) in good time. When the bag is heavily loaded
with material, the vacuum power is considerably reduced. Deposit
organic refuse at a compost site.
Switch off the tool and pull out the plug.
Open the zipper on the debris bag (7 and shake out the material.
Close the zip on the debris bag (7) again.
6.5 Speed control (Fig. 1a, BG-EL 2501 E only)
The device is fitted with an electronic speed controller. To use it, turn
the speed controller (Fig. 1a/Item 11) to the desired position. Use the
device only with the speed which is actually required and do not let it
run at a speed which is faster than necessary.
7. Replacing the power cable
If the power cable for this equipment is damaged, it must only be
replaced by a qualified technician to avoid danger.
8. Cleaning, maintenance and
ordering of spare parts
Always pull out the mains power plug before starting any cleaning work.
8.1 Cleaning
Keep all safety devices, air vents and the motor housing free
of dirt and dust as far as possible. Wipe the equipment with
a clean cloth or blow it with compressed air at low pressure.
We recommend that you clean the device immediately each time you
have finished using it.
Clean the equipment regularly with a moist cloth and some soft soap.
Do not use cleaning agents or solvents; these
could attack the plastic parts of the equipment. Ensure that
no water can seep into the device.
After shaking out the debris bag, turn it inside out and thoroughly
clean and dry it in order to prevent mould and unpleasant odours
from forming.
You can use soap and water to clean out a heavily soiled debris bag.
6. Operation
6.1 Sizing the strap (Fig. 1)
Size the length of the carrying strap (4) so that the vacuum tube just
clears the ground. The guide rollers (9) at the bottom end of the
suction tube will help you to maneuver the suction tube on the
ground.
6.2 Connecting the tool to the power supply and switching on (Fig. 5)
The tool can be plugged into any socket-outlet (with 230 V AC) that is
equipped with a 10A fuse or higher. The socket-outlet has to be
safeguarded by an earthleakage circuit breaker (ELGB). The operating
current must not exceed 30 mA.
Insert the tool plug into the power cord coupling (extension).
To switch on, press and hold the ON/OFF switch (Fig.5/Item 5).
To switch off, let go of the ON/OFF switch (Fig. 5/item 5).
6.3 Selecting the mode of operation
6.3.1 Suction (Fig. 6)
Turn the lever (Fig. 6/Item 8) to position B. You can do this
both when the device is at a stand still and while it is running.
6.3.2 Blowing (Fig. 6)
Turn the lever (Fig. 6/Item 8) to position C. You can do this either
when the device is at a stand still and while it is running.
Channel the air stream forward and walk slowly to blow foliage or
garden refuse into a pile or to clear out hard-to-reach places.
Important! Empty the debris bag before blowing. Otherwise, the
material that has been vacuumed up could drop out.
•
•
•
•
•
•
•
•
•
•
•
•
•
•
•
AFTER SALES SUPPORT
MODEL NUMBER: 8027, 08/2011, GLBV 2501 16
www.einhell.co.uk
GB 0151 649 1500
(Charged at local rates)
1890 946 6244
IRE www.einhell.co.uk
GB 0151 649 1500
(Charged at local rates)
1890 946 6244
IRE
AFTER SALES SUPPORT
MODEL NUMBER: 8027, 08/2011, GLBV 2501 17
Rub a bar of dry soap across the zipper teeth if the zipper becomes
difficult to pull.
Clean the vacuum/blower tube with a brush upon evidence
of dirt and grime.
Dirt and grime can make the switch (blower/vacuum) more
difficult to operate as a result of the material that swirls up off the
ground. When this occurs, simply flip the switch back and forth a few
times, which should bring it back to the normal feel.
8.2 Maintenance
Should the tool experience problems beyond those mentioned above,
let only an authorized professional or a customer service shop
perform an inspection.
There are no parts inside the equipment which require additional
maintenance.
8.3 Ordering replacement parts:
Please quote the following data when ordering replacement parts:
Type of machine: (GLBV 2501)
Article number of the machine (34.332.11)
Identification number of the machine (11021)
Replacement part number of the part required
For spares and accessories please go to www.einhell.co.uk
or call 0151 649 1500 (Charged at local rates)
AC motor 230V ~ 50 Hz
Output 2500 watts
No load speed n0 6000-14000 min-1
Protection class II /
Air velocity 270 km/h
Suction rate 840m³/h
Volume of debris bag approx. 45 l
Sound volume level LWAd 102 dB (A)
Sound pressure level LpAd 87 dB (A)
Vibration ahv 3.96 m/s2
Weight 3.8 kg
Technical data
Useful Information 5
•
•
•
•
•
•
•
•
•
9. Disposal and recycling
The unit is supplied in packaging to prevent its being damaged in
transit. This packaging is raw material and can therefore be reused or
can be returned to the raw material system.
The unit and its accessories are made of various types of material,
such as metal and plastic. Defective components must be disposed of
as special waste. Ask your dealer or your local council.
Do not dispose of Blower/Vac in domestic waste.
AFTER SALES SUPPORT
MODEL NUMBER: 8027, 08/2011, GLBV 2501 18
www.einhell.co.uk
GB 0151 649 1500
(Charged at local rates)
1890 946 6244
IRE www.einhell.co.uk
GB 0151 649 1500
(Charged at local rates)
1890 946 6244
IRE
AFTER SALES SUPPORT
MODEL NUMBER: 8027, 08/2011, GLBV 2501 19
Fault Possible cause Remedy
Motor does No voltage present Check the power
not start cord and fuses
Power cord defective Check power cord
Motor terminals Have the unit
disconnected checked by a
qualified
technician
10. Troubleshooting guide
AFTER SALES SUPPORT
MODEL NUMBER: 8027, 08/2011, GLBV 2501 20
www.einhell.co.uk
GB 0151 649 1500
(Charged at local rates)
1890 946 6244
IRE www.einhell.co.uk
GB 0151 649 1500
(Charged at local rates)
1890 946 6244
IRE
AFTER SALES SUPPORT
MODEL NUMBER: 8027, 08/2011, GLBV 2501 21

This manual suits for next models

1

Other Gardenline Blower manuals

Gardenline GLBV-2500 User manual

Gardenline

Gardenline GLBV-2500 User manual

Gardenline 52754 User manual

Gardenline

Gardenline 52754 User manual

Gardenline 36357 User manual

Gardenline

Gardenline 36357 User manual

Gardenline GLLS 3002 UK User manual

Gardenline

Gardenline GLLS 3002 UK User manual

Gardenline 52754 User manual

Gardenline

Gardenline 52754 User manual

Gardenline 60099 User manual

Gardenline

Gardenline 60099 User manual

Gardenline GLLS 3000/3 User manual

Gardenline

Gardenline GLLS 3000/3 User manual

Gardenline PBV26CC User manual

Gardenline

Gardenline PBV26CC User manual

Popular Blower manuals by other brands

Gaggenau AR 410 710 installation instructions

Gaggenau

Gaggenau AR 410 710 installation instructions

RedMax HBZ2500 Owner's/operator's manual

RedMax

RedMax HBZ2500 Owner's/operator's manual

GreenWorks 2412002 Operator's manual

GreenWorks

GreenWorks 2412002 Operator's manual

Ross RGB18 user manual

Ross

Ross RGB18 user manual

Makita GBU01 instruction manual

Makita

Makita GBU01 instruction manual

EGO LB6000E Operator's manual

EGO

EGO LB6000E Operator's manual

Jula Meec tools 011398 operating instructions

Jula

Jula Meec tools 011398 operating instructions

Poulan Pro PPB2000 LE instruction manual

Poulan Pro

Poulan Pro PPB2000 LE instruction manual

Task Force 24083 Operator's manual

Task Force

Task Force 24083 Operator's manual

Wiedenmann Mega Twister Translation of original operating instructions

Wiedenmann

Wiedenmann Mega Twister Translation of original operating instructions

Craftsman 125B Operator's manual

Craftsman

Craftsman 125B Operator's manual

GreenWorks GC82BL user manual

GreenWorks

GreenWorks GC82BL user manual

Agri-Fab 45-03311 instruction manual

Agri-Fab

Agri-Fab 45-03311 instruction manual

GreenWorks 2400407 user manual

GreenWorks

GreenWorks 2400407 user manual

DR PRO-62V Safety & Operating Instructions

DR

DR PRO-62V Safety & Operating Instructions

Becker SV 5.300 operating instructions

Becker

Becker SV 5.300 operating instructions

Echo PB-265L Specifications

Echo

Echo PB-265L Specifications

Little Wonder Sho Owner's manual and safety instructions

Little Wonder

Little Wonder Sho Owner's manual and safety instructions

manuals.online logo
manuals.online logoBrands
  • About & Mission
  • Contact us
  • Privacy Policy
  • Terms and Conditions

Copyright 2025 Manuals.Online. All Rights Reserved.