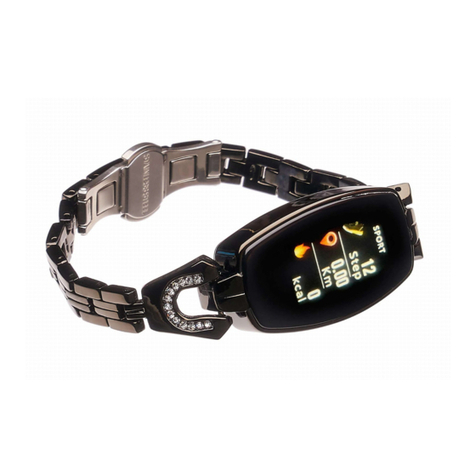
Garett Garett Women DIANA User manual

User manual
MULTILANGUAGE
www.garett.eu
SmartWatch
Garett Women
DIANA

MULTILANGUAGE
English 3
Polski 13
Lietuvos 33
Magyar 43
Český 23
Nederlands 53
Română 63
Slovenčina 72
Українська 82
INFO (EN/PL) 84

English
SECURITY ISSUES
Before use, carefully read the user's manual and save it for later use. The
manufacturer is not responsible for any damage / injury caused by improper
use. Depending on the part of the device, some functions may differ with the
functions described in the operating instructions.
Do not immerse the device in hot water.
Using this device near medical devices may disrupt their operation. Pay
special attention when using the wristband near medical devices, such
as pacemakers, hearing aids and other electronic medical devices.
It is forbidden to throw equipment into the fire. There is a risk of battery
explosion and, as a consequence, life and health hazards.
The device should be protected against heat sources and direct
sunlight.
Do not dive in the device.
It is forbidden to use the device if it is damaged. In the event of damage,
take the device to an authorized service centre for inspection / repair.
Attempting to repair it yourself may lead to damage to the device and
will void the warranty.
Only clean the device with a soft, slightly damp cloth. Do not use
chemicals or detergents to clean this device.
IMPORTANT! The band is not a medical device. The Garett Women Diana
model and the Smart Wristband application are not intended for medical
diagnosis, treatment or as a preventive measure against disease or illness.
Before changing your sleep habits and physical activity, first consult your
doctor.

PRODUCT DESCRIPTION
INSTALLATION
Put on the wristband and adjust the length of the strap so that the strap of the
device is not loose.
2. Touch button for switching on / off / entering the menu / changing functions
1. Display
4. Strap
3. Set of sensors
OPERATION
Press and hold the touch on / off button (2) to turn the device on. When you
want to turn off the device, go to the menu to disable the band, press the button
(2) briefly, switch to OFF, and then press and hold the touch button (2) for
approx. 5 seconds.
Note: Before first use, make sure that the band is connected to the
application. The device will automatically synchronize the time and the
physical activity data will be saved correctly.
Turn on / off

CHARGING
2. Insert the device into the holder so that its contacts on the back side contact
the contacts of the charging holder. Then connect the other end of the cable to
the USB port of your computer or USB power adapter.
Note: The device should be stable when charging on a flat surface and
the magnetic tip should adhere to the contacts. The first charging
should last approx. 1 hour.
1. The band is harged using the charging handle attached to the device.
BEFORE FIRST USE
The band works with a smartphone using the Smart Wristband application.
Before using, download this application from the Google Play Store or
AppStore and install it on your phone.
The application can be searched by entering the name "Smart Wristband" in
the store search engine or by scanning the corresponding QR code shown
below.
iOS Android

Note: Each time the band and application are turned on, the data
synchronizes automatically (devices must be paired!).
Note: The Garett Women Diana band does not require a permanent
connection with the smartphone, but to fully use the functions of the device it
should be paired with the smartphone using the application. When the
application is first launched, the login window will appear. We can set up an
account in the application, thanks to which the data of our activity will be
stored in the cloud and we will have access to them on other devices or skip
login by clicking "Skip". Before using the bands for the first time, user data
must be entered in the application.
The device in standby mode measures and analyzes data on physical activity
and sleep. Garett Women Diana band is equipped with an accelerometer (G-
sensor), which monitors the user's body movements and processes them
based on algorithms that allow to determine the details of sleep and physical
activity.
5. During pairing, place the band near the telephone with which it will be
connected.
4. Go to the "Device" tab at the bottom of the screen, then select the "Connect
device" option and then select the device named "Smart Watch".
After pairing the band with the phone, enter user data (The "Personal" tab at
the bottom of the screen, then click "Personal information." After connecting
3. Open the Smart Wristband application.
Note: The Garett Women Diana band works with smartphones that support
Bluetooth 4.0. It is also compatible with Android 4.3, iOS8 (and higher).
2. Make sure the band is on.
1.Turn on Bluetooth connectivity on your phone
6. After successful pairing, the hour on the band will update.

•Badminton activity mode: in this mode the armband will show us how many
rocket movements we have made. To activate the mode, press and hold
button (2) for approx. 2 seconds. Other modes of activity can be selected
through Smart Wristband applications, the "Exercise" tab. The headband
also has automatic gear detection. When we start running, the gear
registration mode will automatically start.
•Remote camera. Functions are run through applications: Device> Remote
control> Taking pictures. To take the picture, shake the band.
•On. / Off. vibration band.
1. Screen of the main menu. After the menu, we move with short touches of
the button (2). The functions are selected by a long press of the button (2). By
pressing and holding the button (2) for approx. 2 seconds, we will launch an
additional menu:
•Ping Pong activity mode: in this mode the band will show us how many hits
have been made with the ping-pong paddle. To activate the mode, press
and hold (2) for about 2 seconds.
•Phone search function. Starts an audible alarm on the phone.
• Switch off function.
•Control the music player of the phone. Between the buttons we switch over
with a short touch of the button (2), a longer touch presses the button.
the band to the phone, the physical activity and sleep are automatically
recorded and analyzed. After disconnection, the band display shows the time
and information about the activity. in the memory of the band.
DISPLAY MENU

• Reset: restore the device's factory settings.
Pedometer: Number of steps taken on the current day.
Cycling: Activity registration function: cycling. To start recording the activity,
press button (2) for approx. 2 seconds. We are doing the same to stop the
activity. Time and calories burned will be included in the statistics of the current
day's activity.
Heart rate monitor: Function of heart rate monitor. To start the measurement,
press the button (2) for approx. 2 seconds.
Keep your body during tests relaxed
and immobile. Hold the device on the
same the height on which it is located
your heart, do not talk during the test.
The measurement should last at least
1 minute to get optimal score.
Heart rate measurement, attention:
To start measuring the heart rate
from the band, go to the selected
function in the device menu. Before
you start measuring, make sure that
the sensor touches your skin. The
measurement area should be kept
clean, soiling can negatively affect
the result.

APLICATION SMART WRISTBAND
Sleep
Exercises
In this tab we will find information
about the quality of our last sleep.
By clicking the lower half of the
screen, we will display reports
from previous periods.
On the main application screen,
there are tabs:
In the upper part of the screen,
the result of the last pulse
measurement is displayed.
Clicking "Start" remotely starts
the measurement. By clicking the
lower half of the screen, we will
display reports from previous
periods.
Dragging your finger down the
application screen, we can
manually synchronize all data
from the wristband.
We'll see there activity statistics
from the current day. By clicking
the lower half of the screen, we
will display reports from previous
periods.
Home:
Pulse
11
By clicking the icon in the upper
right corner, we will display
previously saved activities.
Exercise
In this tab, we can record the
selected activity and the route
we are traveling using the
phone's GPS.
.
2

For the function to work, the
application must have permanent
access to the GPS
By clicking on one of the few
activities of the bottom part of the
screen, we start registration of
the activity using the band's
sensors. When finished, the data
will be saved in the application.
Personal
In this tab, we will configure
settings related to the band user
(Personal information) and we
will be able to log in to the
application's account.
2
2

Personal
In this tab, we will configure
settings related to the band user
(Personal information) and we will
be able to log in to the
application's account.
SETTINGS
Select the "Device" tab at the bottom of the application to go to the settings
menu in which the user can change settings of the band, search for devices,
adjust the device settings, update the application / software, obtain version
information.

• Bright screen time: configure the device's backlight time.
• Do not disturb mode: configuration of the mode in which notifications will
be displayed on the armband.
• Update device: software update of the wristband.
• Clear data: delete all activity data from the wristband.
• Display: 0.96 inch OLED display
• Battery: Lithium-Polymer 90 mAh
• Dedicated application: Smart Wristband
• Bluetooth: 4.0 (transmission range up to 10 meters)
• Rubber strap
• Warranty: 24 months
• Compatible with: Android 4.3, iOS8 (and higher)
TECHNICAL SPECIFICATIONS
• Water tightness: Degree of protection Ip67
• Dimensions of the case: 47 x 21 x 15 mm

Polski
KWESTIE BEZPIECZEŃSTWA
Przed użyciem należy dokładnie zapoznać się z treścią instrukcji obsługi oraz
zachować ją w celu późniejszego wykorzystania. Producent nie ponosi
odpowiedzialności za jakiekolwiek uszkodzenia / urazy spowodowane
niewłaściwym użytkowaniem. W zależności od danej partii urządzenia,
niektóre funkcje mogą się różnić z funkcjami opisanymi w instrukcji obsługi.
W wypadku uszkodzenia, należy oddać urządzenie do
autoryzowanego punktu serwisowego w celu sprawdzenia/ naprawy.
Podejmowanie prób własnoręcznej naprawy, może prowadzić do
uszkodzenia urządzenia oraz skutkuje unieważnieniem gwarancji.
Używanie tego urządzenia w pobliżu urządzeń medycznych może
zakłócić ich pracę. Należy zwrócić szczególną uwagę podczas
korzystania z opaski w pobliżu aparatów medycznych, takich jak
rozruszniki serca, aparaty słuchowe i inne elektroniczne urządzenia
medyczne.
Zabrania się wrzucać urządzenia do ognia. Istnieje ryzyko eksplozji
baterii i w konsekwencji zagrożenia życia i zdrowia.
Urządzenie należy chronić przed źródłami ciepła i bezpośrednim
nasłonecznieniem.
Nie należy zanurzać urządzenia w gorącej wodzie.
Nie należy nurkować w urządzeniu.
Zabrania się używać urządzenia, jeśli jest uszkodzone.
Urządzenie należy czyścić jedynie za pomocą miękkiej, lekko wilgotnej
ściereczki. Nie należy używać środków chemicznych lub detergentów
do czyszczenia tego urządzenia.
WAŻNE! Opaska nie jest urządzeniem medycznym. Model Garett Women
Diana i aplikacja Smart Wristband nie służą do diagnozy medycznej, leczenia
czy jako środek zapobiegawczy przed chorobą lub schorzeniem. Przed
zmianą nawyków dotyczących snu i aktywności fizycznej, należy najpierw
zasięgnąć porady lekarza.

OPIS PRODUKTU
INSTALACJA
Należy założyć opaskę na nadgarstku i dostosować długość paska w taki
sposób, aby pasek urządzenia nie był luźny.
1. Wyświetlacz
3. Zestaw czujników
4. Pasek
2. Dotykowy przycisk włączania/wyłączania/wejścia do menu/zmiany funkcji
OBSŁUGA
Należy nacisnąć i przytrzymać dotykowy przycisk włączania/wyłączania(2),
aby włączyć urządzenie. Gdy chcemy wyłączyć urządzenie przechodzimy w
menu do opcji wyłączania opaski, krótkim naciśnięciem przycisku(2)
przełączamy na OFF, a następnie przyciskamy i przytrzymujemy przycisk
dotykowy(2) przez ok. 5 sekund.
Uwaga: Przed pierwszym użyciem, należy upewnić się, że opaska jest
połączona z aplikacją. Urządzenie automatycznie zsynchronizuje czas, a
dane o aktywności fizycznej zostaną poprawnie zapisane.
Włączanie/wyłączanie

ŁADOWANIE
1.Opaskę ładuje się za pomocą uchwytu ładującego dołączonego do
urządzenia.
2.Urządzenie wkładamy do uchwytu tak, by jego styki na tylnej stronie stykały
się ze stykami uchwytu ładującego. Następnie należy połączyć drugi koniec
kabla z portem USB komputera lub zasilacza USB.
na płaskiej powierzchni i końcówka magnetyczna powinna przylegać do
styków. Pierwsze ładowanie powinno trwać ok. 1 godziny.
Uwaga: Podczas ładowania, urządzenie powinno leżeć stabilnie
PRZED PIERWSZYM UŻYCIEM
Aplikację można wyszukać wpisując w wyszukiwarkę sklepów nazwę „Smart
Wristband” lub skanując odpowiedni kod QR przedstawiony poniżej.
Opaska współpracuje ze smartfonem za pomocą aplikacji Smart Wristband.
Przed rozpoczęciem użytkowania, należy pobrać tę aplikację ze Sklepu
GooglePlay lub AppStore i zainstalować na swoim telefonie.
iOS Android

PAROWANIE
Urządzenie w trybie czuwania mierzy i analizuje dane na temat aktywności
fizycznej oraz snu. Opaska Garett Women Diana wyposażona jest w
akcelerometr (G-sensor), który monitoruje ruchy ciała użytkownika i
przetwarza je w oparciu o algorytmy, które pozwalają ustalić szczegóły snu i
aktywności fizycznej.
Uwaga: Opaska Garett Women Diana nie wymaga stałego połączenia ze
smartfonem, lecz aby w pełni korzystać z funkcji urządzenia należy sparować
ją ze smartfonem za pomocą aplikacji.Przy pierwszym uruchomieniu aplikacji
wyświetli nam się okno logowania. Możemy założyć konto w aplikacji, dzięki
któremu dane naszej aktywności będą przechowywane w chmurze i
będziemy mi e li do ni c h dostęp na innych ur zą d ze n ia c h lu b
pominąć logowanie klikając „Pomiń”. Przed pierwszym użyciem opaski, w
aplikacji należy wprowadzić dane użytkownika.
Uwaga: Przy każdym włączeniu opaski i aplikacji, dane synchronizują się
automatycznie (urządzenia muszą być sparowane!).
Po sparowaniu opaski z telefonem, należy wprowadzić dane użytkownika
3. Otworzyć aplikację Smart Wristband.
6. Po udanym parowaniu, godzina na opasce zaktualizuje się.
4. Wejść w zakładkę „Urządzenie” w dolnej części ekranu, następnie wybrać
opcję „Połącz urządzenie”, po czym wybrać urządzenie o nazwie „Smart
Watch”.
Uwaga: Opaska sportowa Garett Women Diana współpracuje ze
smartfonami obsługującymi łączność Bluetooth 4.0. Jest także kompatybilny
z systemem Android 4.3, iOS8 (i wyższe).
5. Podczas parowania, należy umieścić opaskę blisko telefonu, z którym
będzie ona łączona.
2. Upewnić się, że opaska jest włączona.
1. Należy włączyć łączność Bluetooth w telefonie.

Naciskając i przytrzymując przycisk(2) przez ok. 2 sekundy uruchomimy
dodatkowe menu :
•Tryb aktywności Ping Pong : w tym trybie opaska wyświetli nam ile
wykonane zostało uderzeń paletką ping-pongową. Aby włączyć tryb
naciskamy i przytrzymujemy przycisk(2) przez ok. 2 sekudny.
•Sterowanie odtwarzaczem muzycznym telefonu. Między przyciskami
przełączamy się krótkim dotknięciem przycisku(2), dłuższe dotknięcie
naciska przycisk.
•Funkcja szukania telefonu. Uruchamia na telefonie alarm dźwiękowy.
•Tryb aktywności Badminton : w tym trybie opaska wyświetli nam ile ruchów
rakietą wykonaliśmy. Aby włączyć tryb naciskamy i przytrzymujemy
przycisk(2) przez ok. 2 sekundy. Inne tryby aktywności możemy wybrać
poprzez aplikacje Smart Wristband, zakładka „Ćwiczenie”. Opaska
posiada także funkcje automatycznego wykrywania biegu. Gdy zaczniemy
biec, tryb rejestracji biegu automatycznie się uruchomi.
•Wł./Wył. wibracji opaski.
• Funkcja wyłączenia opaski.
1. Ekran menu głównego. Po menu poruszamy się krótkimi dotknięciami
przycisku(2). Funkcje wybieramy dłuższym naciśnięciem przycisku(2).
•Zda l ny a para t. F unkc j e u r ucha miamy po p rzez apl ikac j e :
Urządzenie>Zdalne sterowanie>Wykonywanie zdjęć. Aby wykonać zdjęcie
należy potrząsnąć opaską.
(Zakładka „Osobisty” w dolnej części ekranu, następnie klikamy „Informacje
osobiste”. Po połączeniu opaski z telefonem, automatycznie rozpoczyna się
rejestrowanie i analizowanie aktywności fizycznej oraz snu. Po rozłączeniu,
wyświetlacz opaski pokazuje czas oraz informacje o aktywności. Dane
zachowywane są także w pamięci opaski.
MENU WYŚWIETLACZA

• Reset : przywracanie fabrycznych ustawień urządzenia.
Krokomierz: Liczba kroków wykonanych bieżącego dnia.
Jazda na rowerze : Funkcja rejestracji aktywności : jazda na rowerze. Aby
rozpocząć rejestracje aktywności naciskamy przycisk(2) na ok. 2 sekundy.
Postępujemy tak samo, aby zakończyć aktywność. Czas i spalone kalorie
zostaną uwzględnione w statystykach aktywności dnia bieżącego.
Pulsometr : Funkcja pulsometru. Aby rozpocząć pomiar należy nacisnąć
przycisk(2) przez ok. 2 sekundy.
Podczas testów zachowaj ciało
zrelaksowane i nieruchome.
Trzymaj urządzenie na tej samej
wysokości, na której znajduje się
twoje serce, nie mów podczas testu.
Pomiar powinien trwać co najmniej
1 minutę, aby uzyskać optymalny
wynik.
Pomiar tętna, uwagi:
Aby rozpocząć pomiar tętna z opaski,
należy przejść do wybranej funkcji w
menu urządzenia. Przed
rozpoczęciem pomiaru, należy
upewnić się, że czujnik dotyka skóry.
Obszar wykonania pomiaru powinien
być utrzymany w czystości,
zabrudzenia mogą negatywnie
wpłynąć na wynik.

APLIKACJA SMART WRISTBAND
W górnej części ekranu
wyświetlony jest wynik ostatniego
pomiaru pulsu. Klikając „Start”
zdalnie uruchomimy pomiar.
Klikając w dolną połowę ekranu
wyświetlimy raporty z
poprzednich okresów.
Przeciągając palcem w dół po
ekranie aplikacji możemy ręcznie
synchronizować wszystkie dane z
opaski.
Tętno
Ćwiczenie
Dom (Ekran główny)
Na głównym ekranie aplikacji
znajdując się zakładki :
Zobaczymy w niej statystyki
aktywności z bieżącego dnia.
Klikając w dolną połowę ekranu
wyświetlimy raporty z
poprzednich okresów.
Sen
W tej zakładce znajdziemy
informacje o jakości naszego
ostatniego snu. Klikając w dolną
połowę ekranu wyświetlimy
raporty z poprzednich okresów.
11
Ćwiczenie
Klikając ikonę w prawym górnym
rogu wyświetlimy wcześniej
zapisane aktywności.
W tej zakładce możemy
rejestrować wybraną aktywność
oraz trasę którą się poruszamy
przy wykorzystaniu GPS
telefonu.
2

Aby funkcja działała, aplikacja
musi mieć stały dostęp do GPS.
Klikając na jedną z kilku
aktywności dolnej części ekranu
uruchamiamy rejestracje
aktywności z użyciem czujników
opaski. Po zakończeniu dane
zostaną zapisane w aplikacji.
Osobisty
W tej zakładce skonfigurujemy
ustawienia związane z
użytkownikiem opaski
(Informacje osobiste) oraz
będziemy mogli zalogować się
na konto aplikacji.
2
2
Table of contents
Languages:
Other Garett Watch manuals

Garett
Garett G11 User manual

Garett
Garett FIT 14 User manual

Garett
Garett Kids 5 User manual

Garett
Garett Smile User manual

Garett
Garett Action User manual

Garett
Garett KLARA User manual

Garett
Garett Men Elegance RT User manual

Garett
Garett Kids Cloud 4G User manual

Garett
Garett Women LISA User manual

Garett
Garett Kids Life Max 4G RT User manual
Popular Watch manuals by other brands

STURMANSKIE
STURMANSKIE 515.24 Series user manual

Chronos Manufactures
Chronos Manufactures MLG-2107 instruction manual

UNION GLASHÜTTE/SA
UNION GLASHÜTTE/SA U-2896 user manual

IWC Schaffhausen
IWC Schaffhausen AQUATIMER DEEP THREE operating instructions

Invicta
Invicta 8272 instruction manual

Timex
Timex Ironman Transit+ user guide