manuals.online logo
Brands
  1. Home
  2. •
  3. Brands
  4. •
  5. Garmin
  6. •
  7. Bicycle Accessories
  8. •
  9. Garmin EDGE 130 PLUS User manual

Garmin EDGE 130 PLUS User manual

Other Garmin Bicycle Accessories manuals

Garmin Edge 800 Reference guide

Garmin

Garmin Edge 800 Reference guide

Garmin Edge 810 Instruction manual

Garmin

Garmin Edge 810 Instruction manual

Garmin Edge 810 User manual

Garmin

Garmin Edge 810 User manual

Garmin A03001 User manual

Garmin

Garmin A03001 User manual

Garmin EDGE 840 User manual

Garmin

Garmin EDGE 840 User manual

Garmin Edge 1000 Instruction manual

Garmin

Garmin Edge 1000 Instruction manual

Garmin Edge 200 User manual

Garmin

Garmin Edge 200 User manual

Garmin Varia HL User manual

Garmin

Garmin Varia HL User manual

Garmin Edge 1000 User manual

Garmin

Garmin Edge 1000 User manual

Garmin EDGE 530 User manual

Garmin

Garmin EDGE 530 User manual

Garmin EDGE 530 User manual

Garmin

Garmin EDGE 530 User manual

Garmin Vector 2 Instruction manual

Garmin

Garmin Vector 2 Instruction manual

Garmin Varia Instruction manual

Garmin

Garmin Varia Instruction manual

Garmin EDGE 500 User manual

Garmin

Garmin EDGE 500 User manual

Garmin VARIA UT800 User manual

Garmin

Garmin VARIA UT800 User manual

Garmin EDGE 540 User manual

Garmin

Garmin EDGE 540 User manual

Garmin EDGE 530 User manual

Garmin

Garmin EDGE 530 User manual

Garmin Varia User manual

Garmin

Garmin Varia User manual

Garmin Aerosensor User manual

Garmin

Garmin Aerosensor User manual

Garmin EDGE 500 Instruction manual

Garmin

Garmin EDGE 500 Instruction manual

Garmin EDGE 520 PLUS User manual

Garmin

Garmin EDGE 520 PLUS User manual

Garmin Edge Explore User manual

Garmin

Garmin Edge Explore User manual

Garmin Edge 820 User manual

Garmin

Garmin Edge 820 User manual

Garmin EDGE EXPLORE 2 Instruction manual

Garmin

Garmin EDGE EXPLORE 2 Instruction manual

Popular Bicycle Accessories manuals by other brands

Galeo Galeo user guide

Galeo

Galeo Galeo user guide

Shimano DURA-ACE FC-R9100 Dealer's manual

Shimano

Shimano DURA-ACE FC-R9100 Dealer's manual

BAFANG BT C01.340.UART Customer's manual

BAFANG

BAFANG BT C01.340.UART Customer's manual

Minshine T154 Series manual

Minshine

Minshine T154 Series manual

Cateye TRIPLE SHOT PRO HL-EL830RC instruction manual

Cateye

Cateye TRIPLE SHOT PRO HL-EL830RC instruction manual

Navad Trail 200 Quick manual guide

Navad

Navad Trail 200 Quick manual guide

Specialized Elite CylcoComputer user manual

Specialized

Specialized Elite CylcoComputer user manual

Sigma BC 16.16 manual

Sigma

Sigma BC 16.16 manual

Playcore Dero Setbacks installation instructions

Playcore

Playcore Dero Setbacks installation instructions

VDO Cyclecomputing x3dw instruction manual

VDO Cyclecomputing

VDO Cyclecomputing x3dw instruction manual

Cateye RAPID X2 manual

Cateye

Cateye RAPID X2 manual

buratti meccanica Clorofilla Trail Use and maintenance manual

buratti meccanica

buratti meccanica Clorofilla Trail Use and maintenance manual

Shimano SG-8R20 Service instructions

Shimano

Shimano SG-8R20 Service instructions

BOB YAK owner's manual

BOB

BOB YAK owner's manual

APLIC 303303/20190717TW012 user manual

APLIC

APLIC 303303/20190717TW012 user manual

Polini HI-SPEED E-BIKE quick start guide

Polini

Polini HI-SPEED E-BIKE quick start guide

SRAM AXS BlipBox user manual

SRAM

SRAM AXS BlipBox user manual

Shimano FD-RX810 Dealer's manual

Shimano

Shimano FD-RX810 Dealer's manual

manuals.online logo
manuals.online logoBrands
  • About & Mission
  • Contact us
  • Privacy Policy
  • Terms and Conditions

Copyright 2025 Manuals.Online. All Rights Reserved.

EDGE®130 PLUS
Owner’s Manual
© 2020 Garmin Ltd. or its subsidiaries
All rights reserved. Under the copyright laws, this manual may not be copied, in whole or in part, without the written consent of Garmin. Garmin reserves the right to change or improve its
products and to make changes in the content of this manual without obligation to notify any person or organization of such changes or improvements. Go to www.garmin.com for current updates
and supplemental information concerning the use of this product.
Garmin®, the Garmin logo, ANT+®, Auto Lap®, Auto Pause®, Edge®, Forerunner®, and Virtual Partner® are trademarks of Garmin Ltd. or its subsidiaries, registered in the USA and other countries.
Connect IQ™, Garmin Connect™, Garmin Express™, Varia™, and Vector™ are trademarks of Garmin Ltd. or its subsidiaries. These trademarks may not be used without the express permission of
Garmin.
The BLUETOOTH® word mark and logos are owned by the Bluetooth SIG, Inc. and any use of such marks by Garmin is under license. The Cooper Institute®, as well as any related trademarks,
are the property of The Cooper Institute. Advanced heartbeat analytics by Firstbeat. Apple® and Mac® are trademarks of Apple, Inc., registered in the U.S. and other countries. STRAVA and
Strava™ are trademarks of Strava, Inc. Windows® is a registered trademark of Microsoft Corporation in the United States and other countries. Other trademarks and trade names are those of their
respective owners.
This product is ANT+® certified. Visit www.thisisant.com/directory for a list of compatible products and apps.
M/N: A03970
Table of Contents
Introduction.....................................................................1
Device Overview......................................................................... 1
Status Icons........................................................................... 1
Viewing Widgets.................................................................... 1
Using the Shortcut Menu....................................................... 1
Pairing Your Smartphone........................................................... 1
Charging the Device................................................................... 1
About the Battery................................................................... 2
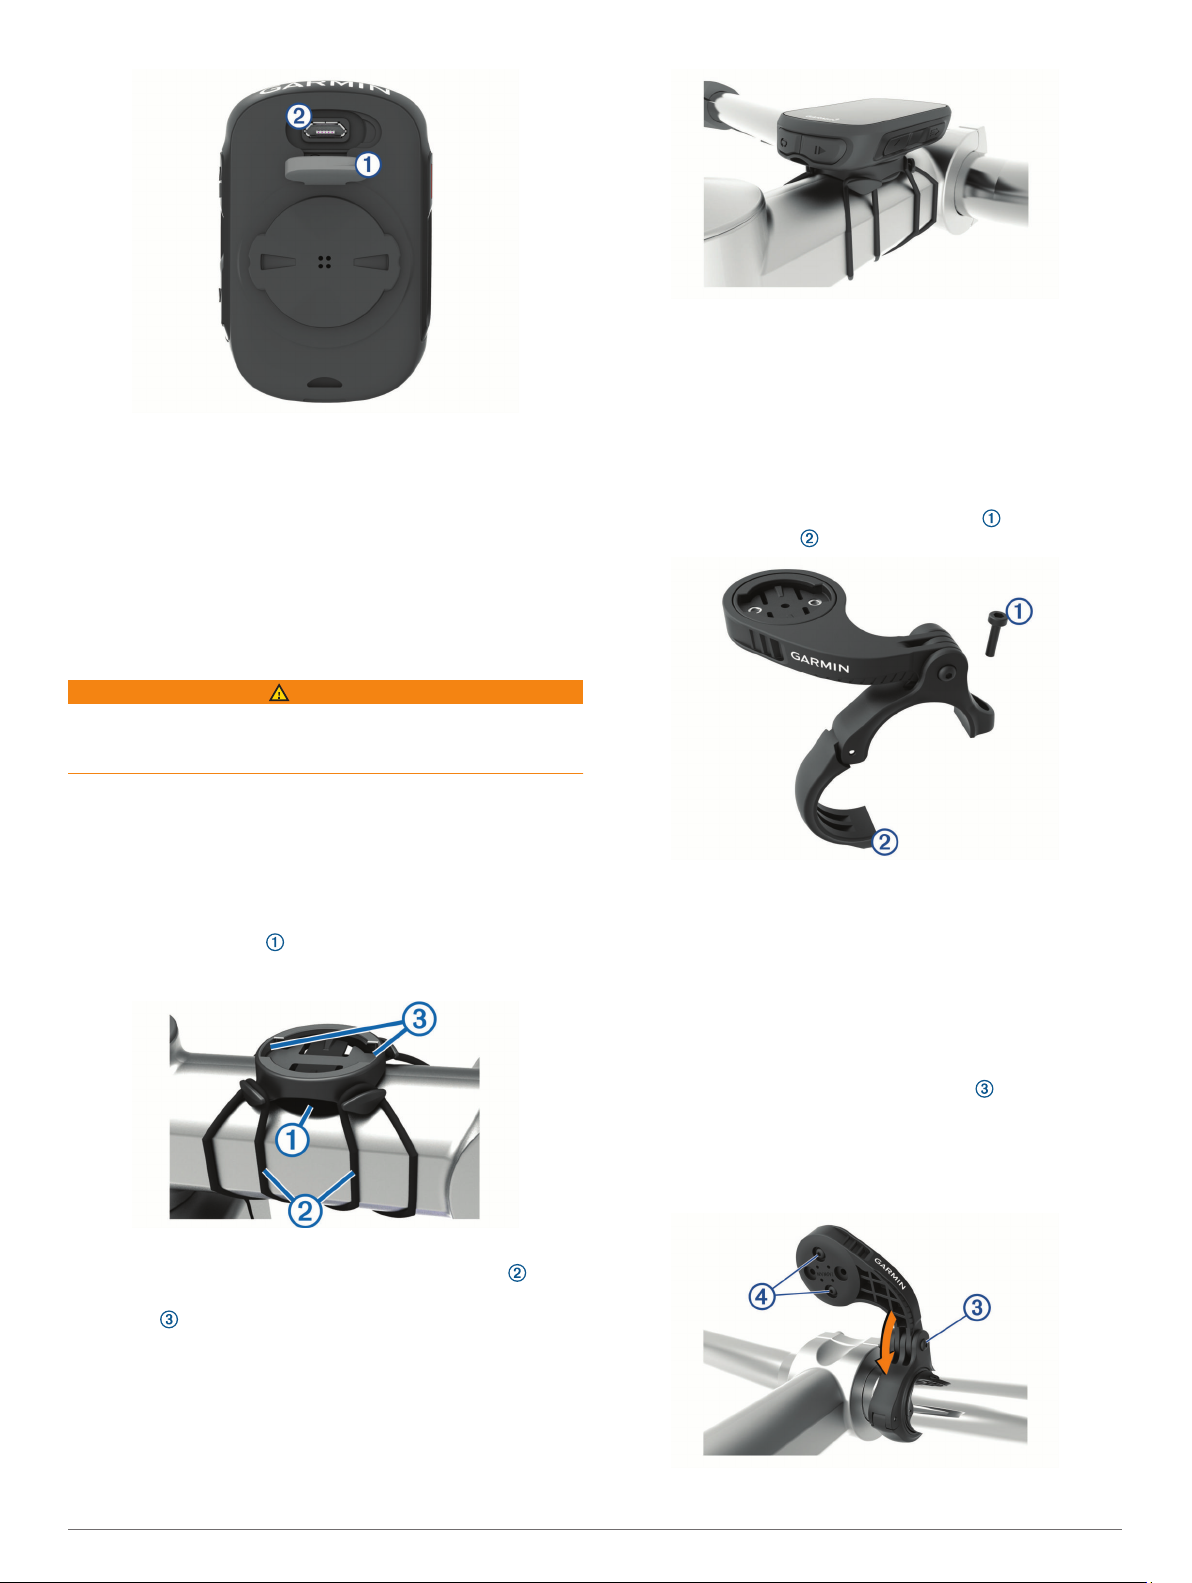
Installing the Standard Mount..................................................... 2
Releasing the Edge................................................................2
Installing the Mountain Bike Mount............................................. 2
Acquiring Satellite Signals.......................................................... 3
Training........................................................................... 3
Going for a Ride..........................................................................3
Following a Saved Ride.............................................................. 3
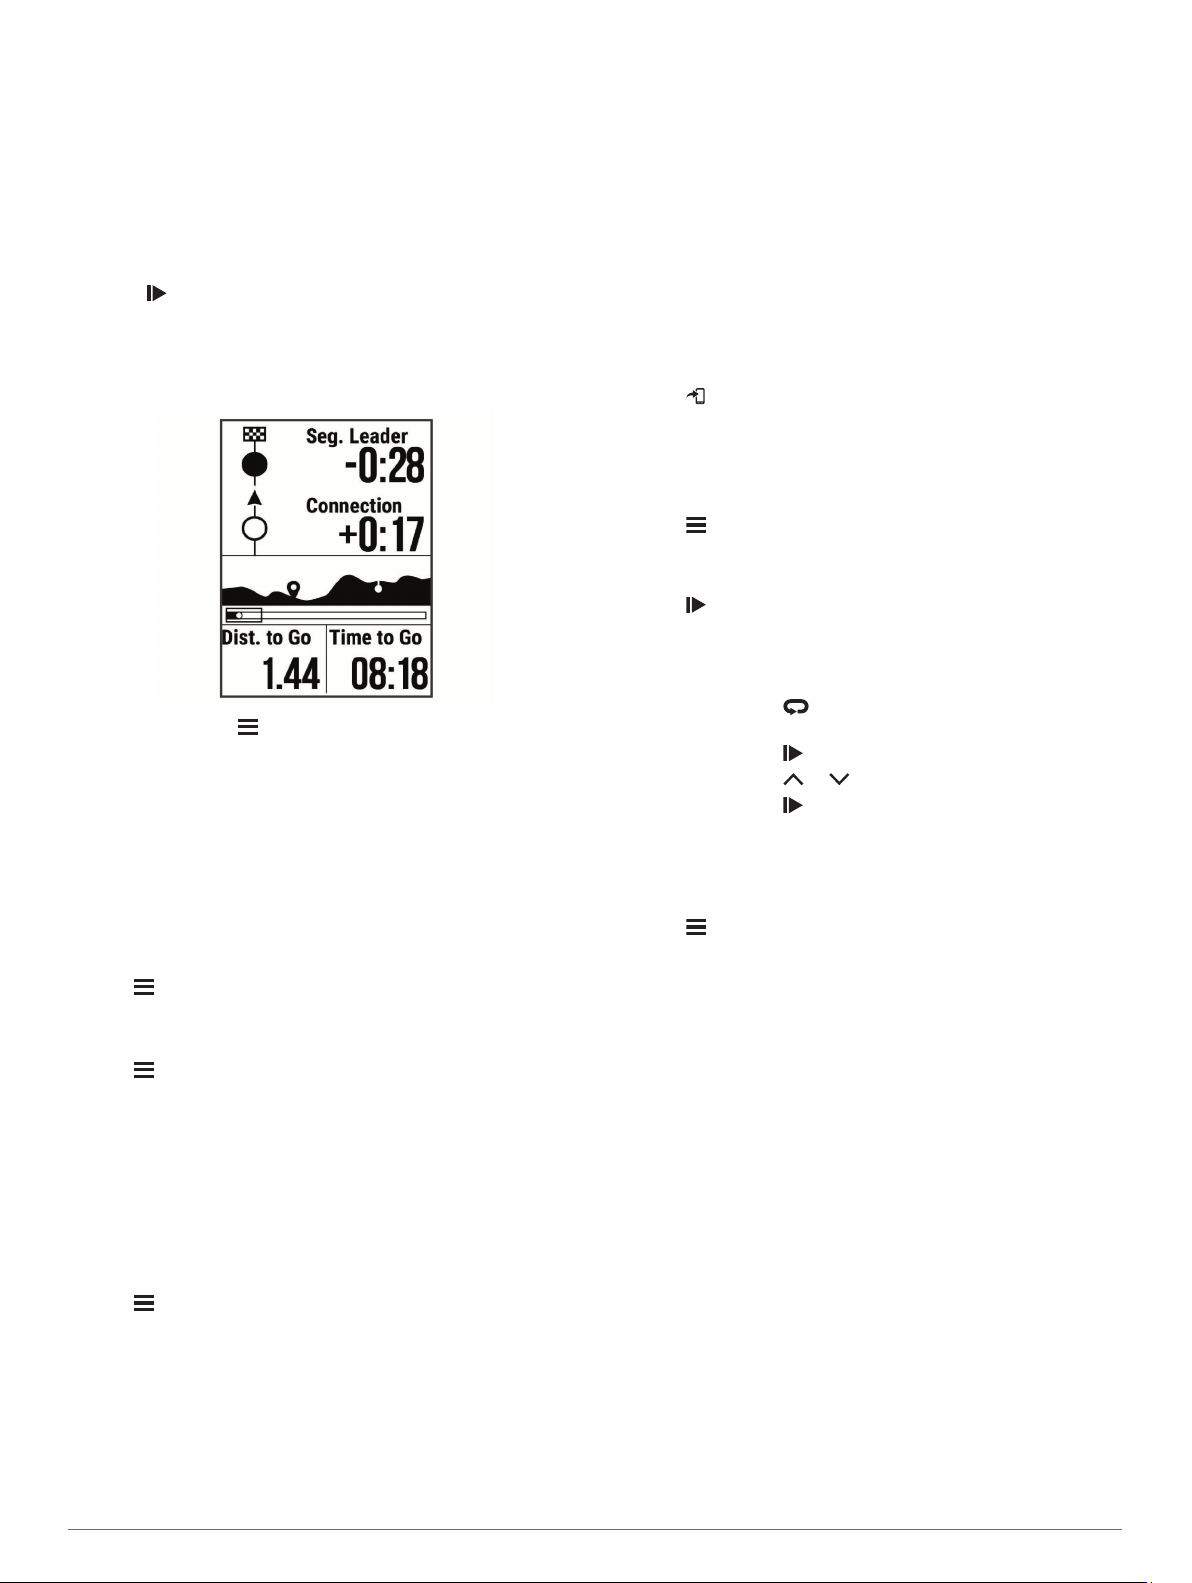
Segments....................................................................................3
Strava™ Segments................................................................ 3
Following a Segment From Garmin Connect......................... 3
Racing a Segment................................................................. 4
Setting a Segment to Adjust Automatically............................ 4
Viewing Segment Details....................................................... 4
Deleting a Segment............................................................... 4
Workouts.....................................................................................4
Following a Workout From Garmin Connect.......................... 4
Starting a Workout................................................................. 4
Stopping a Workout............................................................... 4
Deleting Workouts..................................................................4
About the Training Calendar....................................................... 4
Using Garmin Connect Training Plans...................................4
Training Indoors.......................................................................... 5
My Stats........................................................................... 5
Setting Up Your User Profile.......................................................5
About VO2 Max. Estimates.........................................................5
Getting Your VO2 Max. Estimate........................................... 5
Tips for Cycling VO2 Max. Estimates.................................... 5
Recovery Advisor........................................................................5
Viewing Your Recovery Time.................................................5
Personal Records....................................................................... 5
Viewing Your Personal Records............................................ 5
Reverting a Personal Record................................................. 6
Deleting a Personal Record................................................... 6
Navigation....................................................................... 6
Locations.................................................................................... 6
Marking Your Location........................................................... 6
Navigating to a Saved Location............................................. 6
Navigating Back to Start........................................................ 6
Viewing Saved Locations....................................................... 6
Viewing User Locations on the Map...................................... 6
Customizing the Map Icons....................................................6
Repositioning Your Location.................................................. 6
Deleting a Saved Location..................................................... 6
Courses...................................................................................... 6
Following a Course From Garmin Connect............................6
Tips for Training with Courses............................................... 6
Viewing Course Details.......................................................... 7
Using ClimbPro...................................................................... 7
Deleting a Course.................................................................. 7
Bluetooth Connected Features..................................... 7
Incident Detection and Assistance Features.............................. 7
Incident Detection.................................................................. 7
Assistance..............................................................................7
Adding Contacts.....................................................................8
Requesting Assistance.......................................................... 8
Turning Incident Detection On and Off.................................. 8
Cancelling an Automated Message....................................... 8
Sending a Status Update After an Incident............................ 8
Turning On LiveTrack................................................................. 8
Connect IQ Downloadable Features.......................................... 8
Downloading Connect IQ Features Using Your Computer.... 8
Wireless Sensors........................................................... 8
Putting On the Heart Rate Monitor............................................. 8
Tips for Erratic Heart Rate Data.............................................9
Fitness Goals......................................................................... 9
Installing the Speed Sensor........................................................ 9
Installing the Cadence Sensor.................................................... 9
About the Speed and Cadence Sensors............................... 9
Pairing Your Wireless Sensors................................................... 9
Training with Power Meters...................................................... 10
Calibrating Your Power Meter.............................................. 10
Pedal-Based Power............................................................. 10
Situational Awareness.............................................................. 10
History........................................................................... 10
Viewing Ride Details................................................................. 10
Deleting a Ride......................................................................... 10
Viewing Data Totals.................................................................. 10
Resetting Bike Totals................................................................ 10
Garmin Connect........................................................................10
Sending Your Ride to Garmin Connect............................... 10
Data Management.................................................................... 10
Connecting the Device to Your Computer........................... 10
Transferring Files to Your Device........................................ 11
Deleting Files....................................................................... 11
Disconnecting the USB Cable..............................................11
Customizing Your Device............................................ 11
Ride Settings............................................................................ 11
Alerts.................................................................................... 11
Changing the Satellite Setting............................................. 11
Training Settings....................................................................... 11
Marking Laps....................................................................... 12
Using Auto Pause®............................................................. 12
Using Auto Scroll................................................................. 12
Changing Data Fields.......................................................... 12
Phone Settings......................................................................... 12
System Settings........................................................................ 12
Changing the Device Language.......................................... 12
Using the Backlight.............................................................. 12
Turning the Device Tones On and Off................................. 12
Changing the Units of Measure........................................... 12
Using the Auto Power Off Feature....................................... 12
Setting Up Extended Display Mode.......................................... 12
Exiting Extended Display Mode................................................ 12
Device Information....................................................... 13
Specifications............................................................................13
Edge 130 Plus Specifications.............................................. 13
Heart Rate Monitor Specifications....................................... 13
Speed Sensor and Cadence Sensor Specifications............ 13
Device Care.............................................................................. 13
Cleaning the Device............................................................. 13
Caring for the Heart Rate Monitor........................................ 13
User Replaceable Batteries...................................................... 13
Replacing the Heart Rate Monitor Battery........................... 13
Replacing the Cadence Sensor Battery............................... 13
Viewing E-label Regulatory and Compliance Information........ 14
Troubleshooting........................................................... 14
Restarting the Device............................................................... 14
Restoring All Default Settings................................................... 14
Maximizing Battery Life.............................................................14
Table of Contents i
Improving GPS Satellite Reception.......................................... 14
My Device is in the Wrong Language....................................... 14
Replacement O-rings................................................................ 14
Updating the Software Using the Garmin Connect App........... 14
Updating the Software Using Garmin Express......................... 14
Product Updates....................................................................... 14
Getting More Information.......................................................... 14
Appendix....................................................................... 14
Data Fields................................................................................14
VO2 Max. Standard Ratings..................................................... 15
Heart Rate Zone Calculations...................................................16
Wheel Size and Circumference................................................ 16
Index.............................................................................. 17
ii Table of Contents
Introduction
WARNING
See the Important Safety and Product Information guide in the
product box for product warnings and other important
information.
Always consult your physician before you begin or modify any
exercise program.
Device Overview
Select to wake the device.
Hold to turn the device on and off.
Select to scroll through the data screens, options, and
settings.
From the home screen, hold to view the device menu.
Select to scroll through the data screens, options, and
settings.
From the home screen, select to view the widgets.
Select to start and stop the timer.
Select to choose an option or to acknowledge a
message.
Select to mark a new lap.
Select to return to the previous screen.
Status Icons
A solid icon means the signal was found or the sensor is
connected.
GPS status
Bluetooth® status
Heart rate status
Power status
LiveTrack status
Speed and cadence status
Sync in progress
Viewing Widgets
Your device comes preloaded with several widgets. You should
pair your device with a smartphone to get the most of out your
Edge device.
• From the home screen, select or .
The device scrolls through the widget loop.
• While in an active widget, select to view additional options
for that widget.
Using the Shortcut Menu
Shortcut menu options are available to quickly access features
or perform functions.
• When appears on the screen, hold to view the shortcut
menu options.
Pairing Your Smartphone
To use the connected features of the Edge device, it must be
paired directly through the Garmin Connect™ app, instead of
from the Bluetooth settings on your smartphone.
1From the app store on your smartphone, install and open the
Garmin Connect app.
2Hold to turn on the device.
The first time you turn on the device, you will select the
device language. The next screen prompts you to pair with
your smartphone.
TIP: You can hold , and select Phone > Pair Phone to
manually enter pairing mode.
3Select an option to add your device to your Garmin Connect
account:
• If this is the first device you have paired with the Garmin
Connect app, follow the on-screen instructions.
• If you have already paired another device with the Garmin
Connect app, from the or menu, select Garmin
Devices > Add Device, and follow the on-screen
instructions.
After you pair successfully, a message appears, and your device
syncs automatically with your smartphone.
Charging the Device
NOTICE
To prevent corrosion, thoroughly dry the USB port, the weather
cap, and the surrounding area before charging or connecting to
a computer.
The device is powered by a built-in lithium-ion battery that you
can charge using a standard wall outlet or a USB port on your
computer.
NOTE: The device will not charge when outside the approved
temperature range (Edge 130 Plus Specifications, page 13).
1Pull up the weather cap from the USB port .
Introduction 1
2Plug the small end of the USB cable into the USB port on the
device.
3Plug the large end of the USB cable into an AC adapter or a
computer USB port.
4Plug the AC adapter into a standard wall outlet.
When you connect the device to a power source, the device
turns on.
5Charge the device completely.
After you charge the device, close the weather cap.
About the Battery
WARNING
This device contains a lithium-ion battery. See the Important
Safety and Product Information guide in the product box for
product warnings and other important information.
Installing the Standard Mount
For the best GPS reception, position the bike mount so the front
of the device is oriented toward the sky. You can install the bike
mount on the stem or the handlebars.
1Select a secure location to mount the device where it does
not interfere with the safe operation of your bike.
2Place the rubber disk on the back of the bike mount.
The rubber tabs align with the back of the bike mount so it
stays in place.
3Place the bike mount on the bike stem.
4Attach the bike mount securely using the two bands .
5Align the tabs on the back of the device with the bike mount
notches .
6Press down slightly and turn the device clockwise until it
locks into place.
Releasing the Edge
1Turn the Edge clockwise to unlock the device.
2Lift the Edge off the mount.
Installing the Mountain Bike Mount
NOTE: If you do not have this mount, you can skip this task.
1Select a secure location to mount the Edge device where it
does not interfere with the safe operation of your bike.
2Use the 3 mm hex key to remove the screw from the
handlebar connector .
3Select an option:
• If the handlebar diameter is 25.4 mm, place the thicker
pad around the handlebar.
• If the handlebar diameter is 31.8 mm, place the thinner
pad around the handlebar.
• If the handlebar diameter is 35 mm, do not use a rubber
pad.
4Place the handlebar connector around the handlebar, so that
the mount arm is above the bike stem.
5Use the 3 mm hex key to loosen the screw on the mount
arm, position the mount arm, and tighten the screw.
NOTE: Garmin® recommends tightening the screw so the
mount arm is secure, with a maximum torque specification of
20 lbf-in. (2.26 N-m). You should check the tightness of the
screw periodically.
2 Introduction
6If necessary, use the 2 mm hex key to remove the two
screws on the back side of the mount , remove and rotate
the connector, and replace the screws to change the
orientation of the mount.
7Replace and tighten the screw on the handlebar connector.
NOTE: Garmin recommends tightening the screw so the
mount is secure, with a maximum torque specification of
7 lbf-in. (0.8 N-m). You should check the tightness of the
screw periodically.
8Align the tabs on the back of the Edge device with the bike
mount notches .
9Press down slightly and turn the Edge device clockwise until
it locks into place.
Acquiring Satellite Signals
The device may need a clear view of the sky to acquire satellite
signals. The time and date are set automatically based on the
GPS position.
TIP: For more information about GPS, go to www.garmin.com
/aboutGPS.
1Go outdoors to an open area.
The front of the device should be oriented toward the sky.
2Wait while the device locates satellites.
It may take 30–60 seconds to locate satellite signals.
Training
Going for a Ride
If your device was packaged with an ANT+® sensor, they are
already paired and can be activated during initial setup.
1Hold to turn on the device.
2Go outside, and wait while the device locates satellites.
appears solid when the device is ready.
3From the home screen, select .
4Select the ride type.
TIP: Accurate ride type data is important for creating bike
friendly courses on your Garmin Connect account.
5Select to start the activity timer.
NOTE: History is recorded only while the activity timer is
running.
6Select to stop the activity timer.
7Select an option:
• Select Resume to resume your ride.
• Select Save Ride to stop your ride and save it.
• Select Discard Ride to stop your ride and delete it from
your device.
• Select Back to Start to navigate back to your starting
location.
• Select Mark Location to mark your location and save it.
• Select Main Menu to return to the main menu.
Following a Saved Ride
1Hold .
2Select Navigation > Ride an Activity.
3Select a ride.
TIP: You can select to view more detailed information
about your ride, such as a summary, map location, lap
details, or to delete this ride.
4Select Ride.
5Select to start the activity timer.
Segments
Following a segment: You can send segments from your
Garmin Connect account to your device. After a segment is
saved to your device, you can follow the segment.
NOTE: When you download a course from your Garmin
Connect account, all segments in the course are downloaded
automatically.
Racing a segment: You can race a segment, trying to match or
exceed your personal record or other cyclists who have
ridden the segment.
Strava™ Segments
You can download Strava segments to your Edge 130 Plus
device. Follow Strava segments to compare your performance
with your past rides, friends, and pros who have ridden the
same segment.
To sign up for a Strava membership, go to the segments widget
in your Garmin Connect account. For more information, go to
www.strava.com.
The information in this manual applies to both Garmin Connect
segments and Strava segments.
Following a Segment From Garmin Connect
Before you can download and follow a segment from Garmin
Connect, you must have a Garmin Connect account (Garmin
Connect, page 10).
NOTE: If you are using Strava segments, your favorite
segments are transferred automatically to your device when it is
connected to the Garmin Connect app or your computer.
1Select an option:
• Open the Garmin Connect app.
• Go to connect.garmin.com.
2Create a new segment, or select an existing segment.
3Select or Send to Device.
4Follow the on-screen instructions.
5On the Edge device, select to start the activity timer, and
go for a ride.
When your path crosses an enabled segment, you can race
the segment.
Training 3
Racing a Segment
Segments are virtual race courses. You can race a segment,
and compare your performance to past activities, other riders'
performance, connections in your Garmin Connect account, or
other members of the cycling community. You can upload your
activity data to your Garmin Connect account to view your
segment position.
NOTE: If your Garmin Connect account and Strava account are
linked, your activity is automatically sent to your Strava account
so you can review the segment position.
1Select to start the activity timer, and go for a ride.
When your path crosses an enabled segment, you can race
the segment.
2Start racing the segment.
The segment data screen appears automatically.
3If necessary, hold , and select Main Menu > Navigation >
Segments to change your goal during your race.
You can race against the segment leader, your past
performance, or other riders (if applicable). The goal
automatically adjusts based on your current performance.
A message appears when the segment is complete.
Setting a Segment to Adjust Automatically
You can set your device to automatically adjust the target race
time of a segment based on your performance during the
segment.
NOTE: This setting is enabled for all segments by default.
1Hold .
2Select Navigation > Segments > Auto Effort.
Viewing Segment Details
1Hold .
2Select Navigation > Segments.
3Select a segment.
4Select an option:
• Select Race Time to view the ride time for the segment
leader.
• Select Map to view the segment on the map.
• Select Elevation to view an elevation plot of the segment.
Deleting a Segment
1Hold .
2Select Navigation > Segments.
3Select a segment.
4Select Delete > Yes.
Workouts
You can create custom workouts that include goals for each
workout step and for varied distances, times, and calories. You
can create and find more workouts using Garmin Connect or
select a training plan that has built-in workouts, and transfer
them to your device.
You can schedule workouts using Garmin Connect. You can
plan workouts in advance and store them on your device.
Following a Workout From Garmin Connect
Before you can download a workout from Garmin Connect, you
must have a Garmin Connect account (Garmin Connect,
page 10).
1Select an option:
• Open the Garmin Connect app.
• Go to connect.garmin.com.
2Select Training > Workouts.
3Find a workout, or create and save a new workout.
4Select or Send to Device.
5Follow the on-screen instructions.
Starting a Workout
Before you can start a workout, you must download a workout
from your Garmin Connect account.
1Select > Training > Workouts.
2Select a workout.
3Select Do Workout.
4Select to start the timer.
After you begin a workout, the device displays each step of the
workout, the target (if any), and current workout data.
Stopping a Workout
• At any time, select to end a workout step and begin the
next step.
• At any time, select to stop the activity timer.
• At any time, select or to view the data screens.
• At any time, select > Save Ride to stop the timer and end
the workout.
TIP: When you save your ride, your workout ends
automatically.
Deleting Workouts
1Select > Training > Workouts.
2Select a workout.
3Select Delete > Yes.
About the Training Calendar
The training calendar on your device is an extension of the
training calendar or schedule you set up in Garmin Connect.
After you have added a few workouts to the Garmin Connect
calendar, you can send them to your device. All scheduled
workouts sent to the device appear in the training calendar list
by date. When you select a day in the training calendar, you can
view or do the workout. The scheduled workout stays on your
device whether you complete it or skip it. When you send
scheduled workouts from Garmin Connect, they overwrite the
existing training calendar.
Using Garmin Connect Training Plans
Before you can download and use a training plan from Garmin
Connect, you must have a Garmin Connect account (Garmin
Connect, page 10).
You can browse Garmin Connect to find a training plan, and
schedule workouts and courses.
1Connect the device to your computer.
2Go to connect.garmin.com.
3Select and schedule a training plan.
4Review the training plan in your calendar.
4 Training
5Select an option:
• Sync your device with the Garmin Express™ application on
your computer.
• Sync your device with the Garmin Connect app on your
smartphone.
Training Indoors
The device includes an indoor activity profile where GPS is
turned off. When GPS is turned off, speed and distance are not
available unless you have a compatible sensor or indoor trainer
that sends speed and distance data to the device.
My Stats
The Edge 130 Plus device can track your personal statistics and
calculate performance measurements. Performance
measurements require a compatible heart rate monitor or power
meter.
Setting Up Your User Profile
You can update your gender, age, weight, height, and maximum
heart rate settings. The device uses this information to calculate
accurate ride data.
1Hold .
2Select My Stats > User Profile.
3Select an option.
About VO2 Max. Estimates
VO2 max. is the maximum volume of oxygen (in milliliters) you
can consume per minute per kilogram of body weight at your
maximum performance. In simple terms, VO2 max. is an
indication of athletic performance and should increase as your
level of fitness improves. VO2 max. estimates are provided and
supported by Firstbeat. You can use your Garmin device paired
with a compatible heart rate monitor and power meter to display
your cycling VO2 max. estimate.
Getting Your VO2 Max. Estimate
Before you can view your VO2 max. estimate, you must put on
the heart rate monitor, install the power meter, and pair them
with your device (Pairing Your Wireless Sensors, page 9). If
your device was packaged with a heart rate monitor, the device
and sensor are already paired. For the most accurate estimate,
complete the user profile setup, and set your maximum heart
rate (Setting Up Your User Profile, page 5).
NOTE: The estimate may seem inaccurate at first. The device
requires a few rides to learn about your cycling performance.
1Ride at a steady, high intensity for at least 20 minutes
outdoors.
2After your ride, select Save Ride.
3Hold .
4Select My Stats > VO2 Max.
Your VO2 max. estimate appears as a number and position
on the gauge.
VO2 max. data and analysis is provided with permission from
The Cooper Institute®. For more information, see the
appendix (VO2 Max. Standard Ratings, page 15), and go to
www.CooperInstitute.org.
Tips for Cycling VO2 Max. Estimates
The success and accuracy of the VO2 max. calculation
improves when your ride is a sustained and moderately hard
effort, and where heart rate and power are not highly variable.
• Before your ride, check that your device, heart rate monitor,
and power meter are functioning properly, paired, and have
good battery life.
• During your 20 minute ride, maintain your heart rate at
greater than 70% of your maximum heart rate.
• During your 20 minute ride, maintain a fairly constant power
output.
• Avoid rolling terrain.
• Avoid riding in groups where there is a lot of drafting.
Recovery Advisor
You can use your Garmin device with a heart rate monitor to
display how much time remains before you are fully recovered
and ready for the next hard workout.
Recovery time: The recovery time appears immediately
following an activity. The time counts down until it is optimal
for you to attempt another hard workout.
Viewing Your Recovery Time
Before you can use the recovery time feature, you must put on
the heart rate monitor, and pair it with your device (Pairing Your
Wireless Sensors, page 9). If your device was packaged with
a heart rate monitor, the device and sensor are already paired.
For the most accurate estimate, complete the user profile setup,
and set your maximum heart rate (Setting Up Your User Profile,
page 5).
1Hold .
2Select My Stats > Recovery Advisor.
3Go for a ride.
4After your ride, select Save Ride.
The recovery time appears. The maximum time is 4 days,
and the minimum time is 6 hours.
Personal Records
When you complete a ride, the device displays any new
personal records you achieved during that ride. Personal
records include your fastest time over a standard distance,
longest ride, and most ascent gained during a ride. When paired
with a compatible power meter, the device displays the
maximum power reading recorded during a 20-minute period.
Viewing Your Personal Records
1Hold .
2Select My Stats > Personal Records.
My Stats 5
Reverting a Personal Record
You can set each personal record back to the one previously
recorded.
1Hold .
2Select My Stats > Personal Records.
3Select a record to revert.
4Select Options > Use Previous > Yes.
NOTE: This does not delete any saved activities.
Deleting a Personal Record
1Hold .
2Select My Stats > Personal Records.
3Select a personal record.
4Select Options > Clear Record > Yes.
Navigation
Navigation features and settings also apply to navigating
courses (Courses, page 6) and segments (Segments,
page 3).
• Locations (Locations, page 6)
• Map settings (Viewing User Locations on the Map, page 6)
Locations
You can record and store locations in the device.
Marking Your Location
Before you can mark a location, you must locate satellites.
A location is a point that you record and store in the device. If
you want to remember landmarks or return to a certain spot, you
can mark a location.
1Go for a ride (Going for a Ride, page 3).
2Hold .
3Select Mark Location.
A message appears. The default icon for each location is a
flag (Customizing the Map Icons, page 6).
Navigating to a Saved Location
Before you can navigate to a saved location, you must locate
satellites.
1Hold .
2Select Navigation > Saved Locations.
3Select a location.
4Select Go To.
5Select to start your ride.
Navigating Back to Start
At any point during your ride, you can return to the starting point.
1Go for a ride (Going for a Ride, page 3).
2Select to pause the ride.
3Select Back to Start.
4Select Along Same Route or Straight Line.
5Select to resume your ride.
The device navigates you back to the starting point of your
ride.
Viewing Saved Locations
You can view details about saved locations, such as the
elevation and map coordinates.
1Hold .
2Select Navigation > Saved Locations.
3Select a saved location.
4Select Details.
Viewing User Locations on the Map
1Hold .
2Select Map > User Locations.
3Select Show.
Customizing the Map Icons
You can customize map icons to identify different types of saved
locations. For example, your home location, or locations where
you can eat or drink.
1Hold .
2Select Navigation > Saved Locations.
3Select a saved location.
4Select Change Icon.
5Select an option.
Repositioning Your Location
1Hold .
2Select Navigation > Saved Locations.
3Select a saved location.
4Select Reposition Here > Yes.
The location changes to your current position.
Deleting a Saved Location
1Hold .
2Select Navigation > Saved Locations.
3Select a location.
4Select Delete > Yes.
Courses
Following a previously recorded activity: You can follow a
saved course simply because it is a good route. For example,
you can save and follow a bike friendly commute to work.
Racing against a previously recorded activity: You can also
follow a saved course, trying to match or exceed previously
set performance goals. For example, if the original course
was completed in 30 minutes, you can race against a Virtual
Partner® trying to complete the course in under 30 minutes.
Following an existing ride from Garmin Connect: You can
send a course from Garmin Connect to your device. Once it
is saved to your device, you can follow the course or race
against the course.
Following a Course From Garmin Connect
Before you can download a course from Garmin Connect, you
must have a Garmin Connect account (Garmin Connect,
page 10).
1Select an option:
• Open the Garmin Connect app.
• Go to connect.garmin.com.
2Create a new course, or select an existing course.
3Select or Send to Device.
4Follow the on-screen instructions.
5On the Edge device, hold .
6Select Navigation > Courses.
7Select the course.
8Select Ride.
Tips for Training with Courses
• If you include a warmup, select to begin the course, and
warm up as normal.
6 Navigation