Gasmet GT5000 User manual

Gasmet Technologies
Tel : 1-866-685-0050
1
OPERATING GT5000 TERRA
FTIR GAS ANALYZER
QUICK GUIDE
Check the GT5000 & Calcmet manuals for full user instructions
or contact local representative or Gasmet
Requires that the Hazmat Application Library located in the folder C:\Identification
Tool _ SNxxxxx has been loaded into the Calcmet EASY or EXPERT software
Advanced Test Equipment Corp.
www.atecorp.com 800-404-ATEC (2832)
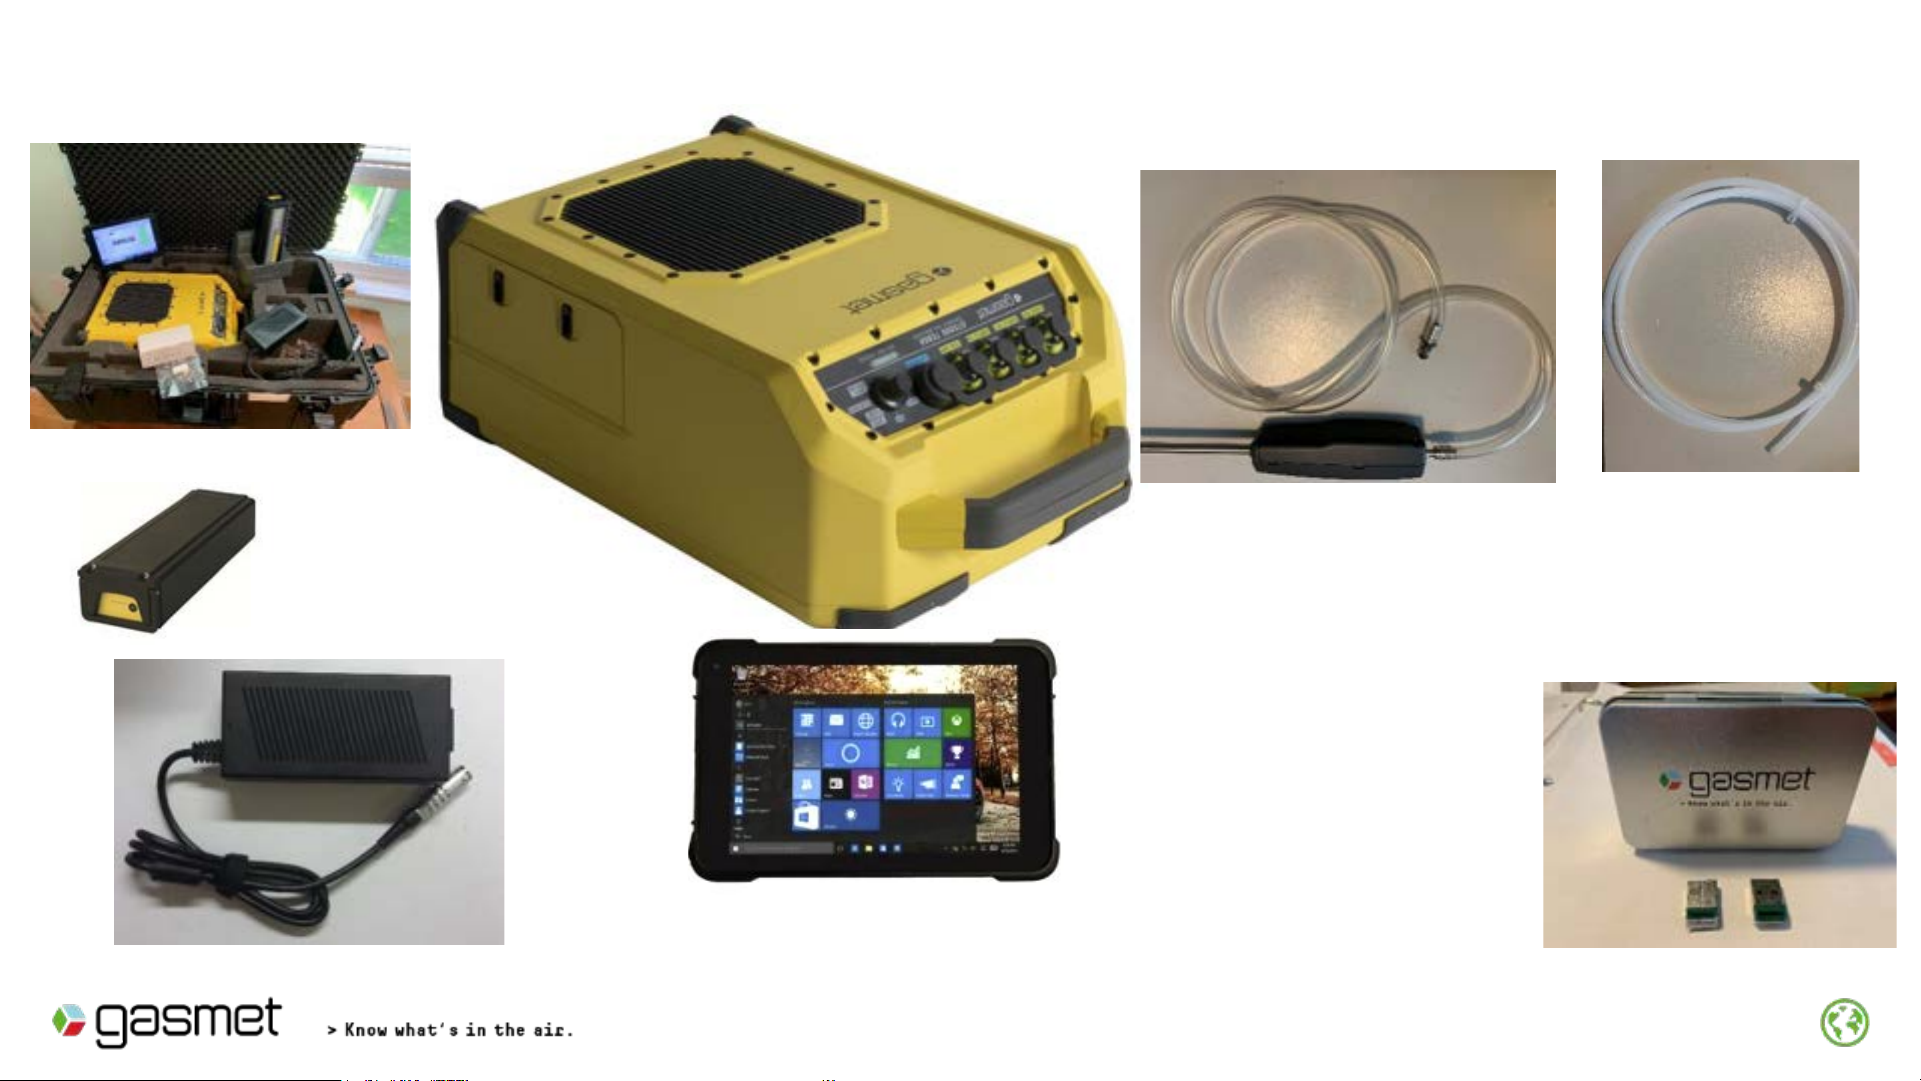
GT5000 Terra Portable FTIR multi-gas Analyzer
Components
2
Gasmet USB Stick –All manuals,
software and documentation
And HASP Keys
Gasmet Sample Probe with
1. Teflon Tubing (white) recommended for sampling
2. Tygon tubing (Clear) recommended for
background measurement
AC Power Pack
Li-ion Battery
GT5000 Terra
Gasmet Tablet

3
BATTERY HATCH & POWER CONNECTION
Door Closed
Battery
AC Power inlet
~ 3Hrs. Battery Life & 4 Hrs. Recharge time
4
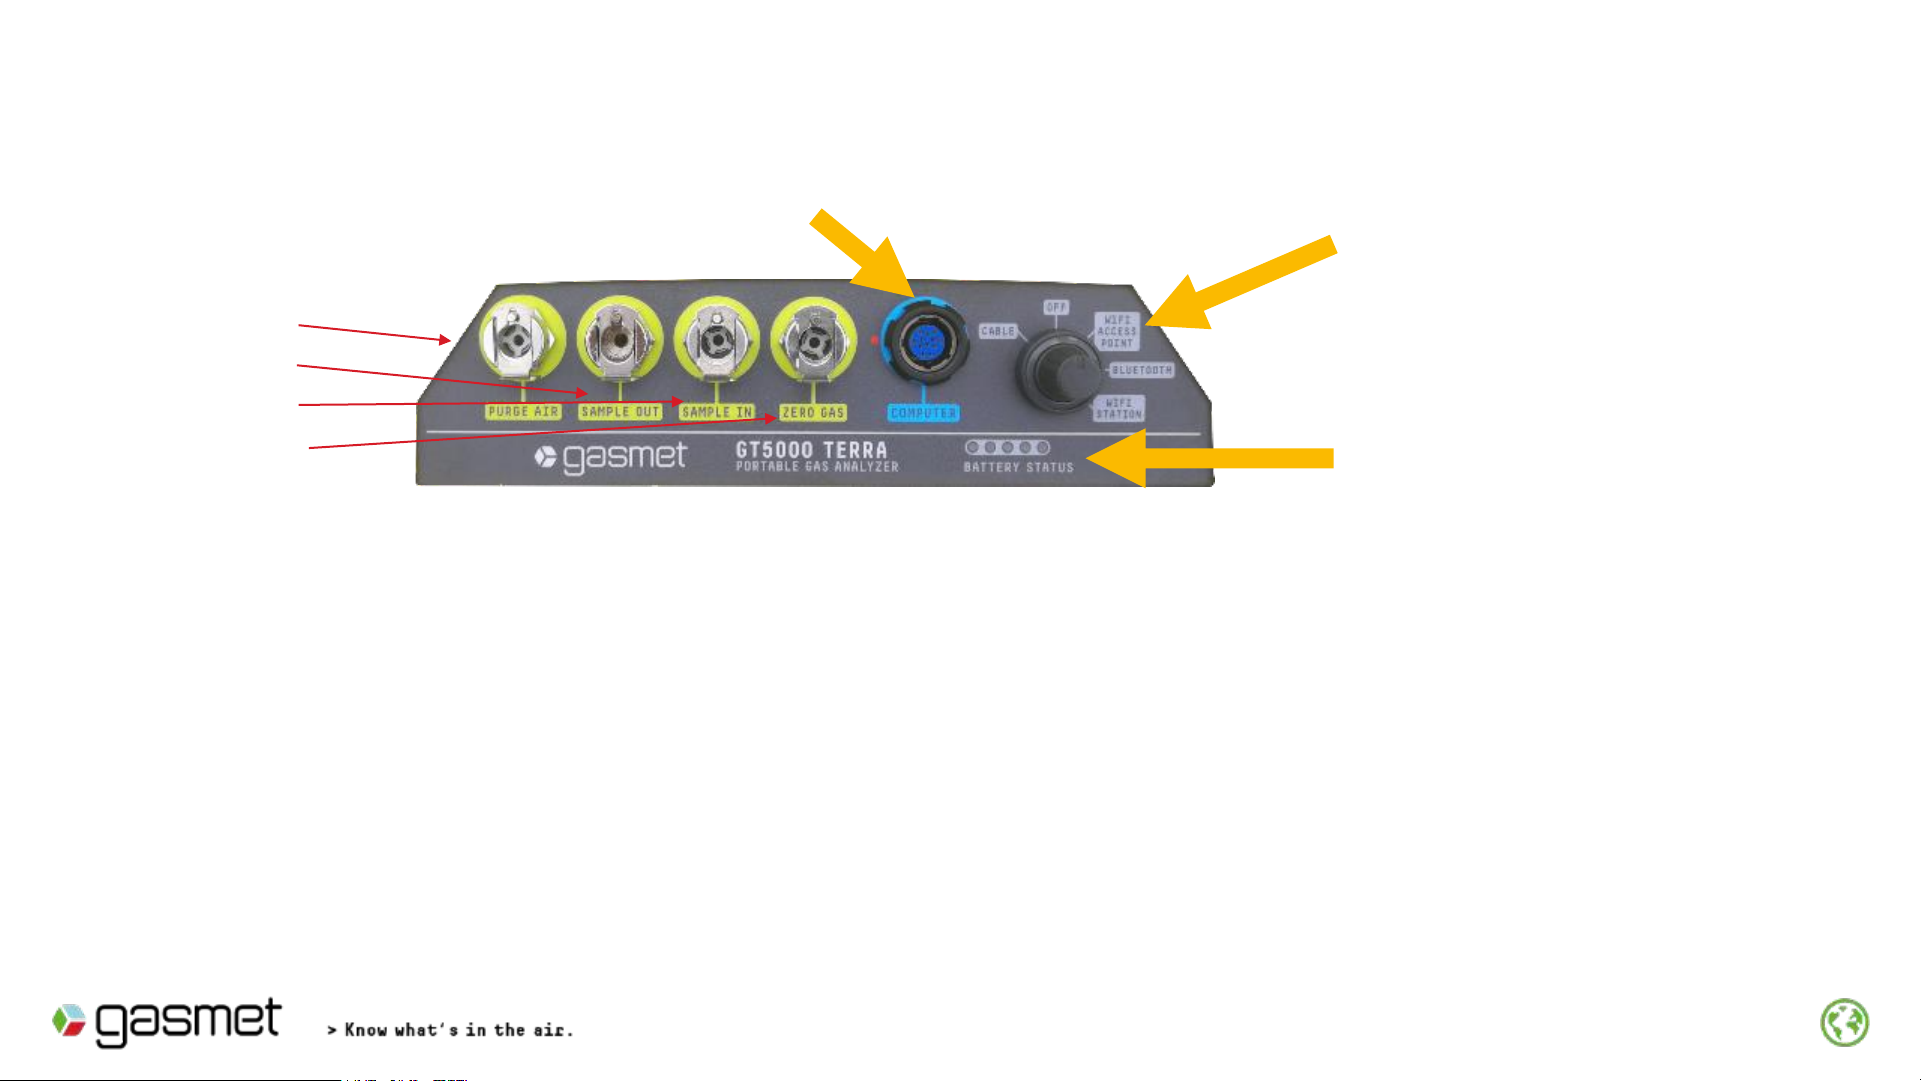
Quick connections for gas
lines
•Purge air in
•Sample out
•Sample in
•Zero gas in
USB Cable port Power button & sets mode of
communication with Tablet
Battery status indicator
1. Remove rubber dust protection from GT5000 front panel
2. Apply Power
3. Attach Sample Connector (Tubing & Probe) to Sample In
4. Turn the Power Button to the desired communication mode
5. Open Calcmet on Tablet (or laptop)
GT5000 Front Panel

GT5000 & Calcmet EASY Communication Settings
5
1. Turn Control switch to communication mode
- Cable
- Wifi
- Bluetooth (default)
2. In Calcmet EASY
Choose the GT5000 Mode of Operation
1
2
GT5000 Setting
Calcmet EASY Setting (no action required unless troubleshooting a communication issue)
Default setting is Bluetooth

Running Calcmet™EASY on Gasmet Tablet 6
1. Turn on Tablet
2. Double Tap Calcmet Icon with Stylus or Finger
3. Wait 10-20 secs for Calcmet EASY screen
(last application library used will automatically load _ Default is Hazmat_Application)
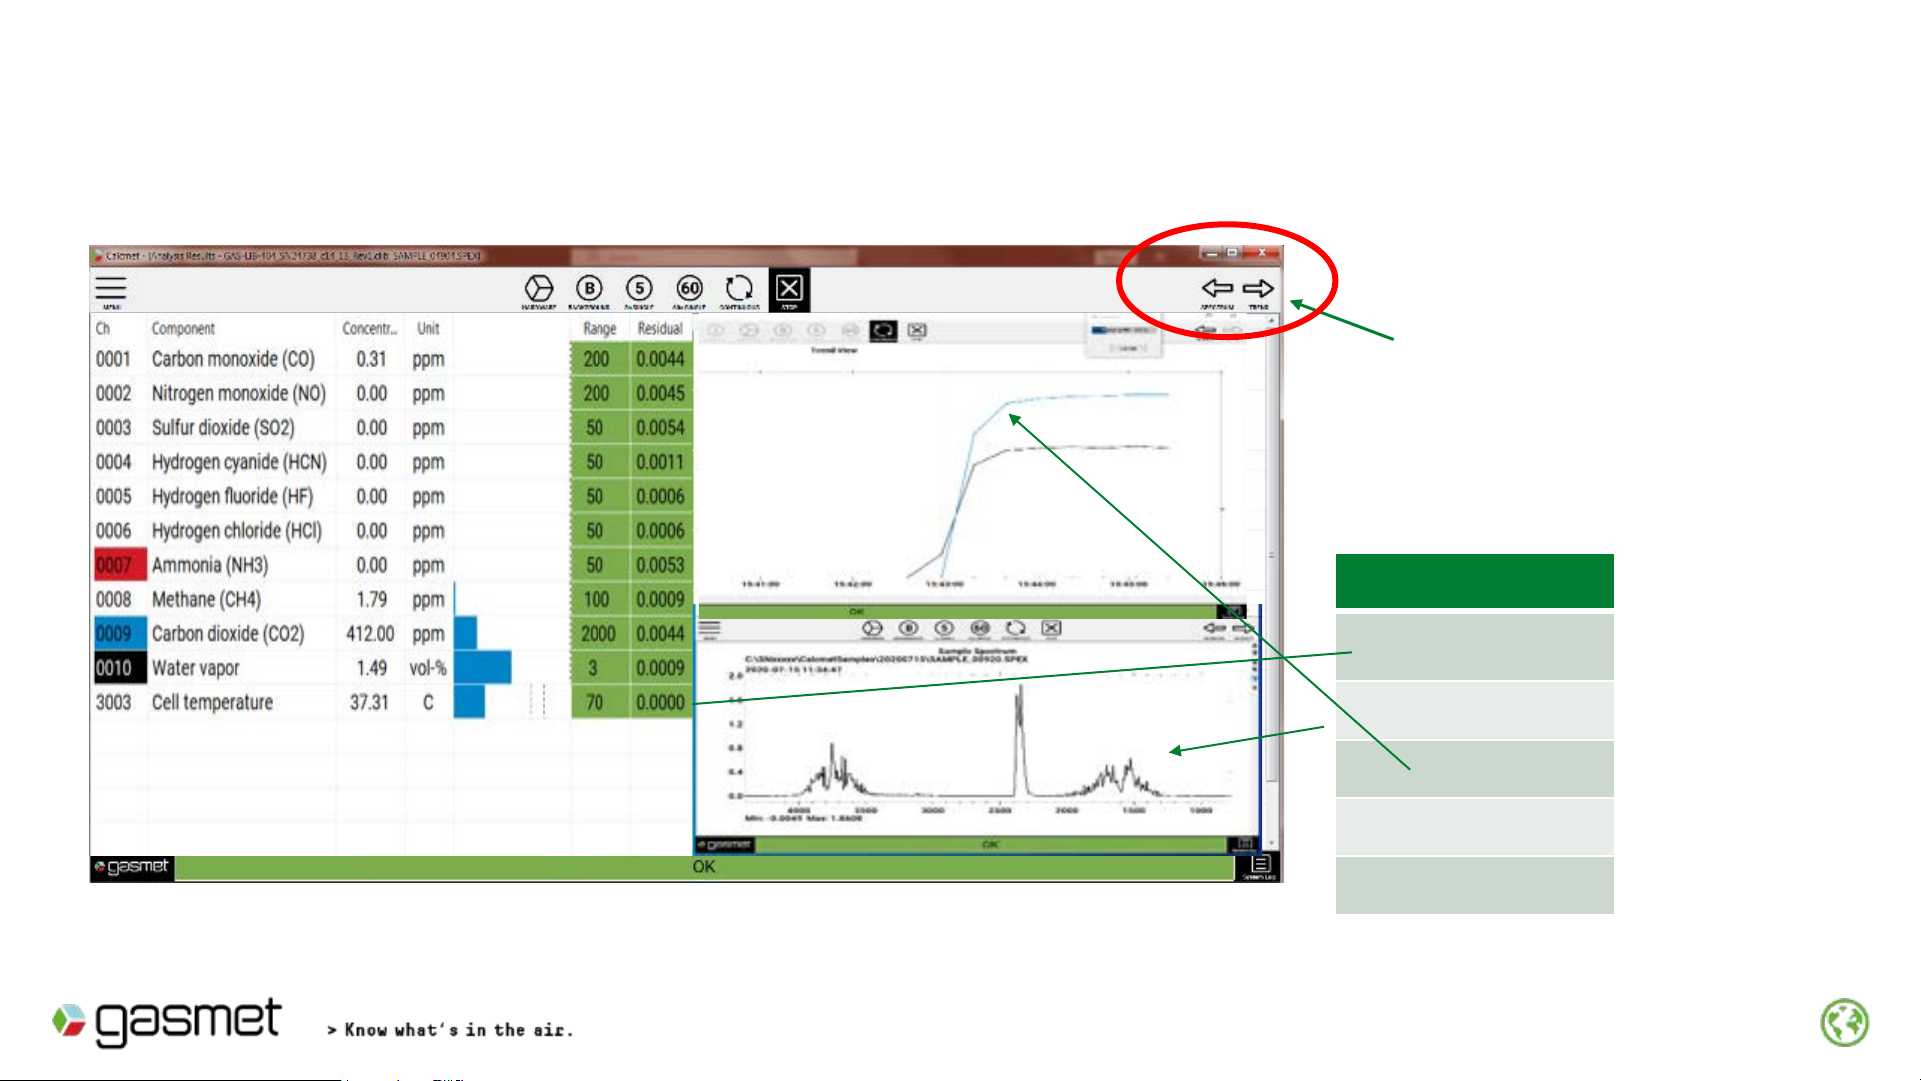
Calcmet EASY Software
7
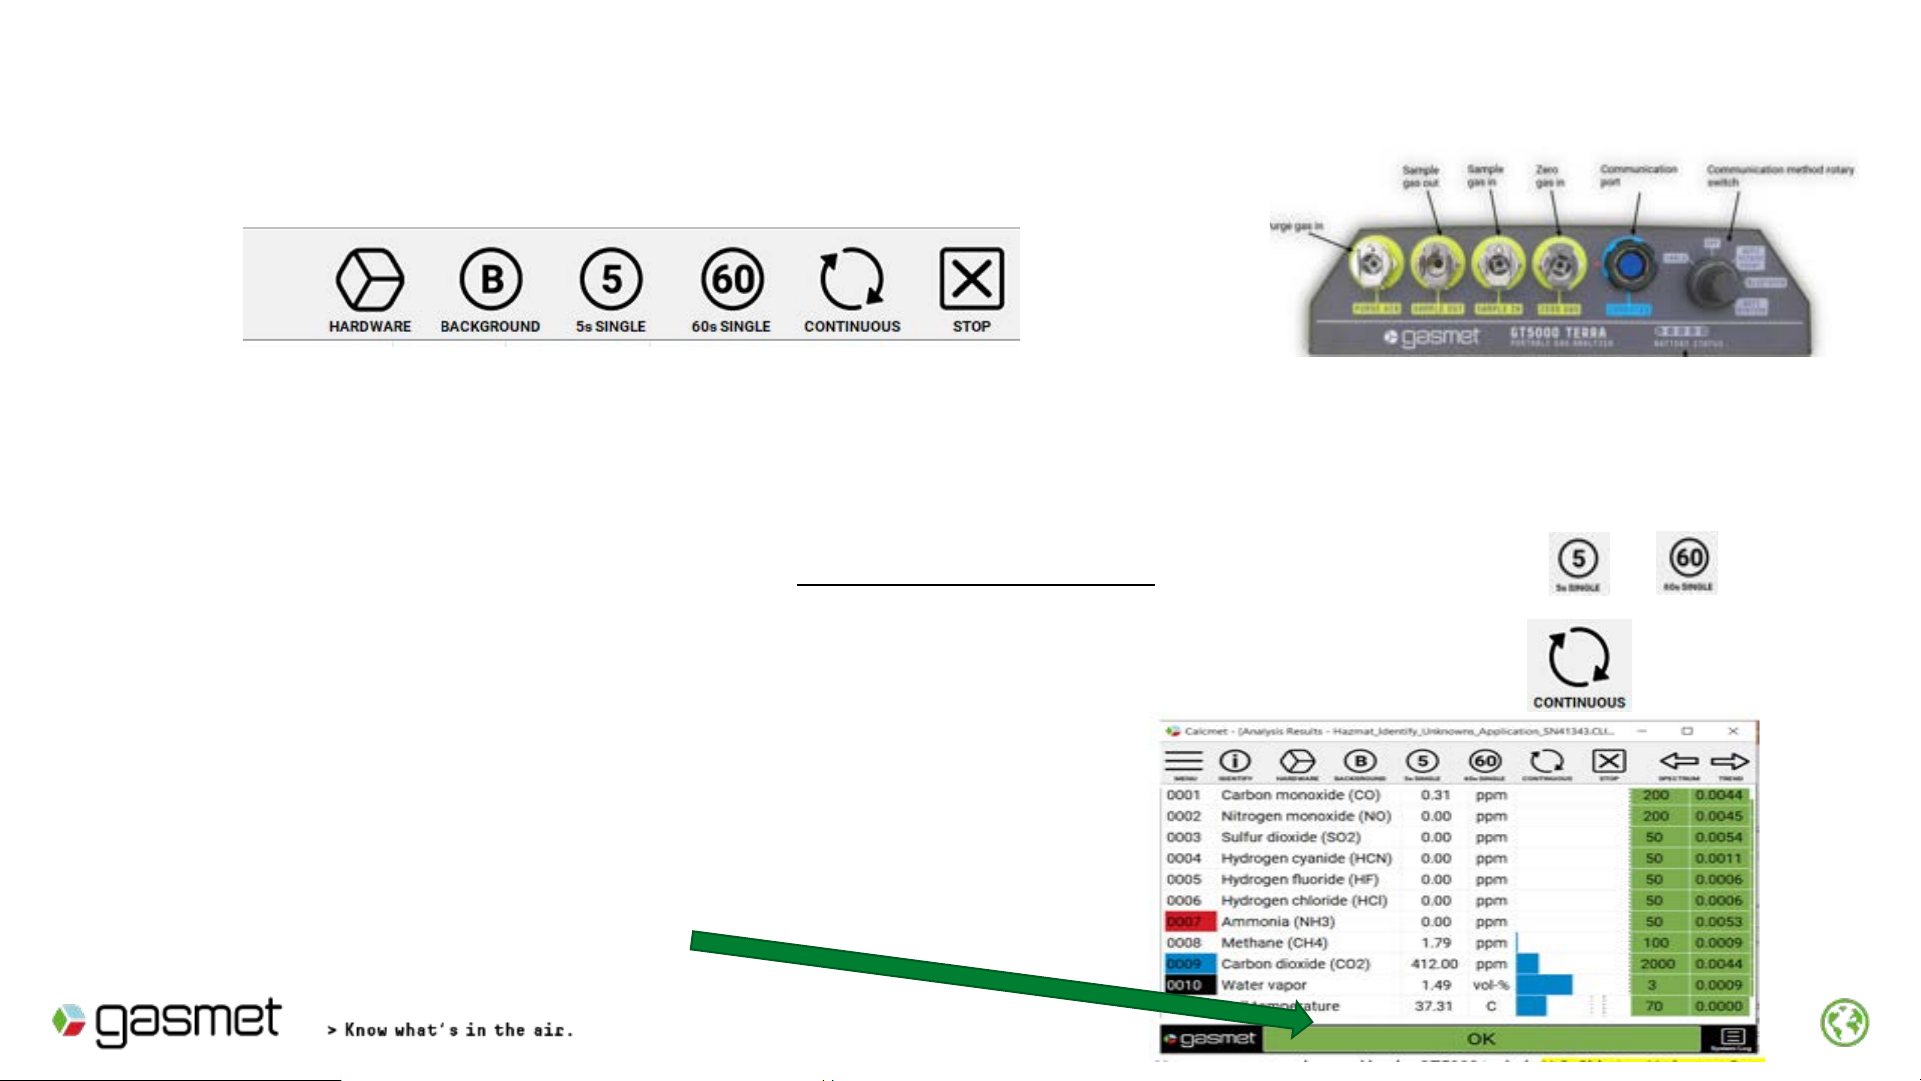
Five different screens available
(each screen is separate not as shown above)
Views
Results
Spectrum
Trend
Residual
Background
Left & Right arrows
move between
screens
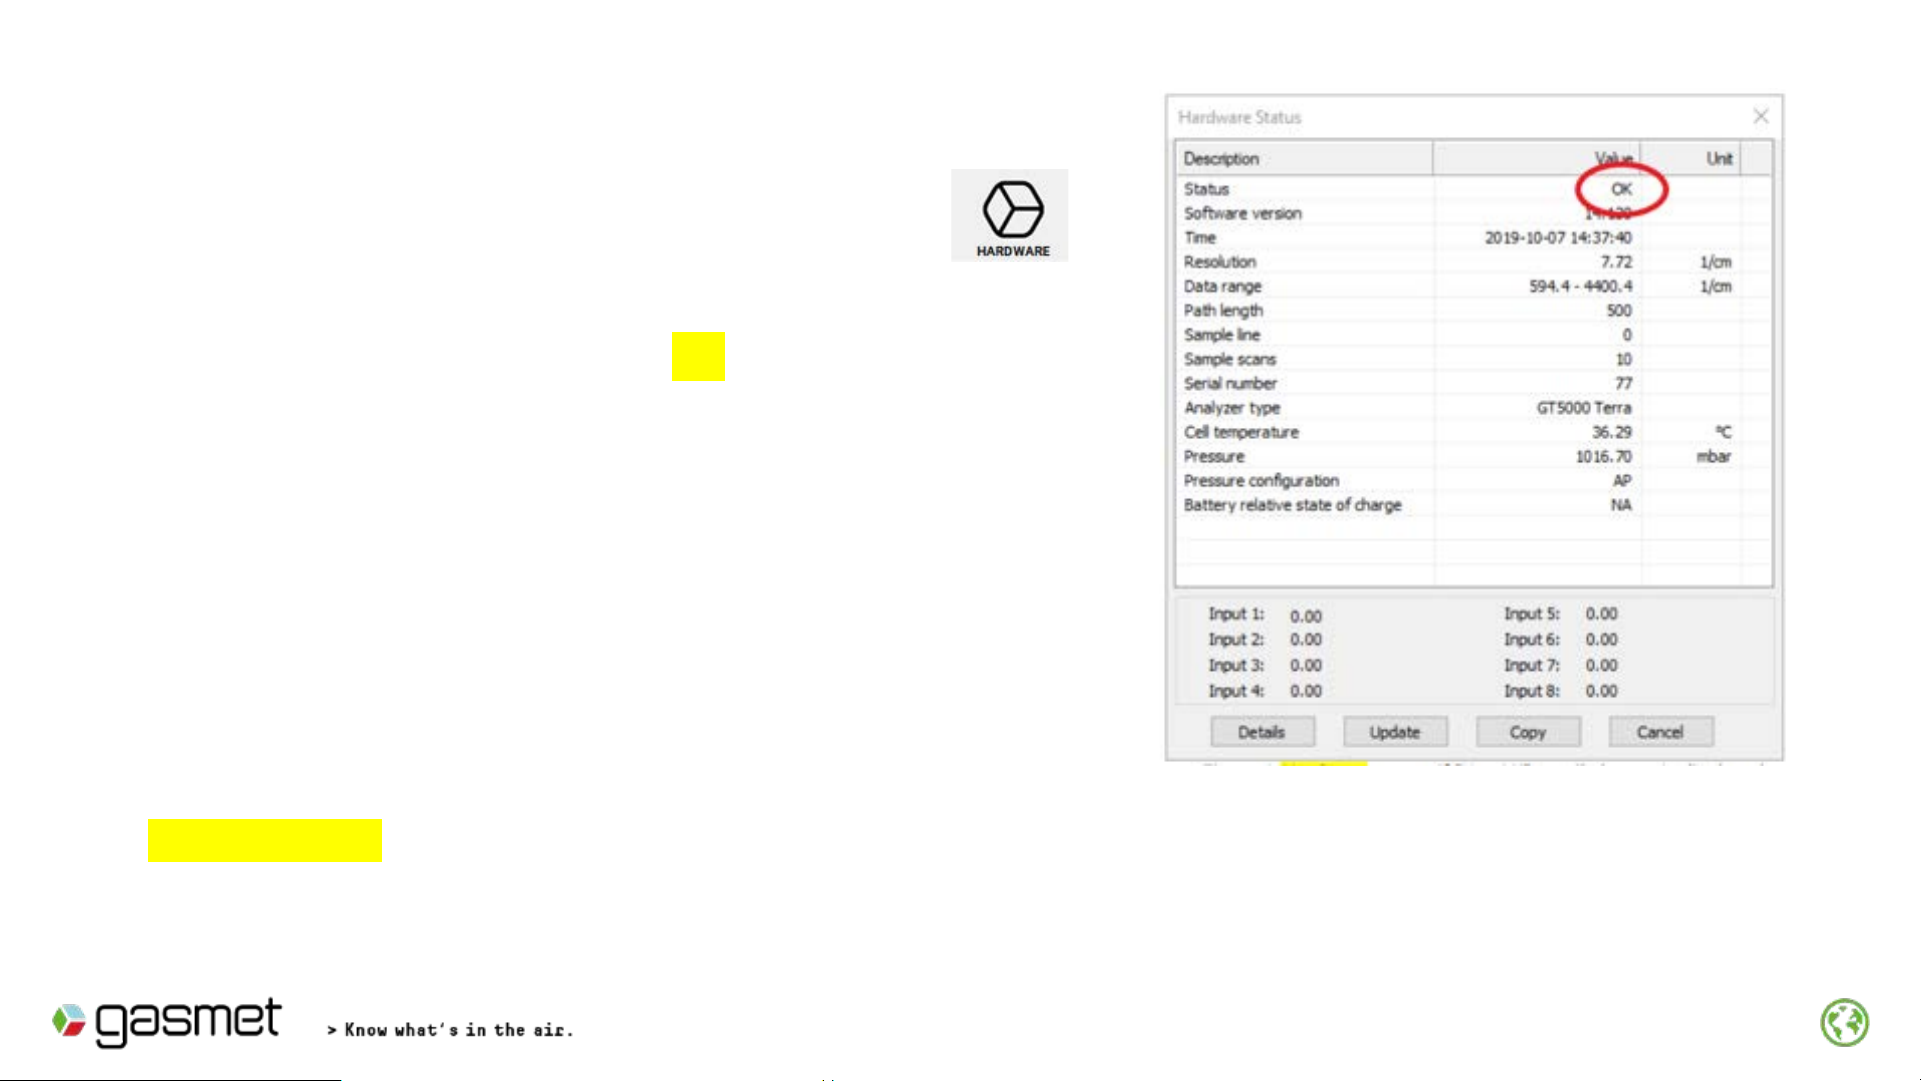
Click Hardware
Checks that the analyzer is ready to measure
‘Hardware status is OK’ is displayed
if analyzer is ready to measure.
If ‘Hardware status is Not OK’ is displayed
Click on Details. Contact Gasmet or
representative if Status ‘OK’
cannot be displayed after waiting further
warm-up time.
8
If error occurs after clicking Hardware, check settings according to slide
“GT5000 & Calcmet EASY Communication Settings “
Check Hardware Status
Verify GT5000 is functioning correctly 9
1. Connect the sampling line with probe to the Sample IN port on the analyzer front panel.
2. One single measurement where the pump is not activated can be taken by clicking or
3. Start a continuous measurement where pump is automatically started by clicking
4. Continuous measurement starts, and results are
updated to the screen at end of each cycle.
5. Check that OK is displayed

10
Background measurement
1. Connect 5.0 purity nitrogen (N2) gas to Zero gas inlet on the
analyzer front panel. Depending on the regulator for the zero
gas bottle following flush times are recommended.
2. Flush Time setting (Menu →Measuring Times)
When (N2) gas flow is 1 - 3 l/min set Flush time = 120 (secs)
3. Click Background .
The GT5000 will automatically proceed to the perform
background. Time clock will show Flush Time then count down
the preset 3 mins background time. At completion of
background a new screen as shown next page will be
displayed.
Immediately Turn off Nitrogen zero gas.
11
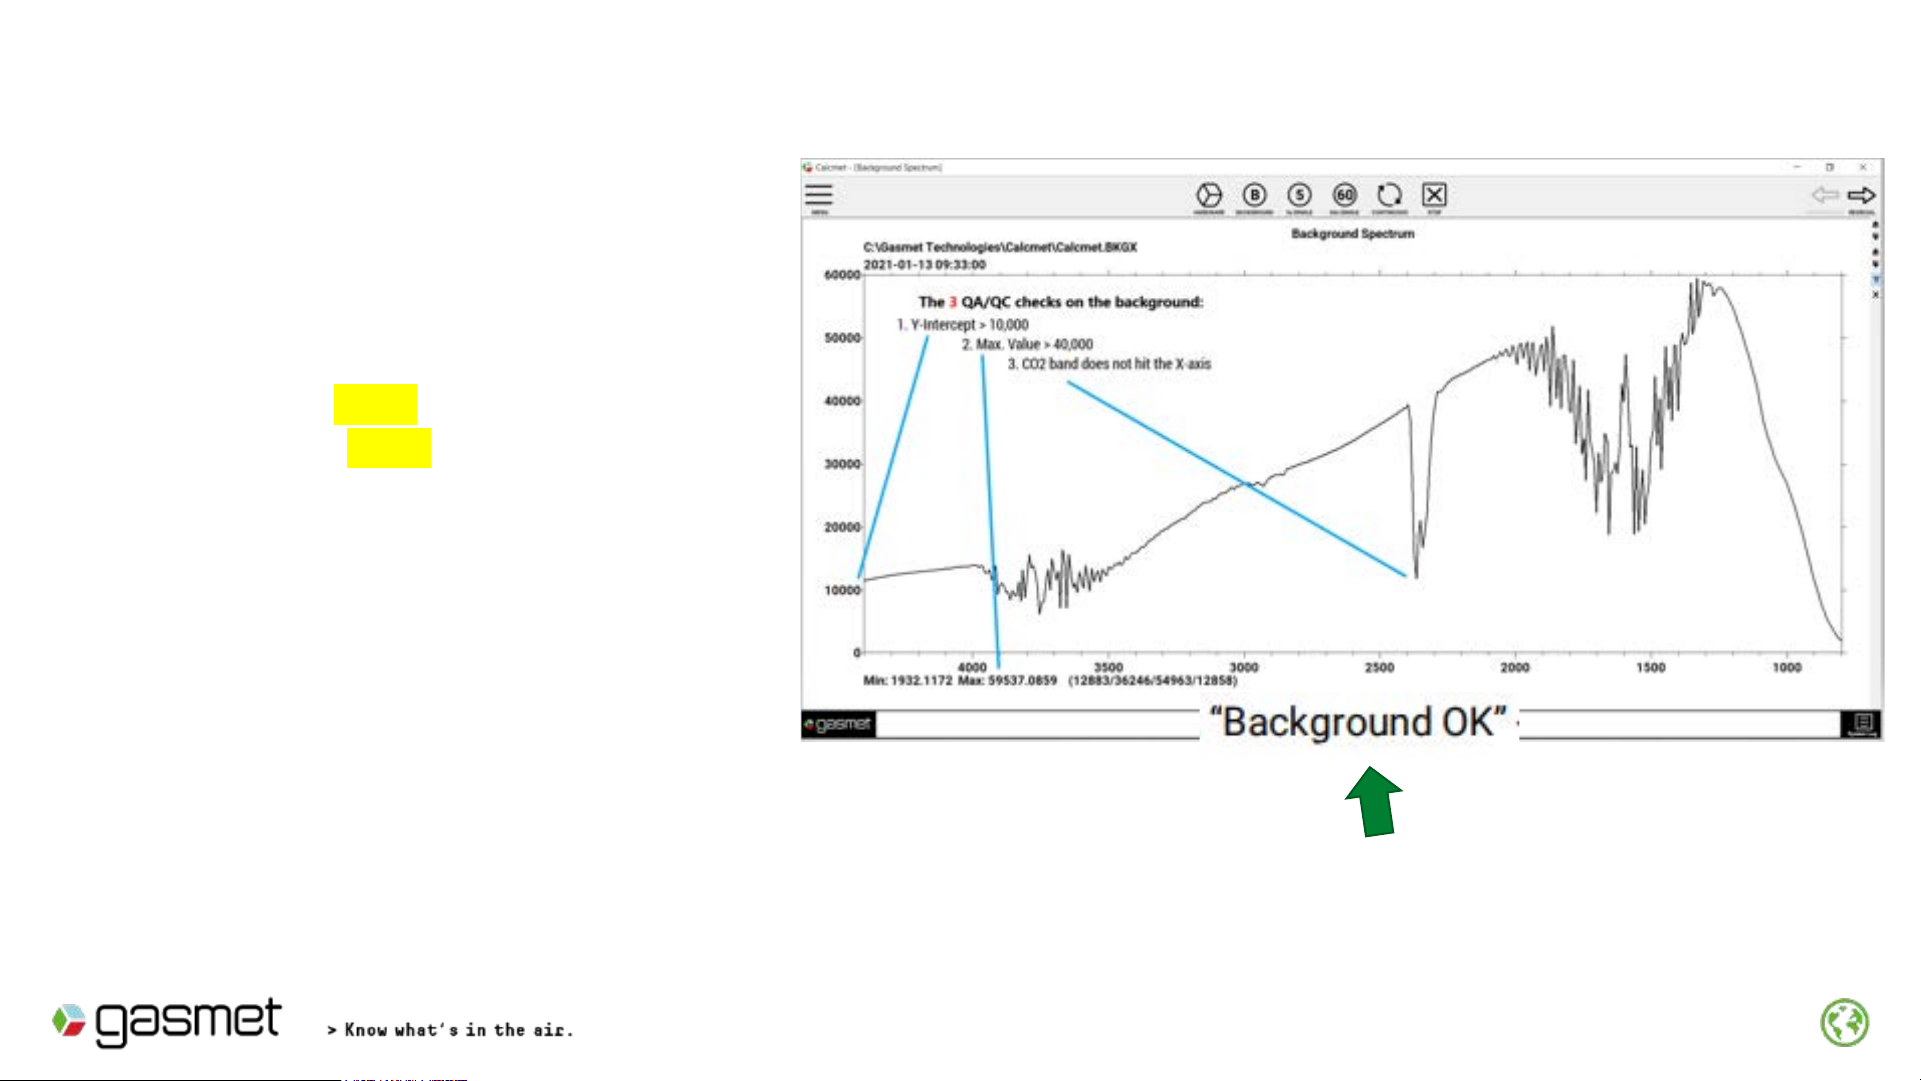
CHECKING BACKGROUND
Check these two parameters :
1). Max value _ Pass if reading > 40,000
2). Y-intercept _ Pass if reading > 10,000
Contact Gasmet or your representative if
there is a Fail for either above parameters.
3). The CO2 band should not reach the x-axis. (refer line 3.above)
If this fails _ Repeat Background but first check following :
a. Is (N2) gas turned on & contain pressure ?
b. Is (N2) gas connected to GT5000 zero gas connector ?
This message is displayed
if background successful
10/10/2023
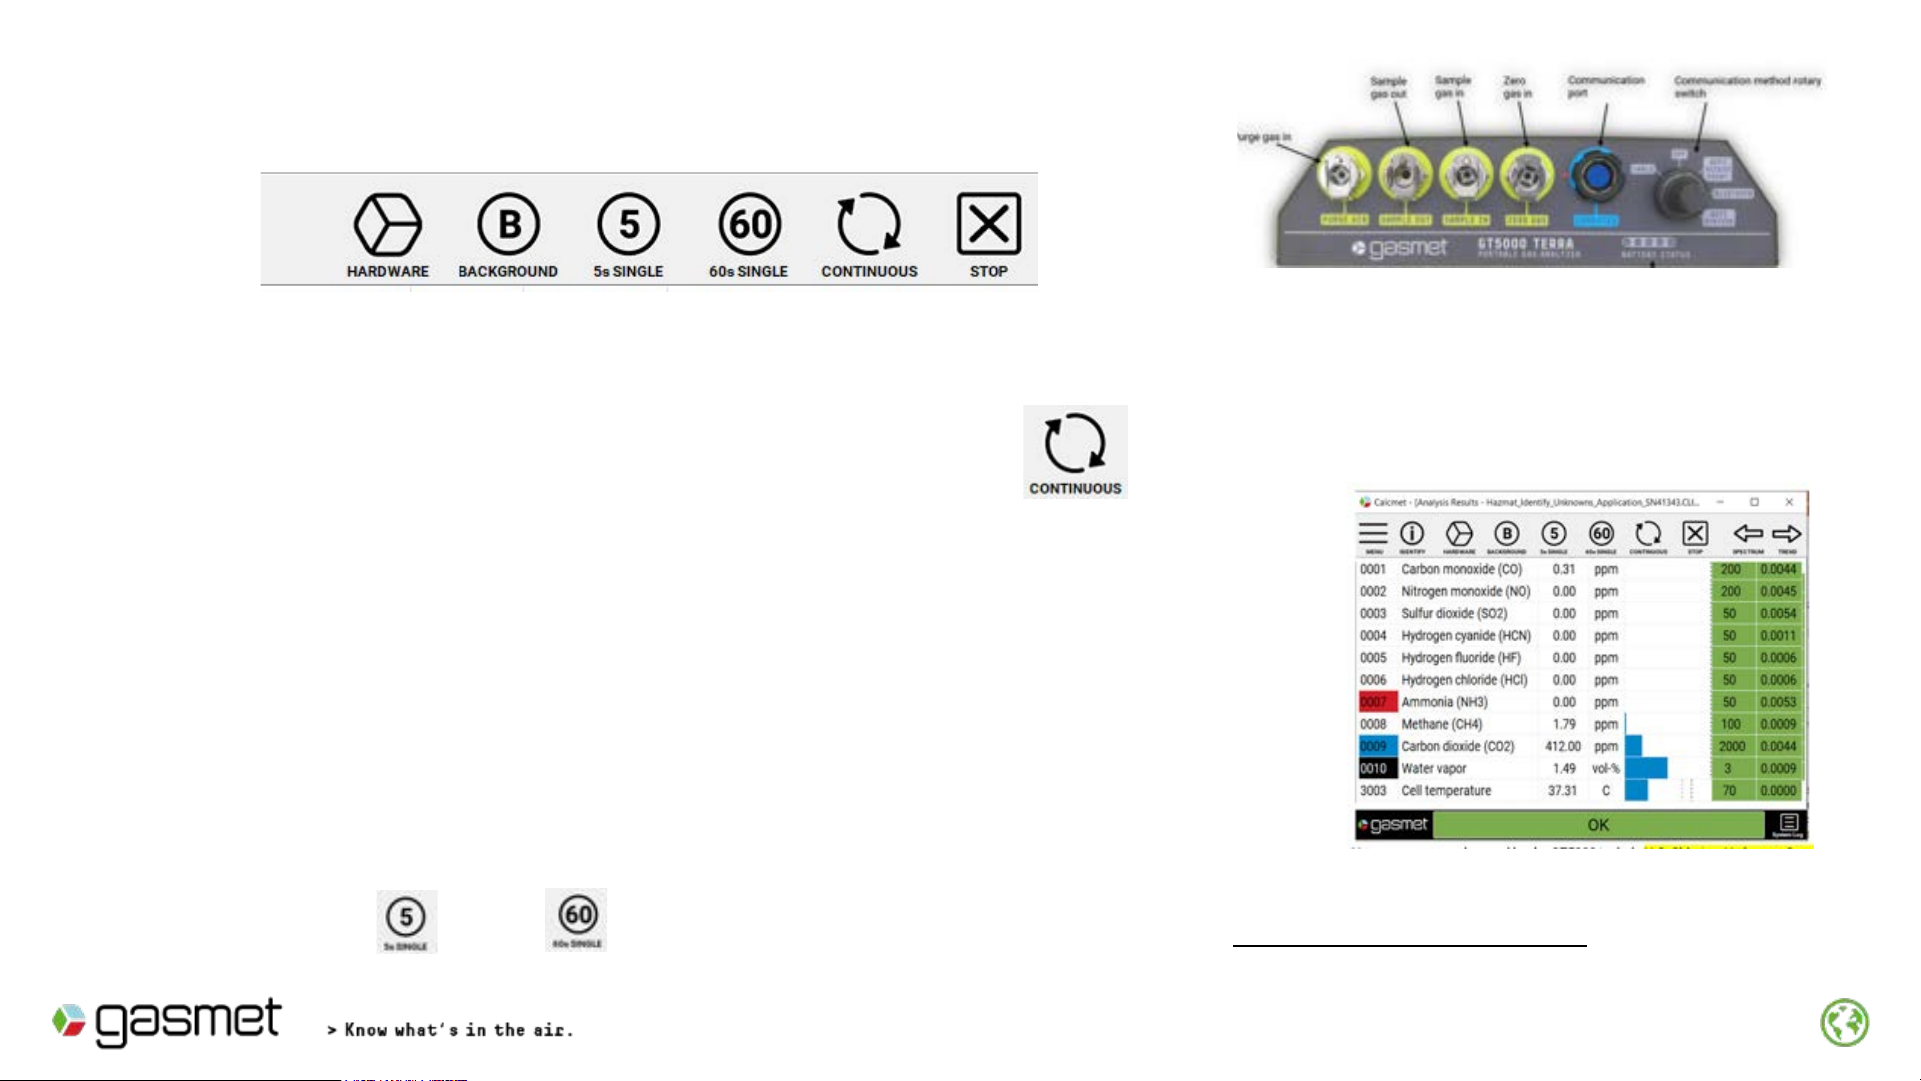
Taking Measurements
12
1. Connect the sampling line with probe to the Sample IN port on the analyzer front panel.
By clicking or One single measurement where the pump is not activated will be
taken. Used in special sampling situations.
2. Start a continuous measurement started by clicking the GT5000 sample pump should start.
3. Continuous measurement starts, countdown clock appears
counting from down from 20s .
4. At completion of 20s the gas readings or Analysis Results will
be updated for all gases. Example :

13
Interpreting Analysis Results (1)
Calcmet Software is reporting air sample is
normal, no toxic gases have been detected .
What is normal for ambient air ?
1. Carbon Dioxide : 400+ ppm (indoors can range
500 –1000 ppm)
2. Methane: ~ 2 ppm
3. Water Vapor : 0.5 –3 v/v% depending on
ambient temperatures
4. Other gases should be ~0 ppm
ALL-CLEAR
Over 5,000 gases are detectible by the GT5000. Refer final page for gases not detected by the GT5000 gas analyzer

14
Interpreting Analysis Results (2)
Calcmet Easy Software is
reporting air sample is not normal
and one or more toxic gases have
been detected .
Residual Column turns from
Green to Yellow or Red for one or
more gases
AND
ALARM Condition
Unknown Gas
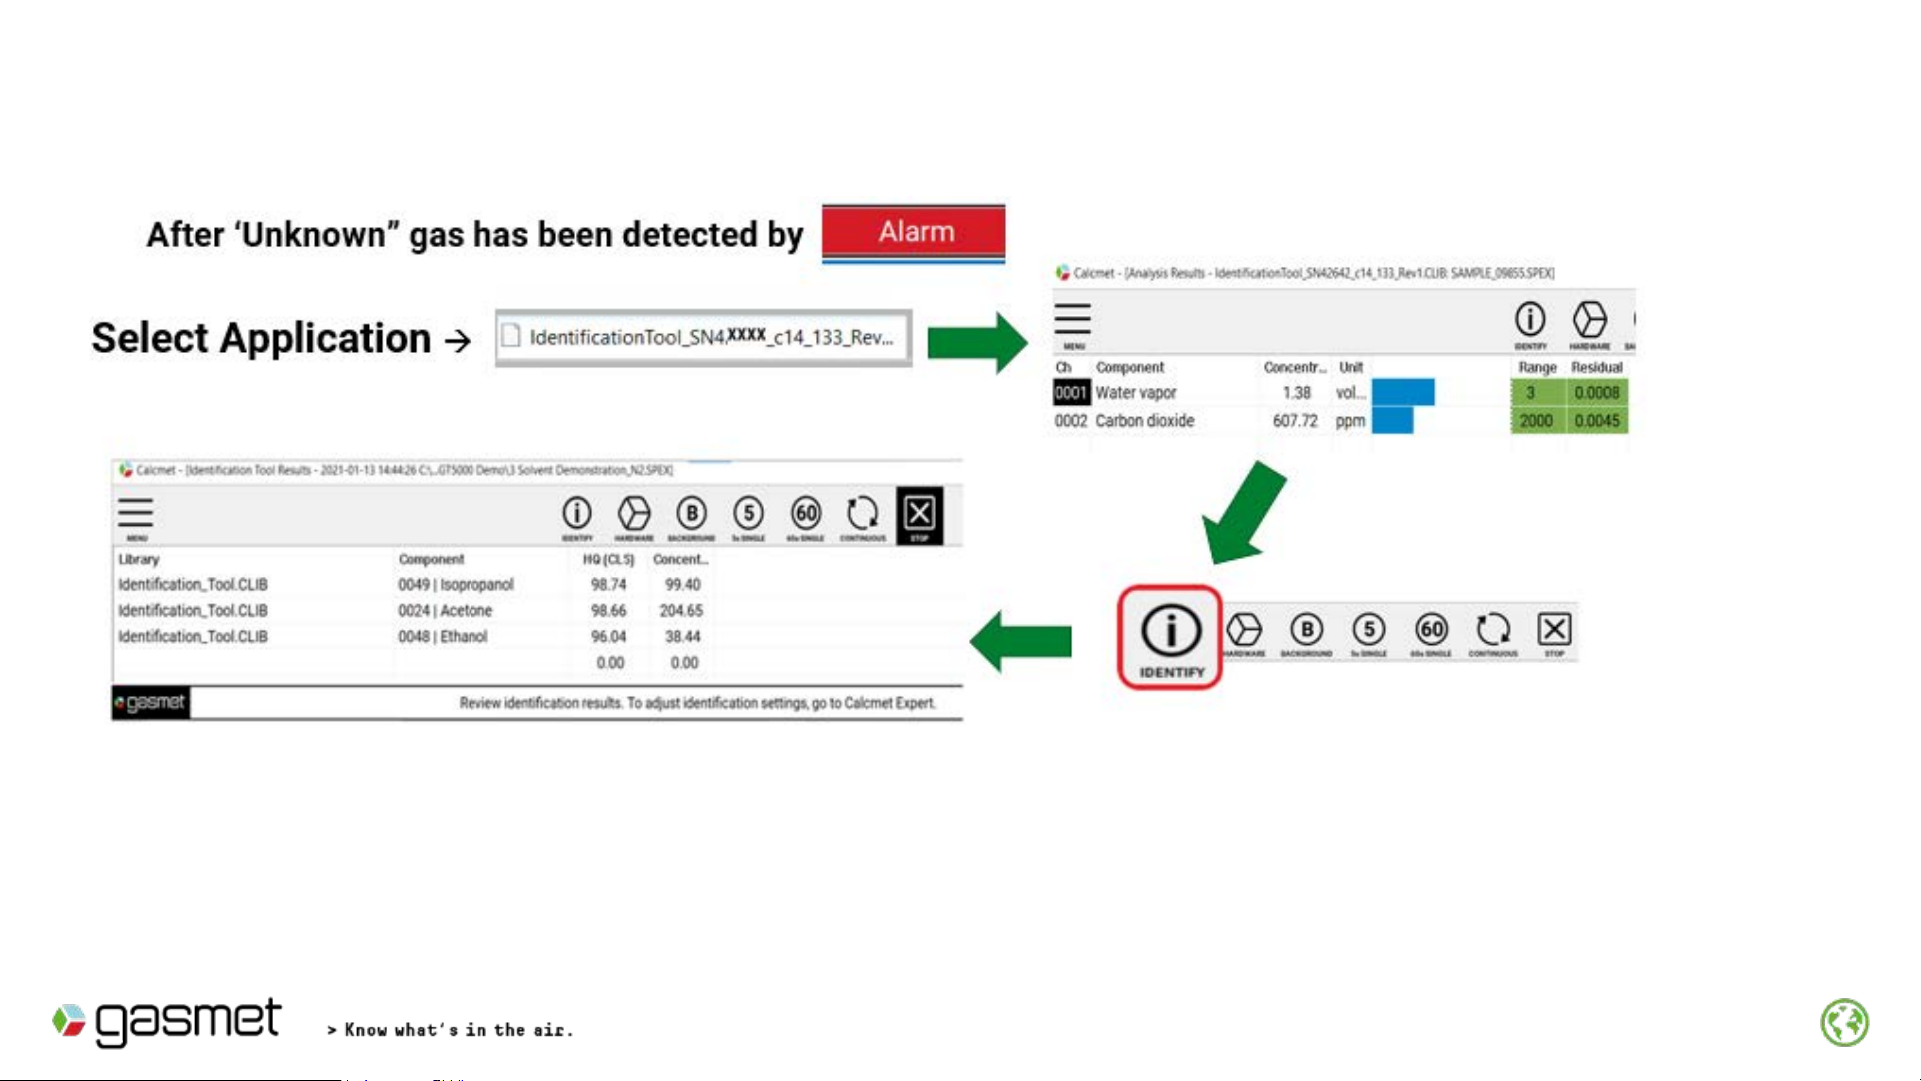
15
Identify the Unknown Gas (or Vapor)
IDENTIFY function automatically searches Gasmet reference library ( > 400 gases) and reports
gas or gases it identifies with gas concentrations.
The NIST/EPA library (with >5,000 gases) can also be searched if activated. [Refer Appendix 8]
16
Identified Gas(es) must be found in Gasmet Reference library to add it to HAZMAT application library. It is
not possible to gases found in NIST Library to the Hazmat library
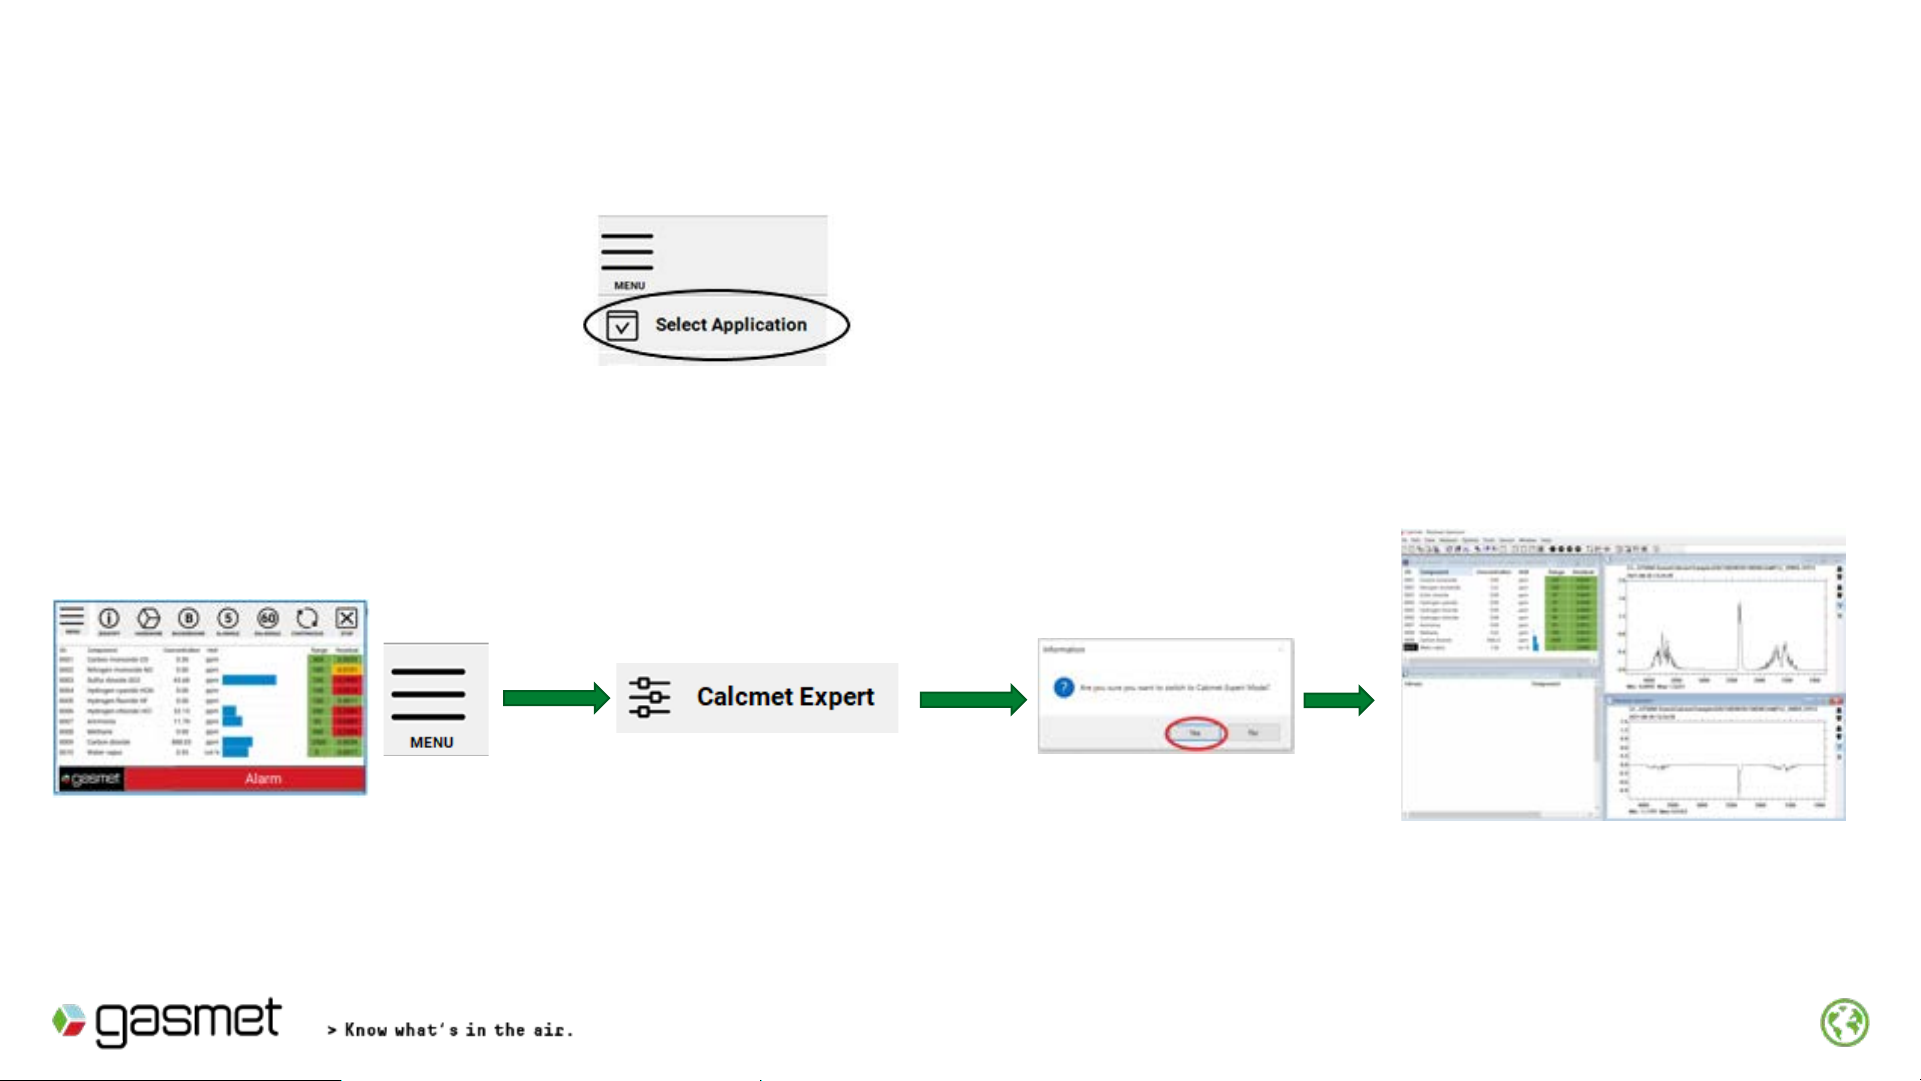
2. Move from Calcmet EASY to EXPERT
Part 1.
To Add Identified gases into the Hazmat Library
Calcmet EASY Screen view
Calcmet EXPERT Screen view
1. Re-Load Hazmat Application i. Browse →C:\Identification Tool_SNxxxxx
ii. Open Folder, locate Hazmat.CLIB
iii. Hazmat Application will load on Tablet. (10 gases)
(x=serial number of GT5000)
17
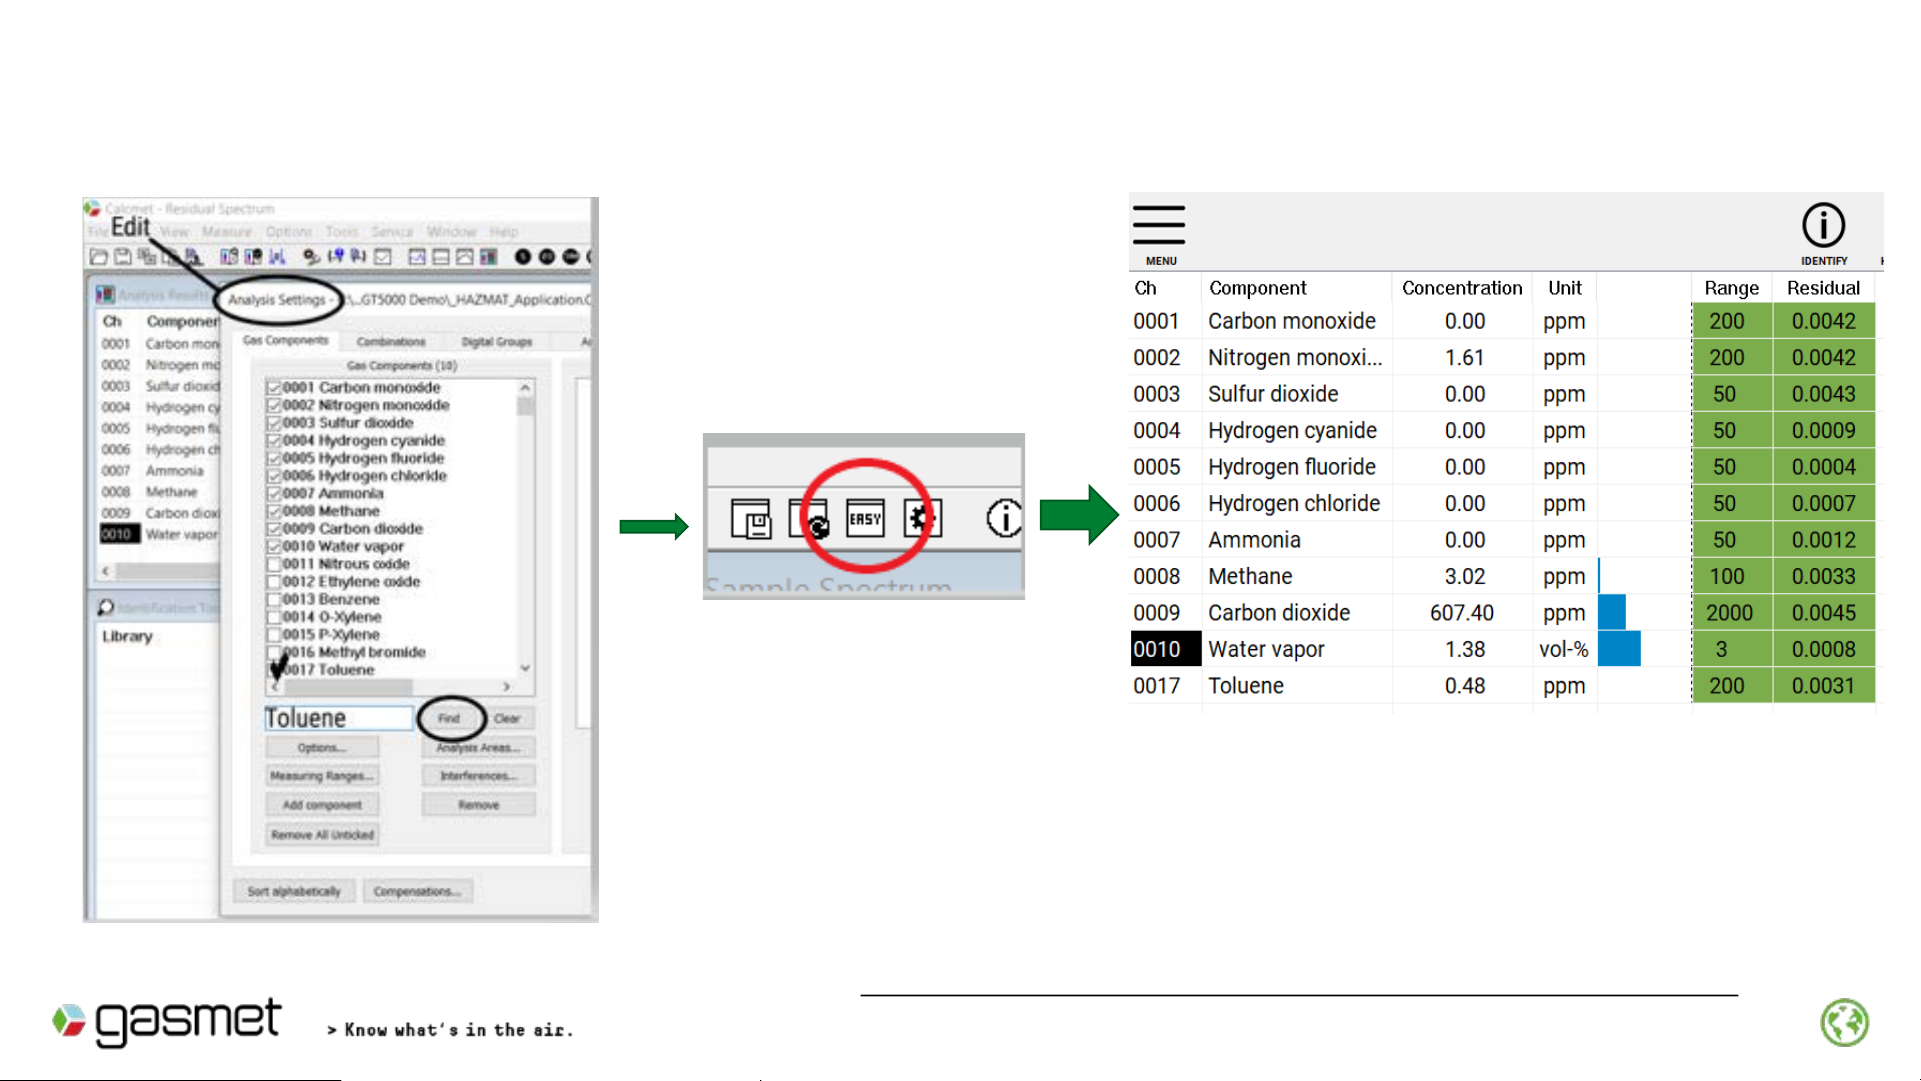
Add identified gas to HAZMAT Application Library
Return to Calcmet EASY
Locate EASY on Icon
tray
HAZMAT Application now includes identified gas
(Example –Toluene)
Part 2
To Add Identified gases into the Hazmat Library
Calcmet EXPERT Screen view
Calcmet EASY Screen view
Refer Appendix 9 for creating new Application Libraries
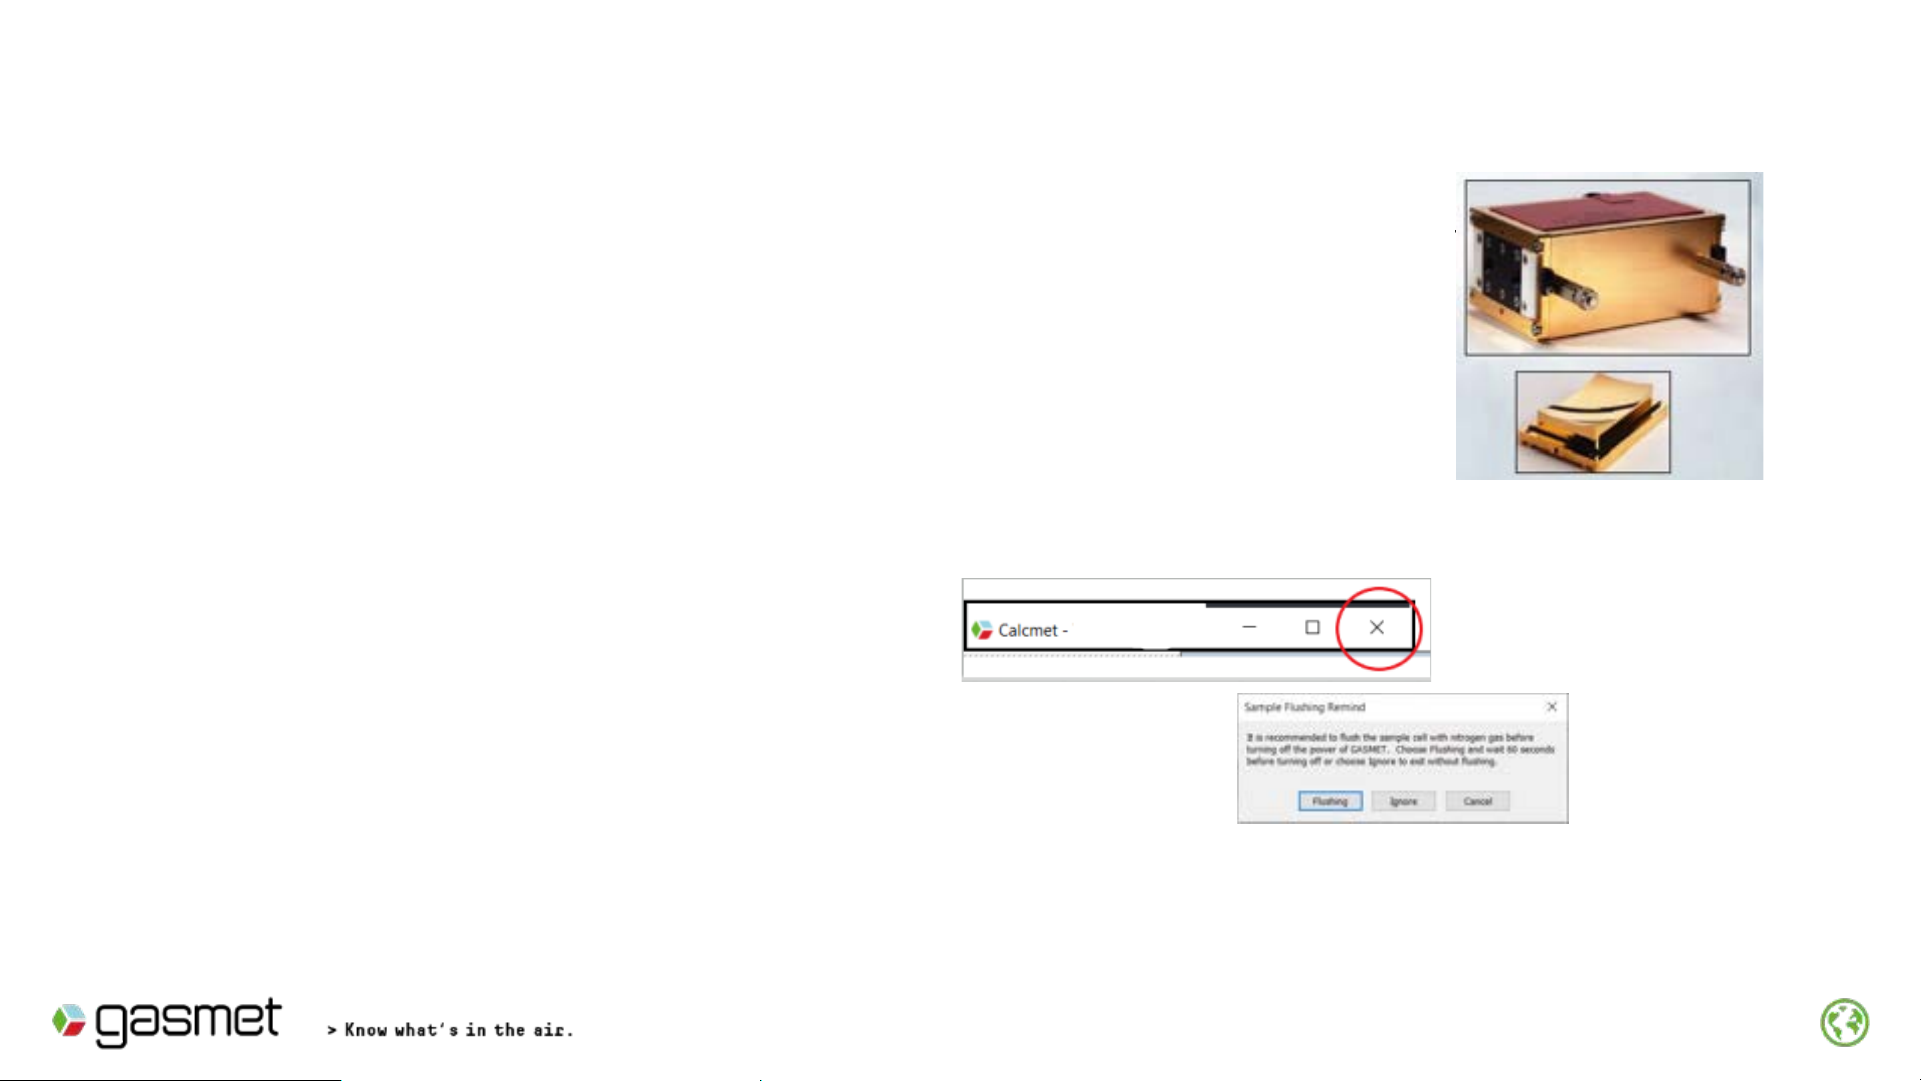
Shutting Down –GT5000
It is very important to flush the gas cell after the completion of the sampling event to prevent any
resident corrosive gases from adversely effecting the gas cell mirrors.
Step 1: Take GT5000 to a location with Clean Ambient Air.
Step 2: Measure continuously this clean ambient air for at least 3 –5 mins.
Step 3: Exit it from Calcmet Software
Calcmet Software will display following “friendly reminder message”
(assuming Step2 is completed) , chose Ignore
Step 4: Remove Sample Lines from GT5000 and return Rubber Dust Cover
onto sampling ports

19
•Typical warm up time is 15 –30 mins. when cell temperature stabilizes
•Hardware status can be checked to see when cell temperature has stabilized
•The response time of the instrument is typically between 45 and 120
seconds depending on the gas measurement time
•When you start measurement at a new sample point, let the analyzer run for
minimum of 1 –3 minutes so that the gas sample is representative
•The internal volume of the sample cell is ~ 500 ml
•The internal pump operates at ~ 2 lpm
Appendix 1
Tips when Measuring (1)

20
•NEVER let water droplet and other liquids enter the sampling cell.
•Always have the sample probe attached
•The handheld probe includes a PTFE filter, periodically checked and replace if necessary.
•If the sample gas is warmer than the sample cell, ensure that moisture in the sample does
not condense inside the analyzer when the gas cools down.
•Allow the analyzer to warm to ambient temperature when moving from cool to warm.
•Use Hardware status to view cell temperature to verify the GT5000 is ready to use..
Appendix 2
Tips when Measuring (2)
Table of contents
Other Gasmet Measuring Instrument manuals


