GATTONI RT010 Guide
INSTALLAZIONE E MONTAGGIO INSTALLATION AND ASSEMBLY
art. RT010
MISCELATORE INCASSO CON DOCCETTA
SHUTOFF A PULSANTE
BUILTIN MIXER WITH SHUTOFF HANDSHOWER

toilet taps
2
art. RT010
IT CONSIGLI PER IL BUON FUNZIONAMENTO
Pressione di esercizio no a 3 bar; in caso di pressioni superiori a 3 bar si raccomanda l’installazione di un riduttore di pressione all’ingresso dell’impianto.
Temperatura acqua calda non superiore a 65°C.
Applicazione ltri all’ingresso dell’impianto.
Soprattutto nel caso di nuove installazioni, onde evitare che impurità o detriti possano giungere all’interno del rubinetto dando origine a problemi
di funzionamento, spurgare l’impianto prima di mettere in esercizio i rubinetti.
EN TIPS FOR ENSURING OPTIMUM PERFORMANCE
Working pressure up to 3 bar. If the pressure is higher than 3 bar, installation of a pressure reducer at the system inlet is recommended.
Hot water temperature no higher than 65°C.
Installation of lters at the system inlet.
Above all in the case of new installations, drain the system before turning on the taps.This measure prevents impurities and other waste from
getting
inside the tap, which could interfere with their operation.
FR CONSEILS POUR LE BON FONCTIONNEMENT
Pression de service maximale 3 bar; en cas de pressions supérieures à 3 bar, il est recommandé d’installer un réducteur de pression à l’entrée de
l’installation.
Température eau chaude non supérieure à 65 °C.
Application de ltres à l’entrée de l’installation.
Surtout en cas de nouvelles installations, an d’éviter que des impuretés ou des détritus puissent arriver à l’intérieur du robinet, entraînant des problèmes
de fonctionnement, purger les canalisations avant de mettre en service les robinets.
DE TIPPS FÜR GUTES FUNKTIONIEREN
Betriebsdruck bis 3 bar; im Fall von höheren Drücken als 3 bar wird die Installation eines Druckreglers am Eingang der Anlage empfohlen.
Warmwassertemperatur nicht höher als 65° C.
Anbringen von Filtern am Eingang der Anlage.
Vor allem bei neuen Installationen die Anlage vor Inbetriebnahme der Hähne durchspülen, um zu vermeiden, dass Unreinheiten oder Partikel in das
Innere des Hahns gelangen können, die Funktionsprobleme verursachen würden.
ES CONSEJOS PARA UN BUEN FUNCIONAMIENTO
Presión de uso de hasta 3 bar; en caso de presión superior a 3 bar se recomienda instalar un reductor de presión en la entrada de la instalación.
La temperatura del agua caliente no debe superar los 65 °C.
Aplicar ltros en la entrada de la instalación.
Especialmente en el caso de instalaciones nuevas, para evitar que puedan entrar impurezas o detritos en el interior del grifo produciendo problemas en su
funcionamiento, purgar la instalación antes de usar el grifo.
RU
3 . 3 .
65°C.
.
, ,
.
3
toilet taps art. RT010
IT INDICE
Assemblaggio rubinetto 4
Sostituzione cartuccia 9
Dimensioni 10
Cura del prodotto 11
Reclamo 12
EN CONTENTS
Tap assembly 4
Cartridge replacement 9
Dimensions 10
Product maintenance 11
Claim 12
FR SOMMAIRE
Montage du robinet 4
Remplacement de la cartouche 9
Dimensions 10
Entretien du produit 11
Réclamation 12
DE INHALTSVERZEICHNIS
Zusammenbau des Hahns 4
Kartuschenwechsel 9
Abmessungen 10
Pege des Produktes 11
Reklamation 12
ES ÍNDICE
Ensamblaje grifo 4
Sustitución cartucho 9
Dimensiones 10
Cuidado del producto 11
Reclamación 12
RU
4
9
10
11
12
toilet taps
4
art. RT010
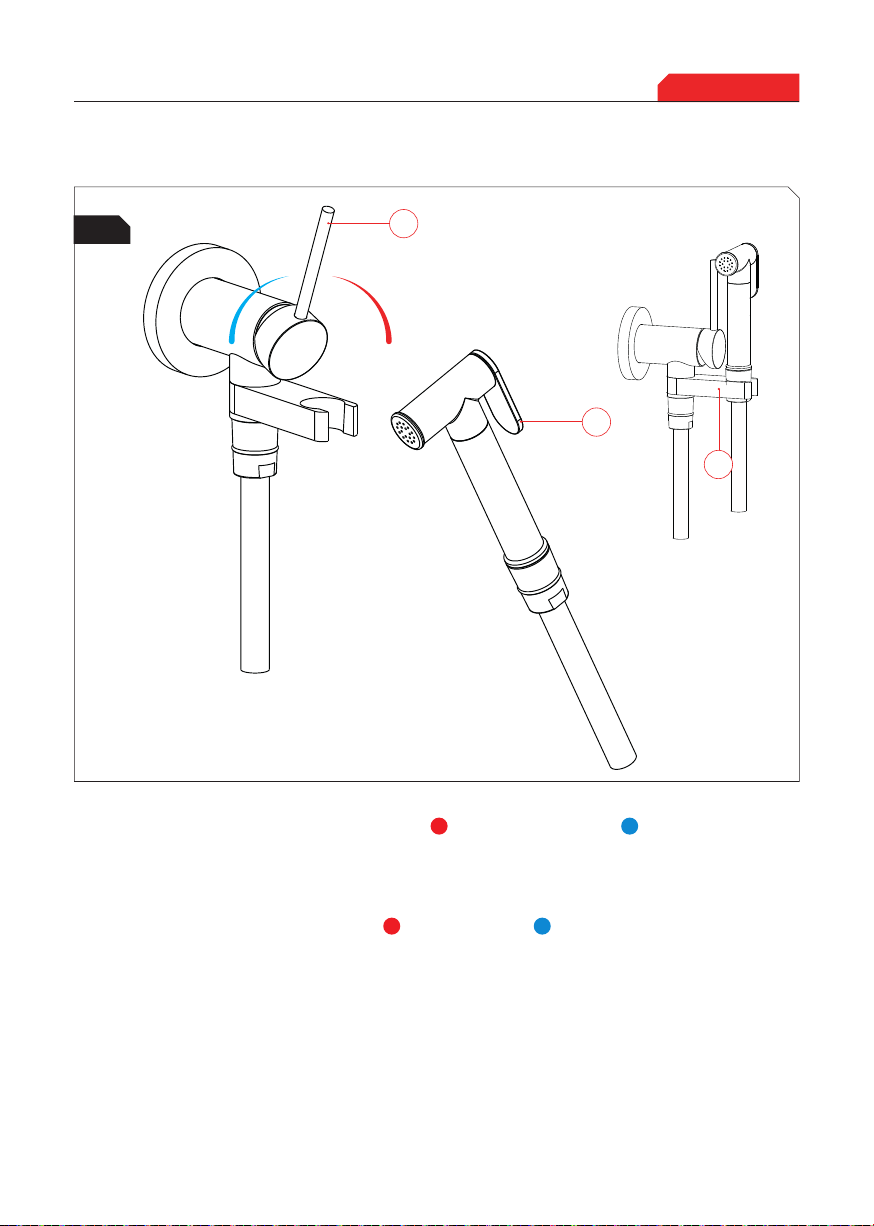
ASSEMBLAGGIO RUBINETTO TAP ASSEMBLY
IT Nell’ambito della congurazione desiderata installare a parete nell’apposito scasso ricavato nella muratura, il
corpo del rubinetto (1) rispettando le indicazioni riportate nella gura.Vericare le tenute dei collegamenti.
EN For the required conguration, install on the wall in the specic slot made in the wall, the body (1) of the tap
tted with protection and connect it as indicate on the cover. Check the tightness of connections.
1
A

5
toilet taps art. RT010
IT Rispettando le indicazioni di Max e Min murare il corpo, prestando attenzione alla profondità di installazione
calcolando anche lo spessore del rivestimento. Terminato il rivestimento della parete rimuovere la protezione
temporanea in ottone (2) svitando le tre viti (3) e rimuovere la guarnizione (4).
EN Once the wall is coated remove the temporary brass protection (2) unscrewing the three screws (3) and remove
the gasket (4).
2 34
B
toilet taps
6
art. RT010
IT Inserire le guarnizioni (5) negli appositi alloggiamenti del corpo e utilizzando una chiave a brugola da 3 mm
avvitare le tre viti (6).
EN Insert the gaskets (5) in the body and screw the three screws using a 3 mm Allen wrench.
5
C
6
ASSEMBLAGGIO RUBINETTO TAP ASSEMBLY

7
toilet taps art. RT010
IT Avvitare il essibile (7) alla presa d’acqua e alla doccetta inserendo le guarnizioni (8).
N°2 valvole di non ritorno all’interno del corpo (9).
EN Screw the ex (7) to the water inlet and to the handshower inserting the gaskets (8).
N°2 non-return valves inside the body (9).
D
8
9
toilet taps
8
art. RT010
FUNZIONAMENTO MODE OF OPERATION
IT Funzionamento: rimuovere la doccetta dal supporto, aprire la leva di comando (1), premere il bottone sulla
doccetta (2) e regolare la temperatura dell’acqua calda a destra e dell’acqua fredda a sinistra.
Terminato l’utilizzo della doccetta shut-o chiudere l’acqua e posizionare la doccetta nel
supporto (3).
EN Mode of operation: remove the handshower from the holder, open the lever (1), push the button on the
handshower (2), adjust water temperature hot on the right and cold on the left.
When nished close the water and place the handshower on the holder (3).
E1
2
3
9
toilet taps art. RT010
SOSTITUZIONE CARTUCCIA CARTRIDGE REPLACEMENT
IT Prima di procedere a manutenzioni di questo tipo chiudere i rubinetti d’arresto, scaricare l’acqua e
seguire le istruzioni seguenti:
Allentare con una chiave a brugola da 2 mm (1), il grano di ssaggio della leva ruotando al massimo di 360°
Estrarre la leva verso l’alto (2), il grano resterà sull’asta della cartuccia.
A questo punto svitare il cupolotto/ ghiera di fermo (3) con l’apposita riduzione in dotazione (4) per la chiave da
20 mm ed estrarre manualmente la cartuccia (5) dal rubinetto.
Eettuare la manutenzione o sostituzione.
EN Before performing this kind of operation, close the stop valves drain the water and proceed as follows:
Using a 2 mm Allen wrench, loose the xing screw of the lever rotating to maximum 360°.
Remove the lever upwards, the screw will remain on the cartridge shaft. Unscrew the locking ring with the
special reduction (4) for the 20 mm key and manually remove the cartridge from the mixer.
Carry out maintenance or replacement.
F
1
2 mm
3
4
20 mm
5
22 mm
TOILET TAPS
10
art. RT010
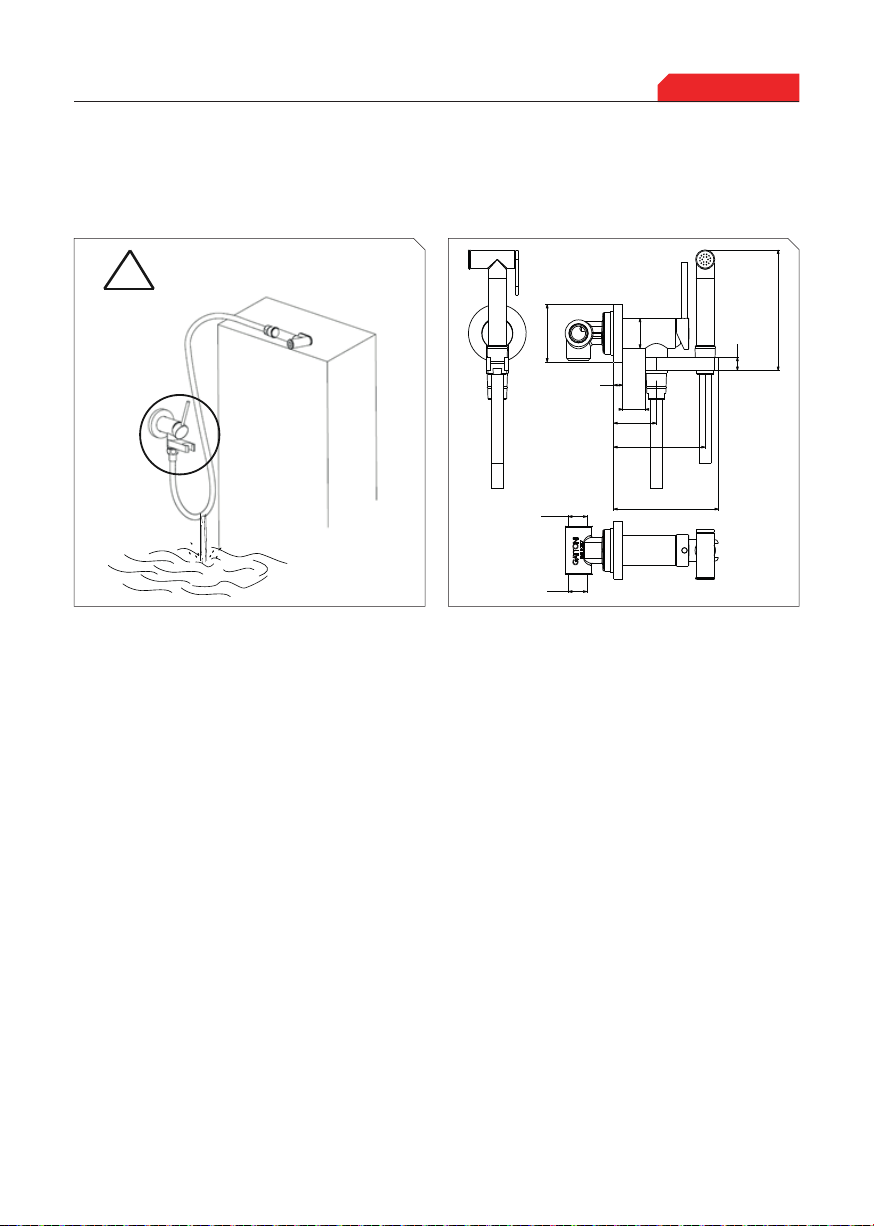
IT Assicurarsi di chiudere sempre l’acqua al
termine dell’utilizzo poichè ci potrebbe
essere una rottura del essibile e
conseguente perdita d’acqua.
EN Make sure to always close the water after
using the shut-o because a break in the
exible may occur and consequently water
loss.
art. RT010
CONSEGUENZE DOVUTE A IMPROPRIO /ERRATO UTILIZZO
CONSEQUENCES DUETO INCORRECT /IMPROPER USE
!
Ø65
Ø34
135.8
15
10
25.5
48
103
118
G1/2”
G1/2”
DIMENSIONI DIMENSIONS
This manual suits for next models
5
Table of contents
Other GATTONI Bathroom Fixture manuals


