GC EUROPE Aadva IOS User manual
GC EUROPE N.V.
Head Office
Researchpark Haasrode-Leuven 1240
Interleuvenlaan 33
B-3001 Leuven
Tel. +32.16.74.10.0 0
Fax. +32.16.40.48.32
info@gceurope.com
http://www.gceurope.com
940623
GC Europe N.V.
Interleuvenlaan 33
B-3001 Leuven
AADVA IOS Intraoral Scanner - INSTRUCTIONS FOR USE
IOS
Intraoral
Scanner
INSTRUCTIONS FOR USE

2
GC AADVA™
IOS
1Table of Contents
1Table of Contents ................................................................................................................................... 2
2Preface...................................................................................................................................................... 6
3Manual for AADVA IOS .................................................................................................................... 7
4Symbols and warnings .................................................................................................................... 7
5Product description........................................................................................................................... 7
6USB port for data storage and Ethernet connection...................................................... 7
7Indications ............................................................................................................................................. 8
8User profile ............................................................................................................................................ 8
9Limitation of patients....................................................................................................................... 8
10 Unauthorised parts ...................................................................................................................... 8
11 Inspection, Repairs and Replacement .............................................................................. 9
12 Odontogram used ....................................................................................................................... 10
13 Copyrights ....................................................................................................................................... 10
14 Intellectual Property Rights -IP........................................................................................ 10
15 Warranty .......................................................................................................................................... 10
16 Limitation of liability................................................................................................................. 11
17 License manager ......................................................................................................................... 11
18 Installation ..................................................................................................................................... 11
19 GC AADVA IOS components .................................................................................................. 11
20 Warnings, safety regulations and other notes........................................................... 18
21 Starting, Terminating and Disconnecting the device ............................................. 21
21.1 Starting the device ............................................................................................................................ 21
21.2 Terminating the device ..................................................................................................................... 21
21.3 Disconnecting the device .................................................................................................................. 21
22 Graphical user interface (GUI)............................................................................................ 21
22.1 Screen layout structure..................................................................................................................... 21
22.2 Settings ............................................................................................................................................. 24
22.3 Help menu......................................................................................................................................... 25
22.3.1 Downloads............................................................................................................................... 26
22.3.2 FAQ.......................................................................................................................................... 26
22.4 User management............................................................................................................................. 26
22.5 Patient database ............................................................................................................................... 27
22.5.1 New Patient............................................................................................................................. 27
22.5.2 Existing patient........................................................................................................................ 27
1
GC Aadva™ IOS

3
GC AADVA™
IOS
22.6 Scan section ...................................................................................................................................... 28
22.7 How to scan ...................................................................................................................................... 29
22.8 Bite scan............................................................................................................................................ 34
22.9 Margin line definition........................................................................................................................ 35
22.10 Bite registration............................................................................................................................ 36
22.11 Restoration tab ............................................................................................................................ 39
22.11.1 Patient tab............................................................................................................................... 39
22.12 Delivery tab .................................................................................................................................. 41
22.13 Attachments tab........................................................................................................................... 42
22.14 Summary tab................................................................................................................................ 42
22.15 Data transfer Tab ......................................................................................................................... 44
23 IOS Cleaning and disinfection procedures ................................................................... 44
24 GC AADVA Cradle Inlays ......................................................................................................... 45
24.1 Insertion and removal....................................................................................................................... 45
24.2 Cleaning and sterilization procedures............................................................................................... 46
25 Safety / Guidelines / Technology...................................................................................... 48
26 Care with the Unit....................................................................................................................... 49
27 Information for electromagnetic compatibility (EMC) .......................................... 50
28 Electrostatic discharge (ESD).............................................................................................. 53
29 Identification plate and labelling ...................................................................................... 56
30 Device specifications and classifications ...................................................................... 56
31 Transport and packaging........................................................................................................ 58
32 Environment................................................................................................................................... 59
33 Troubleshooting........................................................................................................................... 60
34 IOS Customer Service –GC Digital Services Team.................................................. 61
2

4
GC AADVA™
IOS
List of Figures
Figure 1: Monitor movement..................................................................................................................................................... 13
Figure 2: Hand piece/cradle inlay .............................................................................................................................................. 14
Figure 3 : GC AADVA Cradle Inlay .............................................................................................................................................. 14
Figure 4: Scanner Application Device (Hand Piece).................................................................................................................... 14
Figure 5: Monitor Arm............................................................................................................................................................... 15
Figure 6: Transport position ...................................................................................................................................................... 16
Figure 7: Lock/unlock mechanism ............................................................................................................................................. 16
Figure 8: Wheel ......................................................................................................................................................................... 16
Figure 9: Brake mechanism ....................................................................................................................................................... 16
Figure 10: IOS Power switch ...................................................................................................................................................... 17
Figure 11: Back of IOS Cart ........................................................................................................................................................ 17
Figure 12: Ventilation apertures................................................................................................................................................ 17
Figure 13: Screenshot Log-in ..................................................................................................................................................... 22
Figure 14: Screenshot Log-in 2................................................................................................................................................... 22
Figure 15: Screenshot navigation buttons ................................................................................................................................. 23
Figure 16: Screenshot icons ....................................................................................................................................................... 23
Figure 17: Screenshot action features ....................................................................................................................................... 24
Figure 18: Settings icon ............................................................................................................................................................. 24
Figure 19: 'Admin' and 'Log-out' button .................................................................................................................................... 26
Figure 20: User administration.................................................................................................................................................. 26
Figure 21: Screenshot New Patient............................................................................................................................................ 27
Figure 22: Screenshot Existing Patient....................................................................................................................................... 28
Figure 23: Screenshot Scan Section ........................................................................................................................................... 29
Figure 24: Ideal distance ........................................................................................................................................................... 30
Figure 25: Scan parallel to occlusal plane.................................................................................................................................. 30
Figure 26: Scan flow for half arch (Single quadrant) ................................................................................................................. 30
Figure 27: Screenshot screen layout .......................................................................................................................................... 31
Figure 28: Screen layout 2 ......................................................................................................................................................... 33
Figure 29: Screenshot layout 3 .................................................................................................................................................. 33
Figure 30: Screenshot Procedure ............................................................................................................................................... 34
Figure 31: Screenshot Bite Scan................................................................................................................................................. 35
Figure 32: Screenshot Margin Line ............................................................................................................................................ 36
Figure 33: Screenshot Bite Registration..................................................................................................................................... 37
Figure 34: Screenshot Bite Registration 2.................................................................................................................................. 38
Figure 35: Screenshot Bite Registration 3.................................................................................................................................. 38
Figure 36: Screenshot Bite Registration 4.................................................................................................................................. 39
Figure 37: Screenshot Completing Data .................................................................................................................................... 40
Figure 38: Screenshot Restoration Tab...................................................................................................................................... 41
Figure 39: Screenshot Delivery Tab............................................................................................................................................ 41
Figure 40: Screenshot Attachments Tab .................................................................................................................................... 42
Figure 41: Screenshot Summary Tab ......................................................................................................................................... 43
Figure 42: Screenshot PDF form ................................................................................................................................................ 43
Figure 43: Screenshot Data Transfer Tab .................................................................................................................................. 44
Figure 44: Removal of the hand piece ....................................................................................................................................... 45
Figure 45: Removal of cradle inlay ............................................................................................................................................ 46
Figure 46: Identification plate ................................................................................................................................................... 56
Figure 47: Transporting the IOS device...................................................................................................................................... 59
List of tables
Table 1: Settings General _______________________________________________________________________________ 25
Table 2: Settings Scan __________________________________________________________________________________ 25
Table 3: Settings Model ________________________________________________________________________________ 25
3
GC Aadva™ IOS

5
GC AADVA™
IOS
Table 4: Settings Export ________________________________________________________________________________ 25
Table 5: electromagnetic emissions _______________________________________________________________________ 51
Table 6: electromagnetic immunity _______________________________________________________________________ 52
Table 7: Recommended separation distances between portable and mobile RF communications equipment and the AADVA
IOS _________________________________________________________________________________________________ 53
Table 8: Electromagnetic emissions and immunity ___________________________________________________________ 56
Table 9: Device specifications ____________________________________________________________________________ 57
Table 10: Cable specifications____________________________________________________________________________ 57
4

6
GC AADVA™
IOS
2Preface
Dear IOS Customer,
Thank you for purchasing AADVA IOS and its related software from GC Europe n.v.
This device and its software enable you to produce computer-assisted dental
restorations. Improper use and handling can create hazards and cause damage.
Therefore, please read and carefully follow this manual and the relevant operating
instructions. Always keep them within easy reach.
These operating instructions, for the AADVA IOS have been compiled with the greatest
care and contain information which ensures safe operation and long service life. Ensure
that all users read the operating instructions completely and are trained on AADVA IOS.
To prevent personal injury or material damage, it is important to read all safety
information carefully.
In order to master the system safely, you should train on plaster model without
sectioned dies.
Should you discover mistakes and/or a lack of information, GC Europe N.V. would be
pleased to hear your feedback.
The begin date of the warranty is the day of activation of the IOS device.
The GC Europe N.V. AADVA IOS Team
5
GC Aadva™ IOS
Dear IOS Customer,
We would like to thank you for purchasing our GC Aadva Intraoral Scanner.
Our GC Aadva IOS allows you to capture 3D dental impressions.
Please carefully read and follow the instructions for use described in this manual in order to
safely operate the GC Aadva IOS. Improper use of the device will result in personal injury
and hazardous situations.
When multiple users are operating the device, make sure that all users read these
instructions and are trained prior to operating the GC Aadva IOS. We advise you, prior to
scanning a patient, to scan gypsum models without sectioned dies to fully master our GC
Aadva IOS.
Store this manual where you can easily access it when you would need help and/or
information.
The begin date of the warranty is the day of activation of your IOS device.
GC Europe N.V.

7
GC AADVA™
IOS
3Manual for AADVA IOS
The AADVA IOS manual is intended for health professionals (including but not limited to
dentists). The completeness and accuracy of this manual have been tested to the best of
our knowledge. The information within may be subject to change without prior notice.
The unit may be operated only by health professionals (see chapter 8 - "User profile”).
This document is the property and copyright of GC Europe N.V., therefore this manual
may not be used in whole or in part, copied or reproduced in any form without the
express written permission of GC Europe N.V. The information in this manual is subject
to change without notice.
This manual provides information on the proper use of the system, information for the
maintenance, handling of the system components, information on cleaning and
disinfection as well as safety. In addition, instructions for the operation of the system
and for the creation of scans are included. Please thoroughly read and follow all safety
information in this manual before and during use of this device. Keep this manual for
future reference.
4Symbols and warnings
WARNING MESSAGE
Indicates a potentially hazardous situation, which could result in death or serious injury if not
avoided.
CAUTION
Indicates a potentially hazardous situation, which could result in minor or moderate injury if not
avoided.
PLEASE NOTE
Indicates a potentially hazardous situation, which could result in property damage.
5Product description
The GC AADVA IOS creates 3D images of individual teeth or groups of teeth and
generates standard triangulation language (herein after referred to as ‘STL’) files using
software for further machine processing in e.g. dental milling machines.
6USB port for data storage and Ethernet connection
The STL data created can be loaded onto external USB (Universal Serial Bus) storage
through the USB 3.0 ports. Any misuse of data, viruses, data corruption etcetera due to
the uploading of cases via a USB stick is the sole responsibility of the dental professional.
6

8
GC AADVA™
IOS
The USB ports are not allowed to be used with an external power supply. An Ethernet
isolator is included within the system and the Ethernet connection can be used without
an additional isolator.
7Indications
The AADVA IOS is an optical impression system with which the topographical properties
of teeth are recorded. The IOS device can record bite scans and can scan single and/or
multiple elements up to maximum half arch (such as single quadrant and anterior
region).
The obtained scans allow the validation of the preparation, definition of margin lines,
evaluation of bite registration and creation of 3D model. The simulated model can then
be used to create indirect restorations such as veneers, inlays, on lays, single crowns
and bridges of up to 4 elements.
The GC Aadva IOS is not be used to mold or manufacture computer-aided restorations.
Aadva IOS merely provides the digital model and transfers the model data to an external
tool (not part of Aadva IOS).
Other possible uses and applications contrary to the intended use, changes to the
components and/or the installation of unauthorized parts may considerably jeopardize
safety, reliability and function of the IOS. Any of the above will cause the warranty
provided by GC Europe N.V. to void with immediate effect and will transfer responsibility
for personal injury and property damage exclusively to the health professional operating
the IOS.
8User profile
The IOS shall be handled and operated by the health professionals, in compliance with
the national applicable legislation.It is assumed that the users are properly trained and
have clinical experience with popular handsets in dentistry as well as the prevention of
cross-contamination and disinfection procedures.
9Limitation of patients
AADVA IOS should be used with care for:
•Intubated patients;
•Schizophrenia in patients;
•Major depressed or manic depressed patients;
•Patients affected by severe central nervous system pathologies;
•Mentally ill patients;
•Patients with serious or unstable medical illness including cardiovascular
diseases.
•Neurological disease and immunodepressed patients with generalized anxiety
disorder.
10 Unauthorised parts
Copies of high-quality spare parts and additional components have become increasingly
common. Counterfeit devices and/or spare parts are frequently indistinguishable from
7
GC Aadva™ IOS

9
GC AADVA™
IOS
the originals to the naked eye. However,please note that in the case of counterfeit
products, the material may not meet the requirements for health and safety.
In case repair and/or replacement is deemed to be necessary, please read chapter 11 –
“Inspection, Repairs and Replacement”.
The PC component of the AADVA IOS constitutes an integral part of the AADVA IOS and
may not be used for any purposes other than for the functionality of the AADVA IOS
itself. No components (whether hardware and/or software) and/or other applications may
be changed, added or removed.
GC Europe N.V. and/or the GC Europe dealers/distributors approved and appointed by
GC Europe N.V. are responsible for delivering and installing patches, fixes, service packs
and software upgrades related to the installed software through the Aadva Digital Service
Platform (herein after referred to as ‘DSP’) in order to guarantee the proper functioning
of the AADVA IOS during the warranty period or in accordance with the maintenance
contract,if the latter is concluded.
GC Europe N.V. is not deemed to have knowledge of or to take into account the specific
use that will be made by the IOS Customer of the purchased goods, and thus GC Europe
N.V. cannot be held liable for any misuse by the IOS Customer. The IOS Customer is
expected to use the purchased good in accordance with its intended use (See chapter 6 –
“Indications”).
11 Inspection, Repairs and Replacement
Daily inspection by the heath professional:
Daily visual inspection of AADVA IOS includes:
•Intactness/integrity of cables;
•Intactness/integrity of AADVA IOS;
•Unusual running noises, vibrations, etc…
•Correct functioning of all parts;
•Illuminating power of scanner.
If any of the above items is observed, please contact your local GC Digital Services Team
(see chapter 34 –“IOS Customer Service –GC Digital Services Team”)
Maintenance and repair of parts by third parties is forbidden and voids the warranty with
immediate effect. Repair and/or replacements needs to be executed exclusively by GC
Europe N.V. and/or GC Europe authorized third party dealers.
The expected service life of the device is 10000 hours in operation (5 years).
8

10
GC AADVA™
IOS
WARNING MESSAGE
Upon sending/returning the Aadva IOS to GC Europe, it must be cleaned and disinfected in a correct
way. Effective disinfectants consist out of a combination of ethanol and didecyldimethyl-ammonium
chloride. (FD 333 and FD 333 wipes from DÜRR Dental AG1(Bietigheim-Bissingen, Germany).
WARNING MESSAGE
Improper and unauthorized repairs represent considerable danger to the user and will void the
warranty with immediate effect. Only the GC Digital Services Team of GC Europe N.V. and/or
authorized third parties may service the IOS device.
12 Odontogram used
The software uses the international odontogram (FDI).
13 Copyrights
Copyright © GC Europe n.v. All right reserved.
This document is the property and copyright of GC Europe N.V., therefore this manual
may not be used in whole or in part, copied or reproduced in any form without the
express written permission of GC Europe N.V. The contents may only be copied for
private, in-house use.
14 Intellectual Property Rights - IP
All Intellectual property rights to the GC Aadva IOS (including but not limited to patents
and trademarks) are the exclusive property of GC.
Microsoft® , Windows 8®and Windows™ are trademarksof Microsoft Corporation.
15 Warranty
GCE is liable for non-conformity (hard-and software), hidden defects and manufacturing
defects to the Aadva IOS that manifest themselves within a period of one year from the
activation date by the GCE digital services team. The warranty only covers deliveries
made and activations by GCE or an appointed service provider by GCE. Please refer to
the Aadva IOS general terms and conditions for further information.
1FD 333 and FD 333 wipes are products from Dürr Dental. Dürr Dental is not a trademark of GC.
9
GC Aadva™ IOS

11
GC AADVA™
IOS
The user/health professional is solely responsible for the application and the intended use
of the product. For any damage to the product that occurs within the warranty period,
please refer to the Aadva IOS general terms and conditions.
Notice : Any attempt to open the device or service it yourself may cause
damage to the device which may lead to personal injury. Any attempt to open
the device or service it yourself also voids the warranty with immediate effect.
16 Limitation of liability
To the extent permitted by law, GC Europe N.V. rejects any liability for any direct,
indirect or consequential damages or loss of any kind in connection with this product,
regardless of whether the legal demands made are related to assets or liabilities or are of
other nature.
17 License manager
The license manager manages the IOS software licence, which will allow the user to
access and work on the GC AADVA IOS and the GC AADVA DSP.
Depending on the chosen duration of the license, the license will be active for 1 or 3
years. One month prior to the expiration date, a notice will be given to the user, stating
that the license will expire soon. The amount of days left to expiration can be viewed in
the settings menu.
The user can extend their license by paying the invoice sent by GC Europe N.V. If the
invoice is not paid, certain functions will gradually be disabled until it reaches the phase
in which only previous cases can be accessed and viewed.
18 Installation
The AADVA IOS must be installed by IOS experts from GC Europe N.V. or authorized
third parties. The software is installed before the device leaves the factory. After the
installation the IOS expert will train the user to achieve the best results with the GC
AADVA IOS.
The AADVA IOS should be connected only to a power supply of the same voltage as the
one indicated on the voltage display, and can only be operated on single-phase AC
supply.
WARNING MESSAGE
The IOS device should not be used adjacent to or stacked with other equipment, if this is
necessary the IOS device should be observed to perform normally before use on
patients.
19 GC AADVA IOS components
10

12
GC AADVA™
IOS
The AADVA IOS system consists of hardware and embedded software.
WARNING MESSAGE
All components are delivered non-sterile
HARDWARE COMPONENTS:
Hardware components of the AADVA IOS are:the wheeled cart with integrated
computer, safety power supply, touch-screen monitor, scanner application device and
cradle for the support of the scanner application device.
CART:
The cart consists of a metal base frame with PU coated thermoformed plastic housing
which is coated with structure lacquer. The cart also includes a vertically movable
monitor arm with swivel joint to enable the vertical pivot of the monitor. The monitor
arm can be locked in an upright position to put the cart in transport mode. Four wheels
with an easily accessible brake system based on a, one-touch technology, allows
sufficient mobility and fixation in the dental office respectively.
COMPUTER:
The high-performance computer has a graphics card on which the parallel graphics
processes run in real time. Connectivity is provided by an Ethernet port, two USB 3.0
ports and one SD card port. The operating system and user program must not be
modified by the user. Software updates are managed by GC Europe N.V.
POWER SUPPLY:
A medical PC power supply is built in accordance with EN60601-1 for the electrical supply
to ensure the users' and patients' safety requirements.
TOUCH SCREEN MONITOR:
The monitor is a Touch LCD monitor. The monitor meets the requirements of EN60601-1
as well as major international requirements. It is used for the display and control of the
acquired images, scans and videos. The touch screen is used to interact with the system
software and allows the entry of patient information, assignments, etc.
SCANNER APPLICATION DEVICE (HAND PIECE):
The application device for scanning is an optic-electronic device that captures high-
resolution video images in real time during a patient scan. It is connected to the cart via
a USB 2.0 high-speed cable for data transfer. The application device comprises of optics
and sensor electronics, which detect the real-time images which can then be further
processed by the computer.
Caution
11
GC Aadva™ IOS

13
GC AADVA™
IOS
The application device is fragile, please use caution when handling.
CRADLE FOR SCANNER APPLICATION DEVICE
The cradle for the application device for scanning is an open case for the placement of
the hand piece in resting position. It contains a heating plate responsible for the
maintenance of the temperature of the glass plate at the head of the hand piece in order
to avoid fogging when used in the mouth.
Please note
The hand piece may not be actively scanning when placed into the cradle.
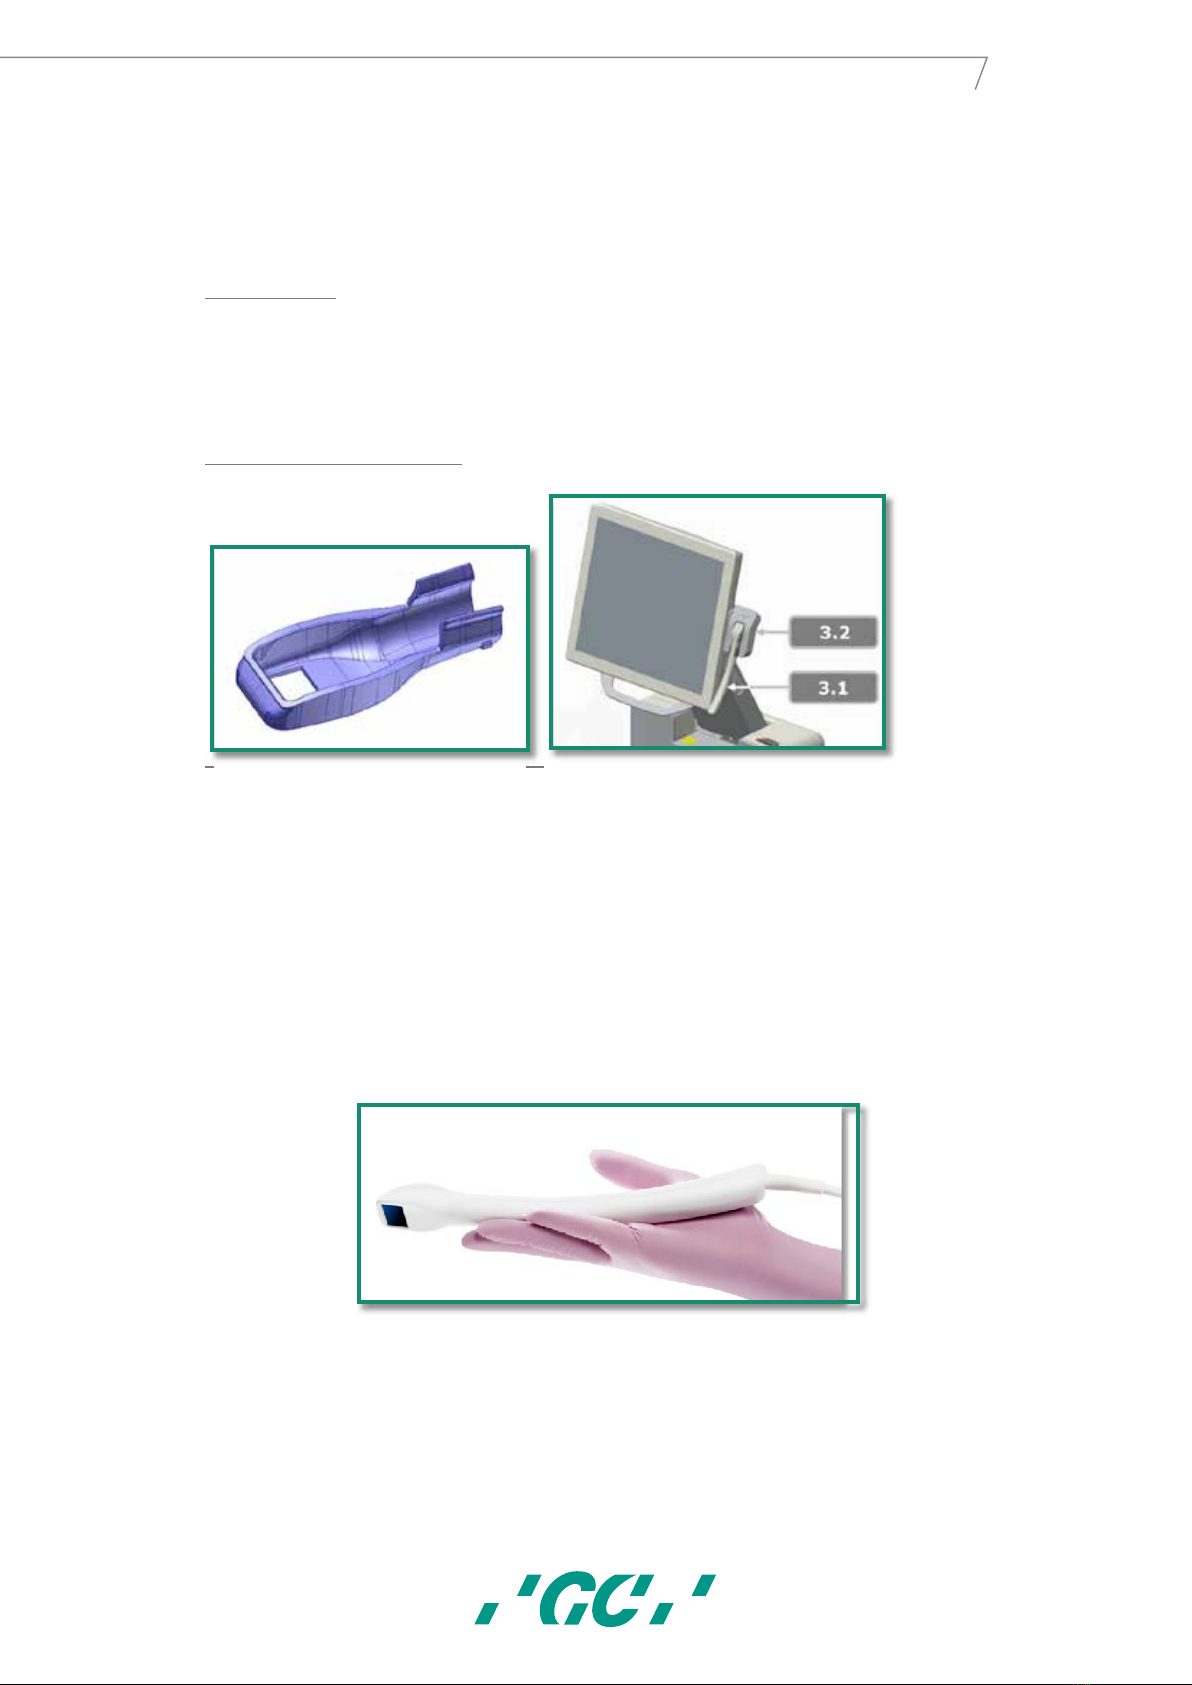
FIGURES WITH DESCRIPTIONS
1. Monitor
1.1. Monitor Movement
1.2. Stylus pen
1.3. GC AADVA Cradle Inlay
2. Scanner application device (hand piece)
3. Monitor arm
3.1. Power button, USB ports (x2),SD Card port (x1)
3.2. Monitor arm locking
4. Wheels and brake
5. Power switch, LAN connector, power plug and label
6. Ventilation apertures
1 Monitor
1.1 Monitor Movement
Figure 1: Monitor movement
The monitor can be easily moved with 2 handles located on the upper and lower side of
the monitor (Fig. 1). The system is self-locking and adjusted for a smooth two-hand
12
14
GC AADVA™
IOS
operation within a 160° angle. The upper monitor handle can also be used for
transportation of the GC AADVA IOS device in the transport mode with the monitor arm
in a locked position. (See chapter 31 – “transport and packaging”).
1.2 Stylus Pen
The accessory stylus pen is a useful accessory tool for those who prefer not to work with
their finger to manipulate the touch screen. The special-designed head of the stylus pen
reacts easily with the monitor. For further information, please see the instructions for use
document, accompanied with the acquired stylus pen.
1.3 GC AADVA Cradle Inlay
In between patients, the hand piece (Fig. 4) can be stored in the cradle (Fig. 3.2). The
cradle is self-locking and can be easily moved upwards and downwards at +/-30°.
Before mounting the hand piece into the cradle inlay part (Fig. 2), the cradle inlay needs
to be mounted into the cradle which is easily done by the locking brackets at the rear
lower side of the inlay. When mounting the hand piece into the inlay, two stabilization
brackets will support the holding mechanism and the backside of the inlay.
2 Scanner Application Device
The scanner application device (Fig. 4) is working with a stereo-camera system and is
based on a real-time scanning system. While scanning, a status LED light is shining on
the back of the hand piece, indicating the scan is operational. The scanner automatically
starts to scan once the start button is pushed on the GUI (Graphical User Interface, also
Figure 2 : GC AADVA Cradle Inlay
Figure 3: Hand piece/cradle inlay
Figure 4: Scanner Application Device (Hand Piece)
13
GC Aadva™ IOS
15
GC AADVA™
IOS
referred to as the screen or monitor) or by a simple up-and-down hand gesture. The
scanner device is an ergonomic,optimized device with accessibility to move in the mouth
for scanning the lower -and upper jaw, and recording the bite registration. After
preparing the IOS device for scanning,take out the scanner from the GC AADVA Cradle
Inlay and follow the instructions on the GUI (Screen) until the start button needs to be
selected. After the scan procedure,clean and disinfect the hand piece (See chapter 23 –
“cleaning and disinfection procedures") and place the hand piece back into the cradle.
The button, located on top of the scanner application device is redundant and not active
in this version of the IOS device.
3 Monitor Arm
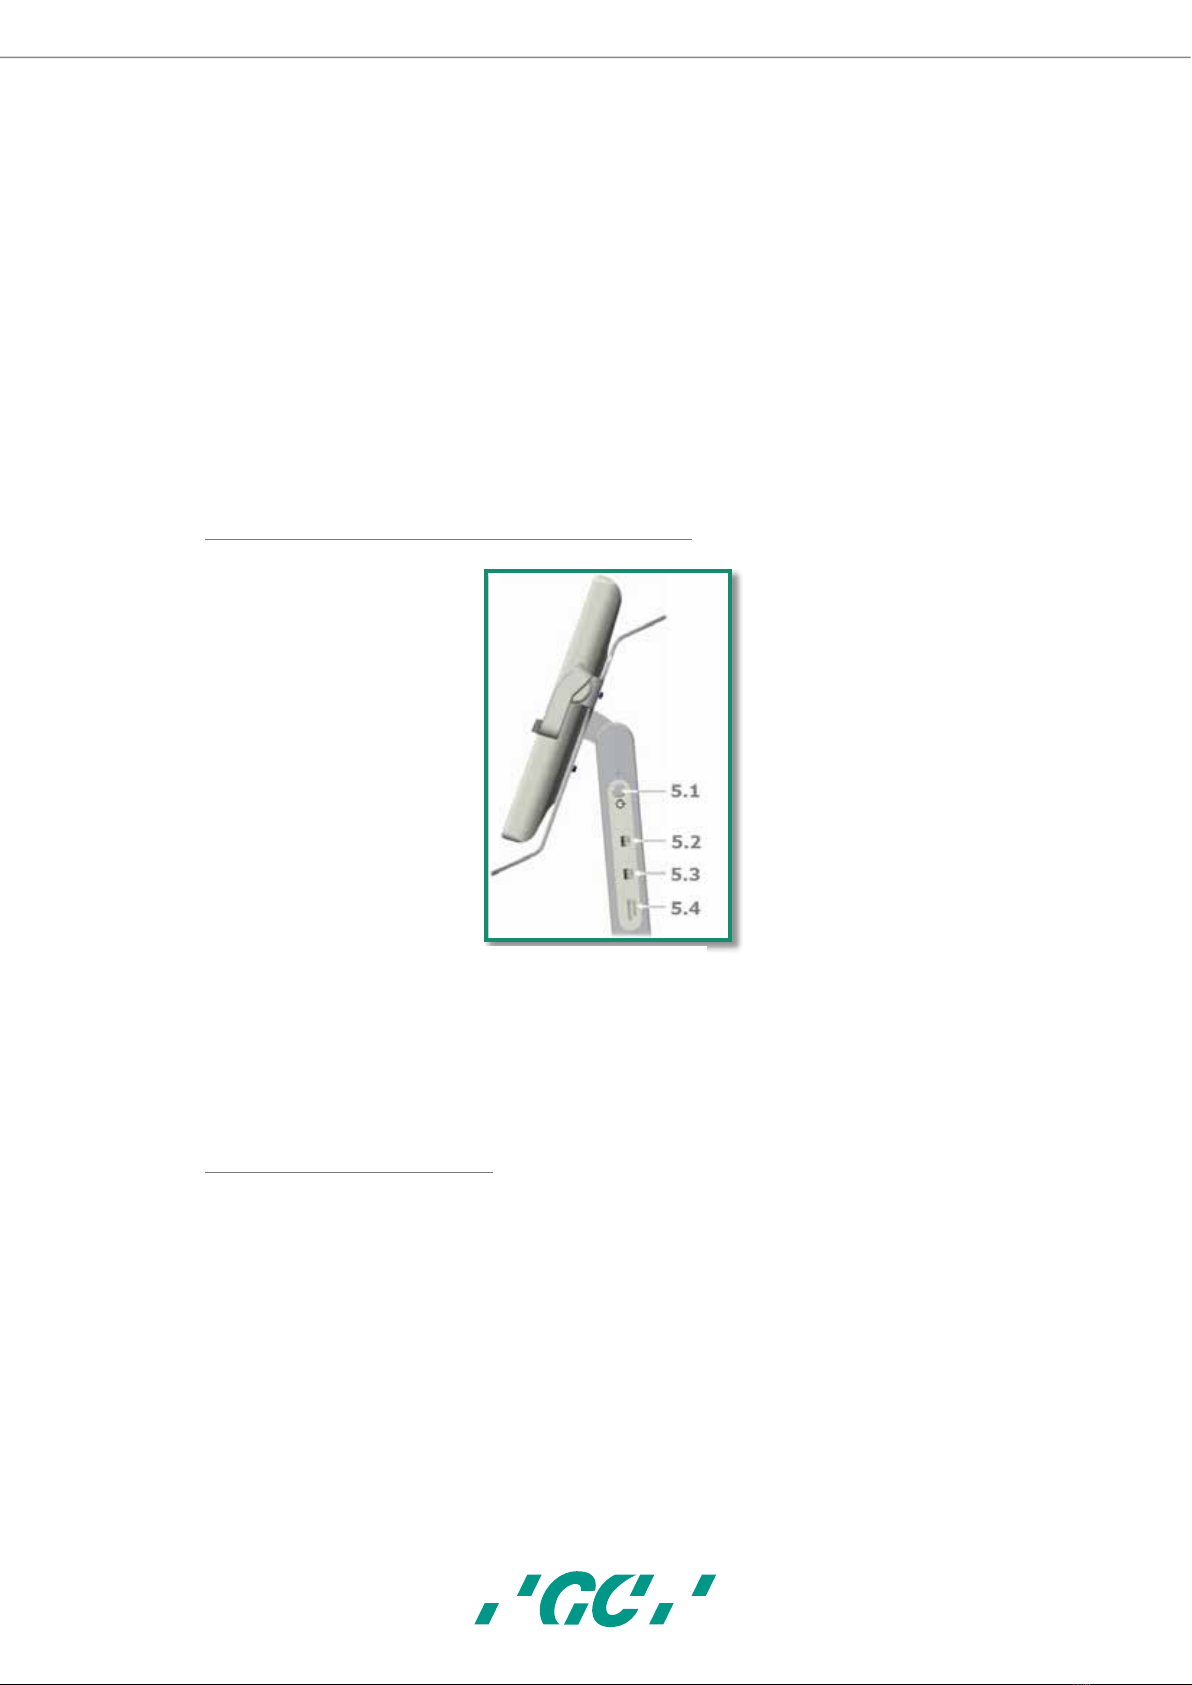
3.1. Power Button, USB Ports (x2), SD Card Port (x1)
The AADVA IOS will be turned on/off by pressing the power button (Fig. 5.1) which is
located on the right side of the monitor, seen from the front view. Once the ‘I/O’button
is pushed, the GUI will be directly shown on the monitor. The GC AADVA IOS also has
the possibility to connect with USB memory sticks on two USB 3.0 ports (Fig. 5.2 and
5.3), which are also suitable for USB 2.0 connections. You will also find one SD card slot
(Fig. 5.4).
Figure 5: Monitor Arm
14
16
GC AADVA™
IOS
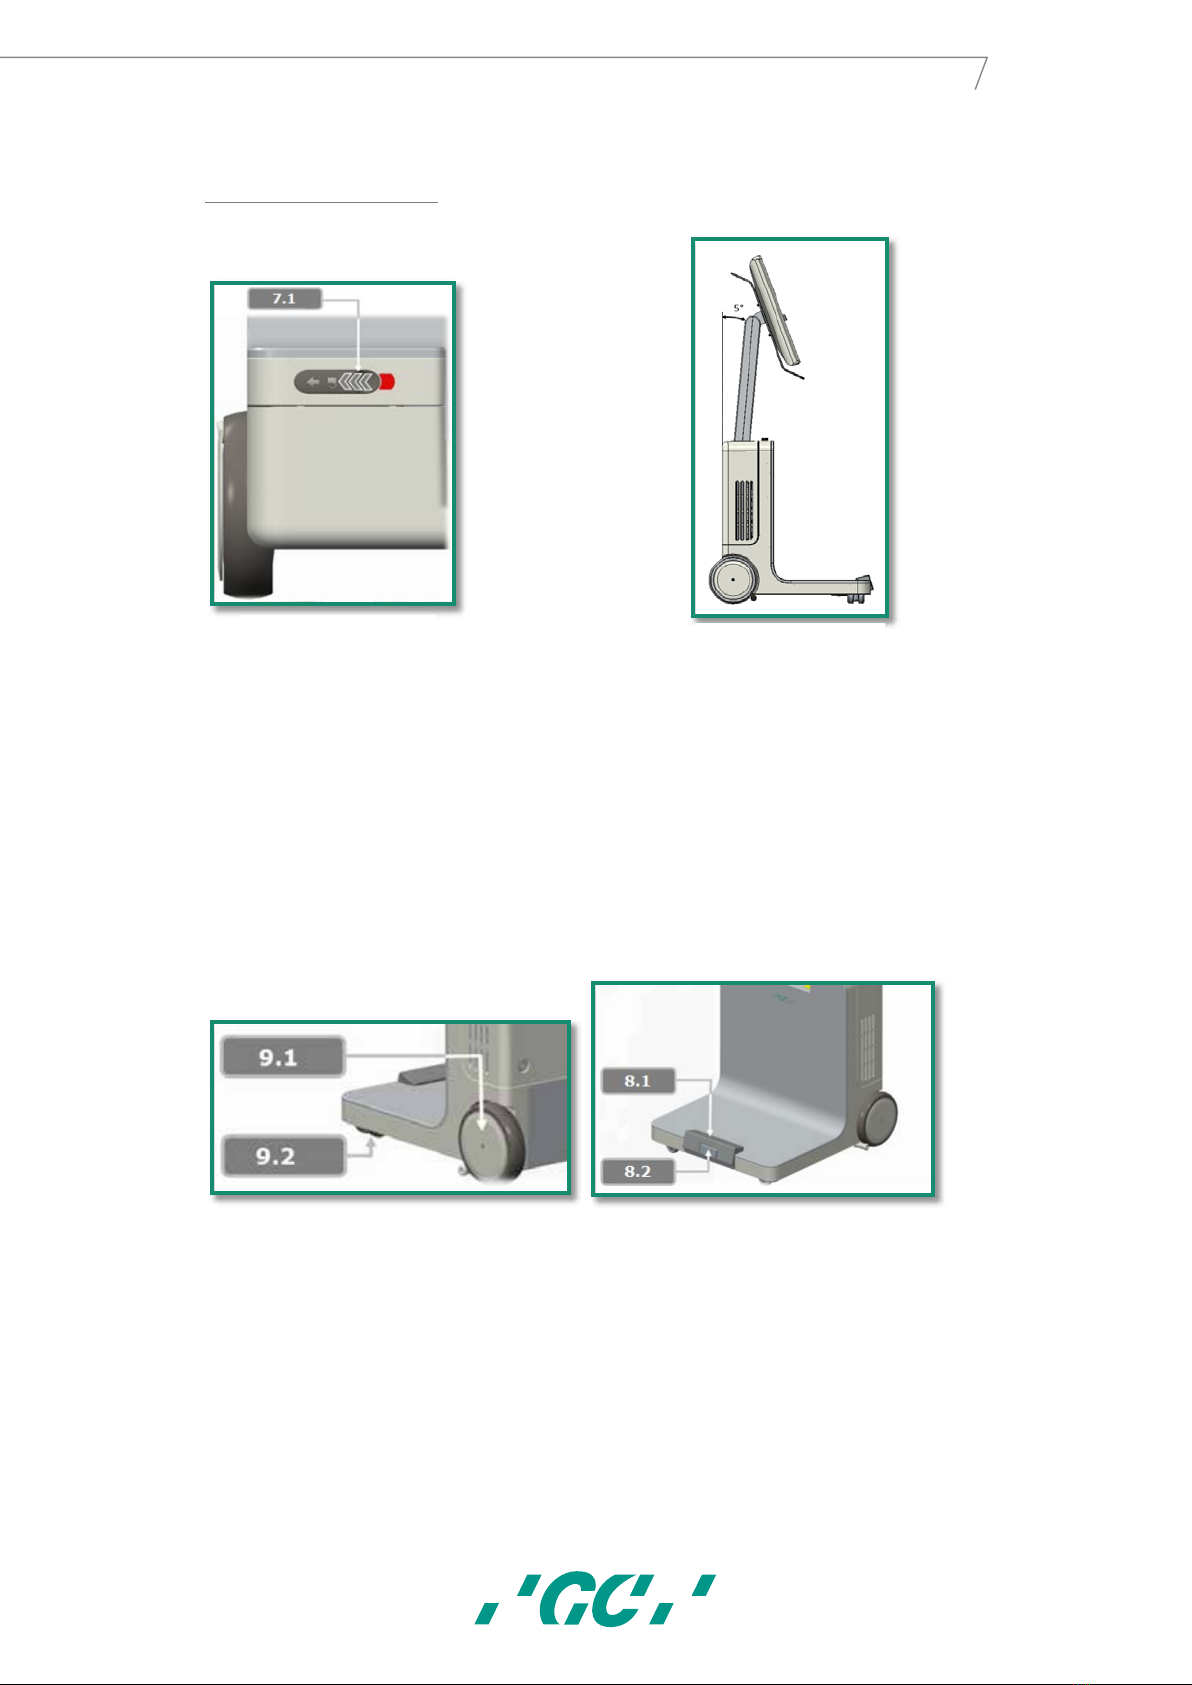
3.2. Monitor Arm locking
Before bringing the monitor arm to the transport position,slide the lock button to the left
(Fig. 7.1). The lock button is located on the upper side of the front cover.Once the
monitor arm is in the correct transport position (5°), release the lock button. Once you
have the correct transport position, the red band will disappear which indicates the
monitor is locked correctly. When moving the monitor arm to the working position push
the lock button again, move the monitor arm forward and release the locking button until
the red level disappears.
4 Wheels and Brake
The GC AADVA IOS consists of two radial turning front wheels (Fig. 9.2) for easy
movement and turning the device with the touch of your foot. The device also has two
back wheels (Fig. 9.1) which are fixed. By pushing the brake lock pedal (Fig. 8.1)with
your foot, the back wheels of the IOS will be immovable and the device will have a
stable, locked position. By pushing the release button (Fig. 8.2) the brake will be
released and the GC AADVA IOS can be moved again. The bottom rubber part is enabling
the operator to slightly adjust and fine tune the device into correct position.
Figure 7: Lock/unlock mechanism
Figure 6: Transport position
Figure 8: Wheel
Figure 9: Brake mechanism
15
GC Aadva™ IOS
17
GC AADVA™
IOS
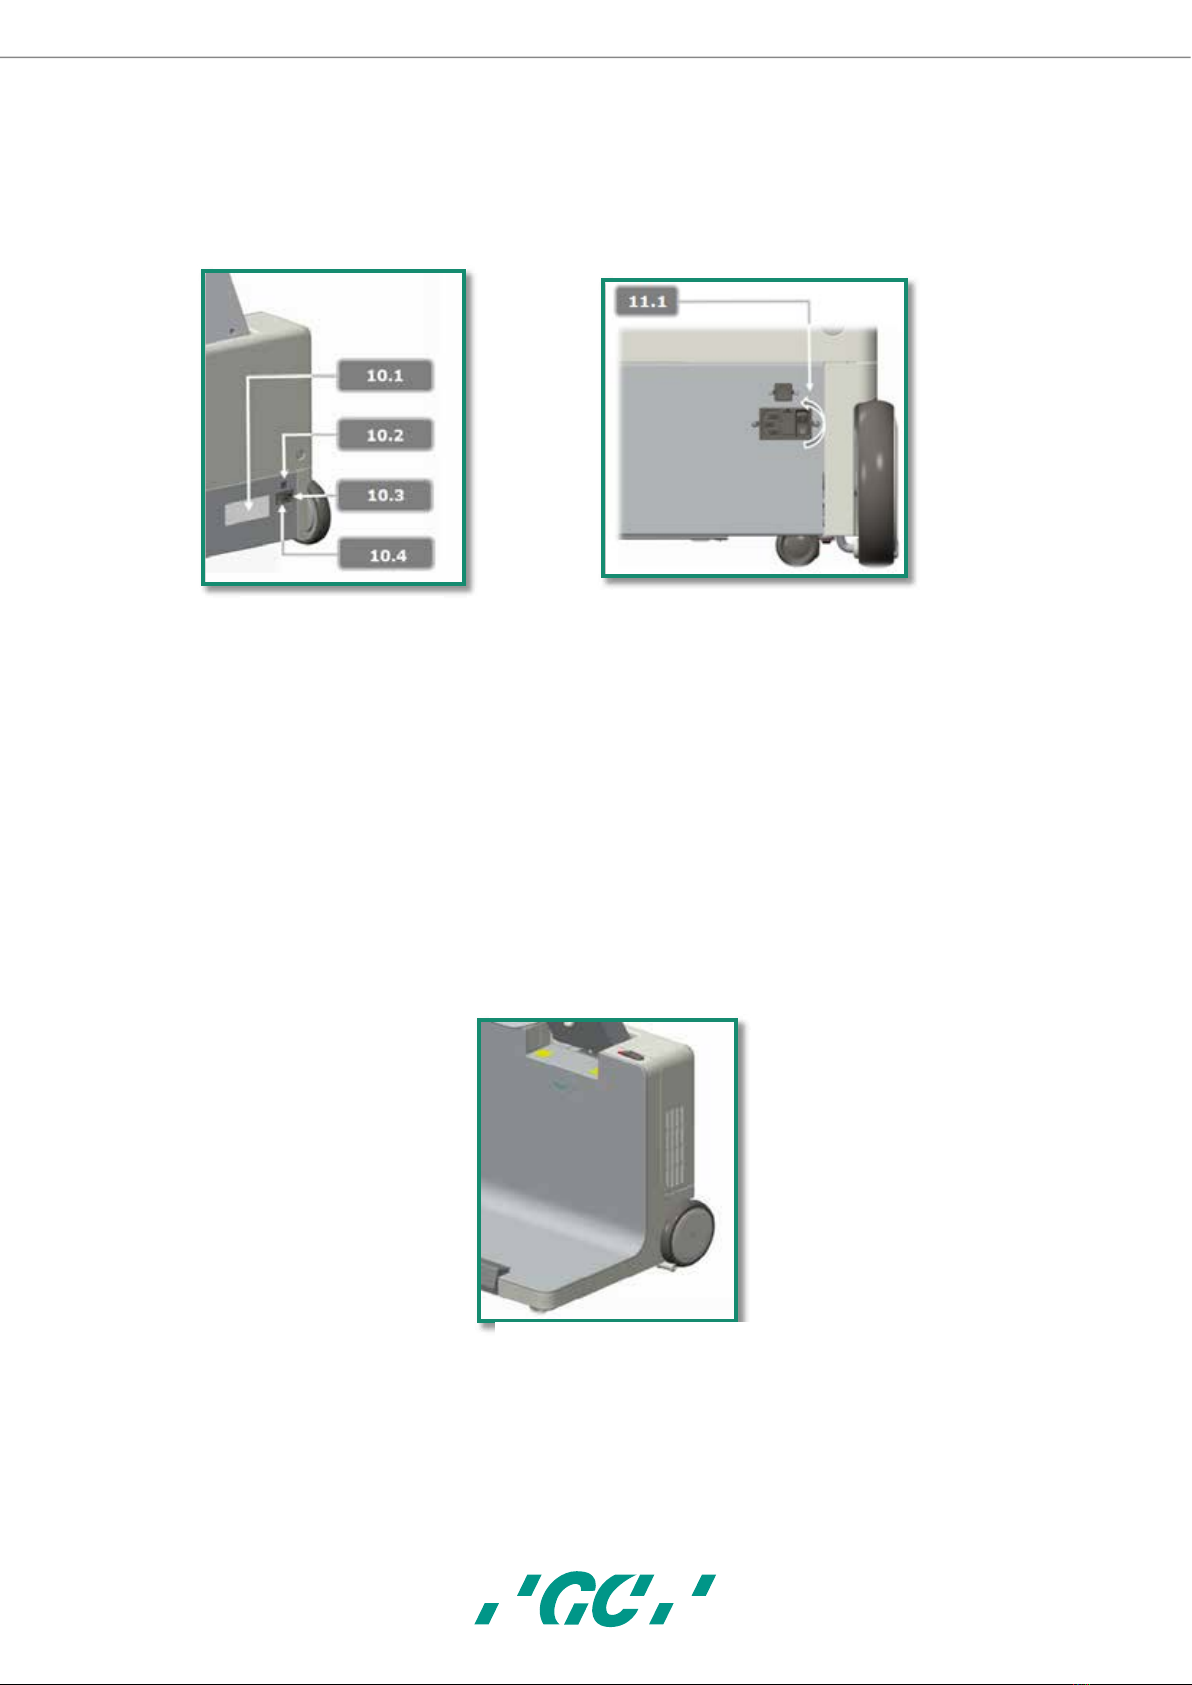
5 Power Switch, LAN connector, Power Plug and Label
To provide the device with electricity, the accompanied power cable must be connected
to the device by connecting the power cable with the power outlet. (Fig. 10.4)The power
switch (Fig. 10.3 and 11.1) is located at the backside of the IOS and needs to be flipped
to enable the power.
For making a connection to a local area network, the GC AADVA IOS can be connected
through a LAN connector,also located on the back of the device (Fig. 10.2). The product
label with according technical information can be found on the left side of the power
outlet (Fig. 10.1).
6Ventilation apertures:
For cooling the system, fans are installed inside the GC AADVA IOS device and will blow
hot air out of the ventilation apertures on the right and left side of the housing cover.
Figure 11: Back of IOS Cart
Figure 10: IOS Power switch
Figure 12: Ventilation apertures
16

18
GC AADVA™
IOS
PLEASE NOTE
Do not cover these areas, do not disturb the cooling process and clean the apertures at
least once per month or anytime there is noticeable contamination.
20 Warnings, safety regulations and other notes
WARNING MESSAGES
To reduce the risk of electrical hazards:
•Check the application device and the system (cart screen) for physical damage
before each use;
•The AADVA IOS is not to be operated under any circumstances if the power cord,
plug or housing is visibly damaged;
•Never attempt to remove the plug from the wall socket or plug it in if your hands
are wet;
•The system has 2 available USB ports. Do not connect any other devices,
including USB hubs and excluding USB memory sticks, to these connectors;
•If the cart is damaged by a fall or if the cables are damaged, disconnect the
AADVA IOS from the power supply before it is repaired;
•Look for loose parts, sharp edges, as well as wear and damage that could affect
the proper use of the scanner;
•If there is any visible damage or if the device is not working properly please
consult our customer service: the GC Digital Services Team (see chapter 34 –
‘IOS Customer Service –GC Digital Services Team’)
•To ensure safe shutdown and disconnection of the device, first,push the power
button at the side, on the flexible arm of the device and secondly,flip the main
power switch on the back of the device. Now,the cable can be disconnected from
the wall socket and the device. (Please also read chapter 21 –‘Starting,
terminating and disconnecting the device’)
•Do not handle liquids (E.g. beverages of cleaning agents in the immediate vicinity
of the GC Aadva IOS. Do not spill liquids on the system as this can result in
personal injury (e.g. skin burns, heart rhythm disturbance…)
To reduce the risk of electrical and fire hazards:
•Only use the power cord accompanied with the IOS device. Do not replace this
cable yourself, please contact our GC Digital Services Team in case of loss or
damage.
•Only use an earthed shockproof wall socket. Do not use extension cords or
multiple-socket plugs;
•The electrical components or cables must not be damp or wet;
•The scanner must not be connected to an uninterruptible power supply (IJSV).
•Do not use an adapter for the power supply;
•Do not try to open the cart's housing or perform maintenance on the device
yourself;
17
GC Aadva™ IOS

19
GC AADVA™
IOS
•Always contact the GC Digital Services Team or authorised GC Europe N.V.
service personnel
•Do not make any modifications to parts of the AADVA IOS;
•Do not place the unit in locations where it is difficult to unplug the power cord
from the outlet.
To reduce the risk of fire hazards:
•Do not use the scanner application device in the presence of a flammable
anaesthetic mixture with air, oxygen or nitrous oxide;
•After cleaning and disinfection it is necessary to ensure that the system is
completely dry;
•The system is not intended or designed for use in outside areas or humid
environments.
To reduce risks of cross-contamination:
•Please read and follow the instructions for cleaning and disinfecting in this
Manual;
•Disinfect the application device prior to every use, including the first use. See
Cleaning and Disinfection session (see chapter 23 -“Cleaning and Disinfection
procedures”)
•After each patient, clean the touch screen, the monitor frame, the housing of the
application device and any other parts that may be contaminated.
•Always store the hand piece in the sterilised GC AADVA Cradle Inlay.
•Use personal protective equipment (PPE).
PLEASE NOTE
To reduce risks from impacts or pressure:
•The cart must not be exposed to any impacts;
•The locking mechanism of the rollers must be enabled when using the system;
•The cart must always be moved under control, especially on hard floors;
•It may only be lifted up from the base. Lifting of the cart from the side panels,
front or back covers or from the monitor is not permitted;
•The trolley is not to be lifted from the handles. The handles are designed to pivot
the monitor or to move it in the transport position;
•The system must always be lifted by two people (e.g. in transit over high
thresholds, steps or in vehicles);
•The power cord and the connecting cable of the handset must be placed so that
they do not create a tripping hazard.
•Position the device in such a way, that all the buttons and switches are easily
handled and are easily accessible.
•Do not place the IOS device in a corner.
18

20
GC AADVA™
IOS
Risk reduction of environmental impact:
•Follow the local regulations when disposing of all electronic equipment parts and
related spare parts;
•Ensure that the disinfectants used are disposed of in accordance with the
applicable law. Please refer to the material safety data of the used disinfectant
for more detailed information.
PLEASE NOTE
In order to reduce the risk of damage to the GC AADVA IOS, please read and follow the
following instructions.
To prevent damage to the system:
•The device may only be used by qualified personnel (see chapter 8 – “user
profile”)
•The power switch may only be operated;or the plug of the GC AADVA IOS may
only be removed from the power outlet;after you have logged out and have shut
down the system;
•Make sure that the ventilation slots are not covered or otherwise blocked, and do
not place items in an enclosure around the device;
•The air intake must not be blocked;
•The scanner must not be connected to an uninterruptible power supply (USV).
•Existing connections to the GC AADVA IOS may not be interrupted or otherwise
modified;
•The start switch on the monitor arm must not be pressed and held;
•Do not use any ammonia-based cleaners on the touch screen, the screen frame,
the application device, the associated cable or the cart's surfaces;
•Do not pour any liquid on the screen, the screen frame, the application device or
its cable or on the cart's surfaces;
•Make sure that the power cord is unplugged before moving the system;
•Plugging in the cable and turning on the system are the only performance or
maintenance-related activities carried out by the user for the GC AADVA IOS. If
the system does not function properly, please contact IOS Customer Service;
•The installation and use must be carried out in a temperature range from +10 °C
to +40 °C.
•During storage and operation of the scanner, ensure that the limits for
temperature, humidity and height are observed.
•Make sure that the power cord is connected to the IOS device in a way that the
IOS device has the freedom to be moved without pulling out the power cord.
To prevent damage to the application device:
The scanner application device is a high-precision optoelectronic instrument. Improper
handling of the scanner application device, e.g. dropping, shaking or bumping can lead to
malfunction or damage. Respect the following basic guidelines:
•Always use the scanner application device with great care;
•If you are not using the application device, place it in the designated Cradle;
19
GC Aadva™ IOS
Table of contents
Popular Dental Equipment manuals by other brands

Gendex
Gendex ORTHORALIX 8500 Operator's manual

Aseptico
Aseptico ADC-02CF Setup guide

Ugin
Ugin DUCATRON QUATTRO Instructions for use

Miele professional
Miele professional PG 8581 operating instructions

Durr Dental
Durr Dental VistaScan Perio Plus Installation and operating instructions

Woodpecker
Woodpecker UDS-K LED instruction manual

Anthogyr
Anthogyr SAFE RELAX DCB 6950C Instructions for use

dentalfarm
dentalfarm SHINING BOX User and maintenance manual

Fona
Fona CDRelite B2272100 user guide

Fona
Fona XDG Service and installation manual

Dabi Atlante
Dabi Atlante Spectro 70X Series owner's manual

Belmont
Belmont Quolis Q5500 Maintenance and adjustment manual


