dentalfarm SHINING BOX Operating instructions

POLISHING UNIT WITH EXTRACTOR
SHINING BOX
USER AND MAINTENANCE MANUAL


ISTRUCTIONS MANUAL FOR INSTALLATION,
USE AND MAINTENANCE
INDEX
1. Introduction.............................................................page 3
2. Guarantee ................................................................page 3
3. Warnings...................................................................page 4
4. Information and useful tips ...............................page 4
5. Materials ...................................................................page 4
6. Equipment ...............................................................page 4
7. Technical features .................................................page 4
INSTALLATION
8. Installation ...............................................................page 5
9. Electric system........................................................page 6
USE
10. Controls ..................................................................page 6
MAINTENANCE
11. Maintenance ........................................................page 7
11.1 Cleaning
12. Problems and solutions....................................page 7
13. Spare parts ............................................................page 8
14. Safety.......................................................................page 8
15. Demolition and waste disposal .....................page 8
1. Introduction
Congratulations and thank you for choosing DEN-
TALFARM products.
This manual concerns the polishing unit exhaust hood
models A110, A110C. It has been developed by
DENTALFARM to assist operators as far as the use of the
appliance is concerned and to make its commissioning and
use easier.
Each exhaust hood is provided with a copy of this manual
and it is necessary to follow the instructions contained
herein to ensure the correct operation of the unit.
Note:
Dentalfarm reserves the right to change the features of
the models
and
the
accessories
supplied
for
technical
or
commercial reasons without being forced to update
this publication promptly.
2. Guarantee
DENTALFARM guarantees that the safety and functionality
of this polishing unit exhaust hood has been tested
by the manufacturer.
The twelve-month guarantee includes the free repair or
replacement of faulty parts caused by material or
workmanship defects.
The guarantee does not cover travelling or delivery costs.
The guarantee shall not be applicable in the event the
appliance is not used according to installation, use and
maintenance instructions.
DENTALFARM shall not be held responsible for further
direct or indirect damage or in case of a suspension in the
use of the appliances.
DENTALFARM declines any liability whatsoever for
damage due to an improper use of the exhaust hood, as
well as by any alterations made to it.
DENTALFARM Srl
via Susa, 9/A
10138 Torino, Italy
Tel. +39 011 4346588
e-mail: info@dentalfarm.it
A.E.E. Register: IT08020000000917
No part of this manual may be reproduced without the prior permission in writing of DENTALFARM Srl MI 18 A110 R00 3

3. Warnings
These polishing unit exhaust hoods models A110, A110C,
A110S, A110CS have been designed and manufactured for
use by gold-smiths, dental technicians or in similar
laboratories and cannot be used in any other
environments.
The unit shall be used by quali sta only and
exclusively for the suction of dust produced when polishing
manufactured products. It is necessary to remember that
the exhaust hoods receive a 220 V power supply and all
the necessary precautions.
Make sure that the existing electric system is in conformity
with current standards.
Disconnect power supply every time it is necessary to opera-
te on the interior of the unit.
Do not use the hood for other purposes than those
described in the instructions for use and in the brochure.
Non-conformity with the provisions contained herein will
cause the immediate forfeiture of any guarantee rights.
4. Information and useful tips
The polishing unit exhaust hood is delivered already
inclusive of all components. Use special trolleys for
transport and do not overturn the carton.
Remove the exhaust hood from the carton and dispose of
packaging according to current regulations.
Note: Dentalfarm shall not be held responsible for packa-
ging left in inappropriate places.
Once the packaging has been removed from the exhaust
hood, check that all parts are intact; in case of broken or
damaged parts attributable to the carrier, advise the latter
immediately and notify by registered letter with return
receipt both, DENTALFARM and the forwarding agency.
Make sure that all components and complementary
accessories are included as listed is the delivery note.
In case of requests, remember to state the purchase date,
model and serial number shown on the data plate. DEN-
TALFARM shall be free from any liability whatsoever regar-
ding third parties if the data plate should be removed
from the appliance.
5. Materials
Hood structure made from electrogalvanized plate, 10/10
mm thick, with epoxy powder coating, oven-dried at
210°C.
The exhaust motor installed is manufactured by EBM-PAPST
- GERMANY. This model is equipped with
containers and bags in which dust is collected.
Dust elimination is ensured by 2 (one on each
exhaust outlet) in conformity with standard B.I.A. ZH1/487
6. Equipment
The polishing unit exhaust hood comes equipped with the
following:
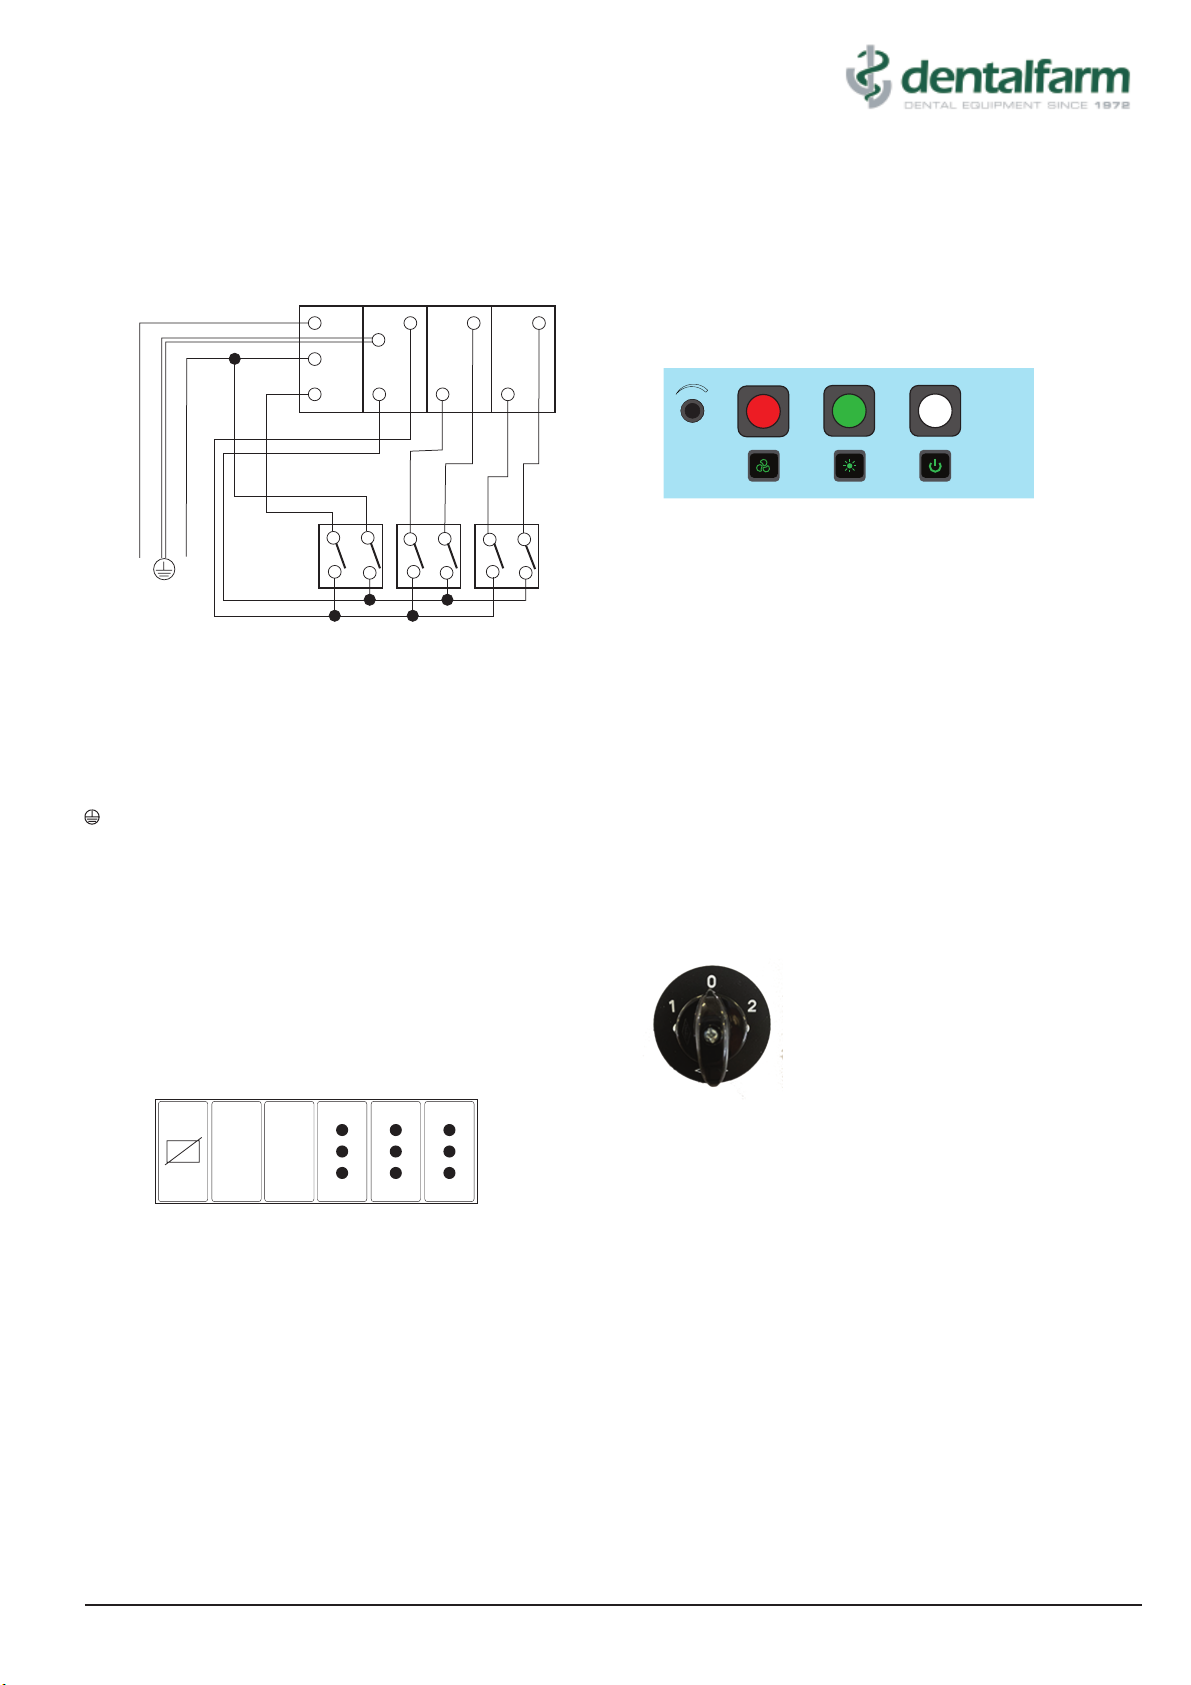
•exhaust motor with speed regulator
•2 B.I.A. ZH1/487
•LED lighting
•polishing connection socket (A110 / A110C)
•recessed polishing lathe (A110S / A110CS)
•adjustable protective screen
•2 ribber trays
•working surface covered with stainless steel
•stand with drawer and inner basin on model A110C
•instructions manual (that shall always be provided with
the appliance, even in case of second-hand sale)
•guarantee (applicable as from the date of
purchase)
•conformity declaration
7. Technical features
Power rating........................................................................230 V
Frequency ...................................................................... 50/60 Hz
Max. absorbed power (A110 / A110C)........................200 W
Max. absorbed power (A110S/ A110CS) ...................600 W
Fuse ..........................................................................16 A - 250 V
Power cord ..............................................................3 x1,5 mm²
Max. load of socket for connection
of polishing late ......................................................................1500 W
Maximum size in mm :
models A110 / A110S .................W. 730 x D. 550 x H. 460
models A110C / A110CS ............W. 730 x D. 550 x H 580
No part of this manual may be reproduced without the prior permission in writing of DENTALFARM Srl MI 18 A110 R00 4

Unscrew the lid and remove it to reach lter holders, led-
light and the wiring system.
INSTALLATION
g. 1. Parts of the exhaust hood
g. 2. Lid
g. 3 Inside from top view
exhaust
mouth
polishing
unit socket
lters
LED light
fuse position
lid
controls
screen
dirt tray
space for polishing
unit positioning
8. Installation
Prepare the electrical connections (16A socket).
Prepare an extremely stable top or rather a stand at the
desired height (recommended height: min. 85 max. 105
cm. from the oor) for the installation of the unit.
Fit the two dirt trays near the suction holes.
Connect to power supply (220 Volt) and make sure that the
main switch is OFF.
Fit the polishing unit in the middle of the exhaust hood and
connect it to the power supply (see g. 1).
Lift the protective screen carefully until it is in a safe
position to protect the operator's face.
Switch on the exhaust hood only once the polishing unit is
operating; do not operate it unnecessarily.
No part of this manual may be reproduced without the prior permission in writing of DENTALFARM Srl MI 18 A110 R00 5

USE
2
2
3
3
8
8
1
18181
6
6
4
4
5
5
7
7
2
L
220 V
N
F P-1
I-1 I-2 I-3
P-2 P-3
g. 4 Wiring diagram
g. 5 Internal electrical distribution system diagram
g. 6 Control buttons
g. 7 Polishing lathe selector switch
9. Electric system
Legend
Line 220 V
L Phase wire (blue)
N Neutral wire (brown)
Earth wire (yellow/green)
External control panel (buttons)
I-1 ON/OFF main switch
I-2 Neon light switch
I-3 Exhaust motor switch
Internal electric system box
A Fuse 16 A
B LED light connection
C Polishing unit connection
D Exhaust motor connection
SUCTION
POWER
ABC
D
10. Controls
The control buttons are on the front right hand side of the
exhaust hood.
The functions are the following:
A White switch (ON-OFF)
To turn on and o the electric circuit of the exhaust
hood
B Green switch (light symbol)
To turn on and o the LED strip light
C Red switch (fan symbol)
To turn on and o the exhaust motor
D Black knob
To regulate the suction speed
Models A110S and A110CS equipped with an integrated
polishing lathe have the speed selector (g. 7) next to the
control panel.
Functions:
0 OFF
1 Starting at 1400 rpm speed
2 Starting at 2800 rpm speed
The manufacturer's instructions are provided with the
machine
No part of this manual may be reproduced without the prior permission in writing of DENTALFARM Srl MI 18 A110 R00 6
A B C D

11. Maintenance
Any controls or maintenance operations shall be
carried out when the appliance has been unplugged. An
improperly operation may be a source of danger.
Dust lter
The periodical control of the lter status is necessary for
the exhaust hood to operate properly.
The dust lters can be reached by unloosing the screws on
the side of the hood cover and removing the latter.
Replace the lter with an original spare part.
Warning!
An incorrect installation of the lter may cause
suction problems and damage the exhaust motor.
Fit the hood cover back on and tighten the previously
removed screws.
LED light
This maintenance operation must be performed only by
qualied personnel.
To replace proceed as per the replacement of the lter.
The LED stripe can be reached by opening the cover of
the exhaust hood (see g. 2-3).
11.1. General cleaning
Clean the hood periodically without using any abrasive
cleaner. Avoid ammoniac detergents.
Use a soft damp cloth to clean the safety glass screen
and the lamp shield. Do not scratch the surface or use
solvents that opacify the screen.
12. Problems and solutions
Some inconveniences may aect the proper operation of this
exhaust hood.
Special maintenance operations shall be performed only
by experts who have been authorised by our company.
Disconnect power supply every time it is necessary to operate
on the interior of the unit.
WHAT TO DO IF …
... the power of the suction stream drops
1) Dust lters are full; check if they still have sucient
capacity and, if necessary, replace them (see
paragraph 11)
... the exhaust motor does not work
1) The power plug has not been plugged in properly.
2) If the red switch (fan symbol) is in "ON" position and the
engine does not work, check that the fuse located inside
the hood (see g. 3) is not broken. If necessary replace it
with one of the same type (250 Volt - 16A fuse).
3) If the fuse is intact and the motor does still not work, it is
necessary to apply to an expert technician authorised by
our oces.
In this case, we advise to send the exhaust hood back to our
works or to one of our service centres. Use suitable
packaging for the delivery of the goods and provide the unit
with the maximum protection.
Any breakage or damage caused by improper packaging will
be charged to the client.
... the LED light does not work
1) The power cord may not be plugged in properly.
2) Make sure than the main ON/OFF switch and the green
switch is "ON”.
3) If the green switch (light symbol) is in "ON" position and the
light is not on, check that the fuse inside the exhaust
hood (see g. 3) ts properly or has no failure. If necessary,
replace the fuse with another one of thesame type ( 250
Volt - 16A).
4) If the fuse is intact and in any case the lamp it still does not
work, the intertechnical wind of specialized and authorized
personnel from our headquarters.
MAINTENANCE
No part of this manual may be reproduced without the prior permission in writing of DENTALFARM Srl MI 18 A110 R00 7

8
No part of this manual may be reproduced without the prior permission in writing of DENTALFARM Srl MI 18 A110 R00
..... the motor of the polishing unit does not work
2) Check if the fuse inside the hood (see g. 4) ts
properly or has a failure. If necessary, replace the fuse
with another one of the same type (250 Volt-16A).
3) If the fuse is intact and the motor does still not work, it
is necessary to apply to an expert technician
authorized by our ocies.
If you need the assistance of our Technical Service Centre,
please apply to:
DENTALFARM Srl
via Susa, 9/A
10138 Torino (TV) Italie
tel. +39 011 4346588
13. Spare parts
The spare parts will be available from our company for 10
years after the date of production. For a correct identica-
tion of the spare parts and to make deliveries easier, always
provide the following details:
• Name of client
• Destination of goods
• Appliance model
• Serial number (see data plate)
• Description of the spare part
• Spare part code
• Quantity
Spare part Code
Microber lter ................................................................GFF
Fuse 250V-16A.............................................................FS250
14. Safety
Following safety rules means working without the
hazard of causing harm to oneself or to others.
Aries shall be very pleased to oer clients all the
information they may need.
1) Use the safety devices and protection means supplied
appropriately. The operator shall not remove any
protective devices.
2) Check periodically that all parts are not damaged and
advise the Company immediately in case of any
dangerous conditions.
3) Before carrying out any maintenance operations, make
sure that the appliance is not connected to the power
supply.
4) Allow repairs to be carried out only by authorised
technicians who use original materials and spare parts.
5) Protect power cables from high temperature and
crushing; have them replaced by authorised
technicians in case of wear or damage.
6) Keep work sites in order; disorder is a source of
danger.
15. Demolition and waste disposal
Products marked with the symbol must be disposed of
to authorised sorting centres for “electric and electronic
equipment waste”.
Follow the instructions below for the demolition and
scrapping of the polishing hood:
1) Disconnect the power supply.
2) Dismantle the appliance dividing materials according to
their chemical composition (iron and other metals, plastic,
wood, etc.).
3) Scrap the dierent materials and dispose of the
“special” and “toxic-noxious” components accordingly in
compliance with the legislation in the country where the
bench is installed.
Dispose of the lters in compliance with the legislation in
the country where the bench is installed.
Note: DENTALFARM reserves the right to change model
features and accessories supplied for technical or commer-
cial reasons without being obliged to update this publica-
tion promptly.

DENTALFARM Srl
via Susa, 9/A
10138 TORINO, Italy
tel. +39 011 4346588
e-mail: [email protected]
web: www.dentalfarm.it
Table of contents
Other dentalfarm Dental Equipment manuals
Popular Dental Equipment manuals by other brands

Florida Probe
Florida Probe VoiceWorks user manual

BG Light
BG Light BLUEDENT XPRESS-R cordless Operating instructions manual

Shofu
Shofu BlueShot Instructions for use

Robots and Design
Robots and Design Maxx DS200 Series user guide

mectron
mectron COMPACT PIEZO LED manual

3M ESPE
3M ESPE Elipar DeepCure-S operating instructions

DENTSPLY Tulsa Dental
DENTSPLY Tulsa Dental Calamus Flow Directions for use

Fona
Fona MyCrown Mill Service manual

Miele
Miele A 317 operating instructions

DentalEZ
DentalEZ StarDental Star Simplicity FX instruction manual

Dentsply Sirona
Dentsply Sirona ProPex II Directions for use

BRYANT DENTAL
BRYANT DENTAL IGNIS manual