GE Lave-vaisselle User manual

Dishwasher
Lave-vaisselle
OWNER’S MANUAL
MANUEL DU PROPRIÉTAIRE
350A4502P654rev1

English
1
PAGE
SAFETY PRECAUTIONS. . . . . . . . . . . . . . . . . . . . . . . . . . . . . . . . . . . . . . . . . . . . . . . . . . . . . . . . . . . . . . . 2-4
Before Using Your Dishwasher . . . . . . . . . . . . . . . . . . . . . . . . . . . . . . . . . . . . . . . . . . . . . . . . . . . . . . . . . 3
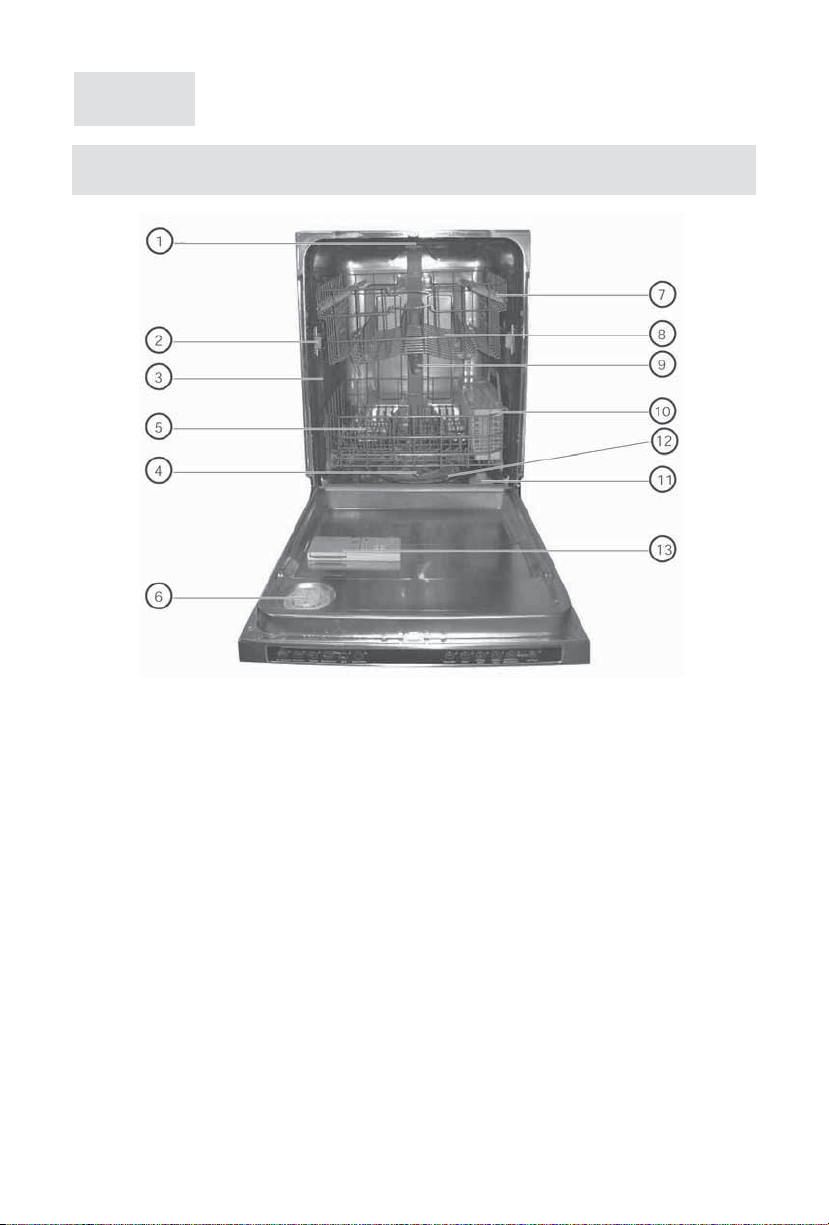
PARTS AND FEATURES . . . . . . . . . . . . . . . . . . . . . . . . . . . . . . . . . . . . . . . . . . . . . . . . . . . . . . . . . . . . . . . . . 5
Control Panel . . . . . . . . . . . . . . . . . . . . . . . . . . . . . . . . . . . . . . . . . . . . . . . . . . . . . . . . . . . . . . . . . . . . . . . . . 5
START-UP GUIDE . . . . . . . . . . . . . . . . . . . . . . . . . . . . . . . . . . . . . . . . . . . . . . . . . . . . . . . . . . . . . . . . . . . . . . 6
Using Your New Dishwasher . . . . . . . . . . . . . . . . . . . . . . . . . . . . . . . . . . . . . . . . . . . . . . . . . . . . . . . . . . . 6
DISHWASHER LOADING . . . . . . . . . . . . . . . . . . . . . . . . . . . . . . . . . . . . . . . . . . . . . . . . . . . . . . . . . . . . 7-12
Loading Suggestions . . . . . . . . . . . . . . . . . . . . . . . . . . . . . . . . . . . . . . . . . . . . . . . . . . . . . . . . . . . . . . . . . . 7
Loading Top Rack . . . . . . . . . . . . . . . . . . . . . . . . . . . . . . . . . . . . . . . . . . . . . . . . . . . . . . . . . . . . . . . . . . . . . 8
Loading Bottom Rack . . . . . . . . . . . . . . . . . . . . . . . . . . . . . . . . . . . . . . . . . . . . . . . . . . . . . . . . . . . . . . . . 10
Loading Silverware Basket . . . . . . . . . . . . . . . . . . . . . . . . . . . . . . . . . . . . . . . . . . . . . . . . . . . . . . . . . . . 12
DISHWASHER USE . . . . . . . . . . . . . . . . . . . . . . . . . . . . . . . . . . . . . . . . . . . . . . . . . . . . . . . . . . . . . . . . 13-23
Proper Use of Detergent. . . . . . . . . . . . . . . . . . . . . . . . . . . . . . . . . . . . . . . . . . . . . . . . . . . . . . . . . . . . . . 13
Detergent Dispenser . . . . . . . . . . . . . . . . . . . . . . . . . . . . . . . . . . . . . . . . . . . . . . . . . . . . . . . . . . . . . . . . . 13
Rinse Aid Dispenser . . . . . . . . . . . . . . . . . . . . . . . . . . . . . . . . . . . . . . . . . . . . . . . . . . . . . . . . . . . . . . . . . . 15
Cycle Selection Charts . . . . . . . . . . . . . . . . . . . . . . . . . . . . . . . . . . . . . . . . . . . . . . . . . . . . . . . . . . . . . . . 16
Cancelling a Cycle . . . . . . . . . . . . . . . . . . . . . . . . . . . . . . . . . . . . . . . . . . . . . . . . . . . . . . . . . . . . . . . . . . . 18
Changing a Cycle or Setting . . . . . . . . . . . . . . . . . . . . . . . . . . . . . . . . . . . . . . . . . . . . . . . . . . . . . . . . . . 18
Adding Items During a Cycle . . . . . . . . . . . . . . . . . . . . . . . . . . . . . . . . . . . . . . . . . . . . . . . . . . . . . . . . . 19
Option Selections . . . . . . . . . . . . . . . . . . . . . . . . . . . . . . . . . . . . . . . . . . . . . . . . . . . . . . . . . . . . . . . . . . . . 19
Using the Plate Warmer . . . . . . . . . . . . . . . . . . . . . . . . . . . . . . . . . . . . . . . . . . . . . . . . . . . . . . . . . . . . . . 21
Cycle Status Indicatrs . . . . . . . . . . . . . . . . . . . . . . . . . . . . . . . . . . . . . . . . . . . . . . . . . . . . . . . . . . . . . . . . 21
Wash System. . . . . . . . . . . . . . . . . . . . . . . . . . . . . . . . . . . . . . . . . . . . . . . . . . . . . . . . . . . . . . . . . . . . . . . . 22
Drying System. . . . . . . . . . . . . . . . . . . . . . . . . . . . . . . . . . . . . . . . . . . . . . . . . . . . . . . . . . . . . . . . . . . . . . . 22
Overfill Protection Float . . . . . . . . . . . . . . . . . . . . . . . . . . . . . . . . . . . . . . . . . . . . . . . . . . . . . . . . . . . . . . 22
WASHING SPECIAL ITEMS . . . . . . . . . . . . . . . . . . . . . . . . . . . . . . . . . . . . . . . . . . . . . . . . . . . . . . . . . 23-24
DISHWASHER CARE . . . . . . . . . . . . . . . . . . . . . . . . . . . . . . . . . . . . . . . . . . . . . . . . . . . . . . . . . . . . . . . 24-25
Cleaning . . . . . . . . . . . . . . . . . . . . . . . . . . . . . . . . . . . . . . . . . . . . . . . . . . . . . . . . . . . . . . . . . . . . . . . . . 24-25
Drain Air Gap . . . . . . . . . . . . . . . . . . . . . . . . . . . . . . . . . . . . . . . . . . . . . . . . . . . . . . . . . . . . . . . . . . . . . . . . 25
Storing . . . . . . . . . . . . . . . . . . . . . . . . . . . . . . . . . . . . . . . . . . . . . . . . . . . . . . . . . . . . . . . . . . . . . . . . . . . . . . 25
TROUBLESHOOTING . . . . . . . . . . . . . . . . . . . . . . . . . . . . . . . . . . . . . . . . . . . . . . . . . . . . . . . . . . . . . . 26-29
WARRANTY . . . . . . . . . . . . . . . . . . . . . . . . . . . . . . . . . . . . . . . . . . . . . . . . . . . . . . . . . . . . . . . . . . . . . . . . . . 30
CONSUMER SUPPORT . . . . . . . . . . . . . . . . . . . . . . . . . . . . . . . . . . . . . . . . . . . . . . . . . . . . . . . . . . . . . . . . 31
FRANÇAIS . . . . . . . . . . . . . . . . . . . . . . . . . . . . . . . . . . . . . . . . . . . . . . . . . . . . . . . . . . . . . . . . . . . . . . . . . . . 32
TABLE OF CONTENTS

English
2
SAFETY PRECAUTIONS
Warning! – To reduce the risk of fire, electric shock, or injury to persons, always
exercise basic safety precautions, including the following:
1. Read all instructions before using the appliance.
2. Use the dishwasher only for its intended function.
3. Use only detergents or rinse agents recommended for use in a dishwasher, and keep
them out of reach of children.
4. When loading items to be washed:
1) Locate sharp items so that they are not likely to damage the door seal;
2) Load sharp knives with the handles up to reduce the risk of cut-type injuries.
5. Do not wash plastic items unless they are marked “dishwasher safe” or the
equivalent. For plastic items not so marked, check the manufacturer’s
recommendations.
6. Do not touch the heating element during or immediately after use.
7. Do not operate the dishwasher unless all enclosure panels are properly in place.
8. Do not tamper with controls.
9. Do not abuse, sit on, or stand on the door, lid, or dish racks of the dishwasher.
10. To reduce the risk of injury, do not allow children to play in or on the dishwasher.
11. Under certain conditions, hydrogen gas may be produced in a hot water system that
has not been used for two weeks or more. HYDROGEN GAS IS EXPLOSIVE. If the hot
water system has not been for such a period, before using the dishwasher turn on all
hot water faucets and let the water flow from each for several minutes. This will
release any accumulated hydrogen gas. As the gas is flammable, do not smoke or use
an open flame during this time.
12. Remove the door or lid to the washing compartment when removing an old
dishwasher from service or discarding it.
Remember to record the model and
serial number. They are on a label in the
dishwasher.
Staple your receipt to your manual.
You will need it to obtain warranty
service.
Model number
Serial number
Date of purchase

English
3
WARNING
Tip Over Hazard
• Do not use dishwasher until completely installed.
• Do not push down an open door; Doing so can result in
serious injury or cuts.
SAFETY PRECAUTIONS
WARNING
Electrical Shock Hazard
• Electrically ground dishwasher.
• Connect ground wire to green ground connector in terminal box.
• Do not use an extension cord.
• Dishwasher must be supplied with 120V 60 Hz, and connected to
an individual, properly grounded branch circuit protected by a
15 amp circuit.
• Failure to follow these instructions can result in death, fire or
elctrical shock.
This dishwasher must be properly installed and located in accordance with the
Installation Instructions before it is used. If you did not receive installation
instructions with your dishwasher, you can obtain them by visiting our Website at
www.geappliances.ca.
• Install where dishwasher is protected from the elements. Protect against freezing to
avoid possible rupture of fill valve. Such ruptures are not covered by the warranty. See
“Storing” in the “Dishwasher Care” section for winter storage information.
• Install and level dishwasher on a floor that will hold the weight and in an area suitable
for its size and use.
• Remove all shipping plugs from hoses and connectors (such as the cap on the drain
outlet) before installing. See Installation Instructions for complete information.

English
4
GROUNDING INSTRUCTIONS
For a grounded, cord-connected dishwasher:
The dishwasher must be grounded. In the event of a malfunction or breakdown, grounding
will reduce the risk of electric shock by providing a path of least resistance for electric
current. The dishwasher is equipped with a cord having an equipment-grounding
conductor and a grounding plug. The plug must be plugged into an appropriate outlet that
is installed and grounded in accordance with all local codes and ordinances.
WARNING: Improper connection of the equipement-grounding conductor can result in a
risk of electric shock. Check with a qualified electrician or service representative if you are
in doubt whether the dishwasher is properly grounded.
Do not modify the plug provided with the dishwasher; if it will not fit the outlet, have a
proper outlet installed by a qualified electrician.
For a permanently connected dishwasher:
The dishwasher must be connected to a grounded metal, permanent wiring system, or an
equipement-grounding conductor must be run with the circuit conductors and connected
to the equipement-grounding terminal or lead on the dishwasher.
DO NOT ATTEMPT TO REPAIR OR REPLACE ANY PART OF YOUR DISHWASHER UNLESS IT
IS SPECIFICALLY RECOMMENDED IN THIS MANUAL. ALL OTHER SERVICING SHOULD BE
REFERRED TO A QUALIFIED TECHNICIAN.
To minimize the possibility of electric shock, disconnect this appliance from the power
supply before attempting any maintenance.
NOTE:
Turning off the dishwasher does not disconnect the appliance from the power
supply. We recommend having a qualified technician service your appliance.
SAVE THESE INSTRUCTIONS

English
5
1. Upper Spray
2. Top Rack Track
3. Water Inlet Opening (in tub wall)
4. Lower Spray Arm
5. Bottom Rack
6. Vent System
7. Split Folding Utility Shelf (4)
8. Adjustable Top Rack
9. Middle Spray Arm
10. Removable Silverware Basket
11. Overfill Protection Float
12. Heating Element
13. Detergent and Rinse Aid Dispenser
PARTS AND FEATURES
NOTE:
not all features available on all models.

English
6
START-UP GUIDE
Before using your dishwasher, remove all packaging materials. Read this entire Owner’s
Manual. You will find important safety information and useful operating tips.
USING YOUR NEW DISHWASHER
1. Rinse aid is essential for good drying. Be sure to fill the dispenser
before you use your new dishwasher. Each filling will last about 1 to
3 months depending on your usage.
2. Scrape leftover food and hard items (toothpicks or bones) from dishes. You do not
need to pre-rinse your dishes.
3. Properly load the dishwasher. (See “Dishwasher Loading”) Load dishes with space in
between so water will reach the soiled surfaces. Make sure nothing prevents the spray
arm(s) from spinning freely.
4. Add detergent. Always use a quality brand detergent. (See “Dishwasher Use”)
5. Press the desired cycle and option selections. (See “Dishwasher Use”)
For integrated control models, press
START/RESET
. The selected cycle and option
lights will glow.
6. Push door firmly closed. The door latches automatically.
NOTE:
For integrated control models, f the dishwasher is not started
before closing the door, the cycle and options will not run.

English
7
DISHWASHER LOADING
LOADING SUGGESTIONS
•Remove leftover food, bones, toothpicks and other hard items from the dishes. To
conserve water and energy and save time, it is not necessary to rinse dishes before
putting them into the dishwasher. The wash module contains a food disposer which will
reduce the size of food items.
NOTE:
If hard items such as fruit seeds, nuts, and eggshells enter the wash module, you
might hear chopping, grinding, crunching, or buzzing sounds. These sounds are
normal when hard items enter the module. Do not let metallic items (such as pot
handle screws) get into the wash module. Damage may occur.
• It is important for the water spray to reach all soiled surfaces.
• Load dishes so they are not too close together, stacked or overlapping if possible. For
best drying results, water must be able to drain from all surfaces.
• Load heavy pots and pans carefully. Heavy items can dent the stainless steel interior of
the door if they are dropped or bumped.
• Make sure pot lids and handles, pizza pans, cookie sheets, etc., do not interfere with the
spray arm rotation.
• Conserve water, energy and save time spent hand-rinsing by running a rinse cycle to
keep dishes moist if you do not plan to wash them soon. Foods such as eggs, rice,
pasta, spinach and cooked cereals may be hard to remove if they are left to dry over a
period of time.
QUIET OPERATING TIPS
To avoid thumping/clattering noises during operation:
•Make sure lightweight load items are secured in the racks.
• Make sure pot lids and handles, pizza pans, cookie sheets, etc., do not touch interior
walls or interfere with the spray arm rotation.
•LOAD DISHES SO THEY DO NOT TOUCH ONE ANOTHER.
NOTE:
If hard items such as fruit seeds, nuts, and eggshells enter the wash module, you
might hear chopping, grinding, crunching, or buzzing sounds. These sounds are
normal when hard items pass through the food disposer.

English
8
LOADING TOP RACK
The top rack is designed for cups, glasses and smaller items. Many items, up to 9” (22 cm),
fit in the top rack. (See recommended loading patterns shown)
NOTE:
The features on your dishwasher rack may vary from the drawings shown.
• Place items so open ends face down for cleaning and draining.
• Load glasses and cups in top rack only. The bottom rack is not designed for glasses and
cups. Damage may occur.
• Place cups and glasses in the rows between tines. Placing them over the tines can lead
to breakage and water spots.
• China, crystal and other delicate items must not touch each other during dishwasher
operation. Damage may occur.
• Load plastic items in the top rack only. Only plastic items marked “dishwasher safe” are
recommended.
•Load plstic items so the force of the spray does not move them during the cycle.
• To avoid chipping, do not let stemware touch other items. Small bowls, pans and other
utensils can be placed in the top rack. Load bowls in the center section for best stability.
Cups and Small Dishes
Cup and Glass Load

English
9
SURE-HOLD • UTILITY SHELF
(available on some models)
Fold down the extra shelf on the left or right side of the top rack to hold additional cups,
stemware or long items such as utensils and spatulas.
Adjustable 2-position top rack
(available on some models)
You can raise or lower the top rack to fit tall items in either the top or bottom rack. Raise
the top rack to accomodate tall items in the bottom rack, or lower the top rack to
accomodate taller glasses or other items in the top rack.
Adjusters are located on each side of the top rack.
To remove the top rack
1. Pull the rack forward slightly to access end caps.
2. While pulling the bottom of the end cap, raise it at the same time..
3. After removing both end caps, pull rack out.
To replace the top rack
1. Place the roller on each side of the rack into the rack tracks and push the rack back.
2. Insert end cap into rack.
3. Pull on the end cap to make sure it is locked into place.
4. Repeat on the other side.
Depress blue
handle to lower
the rack.
Raise the rack
directly with handle
(no need to push the
adjuster handle)

English
10
LOADING BOTTOM RACK
The bottom rack is designed for plates, pans, casseroles and utensils. Many items, up to
12.2” (31 cm) tall, fit in the bottom rack. (See recommended loading patterns shown)
NOTE:
The features on your dishwasher rack may vary from the drawings shown.
• Do not load glasses, cups, or plastic items in the bottom rack. Load small items in the
bottom rack only if they are secured in place.
• Load plates, soup bowls, etc. between tines.
• Load soup, cereal and serving bowls in the rack in a variety of ways depending upon
their size and shape. Load bowls securely between the rows of tines. Do not nest bowls
because the spray will not reach all surfaces.
• Load cookie sheets, cake pans and other large items at the sides and back. Loading
such items in front can keep the water spray from reaching the detergent dispenser.
Dish Settings
Utensil Load

English
11
• Secure heavily soiled cookware face down in the rack.
• Make sure pot handles and other items do not stop rotation of the spray arm(s). The
spray arm(s) must move freely.
• Do not load items between the bottom rack and the side of the dishwasher tub because
they might block the water inlet opening.
NOTE:
Spin the spray arms. Be sure items in the basket do not stop the rotation of the
spray arms.
Fold Down Rack
You can fold down rows of tines at the back of the bottom rack.
1. Grasp the tip of the tine that is in the tine holder.
2. Gently pull the tine out of the tine holder.
3. Lay the row of tines down in the rack to make room for larger dishes, bowls, pots, pans
or roasters.
Mixed Load
Fold Down Rack

English
12
LOADING SILVERWARE BASKET
Load the silverware basket while it is in the bottom rack or remove the basket and place it
on a counter or table for loading. (See recommended loading pattern shown)
NOTE:
Unload or remove the basket before unloading the racks to avoid spilling water
droplets on the silverware.
• Load items with covers down, using the separators to prevent silverware nesting.
• Place small items such as baby bottle caps, jar lids, corncob holders, etc. in the
section(s) with hinged cover(s). Close the cover to hold small items in place.
• When covers are up, mix items in each section of the basket with some pointing up and
some pointing down to avoid nesting. Spray cannot reach nested items.
IMPORTANT: Alsways load sharp items (knives, skewers, etc.) pointing down.
NOTES:
• Do not load silver or silver-plated silverware with stainless steel. These metals can be
damaged by contact with each other during washing.
• Some foods (such as salt, vinegar, milk products, fruit juices, etc.) can pit or corrode
silverware. Run a rinse cycle if you have a full load to wash immediately.

English
13
PROPER USE OF DETERGENT
Use only detergent specifically made for use in dishwashers. Cascade, Cascade Complete
and Finish dishwashing detergents, and Jet-Dry and Cascade Crystal Clear rinse agents
have been approved for use in all GE dishwashers. Keep your detergent fresh and dry.
Don’t put powder detergent into the dispenser until you’re ready to wash dishes.
All wash cycles except
RINSE ONLY
require detergent in the main and pre-wash cup.
Detergent Dispenser
The detergent dispenser has 2 sections. The small Pre-Wash section empties detergent
into dishwasher when you close the door.
The larger Main Wash section automatically empties detergent into dishwasher during the
wash. (See the “Cycle Selection Charts”)
• Use automatic dishwashing detergent only. Other detergents can produce excessive
suds that can overflow out of the dishwasher and reduce washer performance.
• Add detergent just before starting a cycle.
• Store tightly closed detergent in a cool, dry place. Fresh automatic dishwasher
detergent results in better cleaning.
NOTE:
Do not use detergent with a rinse cycle.
Filling the Dispenser
1. If the dispenser cover is closed, open the cover by pushing the cover latch.
DISHWASHER USE
1. Wash Cover
2. Main Wash Section
3. Pre-Wash Section
4. Cover

English
14
2. Fill the Main Wash section with detergent. See “How Much Detergent To Use”.
3. Fill the Pre-Wash section, if needed.
4. Close the dispenser cover.
It is normal for the cover to open partially when dispensing detergent.
NOTE:
Use both sections for cycles with 2 washes. Use only the Main Wash section for
cycles with 1 wash. See the “Cycle Selection Charts” for more details.
How Much Detergent To Use
• The amount of detergent to use depends on the hardness of your water and the type of
detergent. If you use too little, dishes won`t be clean. If you use too much in soft water,
glassware will etch.
• New detergents formulations are phosphate free. Detergents without phosphates tend
to leave mineral deposits on glassware and other items, leading to poor wash
performance complaints. The deposits are in the form of a white film on glassware and
other items, even the dishwasher tub itself. The easiest way to remove the white film is
to run their glassware and dishware through a dishwasher cycle using citric acid. Please
contact your local parts supplier to purchase kits of citric acid.
The use of a rinse agent may help minimize a repeat build up of film.

English
15
Rinse Aid Dispenser
Rinse aids prevent water from forming droplets that can dry as spots or streaks. They also
improve drying by allowing water to drain off the dishes during the final rinse by releasing
a small amount of the rinse aid into the rinse water. Your dishwasher is designed to use a
liquid rinse aid. Do not use a solid or bar-type.
Filling the Dispenser
The rinse aid dispenser holds 4.8 oz (145 mL) of rinse aid. Under normal conditions, this will
last for about three months. Rinse aid is released through an opening in the dispenser. You
do not need to wait until the dispenser is empty to refill it. Try to keep it full, but be careful
not to overfill it.
1. Make sure the dishwasher door is fully open.
2. Open the dispenser by pushing the cover latch.
3. Add rinse aid until the indicator window looks full.
4. Clean up any spilled rinse aid with a damp cloth.
5. Close the cover.
Rinse Aid Setting
The amount of rinse aid released into the final wash can be adjusted. The factory setting is
at 3. For most water conditions, set the adjuster to 2 or 3. If there are rings of calcium
(hard water) spots on dishes, try a higher setting.
To Adjust the Setting
Open the dispenser cover. Turn the adjuster inside the dispenser to the desired setting.

English
16
CYCLE SELECTION CHARTS
Select the wash cycle and options desired. If the door is closed, the dishwasher starts
filling once you press the cycle button, unless you select a delay wash. You can select an
option as the machine is filling.
A “•“ shows what steps are in each cycle. Temperatures indicate where extra heat is
added. Water usage is shown.
The model meets the ENERGY STAR®guidelines for energy efficiency.
Cycle time excludes dry time. An asterisk (*) by the cycle time indicates the cycle time
might be longer depending on the temperature of the water entering the dishwasher.
Pre-
Wash Main
Wash Rinse Final
Heated
Rinse
Dry Minimum
Time
(min)
Water
Usage
(gal/L)
102* 4.5-9.0/
17-34.2
150°F
(66°C) 160°F
(71°C)
Pre-
Wash Main
Wash Rinse Final
Heated
Rinse
Dry
Minimum
Time
(min)
Water
Usage
(gal/L)
First
Wash
Second
Wash
92* 9.0/34.2
140°F
(60°C)
Pre-
Wash Main
Wash Rinse Final
Heated
Rinse
Dry Minimum
Time
(min)
Water
Usage
(gal/L)
81* 4.5-7.5/
17-28.5
130°F
(55°C)
On some
models
Use this cycle for all day-to-
day soil types, including
both normal and heavy soils,
giving you exceptional
cleaning performance
combined with reassuring
sanitization.
Use both
detergent
dispenser
sections.
Use this cycle for
hard-to-clean,
baked-on cookware
and harder than
normal water
conditions.
Use both
detergent
dispenser
sections.
Use this cycle for loads
with normal amounts
of food soil. During the
Main Wash, the wash
action will repeatedly
pause for several
seconds.
Use both
detergent
dispenser
sections.

English
17
• If the incoming water temperature is less than the recommended temperature or food
soils are heavy, the cycle will automatically compensate by adding time, heat and
water as needed.
NOTE:
The sensor in your dishwasher monitors the soil level. Cycle time and/or water
usage can vary from the numbers above as the sensor adjusts the cycle for the
best wash performance.
Pre-
Wash Main
Wash Rinse Final
Heated
Rinse
Dry Minimum
Time
(min)
Water
Usage
(gal/L)
19* 3/11.4
Pre-
Wash Main
Wash Rinse Final
Heated
Rinse
Dry Minimum
Time
(min)
Water
Usage
(gal/L)
41* 4.5/17
130°F
(55°C)
Use this cycle for
china and crystal. This
cycle uses a light
wash and gentle dry.
During the heated dry,
the heating element
cycles on and off.
Use main
detergent
dispenser section.
Use this cycle for a quick
wash and light dry to
clean up cookware prior
to entertaining. The
sensor adds water and
time to the cycle if
needed for maximum
cleaning. This cycle uses a
shortened dry time. Towel
drying may be needed.
Use main
detergent
dispenser
section.
Pre-
Wash Main
Wash Rinse Final
Heated
Rinse
Dry
Minimum
Time
(min)
Water
Usage
(gal/L)
11* 1.5/5.7
Use this rinse cycle for
rinsing dishes, glasses
and silverware that will
not be washed right
away.
Do not use
detergent with
this cycle.

English
18
CANCELLING A CYCLE
(on some models)
Anytime during a cycle, press
CANCEL/DRAIN
. The dishwasher starts
a 2-minute drain (if needed). Let the dishwasher drain completely.
CANCELLING A CYCLE
(on models with integrated controls)
1. Carefully open the door slightly to stop the cycle. Wait for the
spraying action to stop before opening the door to access the
control panel.
2. Press
START/RESET
for 1 second.
3. Close the door. The dishwasher starts a 2-minute drain (if needed).
Let the dishwasher drain completely.
To Stop The Drain
You can press
CANCEL/DRAIN
or
START/RESET
again to stop the drain. Remember to
drain the dishwasher before starting a new cycle.
CHANGING A CYCLE OR SETTING
(on some models)
During The First Fill Of A Cycle
1. Press a new cycle and/or options.
2. Ensure detergent dispensers are full.
After The First Fill Of The Cycle
1. Press
CANCEL/DRAIN
. The dishwasher starts a 2-minute drain (if
needed). Let the dishwasher drain completely.
2. Ensure detergent dispensers are full.
3. Press a new cycle and/or options.
CHANGING A CYCLE OR SETTING
(on models with integrated controls)
While A Cycle Is Running
1. Open the door.
2. Press
START/RESET
for 1 second.
START/RESET
light goes off.
3. Select a new cycle and/or option.
4. Press
START/RESET
.
5.
START/RESET
glows.
6. Check the detergent dispensers. They must be filled properly for
the new cycle.
7. Close the door.

English
19
ADDING ITEMS DURING A CYCLE
You can add an item anytime before the main wash starts. Open the door and check the
detergent dispenser. If cover is still closed, you can add items.
To Add Items
1. Lift up the door latch to stop the cycle. Wait for the spraying action to stop before
opening the door.
2. Open the door. If the detergent dispenser is still closed, add the item.
3. Close the door firmly until it latches. The dishwasher resumes the cycle after about a
10-second pause.
OPTION SELECTIONS
You can customize your cycles by pressing an option. If you change your mind, press the
option again to turn the option off. Select a different option if desired. You can change an
option anytime before the selected option begins.
Hi-Temp Wash
Select this option to heat the water during parts of the cycle. Higher
water temperatures help clean tough soils.
HI-TEMP WASH
combined
with the
POTS & PANS
or
NORMAL
cycles raises the temperature in
the main wash.
This option adds heat, water and wash time to a cycle.
NOTE: HI-TEMP WASH
is an option with the
POTS & PANS
and
NORMAL
cycles. Always use
HI-TEMP WASH
if you have hard water.
Sanitize Rinse Option
(on some models)
Select this option to raise the water temperature in the final rinse to
approximately 160°F (71°C). The
SANITIZE RINSE
option adds heat
and time to the cycle. This high temperature rinse sanitizes your
dishes and glassware in accordance with NSF/ANSI standard 184 for
residential dishwasher. Certified residential dishwashers are not
intended for licensed food establishements.
NOTE: ANTI-BACTERIAL WASH
automatically uses this option.
SANITIZE RINSE
is an option with the
POTS & PANS
and
NORMAL
cycles. Only these sanitization cycles have been
designed to meet the NSF/ANSI requirements.
Table of contents
Languages:
Other GE Dishwasher manuals

GE
GE GSD1250 User manual

GE
GE Monogram ZBD8920PSS User manual

GE
GE Monogram ZBD4800 User manual

GE
GE WZSE5310T User manual

GE
GE GSD1200M-20 User manual

GE
GE GSD580L User manual

GE
GE Monogram ZBD4500DSS User guide

GE
GE 165 D3080P027 Installation instructions

GE
GE PBT650 Series User manual

GE
GE GLDT696T00SS User manual