GE DRYER DWLR473ET User manual

Models:
DWLR473ET
DWLR473GT
.-.
.
.
.
.
.
.
.
.
.
.
.
.
.,,.
,.
.
...
..
.
Dryer
Owner3
Manual
.
. .
.
-..—...——
Important Safe~ Information
Operating Instructions
Specialized Fabric Guide
Loading Suggestions
Can
of Product
If Something Goes Wrong
Behm
You Call For Service
Venting
tie
D~er
GE Service
Numbem
Warranw,
Back cover
GEAppliances
.. ”... ..., -,---- . . . . . . . . . . . . . .
.
..--.-,--

Welcome to the GE family. We’re Best of all, you’ll experience
proud of our quality
producti
and
these values each time you do
we believe in dependable service.
the laundry. That’s important,
You’ll see it in this
easy-t~use
because your new dryer will be
manual and you’ll hear it in the part of your family
for
a
long time.
friendly voices
of
our customer
service department.
Staple yourraceiptto the inside back Write down
tiemodalandsarial
cover of this manual.
numbem
here.
They are on the label
on
the front
of
the dryer behind
the door.
Mmfel
number
Setial
number
Da&
efpumhaae
80(1.
626.2000
2
Before you call for
setice,
there are
a
fm
things you can
do to help us serve
you
better.
Read this manual.
It
contiins
instructions to help you use
and
mainwin
your dryer properly.
Save time andmonay
Check the
section titled
“If
Something Goes
Wrong” before calling. This sec-
tion was designed to solve common
problems you might encounter.
If you do need service, you
can
relax knowing help is only
a
phone
call
awdy.
A list of toll-free customer
setice
numbers is included on the
inside back
cover.
Or call the
GE Answer Center
at
800.626.2000,
24 hours a day,
7
days a week.
Pam
obtaner
la
vemihn
en
espaiolde
esta
manual, name a
“
GE Answer
Center@,
servicio
de
informaci6n
para
el
consumidor,
te16fono
800.626.2000.

A
~~~###c:Foryoursafe~
the information
h
this manual must be
followed to minimize the risk of fire or explosion or to prevent property
damage, personal
inju~
or loss of
ltie.
Do not store or use gasoline
IF
YOUSMEU
US
or other flammable vapors
1
and liquids in the
vicini~
of
this or any other appliance.
2
Insolation and service must
be performed by a
quMled
3
instiler,
sefice
agency or
the gas supplier.
4
5
Do not
~
to
tight
any appliance.
Do not touch any electrical
switch; do not use any phone
in your building.
Clear the room, building or
area of
dl
occupants.
Immediately
cdl
your gas
supplier from a neighbor’s
phone. Follow the gas
supplier’s instructions.
Hyou
cannot reach your gas
supplier, call the fire department.
A
Calihmia
Sah
Drinkjng
Water and Toxic
EnbmementAct
This act requires
the
governor
Gas appliances can cause
of
Cdifomia
to publish a list of minor exposure to four of these
substances
known
to the stite substances, namely benzene,
to cause cancer, birth defects
carbon monoxide, formaldehyde
or other reproductive harm
and soot, caused primarily by the
and requires businesses to warn
incomplete combustion of natural
customers of potential exposure
gas or
LP
fuels.
to such substances.
Properly adjusted
d~ers
W
minimize incomplete combustion.
Mposure
to these substances can
be minimized further by properly
venting
tie
dyer
to the outdoors.
3

●
Use this appliance only for its
intended purpose
as
described
in this Owner’s Manual.
This dryer must be properly
installed and located in
accordance with the
Inswllation
Instructions before it is used.
If you did not receive
an
Installation
Instructi(}ns
sheet
with your
d~er,
you can obtain
one by calling, toll free, the GE
Answer Center”, 800.626.2000.
- Properly ground
to
conform
with all governing codes
and
ordinances. Follow detiils in
Installation Instructions.
–
Inshll
or store where
the
tempera-
ture is
above
50°F.
(lO°C.).
Do
not
instil
the dryer where it will
be exposed to the weather.
– Connect to
a
properly rated,
protected and sized
power
supply
circuit to avoid electrical overload.
Gas dryers MUST be exhausted
to
the ou@ide.
Cwefully
follow
the Exhausting
dehils
in the
Instillation Instructions.
Exhausting electric dryers to
the
ou~ide
is STRONGLY
RECOMMENDED to prevent
large
amounts of moisture and
lint from being blown into the
room. Carefully follow the
Exhausting
detiils
in the
Insmllation
Instructions.
D()
not
repair
or
replace
any part
(If
the appliance or
attempt any servicing unless
specifically recommended in this
Owner’s
Manual
or in published
user-repair instructions
hat
you
understand and have the skills
tf}
carry
out.
men
disconnecting this
appliance pull by the plug rather
than
the
cord to avoid damage to
the cord
orjunction
of cord and
plug. Make sure that the cord
is located so that
itwill
not be -
stepped on, tripped over or
otherwise subjected to damage
or
stress.
4

1?1
.-
Exhaust
Duct4ee
Installation
Instructions. Use only rigid metal
or flexible metal 4“ diameter
ductwork inside the dryer cabinet
or for exhausting to the
ouwide.
USE OF
PMSTIC
OR OTHER
COMBUSTIBLE
DUCWORK
CAN
CAUSEA
HRE.
PUNCTURED
DUCWORK
CAN
CAUSEA
FIRE IF IT
COL
LAPSES OR BECOMES OTHER-
WSE
RESTRICTED IN USE OR
DURING
INSTALM~ON.
Do not dry articles containing
rubber, plastic, or similar
materials (such
m
padded bras,
tennis shoes, galoshes, bath
mati,
rugs, bibs, baby pants,
plastic bags, pillows, etc.) as
these materials may melt or
burn. Also, some rubber
materials, when heated, can
under certain circumstances
produce fire by spontaneous
combustion.
Do not store items that may
burn or melt (such as clothing,
paper material, plastics or
plastic containers, etc.) on top
of
tie
d~er
during operation.
Gmmenfi
labeled “DryAway
from Heat” or
“Do
not Tumble
D~n
(such as life jackets contain-
ing Kapok) must
not
be put in
your
dqer.
● Do not wash or@ articles that
have been cleaned in, washed
in, soaked in, or spotted
witi
combustible or explosive
subs~nces (such as wax, paint,
oil, gasoline,
degreasers,
dry-
cleaning solvents, kerosene, etc.)
which may ignite or explode. Do
not add these substances to the
wash water. Do not use these
substances around your washer
and/or dryer during operation.
s
Any article
on
which you have
used a cleaning solvent, or
which
contins
flammable
materials (such as cleaning
clotis,
mops, towels used in
beauty salons,
restauranfi,
or barber shops, etc.) must
not be placed in or near the
d~er
until all traces of these
flammable liquids or solids
and their
fimes
have been
removed. There are many
highly flammable items used
in homes such as acetone,
denatured alcohol, gasoline,
kerosene, some household
cleaners, some spot removers,
turpentines, waxes, wax
removers and products
containing petroleum distillates.
5

●
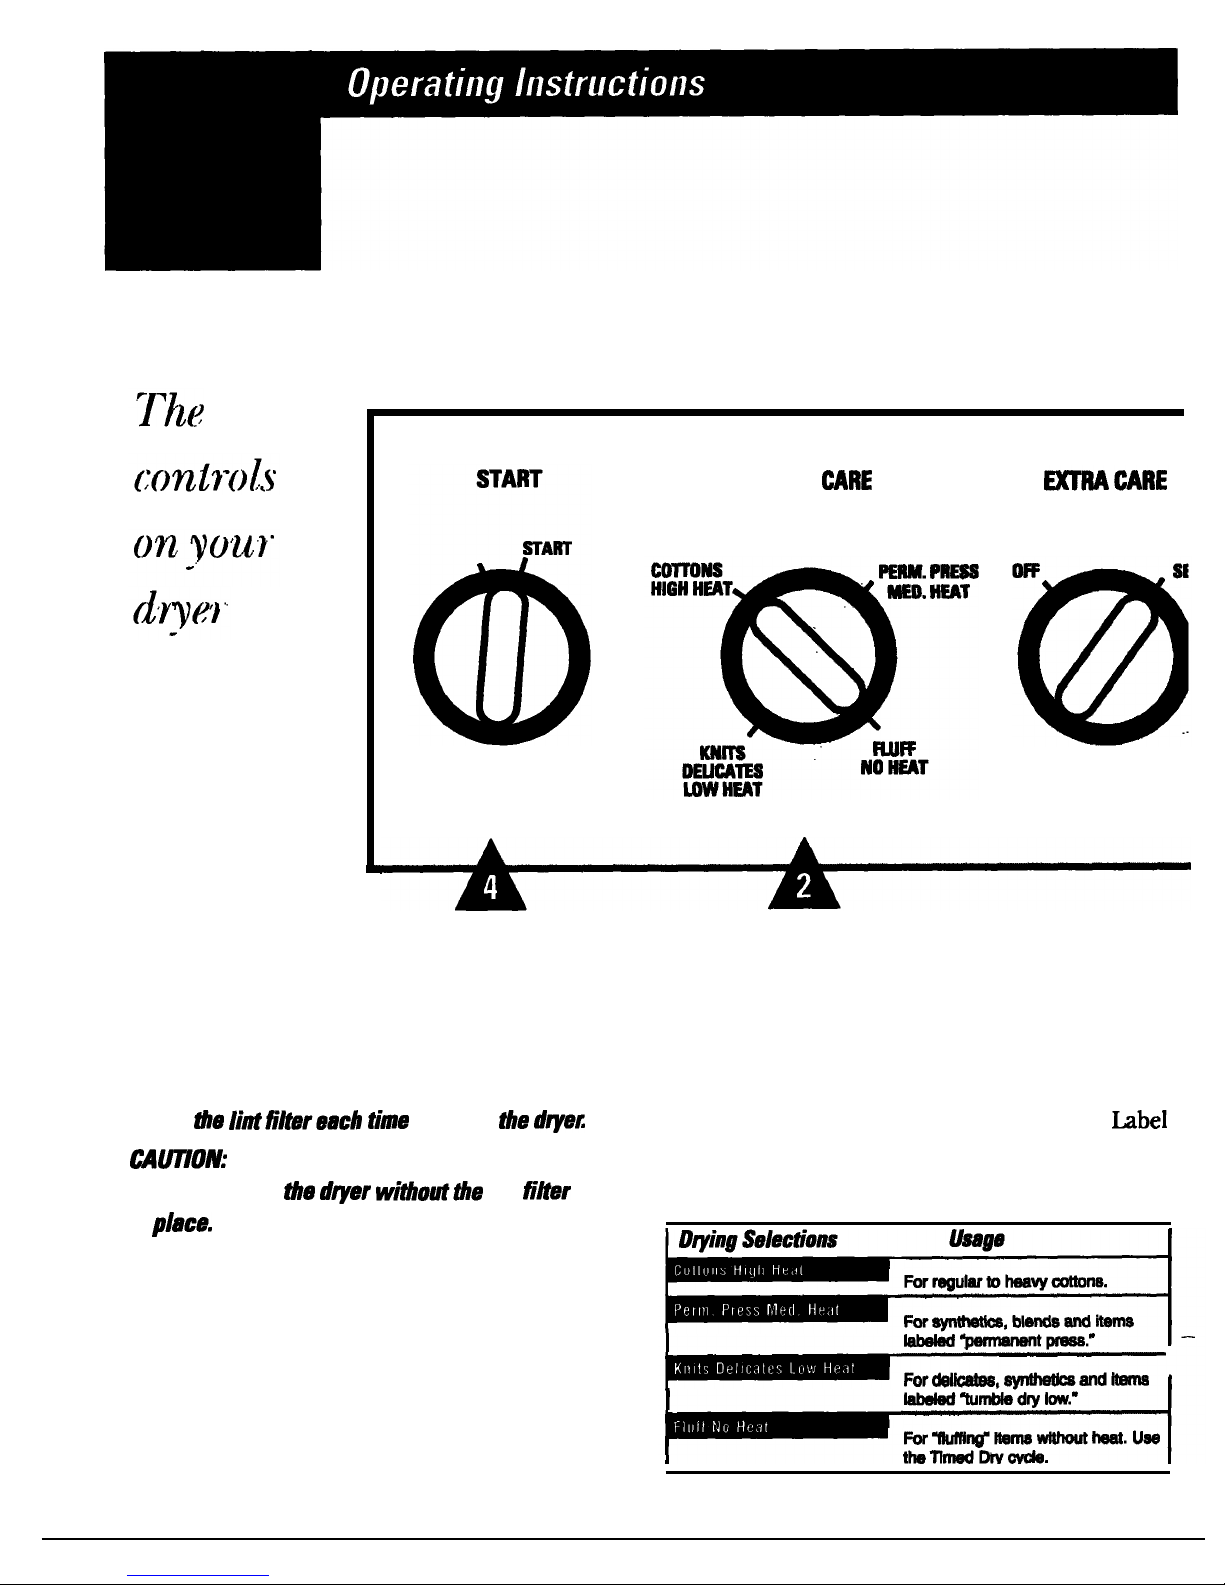
Clean the lint filter before
each load to prevent lint
accumulation inside the
d~er
or in the room. DO
NOT
OPEWTE
THE
DR~R
~HOUT
THE
~NT
FILTER
~
PMCE.
. Keep
tie
area around and
underneath your appliances
free from the accumulation
of combustible materials,
such as lint, paper, rags,
chemicals, etc.
c
The interior of the machine
and the exhaust duct
connection inside the
dyer
should be cleaned periodically
by a qual~led individual.
●
Never reach into the
d~er
while the drum is moving.
Before loading, unloading or
adding clothes, wait until the
drum has completely stopped.
. Do not
d~
fiberglass articles
in your
d~er.
Skin irritation
could result from the remaining
glass particles that may be picked
up by clothing during subs~
quent
d~er
uses.
@
The
laund~
process can
reduce the flame
remrdanq
of fabrics. To avoid such a
result, the garment maufacturer’s
care instructions should be
followed
ve~
carefully.
● Close supetision is necessa~
if this appliance is used by or
near children. Do not allow
children to play inside, on,
or with this appliance or any
discarded appliance. Dispose
of discarded appliances and
shipping or packing materials
properly. Before discarding
a
dqer,
or removing from service,
remove the door of the
d~er
compartment.
s
Keep all
laund~
aids (such
*detergents, bleaches, fabric
softeners, etc.) out of the reach
of children, preferably in a
locked cabinet. Observe all
warnings on container labels
to avoid personal
inju~.
Keep the floor around your
appliances clean and
d~
to
reduce the possibility
of
slipping.
●
s
To minimize the
possibili~
of electric shock, unplug this
appliance from the power supply
or disconnect the
dyer
at the
household distribution panel by
removing the fuse or switching
off the circuit breaker before
attempting any maintenance or
cleaning (except the removal and
cleaning of the lint filter).
NO~:
Turning the
~cle
Selector knob to an OFF
position does NOT
disconnect the appliance
from the power supply.
.-
6

Ivl
Do not tamper with
tie
controls.
Do not operate this appliance
if it is damaged, malfunctioning,
partially disassembled, or
has missing or broken parts,
including a damaged cord
or plug.
. Never climb on or stand on
tie
dryer top.
. If yours is a gas dryer, it is
equipped with an automatic
electric ignition and does not
have a pilot light. DO NOT
A~EM~
TO
UGHT
mH
A MATCH. Bums may result
from having your hand in the
vicinity of the burner when the
automatic ignition may turn on.
●
You may wish to soften your
laundered fabrics or reduce
the static electricity in them
by using dryer-applied fabric
softeners or an antistatic
conditioner. We recommend
you use either a fabric softener
in the wash cycle, according
to
the manufacturer’s instructions
for those products, or try a
dryer-added product for which
the manufacturer gives written
assurance
on
the package that
their product can be safely used
in your dryer.
Sefice
or performance
prob
lems
caused by the use
of
these
products are the responsibility
of the manufacturers
of
those
products and are not covered
under the warranty of this
appliance.
7
.-

FABRIC
MRE
AClean the Lint Filter
Clean
tie
Iintfibreach
tima
you use
tia
d~ez
mmoN:
Do not operate
tie
d~er
witiotitie
lint
fitir
in
placa.
A
Fabric Care Selections
Always follow Fabric Manufacturer’s Care
hbel
or instructions when laundering. Use this chart
as a general guide.
8

MOREDW
\
●
DHINN”
-
TIMED DRY
..:
..:’,’
:..
:
f..::::..
., ....:.
,.
..,.,.
.4,
.,:
.
.
::,..::..:;
;;$,::;
.
‘:
;.
:
,.
,,
:,,
..
..
:.’;,.:,.
,.,.
:,
.,,..:
ASelecting Drying Cycle A‘
Statiing
Dryer
Select an automatic or timed
qcle.
See
tie
. Close
tie
d~er
door.
above
~cle
Descriptions.
. Select START.
Opening
tie
door during
tie
operation till
stop
tie
d~er.
To restart
tie
d~er,
close
tie
door and select START to complete
tie
qcle.
9

Use this option to minimize the Him”
wrinkles in clothes. It provides
#tie
Signal option is selected, the
approximately 15 minutes of
Signal will sound at the end of the
m
m
@
noheat
tumbling after the clothes
drying time and will sound several
are
dry.
times during the
~
tire
cycle.
This option can only be used with
~is
will
mmindyou
that the cycle
the Automatic cycles.
is almost complete.
Q.
m
,’
.~..
. .
.
‘,
.
.
.
The signal control can be set at
0~,
MEDIUM or LOUD.
This signal willsoundjust before
the end of the cycle to remind you
to remove the clothes.
If you selected the Extra Care option
the signal will sound at the end of
the drying time and will sound
sever-
d times during the Extra Care cycle.
This will remind you that the cycle is
almost complete.
NOTE:
. Remove gamentipmmptfy
at the -
sound of the signal. Place clothes
on
hangem
so
w.nkles
wonlset
in.
●
Use the Signal
especia//y
when
drying
fibrics
Iikepolyastarknih
andpemanentpmu.
~ese
tibrics
should be
mmovedpmmptiy
so
w~.nkles
won?
set in.
&fore
replacing
tie
light bulb,
be sure to unplug the dryer power
cord or disconnect the dryer at the
household distribution panel by
removing the fuse or switching
off the circuit breaker. Reach
above dryer opening from inside
the drum. Remove the bulb
md
replace with the same size bulb.
10
.-

D
.
tindard#2
Phillips scmwdn.mr
. Tape-tippedpuw
knih
● Needle-n=edpliem
fOpen the door and remove the
filler plugs opposite the hinges.
2
Witi
tie
door completely open,
remove the bottom screw from
each hinge on the dryer face.
3
Insertthese~~a~uth~~Y
into
tie
TOP holes, for each hinge,
on the opposite side.
(~ereyou
removed the filler plugs.) Apply
fm
pressure to get the screw
started in untapped holes.
4
bosen
the top screw from each
hinge on the dryer face halfway.
m
.
.@
,.
:
‘Q...
5
With one hand holding the top
of the door and the other hand
holding the bottom, remove the
door from the
d~er
by lifting it
UP and OUT.
6
7
8
9
Ro@te
the door 180°. Insert it
on
tie
opposite side of the open-
ing by moving the door IN and
DOWN until the top hinge and
the bottom hinge are resting on
the top screws inserted in step 3.
Remove the remaining screws
from the side of the opening
from which the door was
removed. With these screws
secure each hinge at the bottom.
Tighten the
NO
top screws of
each hinge.
Reinsert the plastic plugs
on
the side from which the door
was removed.
11

Alwa~
tillow
Fabric
Manfictirafs
Cam
tibel
or
in~ti-ons
when laundering.
~emise
use
tie
intimation
below
as
a general guide.
Mend any holes or weak seams where feather or filling could
escape.
D~
only one pillow at a time. Stop
d~er
occasionally and
shake pillow, redistributing filling for even
d@ng.
Check pillow
at the end of
d@ng
time. If it is not completely
dq,
reset
dqer
for more
d@ng
time.
D~on
Iowheat
only.
UU~Ofl:Do
not
d~
pillows containing foam rubber.
BW@
Add
2+
d~
towels and one blanket and set timer for 20-25 minutes.
D~
only one blanket at a time. Do not set control for more than 25
minutes. At the end of
d@ng
cycle block the blanket back to
iti
original shape. Allow blanket to
d~
thoroughly before storing.
.G-
Use a medium heat
d@ng
setting.
sp&*
Use a low heat
d@ng
setting.
Use a low heat
d~ng
setting.
-m~I-
Use a low heat
d~ng
setting.
(Includes
D~
only one extra large item at
a
time. Set
d~er
for 20 minutes.
Cornfomrs,
men
time
isup,
check and redistribute load. Reset dyer and
blankets and
check after 15 minutes.
men
time is up, check and redistribute
matmess
pads.)
load. Reset timer and check at 5 minute intemls. Check after each
5 minutes to ensure articles do not fill
d~er
drum.
-e,
wet
articles should have ample room in the dryer, but as they
d~
and
fltiup
they may not have room to tumble.
UU~ON:Itemswithout
room to tumble may block air
flowand
-
could result in scorched items.
D~
mattress pads separately. Use
a low heat
d@ng
setting.
12

I.oading
i
As a general rule, if clothes are
sorted properly for
tie
washer, they
are sorted properly for the @cr.
Sort by color Sepamta
lint pmducem
tim
(Separate colorfast from
lint
collactom
non+olorfast
fabrics*) . Lint producers:
te~
cloti
and
*
Whites
chenille
.
Ligh@ . Lint collectors: velveteen and
8
Darks
corduroy
Separata
bytibric
~pa
Sort by
weight
.
Cottons and linens
. Heavy Items
●
Permanent
press
cottons . Light Items
.
and blends
●
Syntietic and poly knits
s
Delicates
*
Avoid drying very small loads.
@
Do not dry the following items:
Sort clothes by weight so you . Fiberglass items
won’t have to run an extra cycle
● Woolens
for one or two heavier, slower
. Rubber coated items
d@ng
items.
●
Plastics
Do not add fabric softener shee~
●
Items with plastic trim
once the load has become warm. . Foam-filled items
This may cause fabric softener
stains.
Do not overload. This causes
inefficient operation and
unnecessa~ wrinkling. Clothes
need
to
tumble freely.
13

o~
;“
1
I
(;are
b“
(;lt(lr)in,g
The drum is rust-resistant and
requires no special care.
Wipe off any spills or washing
compounds. Wipe or dust
wi-ti
a damp cloth. Try not to strike
the surface with sharp
objecfi.
Dryer control panel and finishes
may be damaged by some
Iaundq
pretreatment soil and stain remover
producti
if such products are
sprayed on or have direct contact
with the
d~er.
Apply these pretreatment products
away from the
d~er.
The fabric
may then be washed and dried
normally. Damage to your
d~er
caused by pretreatment products
is not covered by your
~n~.
&fore
every dryer use, clean the
L
lint filter. Moisten your fingers and
I
B
reach into the filter opening. Run
../--
your fingers across the filter.
To keep your dryer operating at
peak performance, be sure to have
a technician vacuum the lint from
the machine
eve~
three years.
To store your dryer for a short
period of time, disconnect the
power supply and clean the lint
filter.
14

i
Inspect and clean the dryer
To clean the exhaust duct follow
exhaust ducting at least once
these steps:
a year to prevent clogging. A
1
partially clogged exhaust can
lengtien
the
d@ng
time.
2
3
4
Turn off electrical supply by
disconnecting the plug from
the wall socket.
Disconnect exhaust duct from
the
dqer.
Vacuum the exhaust duct
tith
the hose attachment.
Reconnect the exhaust duct to
the
dqer.
●
Make sure
tie
inside flaps of the
exhaust hood move freely (you
may want to check with a mirror).
o
Make sure inside flaps are fully
open when dryer is operating.
●
Make sure there is not wildlife
(birds, insects, etc.) nesting
inside the exhaust duct or hood.
Check the inside
d
the exhaust
hti
with a
mirmr
W
rid
d
debris
15
—

Problem Possible Causes
Hat
to Do
Dryer is unplugged
●
Make sure the dryer plug is pushed
completely into the
oudet.
Fuse is blm/eireuit
●
Check the house fuse/circuit breaker
breaker is
tip-
box and replace fuse or reset breaker.
NO~.Most
electric dryers use two breakers.
Fuse
is
blown/eireuit
breaker
c
Check the house fuse/circuit breaker box
is
tip-
the
dryer
may
tumble but not heat
and replace fuse or reset breaker.
Gas
Ace
is off
●
Make sure gas shutoff at dryer and main
shutoff are fully open.
Some
-/noise
isnd.
●
Move
d~er to an even floor space, or adjust
Dryer maybe
sittingunm
as necessary until even.
tipper
use of fabric softener
●
Follow directions on fabric softener package.
Drying
dirty
items
tith
. Use your dryer to dry only clean items.
Di~
dean
on-
items can stain clean items and the dryer.
aothes
~
not
completiy
●
Sometimes
stins
which cannot be seen when
dean
the clothes are wet ‘appear
n
&r
@rig. Use
proper washing procedures before drying.
bt
falter is
M
c
Clean lint screen before each load.
bproper
sorting
c
Sort lint producers (like chenille)
fmm
lint collectors (like corduroy).
Static
tieitycan
attract tit
●
See
su~estions
in this section under
fiA~C.
*loading
●
Separate large loads into smaller ones.
Rper,
tissue, etc. left in pockets
*Empty
all
pocke~
before laundering clothes.
16
. . .

191
Problem Possible Causes
Mat
to Do
●
TV
a fabric softener.
● Adjust controls for less-g.
No
fabric
softierwas
used
●
TV
a fabric softener.
Sptiedm
permanent press
●
Tq
a fabric softener.
●
Separate heavy items from lightweight items
(generally, a
well+ortedwasher
load is a
well+orted
d~er load).
\
kge
loads of
hea~
items
●
Large,
heavy loads contain more moisture
(We
betitoweh)
and take longer to
d~.
Separate large, heavy
items into smaller loads to speed
d~ng
time.
Wtrok
improperqset
●
Match
control settings to the load you
are
d~ng.
tit
falter is
fti
●
Clean lint filter before
eve~
load.
hproper
or
obstructe
d
●
Check instigation instructions for proper
du~
ducting/venting.
. Make sure
ducting
is clean, free of kinks
and unobstructed.
c
Check to see if outside wall damper
operates easily.
s
See the Venting the Dryer section.
Blown fuses or tripped
●
Replace fuses or reset circuit breakers. Since
circuit
breakers
most dryers use 2 fuses/breakers, make sure
both are operating.
*loading/
●
Do
not put more than one washer load in
combining
loads
the dryer at a time.
Underloading
. If you are drying only one or two items,
add a few items to ensure proper tumbling.
17

Problem
Possible
Causes
mat
to Do
●
Select a shorter drying time.
. Remove items while they still hold a slight
amount of moisture.
U*
items
ait
k
dryer
@Remove
items when cycle ends and fold or
after cycle ends hang immediately.
Some
fabrimtinaturx
o
To
avoid
shrin~e,
follow ~rment
care
M
hen
Waahed.
Otirn labels exactly. - -
-
be
d~washed,
but
W
*k
tie dryer.
●
Some items maybe pressed back into
shape
after drying.
●
If you are
ct>ncerned
about shrinkage in
a particular item, do not machine wash
or
tumble dry it.
.-
18
——

Venting
theDqw
For the best
dqing
performance
the dryer needs to be properly
vented.
Camtilly
tillow
the
detajls
on
fihausting
in the Installation
ln~tiions.
. Use only rigid metal or flexible
metal 4“ diameter
duc~ork
inside the
dqer
cabinet or for
exhausting to
tie
ou~ide.
Do not use
plutic
or other com-
bustible
duc~ork.
s
Use the shortest length possible.
●
●
Do not crush or collapse.
Avoid resting the duct on sharp
objects.
Venting must
conhm
to local
building codes
19

-.
This manual suits for next models
1
Table of contents
Other GE Dryer manuals
Popular Dryer manuals by other brands

Electrolux Professional
Electrolux Professional Compass Pro TD6-16 installation manual

Dyson
Dyson AB09 owner's manual

Double K Industries
Double K Industries Challengair 850 instruction manual

Maytag
Maytag Amana NDE2330AYW Service manual

Whirlpool
Whirlpool WGD94HEAW installation instructions

AEG
AEG LAVATHERM 67680IH3 user manual

Bosch
Bosch WTW87468GR Installation and operating instructions

Hoover
Hoover DYC 8813BX Instruction book

Caple
Caple TDF160 instruction manual

Maytag
Maytag SDE505DAYW user guide

Champion
Champion Eseries Installation/operation manual with service replacement parts

Samsung
Samsung DV56H9100E Series user manual