GE 29897 User manual

Model 29897
Digital Answerer with
Call Waiting Caller ID and
Speakerphone Telephone
User’s Guide

2
Important Information
NOTICE: This product meets the applicable Industry Canada technical specications.
Operation is subject to the following two conditions: (1) This device may not cause interference, and (2) This
device must accept any interference, including interference that may cause undesired operation of the
device.
The equipment must be installed using an acceptable method of connection. The customer should
be aware that compliance with the above conditions may not prevent degradation of service in some
situations.
Repairs to certied equipment should be made by an authorized Canadian maintenance facility designated
by the supplier. Any repairs or alterations made by the user to this equipment, or equipment malfunctions,
may give the telecommunications company cause to request the user to disconnect the equipment.
Users should ensure for their own protection that the electrical ground connections of the power
utility, telephone lines and internal metallic water pipe systems, if present, are connected together. This
precaution may be particularly important in rural areas.
CAUTION: Users should not attempt to make such connections themselves, but should contact the
appropriate electric inspection authority, or electrician, as appropriate.
NOTES: This equipment may not be used on coin service provided by the telephone company.
Interference Information
This equipment generates and uses radio frequency energy which may interfere with residential radio and
television reception if not properly installed and used in accordance with instructions contained in this
manual. Reasonable protection against such interference is ensured, although there is no guarantee this
will not occur in a given installation. If interference is suspected and veried by switching this equipment on
and off, the user is encouraged to try to correct the interference by one or more of the following measures:
Reorient the radio/television receiver’s antenna, relocate the equipment with respect to the receiver, plug
the equipment and receiver into separate circuit outlets. The user may also wish to consult a qualied
radio/television technician for additional suggestions. This equipment has been fully tested and complies
with all limits for Class B computing devices pursuant to part 15 FCC Rules and Regulations.

3
Telephone Network Information
Should your equipment cause trouble on your line which may harm the telephone network, the telephone
company, where practicable, may notify you that temporary discontinuance of service may be required.
Where prior notice is not practicable and the circumstances warrant such action, the telephone company
may temporarily discontinue service immediately.
The telephone company may make changes in its communications facilities, equipment, operations or
procedures where such action is required in the operation of its business. If these changes are expected
to affect the use or performance of your telephone equipment, the telephone company will likely give you
adequate notice to allow you to maintain uninterrupted service.
Notice must be given to the telephone company upon termination of your telephone from your line.
REN Number
On the bottom of this equipment is a label indicating, among other information, the Ringer Equivalence
Number (REN) for the equipment.
The REN is useful in determining the number of devices you may connect to your telephone line and still
have all of these devices ring when your telephone number is called. In most (but not all) areas, the sum of
the RENs of all devices connected to one line should not exceed 5. To be certain of the number of devices
you may connect to your line as determined by the REN, you should contact your local telephone company.
REN number is located on the cabinet bottom
Hearing Aid Compatibility
This telephone system meets FCC standards for Hearing Aid Compatibility.
Licensing
Licensed under US Patent 6,427,009.

4
Table of Contents
Important InformatIon .................................2
Interference InformatIon .............................2
telephone network InformatIon .................3
ren number ...............................................3
hearIng aId compatIbIlIty ............................3
lIcensIng .....................................................3
table of contents .......................................4
IntroductIon ...............................................6
before you begIn ........................................6
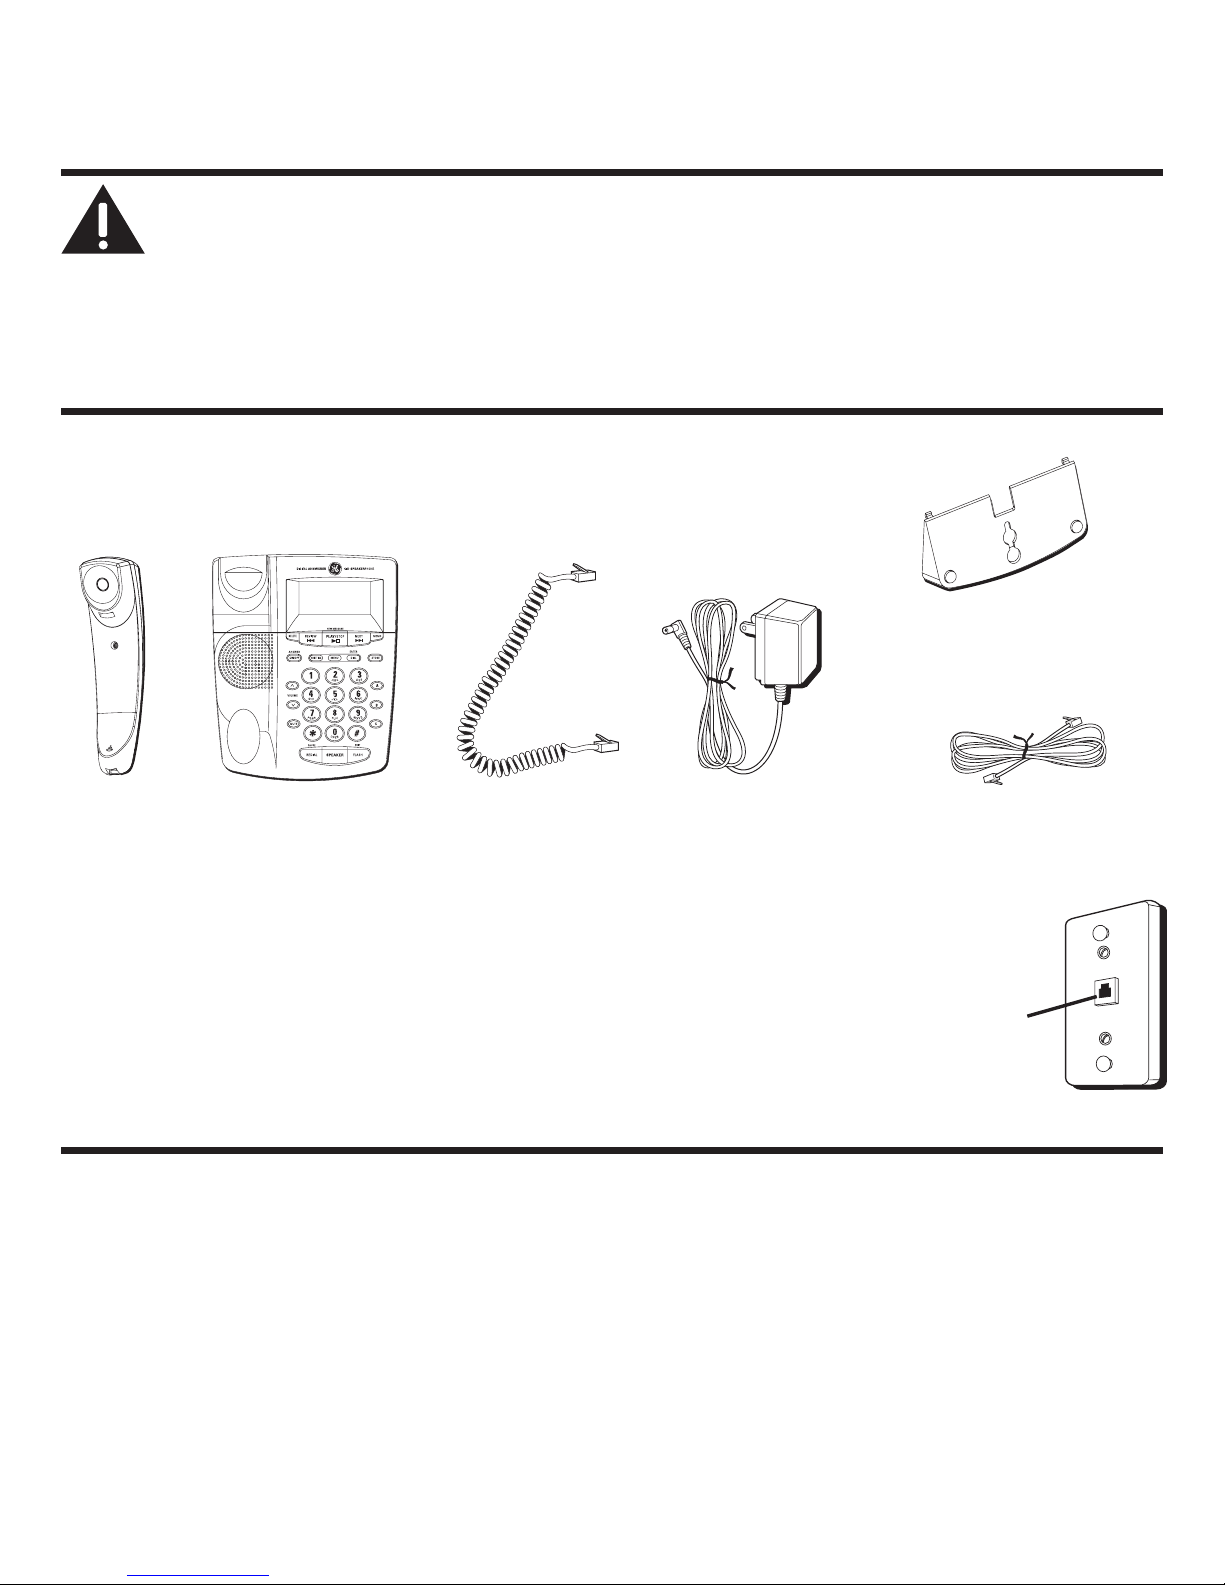
Parts CheCklist .................................................6
telePhone JaCk requirements.........................6
Important InstallatIon InformatIon .............6
base layout .................................................7
InstallIng the phone ....................................7
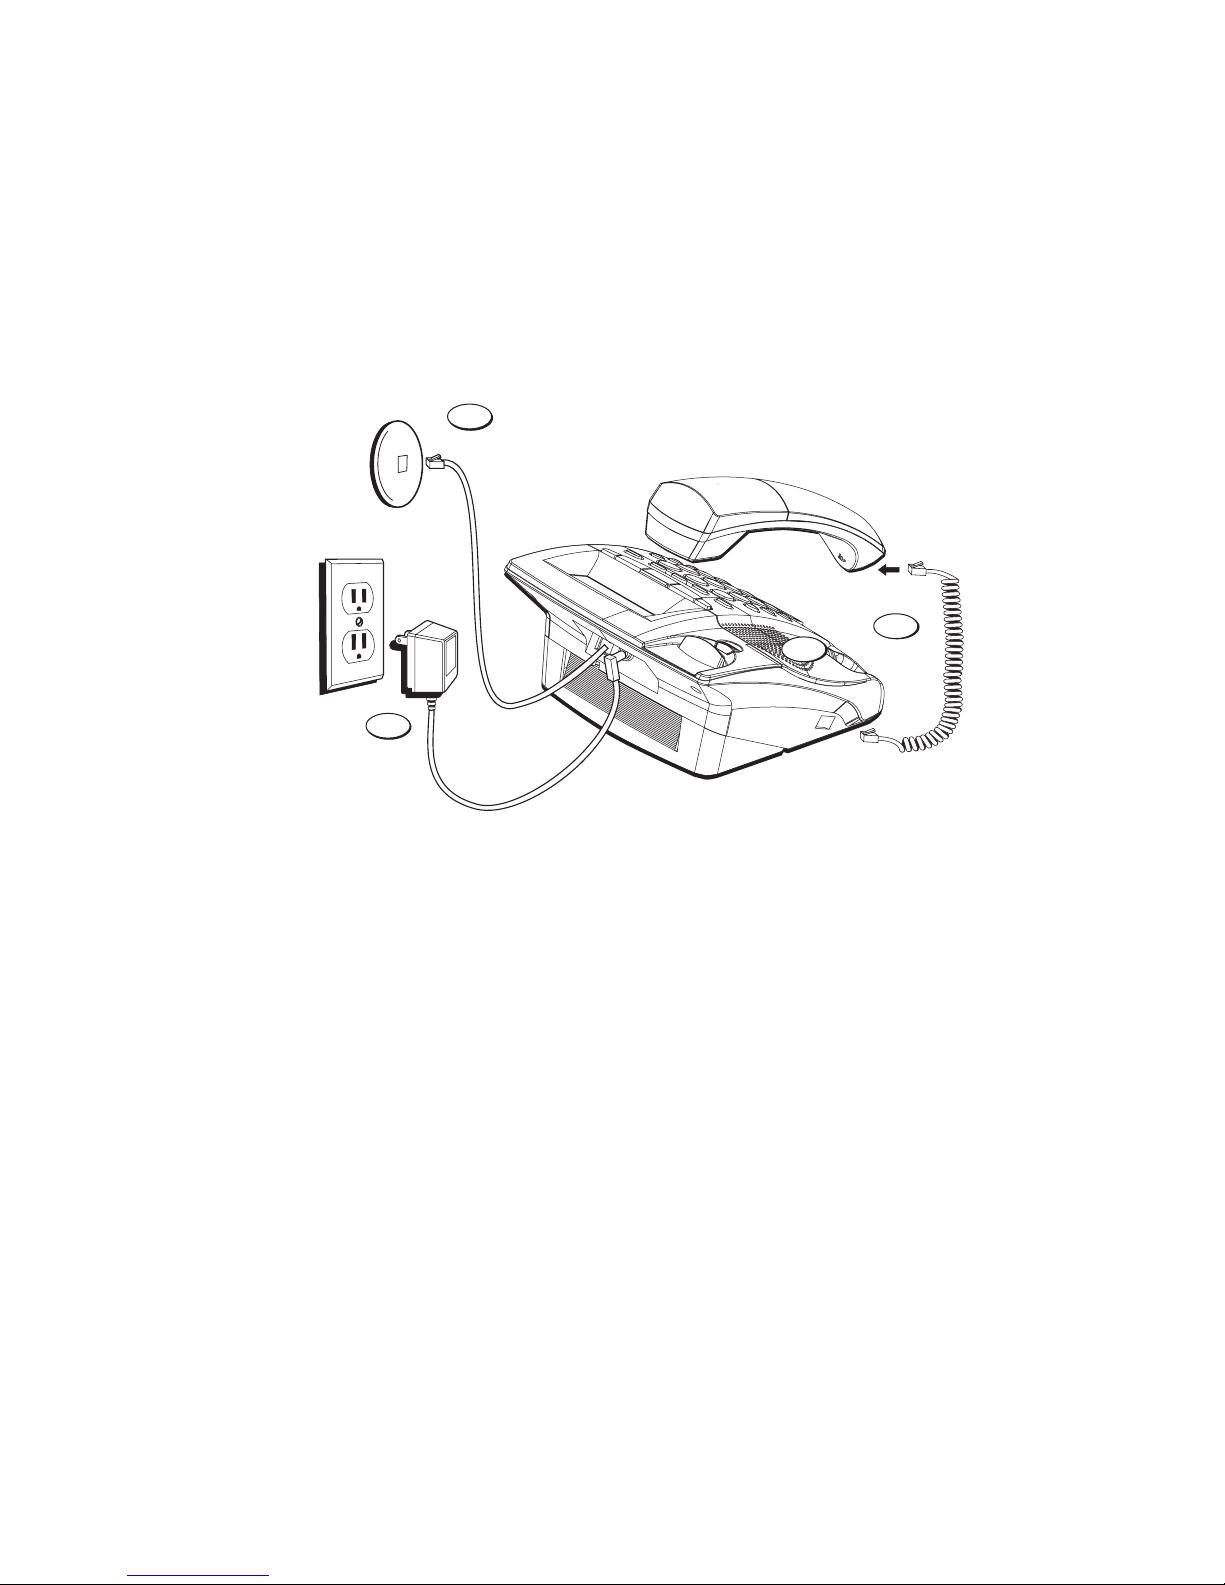
DesktoP installation ........................................7
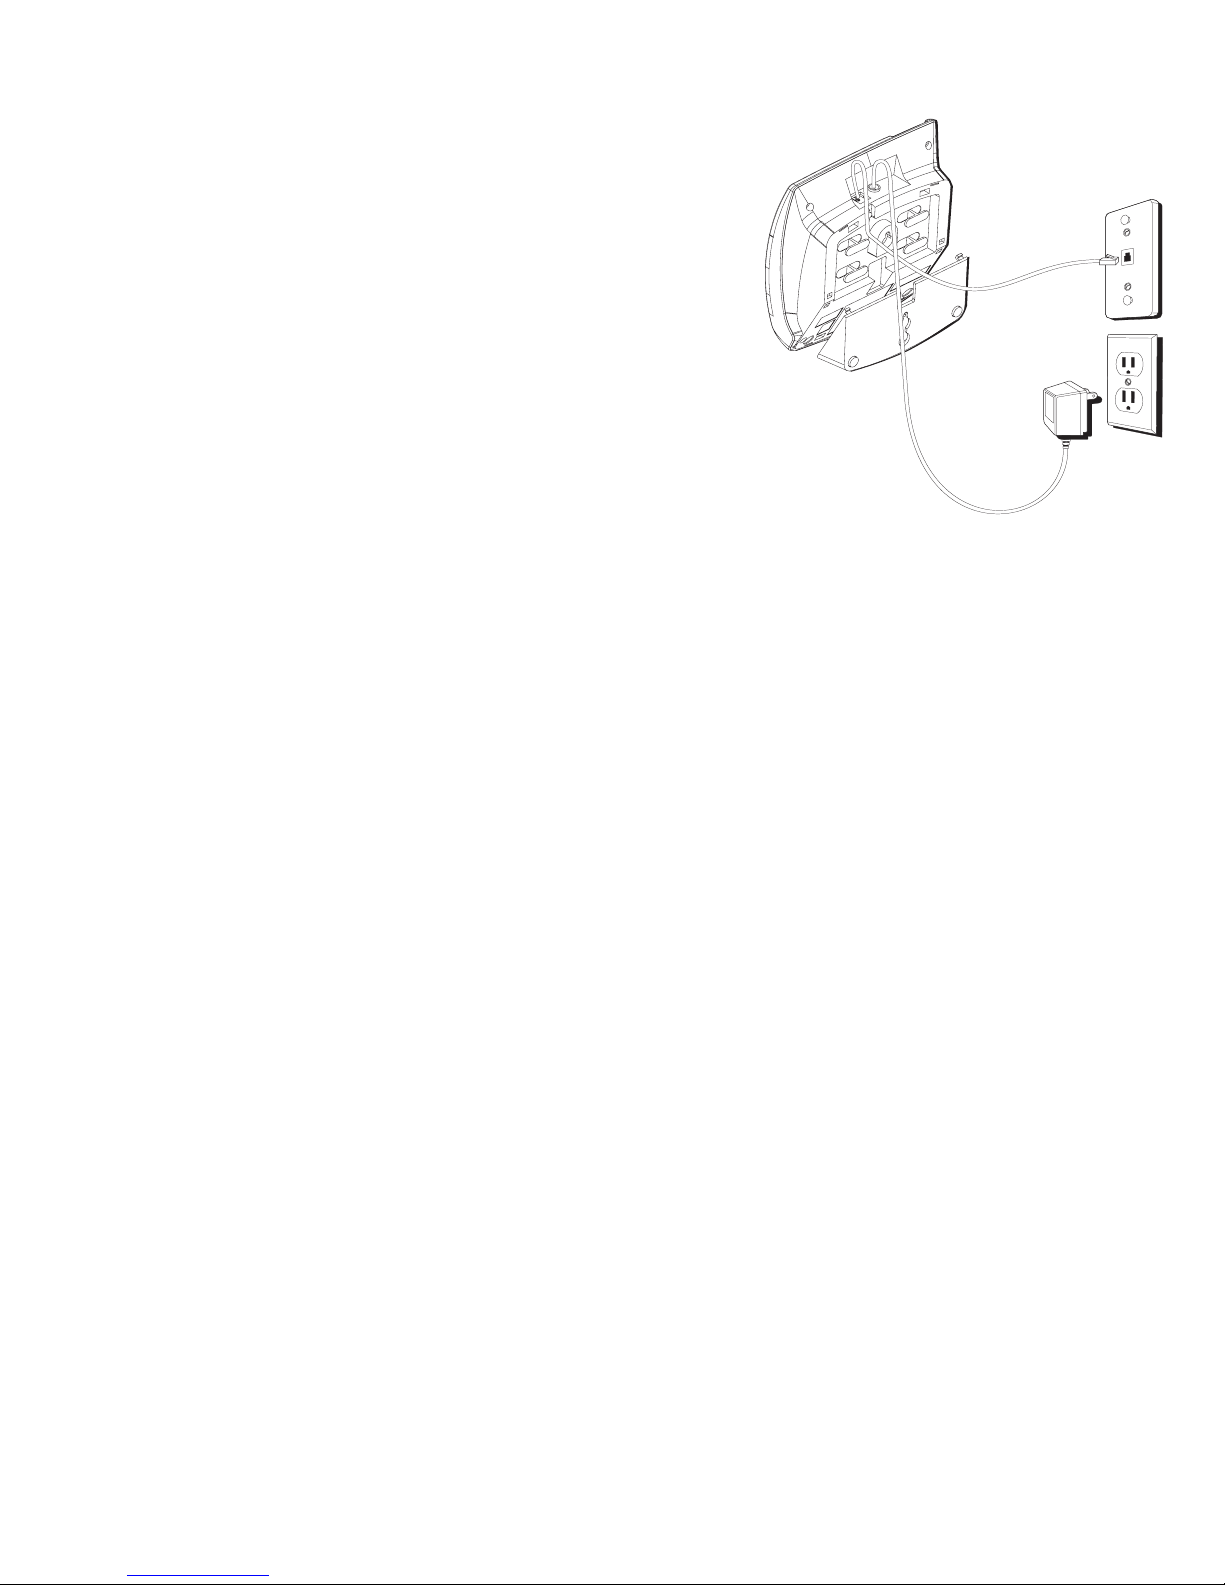
Wall mounting the Phone .............................8
imPortant instruCtions for moving the
ansWerer: ...........................................................9
answerIng system set up ..........................10
reCorDing the greeting ...........................10
telephone set up ......................................10
setting the DisPlay Contrast ......................11
setting the time anD Date ............................11
setting your loCal area CoDe ...................12
setting the inComing message length ......13
setting the rings to ansWer .......................13
toll saver .......................................................14
setting the seCurity CoDe ...........................14
setting the Dialing moDe ............................14
setting the regional area CoDes ...............15
message volume.............................................16
ringer volume ................................................16
hanDset volume.............................................16
sPeakerPhone volume ...................................16
telephone operatIon .................................16
using the sPeakerPhone ...............................16
reCeiving a Phone Call.................................17
PlaCing a Phone Call ...................................17
sWitChing betWeen sPeaker anD
hanDset ......................................................17
temPorary tone Dialing ...............................18
flash ................................................................18
reDial ...............................................................18
mute .................................................................18
answerer operatIon ..................................19
Call ansWering ..............................................19
auto DisConneCt ............................................19
Playing messages ...........................................19
erase messages ..............................................20
leaving a memo ..............................................20
memory full ...................................................20
remote aCCess ................................................21
remote aCCess CommanDs .......................21

5
caller Id features ....................................22
summary sCreen .............................................22
Caller iD With Call Waiting .......................22
reCeiving anD storing Calls ........................23
revieWing Call reCorDs ...............................23
erasing Caller iD info .................................23
Dialing baCk ...................................................24
memory .....................................................25
storing a number in memory .....................25
storing Caller iD reCorDs ..........................26
inserting a Pause in the Dialing sequenCe 26
Changing a storeD number .........................26
Dialing a storeD number .............................26
Dialing a quiCk Dial number ......................27
revieWing storeD numbers ..........................27
Chain Dialing from memory ........................28
message IndIcators ....................................28
troubleshootIng guIde ..............................29
general product care ..............................30
servIce.......................................................31
Index .........................................................32
SEE MARKING ON BOTTOM / BACK OF PRODUCT
RISKOFELECTRICSHOCK
DONOTOPEN
WARNING: TO
PREVENT FIRE OR
ELECTRICAL SHOCK
HAZARD, DO NOT
EXPOSETHIS
PRODUCT TO RAIN
OR MOISTURE.
THE LIGHTNING
FLASH AND ARROW
HEAD WITHIN THE
TRIANGLE IS A
WARNING SIGN
ALERTING YOU OF
“DANGEROUS
VOLTAGE” INSIDE
THE PRODUCT.
CAUTION: TO REDUCE THE
RISK OF ELECTRIC SHOCK, DO
NOT REMOVE COVER (OR
BACK). NO USER
SERVICEABLE PARTS INSIDE.
REFER SERVICING TO
QUALIFIED SERVICE
PERSONNEL.
THE EXCLAMATION
POINT WITHIN THE
TRIANGLE IS A
WARNING SIGN
ALERTING YOU OF
IMPORTANT
INSTRUCTIONS
ACCOMPANYING
THE PRODUCT.
CAUTION:
Table of Contents

6
Telephone Jack Requirements
To use this phone, you need an RJ11C type modular telephone
jack, which might look like the one pictured here, installed in your
home. If you don’t have a modular jack, call your local phone
company to nd out how to get one installed.
Important Installation Information
• Never install telephone wiring during a lightning storm.
• Never touch non-insulated telephone wires or terminals, unless the telephone line
has been disconnected at the network interface.
• Use caution when installing or modifying telephone lines.
• Never install telephone jacks in wet locations unless the jack is specically
designed for wet locations.
Introduction
CAUTION: When using telephone equipment, there are basic
safety instructions that should always be followed. Refer to the
IMPORTANT SAFETY INSTRUCTIONS provided with this product
and save them for future reference.
Before You Begin
Parts Checklist
Make sure your package includes the following items:
Base AC power adaptorHandset Coiled cord
Mounting bracket
Line cord
Telephone
line jack
Wall plate

7
Base Layout
NEXT (button)
PLAY/STOP (button)
REVIEW (button)
DELETE (button)
MEMO (button)
STORE (button)
MENU (button)
ENTER/DIAL (button)
ANSWER/ON/OFF
(button)
GREETING (button)
VOLUME (buttons)
MUTE (button) FLASH/EXIT (button)
SPEAKER (button)
REDIAL/PAUSE (button)
Hook switch
NEW MESSAGE/
CID (indicator)
SPEAKER (indicator)
Microphone
Installing the Phone
CAUTION: To reduce risk of personal injury, re, or damage
use only the 5-2768 (white), 5-2644 (black), or 5-2779 (black)
power adaptor listed in the user’s guide. This power adaptor is
intended to be correctly orientated in a vertical or oor mount
position.
Desktop Installation
1. Plug the coiled cord into the handset. Plug the other end into the jack on the side of
the base.

8
2. Place the handset in the base.
3. Plug the telephone line cord into the LINE jack on the back of the phone. Plug the
other end into a wall jack.
4. Connect the small end of the power adaptor into the POWER 7.5V AC jack on
the back of the answerer. Plug the other end into an AC power outlet. The unit
beeps once and is ready for setup or to answer calls with the default greeting and
settings.
1
2
3
4
NOTE: The phone automatically defaults to touch-tone dialing. To
change to pulse (rotary) dialing, see “Setting the Dialing Mode.”
If you don’t know which type of service you have, check with the
phone company.
NOTE: The unit is properly installed if you pick up the handset and
hear the dial tone. Otherwise, recheck all the installation steps.
Wall Mounting the Phone
1. Carefully turn the handset hook 180° with a coin or screwdriver until it points
upward. You need to do this so that the handset doesn’t fall out of the base.
2. Plug the coiled cord into the handset. Plug the other end into the jack on the side
of the base.
3. Place the handset in the base.

9
4. Carefully turn the phone over. Detach the
mounting bracket from the two sets of top
grooves by pressing the tabs in. Pull the bracket
from the phone and turn it around so that it
looks like the diagram. Gently press the bracket
into the two sets of bottom grooves until it snaps
into place.
5. Plug the line cord into the jack on the back of the
base. Wrap the extra line cord, if any, around the
hooks provided on the bottom of the unit.
6. Feed the short line cord through the grooves
provided so that the bottom of the phone is at and ready to mount on the wall.
7. Connect the other end of the line cord into the wall phone jack.
8.
Connect the small end of the power adaptor into the POWER 7.5V AC jack on the
back of the answerer. Plug the other end into an AC power outlet. The unit beeps
once and is ready for setup or to answer calls with the default greeting and settings.
9. Slip the mounting holes of the base (on bottom of unit) over the wall plate posts
and slide the base down until the phone is rmly in place.
Important Instructions for Moving the Answerer:
To move the answerer to a different location in the house, follow these instructions:
1. Disconnect the phone line.
2. Go to the electrical outlet and unplug the power adaptor.
3. Move the unit and phone line to the desired location.
4. Plug in the power adaptor into an electrical outlet.
5. The display shows that the messages have not been erased.
6. Connect the phone line.
7. Reset the time/date settings or wait for the next call to set them automatically.

10
Answering System Set Up
Recording the Greeting
Before using your new answerer, you should record a greeting (the announcement
callers hear when your answering system answers a call). If you don’t record a
greeting, callers hear a default greeting which says, “We are not available to take
your call. Please leave a message. Thank you for calling.”
When recording the greeting you should be about 6 inches from the unit. Eliminate as
much background noise as possible.
1. Prepare your greeting.
Sample Greeting: “Hi, this is (use your name here). I can’t answer the phone right
now, so please leave your name, number, and a brief message after the tone, and
I’ll get back to you. Thanks for calling.”
2. Hold down the GREETING button. The unit announces “Record your greeting after
the tone,” and displays GREETING RECORD. After the tone, you have 30 seconds to
record your greeting.
3. Release GREETING when you nish.
• To review the greeting, press and release GREETING. The unit plays back your
greeting automatically.
• To return to the answerer’s default greeting after you’ve recorded one, press
GREETING and release it when you hear the tone, or press and hold DELETE when
the greeting is playing.
Telephone Set Up
You can customize the following settings to suit your
needs.
Display Contrast Selects the display contrast.
Time/Date Sets the time and date.
Local Area Code Sets your local area code for Dial Back.
Message Length Sets the length of time allowed for
incoming messages.
Default Settings
Display Contrast 3
Time/Date 12 a.m. 1/01
Local Area Code – – –
Message Length 2 minutes
Rings to Answer 4
Security Code 123
Dialing Tone
Regional Area Codes – – –

11
Rings to Answer Selects the number of rings before the unit answers.
Remote Access Sets your 3-digit code used for remote access to the unit.
TONE/PULSE Dialing Sets the phone for tone or pulse dialing.
Regional Area Codes Sets your regional area codes if you have multiple area codes
where you live.
During the course of setting up the phone, you can press the DELETE button to scroll
back to the previous Setup menu.
Setting the Display Contrast
This setting allows you to adjust the display contrast for easier readability.
1. Press and release the MENU button until SET CONTRAST is displayed. The unit
announces, “Setup menu. To change setting, use NEXT or REVIEW. To save a
setting, press ENTER.”
2. Use NEXT or REVIEW to select the desired setting or press the keypad number for
the setting (1-5).
3. When nished, press ENTER to conrm. The unit beeps.
NOTE: To skip to the next setting, press MENU. To exit setup, press EXIT.
Setting the Time and Date
NOTE: If you have subscribed to the Caller ID display feature from
your telephone company, the telephone company sends the time
and date with the Caller ID information. The unit automatically sets
the time and date when the rst call is received.
Hour
1. If you just adjusted the Display Contrast menu, skip to step 2. If you haven’t
adjusted any other setting, press and release the MENU button until SET TIME/
DATE is displayed.
2. Use NEXT or REVIEW to set the hour.
3. When nished, press ENTER to conrm. Now you’re ready to enter the minutes.

12
Minutes
1. Use NEXT or REVIEW to set the minutes.
2.
When nished, press ENTER to conrm. Now you’re ready to enter the time of
day, AM or PM.
AM/PM
1. Use NEXT or REVIEW to set the time of day.
2. When nished, press ENTER to conrm. Now you’re ready to enter the month.
Month
1. Use NEXT or REVIEW to set the month.
2. When nished, press ENTER to conrm. Now you’re ready to enter the day.
Date
1. Use NEXT or REVIEW to set the date.
2. When nished, press ENTER to conrm.
TIP: You can use the keypad as a shortcut to enter the time/date
information. For example, to enter 8:09 a.m. 7/4:
1. Press 08.
2. Press 09.
3. Press 1 (for a.m.).
4. Press 07.
5. Press 04.
6. Press ENTER.
Setting Your Local Area Code
1. If you just adjusted the Time/Date menu, skip to step 2. If you haven’t adjusted
any other setting, press and release the MENU button until LOCAL AREA CODE is
displayed.
2. Use NEXT or REVIEW to select the rst digit.

13
3. Once the rst digit is set, press ENTER.
4. Repeat steps 2-3 until all the digits of the area code are set.
5. When nished, press ENTER to conrm. The unit beeps.
NOTE: To skip to the next setting, press MENU. To exit setup, press EXIT.
TIP: You can use the keypad to enter all the digits in one step. To
enter 317, press 3,1, and 7. Then press ENTER.
Setting the Incoming Message Length
This setting allows you to set the maximum length of time allowed for a single
incoming message. You can choose from 1-4 minutes.
1. If you just adjusted the Local Area Code menu, skip to step 2. If you haven’t
adjusted any other setting, press and release the MENU button until MESSAGE
LENGTH is displayed.
2. Use NEXT or REVIEW or press the keypad number (1-4) for the desired setting.
3. When nished, press ENTER to conrm. The unit beeps.
NOTE: To skip to the next setting, press MENU. To exit setup, press EXIT.
Setting the Rings to Answer
This setting allows you to set the number of rings before the unit answers a call. You
can choose from 2-8 or Toll Saver (see “Toll Saver.”)
1. If you just adjusted the Message Length menu, skip to step 2. If you haven’t
adjusted any other setting, press and release the MENU button until SET RINGS TO
ANS is displayed.
2. Use NEXT or REVIEW or press the keypad number (2-8, Toll Saver) for the desired
setting.
3. When nished, press ENTER to conrm. The unit beeps.
NOTE: To skip to the next setting, press MENU. To exit setup, press EXIT.

14
Toll Saver
Toll Saver can save you the cost of a call when you access your messages from
another phone:
• If you have new messages, the unit answers after the 2nd ring.
• If you have no new messages, the unit answers after the 5th ring.
You can hang up after the 3rd ring and save the pay telephone or long distance charge.
Setting the Security Code
This feature allows you to change the factory default remote access code used for
remote access to you answerer. The default code is 123.
1. If you just adjusted the Rings to Answer menu, skip to step 2. If you haven’t
adjusted any other setting, press and release the MENU button until REMOTE
ACCESS is displayed.
2. Use NEXT or REVIEW to select the rst digit.
3. Once the rst digit is set, press ENTER. The unit beeps to conrm.
4. Repeat steps 2-3 until all the digits of the security code are set.
NOTE: To skip to the next setting, press MENU. To exit setup, press
EXIT.
TIP: You can use the keypad to enter all the digits in one step. To
enter 456, press 4,5, and 6. Then press ENTER.
Setting the Dialing Mode
This adjustment allows you to select tone (touch-tone) or pulse (rotary) mode dialing.
The phone is automatically set for touch-tone use.
1. If you just adjusted the Remote Access menu, skip to step 2. If you haven’t adjusted
any other setting, press and release the MENU button until DIALING is displayed.
2. Use NEXT or REVIEW or press the keypad number for the desired setting (1 for
pulse, 2 for tone).

15
3. When nished, press ENTER to conrm. The unit beeps.
NOTE: To skip to the next setting, press MENU. To exit setup, press EXIT.
Setting the Regional Area Codes
Depending on your area, you may need to set regional area codes. These are needed
in order for the phone to determine the number format to be displayed when a valid
Caller ID signal is received. Calls received that match any of the regional area codes
are displayed as 10 digits. If the number is not displayed correctly, the phone may not
be able to dial back the number properly. You can store up to 6 regional area codes.
You may need to use this feature if you have:
• Multiple area codes
• Overlapping area codes
• Areas that require 10-digit dialing.
1. If you just adjusted the Dialing menu, skip to step 2. If you haven’t adjusted any
other setting, press and release the MENU button until REGIONAL AC# is displayed.
The rst digit of code #1 ashes.
2. Use NEXT or REVIEW to set the rst digit.
3. Press ENTER. The next digit ashes.
4. Repeat steps 2-3 until all the digits of the regional area code are set.
5. When nished, press ENTER to conrm. The unit beeps.
NOTE: If you don’t want to enter any more area codes, press MENU.
To exit setup, press EXIT.
NOTE: You can use MENU at any time to scroll through the settings.
Also, if you don’t make a selection within 30 seconds, the unit
automatically exits the setup menu.
TIP: You can use the keypad to enter all the digits in one step. To
enter 891, press 8,9, and 1. Then press ENTER.

16
Message Volume
Use the VOLUME ^ and v buttons to adjust the volume when playing back messages
and while reviewing or changing the setting.
Ringer Volume
Use the VOLUME ^ and v buttons to adjust the loudness of the ringer when the
handset is not in use. The phone gives a sample ring when adjusting.
Handset Volume
Use the VOLUME ^ and v buttons to adjust the handset listening volume while it is in use.
Speakerphone Volume
Use the VOLUME ^ and v buttons to adjust the speakerphone listening volume while
it is in use.
Telephone Operation
Using the Speakerphone
Speakerphone Location
For best speakerphone performance, avoid the following:
• Areas with high background noise. (The microphone might pick up these sounds
and prevent the speakerphone from going into the receiving mode when you nish
talking.)
• Surfaces affected by vibration.
• Recessed areas such as in a corner, under a cupboard, or next to a cabinet, which
can generate an echo effect.
Speakerphone Use
Note the following guidelines when using the speakerphone:
• The speakerphone works similar to a two-way radio in that you can only listen or
talk at one time.

17
• Stay reasonably close to the phone so that you can be clearly heard by the person
to whom you are talking.
• You can adjust the speaker volume by pressing the VOLUME ^ and v buttons.
• The speakerphone indicator comes on when the speakerphone is in use.
Receiving a Phone Call
1. When the phone rings, the speakerphone indicator blinks and the caller’s
information, if any, will be shown on the display panel. Lift the handset or press the
SPEAKER button to connect your phone call.
2. You can adjust the volume of the caller’s voice by pressing the VOLUME ^ and v
buttons.
Placing a Phone Call
1. Lift the handset or press the SPEAKER button and wait for a dial tone.
2. Dial the telephone number you wish to call.
3. You can adjust the volume of the caller’s voice by pressing the VOLUME ^ and v
buttons.
Switching between Speaker and Handset
You can switch between speakerphone and handset while the phone is dialing a
number, or anytime during a conversation.
• Speaker to Handset — Pick up the handset.
• Handset to Speaker — Press SPEAKER, then hang up handset.
Temporary Tone Dialing
If you have pulse service, you can temporarily change from pulse to tone service.
After dialing the telephone number, press and release the TONE (*) button on
the telephone. This allows access to phone services that require a tone, such as
banking and long-distance services. After you hang up the handset, the telephone
automatically returns to pulse service.

18
Flash
Press the FLASH button instead of using the hook switch to activate customer calling
services such as call waiting or call transfer, which are provided by your local phone
company.
Redial
Redial the last number you called by pressing the REDIAL button after you get a dial
tone.
NOTE: The Redial feature holds in memory the last phone number
you dialed (as many as 63 digits). If you pressed any numbers after
dialing the phone number, (for example, when accessing a voice-
menu system) those numbers also are redialed.
IMPORTANT: In the event of a power outage, your phone will still
be able to make and receive calls, however, the speakerphone and
answerer will not be operational.
Mute
1. Press the MUTE button to mute a call, the MUTE indicator will light up. You will still
be able to hear the calling party but they will not be able to hear you speaking.
2. Press the MUTE button again to unmute the call.
Answerer Operation
Call Answering
When a call comes in, the unit will ring the number of times set, play the greeting, and
record the incoming call.
You can:
• Answer the call before the unit answers.
• Pick up the phone during the greeting.
• Listen to the incoming message (Call screening).

19
• Pick up the phone during the incoming message, if desired.
• Disconnect the caller by pressing the STOP button.
Auto Disconnect
Auto disconnect is a feature that tells the unit to stop playing the greeting or
recording when a extension phone is picked up. Sometimes you may pick up and the
system keeps playing the greeting. This is normal. If you want to pick up the phone
during the greeting play, wait about two seconds after the system answers before
picking up a phone.
If the greeting continues to play after picking up an extension phone, press the PLAY/
STOP button.
Playing Messages
Use the PLAY/STOP button to play messages. The unit rst plays new messages
in the order received. If there are no messages, the unit announces, “You have no
messages.” If there are no new messages, the old messages are played back.
When playing messages, the message number and the date-time stamp will be
shown on the display. If Caller ID name and number information is received, that will
be displayed also.
• To play messages, press and release PLAY/STOP.
• To stop playback, press and release PLAY/STOP again.
• To restart the message that is playing, press and hold REVIEW until the message
restarts.
• To replay the previous message, press and release REVIEW.
• To play the next message, press and release NEXT.
Erase Messages
Single Messages
You can erase a message itself, leaving the Caller ID information.
• While the message is playing, press and release DELETE. The unit erases the
current message and announces, “Message erased.”

20
All Messages
You can also erase all the old messages only, leaving the new messages and Caller ID
information.
While the unit is in ready-to-answer mode, press and hold DELETE until the unit
announces, “Messages erased.”
• New messages can not be erased in this way. To erase new messages, play them
then press DELETE during play back.
Leaving a Memo
Use the MEMO button to record a specic message for others who have access to
the unit.
1. Press and hold the MEMO button. The unit announces, “Record your memo after
the tone.”
2. Record your message after the beep.
3. Release MEMO when you’re nished talking. The unit treats the memo as a
message, as the display shows.
Memory Full
When the unit’s memory is full, it answers after 10 rings and announces, “Memory
is full. No messages will be recorded.” A 20-second waiting period follows, allowing
you to enter your security code.
Remote Access
You can access your answerer from any touch-tone phone from another location
by entering your 3-digit security code (the default security code is 1 2 3, but you can
change it.) Be aware that remote functions do not work with rotary or push-button
pulse-dialing phones.
To access your answerer:
1. Call your telephone number.
2. After you hear the beep that follows the greeting, enter your 3-digit security code.
Other manuals for 29897
1
Table of contents
Languages:
Other GE Telephone manuals