Gearmore 12 UNIV Guide

QUICK ATTACH
BUCKET FORKS
Operation, Service
& Parts Manual For
1,200 to 22,000 lb.
Capacity
November 1996 (Rev. 3-2009)
FORM: QABuckfork.QXD

Introduction . . . . . . . . . . . . . . . . . . . . . . . . . . . . .1
Plan Your Work . . . . . . . . . . . . . . . . . . . . . . . . . .2
Know The Work Area . . . . . . . . . . . . . . . . . . . . .3
Operating/Safety Procedures . . . . . . . . . . . . . .4-7
Operation . . . . . . . . . . . . . . . . . . . . . . . . . . . . . . .8
Installation . . . . . . . . . . . . . . . . . . . . . . . . . . .9-10
Parts Breakdown . . . . . . . . . . . . . . . . . . . . . . . .11
Date of Purchase:_____________________________
Model Number:_______________________________
Serial Number _______________________________
TABLE OF CONTENTS

We welcome you as an owner of a set of Gearmore Quick Attach Bucket
Forks. Please read the following instructions and refer to them when
required:
These forks are intended to convert your loader into a forklift for limited use. Since your loader
was not specifically designed as a forklift, extra care must be taken when operating, such as the
following:
1. Know the capacity and limitations of the forks.
2. Know your machines characteristics and operating procedures.
3. Study and know the safety procedures in this manual and the manual
provided with your tractor.
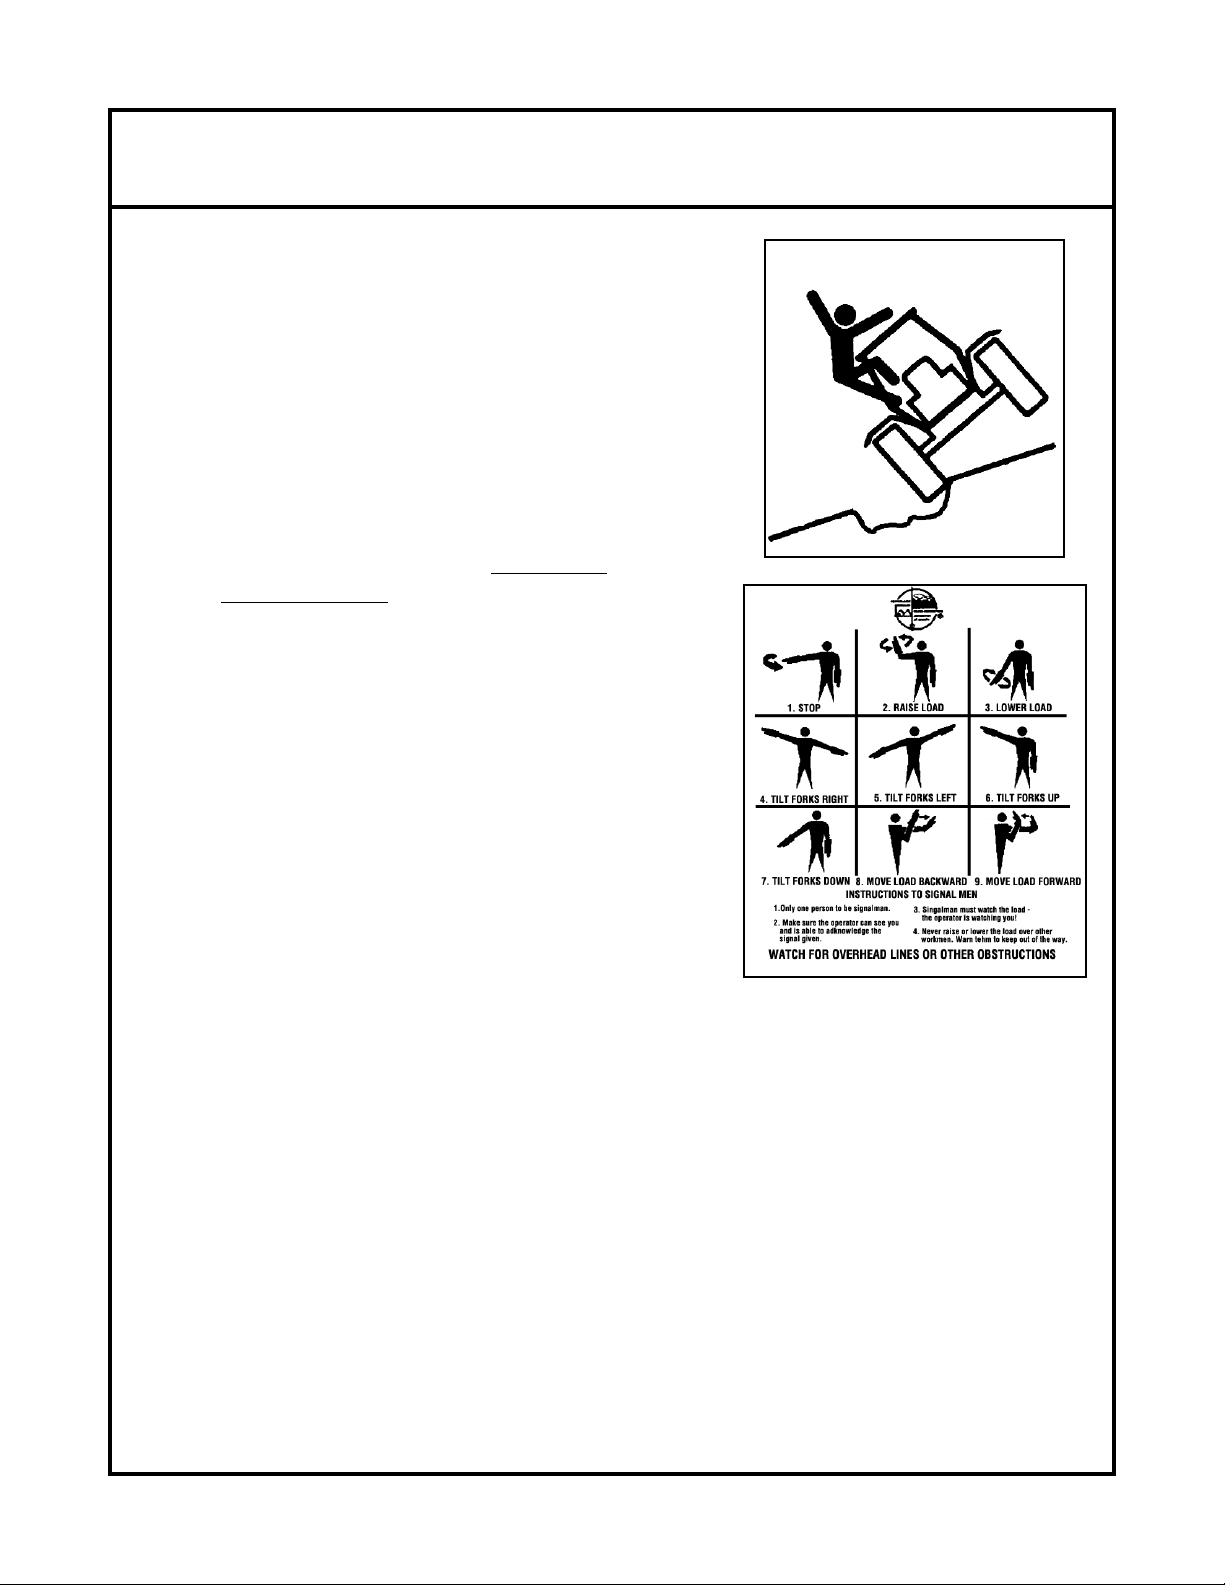
4. When in the field, refer to the safety decals on the forks (Ref. A). If at any time, over the
life of the forks, your safety decal becomes damaged, contact your dealer or Gearmore for
free replacement (909) 548-4848.
INTRODUCTION
Page 1
CAUTION
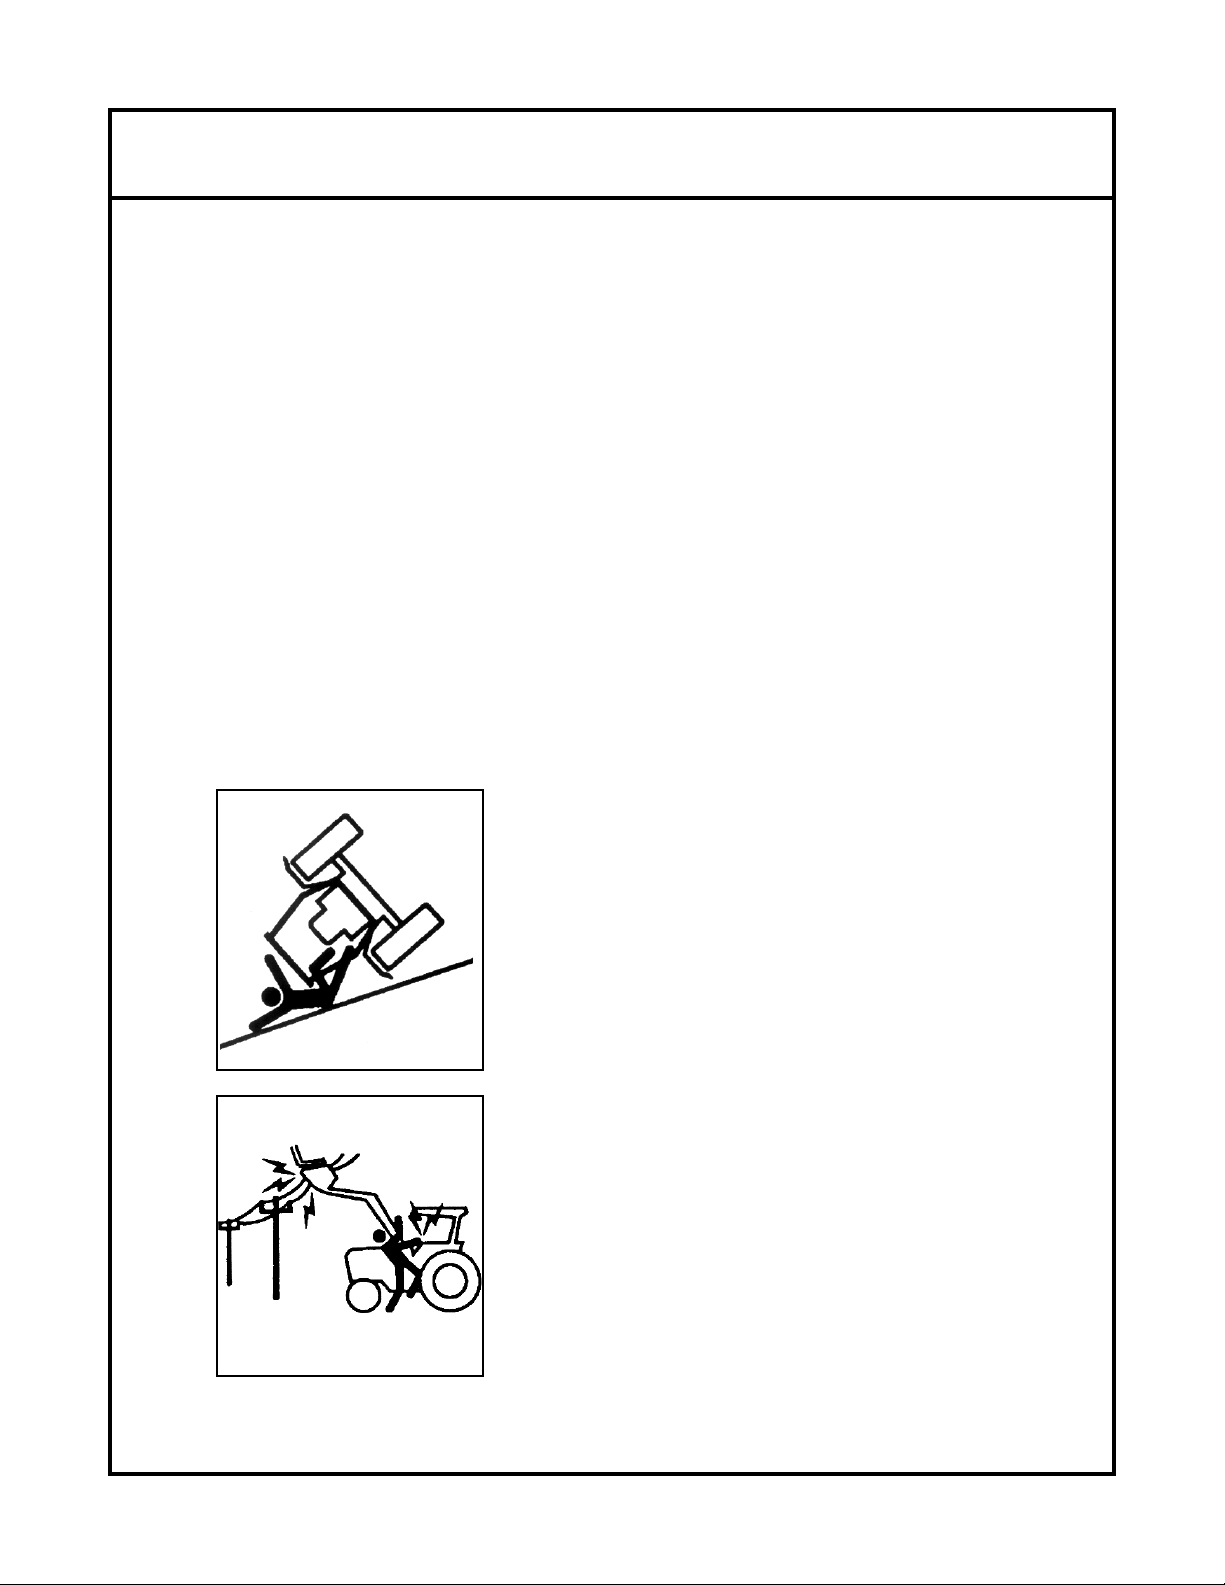
USE OF FORKS CAN BE EXTREMELY DANGEROUS! YOU
OR OTHERS CAN BE HURT BY:
TIPPING THE MACHINE LOSING THE LOAD
KNOW YOUR SAFETY RULES!
Before operating fork equipped loader, read your fork
owner's manual! Use extreme caution when operating!
ALWAYS KEEP LOAD CENTERED ON TINES AND MACHINE!
PROTECT YOURSELF!
Never roll back forks so that the load can fall on you or
others!
BEFORE DISMOUNTING MACHINE PLACE FORKS ON GROUND!
Never leave machine with a raised load! Always follow machine
manufacturers recommendations for dismounting and parking
machine.
USE OF FORKS WILL REDUCE MACHINE STABILITY!
Use extreme caution when lifting and transporting loads! Follow
machine manufacturers recommendations for use of counterweights
and other ballast!
KNOW YOUR MACHINE!
Never lift or transport more than your machine can handle!
RAMPS, GRADES, AND BUMPY OR SOFT GROUND WILL GREATLY
REDUCE YOUR MACHINE'S STABILITY!
Lifting and transporting loads under these conditions is extremely
dangerous! Use Extreme Caution!
KEEP FORKS AS LOW AS POSSIBLE DURING OPERATION!
KNOW YOUR SAFETY RULES!
GEARMORE, INC.
13477 Benson Ave.
Chino, CA 91710
(909) 548-4848
Ref. A

PLAN YOUR WORK
Page 2
Before you operate, know how and where you will travel, turn
and pickup, lift and place loads.
Choose a smooth level route to prevent possible tipover or loss
of load. If possible, avoid crossing:
•Ruts
•Ditches
•Curbs
•Exposed Railroad Tracks
When these conditions cannot be avoided, keep the load
as low as possible and travel very slowly and with
extreme caution.
Know where there are any blind corner conditions on the
worksite. Before turning a blind corner, stop, sound your horn,
and proceed slowly.
Always maintain safe distances between your tractor and other
equipment that may be on the worksite.
Know the weights of all loads you may be expected to trans-
port before attempting to lift them. Avoid loads of loose
material if possible. Check that loads are properly banded or
strapped together.
If you will be placing loads at high elevations, remember your depth perception is decreased
because of distance. Use a signal person near the point where the load is to be placed.
Know the rules for movement of people and forklifts on the worksite. Slow down and sound your
horn, making sure that your approach has been acknowledged by those in your path. Stop your
forklift until your presence has been recognized or until the path is clear.
Insure that adequate clearance is provided between both rear tail swing and front fork swing of the
forklift to avoid injury to personnel or damage to objects nearby.
REMEMBER:
•Be Alert - Knowing that conditions can change.
•Use Common Sense - Showing that you are a responsible operator.
•Be a Defensive Operator - Preventing accidents before they happen.

KNOW THE WORK AREA
Page 3
Before you operate, learn as much as possible about the work area.
Walk around the worksite and inspect the surface(s) over which you will be expected to travel.
AVOID:
⇒Holes
⇒Drop-offs
⇒Obstacles
⇒Rough Spots
⇒Soft Soil
⇒Deep Mud
⇒Standing Water
⇒Oil Spills
⇒Wet Spots
⇒Slippery Surfaces
If any of the above listed conditions exist in the work area, correct the condition before operating.
If the condition cannot be corrected, avoid operating in the problem area.
When operating on docks, ramps or floors, check for weak
spots. Clear away trash and debris. Pick up anything that
could puncture a tire.
Watch for any condition that could cause:
♦Loss of Control
♦A Collision
♦Tipover
Check overhead clearances. Know the size of doorways and
canopies. Know exactly how much clearance you have under
power lines and telephone lines.
IMPORTANT: DO NOT approach power lines, overhead
or underground cables or other power sources with any part of your
forklift unless all local, state/provincial and federal regulations have
been met and the appropriate utility company or digger's hotline has
been contacted to de-energize the lines.

OPERATING/SAFETY PROCEDURES
Page 4
Keep in mind that the lift capacity of the machine can be greatly reduced by a number of
factors, including:
1. Operating on a grade, especially across a grade.
2. Operating on uneven, soft, bumpy or rough terrain.
3. Under-inflated tires.
Double-tiered loads are hard to control and should not be lifted.
If there is any question about being able to lift the load, stop and separate the load
into smaller lifts.
Remember that the weight of the forklift attachment is the same as carrying a partial
load. In this case, operate the machine as if you were transporting a partial load.
Carry the load low - always at the lowest possible bucket height recognizing the
irregularities in the surface of the working area.
Keep your speed low enough so that you are in complete control at all times.
Operate your machine only from the operator's seat.
Sudden stops, starts, turns, or changes in direction can cause the load to fall or the
machine to overturn.
Keep others away from your operation. NEVER allow anyone to stand or pass
under a raised load.
NEVER drive a fork equipped machine up to someone standing in front of a
fixed object.
If overload causes the machine to tip - lower the load immediately.
If loads are to be re-handled, place stacking blocks under the load.

OPERATING/SAFETY PROCEDURES
Page 5
Approach the load slowly and squarely. Keep fork tips straight and level.
Engage the load by moving the machine carefully into position.
Make sure the load is evenly distributed between both forks.
Be sure that the forks are centered on the bucket.
When the load is up against the fork back rest, tilt the forks back to the "carry" position.
Tilt the load only enough to clear obstacles while moving.
Adjust the width between the forks to the widest setting allowed by the load.
Be certain that the load is secure.
DO NOT drag a load.
When carrying a suspended load, avoid sudden starts, stops, and turns. Use a tether
to restrict the movement of a suspended load.
WARNING!
When carrying drums, cylinders, reels, pipe, or other round objects, tilt forks back and
use a tie down, or tether if necessary, to secure the load.
Use extra care when handling long, high, or wide loads. Be particularly watchful to
avoid any contact with power lines.
ALWAYS watch your overhead and side clearance.
ALWAYS come to a gradual stop before reversing direction.

OPERATING/SAFETY PROCEDURES
Page 6
Whenever possible, two people should work together - one to operate the machine and the
other to direct and watch for danger and hazards.
NEVER travel down grade with loaded forks pointing down grade.
Make sure that the place where you will put the load can take the weight of the load.
Use extreme caution when placing or stacking a load overhead. This practice is
extremely dangerous. When carrying high, remember:
1. Use extreme caution because there may be workers or others in the area that you
cannot see.
2. Keep the load as low as possible while maneuvering the machine into position.
3. DO NOT lift the load until the machine is as close as possible to the place where
the load will go.
4. DO NOT raise the load if the forks are tilted to one side or bent.
5. If your machine is equipped with out-riggers, these should be lowered into position.
6. Use a signal person if necessary to help you safely place the load.
7. If there is any sign of instability, immediately lower the load and:
⇒Re-stack the load on the pallet or break it down into smaller loads.
⇒If necessary, move the machine to a more stable, level position.
WARNING!
The machine will become less stable as loads are raised higher.
DO NOT ram a hydraulic cylinder to the end of its stroke. The resulting jolt could
spill the load.

OPERATING/SAFETY PROCEDURES
Page 7
DO NOT apply the full down pressure of the machine to the forks; it could cause damage
to the tines, rod and/or mounting brackets.
The fork attachment will not withstand any substantial side loading as could result from
letting the tines contact a solid object while turning.
NEVER let anyone near the pinch points of the machine, including:
1. The pivot point of an articulated machine.
2. The loader lift arms.
3. The loader bucket.
NEVER carry a rider.
NEVER use the bucket or forks as a man lift.
NEVER lift a load over the heads of other people.
Before you backup, look to be sure everyone is clear of the machine.
Make sure your backup alarm is working.
ALWAYS keep any signal person in view.

OPERATION
Page 8
To install the forks, make sure they are placed in working position with the rod in place. Curl
forward your loader bucket and slowly drive into the forks. when fork rod is directly over the
bracket slot, stop the tractor and slowly curl back the bucket until the rod is in the base of the
bracket.
IMPORTANT:
Your forks are held in place with an exclusive "self-locking" bracket. Take special
care that this safety rod locking bracket is always in good working condition.
Know the capacity of the forks you are using. Check the serial number plate, which shows the
capacity. Remember, the forks rated capacity is at the center point of the tine.
The tines can slide sideways to adjust the spread. The maximum spread should be utilized whenever
possible to provide maximum load stability. However, the tines must be centered on the axis of the
machine to prevent any tendency of the machine to slip sideways.
Since these forklift attachments are designed to be attached to existing loader buckets, visibility is
restricted and special care is required in picking up and placing a load. The assistance of another
individual, standing to the side during such positioning would be helpful.

INSTALLATION
Page 9
1. Slide the tines onto the rod.
2. With the tines sitting upright on a hard level surface in normal operating position, use
the rod as a fixture to locate the brackets on the top of the bucket.
NOTE: The gap between the top of the bucket and the top of the forks
should be approximately 1/2". The fork should not stick more than
8" below the bucket cutting edge.
3. Hook the brackets over the rod and position them equally spaced across the top of the
bucket within the length of the rod. If there are only three brackets, one must be located in
the center. Check with your customer as to the widest fork position they will require, and
weld on the 2 outside brackets accordingly. Thus, by placing the brackets as close together
as possible you reduce the stress on the rod.
NOTE:
The tops of loader buckets vary greatly
from manufacturer to manufacturer, thus
it may be necessary to trim or notch the
brackets to fit the bucket. The bracket
should be positioned as close as possible
to parallel to the ground when loader bucket
is in level position. DO NOT angle more
than 15oeach way.

INSTALLATION (Continued)
Page 10
4. Tack weld the positioned brackets to the bucket. Roll the bucket forward to check
alignment. Then roll back into working position to make sure the rod "bottoms out"
in all brackets.
NOTE: If the forks extend more than 8" below the bucket, it will be necessary
to order new rod bushings to weld on the forks in a lower position.
5. Complete the welding of the brackets to the bucket. The weld should cover the full length
and both sides of the bracket.
The side of the fillet weld should be:
⇒3/8" thick brackets - 1/4" fillet weld
⇒1/2" & 3/4" thick brackets - 3/8" fillet weld
6. Install the rod locking collar on the open rod end.

PARTS BREAKDOWN
Page 11
SPARE PARTS
ITEM # DESCRIPTION
1 Tines
2Rod
3 Mounting Bracket
4 Locking Latch
5 Rod Locking Collar
6 Safety Decals - (no charge)
7 Rod Bushing
When ordering parts, simply state item
number, model number and quantity
required.
MODEL NO. OF LOAD NO. OF FITS BUCKET
NO. TINES CAPACITY BRACKETS OPENING WEIGHT
12 UNIV 2 1,200 lbs. 3 17" to 25" 185#
25 UNIV 2 2,500 lbs. 3 24" to 32" 255#
40 UNIV 2 4,000 lbs. 4 32" to 40" 320#
60 LB 2 6,000 lbs. 4 32" to 40" 410#
60 UNIV 2 6,000 lbs. 4 41" to 49" 460#
80 UNIV 2 8,000 lbs. 4 46" to 54" 720#
110 UNIV 2 11,000 lbs. 4 59" to 67" 950#
165 UNIV 3 16,500 lbs. 6 59" to 67" 1355#
220 UNIV 4 22,500 lbs. 8 59" to 67" 1740#

WARRANTY
Page 12
GEARMORE, INC., warrants each new Gearmore product to be free from defects in materi-
al and workmanship for a period of twelve (12) months from date of purchase to the original
purchaser. This warranty shall not apply to implements or parts that have been subject to
misuse, negligence, accident, or that have been altered in any way.
Our obligation shall be limited to repairing or replacement of any part, provided that such
part is returned within thirty (30) days from date of failure to Gearmore through the dealer
from whom the purchase was made, transportation charges prepaid.
This warranty shall not be interpreted to render us liable for injury or damages of any kind or
nature, direct, consequential or contingent, to person or property. This warranty does not
extend to loss of crops, loss because of delay in harvesting or any other expenses, for any
other reasons.
Gearmore in no way warranties engines, tires, or other trade accessories, since these items
are warranted separately by these respective manufacturers.
Gearmore reserves the right to make improvements in design or changes in specification at
any time, without incurring any obligations to owners or units previously sold.
GEARMORE, INC.
13477 Benson Ave.
Chino, CA 91710
Always refer to and heed machine operating warning decals on machine.
The serial number of this product is stored in our computer database, thus
submitting a warranty registration card is not required.
This manual suits for next models
8
Table of contents
Popular Tractor Accessories manuals by other brands

Hardi
Hardi COMMANDER Classic DELTA Instruction book

Great day
Great day TT400 Instructions for installation and use

Duncan
Duncan Renovator AS3000 owner's manual

Avantco
Avantco A2971 Operator's manual for Attachment

Avantco
Avantco SD A36968 Operator's manual

Avantco
Avantco Snow Blower 1150 Operator's manual for Attachment