TMG TMG-SP08 User manual

Snow Plow Pusher
MODEL: TMG-SP08
PROFUCT MANUAL
Please read the product manual completely before assembly
Check against the parts list to make sure all parts are received
Wear proper safety goggles or other protective gears while in assembly
Missing parts or questions on assembly?
Please call: 1-877-761-2819 or email: cs@tmgindustrial.com
Do not return the product to dealer, they are not equipped to handle your requests
WWW.TMGINDUSTRIAL.COM Toll Free:1-877-761-2819
8.5 FT, U/V Angle Blade

CONTENTS
Safety operation warning ..................................................................................................................03
1. safety instructions
Preparations before operation.............................................................................................................04
In operation..........................................................................................................................................05
After operation.....................................................................................................................................06
2. Machine introduce
Product parts name and function........................................................................................................07
Product specifications.........................................................................................................................08
3. Assembly work instruction
Check after unpacking................................................................................................................................10
Assembly of bracket and shovel.................................................................................................................12
Installation of shovel cylinder......................................................................................................................13
Installation of bracket component ..............................................................................................................14
Installation of bracket assembly and bracket..............................................................................................15
Installation of rubber components and three-point suspension..................................................................16
Cylinder and oil pipe connection................................................................................................................. 17
Electrical circuit connection.........................................................................................................................19
Lubricating grease........................................................................................................................................20
4. Explosion diagram and Product Parts.............................................................................................21
WWW.TMGINDUSTRIAL.COM P02/27 Toll Free:1-877-761-2819

Warning instructions for safe operation
Meaning of warning labels
NOTICE! Read the instruction manual carefully
before using the machine. Failure to follow this
warning may cause injury.
WARNING ! Keep away from the cutting area of the
running machine. If this warning is not followed, a
personal injury accident may occur
WARNING ! Keep a safe distance while driving the
machine. If this warning is not followed, a personal
injury accident may occur
WWW.TMGINDUSTRIAL.COM P03/27 Toll Free:1-877-761-2819

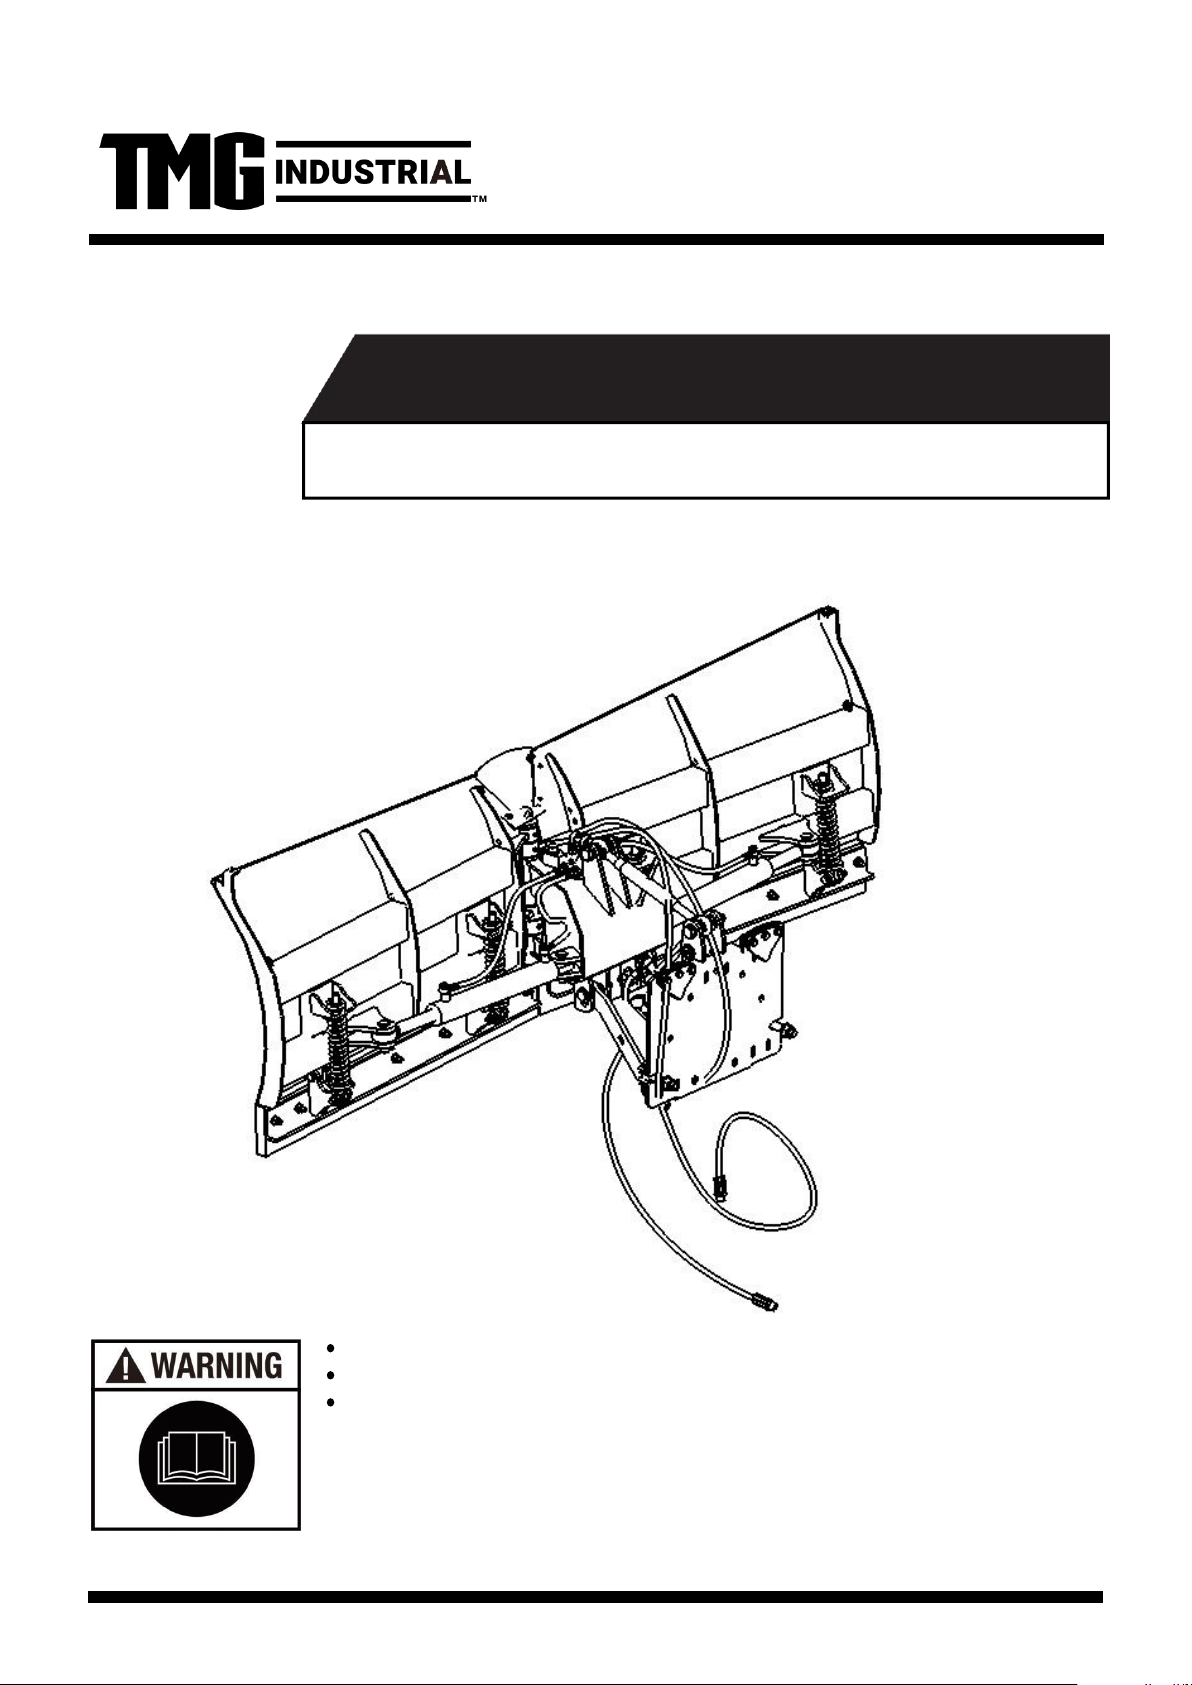
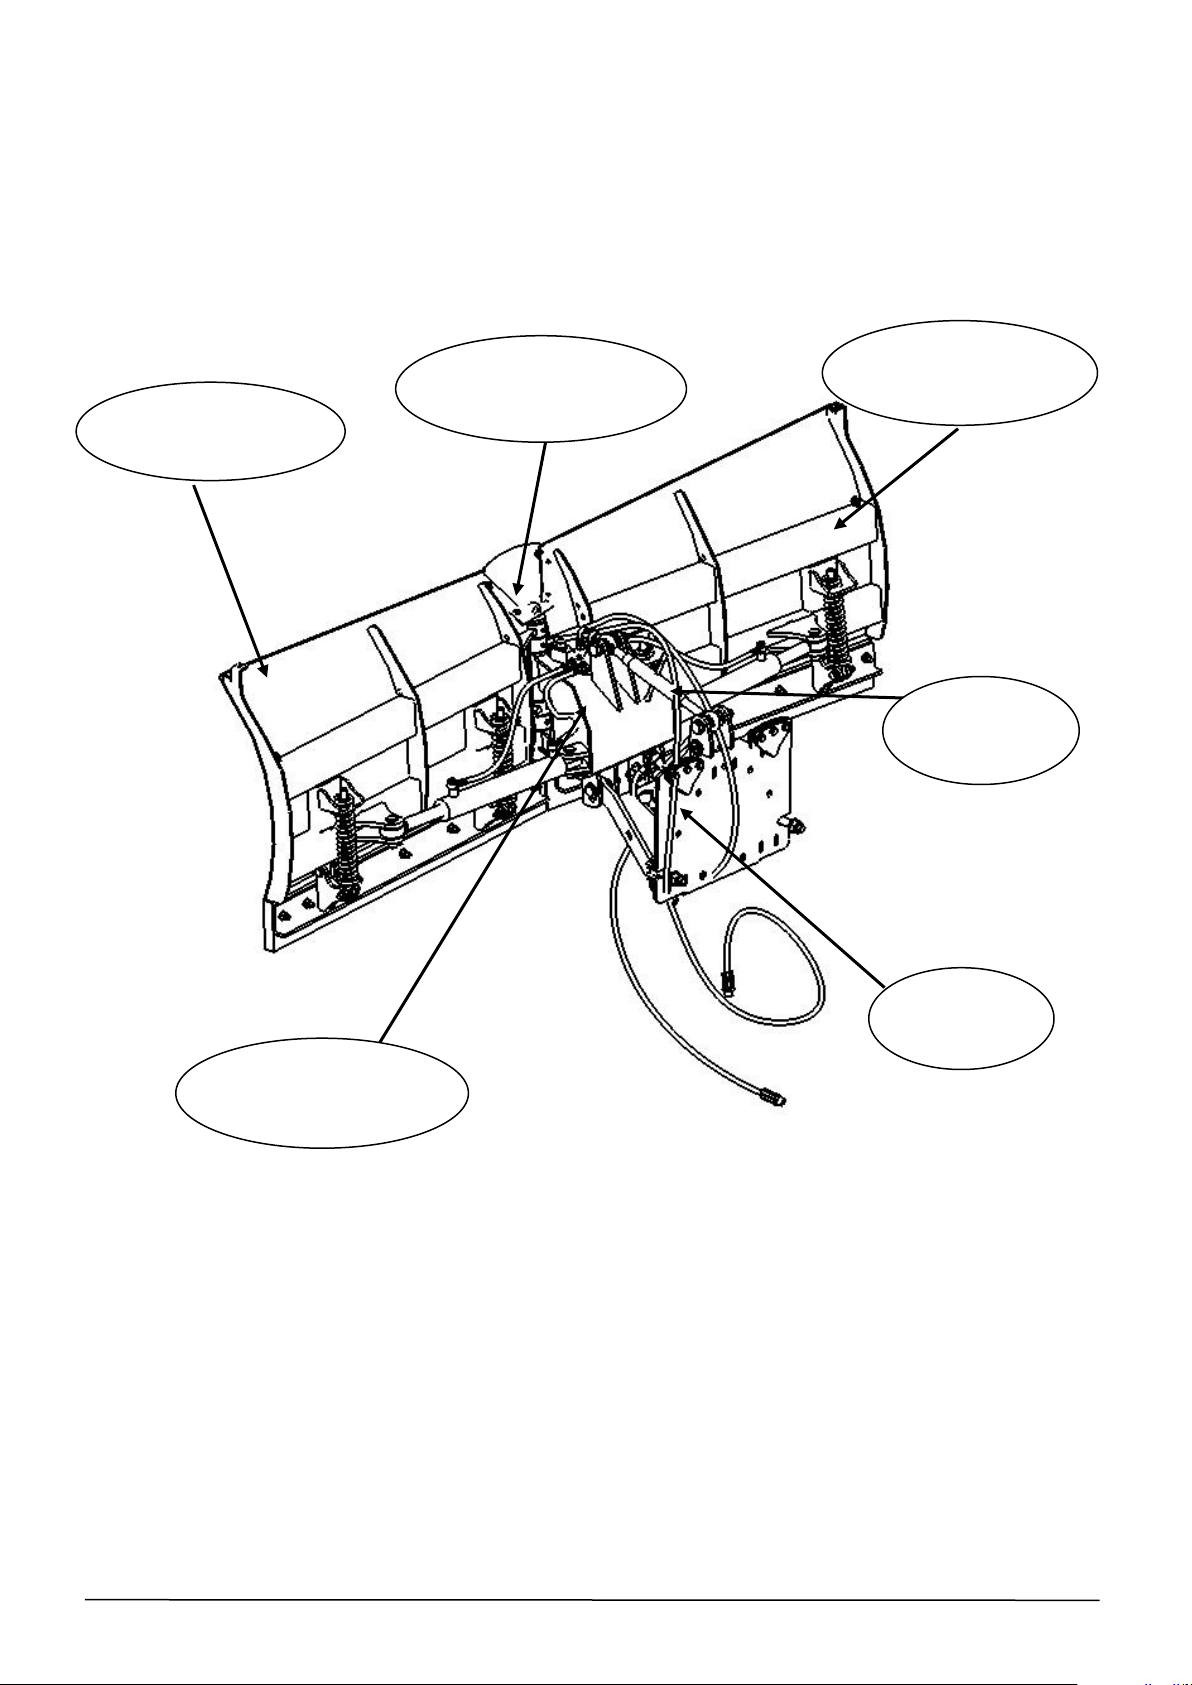
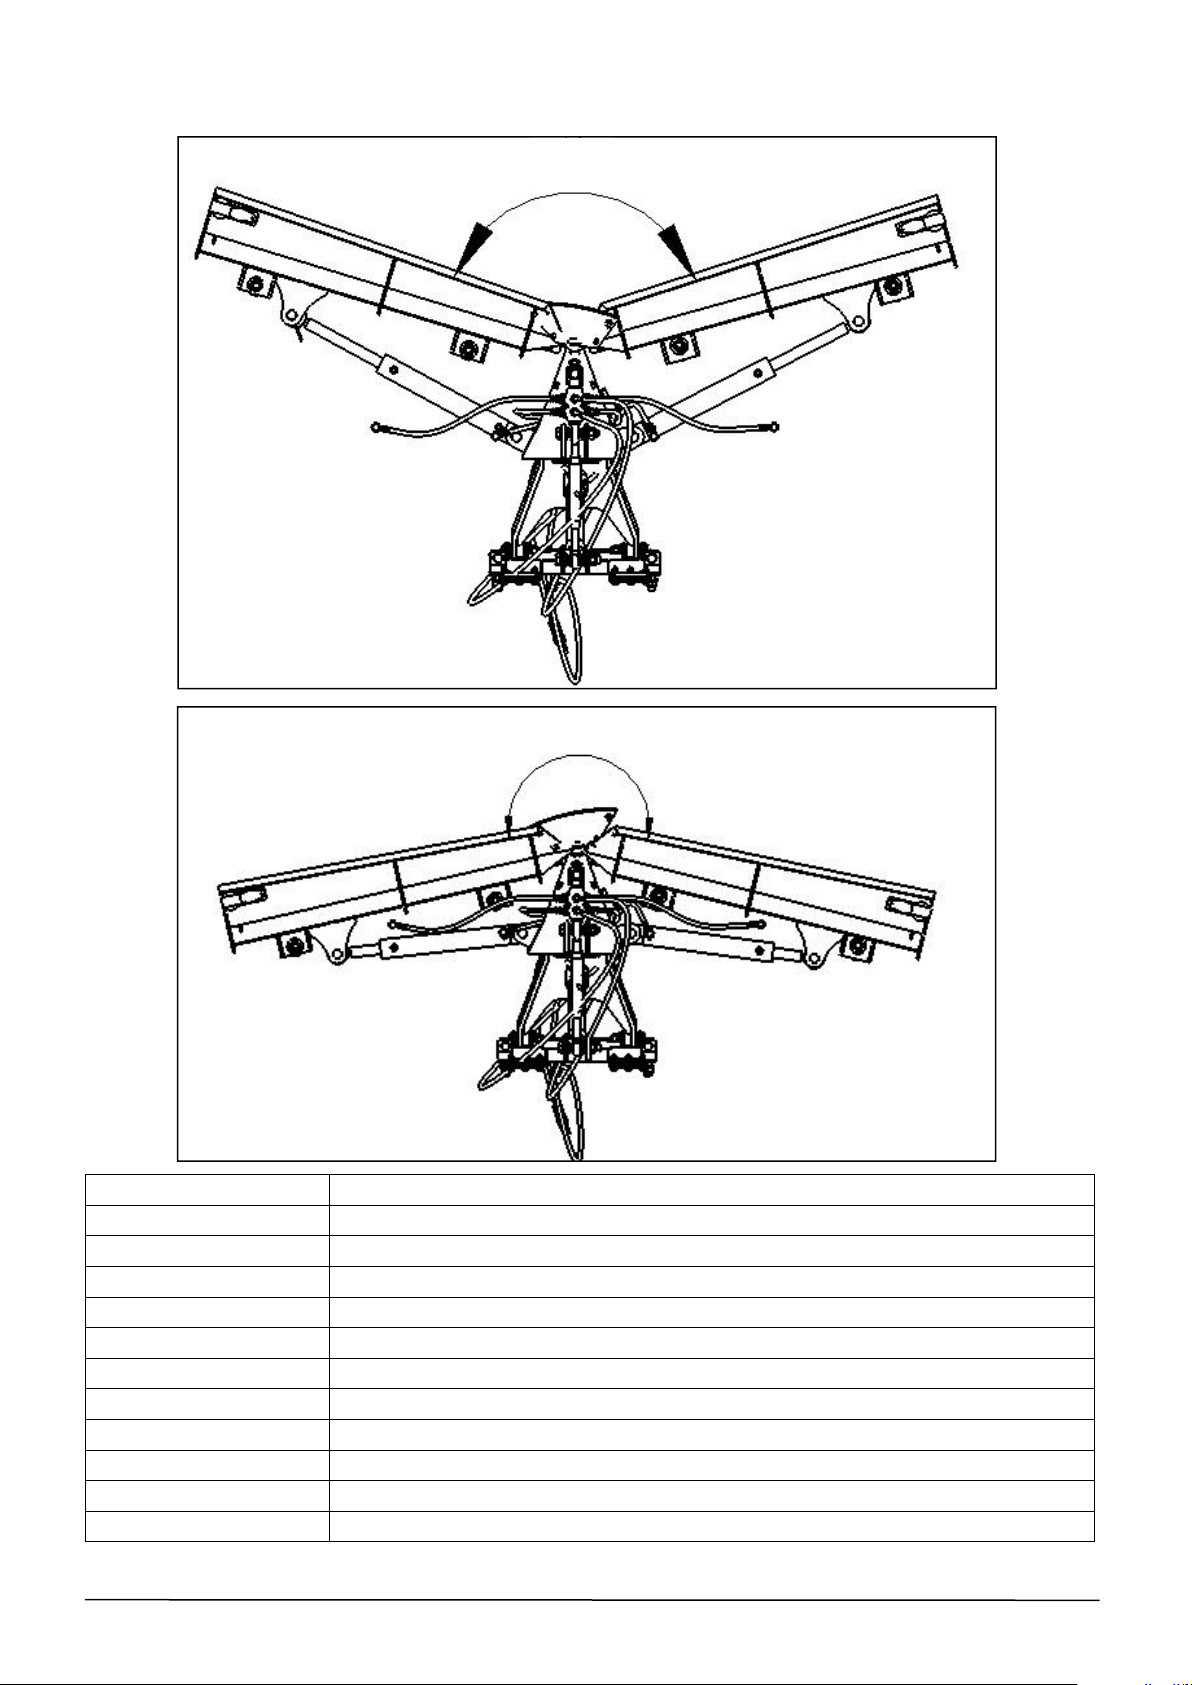
1.Precautions for safe operation
Read the operating instructions of the machine carefully, and be familiar with the performance and how
to operate all the control devices!
Understand all the safety labels on the equipment, and keep the labels clean. Please do not paint or
move any safety labels casually. If they are damaged, they should be replaced immediately!
A warning sign should be set up in the work area where the operator is to tell others not to approach
it to prevent splashing!
Do not clean up close to people, buildings, vehicles or other objects that may be damaged by flying
debris!
Notice! Failure to follow this warning may cause injury.
Preparations before operation
NOTICE !
★If you do not know how to operate the
machine, because the instruction manual is not
placed around the product, if you use your own
judgment to deal with it, unexpected accidents
may occur and cause injuries. Make sure that
the instruction manual is kept around the
product, and you can read it at any time when
you don't know how to use it.
Place the instruction manual
around the product
WARNING !
★If you wear inappropriate clothing to
operate the machine, a part of the clothing will
be caught by the machine and cause injury. In
severe cases, a major fatal accident may
occur.
Please operate according to the clothes
suggested below:
● Do not wear oversized tops and pants.
● The sleeves and hem should not be too fat.
● Wear a safety helmet.
Do not wear banded or flocculent items such
as turbans or towels on the head and waist.
Clothing selection during operation
NOTICE !
★If you do not fully understand the safety
precautions and use essentials described in the
instruction manual, unexpected accidents may
occur. before operation, please fully understand
the warning signs affixed to the product, the
safety precautions and the essentials in the
instruction manual before proceeding.
Read the instructions carefully
before doing the homework
WARNING !
★Unexpected accidents may occur when
operating in situations where the body is
uncomfortable or the machine operation is
unfamiliar.
Do not operate under the following
conditions:
● When over-fatigue, sickness, drug
influence, and other reasons make it
impossible to concentrate on work.
● After drinking alcohol.
● Personnel who are unskilled in
mechanical operation.
Do not operate under the following
conditions
WWW.TMGINDUSTRIAL.COM P04/27 Toll Free:1-877-761-2819

During operation
Before operation
DANGER !
★Press the button on the remote control before starting to remove snow. Place the snow
shovel at an appropriate angle.
★Use the up and down buttons of the remote control to adjust the snow shovel to be parallel
to the road surface.
★After adjusting the up and down and angle of the snow shovel, you can start the vehicle to
move forward and perform snow removal operations.
★When walking on the slope at high speed, it may cause side slip or rollover. Please
downshift and slow down before entering the slope and cross the slope smoothly.
★Be sure to concentrate and drive carefully when working.
★If someone approaches when lifting the shovel, it may cause injury. Please stay away.
★When making machine adjustments and removing debris, be sure to cut off the engine.
Otherwise, due to the carelessness of a third party, the work machine suddenly starts, which
may cause unexpected things to happen.
★After the snow removal operation is completed, the shovel must be lifted up and allowed to
enter to avoid damage to the road surface.
DANGER !
★Make sure that the snow shovel and the car (other) connecting frame have been connected.
★Operate in a safe area.
★Ensure that the snow shovel is installed firmly.
★Ensure that all hydraulic joints and hydraulic devices are firmly connected.
★Replace vulnerable devices and hoses.
★Determine the power supply voltage. If the voltage is less than the required voltage, it will
affect the performance of the snow shovel.
★If people or objects are loaded on the working machine, it will cause injury accidents after
falling. Do not carry people or anything on the working machine.
WWW.TMGINDUSTRIAL.COM P05/27 Toll Free:1-877-761-2819

作业后
After operation
Storage instructions
NOTICE !
★After the machine is used, the shovel body and joints should be cleaned with a
high-pressure water gun.
★Grease the exposed cylinder rod
★Thoroughly remove all dirt, dirt and grease on the clean surface.
★The interfaces of hydraulic oil pipes, cylinders and battery valves are capped and sealed
★Check the connecting bolts and tighten all loose bolts and nuts.
★Fill all lubrication points with butter.
★Replace damaged or obscure identification labels.
NOTICE !
★The snow shovel must be cleaned up before storage to prevent rainwater and hemolytic
agent from corroding the shovel body.
★In storage, the support frame of the snow shovel must be lowered, and the jack must be
placed at the lowest level.
★Cover the electrical parts with rain-proof cloth to prevent aging due to exposure to the sun.
WWW.TMGINDUSTRIAL.COM P06/27 Toll Free:1-877-761-2819

2.Machine introduce
Products part names and functions
Right main shovel
assembly
Protect the rubber
components
Left main shovel
assembly
Hydraulic
component
s
Bracket
assembly
Bracket assembly
WWW.TMGINDUSTRIAL.COM P07/27 Toll Free:1-877-761-2819

Model No.
TMG-SP08
Max Working Pressure
3050PSI
Max Working Flow
8.0GPM
Working Width
8.5ft(102”)
Working Voltage
DC 12V
U blade
up to 140 degree
V blade
up to 215 degree
Blade Angle
22 degrees left or right
Hydraulic Hose Diameter
1/4”(I.D)/1/2”(O.D)
Fitting
1/2” NPT
Shipping Weight
616 lb
Shipping Size
75”x36”x24”
WWW.TMGINDUSTRIAL.COM P09/27 Toll Free:1-877-761-2819
U
V

3.Assembly work instruction
1. After unpacking, check the following components
*All numbers are not part numbers in the drawings. For correct part
numbers, see explosive diagram
WWW.TMGINDUSTRIAL.COM P10/27 Toll Free:1-877-761-2819

REF#
SPECIFICATION
QTY
REF#
SPECIFICATION
QTY
1
Left main shovel assembly
1
24
Flat Washers Ø22
4
2
Right main shovel assembly
1
25
Hex Bolts M20x120
1
3
Protection eraser
1
26
Hex Bolts M20x110
1
4
Rubber splint
1
27
Flat Washers Ø20
4
5
Rubber splint two
1
28
Cylinder pin
2
6
King pin shaft welded parts
1
29
Cylinder head gasket 2
4
7
Shovel cylinder 50x32x255
2
30
Flat Washers Ø18
4
8
Bracket welded parts
1
31
Hexagon lock nuts with
non-metallic inserts M20
2
9
Lower bracket welded parts
1
32
Pin one
2
10
Rear bracket welded parts
1
33
Hexagon lock nuts with
non-metallic inserts M18
4
11
Adjust the rod assembly
1
34
Straight-through pressure oil
cup
4
12
Lifting cylinder 40X22X160
1
35
Three-point suspension
welding
1
13
Hydraulic hose-1/2”x650mm
2
36
Upper suspension pin
1
14
Hydraulic hose-1/2”x600mm
2
37
Suspension connecting pin
2
15
Hydraulic hose-1/2”x4100mm
1
38
Flat Washers Ø16
14
16
Hydraulic hose-1/2”x4000mm
1
39
Non-metallic insert hexagonal
lock nut Ø16
7
17
Hydraulic hose-1/2”x4000mm
2
40
Hexagon bolts with full thread
M16x50
5
18
Hollow bolt
6
41
Hexagon bolts with full thread
M16x85
2
19
Combination washer
12
42
Lock pin
3
20
Cylinder pin 2
4
43
Hexagon bolts with full thread
M10x30
4
21
Split pin
4
44
Hexagon lock nuts with
non-metallic inserts M10
4
22
Cylinder pin 1
2
45
Hexagon head bolts M8x70
1
23
Elastic cylindrical pin
2
46
Hexagon lock nuts with
non-metallic inserts Ø8
1
WWW.TMGINDUSTRIAL.COM P11/27 Toll Free:1-877-761-2819

2. Assembly of bracket and shovel
Installation steps: align the right main shovel(3), bracket(1), and left main shovel (4) in sequence
and align them with the king pin shaft welded parts (A6), then adjust the hole position at the end
of the king pin shaft to be perpendicular to the bracket, Then use M8*70 bolts (A7) to insert and
fasten.
Importance: All bolts are locked in place without shaking.
WARNING: Once the assembly bolts are not fastened in place, there will be abnormal
noises when the machine is working.
Inspection: Check whether each bolt is loose.
Part name and specification
REF No
Specification
QTY
1
Bracket assembly
1
3
Right main shovel assembly
1
4
Left main shovel assembly
1
A6
King pin shaft welded parts
1
A7
Hexagon head bolts M8×70
1
A8
Lock nut M8
1
WWW.TMGINDUSTRIAL.COM P12/27 Toll Free:1-877-761-2819

3. Installation of shovel cylinder
Installation steps: After installing the bracket, install the shovel cylinder(F11 according to the
cylinder position in the above figure, and fix it with the cylinder pin(F12) and the split pin.
Note: The oil port of the oil cylinder is facing upwards, and the position of the cotter pin of the oil
cylinder pin is facing downwards.
Importance: All bolts are locked in place without shaking.
WARNING: Once the assembly bolts are not fastened in place, there will be abnormal
noises when the machine is working.
Inspection: Check whether each bolt is loose.
Part name and specification
REF No
Specification
QTY
F11
Shovel cylinder 50x32x255
2
F12
Cylinder pin
4
F13
Split pin 5×40
4
WWW.TMGINDUSTRIAL.COM P13/27 Toll Free:1-877-761-2819

4. Installation of bracket component
Installation steps: 1. Align the mounting holes on the B1 and B2 pieces according to the style
of the above figure, and then fix them with a pin with a flat washer and a lock nut.
Note: Do not reverse the direction of the lower bracket assembly.
Importance: All bolts are locked in place without shaking.
WARNING: Once the assembly bolts are not fastened in place, there will be abnormal
noises when the machine is working.
Inspection: Check whether each bolt is loose.
Part name and specification
REF No
Specification
QTY
B1
Lower bracket welded parts
1
B2
Rear bracket welded parts
1
B7
Pin shaft (L=109)
2
B8
Plain washer Ø18
2
B9
Lock nut M18
2
WWW.TMGINDUSTRIAL.COM P14/27 Toll Free:1-877-761-2819

5. Installation of bracket assembly and bracket
Installation steps:
1. First align the Lower bracket welded parts (B1) with the hole on the Bracket Assembly (1)
according to the style of the above figure, and then fix the cylindrical pin (B11) with the spring-
type straight pin (B12) .
2. Installing the lifting cylinder (F1), first connect the connecting end with the lower bracket (B1),
and install the other end after adjusting the angle of the bracket
Note: when connecting the cylinder, you need to add two gaskets as shown in the figure.
3. First adjust the length of the tie rod assembly (B3), so that the length can be matched with
the bracket and bracket, and then use M20*120 bolts (B13) to insert and tighten the nuts(B6).
Importance: All bolts are locked in place without shaking.
WARNING: Once the assembly bolts are not fastened in place, there will be abnormal
noises when the machine is working.
Inspection: Check whether each bolt is loose.
WWW.TMGINDUSTRIAL.COM P15/27 Toll Free:1-877-761-2819

Part name and specification
REF No
Specification
QTY
B1-B2
Bracket assembly
1
B3
Adjust the rod assembly
1
B4
Plain washer Ø20
4
B6
Lock nut M20
2
B11
Cylinder pin
2
B12
Spring-type straight pin 8×40
2
B13
Hexagon head bolts M20×120
2
B23
Plain washer Ø22
4
F1
Lifting cylinder 40x22x160
1
F3
Cylinder gasket
4
F4
Cylinder pin shaft (L=121)
2
F5
Plain washer Ø18
2
F6
Lock nut M18
2
6. Installation of rubber components and three-point suspension
WWW.TMGINDUSTRIAL.COM P16/27 Toll Free:1-877-761-2819

Installation steps:
1. Assemble the eraser in the order of the style above.
2. Install the three-point suspension according to the above figure with M16*50 bolts (G6) and
flat washers (G4) and nuts (G5) to tighten, and finally fit the lock pin (G8) to insert the suspension
connecting pin (G3) and the upper suspension pin (G2).
Importance: All bolts are locked in place without shaking.
WARNING: Once the assembly bolts are not fastened in place, there will be abnormal
noises when the machine is working.
Inspection: Check whether each bolt is loose.
Part name and specification
REF No
Specification
QTY
C1
Rubber splint II
1
C2
Rubber splint
1
C3
Rubber sheet
1
C4
Plain washer
4
C5
Full-thread hexagon bolts M10×30
4
C6
Lock nut M10
4
G1
Three-point suspension welding
1
G2
Upper suspension pin
1
G3
Suspension connecting pin
2
G4
Plain washer Ø16
14
G5
Lock nut M16
7
G6
Full-thread hexagon bolts M16x50
5
G7
Full-thread hexagon bolts M16x85
2
G8
Lock pin
3
7. Cylinder and oil pipe connection
Installation steps:
1. Firstly fasten the transition joints (F14) to the 6 ports of the solenoid valve.
2. Connect the left shovel cylinder with hollow bolts (F18) and combination washers (F15) to
the hydraulic hose (F16,F17) to connect the solenoid valve D and C ends, and the right shovel
cylinder with hollow bolts (F18) and combination washers (F15) to connect the hydraulic hose
(F16,F17) to the solenoid valve F and E ports. The A and B ends of the solenoid valve are
connected to the hydraulic hose (F21) (the other end of the oil pipe is connected to the tractor
oil pump)
3. The lifting oil cylinder is connected to the hydraulic hose (F19, F20) respectively with the
hollow bolt and the combined washer (the other end of the oil pipe is connected to the tractor
WWW.TMGINDUSTRIAL.COM P17/27 Toll Free:1-877-761-2819

oil pump).
Importance: All bolts are locked in place without shaking.
WARNING: Once the assembly bolts are not fastened in place, there will be abnormal
noises when the machine is working.
Inspection: Check whether each bolt is loose.
Part name and specification
REF No
Specification
QTY
F2
Hydraulic manifold
1
F14
Transition Joints
6
F15
Combined sealing gaskets
12
F16
Hydraulic hose1/2”x650mm with BSP G1/4 fitting
2
F17
Hydraulic hose 1/2”x600mm with BSP G1/4 fitting
2
F18
Hollow bolt
6
F19
Hydraulic hose 1/2”x4000mm with NPT 1/2 male end, BSP G1/4 fitting
1
F20
Hydraulic hose 1/2”x4100mm with NPT 1/2 male end, BSP G1/4 fitting
1
F21
Hydraulic hose 1/2”x4000mm with NPT 1/2 male end, BSP G1/4 fitting
2
WWW.TMGINDUSTRIAL.COM P18/27 Toll Free:1-877-761-2819
C
D
A
B
E
F
F14
F14

8. Electrical circuit connection
SOLENOID VALVE
SWITCH CORTOL
POWER INLET
The solenoid valve head harness is fastened to
the solenoid valve by inserting the phillips
screws on the solenoid valve
One end of the switch harness is connected to the
conversion head of a section of the solenoid valve
harness, and the other end is connected to the power
supply.
WWW.TMGINDUSTRIAL.COM P19/27 Toll Free:1-877-761-2819

9. Lubricating grease
WARNING
Lubricate the bearing before each use, Otherwise, the service life of the machine will be
affected
Grease Nipple
Grease Nipple
Grease Nipple
Grease Nipple
WWW.TMGINDUSTRIAL.COM P20/27 Toll Free:1-877-761-2819
Table of contents
Other TMG Tractor Accessories manuals
Popular Tractor Accessories manuals by other brands

SaMASZ
SaMASZ AlpS 271 Operator's manual

Classic Accessories
Classic Accessories Zero Turn 73997 instructions

Vari
Vari ANV-350 Instructions for use

Douglas Dynamics
Douglas Dynamics 33230 installation instructions

Bradco
Bradco HP400 Operator and parts manual

Original Tractor Cabs
Original Tractor Cabs 9551 Assembly and operating instructions