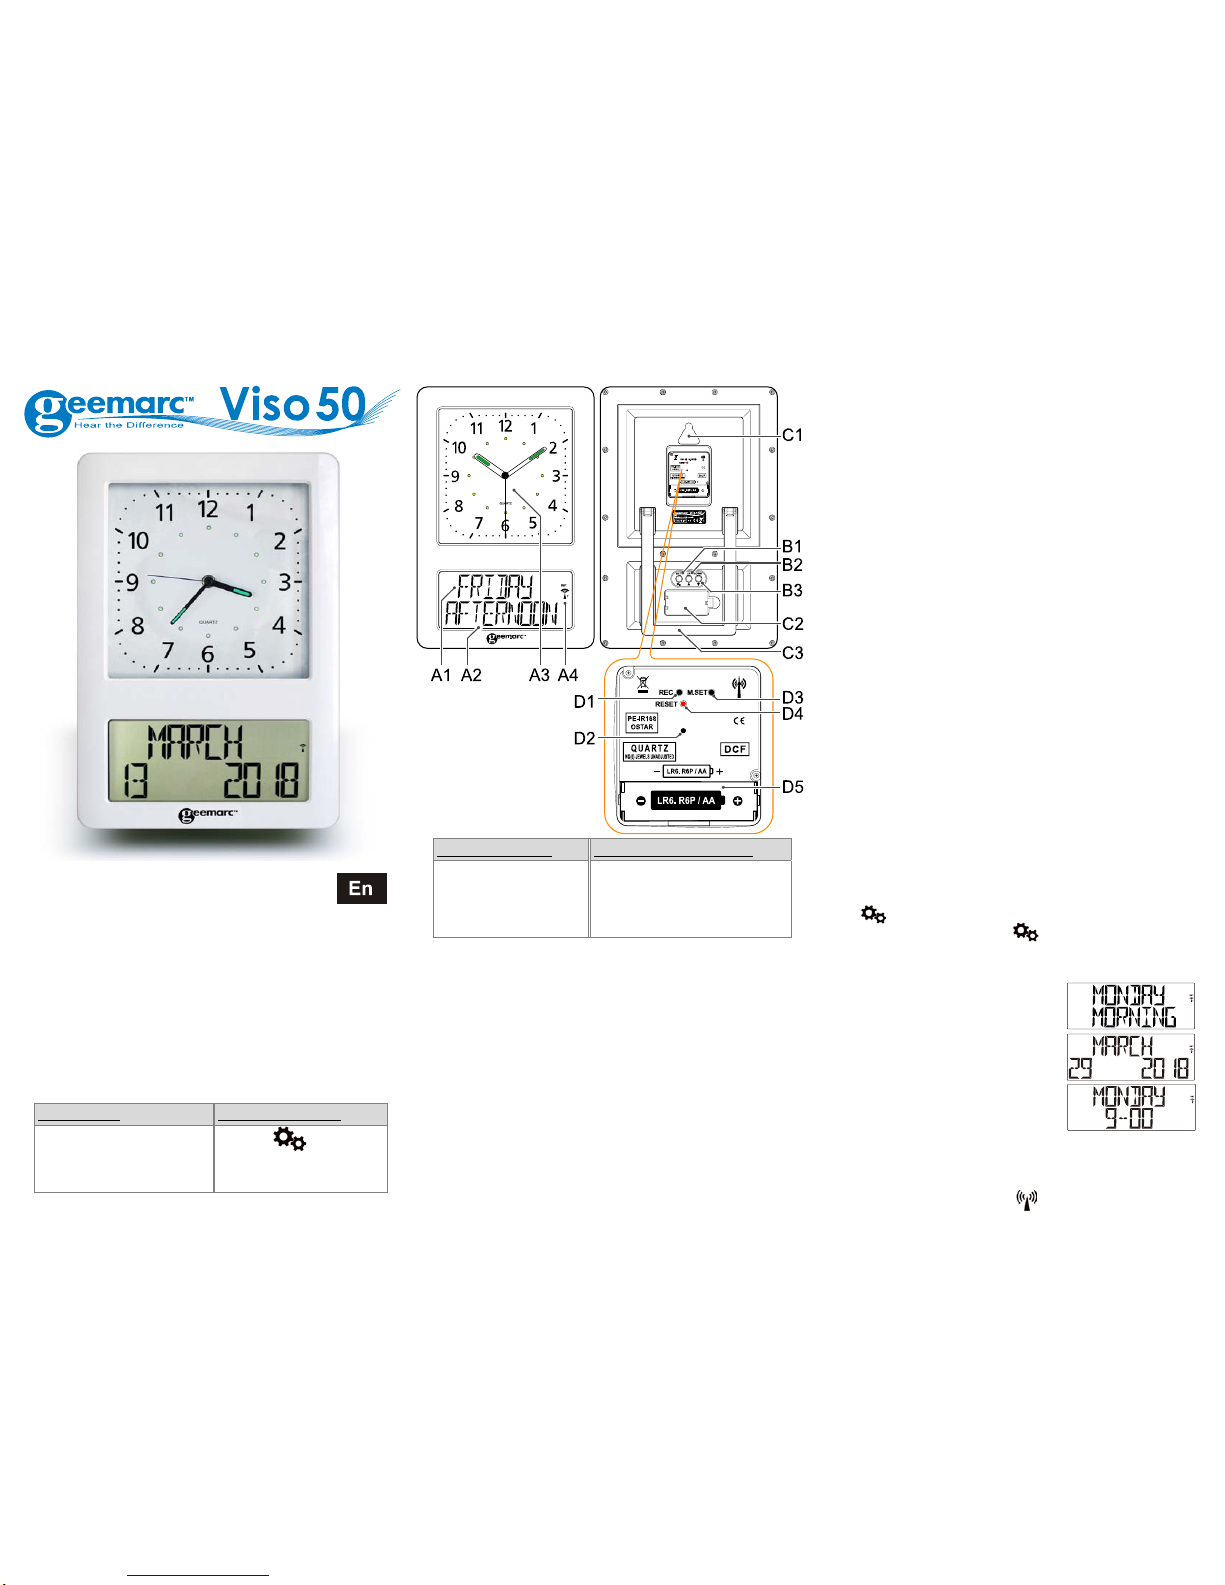
manuals.online logo
Brands
  1. Home
  2. •
  3. Brands
  4. •
  5. Geemarc
  6. •
  7. Clock
  8. •
  9. Geemarc Viso 50 User manual

Geemarc Viso 50 User manual


123
UserManual
Viso50–DCF
(MainlandEurope–NotUK)
!!!PLEASEREFERTOOURWEBSITE:WWW.GEEMARC.COMFORAN
UPTODATEUSERGUIDE,ASTHEREMAYBEIMPORTANTUPDATES
ANDCHANGESYOUNEEDTOBEAWAREOF!!!
1.Features
‐EasytoReadandUnderstandTimedisplay
‐PerpetualCalendarUptoYear2099
‐5languagesuserselectableatthestarting
‐Dayoftheweek,month,stageofthedaymodes
2.UnitAppearance
PartA‐LCD   PartB‐Rearpart
A1:DayofWeekorMonth
A2:Stageoftheday
A3:AnalogTime
A4:RadioControlIcon
B1:“SET/ ”Button
B2:“▲”Button
B3:“▼”Button
PartC‐Structure   PartD–AnalogSetting
C1:HangingHole
C2:BatteryDoor
C3:Stand
D1: RECbutton
D2:Transportationpin
D3:MSetbutton
D4:Resetbutton
D5: Battery compartment
3.ANALOGUECLOCK(A3)
3.1GETTINGSTARTED/POWERSUPPLY
(1)Removethetransportationpin(D2)fromtheclockmovement.The
clockcanbeoperatedonlyafterthepinhasbeenremoved.
(2) Insertonebattery(1.5V,AA/LR6)intobatterycompartment
(D5).Makesuretoplacethebatterystrictlyaccordingtothe
rightpolarities(+/‐)asshowninthebatterycompartment.
3.2TIMESETTING
AftertheclockhasreceivedtheDCFtimesignalthetimewillbeset
accordingtotheCentralEuropeantime(CET).Summerandwinter
timechange(andreverse)isalsosetautomatically.Otherdeviating
timescanbesetmanuallyonly.
3.3AutomatictimesettingviaDCFtimesignal
Afterinsertingthebattery,thetimewillbesetautomaticallyviaDCF
signal.Thisprocessmaytakeafewminutes(about5‐7minutes).
Duringthisprocess,theclockhandswillturnseveraltimesandmay
pauseuntiltheydisplaytherighttime.
3.4InitiatetoreceivetheDCFtimesignalmanually
Usethisfunctionwhenautomaticsummer/wintertimechangedoes
notworkorthewallclocktemporarilyreceivesnotimesignal.
(1)PressandholdtheRECbutton(D1)for3secondstostartmanual
searchfortheDCFsignal.
(2)Theclockhandswillmovetotheirstartposition(12:00a.m.)
andthewallclockthentriestoreceivethesignal.
Waitapprox.2‐5minutesuntilthecurrenttimewillbedisplayed.
3.5Manualtimesetting
Itisnecessarytosetthetimemanuallyinplaceswherenoradiosignal
isreceived.
(1)PressandholdtheM.SET(D3)buttonforapprox.3seconds.
(2)Whentheminute’shandstartsmovingyoucansetthetimemanually:
‐PresstheM.SET(D3)buttonshortlytosetthetimeinminutes’steps.
‐PressandholdtheM.SET(D3)buttontosetthetimecontinuously.
(3)ReleaseM.SET(D3)buttontostopmanualsettingandsavethetime
automaticallyandexitmanualtimesettingmodeafteranyseconds.
3.6Reset
Ifthereisnoresponsefromthewallclockbykeystrokesorifanyother
malfunctionoccursperformthefollowingsteps.
Withthisprocedureallreceiveddatawillbedeleted.
(1)PressRESETbuttonwithapointedinstrument(e.g.pen).
(2)Theclockhandwillmovetotheirstartposition(12:00a.m.)andthe
wallclockwillthentriestrytoreceivethesignal.
Waitapprox.2‐5minutesuntilthecurrenttimewillbedisplayed.
4.DIGITALCLOCK
4.1Gettingstarted:
zOpenbatteryCover(C2).
zInsert2xAAsizebatteriesobservingpolarity[“+”and“–“marks].
You willheara“click”soundtoconfirmthebatterieshavebeen
insertedcorrectly.
zReplacebatterycompartmentcover(C2).
4.2Tobegin
Youhave1minutetoarrangethefirstsetting.Theclockdisplays
English,press“▲”(B2)or”▼”(B3)toselectyourlanguageandpress
“SET/”(B1)tovalidate,Press”▲”(B2)or”▼”(B3)tochoosethe
typeofdisplaysetandpress“SET/”(B1)tovalidate(seenotethe
differentdisplaymethods).
Ifyoudon’tpressanykeys,after1minutetheViso50willlaunchthe
automaticclocksetting.
Note:PlacetheViso50nearawindowfor
theclocktoautomaticallyset.
‐DP‐1displaysthedayoftheweekandthe
2ndlinethepartoftheday.
‐DP‐2displaystheMonthandthe2ndline
thedateandtheyear.
‐DP‐3displaysthedayofweekandthe2nd
linethetime.
‐DP‐4rotatesbetweenall3displaysandyoucansetthetimethat
eachdisplayisshown.Seechapter4.5.Cforfullinstructions.
4.3RadioControlledTime:
zTheclockautomaticallystartstoscantheDCFtimesignalinthefirst
10minutes.(RadioControlIcon“”(A4)flashesonLCD).

456
(A4)flashingIndicatestheDCFsignalisbeing
received
(A4)ContinuousflashIndicatessignalreceivedsuccessfully
(A4)IcondisappearsIndicatessignalreceptionfailed
zTheclockcanbesettoscantheradiosignalmanuallybyholding
“▼”(B3)buttonfor3seconds.Eachreceptiontakesaroundseveral
minutes.Ifthereceptionfails,scanningstops.(“ ”(A4)onLCD
disappear)andrepeatsagainonnextfullhour.E.g.scanningfailedat
8:20a.m.Itwillscanagainat9:00a.m.
zSummerandwintertimechange(andreverse)issetautomatically.
4.4TimeSetting
You mustwait10mintochecktheclockissetautomatically(seechapter
4.2)beforeyouproceedtothesetting,pressandhold“▼”(B3)for3
secondstoturnofftheautomaticclocksetting(icon(A4)disappears).
4.5ManualTimeSetting:
Notethatduringthesettingsituation,longpress“▼”or”▲”can
acceleratethesettings
(a)CalendarandTimeSet
zInnormalpattern,pressbutton“SET”(B1)todisplaythetimeonthe
firstline.
zTochangethetimeformat,press“▼”(B3)topassbetween12H
(AM/PM)and24H.
zPressbutton“SET”(B1)for2secondstoenterdateandtimesetting,
zSettheTIMEZONE(2),press”▲”(B2)or”▼”(B3)tosetthetimezone
andpressbutton“SET”(B1)toconfirm.
zSettheYEAR,press”▲”(B2)or”▼”(B3)tosettheYEARandpress
button“SET”(B1)toconfirm.
zSettheMONTH,press”▲”(B2)or”▼”(B3)tosettheMonthand
pressbutton“SET”(B1)toconfirm.
zSettheDAY,press”▲”(B2)or”▼”(B3)tosettheDayandpressbutton
“SET”(B1)toconfirm.
zSettheHOUR,press”▲”(B2)or”▼”(B3)tosettheHourandpress
button“SET”(B1)toconfirm.
zSettheMINUTE,press”▲”(B2)or”▼”(B3)tosettheMinuteand
pressbutton“SET”(B1)toconfirmandexit.
Note:
(1)AllSettingmodeswillautomaticallyexitinaround15secondswithout
anyadjustment.
(2)ForTimeZone:IfyoudonotreceiveaRC‐DCFfrequencysignal,the
timezoneshouldbesetto0.TimeZoneisusedincountrieswhich
canreceivetheDCFfrequencysignalbutthetimezoneisdifferent
fromGermanTime(i.e.MT+1).
(b)StageoftheDayset
Note:Defaulttimeforstageof
theday:

zInstandbymode,pressbutton“SET”(B1)for2secondstoenterstage
ofthedaysetting.
zSetthehouroftheMORNINGandpress”▲”(B2)or”▼”(B3)toset
theHOURandpressbutton“SET”(B1)toconfirm.
zSetthehouroftheAFTERNOONandpress“▲”(B2)or”▼”(B3)to
settheHOURandpressbutton“SET”(B1)toconfirm.
zSetthehouroftheEVENINGandpress”▲”(B2)or”▼”(B3)tosetthe
HOURandpressbutton“SET”(B1)toconfirm.
zSetthehouroftheNIGHTinpress”▲”(B2)or”▼”(B3)tosetthe
HOURandpressbutton“SET”(B1)toconfirm.
(c)Languageset&Displayset
Instandbymode,pressbutton“▲”(B2)for2secondstoenterthe
languagesetting,press”▲”(B2)or”▼”(B3)toselectyourlanguage
(EN,DE,FR,ITorES),press“SET”(B1)toconfirm.
zAfterthelanguageisconfirmed,itwillautojumptodisplaymode.
Press“▲”(B2)or▼
””(B3)toselectDP‐1/DP‐2/DP‐3orDP‐4,
pressSET(B1)toconfirm.
Note:ForDP‐4,usercansethowmanysecondsrolluptime.When
thedisplayselectionisblinkingDP‐4longpressbutton“SET”(B1)for
2secondstoactiveandpress”▲”(B2)or”▼”(B3)toincreaseor
decreasetheseconds.Defaultsettingis5seconds,anditwillbe5s
asaunitmaximumto60s,whichmeansyoucanset05s,10s,15s,
20s,...,60sonly.Press“SET”(B1)toconfirmandexit.
zdifferentdisplaymethods
‐DP‐1displaydayandstageoftheday.
‐DP‐2displayMonth,dateandyear.
‐DP‐3displaydayandtime
‐DP‐4displaydayandtimeforXXsecondsthendisplaydayandstage
ofthedayforXXsecondsthendisplaymonth,dayandyearforXX
seconds.
(XXsecondsaresettable,defaultfor5seconds)
5.Othermalfunctions
Ifthereisnoresponsefromthewallclockbykeystrokesorifanyother
malfunctionoccursperformthefollowingsteps:
Withthisprocedureallreceiveddatawillbedeleted.
(1)PressRESETbutton(D4)withapointedinstrument(e.g.pen).
(2)Theclockhandswillmovetothestartposition(12:00a.m.)andthe
wallclockthentriestoreceivethesignal.
(3)Waitapprox.2‐5minutesuntilthecurrenttimeis
(4)displayed.
6.MOUNTING/POSITIONING
Makesureyouhavemountedorplacedthedeviceinasafeposition.If
notthedevicemayfalldownandheavydamagescanoccurforwhich
themanufacturerisnotliable.
7.CLEANINGANDMAINTENANCE
Beforecleaningthedevice,disconnectitfromthepowersupply(remove
battery)!
Onlyusedryclothtocleantheexteriorofthedevicetoavoiddamaging
theelectronics,donotuseanycleaningfluid.



Forproductsupportandhelpvisitourwebsiteat
www.geemarc.com
UnitedKingdom:5BSwallowCourt,Swallowfields,Welwyn
GardenCity,Hertfordshire,AL71SB,UK
telephone01707387602
orfax01707832529

UGViso50_DCF(VDE)_En_A4_V1.0
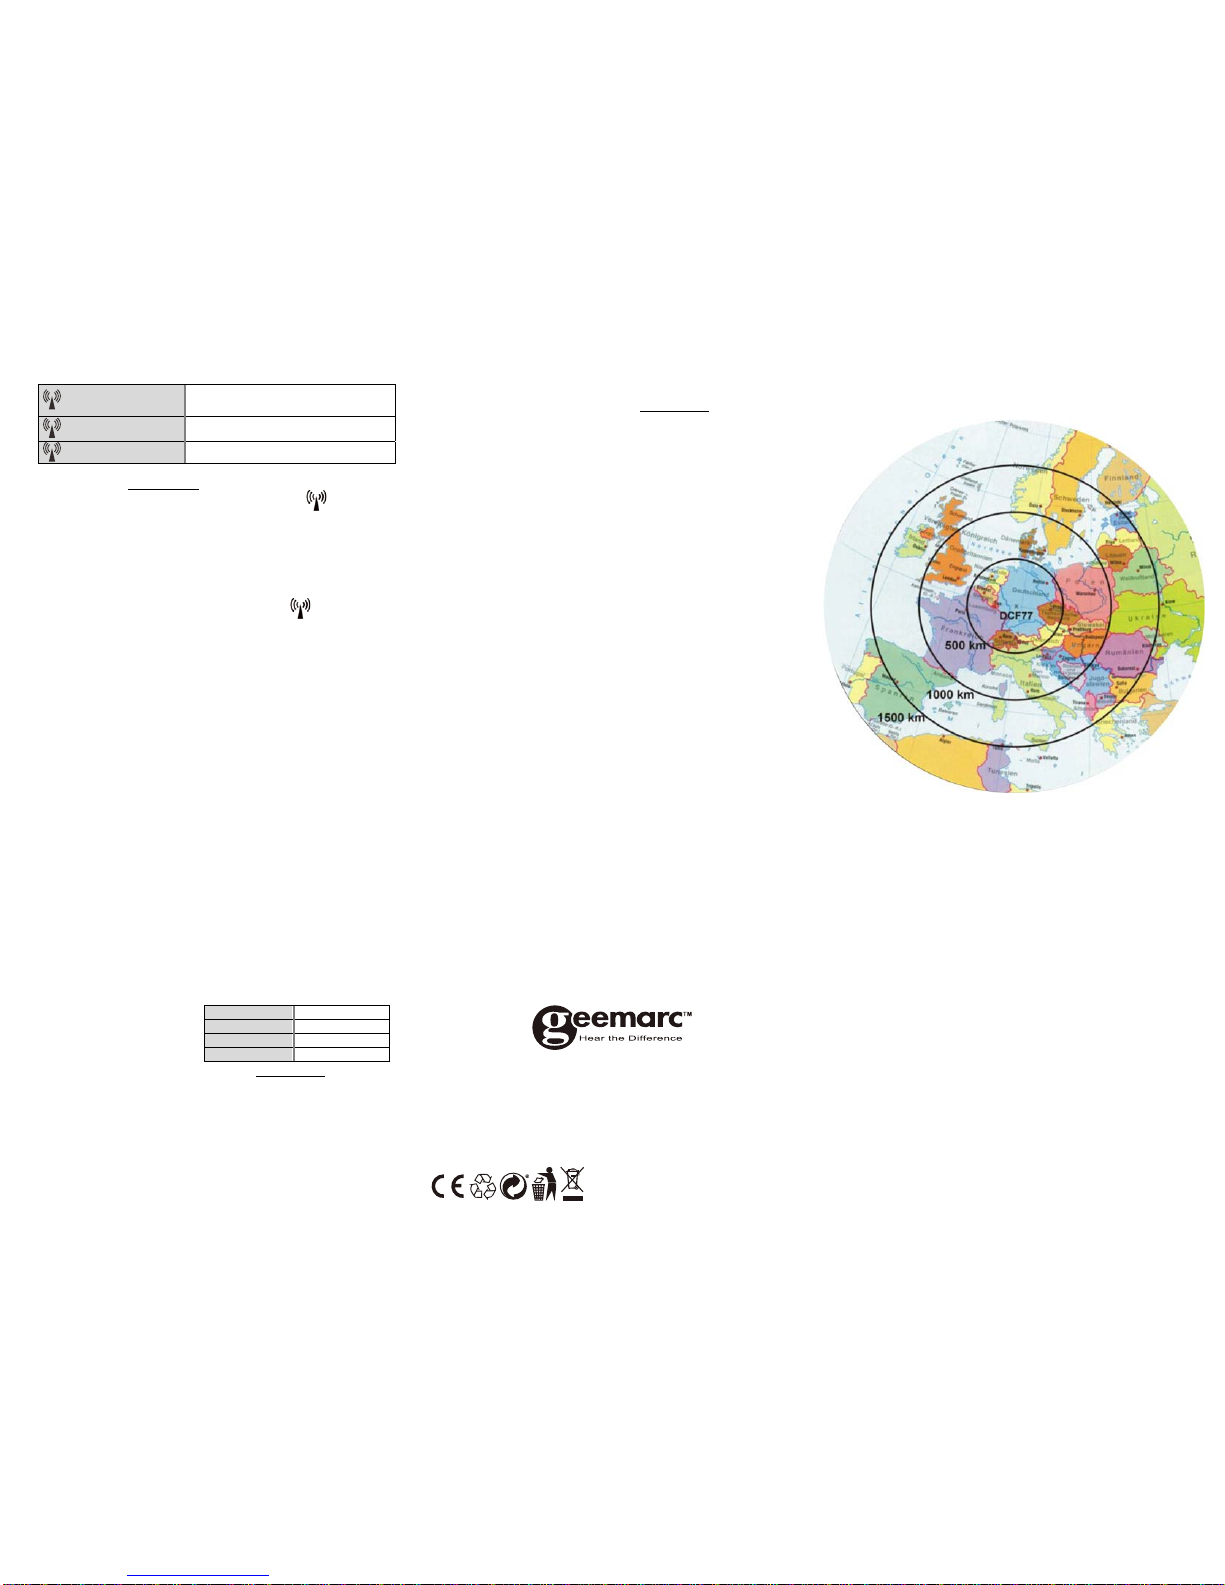
8.Radiocontrolledtimereceptionrange:upto
1500kmfromDCF77transmitter.
9.Guarantee
FromthemomentyourGeemarcproductispurchased,Geemarc
guaranteeitfortheperiodoftwoyears.Duringthistime,allrepairs
orreplacements(atouroption)arefreeofcharge.Shouldyou
experienceaproblemthencontactourhelplineorvisitourwebsite
atwww.geemarc.com.Theguaranteedoesnotcoveraccidents,
negligenceorbreakagestoanyparts.Theproductmustnotbe
tamperedwithortakenapartbyanyonewhoisnotanauthorised
Geemarcrepresentative.TheGeemarcguaranteeinnowaylimits
yourlegalrights.
IMPORTANT:YOURRECEIPTISPARTOFYOURGUARANTEEANDMUST
BERETAINEDANDPRODUCEDINTHEEVENTOFAWARRANTYCLAIM.
CEDeclaration:HerebyGeemarcTelecomSAdeclaresthatthis
productisincompliancewiththeessentialrequirementsandother
relevantprovisionsoftheRadioandTelecommunicationsTerminal
EquipmentDirective2014/53/UE.
Thedeclarationofconformitymaybeconsultedatwww.geemarc.com
Caution:Radiofrequencyinterferencemaycausediscerniblesound
ontheunit.Thesoundwillendwhentheinterferencestops.
10.Recyclingdirectives
TheWEEE(WasteElectricalandElectronicEquipment)hasbeenputin
placefortheproductsinendoflifearerecycledinthebestway.
Whenthisproductisoutoforder,pleasedonotputitinyour
domesticwastebin.
Pleaseuseoneofthefollowingdisposaloptions:
‐RemovethebatteriesanddeposittheminanappropriateWEEEskip.
DeposittheproductininaappropriateWEEEskip.
‐ Orhandtheoldproducttotheretailer.Ifyoupurchaseanewone,
theyshouldacceptit.
MORNING7:01
–
12:00
AFTERNOON12:01
–
17:00
EVENING17:01
–
23:00
NIGHT23:01
–
7:00

Other Geemarc Clock manuals

Geemarc Viso5 User manual

Geemarc

Geemarc Viso5 User manual

Geemarc Viso 10 User manual

Geemarc

Geemarc Viso 10 User manual

Geemarc VISO15-DCF User manual

Geemarc

Geemarc VISO15-DCF User manual

Geemarc Viso 30 User manual

Geemarc

Geemarc Viso 30 User manual

Geemarc Viso 15 User manual

Geemarc

Geemarc Viso 15 User manual

Geemarc Viso 5 User manual

Geemarc

Geemarc Viso 5 User manual

Geemarc VISO10 User manual

Geemarc

Geemarc VISO10 User manual

Geemarc VISO10-DCF User manual

Geemarc

Geemarc VISO10-DCF User manual

Popular Clock manuals by other brands

Conrad Electronic 67 16 50 operating instructions

Conrad Electronic

Conrad Electronic 67 16 50 operating instructions

La Crosse Technology 404-3840CA manual

La Crosse Technology

La Crosse Technology 404-3840CA manual

BRG DuraTime Installation and operation manual

BRG

BRG DuraTime Installation and operation manual

MFJ 122 user manual

MFJ

MFJ 122 user manual

Evil Mad Scientist Alpha Clock Five User Interface Guide

Evil Mad Scientist

Evil Mad Scientist Alpha Clock Five User Interface Guide

La Crosse Technology T82394 quick start guide

La Crosse Technology

La Crosse Technology T82394 quick start guide

Velleman WCM2 user manual

Velleman

Velleman WCM2 user manual

T&J EL4780 instruction manual

T&J

T&J EL4780 instruction manual

Amano CP-5000 user guide

Amano

Amano CP-5000 user guide

La Crosse Technology WS-8248U-CH instruction manual

La Crosse Technology

La Crosse Technology WS-8248U-CH instruction manual

La Crosse Technology WS-8117U-AL instruction manual

La Crosse Technology

La Crosse Technology WS-8117U-AL instruction manual

Lathem 1221 user manual

Lathem

Lathem 1221 user manual

Befour Edge SS-3300 manual

Befour

Befour Edge SS-3300 manual

Ditel DR-109 Technical manual

Ditel

Ditel DR-109 Technical manual

Oregon Scientific RMR939P user manual

Oregon Scientific

Oregon Scientific RMR939P user manual

Auriol Z30300A manual

Auriol

Auriol Z30300A manual

Casio ID-14 Operation guide

Casio

Casio ID-14 Operation guide

Pyramid TIMETRAX SYNC RF installation instructions

Pyramid

Pyramid TIMETRAX SYNC RF installation instructions

manuals.online logo
manuals.online logoBrands
  • About & Mission
  • Contact us
  • Privacy Policy
  • Terms and Conditions

Copyright 2025 Manuals.Online. All Rights Reserved.