Gefei MIO AV-AViewer User manual

MIO AV-AViewer
User Manual V1.0
www.gefei-tech.com
[Gefei Tech.Co.,Ltd]

Copyright
Copyright © 2009 Gefei Tech. Co., Ltd All rights reserved. This document may not be copied in
whole or in part.
Trademarks
Gefei-Tech,Magi,MIO,VIO,XIO,MVS,MRS are either registered trademarks or trademarks of
Gefei Tech. Co., Ltd in China and/or other countries. Other trademarks used in this document are
either registered trademarks or trademarks of the manufacturers or vendors of the associated
products.
Disclaimer
Product options and specifications subject can be changed without notice. The information in this
manual is furnished for informational use only, is subject to change without notice, and should not
be construed as a commitment by Gefei Tech. Co., Ltd. Gefei Tech. Co., Ltd assumes no
responsibility or liability for any errors or inaccuracies that may appear in this publication.
Revision Status
Rev Date
Description
2013/7/18
Initial release of the MIO AV- AViewer User Manual
WEB Software V1.3

Table of Contents
Product Description......................................................................................................................... 1
Features ........................................................................................................................................... 1
Panel Description............................................................................................................................ 2
Left Panel................................................................................................................................... 2
Right Panel................................................................................................................................. 3
Buttons Definition...................................................................................................................... 3
Special Notice.................................................................................................................................. 4
How to Use the Remote Control Software................................................................................... 6
Attention before use................................................................................................................... 6
Introduction of Web Control........................................................................................................ 6
Function overview ............................................................................................................. 6
Audio & Video.................................................................................................................... 7
Input Source............................................................................................................... 7
Output resolution ...................................................................................................... 8
Video Display Mode................................................................................................... 8
Color parameters ....................................................................................................... 9
Audio to HDMI ........................................................................................................... 9
OSD parameters .............................................................................................................. 10
Audio meter display................................................................................................. 10
Editable program UMD............................................................................................ 11
Attach UMD and Audio meters to edge................................................................... 12
Transparency of Audio meters and UMD................................................................. 12
Tally Display............................................................................................................. 12
Safe Marker.............................................................................................................. 12
Input Format ............................................................................................................ 13

Waveform Display.................................................................................................... 14
Disable OSD (Full screen)......................................................................................... 15
Layout management ............................................................................................... 15
Alarm Settings................................................................................................................. 17
Audio Detection ...................................................................................................... 18
Video Detection....................................................................................................... 19
Status ofVideo and Audio ............................................................................................... 20
User Configuration.......................................................................................................... 21
Network Configuration ................................................................................................... 22
Change IP address.................................................................................................... 22
Change manager IP for SNMP Management........................................................... 22
Upgrade firmware of system................................................................................... 23
Specifications................................................................................................................................. 24
Contact Us...................................................................................................................................... 26

MIO AV- AViewer User Manual V1.0 Gefei-tech
Gefei Tech. Co., Ltd 1 / 29
Product Description
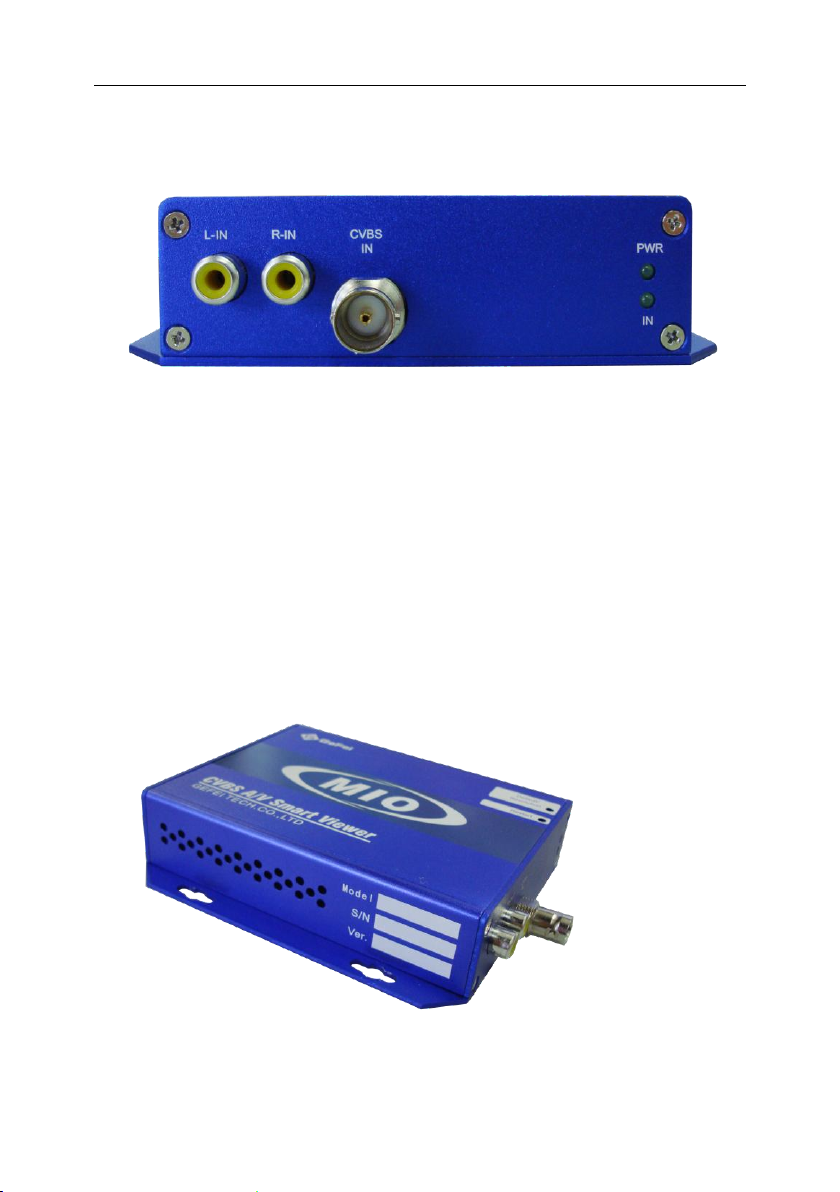
Based on Mini BOX platform, MIO AV-AViewer is a high-quality video and audio
converter which can convert one CVBS signal to DVI or HDMI signal for digital display
devices, such as LCD, DLP, and Plasma. It is the ideal ways to monitor digital signal.
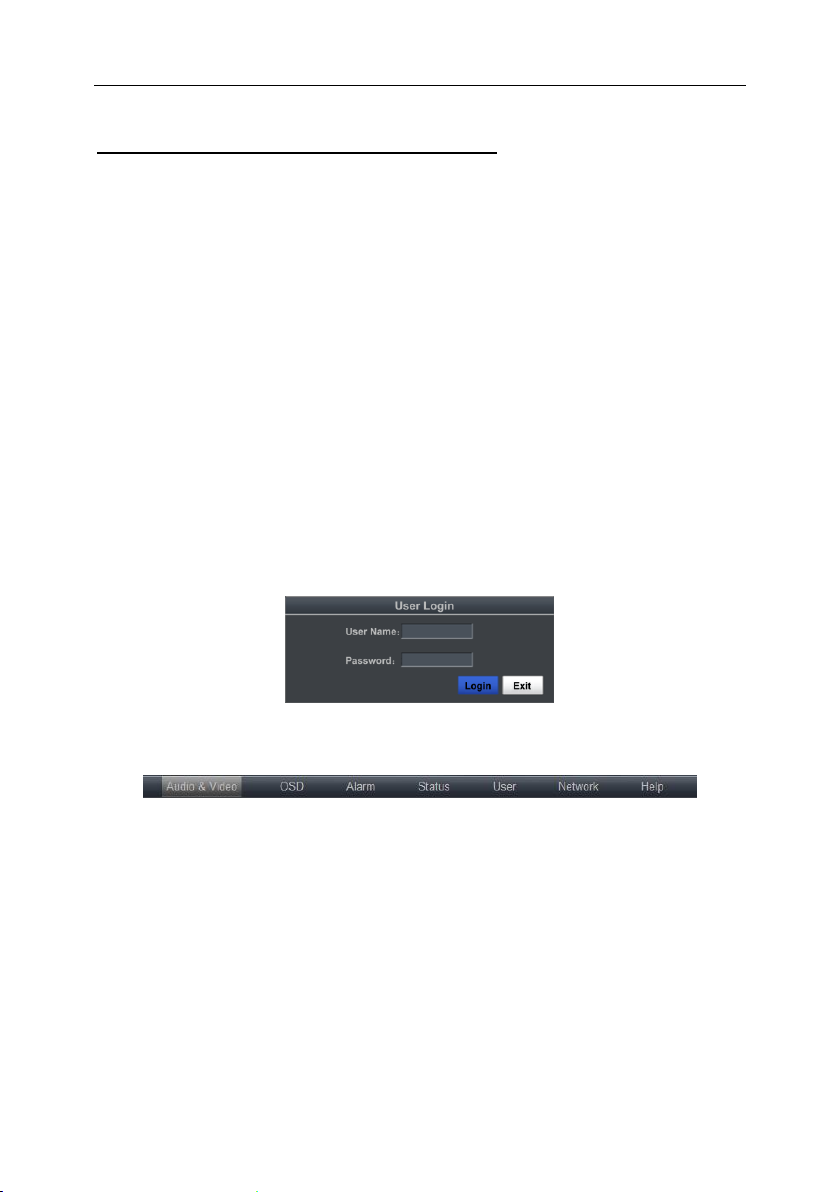
MIO AV-AViewer can be controlled by Ethernet network via IE browser, which is
convenient to configure the display parameters. The device provides various output
resolutions and audio and video detection, such as signal loss, signal freeze, audio
silence and so on.The text of UMD program can be edited freely.
Although the device adopts DVI output interface, the HDMI signal can be obtained by
using a DVI to HDMI adapter or cable. In HDMI mode, the video and audio are
embedded into HDMI signal.
Features
Automatic input detection of NTSC and PAL signal
Various output resolutions up to 1920x1080px60
In HDMI mode, the analog audio are embedded into HDMI signal
Provide audio and video monitoring and alarm, such as signal loss, signal freeze,
audio silence and so on
Display program UMD and 8 channels audio, and adjust transparency of them
freely
Provide various waveforms, such as illumination waveform, PbPr waveform, audio
waveform and so on
Build-in web server to control the device with user-friendly interface
Adjust luminance, saturation, contrast and de-noise freely
Provide on-screen display: input formats, safe marker
Mini box structure easily installed inside frame racks, video walls and so on
Widely used in broadcasting system, studios and other professional fields

MIO AV- AViewer User Manual V1.0 Gefei-tech
Gefei Tech. Co., Ltd 2 / 29
Panel Description
Left Panel
DC IN: Standard power, 12V, 1A
HDMI/DVI-OUT: Via DVI-I interface (female) to output DVI-D and HDMI signal.
Although the device adopts DVI output interface, the HDMI signal can
be obtained by using a DVI to HDMI adapter or cable. In HDMI mode,
the SDI audio signals are embedded into HDMI signal.
The output resolution can be configured as below.
1024x768x60p, 1280x720x50p/60p
1280x768x60p, 1280x800x60p
1280x1024x60p, 1360x768x60p
1400x1050x60p, 1600x900x60p
1680x1050x60p, 1920x1080x50i/60i
1920x1080x50p/60p, AUTO HDMI
Network: RJ45 interface with 10/100/1000M auto-detection. And the default IP address
is 192.168.1.76. The web server is remote control interface.

MIO AV- AViewer User Manual V1.0 Gefei-tech
Gefei Tech. Co., Ltd 3 / 29
Right Panel
PWR: Power indicator, the indicator shows green as the power is working normally.
IN: Signal indicator, the indicator shows green as the video is locked with no errors.
CVBS IN: BNC interface, CVBS video signal input
Support input formats as below
NTSC,PAL
L-IN & R-IN:RCA interface, 1 analog audio stereo signal input
Buttons Definition
Resolution/ Default: Using a push pin to short press the button, the output resolution

MIO AV- AViewer User Manual V1.0 Gefei-tech
Gefei Tech. Co., Ltd 4 / 29
is changed among 1280x720x60p、1920x1080x60p and AUTO
HDMI. Using a push pin to long press the button until the DVI
output disappears. The parameters on the web page will be
restored to default ones, including IP address and user password.
The default IP address is 192.168.1.76, and default password is
000000 (six zeros).
Restart: Using a push pin to press the button, The function of the button equals to turn
off. Probably around 5s, the power to restart .
Special Notice
1.In order to avoid network traffic congestion, please do not submit parameters before
the first modification is applied.
2.In order to avoid hardware loose contact caused by continuous operations on the
front panel, please do your second operation after you have got the first operation
result.
3.Generally, it will spend about three seconds to get the results after you submit. The
time is related with the monitor type. If the time is too long (over 7seconds), maybe
there is something abnormal with the hardware’s working status (overheating for
example), please wait patiently.
4.Do not plug the DVI connector without power-down.
5.When there is no display output from the device on the monitor, maybe the output
resolution don’t match the monitor. Please try to change the output resolution
though web server.
6.Windows 2003, Windows XP, Windows Vista and Windows 7 are strongly
recommended with Internet Explorer.exe.
7.Build-in Web server to control Mini box easily by your computer via Ethernet. Please
make sure IP address of Mini box is in the same network segment as your computer.
And the IP and Mac address of Mini box are unique value in Ethernet.
8. User can also upgrade system under the label “Network”. Before the upgrade, the

MIO AV- AViewer User Manual V1.0 Gefei-tech
Gefei Tech. Co., Ltd 5 / 29
anti-virus software and firewall have to be closed to make sure that the upgrade data
is transmitted to MIO AV-AViewer system without rejection. Power and network
cannot be cut off during upgrading.

MIO AV- AViewer User Manual V1.0 Gefei-tech
Gefei Tech. Co., Ltd 6 / 29
How to Use the Remote Control Software
Attention before use
MIO AV-AViewer has a built-in Web server, so user could configure it by Internet
Explorer easily when connecting it through cable.
The default IP address: 192.168.1.76.
The default user name: admin
The default password: 000000 (six zeros)
Introduction of Web Control
You do not need to install the client software. Open the IE, and input the IP address in
the location bar to open the user interface. Default IP address is “http://192.168.1.76”.
Input user name (admin) and initial password (000000). Click “login”, you will enter into
the actual operation remote control.
Function overview
There are many labels at the top of the web page: Audio & Video, OSD, Alarm, Status,
User, Network, and Help. Different functions can be achieved under different labels.
Audio & Video: Configuration of input source, output resolution, display mode, color
parameters, and HDMI embedded audio.
OSD: Configuration of UMD display, Audio meters, AFD information display, Safe
Marker, Waveform, and Layout management.
Alarm: The system supplies detection of audio, mute, frame frozen, black, signal loss.
Each alarm threshold can set to meet your needs.

MIO AV- AViewer User Manual V1.0 Gefei-tech
Gefei Tech. Co., Ltd 7 / 29
Status: Show the current status of video and audio.
Network: Configuration of IP address and parameters for SNMP management, and
upgrade the firmware.
Help: Show the versions of each firmware here.
Audio & Video
Input Source
You can choose input source between Cable and Fiber. So far, only the type of BNC
cable is available.

MIO AV- AViewer User Manual V1.0 Gefei-tech
Gefei Tech. Co., Ltd 8 / 29
Output resolution
HDMI output interface provides EDID detection from the monitor. And the resolutions
from EDID are highlighted in the dropdown list. See the picture shown above. The
output resolution of HDMI signal is up to 1920x1080x60p.
The output resolution can be configured as below.
1024x768x60p, 1280x720x50p/60p
1280x768x60p, 1280x800x60p
1280x1024x60p, 1360x768x60p
1400x1050x60p, 1600x900x60p
1680x1050x60p, 1920x1080x50i/60i
1920x1080x50p/60p, AUTO HDMI
(AUTO HDMI: auto-match the output resolution based on EDID detection of monitors.)
Video Display Mode
There are two types of video display: Full channel and Original Ratio.
Full channel means the video image will cover the entire window and ignore the aspect
ratio of video signal.

MIO AV- AViewer User Manual V1.0 Gefei-tech
Gefei Tech. Co., Ltd 9 / 29
Original Ratio means the video image always keeps the aspect ratio of video signal. So
for SD input signal, the aspect ratio of video image is 4:3;And for HD input signal, it is
16:9.
Color parameters
Brightness: to set the brightness or darkness of picture. The range is from -512 to 511.
Saturation: to set the color of picture. The range is from 0 to 511.
Contrast: to adjust the clarity of picture. The range is from 0 to 511.
Put the mouse on the cursor and drag it to the assigned position; or you can fill in the
certain value ranging from 0 to 255, and then press “Enter” on keyboard.
Reset button: to restore the factory default settings. The default value of brightness,
saturation and contrast is zero.
Audio to HDMI
Select audio channels from analog audio to embed into HDMI signal. It supports eight
audio channels for HDMI signal.
The drop-down list is shown as following.
Off/ CH1&2
“Off”option means no audio signal is embedded into the selected channels of HDMI
signal.

MIO AV- AViewer User Manual V1.0 Gefei-tech
Gefei Tech. Co., Ltd 10 / 29
OSD parameters
Here you can adjust various parameters for On-screen Display, such as UMD, Audio
meters and so on.
Audio meter display
Audio meter monitoring
System provides four groups of audio meters to monitoring up to eight audio channels
from CVBS signal. Each group can show two audio channels and be configured
individually.
The drop-down list is shown as following.
Off/ CH1&2
“Off”option means the selected audio meters are turned off and not displayed on
screen.
The position of audio meters
Both Sides: AM1 and AM2 are located on the left side of screen, while AM3 and AM4 are
located on the right side of screen. If there are only AM1 and AM2 (or AM3
and AM4) displayed on the screen, so AM1 (AM3) is on the left side and AM2
(AM4) on the right side.
Left Side: AM1, AM2, AM3, and AM4 are all located on the left side of screen.
Right Side: AM1、AM2、AM3、AM4 are all located on the right side of screen.

MIO AV- AViewer User Manual V1.0 Gefei-tech
Gefei Tech. Co., Ltd 11 / 29
Editable program UMD
Upload UMD Text
Type the characters in blank bar, change color of characters, and preview the UMD
effect real time. Click “Submit”after all parameters are settled and all characters will
be displayed in UMD.
Clear UMD Text
Delete all characters or enter a “space”, and then click “Submit”, the character in UMD
area will be cleared.
Upload UMD picture
UMD picture can be changed to user-defined one freely through this function.
The picture that you need to upload must be 32bits TGA format with Alpha channel.
The size of picture is 720x60 pixels
Check/ uncheck UMD
Check the box “UMD”. It will be shown within the channel, otherwise, not.
UMD effect
preview

MIO AV- AViewer User Manual V1.0 Gefei-tech
Gefei Tech. Co., Ltd 12 / 29
Attach UMD and Audio meters to edge
Check the box, UMD bar and audio meters are attached to the edge of screen which
makes the video image be shown completely. If not, UMD bar and audio meters are
overlaid on the image.
Transparency of Audio meters and UMD
In this area, users can modify the transparency of audio meters and UMD. Put the
mouse on the cursor and drag it to the assigned position; or you can fill in the certain
value ranging from 0 to 100, and then press “Enter” on keyboard. “0” stands for full
transparency and “100” stands for opacity.
Tally Display
This function is reserved so far.
Safe Marker
Mask: block the image with Mark
Line: Marker showed with lines

MIO AV- AViewer User Manual V1.0 Gefei-tech
Gefei Tech. Co., Ltd 13 / 29
Transparency of Safe Area
Adjust transparency value of Mark. The image can be blocked more or less by this
adjustment.
Put the mouse on the cursor and drag it to the assigned position; or you can fill in the
certain value ranging from 0 to 100, and then press “Enter” on keyboard. “0” stands for
full transparency and “100” stands for opacity.
Input Format
Check the box, and input resolution/format will be overlaid on the top of the screen,
otherwise, not.
None: No safe marker on the screen
Mask & Line: Apply both mode
1080i 60
Input
Resolution

MIO AV- AViewer User Manual V1.0 Gefei-tech
Gefei Tech. Co., Ltd 14 / 29
Waveform Display
Choose Waveform Mode
System supports display of real-time waveform and vector overlaid on image. There
are three options in drop-down list. They are “None”, “Y+PbPr+Vector”, and “Y+Audio
Waveform/Phase”.
Y+PbPr+Vector
Y+Audio Waveform/Phase
None: No waveform on the screen
Y Waveform
PbPr Waveform
Vector
Y Waveform
Audio Waveform of two
channels
Audio Phase of two
channels

MIO AV- AViewer User Manual V1.0 Gefei-tech
Gefei Tech. Co., Ltd 15 / 29
Select audio channels for Audio Measure
In the mode of “Y+Audio Waveform/Phase”, Audio Waveform and Phase are based on
the audio channels you selected from analog audio.
The drop-down list is shown as following.
Off/ CH1&2
Adjust transparency of Waveform Background
Adjust transparency value of Waveform Background. The image can be blocked more
or less by this adjustment.
Put the mouse on the cursor and drag it to the assigned position; or you can fill in the
certain value ranging from 0 to 100, and then press “Enter” on keyboard. “0” stands for
full transparency and “255” stands for opacity.
Disable OSD (Full screen)
Check the box, on-screen-display elements all disappear, so the image is displaying in
the full screen mode.
Uncheck the box, the checked elements appear on the screen. Meanwhile, the status of
each on-screen-display element can be set individually.
Layout management
All configured parameters can be saved as a template. System provides up to four
templates for quick application of different occasions.

MIO AV- AViewer User Manual V1.0 Gefei-tech
Gefei Tech. Co., Ltd 16 / 29
Click one of four buttons, for example, click “Template 1”. Here is a message box
appearing. Enter the name of template in the blank area on the top of message box,
and click “Save”button on the bottom. So the name of the button is changed to the
one you edited, not “Template 1”any more.
Click the template which is saved already, and a message box appears to show the
status of its each parameter. You can apply the template, or delete the template. After
you change its parameters, even its name, press “Save” button to submit the new data.
Edit name of template in the blank bar.
HD Studio
Press “Save” button to submit data.
You can change the name of template which
has been saved, then press “save” button.
Show status of each
parameter of the
saved template
Apply the template
Delete the template
Table of contents
Other Gefei Media Converter manuals
Popular Media Converter manuals by other brands

HEIDENHAIN
HEIDENHAIN LC 2 1 Series Mounting instructions

Mid-Continent Instrument
Mid-Continent Instrument True Blue Power TC234 Installation manual and operating instructions

Glamox
Glamox H60 H 04 installation manual

Beresford
Beresford TC-7535 Caiman SEG instruction manual

HEIDENHAIN
HEIDENHAIN LS 3 8 Series Replacing Instructions

Sunricher
Sunricher Easy DMX512 Using instruction