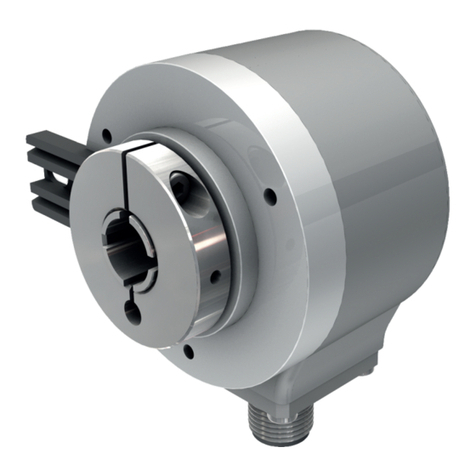
turck RM-97 User manual

Analog Encoders
RM-97/98/115
Manual
Your Global Automation Partner

2 Turck Inc. |3000 Campus Drive, Minneapolis, MN 55441 |T +1 800 544 7769 |F +1 763 553 0708 |www.turck.com

3
1 Technical details and encoder characteristics...................................................................... 4
Mechanical values .......................................................................................................4
Working temperature range..............................................................................................4
Supply voltage and current consumption.................................................................................4
Load at the output / max. output current .................................................................................4
Hardware characteristics .................................................................................................4
Supported standards and functions ......................................................................................4
Optional functions .......................................................................................................5
2 Electrical installation............................................................................................. 6
Electrical installation .....................................................................................................6
Terminal assignment .....................................................................................................6
3 Function and status LED ......................................................................................... 7
LED combinations during operation ......................................................................................7
LED combinations for scaling.............................................................................................8
4 Standard function ............................................................................................... 8
Scaling function (optional) ...............................................................................................9
Roll-over through zero ...................................................................................................9
Reference point display ..................................................................................................10
Resetting the scaled output signal........................................................................................10
Scaling with direction of rotation change .................................................................................10
Limit switch function (optional) ..........................................................................................11
5 Abbreviations used .............................................................................................. 11

4 Turck Inc. |3000 Campus Drive, Minneapolis, MN 55441 |T +1 800 544 7769 |F +1 763 553 0708 |www.turck.com
1 Technical details and encoder characteristics
Mechanical values
RM-97/RM-98
Shock resistance acc. to EN 60068-2-27 2500 m/s2, 6 ms
Vibration resistance acc. to EN 60068-2-6 300m/s2, 10 … 2000 Hz
RM-115
Shock resistance acc. to EN 60068-2-27 5000 m/s2, 6 ms
Vibration resistance acc. to EN 60068-2-6 300m/s2, 10 … 2000 Hz
Working temperature range
-40…+85°C
Supply voltage and current consumption
Output: 4 … 20mA: 10 … 30 VDC max. 30.0 mA
0 … 10V: 15 … 30 VDC max. 30.0 mA
0 … 5V: 10 … 30 VDC max. 30.0 mA
Load at the output / max. output current
Output: 4 … 20mA: at 10 VDC max. 200 Ohm
at 24 VDC max. 900 Ohm
at 30 VDC max. 1200 Ohm
0 … 10V / 0 … 5V: min. 1kOhm load resistance / max. output current: 10mA
Hardware characteristics
Singleturn technology Magnetic 2 axes Hall sensor
Resolution (DA converter) 12 bits
Singleturn accuracy (at 25 °C) +/-1.00°
Temperature coecient < 100 ppm/K
Repeatability (at 25 °C) +/-0.2°
Update rate 1 ms
Power ON time < 1 sec.
Settling time < 1 ms
Multiturn technology Magnetic revolution counter
Multiturn resolution Maximum 65536 revolutions
Multiturn range (default) 16 revolutions
Direction of rotation (default) CW
Smallest measuring range 22.5°
Function display and diagnostics by means of LEDs.
Supported standards and functions
RM-97/RM-98, Output ‘7A’
Output: 4 … 20mA
Resolution: 12 bits
Max. measuring range: 65536 revolutions
Min. measuring range: 22.5°
Zero point display: 0 … 1°
(The measuring range is factory-set and cannot be modied by the user)

5
RM-115, Output ‘7A’
Output: 4 … 20mA
Resolution: 12 bits
Max. measuring range: 65536 revolutions
Min. measuring range: 22.5°
Zero point display: 0 … 1°
(The measuring range is factory-set and cannot be modied by the user)
RM-97/RM-98, Output ‘8B’
Output: 0 … 10 VDC
Resolution: 12 Bit
Max. measuring range: 65536 revolutions
Min. measuring range: 22,5°
Zero point display: 0 … 1°
(The measuring range is factory-set and cannot be modied by the user)
RM-115, Output ‘8B’
Output: 0 … 10 VDC
Resolution: 12 Bit
Max. measuring range: 65536 revolutions
Min. measuring range: 22,5°
Zero point display: 0 … 1°
(The measuring range is factory-set and cannot be modied by the user)
RM-97/RM-98, Output ‘BA’
Output: 0 … 5 VDC
Resolution: 11 bits
Max. measuring range: 65536 revolutions
Min. measuring range: 22.5°
Zero point display: 0 … 1°
(The measuring range is factory-set and cannot be modied by the user)
RM-115, Output ‘BA’
Output: 0 … 5 VDC
Resolution: 11 bits
Max. measuring range: 65536 revolutions
Min. measuring range: 22.5°
Zero point display: 0 … 1°
(The measuring range is factory-set and cannot be modied by the user)
Optional functions
• Measuring range scaling via scaling inputs (max. 10,000 cycles)
• Limit switch function
• Direction of rotation: CCW (is factory-set and cannot be modied by the user.)

6 Turck Inc. |3000 Campus Drive, Minneapolis, MN 55441 |T +1 800 544 7769 |F +1 763 553 0708 |www.turck.com
2 Electrical installation
This chapter contains information about the electrical installation, commissioning of the absolute encoder RM-97/RM-98/RM-
115 analog.
Electrical installation
Switch o the plant!
Make sure that the whole plant remains switched o
during the whole electrical installation.
Electrical installation requires connectors or connection cables
Terminal assignment
Top view of mating side, male contact base
M12 connector, 5-pole
Interface Connection type Cable (isolate unused wires individually before commissioning)
7A
(current) C*M/CA*M Signal: 0 V +V +I SET 1) Set 2)
Cable color: WH BN GN GY PK
Interface Connection type M12 connector, 5-pole
7A
(current) H1*51 Signal: 0 V +V +I SET 1) Set 2)
Pin: 3 1 2 4 5
Interface Connection type Cable (isolate unused wires individually before commissioning)
8B/BA
(voltage) C*M/CA*M Signal: 0 V +V +I SET 1) Set 2)
Cable color: WH BN GN GY PK
Interface Connection type M12 connector, 5-pole
8B/BA
(voltage) H1*51 Signal: 0 V +V +I SET 1) Set 2)
Pin: 3 1 2 4 5
+V: Encoder supply voltage +V DC +U: Voltage SET 1: Set input for teach point 1
0 V: Encoder ground GND (0 V) +I: Current SET 2: Set input for teach point 2
1)For scalable variants
Make sure that the shield of the encoder is properly connected to the shield of your plant.
If possible, mount all cables with traction relief.
Check the maximum supply voltage on the device.

7
3 Function and status LED
The device is equipped with a two-color (green / red) LED
displaying status and errors.
LED combinations during operation
Display LED Meaning Error cause Addition
No LED on No encoder operation Faulty supply voltage.
Encoder is not operational
Check the power supply and
the wiring
Green LED ashes in
250 ms cycles
Service mode Encoder in Service mode Please contact the service
department of the
manufacturer
Green LED constantly
on
Encoder in operation
Red and green LEDs
ashing alternately in
250 ms cycles
System error Error Internal system error Please contact the service
department of the
manufacturer
Red and green LEDs
ashing alternately in
500 ms cycles
Wire break (only for
current output)
Load at the output too low.
Connection with the control
interrupted
Check the wiring
Green and red LED
constantly on
Reference point
display

8 Turck Inc. |3000 Campus Drive, Minneapolis, MN 55441 |T +1 800 544 7769 |F +1 763 553 0708 |www.turck.com
LED combinations for scaling
Display LED Meaning Error cause Addition
Green LED ashes 1x
1x
Activation of scaling input 1
detected and conrmed
Green LED ashes 3x
3x
Activation of scaling input 2
detected. The new measuring
range has been taken over
Red LED ashes 3x
3x
Error during the scaling
process. The new measuring
range has not been taken
over
Selected measuring range
< 22.5° or > 65536 rev
Scale another
measuring range
Green/red/green
sequence
1x 1x 1x
Reset of the scaled measuring
range. Default measuring
range is loaded. Preset is
performed at the current
position
4 Standard function
As a standard, the corresponding desired output signal ( 4 … 20m A / 0 … 10 V /0 … 5 V) is linearily factory-scaled over 16
revolutions
and supplied in the CW or CCW direction of rotation according to customer requirement.
The reference point is indicated by the LED from 0 … 1°.

9
Scaling function (optional)
The encoder is factory-set to a measuring range of 16 revolutions over which the corresponding output signal is scaled
linearily.
Two scaling inputs (set 1, set 2 - see chapter Terminal assignment) allow the user to dene a desired measuring range.
The desired measuring range must be > 22.5° and shall not exceed 65536 revolutions.
The factory-set output range of 4 … 20mA / 0…10V / 0…5V is scaled linearily over the desired measuring range.
To trigger the scaling operation, the corresponding scaling input must be connected with the supply voltage + V for at least
1 second.
Scaling process:
1. Turn the shaft to the desired start position.
2. Connect scaling input 1 with + V for at least 1 second.
3. Green LED ashes 1x.
4. Turn the shaft to the desired end position.
5. Connect scaling input 2 with + V for at least 1 second.
6. Green LED ashes 3x. The new measuring range is active.
(The output signal assumes the highest state)
Scaling input 1* Scaling input 2* Function
0 0 Normal operating mode
1 0 Setting the start position
0 1 Setting the end position
1 1 Resetting to the default measuring range
* 0 = GND
1 = V+ for 1 second
Scalable variant without limit switch function
Roll-over through zero
Roll-over through zero takes place at the next larger binarily divisible number of revolutions.
Example: If a measuring range is scaled over 3 revolutions, a total measuring range of 4 revolutions is set up. The scaled
measuring range of 3 revolutions is centered in this measuring range, without loosing the absolute reference. This way,
after reaching the maximum or minimum signal level of the scaled measuring range, the output remains in this state for 0.5
revolutions until roll-over1 through zero takes place.

10 Turck Inc. |3000 Campus Drive, Minneapolis, MN 55441 |T +1 800 544 7769 |F +1 763 553 0708 |www.turck.com
Reference point display
With the factory-set„default“ scaling, the LED displays the reference point of 0..1°. The reference point display is no longer
available if another measuring range is scaled using the scaling inputs.
Caution:
The scaling function is limited to 10,000 cycles. Beyond this limit, the error-free scaling of the output signal cannot
be guaranteed any more.
Caution:
Actuate the scaling inputs only once the shaft has stopped. Only this way will it be possible to take over the desired
start and end position of the desired signal scaling.
Resetting the scaled output signal (Factory Defaults)
1. Connect scaling inputs 1+2 with + V for at least 1 second.
2. The LED sequence green / red / green is displayed. The factory-set scaling of the output signal is available again and is set to
the central value of the measuring range at the current position.
Scaling with direction of rotation change
Fixed output levels are assigned to the scaling inputs.
Scaling input 1 = lowest output level (current variant = 4 mA / voltage variant = 0 V)
Scaling input 2 = highest output level (current variant = 20 mA / voltage variant = 5 or 10 V)
If scaling input 2 is actuated rst, followed by input 1, the new measuring range is dened with the reversed direction of
rotation.
Inputs sequence Absolute position Sign of the curve
1 – 2 1 > 2 (CCW) Positive
1 – 2 2 > 1 (CW) Positive
2 – 1 1 > 2 (CW) Negative
2 – 1 2 > 1 (CCW) Negative

11
Limit switch function (optional)
Depending on the scaled measuring range, the output signal remains at the last nal value of the scaled output signal until
the transition through zero. With the limit switch function, the output signal does not remain at the last nal value, but it
makes a dened jump. This signal jump can be used by a control as a limit switch. The output levels of the limit switches are
factory-set.
Scalable variant with limit switch function
5 Abbreviations used
CW Direction of rotation: clockwise looking at the shaft.
CCW Direction of rotation: counterclockwise looking at the shaft.
MT Revolution Counter (Multi-turn).
ST Angle information within a revolution (Singleturn).

12 Turck Inc. |3000 Campus Drive, Minneapolis, MN 55441 |T +1 800 544 7769 |F +1 763 553 0708 |www.turck.com

13
Turck Inc. sells its products through Authorized Distributors. These distributors provide our
customers with technical support, service and local stock. Turck distributors are located
nationwide – including all major metropolitan marketing areas.
For Application Assistance or for the location of your nearest Turck distributor, call:
1-800-544-7769
Specications in this manual are subject to change with out notice. Turck also reserves the right to
make modications and makes no guarantee of the accuracy of the information contained herein.
Literature and Media questions or concerns?

28 subsidiaries and over
60 representations worldwide!
www.turck.comMA1028 A 02/17
©2015 by Turck Inc. All rights reserved. No part of the
publication may be reproduced without written permission.
Printed in USA
This manual suits for next models
2
Table of contents
Other turck Media Converter manuals

turck
turck FOC1 Series User manual

turck
turck Ri-QR24 User manual

turck
turck DW108 Service manual

turck
turck Ri-QR24 User manual
turck
turck Ri-QR24 User manual
turck
turck RI360P0-EQR24M0-HESG25X3-H1181 User manual

turck
turck Ri-QR24 User manual

turck
turck REM Series User manual

turck
turck RES Series User manual

turck
turck RI QR20 Series User manual