GeneralTouch PIT User manual

GENERALTOUCH TECHNOLOGY CO., LTD
Issued by: Customer Service Department 1 / 13 Issued Date: 2014.1.23
发行部门:客户服务部 发行时间:2014.1.23
Quick Installation Guide for 21.5”GeneralTouch PIT
吉锐 21.5 寸PIT 触摸屏快速安装指导
V1.3
GeneralTouch Projected Infrared Touch Screen(PIT)is a new type of multi-touch infrared technology with
excellent performance, fashion appearance, which is easy to design-in, easy to install and easy to maintain.
How to install the PIT correctly to reach the best user experience? Please kindly follow the instructions below
to achieve the success.
吉锐投射式红外触摸屏(PIT)是一种集极优性能与时尚外观于一体的新型多点红外触摸技术,具有易于设计、
安装、维护的特点。如何正确安装吉锐投射式红外触摸屏以达到最佳的用户体验?请参考下述安装说明以达成功。

GENERALTOUCH TECHNOLOGY CO., LTD
Issued by: Customer Service Department 2 / 13 Issued Date: 2014.1.23
发行部门:客户服务部 发行时间:2014.1.23
Part One: Recognize 21.5”PIT Hardware System
第一部分:认识 21.5 寸PIT 硬件系统
21.5”PIT hardware system includes PIT touch screen, 28-Pin Flexible Flat Cable (FFC), controller and
communication cable. 28-Pin FFC is connected on the PIT touch screen when you receive the product.
GeneralTouch doesn’t provide communication cable, which is supposed to be designed by the customer
according to detailed application. GeneralTouch will provide the controller PIN definition to the customer.
PIT 硬件系统包含 PIT 触摸屏、28 针柔性扁平线缆(FFC)、控制器和通讯线缆。28 针FFC 在您收到我司 PIT
产品的时候已经连接在 PIT 触摸屏上。吉锐不提供通讯线缆,需要客户根据自身具体应用来设计通讯线缆。吉锐
将提供控制器针脚定义以便客户设计通讯线缆。
Controller
控制器
21.5”PIT Touch Screen
21.5 寸投射式红外触摸屏
28-Pin FFC
28 针FFC

GENERALTOUCH TECHNOLOGY CO., LTD
Issued by: Customer Service Department 3 / 13 Issued Date: 2014.1.23
发行部门:客户服务部 发行时间:2014.1.23
Part Two: Hardware Installation
第二部分:硬件安装
1. PIT Touch Screen Installation:
1、PIT 触摸屏的安装:
There are ten screw holes on the back side of the PIT touch screen. It’s recommended to design a kit of
brackets, metal or plastic carrier to support the PIT touch screen and fix the PIT touch screen onto LCD Panel.
Screws’ fixing will bring you an easy maintenance way.
在PIT 触摸屏的背面有 10 个螺钉孔。推荐使用一组支架,金属或塑料的框体支撑 PIT 触摸屏,并且将 PIT 触摸
屏固定在液晶面板上。通过螺钉进行锁附的安装方式为后续维护带来便捷。
1) Screw holes’ locations are shown in the picture below. The size of the screw should be M3 and the max
depth of the screw should be less than 4mm. If the screw is more than 4mm, it will press onto the glass and
lead the glass broken. The mounting torque of the screw should be less than 4kgf.cm.
1)螺钉孔的位置如下图所示。螺钉的尺寸为 M3 且最大长度需小于 4毫米。如果螺钉长度大于 4毫米,螺钉将
会挤压到玻璃并导致玻璃碎裂。安装螺钉时的扭矩请小于 4kgf.cm。
Back side of the PIT Touch Screen
PIT 触摸屏背面图
2) When you are using brackets or carrier to fix the PIT touch screen onto the LCD Panel or the chassis,
please kindly make sure:
2)当您使用支架或框体将 PIT 触摸屏固定到液晶面板或者铁盘上的时候,请确保按照下述要求进行设计、组装:
Point-1: When designing the PIT touch monitor, please kindly pay attention to the installation direction of the
PIT touch screen. Please make sure the side where the 28-Pin FFC comes out is the top side after the PIT
touch monitor is assembled.
要点-1:当您在设计 PIT 触显的时候,请注意 PIT 触摸屏的安装方向。请保证 28 针FFC 的出线所在方向在 PIT
触显组装后朝上。

GENERALTOUCH TECHNOLOGY CO., LTD
Issued by: Customer Service Department 4 / 13 Issued Date: 2014.1.23
发行部门:客户服务部 发行时间:2014.1.23
Front Side 正面 Back Side 背面
Point-2: During or after assembly, the PIT touch screen should keep the flatness and should not be twisted, or
the infrared light path would be changed and affect the touch function.
要点-2:在组装过程及组装后,请注意必需保持 PIT 触摸屏的平整度。PIT 触摸屏不能被扭曲否则红外线光路有
可能会被改变从而影响触摸性能。
Point-3: During or after assembly, the PCBAon the back side of the PIT touch screen should be protected well.
Non-uniform stress on the PCBA is not permitted. And the brackets or the chassis contacted with the PCBA
should not lead the PCBA short circuit or open circuit.
要点-3:在组装过程及组装后,PIT 触摸屏背面的 PCBA 应该被良好地保护。PCBA 受到不均匀压力是不允许的。
注意接触 PCBA 的支架或铁盘不可导致 PCBA 短路或断路。
Point-4:After assembly, there should be no any materials or glues stick on the IR diodes or fill in the clearance
between the PCBA and the Lens, or the IR light path would be blocked. If you want to use glue to seal the
seam between the PIT touch screen and the carrier or chassis, please kindly make sure the glue will not flow
into the seam, or the light path will be blocked.
要点-4:组装后,不能有任何材料或胶粘贴在红外管上或填充在 PCBA 和滤光条之间的间隙中,否则红外光路
将被阻挡。如果您想用胶密封 PIT 触摸屏和支撑框体或铁盘之间的缝隙,请保证胶不会流入缝隙,否则光路将被
阻挡。
Top Side
朝上
Top Side 朝上

GENERALTOUCH TECHNOLOGY CO., LTD
Issued by: Customer Service Department 5 / 13 Issued Date: 2014.1.23
发行部门:客户服务部 发行时间:2014.1.23
Point-5: After assembling the PIT touch screen onto the LCD Panel or the chassis, the FFC should be fixed
nearby the outlet to prevent the FFC comes off while there is a strength placed on it.
要点-5:将 PIT 触摸屏安装到液晶面板或铁盘上之后,柔性扁平线应该在靠近出口处被固定,以防止柔性扁平线
受力时脱落。
Point-6: During or after assembly, the two 7-Pin FFC and one 17-Pin FPC (Flexible Printed Circuit) on the back
corner of the PIT touch screen should be protected well and reserve enough safe space for them to avoid any
pressure. This requires you to consider designing a pierced structure on the bracket and the carrier.
要点-6:在组装过程及组装后,在 PIT 触摸屏背面角落的 2根7针柔性扁平线和 1根17 针柔性印刷电路板需要
被良好地保护,同时预留足够的安全空间避免其遭受任何压力。这需要您考虑在支架和框体上设计镂空结构。
Fix the FFC nearby the
outlet 靠近出口处固定
柔性扁平线
IR Diode
红外管
PCBA
LENS
滤光条
Keep the diodes and
clearance clean
保持红外管和间隙清洁
Carrier
框体

GENERALTOUCH TECHNOLOGY CO., LTD
Issued by: Customer Service Department 6 / 13 Issued Date: 2014.1.23
发行部门:客户服务部 发行时间:2014.1.23
Point-7: Please reserve a safe space on the brackets or the carrier as the outlet of the 28-Pin FFC.
要点-7:请在支架或框体上预留 1个安装空间作为 28 针柔性扁平线的出口。
3) When assembling the PIT touch monitor, please make sure the 28-Pin FFC cable is as far as possible away
from the power board, inverter board, power cord and LVDS cable to avoid interference. Please don’t kink or
bend down the 28-Pin FFC cable to avoid the inner damage.
3)当安装 PIT 触摸屏时,请保证 28 针柔性扁平线尽可能地远离电源板、高压板、电源线和液晶屏连接线以避
免干扰。禁止打结或弯折 28 针柔性扁平线以防止线缆内部损伤。
2. Controller Installation:
2. 控制器安装:
1) Controller should be also installed as far as possible away from the power board, inverter board, power cord
and LVDS cable to avoid interference.
7-Pin FFC
7针FFC
Reserve enough
safe space 预留足
够的安全空间
7-Pin FFC
7针FFC
7-Pin FFC
7针FFC
17-Pin FPC
17 针FPC
Safe space on the bracket to
protect the FFC cable 支架上用
于保护柔性扁平线的安全空间

GENERALTOUCH TECHNOLOGY CO., LTD
Issued by: Customer Service Department 7 / 13 Issued Date: 2014.1.23
发行部门:客户服务部 发行时间:2014.1.23
1)控制器也应该尽可能地远离电源板、高压板、电源线和 液晶屏连接线后进行安装,以避免干扰。
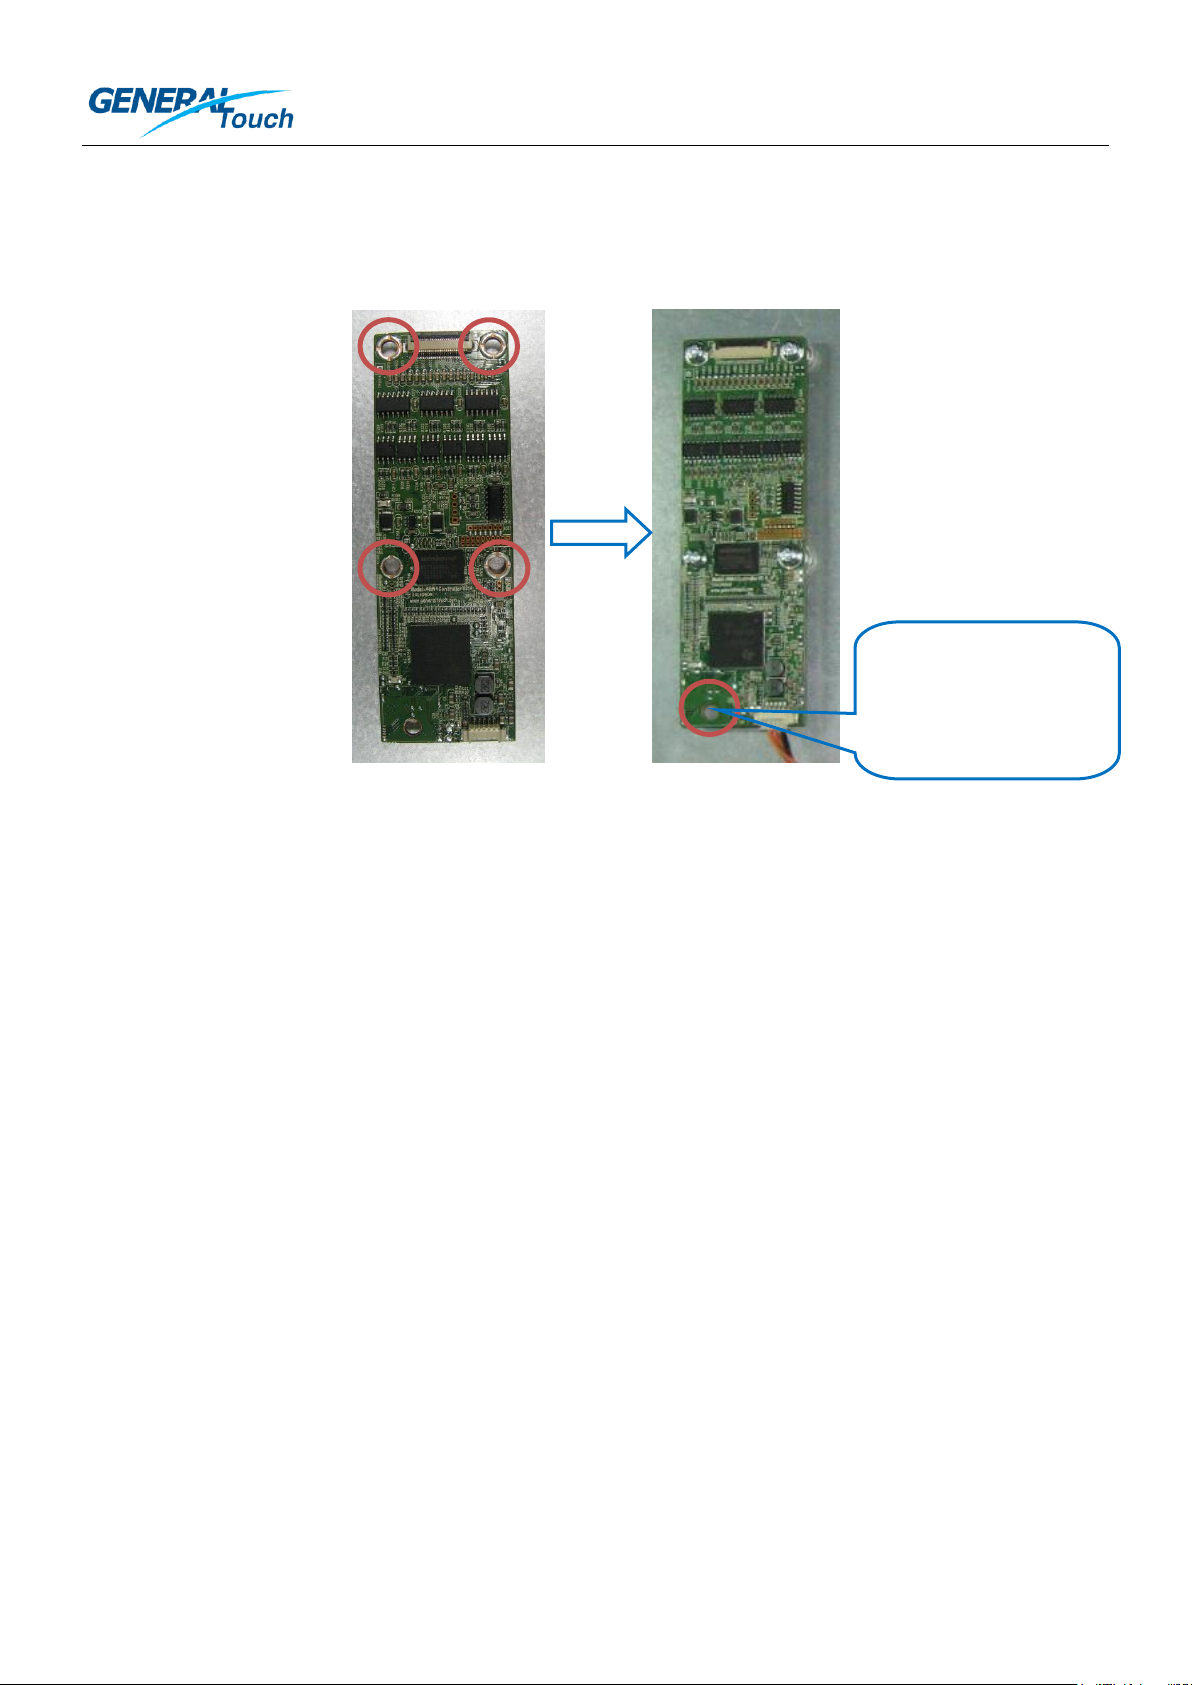
2) Please use the four screw holes to fix the controller onto the chassis. The screw should be M3 and with
screw washer on it.
2)请使用 4个螺钉孔固定控制器在铁盘上。螺钉应该是 M3 且自带垫片的。
3) Good grounding is needed. Please also pay attention to wearing antistatic gloves or antistatic wrist strap to
protect controller from static damage.
3)良好的接地是必须的。请注意带上防静电手套或防静电手腕带来保护控制器免受静电损害。
4) To protect the electrical parts on the controller, a safe height should be reserved between the controller and
the chassis. The electrical parts on the controller should not touch the chassis to avoid short circuit. The height
of the electrical parts for each side of the controller is Max4mm. You can design the safe height according to
the machining accuracy of your chassis.
4)为保护控制器上的电子元件,需要在控制器和铁盘之间预留安全高度。控制器上的电子元件不能接触铁盘以
避免短路。控制器每一面上的电子元件高度最大为 4mm。您可以根据您的铁盘加工精度来设计安全高度。
5) Usually, the electrical parts around the screw holes have a high risk to be pressed by the chassis. Please
kindly check this point when designing the chassis.
5)通常,螺钉孔附近的电子元件有很高的被铁盘挤压的风险。在设计铁盘时,请确认好这一点。
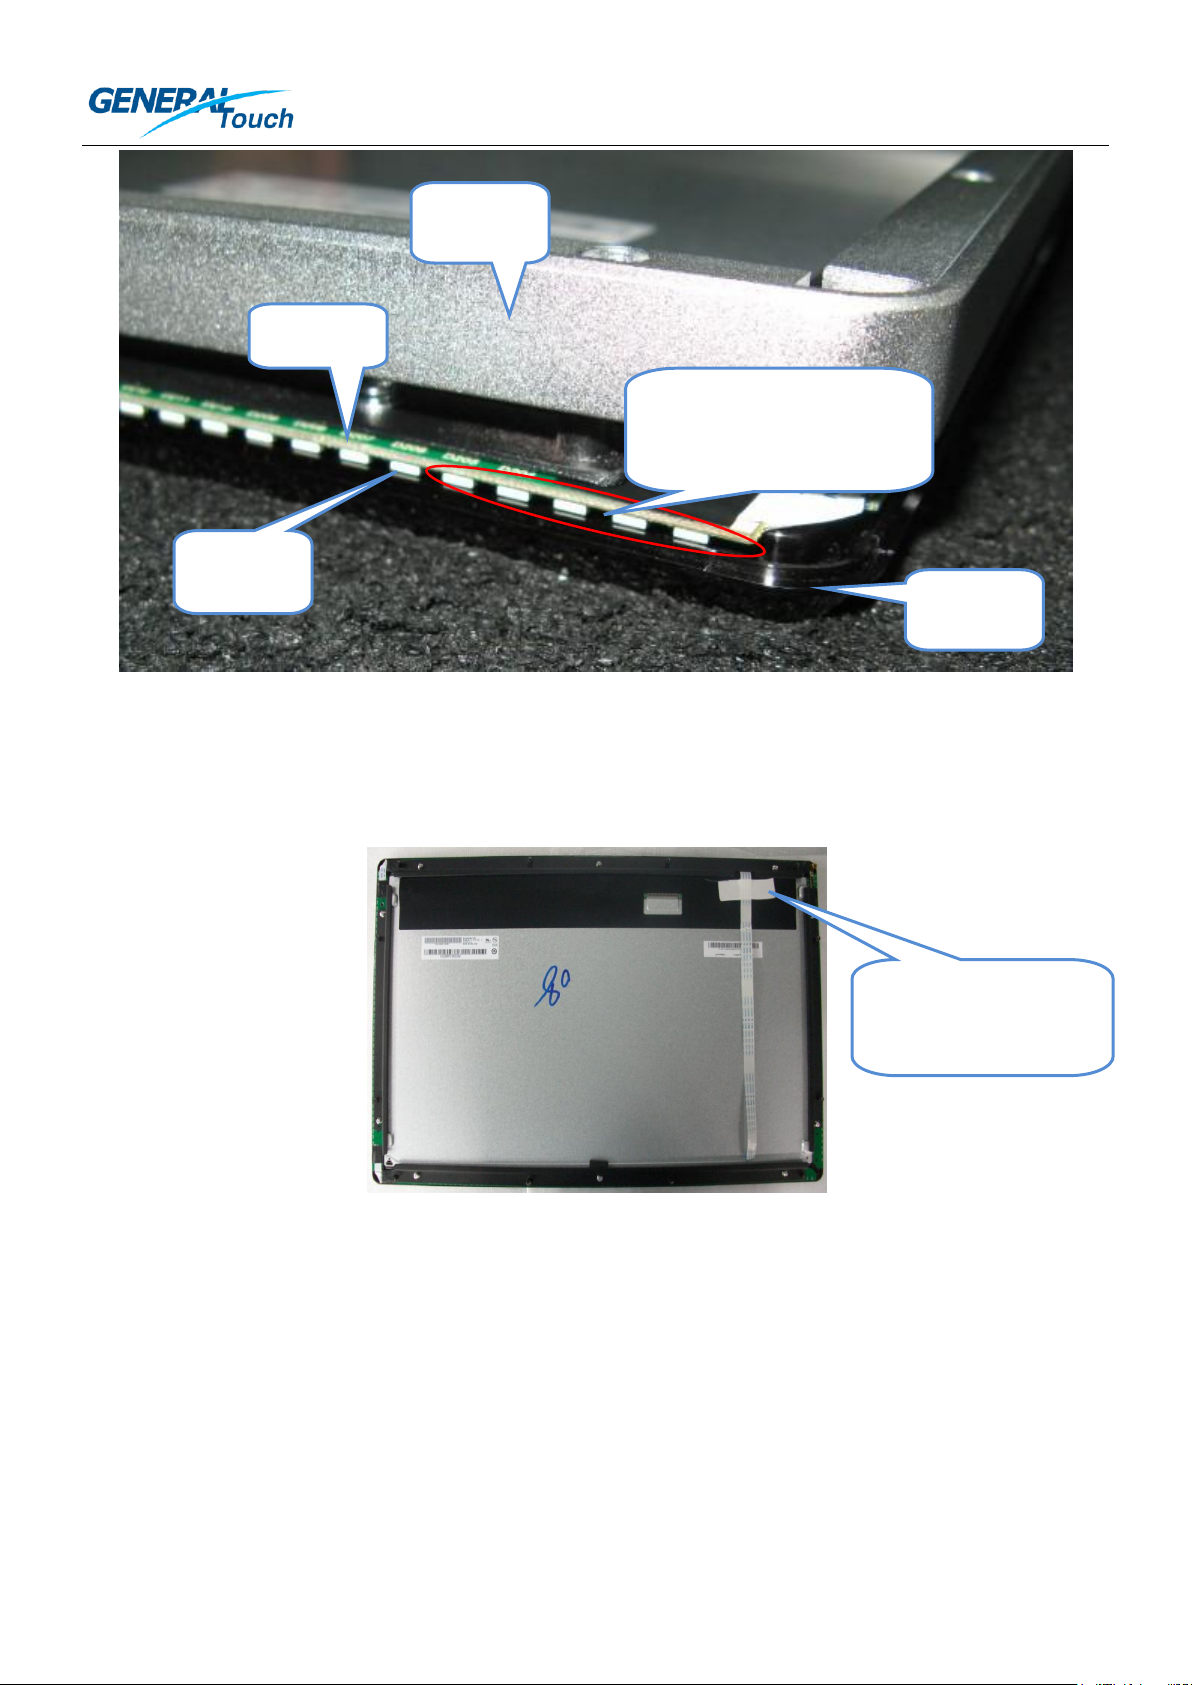
3. Connection of the 28-Pin FFC:
3. 连接 28 针柔性扁平线
When connecting the 28-Pin FFC cable with the controller, please make sure the golden fingers on the 28-Pin
FFC are well contacting with the connector pins. For a simple recognition, after correct connecting, the blank
side with no painting of the 28-Pin FFC should be on the same side as the top side of the controller.
在连接 28 针柔性扁平线到控制器时,请保证 28 针柔性扁平线上的金手指与控制器的针脚良好地连接。作为简
单的识别方法,正确的连接后,28 针柔性扁平线的无印刷面应该和控制器的正面在同一面。
This hole is not a screw
hole. Please just leave it
open. 这个孔不是螺钉
孔,请不要使用它。

GENERALTOUCH TECHNOLOGY CO., LTD
Issued by: Customer Service Department 8 / 13 Issued Date: 2014.1.23
发行部门:客户服务部 发行时间:2014.1.23
4. Communication Cable:
4. 通信线
You need to design the communication cable for your PIT touch monitor because for different application, the
connector and the length of the cable could be different. So it’s more convenient for the customer to design
their own cable based on the pin definition of the controller. The own-made cable should comply with the USB
electrical standards. You can find the pin definition of the controller on the controller drawing. The Controller
USB interface connector is a model 53261-0571(Molex) or Compatible. The mating housing part number is
51021-0500 or equivalent.When making the USB communication cable, please kindly make sure the cables of
D+ and D- are twisted. Shielding cable is preferred.
您需要为您的 PIT 触摸显示器设计通信线,因为对于不同的应用,线材的连接头和长度可能不一样。因此由客户
根据其具体应用并基于控制器针脚定义来设计通讯线会更加方便。自制的线材应该遵守 USB 电子标准。您可以
从控制器图纸找到控制器的针脚定义。控制器 USB 接口连接头是 Molex 53261-0571 或其他兼容型号。匹配的
连接头型号是 51021-0500 或其他兼容型号。当制作 USB 通信线时,请保证线材中 D+和D-是双绞线,并首选
加强屏蔽线。
5. EMC Solution:
5. EMC 方案
To make the PIT touch monitor reach a good EMC level, following suggestions are recommended:
1) The whole PCBAof the PIT touch screen is better to be shielded by the metal chassis;
2) EMI core is recommended. Recommended model name is FS 24.5x5x12-0.5-G. The EMI core should be
fixed nearby the controller connector. Please consider a good way to fix the EMI core on your chassis.
3) USB communication cable needs to comply with the USB standard, such as twin twisted cable, shielding
cable and so on.
为使 PIT 触摸显示器达到一个好的 EMC 等级,请参考下述建议:
1)PIT 触摸屏的整个 PCBA 最好被金属铁盘屏蔽;
2)推荐使用 EMI 磁环。推荐的型号名是 FS 24.5x5x12-0.5-G。磁环应该固定在控制器连接头附近,请考虑一
个好的办法将磁环固定在铁盘上。
3)USB 通信线需要符合 USB 标准,比如双绞线、加强屏蔽线等等。
Top side of the
controller 控制器正面
Blank side of the
28-Pin FFC 28 针柔
性扁平线的空白面

GENERALTOUCH TECHNOLOGY CO., LTD
Issued by: Customer Service Department 9 / 13 Issued Date: 2014.1.23
发行部门:客户服务部 发行时间:2014.1.23
Part Three: Software Installation
第三部分:软件安装
Please kindly refer to the table below to choose the suitable way for you to run the PIT system.
请根据下面的表格选择适合于您的方法来运行 PIT 系统。
O/S 操作系统
Driver Version 驱动版本
Testing Platform 测试平台
Windows8
Driverless 无需额外驱动
Windows8
Windows7
Driverless 无需额外驱动
Windows7
Android
SOPforAndroid_PithidV2.0
(NDA is needed 需要签署保密协议)
Android distribution 4.0, 4.1, 4.2 and Kernel distribution
is higher than 3.0 安卓发行版本 4.0, 4.1, 4.2 和内核版
本高于 3.0
Linux
SOPforlinux-generaltouch-multi_V1.0
(NDA is needed 需要签署保密协议)
Ubuntu12.04(Kernel update is needed 内核需要升级),
Ubuntu12.10(Kernel update is needed 内核需要升级),
Ubuntu13.04, Fedora19
(User needs to develop the multi-touch gesture
function in the Linux application.用户需要开发 Linux应
用下的多点手势功能。)
Normally, calibration of the PIT system is not needed, because GeneralTouch has pre-calibrated the PIT touch
screen. If you still need to calibrate the PIT system, please kindly contact the GeneralTouch technical support
for calibration tool.
通常,PIT 系统是不需要校准的,因为吉锐在产品出厂前已经预校准了 PIT 触摸屏。如果您仍然需要校准 PIT 系
统,请联系吉锐技术支持获取校准工具。

GENERALTOUCH TECHNOLOGY CO., LTD
Issued by: Customer Service Department 10 / 13 Issued Date: 2014.1.23
发行部门:客户服务部 发行时间:2014.1.23
Part Four: Troubleshooting
第四部分:故障排查
At first, let’s recognize the three LEDs on the controller.
首先,让我们认识控制器上的 3个LED。
LED
Function
Normal Status
#1 LED
To show the power status
Always on when there is a power
#2 LED
To show the controller self-scanning mode
to detect the touch
#2 LED blinks every 3 seconds when there is no
touch. It will be off when the touch begins.
#3 LED
To show the touch status
When there is a touch, #3 LED is on. When
there is no touch, #3 LED will be off.
LED
功能
正常状态
1号LED
显示供电状态
上电后常亮
2号LED
显示控制器检测触摸的自检测模式
没有触摸时,每 3秒闪烁 1次。有触摸时,熄
灭。
3号LED
显示触摸状态
有触摸时亮,无触摸时熄灭。
*Remark: LED normal status may be different according to different firmware versions. If your controller’s LEDs act different from
the table above, please kindly contact with GeneralTouch technical support.
*注意:LED 正常状态对于不同的固件版本可能不同。如果您的控制器 LED 状态不同于上表,请联系吉锐技术支持。
If there is any problem happens, at least one of the 3 LEDs will be abnormal. When you found any of the 3
LEDs abnormal, please check:
1) Whether you match the wrong controller model?
2) Whether the appearance of the PIT touch screen, controller, and cables are OK?
3) Whether the cable connection is correct?
4) Whether the cable itself is OK? You can change a new cable to test.
5) Whether the power supply or communication of USB port in the PC is OK? You can change a USB port to
test.
如果发生任何问题,至少有 1个LED 状态是异常的。当您发现任何一个 LED 状态异常,请检查:
1)您是否匹配了错误的控制器型号?
#1 LED
#3 LED
#2 LED

GENERALTOUCH TECHNOLOGY CO., LTD
Issued by: Customer Service Department 11 / 13 Issued Date: 2014.1.23
发行部门:客户服务部 发行时间:2014.1.23
2)PIT 触摸屏、控制器和线材的外观是否正常?
3)线材的连接是否是正确的?
4)线材本身是否是正常的?您可以更换 1根新的线材来测试。
5)PC 上USB 端口的电源和通讯是否正常?您可以更换 1个USB 端口来测试。
If possible, you can also use another good controller or good PIT touch screen to do swapping test to find
which part is defective. If the information above can not help you to solve the problem, please contact with the
GeneralTouch technical support.
如果可能,您也可以用另一个好的控制器或 PIT 触摸屏进行交叉测试来找出哪一部分是有问题的。如果以上信息
不能帮助您解决问题,请联系吉锐技术支持。

GENERALTOUCH TECHNOLOGY CO., LTD
Issued by: Customer Service Department 12 / 13 Issued Date: 2014.1.23
发行部门:客户服务部 发行时间:2014.1.23
Part Five: Maintenance
第五部分:维护
Touch Screen Care and Cleaning
触摸屏的维护和清洁
The touch screen requires very little maintenance. GeneralTouch recommends that you use a 50:50 isopropyl
alcohol and water solution to clean the touch screen surface periodically. You can also use straight isopropyl
alcohol or other neutral glass cleaner. If you use non-neutral cleaner, it may corrode the special surface
treatment layer of touch screen and then cause the special surface treatment layer loses function. If the
non-neutral glass cleaner enters into the inner structure of the PIT touch screen, the PCBA could be corroded
and finally affect the touch function.
触摸屏只需要较少的维护。吉锐推荐您定期定期使用 50:50 的酒精溶液清洁触摸屏表面。您也可以使用纯酒精
或其他的中性玻璃清洁剂。如果您使用非中性清洁剂,可能会腐蚀触摸屏的表面特殊处理层,导致特殊处理层功
能失效。如果非中性玻璃清洁剂进入 PIT 触摸屏的内部结构,PCBA 将被腐蚀,最终影响触摸功能。
Apply the cleaner with a soft, lint cloth. Always dampen the cloth and then clean the screen. Be sure to
spray the cleaner onto the cloth, not the screen. This method is helpful to control the cleaner consumption.
If directly spraying the cleaner onto the touch screen, too much cleaner is likely to be sprayed, then the cleaner
mixed with dust and dirt will seep into the inner part of PIT touch screen, finally it will affect the touch function.
请将清洁剂喷在无结节的软布料上。始终先弄湿软布后再清洁屏体。一定要将清洁剂喷到软布上,而不是屏体。
这个方法可以帮助控制清洁剂的用量。如果直接将清洁剂喷到触摸屏上,可能喷洒了过多的清洁剂,这样混有灰
尘和脏污的清洁剂将进入 PIT 触摸屏的内部,最后影响到触摸功能。

GENERALTOUCH TECHNOLOGY CO., LTD
Issued by: Customer Service Department 13 / 13 Issued Date: 2014.1.23
发行部门:客户服务部 发行时间:2014.1.23
Part Six: Contact Information
第六部分:联系信息
GeneralTouch Technology Co., Ltd.
Add.: No.6 Keyuan South Road, High-Tech Zone, Chengdu, China
Zip Code: 610041
Tel: +86-28-85124114
Fax: +86-28-85124115
E-Mail: service@generaltouch.com
成都吉锐触摸技术股份有限公司
地址:四川省成都市高新区科园南路 6号
邮编:610041
电话:+86-28-85124114
传真:+86-28-85124115
邮箱:service@generaltouch.com
GeneralTouch Technology Co., Ltd. reserves the rights to change or update the information contained in this
document without any notification in advance.
吉锐触摸技术股份有限公司保有更改或更新此文档中的信息而不提前通知的权利。
Other GeneralTouch Touch Panel manuals
Popular Touch Panel manuals by other brands

Extron electronics
Extron electronics TLP Pro 1230WTG user guide

Aplex
Aplex ARCHMI-932P user manual

Elo TouchSystems
Elo TouchSystems 19R2 Quick installation guide

Crestron
Crestron TPMC-V12 & TPMC-V15 quick start guide

Tobii Dynavox
Tobii Dynavox TD I-110 Getting started guide

WIKA
WIKA A-RB-1 operating instructions