Genetix CloneSelect Imager User manual

CloneSelectTM Imager
Description of the Automation API
Control #: 05GUI1010.A2
Effective Date: 03-Jun-11
ECO #: 3011

GENETIX > CLONESELECT IMAGER DESCRIPTION OF THE AUTOMATION API
Page 2of 8
Contents
Theory of Operation..........................................................................................3
Manual Mode .............................................................................................................................3
Automated Mode.......................................................................................................................3
Remote Results Viewing..........................................................................................................3
Programmatic Interface ....................................................................................4
Automatic Functions................................................................................................................4
Instrument State and Flow.......................................................................................................6
Reading Barcodes ....................................................................................................................7
Selecting An Image Pipeline....................................................................................................7
Contact Details ..................................................................................................8

GENETIX > CLONESELECT IMAGER DESCRIPTION OF THE AUTOMATION API
Page 3of 8
Theory of Operation
Manual Mode
The CloneSelect Imager takes images of cell culture microplates and generates confluence data
for each well. When the instrument is used by a human operator in manual mode, they operate
the instrument by running processes in the software. There are two processes available that
image a well plate. One is named “Image Plate”, the other is named “Microscope mode”.
Microscope mode is a point-and-click way for the user to look at a well plate without saving the
result, so will not be discussed further.
Image Plate mode prompts the user for the well plate type and then asks them for the wells they
want to image. It next allows the user to adjust the focus, brightness and alignment of the
images. Finally, the wells are imaged and the results displayed.
Whilst it is possible for the user to save the process configuration to a file so that they can load it
later, in practice this is not used on the CloneSelect Imager. The saved processes do not contain
brightness, focus and alignment settings.
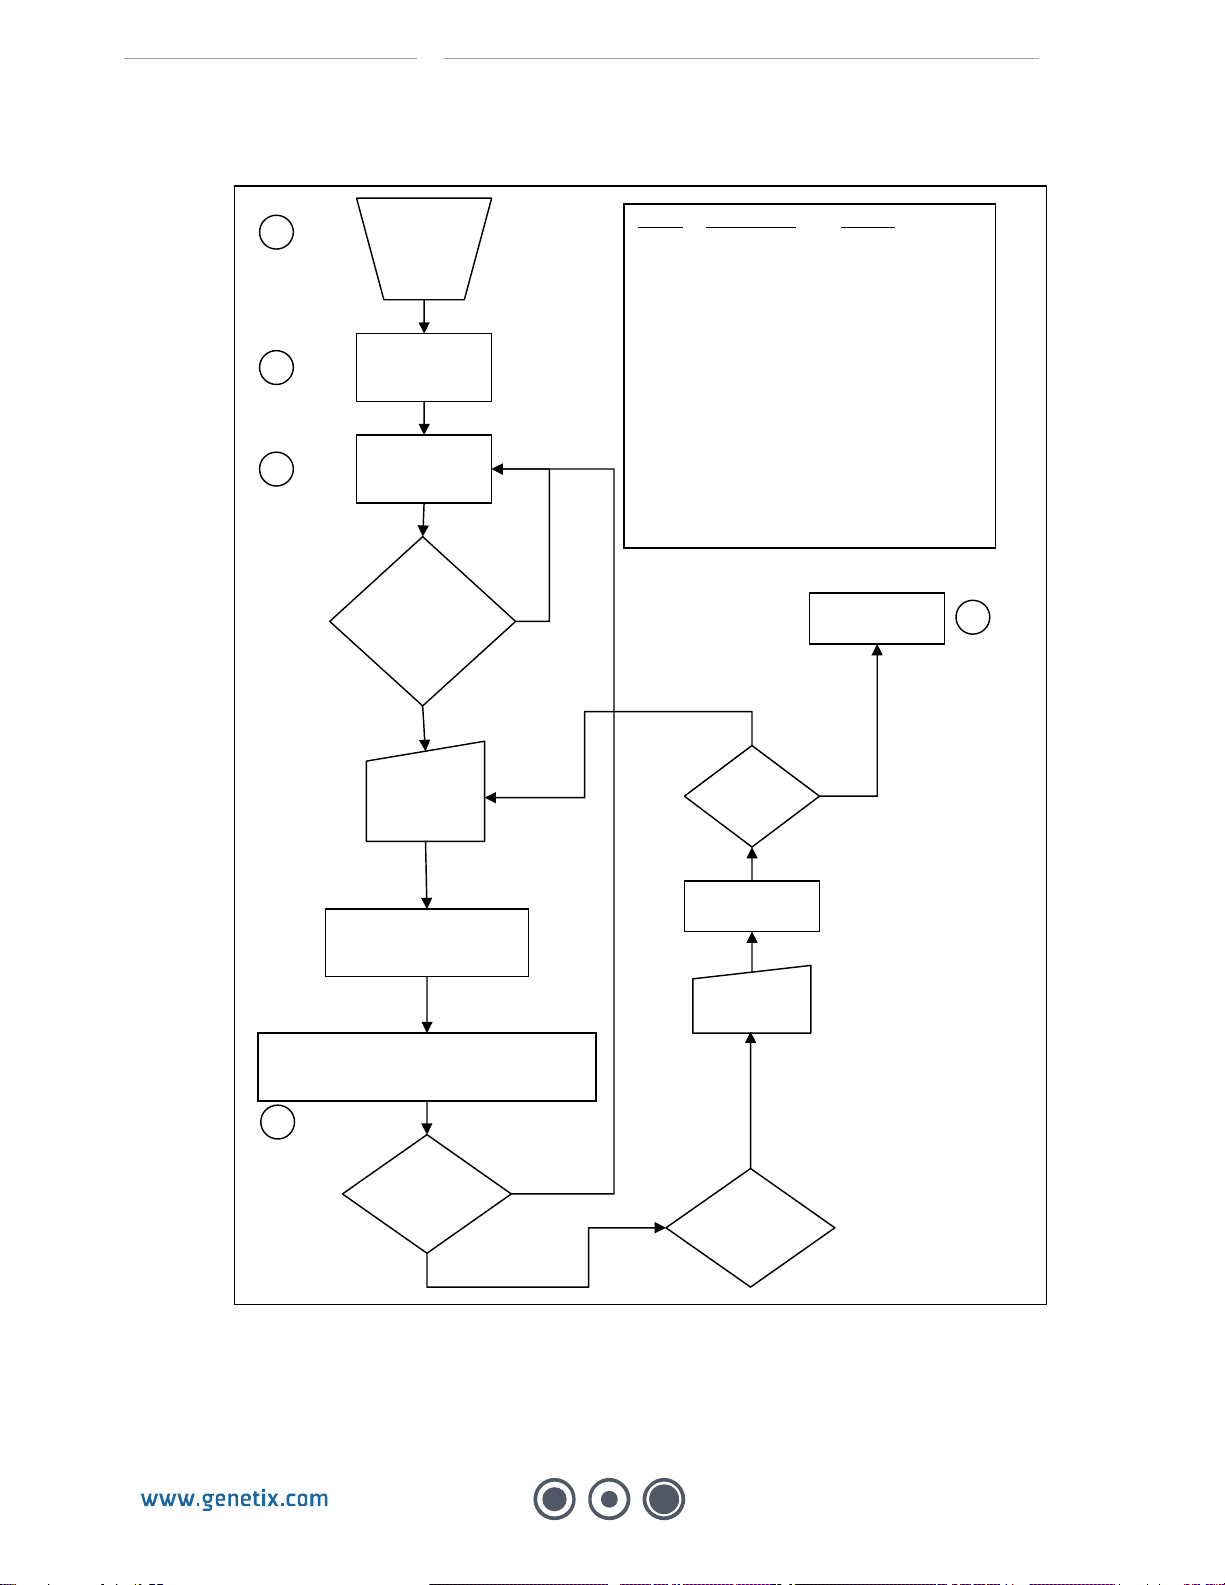
Automated Mode
To run the instrument from external software, it is first necessary to start the CloneSelect Imager
software as normal, then start the “Automation Process” from the start screen. When this
process runs, it opens the automation server and waits for an automation client to connect. It is
not possible for the user to operate the software whilst it is in this state. The automation client
can use the functions in the automation interface to control the instrument. When the automation
client has completed its task, it disconnects from the automation server. At this point, the user is
able to close the automation process in the CloneSelect Imager software and begin using
manual processes again.
Communication with the automation sever is via a SOAP protocol. Details of the automation API
and a sample application that illustrates its use are available once an order has been placed.
Please note that the Automation Process is an optional extra and is not included in the standard
CloneSelect Imager package.
Remote Results Viewing
An optional component of the CloneSelect Imager system is the Remote Data Viewer. This is a
software program that can be installed on any PC, and used to view the results of plates
scanned on the CloneSelect Imager. The results can be on the CloneSelect Imager PC and
shared using Windows® network folder sharing, on a Network server, on a CD or DVD, or
copied to the local PC and viewed from there.
The Remote Data Viewer is especially useful when used in conjunction with the CloneSelect
Imager that is fed by an automatic arm, since then it can be used on a remote PC to view recent
results whilst the CloneSelect Imager itself is in use.

GENETIX > CLONESELECT IMAGER DESCRIPTION OF THE AUTOMATION API
Page 4of 8
Programmatic Interface
The CloneSelect Imager automation mechanism uses a SOAP interface to communicate with
automation clients. The CloneSelect Imager software is written using Microsoft® .NET™ 3.5
framework. The SOAP interface does not use IIS, but instead uses a self contained web server.
When the automation server starts, it opens a URL based on the computer name (it uses the
.NET Environment.MachineName property). The port it opens is always 8080. This yields URLs
in the form http://name:8080
We have created a sample application to demonstrate use of the automation interface. You can
either modify it to communicate with your own software, or simply examine it to understand how
to use the SOAP interface and then write your own application.
Automatic Functions
The automation interface for the CloneSelect Imager contains the following functions:
bool Connect()
bool Disconnect()
bool Initialise()
string GetStatus()
string GetHolderStatus()
string[] GetAvailablePipelines()
bool SetImagingPipeline(string sPipeline)
string GetCurrentImagingPipeline()
bool RunImagingAutomated(string sSourceWellplate, bool bAutoFocus, bool
bReadBarcodes, bool bFastScan, bool bEnhanceImages, string sExpectedBarcode)
bool RunImagingAutomatedSelectedWells(string sSourceWellplate, bool bAutoFocus, bool
bReadBarcodes, bool bFastScan, string sWellList, bool bEnhanceImages, string
sExpectedBarcode)
string [] GetResults()
The GetStatus function can return one of the following states:
Waiting
LoadingPlate
Barcoding
AutoFocusing
Imaging
EjectingPlate
Errored
FatalError
The GetHolderStatus function can return one of the following states:
Ejected
InsideEmpty
InsideLoaded
Unknown
Initial communication with the instrument should be established by the Connect function. This

GENETIX > CLONESELECT IMAGER DESCRIPTION OF THE AUTOMATION API
Page 5of 8
will return True if connection was successfully made. If the instrument is busy when connection
was attempted False is returned. If the listening process has not been started on the instrument
an exception may be thrown.
Once connection has been established with the instrument, the instrument requires initializing.
This is done by calling the initialize function. The initialize function blocks while the instrument is
placed in to a known state. This will place the plate holder in the Ejected state and set the
instrument to the Waiting state. The instrument is now in the required state to have a microplate
loaded.
Once a microplate is loaded and the loading device is clear, the RunImagingAutomated or
RunImagingAutomatedSelectedWells function can now be called. The parameters used by these
functions are as follows:
RunImagingAutomated (images all wells)
Parameter
Description
string sSourceWellplate
The type of plate to be imaged e.g. “Greiner 96 well”
bool bAutoFocus
If the instrument should try to find a focus level automatically or if it should use the stored
value for the microplate type.
bool bReadBarcodes
See ‘Reading Barcodes’ Section.
bool bFastScan
If only a centre section of each well should be imaged (True) or the complete well should
be imaged (False).
bool bEnhanceImages
If the captured images should be enhanced for visualization. In manual imaging this is
True by default.
string sExpectedBarcode
See ‘Reading Barcodes’ Section.
RunImagingAutomatedSelectedWells (same as RunImagingAutomated plus)
Parameter
Description
string sWellList
A comma separated list of wells to be imaged e.g. “A1, B1, C1, D1”
Both the RunImagingAutomated and RunImagingAutomatedSelectedWells do not block when
called. They return if the functions have been started correctly by the way of boolean. Both
Imaging tasks will take in the region of 1-8 minutes to complete and in this time their progress
can be monitored by the GetStatus function. On completion the status will be set to Waiting.
Once the Waiting state has been reported the results can be retrieved by calling the GetResults
function. This returns a string array. Each item in the array is a well and confluence pair
separated by a comma. E.g. “A1, 56.19” meaning well A1 has a confluence of 56.19%. The only
exception to this is when there are no results to return. In this case the first item in the string
array will be set to “No Results”.
The plate can be removed from the instrument when the Waiting state is set and the plate holder
status is set to Ejected. At this point another microplate could be loaded and the
RunImagingAutomated or RunImagingAutomatedSelectedWells function called to image that
plate or if there are no more plates in the batch, the Disconnect function can be called. This will
cause the plate holder to be returned to the safe position back within the instrument.

GENETIX > CLONESELECT IMAGER DESCRIPTION OF THE AUTOMATION API
Page 6of 8
Instrument State and Flow
Instrument
Started and
listening
process
Started
Call
Connect
Call
Initialise
Check Status
is ‘Waiting’
and Holder
Status is
‘Ejected’
False
True
Load Plate
on to
Holder
Call RunImagingAutomated or
RunImagingAutomatedSelectedWells
Monitor
GetStatus
If Errored
Remove Plate
Monitor
GetHolderStatus
If Waiting
Call
GetResults
Image
Another
Plate?
Yes
Call
Disconnect
No
1
2
3
4
5
State Instrument Holder
1 No State No State
2 Waiting Unknown
3 Waiting Ejected
4 LoadingPlate Ejected
Barcoding InsideLoaded
AutoFocusing InsideLoaded
Imaging InsideLoaded
Ejecting InsideLoaded
Waiting Ejected
5 Waiting InsideEmpty
At any stage the instrument may enter
the Errored state. The only call
available then is Initialise. If this
call fails the instrument enters the
FatalError state and user intervention
is required.
Optionally Call
SetImagingPipeline

GENETIX > CLONESELECT IMAGER DESCRIPTION OF THE AUTOMATION API
Page 7of 8
Reading Barcodes
Both RunImagingAutomated and RunImagingAutomatedSelectedWells functions allow the way
in which barcodes are used to be specified. This is controlled by the bReadBarcodes and
sExpectedBarcode properties. The following table shows the how changes to these properties
effects the method of barcoding that is used.
bReadBarcodes
sExpectedBarcode
Result
false
Length = 0
Barcodes are not scanned. A random barcode is automatically
generated for the plate.
false
Length > 0
Barcodes are not scanned. The value of sExpectedBarcode is
assigned to the plate.
true
Length = 0
Barcodes are scanned. The read barcode is assigned to the plate.
An error is raised if no barcode was found.
true
Length > 0
Barcodes are scanned. The read barcode is checked against the
value of sExpectedBarcode. If the barcodes do not match an error
is raised. An error is raised if no barcode was found.
Selecting An Image Pipeline
After the call to Initialise is made and before the call to RunImagingAutomated or
RunImagingAutomatedSelectedWells (See the diagram under the Instrument State and Flow
section.), a pipeline to be used can be selected. This is achieved by calling the
SetImagingPipeline function with the name of the pipeline to be used passed as a parameter. An
array of the available pipelines can be found by calling the GetAvailablePipelines function and
the currently selected pipeline can be found by making a call to the
GetCurrentImagingPipelineFunction. It is advised that an imaging pipeline is set at the start of
each session of plates.

GENETIX > CLONESELECT IMAGER DESCRIPTION OF THE AUTOMATION API
Page 8of 8
Contact Details
Corporate Headquarters
Genetix Ltd
Queensway, New Milton
Hampshire BH25 5NN, UK
Tel: +44 (0) 1425 624 600
Fax: +44 (0) 1425 624 700
Web: www.genetix.com
For all technical queries please contact your nearest Customer Support group. Visit www.genetix.com
for latest contact details.
Trademarks
ClonePix™, CloneSelect™, CellReporter™, HalfBD®, 'NRich®, SlidePath™, Data Arena™ and Image
Arena™ are trademarks of Genetix Ltd., UK
CytoVision®, Ariol®, CytoNet®and CytoTalk®are registered trademarks of Leica Microsystems (San
Jose) Corp. USA
Copyright © 2011 by Genetix Ltd
All rights reserved. No part of this publication may be reproduced, stored in a retrieval system, or
transmitted, in any form by any means, electronic, mechanical, by photocopying, recording, or
otherwise, without the prior written permission of Genetix Ltd.
Information furnished by Genetix Ltd is believed to be accurate and reliable; however, no responsibility
is assumed by Genetix Ltd, for its use; nor for any infringements of patents or other rights of third
parties which may result from its use. No license is granted by implication or otherwise under any
patent rights of Genetix Ltd.
Revised June 2011
Table of contents
Other Genetix Laboratory Equipment manuals
Popular Laboratory Equipment manuals by other brands

Kasanova
Kasanova KGS000001NOC instruction manual

Analytik Jena
Analytik Jena aj CYBERTRON InnuPure C12 manual

Thermo Scientific
Thermo Scientific M79700 Operation manual and parts list

Thermo Scientific
Thermo Scientific invitrogen EVOS XL Core quick reference

tecan
tecan GENios operating manual

Thermoline Scientific
Thermoline Scientific TELR 130 instruction manual