Genetix QPix User manual

08MAN1058.A0
Effective Date: 29-Sep-09
QPix
Robot Manual

GENETIX > COLONY PICKERS QPIX USER GUIDE
2
of
44
Contents
Table of Figures.................................................................................................4
Introduction........................................................................................................5
Genetix QPix.........................................................................................................................5
Picking..................................................................................................................................5
Technical Specifications...................................................................................6
QPix.......................................................................................................................................6
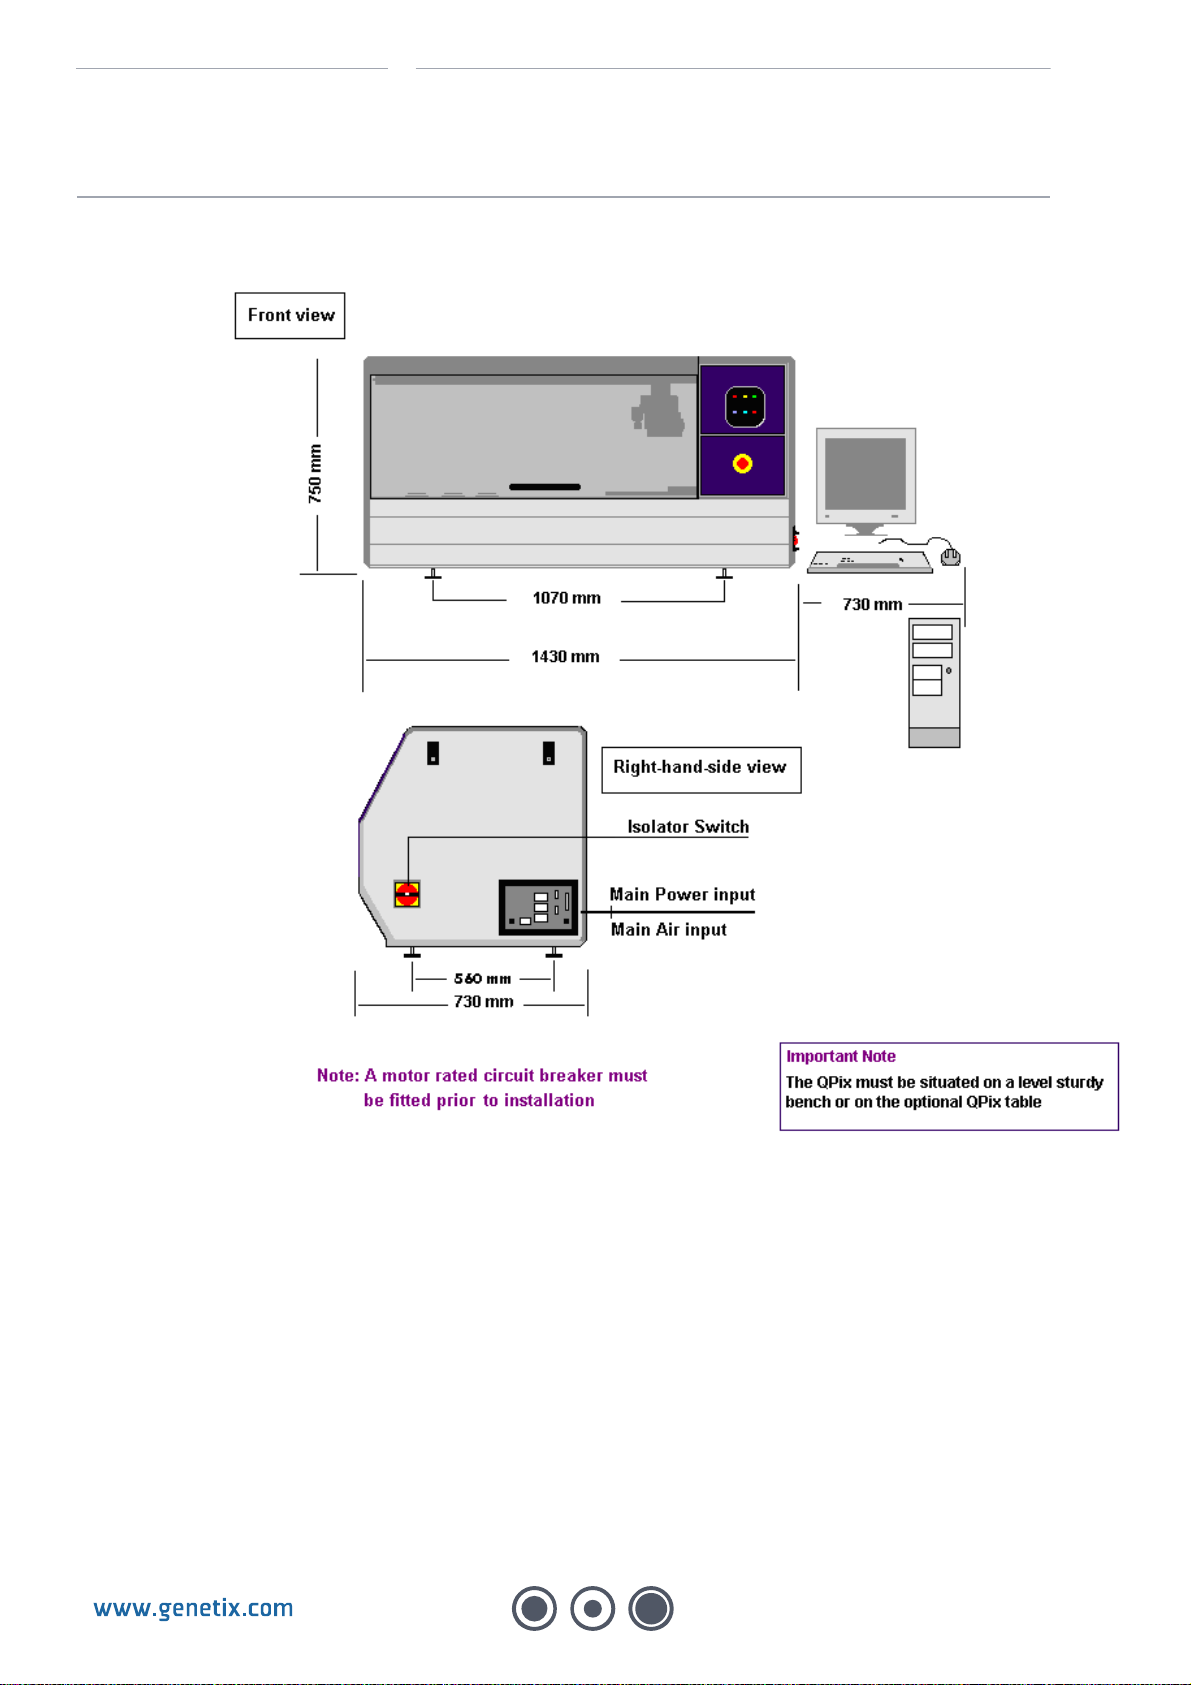
Dimensions: ......................................................................................................................6
Compressed Air Supply:....................................................................................................6
Operating Environment:.....................................................................................................6
Electrical Supply:...............................................................................................................7
Installation..........................................................................................................8
QPix Installation ...................................................................................................................8
Health and Safety...............................................................................................9
Note.......................................................................................................................................9
Transport and Storage.........................................................................................................9
Lifting Points ........................................................................................................................9
External Covers....................................................................................................................9
Safety Features.....................................................................................................................9
Isolator Switch:..................................................................................................................9
QTray Stacker Isolator Switch: (MegaPix robot only)..........................................................9
Door(s):...........................................................................................................................10
UV Light:.........................................................................................................................10
Emergency STOP Button(s):............................................................................................10
Warning Labels: ..............................................................................................................10
Electrical Safety..................................................................................................................10
Drive Safety ........................................................................................................................10
Datuming mode..................................................................................................................11
Hot Air/Halogen Dryer........................................................................................................11
Noise Levels .......................................................................................................................11
Cleaning the Machine.........................................................................................................11
Service and Maintenance...................................................................................................11
Operation..........................................................................................................12
System Features.................................................................................................................12
Pre-Power-Up Checklist.....................................................................................................12
Power-Up Procedures........................................................................................................12
Shutdown procedure..........................................................................................................13

GENETIX > COLONY PICKERS QPIX USER GUIDE
3
of
44
Opening the door during a run ..........................................................................................13
Datuming mode..................................................................................................................13
Configuration Guide ........................................................................................14
Configuring the Robot........................................................................................................14
Configuration Screen.........................................................................................................14
Hardware Configuration tab.............................................................................................15
Base Classes tab.............................................................................................................18
Datum Points...................................................................................................................19
Index of Datum Points.....................................................................................................24
Defined Objects...............................................................................................................25
Database.........................................................................................................................27
Diagnostics and Checking I/O ........................................................................29
Diagnostics Screen ............................................................................................................29
Routine tests...................................................................................................................29
Other Robot Controls:......................................................................................................30
Using the I/O Diagnostics Screen......................................................................................30
General Maintenance.......................................................................................32
Changing the Head.............................................................................................................32
Cleaning the Robot.............................................................................................................32
Regular Maintenance..........................................................................................................34
Daily................................................................................................................................34
Weekly............................................................................................................................34
Annually..........................................................................................................................34
As Required ....................................................................................................................34
General Precautions...........................................................................................................34
Troubleshooting...............................................................................................35
Common Problems.............................................................................................................35
Recommended Spare Parts ............................................................................36
Spare Parts List for QPix....................................................................................................36
Glossary of Terms ...........................................................................................37
Index .................................................................................................................42
Contact Details.................................................................................................44

GENETIX > COLONY PICKERS QPIX USER GUIDE
4
of
44
Table of Figures
Figure 1: Robot dimensions....................................................................................................8
Figure 2: Robot configuration screen...................................................................................15
Figure 3: Object properties dialog ........................................................................................16
Figure 4: Edit property dialog................................................................................................16
Figure 5: Use object dialog....................................................................................................17
Figure 6: Example of License Details screen .......................................................................17
Figure 7: Robot Configuration - Base Classes tab...............................................................18
Figure 8: Robot Configuration - Datum Points tab...............................................................19
Figure 9: Drive Limits dialog .................................................................................................20
Figure 10: Align camera to pin..............................................................................................21
Figure 11: Camera alignment ................................................................................................21
Figure 12: Set Datum Point dialog ........................................................................................22
Figure 13: Set Datum Point - Goto Datum Point...................................................................23
Figure 14: Set Datum Point - Head Position .........................................................................23
Figure 15: Datum position message .....................................................................................24
Figure 16: Robot Configuration - Defined Objects...............................................................25
Figure 17: Plate Object Properties ........................................................................................26
Figure 18: Add new object.....................................................................................................26
Figure 19: Robot Configuration – Database .........................................................................27
Figure 20: Representation of QPix bed.................................................................................29
Figure 21: Shortcut menu......................................................................................................29
Figure 22: I/O Diagnostics dialog..........................................................................................31
Figure 23: UV Light button ....................................................................................................32
Figure 24: UV Light Setup dialog ..........................................................................................33

GENETIX > COLONY PICKERS QPIX USER GUIDE
5
of
44
Introduction
Genetix QPix
The QPix provides the optimum in benchtop colony picking technology. Designed around a
highly accurate linear system (x/y axis) and ball-screw system (z axis), the QPix combines
speed, precision, versatility and durability to offer an invaluable tool for any laboratory engaged
in high-throughput Pharmaceutical, Genomic or Bioresearch picking.
The new patented picking actuator has greatly increased the speed of the picking routine. Once
located using a CCD camera, colonies or plaques are picked from QTrays by a 96-pin Picking
Head and then inoculated into pre-filled 96 or 384 well QPlates.
Custom written Windows® based software, QSoft, allows you to easily configure routines and
offers easy switching between software programs.
A number of additional applications are also available with the QPix.
The 96 and 384 pin Gridding Heads allow samples of DNA or bacteria to be gridded at high
density onto large (22.2cm x 22.2cm) nylon membranes from 96 or 384 well QPlates.
Replication of colonies can be carried out from 96 to 96 well plates and from 384 to 384 well
plates using the 96 or 384 pin Gridding Head. Compression and expansion of DNA libraries is
also possible.
The 96 pin picking head will ReArray selected clones of interest from a library into new well
plates.
In order to optimize the performance of the QPix, Genetix has developed a range of plastic
consumables for use with the machine. This began with the Quadruple density microplates - the
origin of the 384 well format - and has continued with QReps (replicators) and QTrays.
Picking
The QPix is capable of automatically picking in excess of 3,500 colonies per hour. This is made
possible using an integrated vision, detection and analysis system combined with novel software
and a (patented) 96 pin picking head assembly, both custom designed by Genetix.
You are required to specify picking thresholds relating to the intensity (color), roundness and
proximity of clones. The QTray is then imaged in 35 frames, via a CCD camera, and the
information obtained analyzed according to the user-defined parameters. A correction factor
within the software ensures that any colonies which appear in more than one frame are only
chosen once, and therefore double picking of colonies does not occur.
The QPix can also pick from standard Petri dishes using the optional Petri dish holder.
Colonies are picked using a unique patented picking head assembly with a 96 pin picking head.
Once all 96 pins have picked colonies they are inoculated into pre-filled 96 or 384 well QPlates.
The picking head is then automatically sent to the wash station where it is cleaned and sterilized
ready for the next cycle.
Notes: The robot is strictly for research use only and is not intended or recommended for the
diagnosis of disease in humans or animals. If the robot is used in a manner not specified in this
manual the protection provided by the equipment may be impaired.

GENETIX > COLONY PICKERS QPIX USER GUIDE
6
of
44
Technical Specifications
QPix
Manufactured by Genetix Ltd (UK)
Dimensions:
Total assembled:
Size: 1430 mm (width) x 730 mm (depth) x 1620 mm (height on table)
Weight: 200Kg
Compressed Air Supply:
Minimum Pressure: 6 bar
Minimum volume: 80L/min
Operating Environment:
Indoor use only
Temperature: 10°C to 40°C
Humidity: 20 to 80% non-condensing
Altitude: Up to 2000M
Mains supply: +/- 10% Rated Voltage
Transient overvoltage: Installation Category (Overvoltage category) II
Rated pollution: Pollution degree 2

GENETIX > COLONY PICKERS QPIX USER GUIDE
7
of
44
Electrical Supply:
Voltage is factory set
European
Voltage 210 - 250V AC 45-66 Hz single phase
Power 300VA
Current 3A Max
Connections IEC Input - Robot Mains
IEC Output - PC
IEC Output - Monitor
Fuses Input - F1 – T10A - Robot
Output - F2 - T5A - Computer and Monitor
USA/Japan
Voltage 100 – 125V AC 45-66 Hz single phase
Power 300VA
Current 3A Max
Connections IEC Input - Robot Mains
IEC Output - PC
IEC Output - Monitor
Fuses Input - F1 – T10A - Robot
Output - F2 - T5A - Computer and Monitor
General
Halogen drier When the Robot is operating, additional Power will be consumed by the Halogen Drier.
Maximum duty cycle 50%, actual duty cycle is determined by operator selected parameters.
Halogen 900KVA
Inrush current 20A 100mS Max.
Due to the large inrush current the QPix should be supplied by a “motor” rated (class C) circuit
breaker to avoid nuisance tripping. RCCD’s and ELCB’s are not recommended.
Air compressor Note that the optional external air compressor is not included in this assessment
Supply It is recommended that the QPix is powered from a dedicated ring main or spur as appropriate
to local regulations.

GENETIX > COLONY PICKERS QPIX USER GUIDE
8
of
44
Installation
QPix Installation
Figure 1:
Robot dimensions

GENETIX > COLONY PICKERS QPIX USER GUIDE
9
of
44
Health and Safety
Note
Before using the robot, it is very important that you have read this manual and have understood
all the safety instructions.
Prior to using the robot please make sure that you have been through the robot Pre-Power-Up
checklist. This checklist ensures that all moving parts on the Robot are correctly situated in their
datum positions.
Then follow the procedures as set out in the Power Up section.
Transport and Storage
The robot must be stored and transported in temperatures within the range –25°C to +55°C.
Lifting Points
The machine should not be moved after installation. However, in the unlikely event of it needing
to be moved then standard lifting gear is adequate, but only in the presence of a Genetix
approved engineer.
The robot should be moved into position using appropriate handling equipment such as forklift
trucks or dolly trucks. The machine should be properly balanced on the forks prior to lifting.
External Covers
Warning – If any of the external covers on a bench top robot are removed the power supply is
not automatically interrupted. If it is necessary to remove any of the external covers you must
ensure that the power is switched off first and do not attempt to use the robot until the
covers are replaced.
Safety Features
Isolator Switch:
Turns on power to robot (the location of the isolator switch is shown on the Installation diagram).
If the robot has a status panel, the lights indicate whether main power is on.
QTray Stacker Isolator Switch: (MegaPix robot only)
Located on the front-right of the QTray Stacker, turning this switch off will isolate power to the
QTray stacker but leave the robot power on.

GENETIX > COLONY PICKERS QPIX USER GUIDE
10
of
44
Door(s):
The machine will not run with the door(s) open. If a door is open, a mechanical switch prevents
the machine from running. This switch should never be tampered with, as it serves two
purposes:
It prevents the motors from running and therefore the potential of any physical damage.
It disables the UV light therefore preventing the risk of damage from UV radiation.
The door is made from acrylic, and so prevents UV light from passing through during operation.
UV Light:
Some robot models have a UV light fitted for sterilization. This is a 30W linear discharge lamp
with a sharply defined output at 253.7nm making the lamp an efficient source of germicidal
radiation.
Emergency STOP Button(s):
The location of the Emergency Stop button(s) is shown in the Installation diagram. Striking an
Emergency Stop button will immediately stop the machine and cut power from the drives. The
button must be pulled out before the machine can be restarted.
Note: If the PC is powered from the robot, power to the PC will also be cut and current data will
be lost.
Warning Labels:
Hazards are marked with warning labels. These have a yellow background with black writing so
that they can be easily recognized.
Electrical Safety
The robot must be connected to a properly earthed power outlet to protect users from the risk of
electric shock. The main chassis of the machine is earthed together with all associated electrical
components. Do not remove any of the fixed covers, as there are no user serviceable parts
inside. All internal work should be referred to Genetix approved service personnel.
In the event of a liquid spillage into the base cavity of the robot, the power supply should be
disconnected at the mains before any attempt is made to clean up the spillage.
There should not be any spillage from the Wash Bath in normal use with the Wash Station
correctly set up. However, spill trays have been fitted where appropriate.
Drive Safety
Be aware that the motors use high-powered magnets.
The linear drive units and encoders are delicate so great care should be taken with them.
The Pre-Power-Up checklist should be followed before every routine in order to prevent serious
damage to the robot or any of its constituent parts.

GENETIX > COLONY PICKERS QPIX USER GUIDE
11
of
44
Datuming mode
Be aware of moving parts when in datuming mode
When the instrument is in datuming mode the door switch override key is inserted into the door
switch to enable the QPix to run with the door open.
When the QPix is in datuming mode, a secondary door switch will cause a sounder to operate,
warning the user of enabled drives.
Hot Air/Halogen Dryer
If the robot has a dryer fitted, be aware that the casing may become hot during the wash cycle.
Noise Levels
During normal operation the level of airborne noise emitted by the robot will not exceed 70db
measured at a distance of 1 meter.
Cleaning the Machine
The bed of the machine should be cleaned before and after each routine that is performed, using
80% ethanol or dilute detergent and a soft cloth.
Organic solvents and abrasive cleaners should not be used, as they will damage the surface of
the bed.
Specific cleaning instructions are described in the Maintenance section of this manual.
Service and Maintenance
We would strongly recommend that maintenance be carried out regularly and by a
Genetix-approved service engineer.
Maintenance contracts can be obtained from Genetix, contact sales@genetix.com.

GENETIX > COLONY PICKERS QPIX USER GUIDE
12
of
44
Operation
System Features
The QPix is constructed within a welded steel framework. The outer measurements are given in
the section headed Dimensions: on page 3. Be aware that these dimensions do not allow for
opening the robot doors.
The lifting door on the front of the machine, monitored by a mechanical door switch, contains the
working volume of the machine.
The main bed of the machine is capable of holding 15 microtiter plates and 2 bioassay trays. It
also contains the sterilization bath(s) and dryer, used for cleaning and drying the picking head
between cycles in order to eliminate cross-contamination.
The Z ball-screw drive carries a unique actuator system that accommodates the head. This
system allows for easy exchange and set-up of the head. Removing a head is achieved by
undoing the thumb screw which secures the head to the actuator assembly, and sliding the head
backwards out of its holster. Fitting a head is simply the reverse process.
Pre-Power-Up Checklist
Check that the Emergency Stop button (Red) has been pulled out.
Check that no loose items have been left on the bed of the QPix.
Check that all motor tracks are free of obstruction.
Check that the main robot axes, XY, are roughly in the centre of their respective travel
positions. The axes need to be away from their respective end-stops on ‘start up’ in order
that they may reference themselves correctly to their ‘home’ positions.
Check that the lifting door on the front of the robot is closed.
Check that both doors on the QTray Stacker are closed.
Power-Up Procedures
Note: The computer will power on with the QPix.
Turn on the power supply to the compressor.
Turn main isolator switch (situated on the right hand side of the QPix) to the on position (1).
This isolator switch is lockable and clearly labeled. The red ‘Power On’ indicator (on the
front panel of the QPix) illuminates. If the system fails to ‘power on’, it is likely that the
emergency stop button has not been primed.
Check that the air supply indicator (on front panel) is on.
Once the computer has booted up (check by moving the mouse on the screen), click on one
of the application icons, the three axes will sequentially go through their ‘Initialize drives’
routine. This enables the drives to find their respective datum positions. The QPix must be
allowed to complete this process without interference to ensure that there is no damage to
the QPix or its ancillary equipment.
Once the QPix has finished its calibration procedure, the three axes, XYZ, should return to
their home positions.
It is important that you check this every time you go through a system reset or when a
'Start-Up' is initiated.

GENETIX > COLONY PICKERS QPIX USER GUIDE
13
of
44
Shutdown procedure
Exit from the application by clicking the Done button on the main setup screen.
Close down Windows – Click the Start menu at the bottom of the screen then choose Shut
Down. Make sure that Shut down is the selected option and click on OK.
Switch the robot isolator switch to the off (0) position.
Turn the power off at the mains.
Opening the door during a run
As part of the Safety systems, the door operates the emergency braking system, therefore the
door cannot be opened whilst the "Robot working" light is illuminated.
When the "Robot working" light is illuminated, the QPix motion system is enabled and ready to
move. Opening the door whilst the robot is working will cause the QPix to go into emergency
stop mode, essentially the same as striking the emergency stop button.
If the "Robot Working" light is extinguished the door can be opened. If the QPix is running and
the door is required to be opened, the user must press "Pause" then "Open Door" in the script
window.
The script will home then disable the drives.
After opening & closing the door "Close Door" should be pressed, the drives will then be re-
enabled and continue from where they left off.
Note: If the door is opened without pausing and clicking ‘open door’ or before the drives have
reached the home position, an error will occur that may require the QPix & the PC to be shut
down for 30 seconds and then restarted.
Datuming mode
To enter the Datuming mode for the QPix , the door switch override key has to be inserted into
the door switch.
The QPix can now run with the door is open but a secondary door switch will cause a sounder to
operate, warning the user of enabled drives.

GENETIX > COLONY PICKERS QPIX USER GUIDE
14
of
44
Configuration Guide
Configuring the Robot
Before the robot can be used it is necessary to configure it (tell the software what component
objects we have and where they are.)
The configuration settings can be accessed from any application and are held in a central
database (namely QSoft.mdb).
Configuration entails entering all required objects and then datuming all the co-ordinates for the
various objects on the workbed. This procedure needs to be carried out:
On first receipt of the machine (to be carried out by Genetix Personnel).
On the addition or change of any objects to the workbed.
If the drives have been realigned or subject to a knock.
The procedure for configuring the robot is as follows:
Configuration Screen
This facility is designed to allow qualified, Genetix approved personnel to configure the robot
Datum Points and Defined Objects very precisely - each position can be fine-tuned to ensure
optimum performance.
Due to the potential hazards of changing configurations, only Genetix approved personnel
should change these settings.
Warning - Changes made to the Datum Points and/or Defined Objects affect the overall
accuracy of the robot. The Datum Points and Defined Objects are accurately defined when your
robot is installed and commissioned. We recommend that a backup of the master configuration
file (QSoft.mdb) is copied and stored in a separate place. The facility for backing up the
database is available on the Database tab. Two reports are available within the configuration
screen, which should be printed and stored. Please take care over all further changes made!!
Any inappropriate changes to the ‘Datum Points’ and/or 'Defined Objects' could result in crashes
to the robot Head. Also, to avoid possible crashes we advise that the robot is sent to the Home
position after each change to a particular Datum Point.
To access the robot Configuration screen, click on the Configuration button on the toolbar or
select Configuration from the View menu.
The robot configuration screen will appear which comprises the following tabs:
Hardware Configuration – Software model representing the physical layout of the robot.
Base Classes – Information pertaining to the creation/usage of each physical element
(object i.e. bath, dryer, well plate etc) of the robot.
Datum Points – List of Datum Points that comprise the locations (co-ordinates) of all
Objects on the robot bed.
Defined Objects – List of all Objects currently defined. i.e. bath, dryer, drives, well plates
etc.
Database – Provides a set of utilities for managing/maintaining the database.

GENETIX > COLONY PICKERS QPIX USER GUIDE
15
of
44
Figure 2:
Robot configuration screen
Hardware Configuration tab
This tab displays the Software model that closely resembles the physical layout of the robot. You
should not normally modify any details on this tab unless explicitly advised to by Genetix. The
view displays the robot as the parent Object with 4 sections:
Actuator – The Actuator represents the bottom of the Z Drive, which hosts the Camera, Pin
firing mechanism and Head. (The head is not displayed in the Actuator section as it is
regarded as a 'Consumable Object' i.e. can be changed at runtime and is not a fixed
component of the robot).
Bed – The Bed represents the work area of the robot and hosts the Baths, Dryer, Light Box
and U Drive. (Note: Destination Plate Holders are not displayed in the Bed section as they
are regarded as 'Consumable Objects' i.e. can be changed at runtime and are not fixed
components of the robot).
Consumables – Displays the Objects that are used when Datuming. This section DOES
NOT display all consumable objects ONLY those to be used when Datuming. There should
be a Bioassay Tray, Destination Plate Holder, Head and well plate visible in this section.
Drives – displays the 3 drives (X, Y and Z) used in the robot configuration.
Properties
Displays the property sheet dialog relating to the highlighted object.

GENETIX > COLONY PICKERS QPIX USER GUIDE
16
of
44
Figure 3:
Object properties dialog
Object Details - Displays the base details of the given object, short name and Datum Point if
applicable.
Properties – Lists the properties that comprise the Object. A description of each property can be
viewed at the foot of the dialog as you scroll though the list.
Edit – Displays the Edit Property dialog for the highlighted Property. For example:
Figure 4:
Edit property dialog
Make amendments as applicable and select:
OK – to save and close the Edit Property dialog or
Cancel – to abandon and close the Edit Property dialog
Log – Stores a record of changes made to the properties of the selected object. A check box
allows you to purge the log of all entries that are more than 21 days old.
OK – Saves the Object with any modified properties and closes the Object Properties dialog.
Cancel – Abandons any changes made and closes the Object Properties dialog.
Refresh – Configuration data is loaded when the application starts. However if any object
properties are changed, click the Refresh button to reload the configuration data with the
changed properties.

GENETIX > COLONY PICKERS QPIX USER GUIDE
17
of
44
Use – Displays available objects to be used in the current configuration. Do not use unless
advised by Genetix.
Figure 5:
Use object dialog
Remove – Removes the highlighted object from the current configuration. Do not use unless
advised by Genetix.
License
Displays details of your license agreement, if you currently have a 'demo' simulation version of
QSoft this will be displayed here.
Figure 6:
Example of License Details screen
Robot name
Allows the user to give the robot a name.

GENETIX > COLONY PICKERS QPIX USER GUIDE
18
of
44
Base Classes tab
Figure 7:
Robot Configuration - Base Classes tab
This tab displays the Base Classes that comprise the blueprint for each individual Object defined
in the Configuration. Do not modify data on this tab unless advised by Genetix.

GENETIX > COLONY PICKERS QPIX USER GUIDE
19
of
44
Datum Points
Figure 8:
Robot Configuration - Datum Points tab
The Datum Points tab displays the Datum Points currently active for the robot. Datum Points are
the physical location of various points critical to the accuracy of the robot.
When setting Datum Points, it is advisable to remove the Head until you are familiar with each
individual Datum Point. Always make small changes and test the new positions frequently.
Be aware of moving parts when in datuming mode
When the instrument is in datuming mode the door switch override key is inserted into the door
switch to enable the QPix to run with the door open.
When the QPix is in datuming mode, a secondary door switch will cause a sounder to operate,
warning the user of enabled drives.

GENETIX > COLONY PICKERS QPIX USER GUIDE
20
of
44
Drive Limits
In order to prevent any damage to the drives, it is necessary to set, in software, the minimum
and maximum travel positions for the X and Y drives.
This is done by clicking on the Drive Limits (Min) and Drive Limits (Max) buttons and following
the instructions on the respective Dialog boxes.
Figure 9:
Drive Limits dialog
Align Camera
The Align Camera option is found on the Datum Points Tab of the robot configuration screen.
A screen similar to the one in Figure 10 will be displayed.
Table of contents
Other Genetix Laboratory Equipment manuals