N-BIOTEK NB-204MR User manual

MINI ROLLER
< NB-204MR >
* Design is subject to change without prior notice for improvement of performance.
OPERATING MANUAL

1
CONTENTS
SAFETY AND GENERAL PRECAUTION ...................................................................................................................2
FEATURES....................................................................................................................................................................5
SPECIFICATION ..........................................................................................................................................................5
CONFIGURATION.......................................................................................................................................................6
CONTROL PANEL.......................................................................................................................................................7
OPERATION ................................................................................................................................................................8
WARRANTY ................................................................................................................................................................9

2
SAFETY AND GENERAL PRECAUTION
■Precaution is the subject to follow without fail, which is to prevent the possible accident
or danger.
■Precaution is separated into ‘Warning’ and ‘Caution’.
Each of them has following meaning.
■Other Signs
1. PRECAUTION FOR ELECTRICITY
WARNING
Use this product only internally. (220V, 60Hz)
(If the product is used in different power pressure, not the marked one, it will cause a fire
and malfunction of the product.)
Do not make the power plug be pressed by back of the product.
(A space between the product and the plug must be 10cm at least.)
The power outlet must be only for this product.
(Using various products simultaneously can cause a fire.)
Clean the power plug with a dry towel and connect it properly.
(Foreign substances or unsafe connection can cause a fire.)
Do not band the power cable harshly and do not make it to be pressed by heavy products.
(When it is damaged, it can cause a fire.)
Do not touch the power code with wet hands.
(It can cause an electric shock.)
Do not use the damaged power code and outlet.
(It can cause an electric shock and a fire.)
When the smoke comes out from the product or smell something is burning or any other
strange symptoms are occurred, pull out the power code and stop using it.
(It can cause an electric shock and a fire.)

3
2. PRECAUTION FOR INSTALLATION
WARNING
Use it with the proper voltage.
Please check the voltage & Hertz written on serial label.
(Over-voltage, low-voltage can damage the product and poor performance.)
Do not install at a humid place.
(It causes an electric leakage accident and a corrosive of the product.)
Keep this product out of the direct ray of sun and do not install at a hot place or a place
that is near an electric heat or ducts, cooling source.
Do not put inflammable substances near the product.
(It may cause a fire.)
CAUTION
The product requires the distance of at least 10cm from the wall.
Install the unit at a flat surface and solid place.
(If the ground is not flat, it can cause an excessive vibration of the product.)
When you move the product, do not lay down to its side or reverse the head to bottom.
(It can cause a malfunction.)
3. PRECAUTION FOR USE
WARNING
You must not disassemble, fix and remodel the product by yourself.
(You can damage the product throughout a fire and malfunction or get a loss from a
different study result than the original purpose.)
Do not use the product for different purpose.
(It can cause malfunction or poor function. Consequently, you will get a wrong result.)
Do not use an inflammable spray near the product.
(The switch and other electric connection parts can cause a fire.)
Be careful to use inflammable substances such as benzene, thinner, alcohol and LP gas.
(It can cause a fire and an explosion.)
To prevent water and experiment material from going into the control panel during the
experiment, make sure to clean the control panel with a dry towel.
(It can cause a fire and an explosion.)

4
4. PRECAUTION FOR GROUND CONNECTION
WARNING
Please ground before use the product, if you don't ground, you can be electrically shocked
when malfunction or an electric leakage occurs
At the place where you can't ground,
* Please buy the equipment to prevent elect leakage.
* An electric shock, an electric leakage and a fire can be occurred without an
electric leakage breaker.
Do not ground to these places; Gas Pipe, water pipe, pipe, lighting rod, telephone wire
etc.
* Wrong ground connection can occur an electric shock, an electric leakage and a fire.

5
FEATURES
■Minimal heat emission from the motor and it is good for the use in an incubator.
■LED Digital display for RPM of roller
■Auto-restart after power failure
■Remote control box to control roller outside incubator when using it in an incubator
■Oil Lubricants free system for maintenance free
SPECIFICATION
Items
Unit
NB-204MR
Speed
Range
rpm
Variable 1 to 30
*RPM is based on the rotation speed of roller shaft, not the
rotation of bottle.
Accuracy
rpm
1rpm
Increment
rpm
0.1rpm
Control
Microprocessor digital PID.
Time
Range
Hour, Min.
Continuous or up to 99h 59min
Accuracy
%
±1%
Display
LED Display
Motor type
Brushless DC motor
Standard roller bottle
mm, ea
110mm to 120mm(diameter), 2L x 4ea
Roller deck dimension
mm
362(W) x 299(D) x 212(H)mm
Overall dimension
mm
375(W) x 370(D) x 345(H)mm
Power
V, Hz, W
AC 90 to 264V, 50/60Hz, 10W
Weight
Kg
12.5 Kg

6
CONFIGURATION
Classification
Name
Classification
Name
A
Roller Frame
I
Belt Pully (Acetal)
B
Roller Shaft
J
DC Motor
C
Control Box
K
Hand Grip to hold
D
Power Cable
L
Connector(L-1 from roller body)
E
Back Cover
M
AC Inlet and Power Switch
F
Belt Pully (Aluminum)
O
Fuse Box(Fuse is Inserted)
G
Urethane Belt (round type)
P
Power Switch
H
Timing Belt
Q
Magnetic foot
A
B
C
D
E
<Front View>
G
F
H
I
J
<Back View>
<Control Box >
K
L-1
L-2
O
Q
O
M

7
<Example View – How to Use Roller in an Incubator>
CONTROL PANEL
No.
Classification
Description
1
RPM/TIME Display
Displays present RPM or TIME
2
RPM/TIME Button
RPM ↔ TIME Mode switching button
3
SET Button
To set RPM or TIME
4
UP & DOWN Button
To adjust RPM or TIME up and down
5
START/STOP Button
To start or stop the operation of roller
6
RUN Status
To inform running of roller or not
When roller is running, lamp is flashing
7
Power Indication
Lighting when main power is on
1
2
3
4
5
6
7
Attachment with Magnetic foot
Ensure to place it on flat surface
Thin flat roller
connecting cable

8
OPERATION
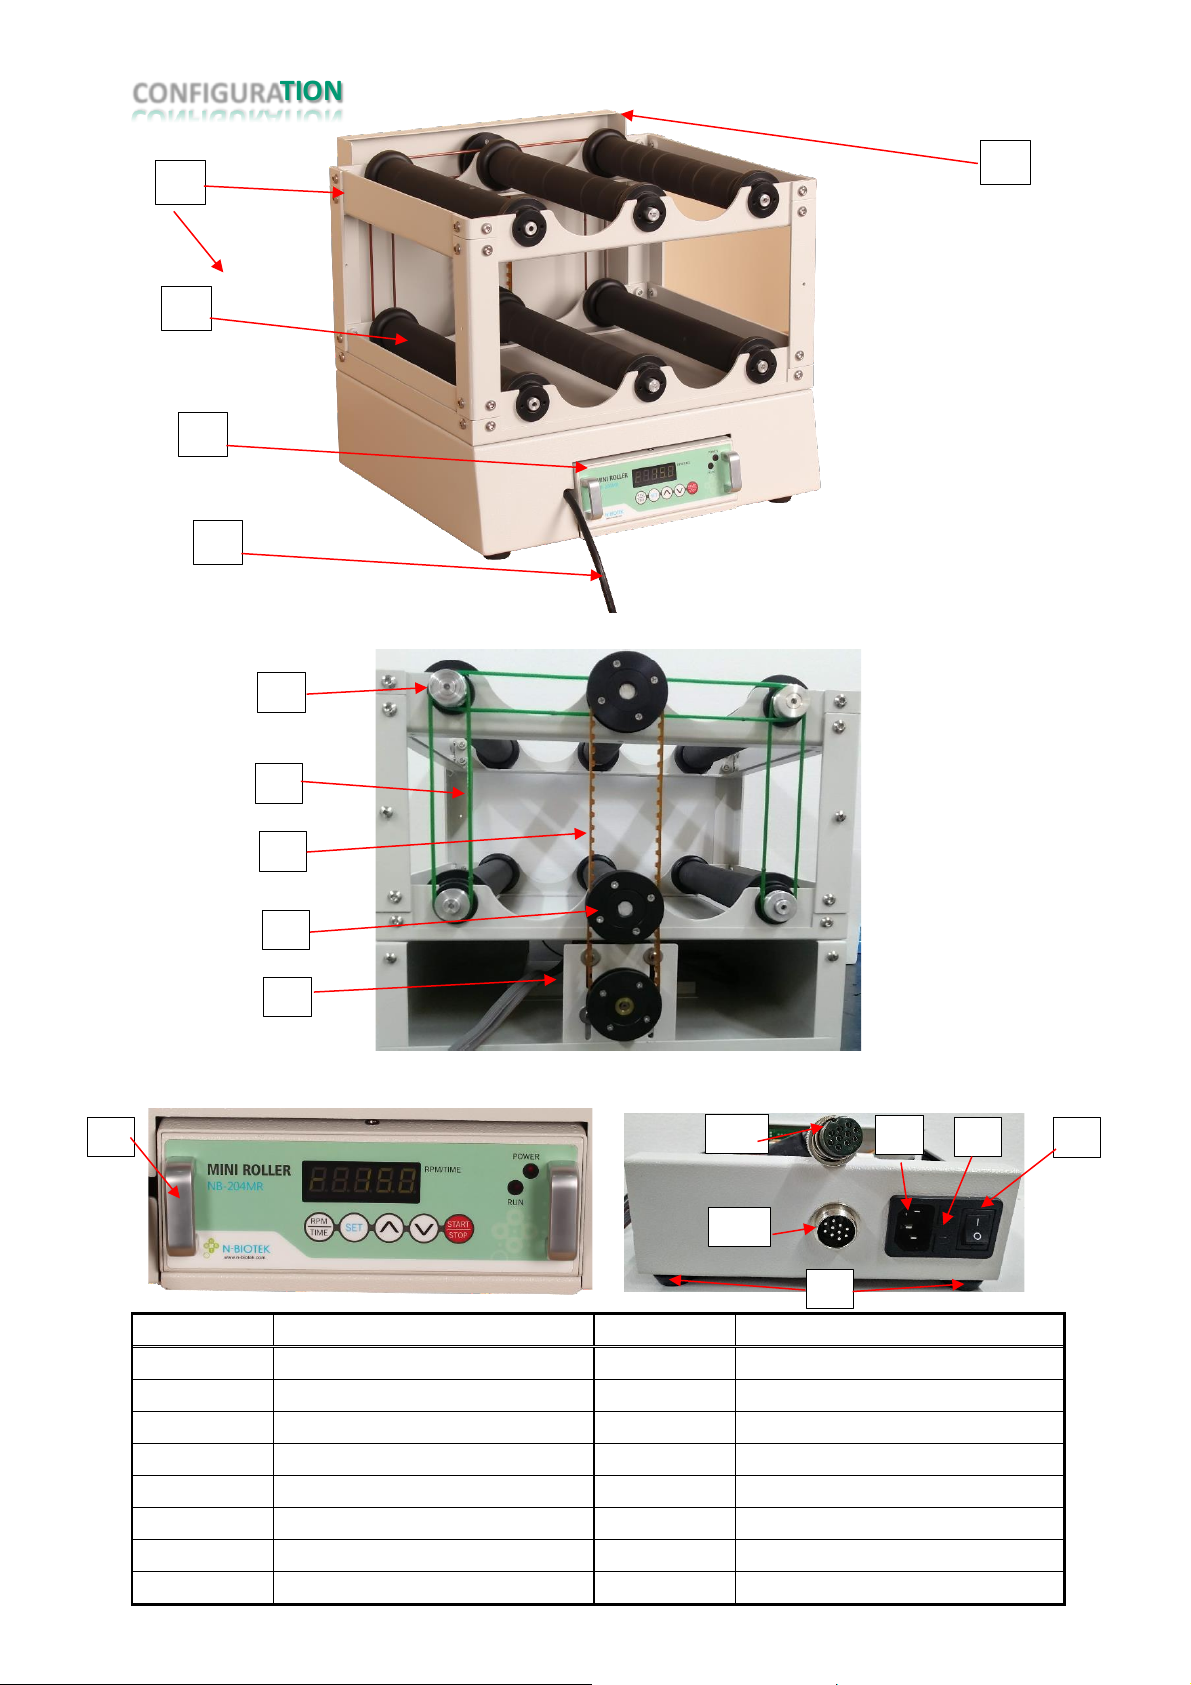
➢Locating the roller and the control box
✓Before connecting the power cable, place the roller and control box at desired place.
✓In case that roller is used in an Incubator or chamber, be sure to enough clearance in the
space for the use of roller.
✓Place the remote box near the roller and within the availability of its connecting cable and
power cable. Be cautious that the connecting cable between roller and control box is not
too much bended and is not exposed to damage or electric noise.
✓Before powering on, be sure to connect the connector between control box and roller.
➢CONNECTING POWER
✓Connect the power cable to AC Inlet located on backside of the unit.
✓After connecting it properly, turn on the AC POWER switch which is at back of control box.
(Recalling and operating with the previous settings after restarting by power failure)
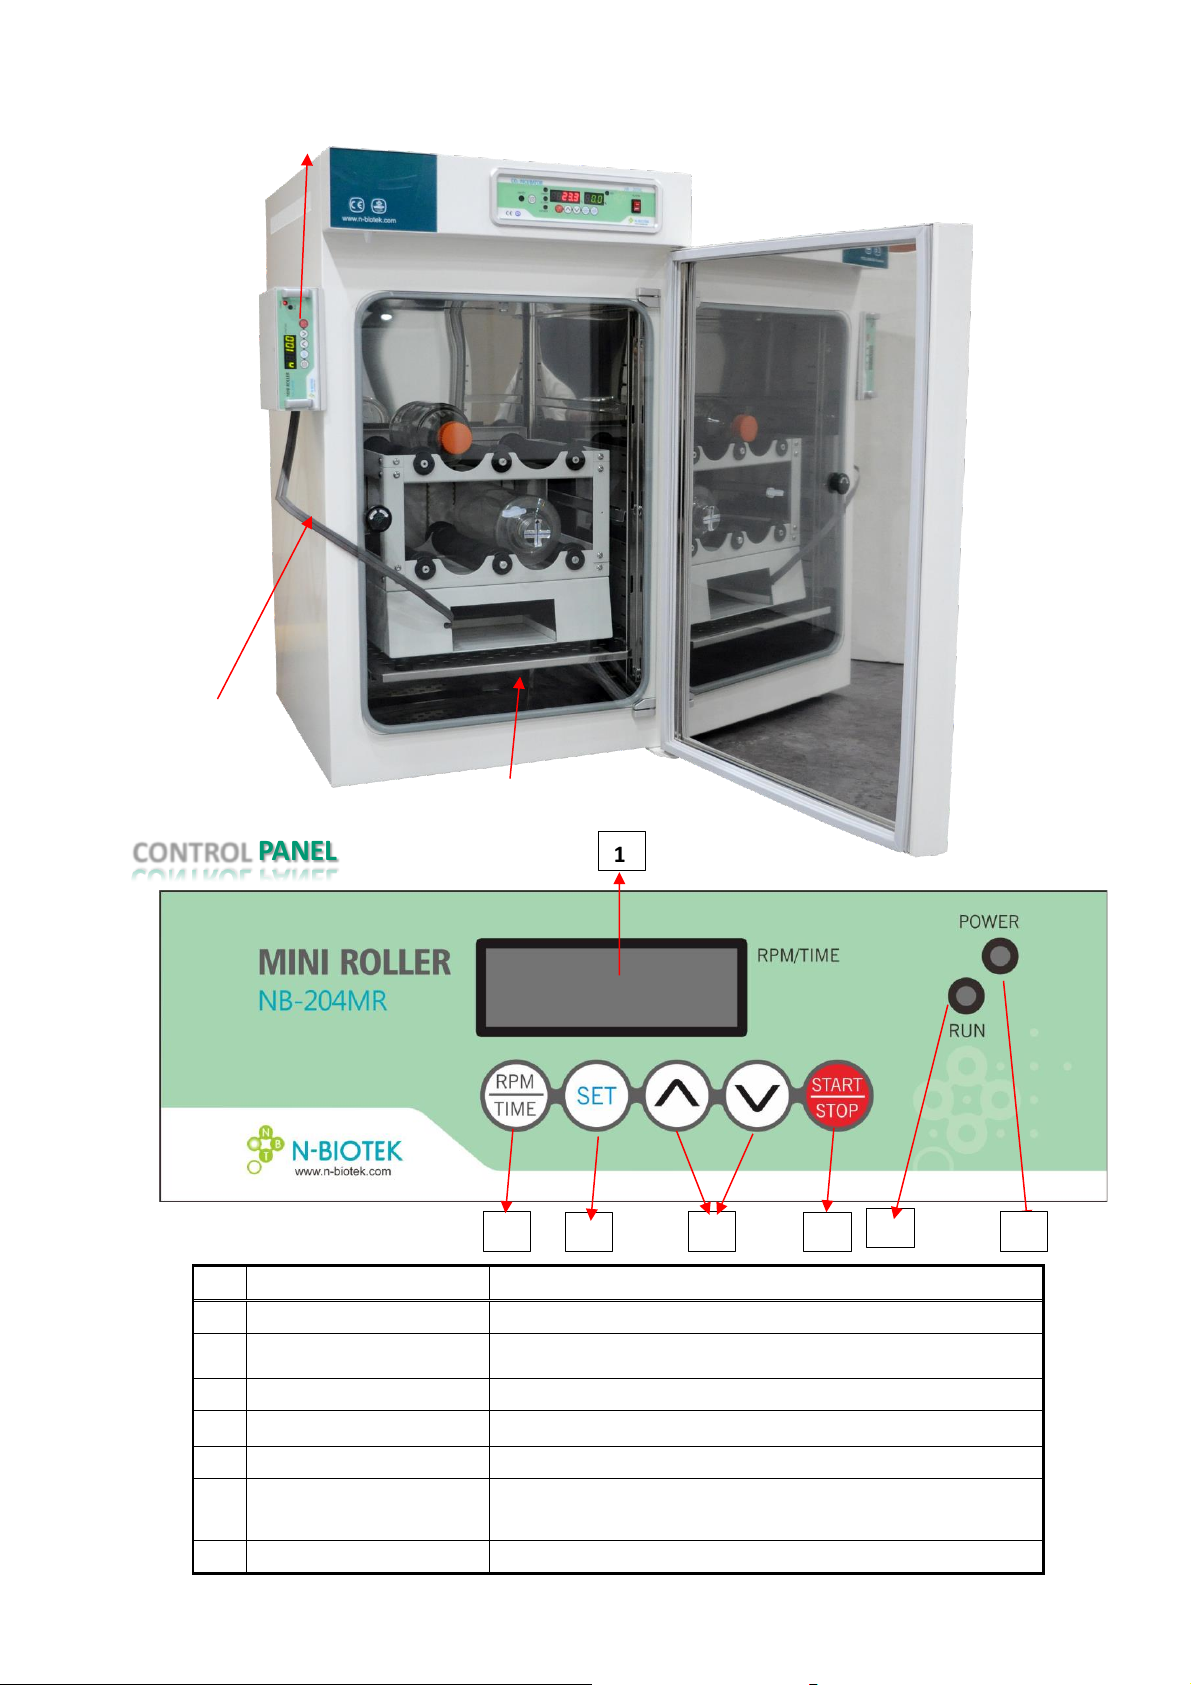
➢RPM and TIME SETTING
✓RPM Setting Range: 1 ~ 30 RPM (Do not set it less than 1RPM)
TIME Setting Range: 1 Minute ~ 99 Hour 59 Minutes
✓RPM setting can be adjusted by UP & DOWN buttons.
Adjustment is available while the roller is operating.
(The revolution of shaft of roller is the standard for RPM.)
✓Displaying “n” in front of RPM value is shown on the display in case of conditions listed
below.
-Turning on the main power after turning off the unit without stopping the roller
-Auto-restart after Power failure during the operation
✓RPM Setting
①Press START/STOP button to stop the roller if it is in operation.
②Press RPM/TIME button to switch if the display shows the time mode.
③Press SET button in RPM display mode. Then, current programmed RPM will be
blinking continually. In such flashing mode, adjust RPM with up & down button.
After the adjustment, press SET button to save the change and confirm r SAVE
message. *If failed to press SET button finally, the change in TIME setup will not apply)
④Then, new programmed value will be displayed.
⑤Press START/STOP button to start roller.
✓TIME Setting
①Press START/STOP button to stop the roller before setup if roller is running.
②Press RPM/TIME button to switch the display of RPM to time display and setup mode.
③Press SET button in time display mode and then the current programmed time will be
flashing in the display. In such flashing mode, set up the desired time.
④Press SET button again and use UP & DOWN button to set the desired minute value.
⑤Press SET button. Then, t SAVE message will come out shortly and then, the display
will turn out to newly programmed TIME. From that change, timer will start counting.
*If failed to press SET button finally, the change in TIME setup will not apply)
*For continuous running, set TIME at 00:00)
⑥Press START/STOP button to operate. The unit will stop its operation after the
programmed time and message “–END–“ in the display will blink continually.

9
WARRANTY
Thank you for purchasing our Giant Roller.
This operation manual includes practical information such as performance, usage, and cautions &
notices for use of the product.
Therefore, before using the product, please read all the safety instructions described in this manual
carefully and keep this manual for future use.
W A R R A N T Y
ITEM
MINI ROLLER
MODEL
NB-204MR
DATE OF
INSTALLATION
MM-DD-YEAR
SUPPLIER
SERIAL No.
PERIOD
1year
N-BIOTEK provides a warranty on all parts and factory workmanship. The warranty includes
areas of defective material and workmanship, provided such defect results from normal and
proper use of the equipment.
1. The free warranty service will be provided once the unit is proved to be defective by
wrong workmanship after N-BIOTEK or reliable distributor’s examination.
2. The warranty period is 1 year from date of installation or 1 and Half year from the date
of shipment from N-BIOTEK, whichever is sooner as indicated in above table. This period
is proved by serial no.
3. N-BIOTEK will not be responsible of free warranty service for the faulty caused by user’s
improper operation, excessive use, use of incorrect voltage & frequency, storage in
wrong environment mentioned in Manual.
4. Complete the above table after installation and keep this card. Then, present it to a
dealer or N-BIOTEK when warranty repair is needed.
Signed By
Table of contents
Other N-BIOTEK Laboratory Equipment manuals

N-BIOTEK
N-BIOTEK NB-201M User manual

N-BIOTEK
N-BIOTEK NB-203XXL User manual

N-BIOTEK
N-BIOTEK NB-T101M User manual

N-BIOTEK
N-BIOTEK NB-T101S User manual

N-BIOTEK
N-BIOTEK NB203QR User manual

N-BIOTEK
N-BIOTEK NB-205LF User manual

N-BIOTEK
N-BIOTEK MINI-CELL NB-203M User manual

N-BIOTEK
N-BIOTEK NB-101S User manual

N-BIOTEK
N-BIOTEK NB-101M User manual

N-BIOTEK
N-BIOTEK NB-205QM User manual