Genius TVGo DVB-T01 User manual

English
1
Chapter 1 Introduction of TVGo DVB-T01
1.1 Introduction
The TVGo DVB-T01 can turn your notebook or desktop PC into a personal digital TV. It
receives free-to-air terrestrial broadcasting signal through the USB interface to let you
watch digital TV on your notebook or desktop PC. You can watch TV within a window or
full screen. The compact size design makes it easy for you to take it anywhere. With the
remote controller, there is no distance limitation to control your TV channel. You can
watch TV, video record and playback high quality digital video programs on your
notebook or desktop PC. With digital technology today, TVGo DVB-T01 lets you record
digital TV programs to your computer, watch TV, record TV programs, preview TV
channels and use the Time-Shift function without missing any programs. These functions
supported by TVGo DVB-T01 make this a product you don’t want to miss.
1.2 Package contents:
- TVGo DVB-T01 x 1
- USB 2.0 cable x 1
- Portable Digital TV Antenna x 1
- Remote Controller (includes battery) x 1
- Software Disc x 1
- Quick installation guide x 1
- Switching Head x 2
Notice: We highly recommend you use the outdoor antenna for better signal
receiving quail

English
2
1.3 Features of TVGo DVB-T01
- Watch worldwide free-to-air digital HDTV and SDTV TV programs and free-to air
digital radio
- Powered by USB2.0 cable (compatible with USB1.1)
- Supports time-shifting functions to avoid missing any TV programs
- Supports real-time recording and schedule recording in MPEG-2 format
-Supports snapshot function that lets you capture your favorite images from
programs and turn it into wallpaper for your PC or NB
--Supports EPG (Electronic Guide program) and Teletext function.
1.4. Minimum system requirements:
- IBM or IBM compatible computer
- CPU (MMXTM-enhanced CPU),
above 1.7 GHz for watching SDTV TV program
above 2.4 GHz for watching HDTV TV program
- 128MB system memory size
- Microsoft Windows 2000 SP4, or Windows XP SP1/SP2 operating system
- Microsoft DirectX version should be 9.0c or later
- 100MB available hard disk space (used by the driver and software),
- 3GB disk space per hour needed for TV program recording
1.5 Recommended system requirements:
- IBM or IBM compatible computer
-CPU (MMXTM-enhanced CPU),
above 2.4 GHz for watching SDTV TV program and recording
above 3.0 GHz for watching HDTV TV program and recording
- 256MB system memory
- Microsoft Windows 2000 SP4, or Windows XP SP1/SP2 operating system
- Microsoft DirectX version should be 9.0c or later
- 100MB available hard disk space (used by the driver and software)
- 3GB disk space per hour needed for TV program recording
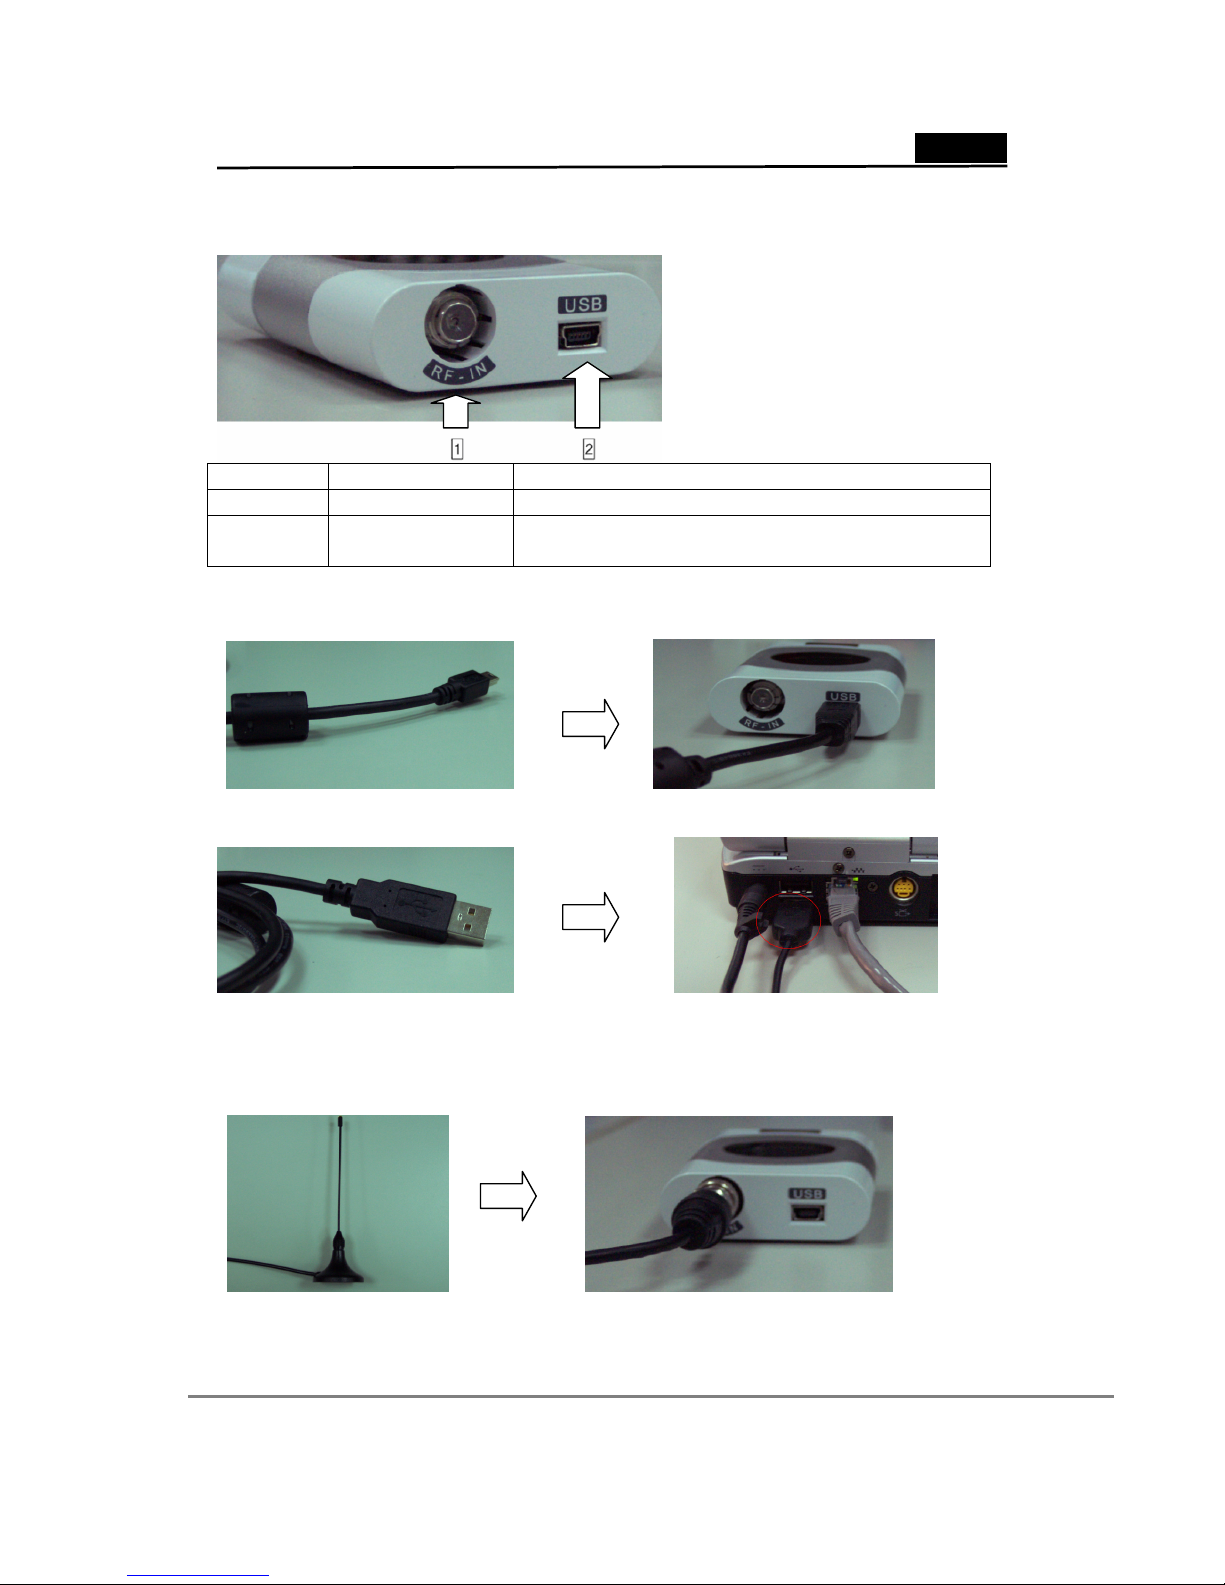
Chapter 2 Installation
You can install the TVGo DVB-T01 easily after reading this chapter. The following
sections will provide you detailed information to install the box to your PC or NB.

English
3
2.1 Brief introduction on hardware installation
The back side of the TV box
Connector Description Comment
1 Antenna RF-IN Connect antenna signal to the USB TV box
2 USB Interface Use USB cable to connect TV box and
computer
Step 1. USB connection
I. Connect the USB cable and the TVGo DVB-T01 as shown below.
II. Connect the other end of the USB cable to your notebook or PC as shown
Step 2. Connect the antenna signal line
I. Connect the TV antenna signal line to the TVGo DVB-T01 as shown below.
Notice: When the hardware is connected, you can start the software installation.

English
4
2.2 Software installation
The TVGo DVB-T01 installation includes the application and driver, follow the sections
below to install the software.
1. After the computer and TVGo DVB-T01 are connected, the following window appears.
Click on “cancel" to install the driver later.
2. Please put into the software disc into your CD-ROM drive. The following window will
pop up automatically.
If you do not see this window, please manually run “setup.exe " from the software
disc.

English
5
3. After entering WINDOWS, please choose the languages installed, then continue
installing according to the instruction.
4. The installation procedure will copy the driver and application software to your PC or
NB. You can choose “Cancel” to stop the installation procedure.

English
6
5. Please select “Next” to continue installing and choose the desired file folder to install
and go to next step.
6. Please choose “Next” to continue installing according to the instruction, or “Back” to
return to the last step and choose the suitable file folder to install. Or choose “Cancel”,
to stop the installation.

English
7
7. The installation procedure is copying the driver to your PC or NB. You can choose
“Cancel” to stop the installation procedure.
8. After the installation is done, click on “Yes, I want to restart my computer now.”,
Then click and select “Finish” to complete the installation procedure.
9. The installation disc also contains Direct X 9.0c package. In order to use TVGo
DVB-T01, you must install Direct X 9.0c or later version. The InstallShield will enter
the DirectX 9.0c installation procedure automatically.

English
8
Chapter 3 Introduction of the software
It offers the strong and exhaustive function for one high-level digital TV player. Through it,
you can enjoy exciting high-resolution, high-quality video and audio TV play back.
3.1 Control panel
Control Panel without Numerical Keypad
Control Panel with Numerical Keypad
Icon Function description
Close the TV player
Full screen / normal screen switch
Minimize the TVGo DVB-T01 player
Show the information of the TVGo DVB-T01 player
Fast forward the playback movie
Fast backward the playback movie
Stop the playback movie
Pause the playback movie
Play the previous television channel
Record the TV program
Choose the movie file to play
Switch the TV channel up
On-line help
Switch the TV channel down
Increase volume level
Decrease volume level

English
9
Volume level status display and adjustment
Open EPG (Electronic Program Guide) of TV
program
Open or close the sound
Watch the TV program
TVGo DVB-T01 player system setting
Channel preview of TV program
Start-up time-shift
Capture a picture of the movie
Establish the schedule of TV recording
Switch between bilingual
Turn on the numerical keypad
Shut off the numerical keypad
~ Choose the television channel
Play the previous television channel
Status display of intensity of the terrestrial TV signal
Mute status display
Stereo status display
3.2 Brief introduction of basic function
Intensity index of free-to-air terrestrial TV signal
This will show the status display of strength of your television channel signal
automatically.
Clock
The clock will show the time of your computer automatically 。
Channel name
The channel names broadcast at present time is shown automatically。
Toggle for audio mute function
You can click the icon on the control panel to turn the mute on or off. This icon
represents the status of mute - 。

English
10
Live TV recording
If you want to record the TV program you are watching now, please click the icon on the
control panel - 。
Schedule TV recording
If you want to set the TV recording schedule, please choose the icon on the control panel
- 。
System configuration
If you want to scan TV channel, change video attribute, or set the file path of recording
and capturing, please click the icon on the control panel- ,to do the setting。
Bilingual support
If the TV program supports bilingual,you can click the icon on the control panel - 。
Be careful! This function depends on whether the TV program offers bilingual.
Frame capture
You can click the icon on the control panel - to capture a picture from the video
playback or a live TV program。
Electronic Program Guide
If the TV program supports EPG (Electronic Program Guide) ,you can click the icon on
the control panel - 。
Be careful! It depends on whether the TV channel offers this function or not.
Time Shift
You can use this function when there is interrupt while you are watching TV。Please click
the icon on the control panel - ,you can reverse the TV to the point you were
interrupted。
3.3 The multi-functional remote controller

English
11
ICON Explanation
POWER Start / close the TV
SLEEP Set the player dormancy start time
TIME-SHIFT Start-up time-shift
REC Record the TV program
0 ¡-9 … Choose the television channel
VOL / Increase/Decrease the volume level
CH / Switch up/down the TV channel
SIZE Full screen / normal screen switch
RET Play the previous television channel
MUTE Open or close the sound
FWD Fast forward the playback movie
PLAY/PAUSE Play/Pause the playback movie
REV Fast backward the playback movie
3.4 Functions supported by mouse
Click the right button of the mouse, you will see the following menu pop up.
Function Function description
Channel up TV channel up
Channel down TV channel down
Channel return Play the previous TV channel
Play Choose the movie file to play
Stop Stop the playback movie
Pause Pause the playback movie
Forward Fast forward the playback movie
Backward Fast backward the playback movie
Recording Record TV programs
Time-shift Start-up time-shift
Mute Open or close the sound
Zoom Full screen / normal screen switch
About Show the information of the TVGo DVB-T01 player
Exit Close the TV player

English
12
3.5 Hot keys function table
After TVGo DVB-T01 Player is working, you can also use the following keys.
Function Fast key
Close the TV player ALT + P
Play recorded movie ALT + S
Stop movie playing ALT + S
Fast forward ALT + F
Fast backward ALT + B
Pause ALT + S
Video recording ALT + R
Stop recording ALT + S
Capture picture ALT + C
Time-shift ALT + T
Full screen ALT + X
Normal screen ALT + X
Increase volume level ALT + V
Decrease volume level ALT + L
Mute ALT + M
Up channel ALT + U
Down channel ALT + D
Channel selection XX (X:1234567890)
Previous channel ALT + J
On-line help F1
Chapter 4 System Configuration
You can use some of the same settings when watching and recording TV. The sections in
this chapter are based on the priority which you need.
Please select and click the pattern - on the control panel to enter the configuration
page.

English
13
4.1 Channel scan
You can select and click "Load” to load the channel table, or select some specific
channels and select "Delete" to delete these specific channels, or select and click
"Delete All" to delete all channels. Then you can select “OK” to store all changes. Or you
can select “Cancel” to give up all changes and exit.
Notice:
1. The digital TV has a characteristic called cliff effect. If the receiving free-to-air
terrestrial signal is bad, you will not see the video image at all. This is unlike analog
TV, for analog TV you can still watch TV in unclear video image. If the signal in your
area is bad, you need to have an external outdoor antenna. Please see the details on
how to fix this issue from Q&A in chapter 6.
2. The free-to-air terrestrial signal coverage status and the TV program broadcasting
status can be found at the web site WWW.DVB.ORG

English
14
4.1.1 Scan channels by area
Step one:
Please click and select “Nation/Area” under the "Sector Scanning" section.
Step two:
Please choose your nation or area.
Step three:
Please click and select the “Auto Scan”.
Step four:
After the channel scanning is finished, you can click and select "OK" to save and exit, or
select "Save As” to store the new channel table and exit.
Be careful! If you are unable to scan any TV channels using your nation or area, please
choose option item “6, 7, 8” under "Bandwidth” field and do the auto scan again.

English
15
4.1.2 Scan channels by single frequency
Step one:
Please click and select "Bandwidth".
Step two:
You can select the bandwidth you want to scan. (" 6 ", or " 7 ", or " 8 ", or " 7, 8 ", or " 6, 7,
8 ")
Step three:
Please fill in the desired frequency you want to scan under "Min Freq." field.
Step four:
Please fill in desired frequency you want to scan under "Max Freq." field.
Step five:
Please click and select "Auto Scan” to begin the channel scanning.
Step six:
After the channel scanning is finished, you can click and select "OK" to save and exit, or
select "Save As” to store the new channel table and exit.

English
16
4.1.3 Scan channels by frequency range
Step one:
Please click and select "Bandwidth".
Step two:
You can select the bandwidth you want to scan. (" 6 ", or " 7 ", or " 8 ", or " 7, 8 ", or " 6, 7,
8 ")
Step three:
Please fill in initial frequency you want to scan under "Min Freq." field.
Step four:
Please fill in ending frequency you want to scan under "Max Freq." field.
Step five:
Please click and select "Auto Scan” to begin the channel scanning.
Step six:
After the channel scanning is finished, you can click and select "OK" to save and exit, or
select "Save As” to store the new channel table and exit.

English
17
4.2 Adjusting Video
This configuration page has a lot of color parameters, you can adjust in accordance with
your favor color style.
Enable OSD: By not canceling this function, the brief description of function you choose
will be shown in the TV video window.
Video information attributes
Brightness: You can adjust the luminance of the image according to your taste.
Hue: You can adjust the tone of the image to your liking.
Contrast: You can adjust the contrast of the image.
Saturation: You can adjust the degree of saturation of the image.
Default: You can click this button to restore the default value stored on the system for
“Brightness”, “Hue”, “Contrast” and “Saturation”.
If the settings of video information are correct, you can click and select "OK" to save and
exit, or select "Cancel” to give up all the change you made and exit.

English
18
4.3 Configuration for Record / Time shift
RecordingPath
Please choose the data file path for the video recording.
Time shift Duration
The maximum period of "Time shift" you allow. You can choose from 30 minutes to 60
minutes, this field is restricted by the hard disk space on your system. (Time shift: If you
need to leave temporarily for some reason when watching a TV program, you can use
this function to store the program at this moment and playback when you return.)
Capture Path
Please choose the data file path for the frame capture.

English
19
4.4 Configuration of schedule recording
To configure the schedule recording, please select and click the icon on the control panel
- .The following setting page will pop up.
Basic Setting
Job Title: You can type in a name for the video recording
Action After / Recording: There are three actions you can select after the schedule
recording. Here are the options:
Exit: Click this and the application will exit after schedule recording.
Enter Hibernate State: Select this and the system will go into hibernation after the
schedule recording.
No Action: Click this and the application will stay alive after the schedule recording.
Recording Setting
Channel: You can type in the TV channel name for the schedule recording you want.
Be careful! You cannot record the TV programs in different channels at the same time.
Mute Duration Recording: Select this and the system will be mute during schedule
recording.
Date / Time Setting
Starting Date: You can choose to make an appointment to make video recording by
filling in the starting date here.
(Be careful! You cannot type in a date and time in the past.)

English
20
Starting Time: You can choose to make an appointment to make video recording by
filling in the starting time here.
Be careful! You must type in a time, which is ahead more than one minute from the
present time.
Recording Period: You can type in the recording length here.
Once: Select this if you want to establish a video recording reservation just this time.
Weekly: Click on this to establish the video recording reservation the same time every
week.
Other manuals for TVGo DVB-T01
1
Table of contents
Other Genius TV Tuner manuals

Genius
Genius TVGo DVB-T31 User manual

Genius
Genius TVGo A11MCE User manual

Genius
Genius TVGo A03MCE User manual

Genius
Genius VideoWonder DVB-T User manual

Genius
Genius TVGo A03-IPTV User manual

Genius
Genius TVGO-U202 User manual

Genius
Genius VIDEOWONDER CARDBUS DUAL User manual

Genius
Genius TVGo DVB-D01 User manual

Genius
Genius TVGo DVB-T11 User manual

Genius
Genius VIDEOWONDER DVB User manual