INSTALACIÓN DE LA TARJETA PCI
Su tarjeta PCI se instala en el interior de la computadora personal. Asegúrese de tener
conocimientos de instalación de computadoras, en caso contrario acuda con un técnico
especializado.
1.- Desconecte el cable de corriente de su computadora y desconecte cualquier dispositivo
conectado a ella. Tenga precauciones acerca de la electricidad estática o descargas
eléctricas.
2.- Remueva la cubierta del CPU, seleccione una bahía disponible PCI.
3.- Utilice un desarmador para quitar la cubierta de la bahía y coloque la tarjeta PCI, haciendo
que coincidan los conectores con la ranura de expansión. Presione firmemente y vuelva a
colocar los tornillos para asegurarla.
4.- Coloque nuevamente la cubierta del CPU y conecte todos sus dispositivos.
Antes de comenzar a utilizar el sintonizador es necesario que realice un “puenteo”
entre el COM-425 y la tarjeta de audio de su computadora. Solo conecte un cable
3,5mm en la salida de audio del COM-425 (OUT) hacia la entrada (AUDIO IN) de su
tarjeta de audio. De esta forma podrá escuchar los programas de TV en sus bocinas.
Asegúrese de conectar una antena con conector RF.
Para realizar la búsqueda de canales, presione el botón de Scan una vez.
En el caso del audio, es necesario seleccionar en el menú de Audio de Windows, la
opción de Grabación en Línea (Line-In).
INSTALACIÓN DE CONTROLADORES EN XP
1.- Una vez que haya instalado la tarjeta en la computadora, el sistema la detecta y el
asistente para hardware nuevo aparece. Presione Cancelar para cerrar el asistente.
2.- Inserte el disco de instalación en la unidad de CD. El disco ejecutará la aplicación.
3.- Seleccione “imNetATV”, posteriormente elija “Device Driver” En caso que no ejecute el
Autorun del CD, localice y ejecute el archivo Setup.exe de la carpeta “ImNetATVDriver”
4.- Elija el idioma para la instalación y presione NEXT para continuar.
5.- El asistente de instalación comienza. Presione Next para continuar.
6.- En la siguiente pantalla seleccione “Complete” para que realice la instalación completa.
posteriormente elija NEXT para continuar.
7.- Seleccione el país donde va a utilizar el equipo y presione Set para continuar. La
instalación comienza.
8.- Durante la instalación aparecerá la siguiente ventana, solo elija “Continuar”
9.- Presione Finish para concluir esta parte del proceso. Deberá reiniciar la computadora.
Seleccione “Yes, I want to restart my computer now” y presione OK para reiniciar.
10.- Una vez que reinicie la computadora, presione Inicio >>> Panel de Control >>> Sistema
>>> Hardware >>> Administrador de dispositivos >>> Dispositivos de Sonido, vídeo y juegos
y deberá visualizar el nombre de la tarjeta de captura.
INSTALACIÓN DEL SOFTWARE DE VISUALIZACIÓN
Antes de instalar el software de aplicaciones, asegúrese de que su sistema cuente con
DirectX 9 o superior.
1.- Inserte el disco de instalación en la unidad de CD.
2.- Localice y ejecute el archivo Setup.exe en la carpeta AP software.
3.- Seleccione el idioma de instalación.
4.- Seleccione el país donde va a utilizar el equipo y presione SET para continuar.
5.- Seleccione la carpeta donde desee instalar el programa y oprima NEXT para continuar
con la instalación.
6.- Puede salir el siguiente mensaje, simplemente seleccione Si para continuar.
7.- En la siguiente ventana solo acepte la licencia del software
8.- En las siguientes pantallas solo acepte los mensajes para continuar con la instalación.
9.- Posteriormente aparecera la siguiente pantalla, presione NEXT para continuar.
10.- Elija completa para una mejor instalación.
11.- Seleccione la carpeta donde se instalará la aplicación y presione Finish.
12.- Por ultimo presione OK y Finish para terminar con la instalación. Posteriormente reinicie
la computadora COMO USAR EL SOFTWARE DE VISUALIZACIÓN
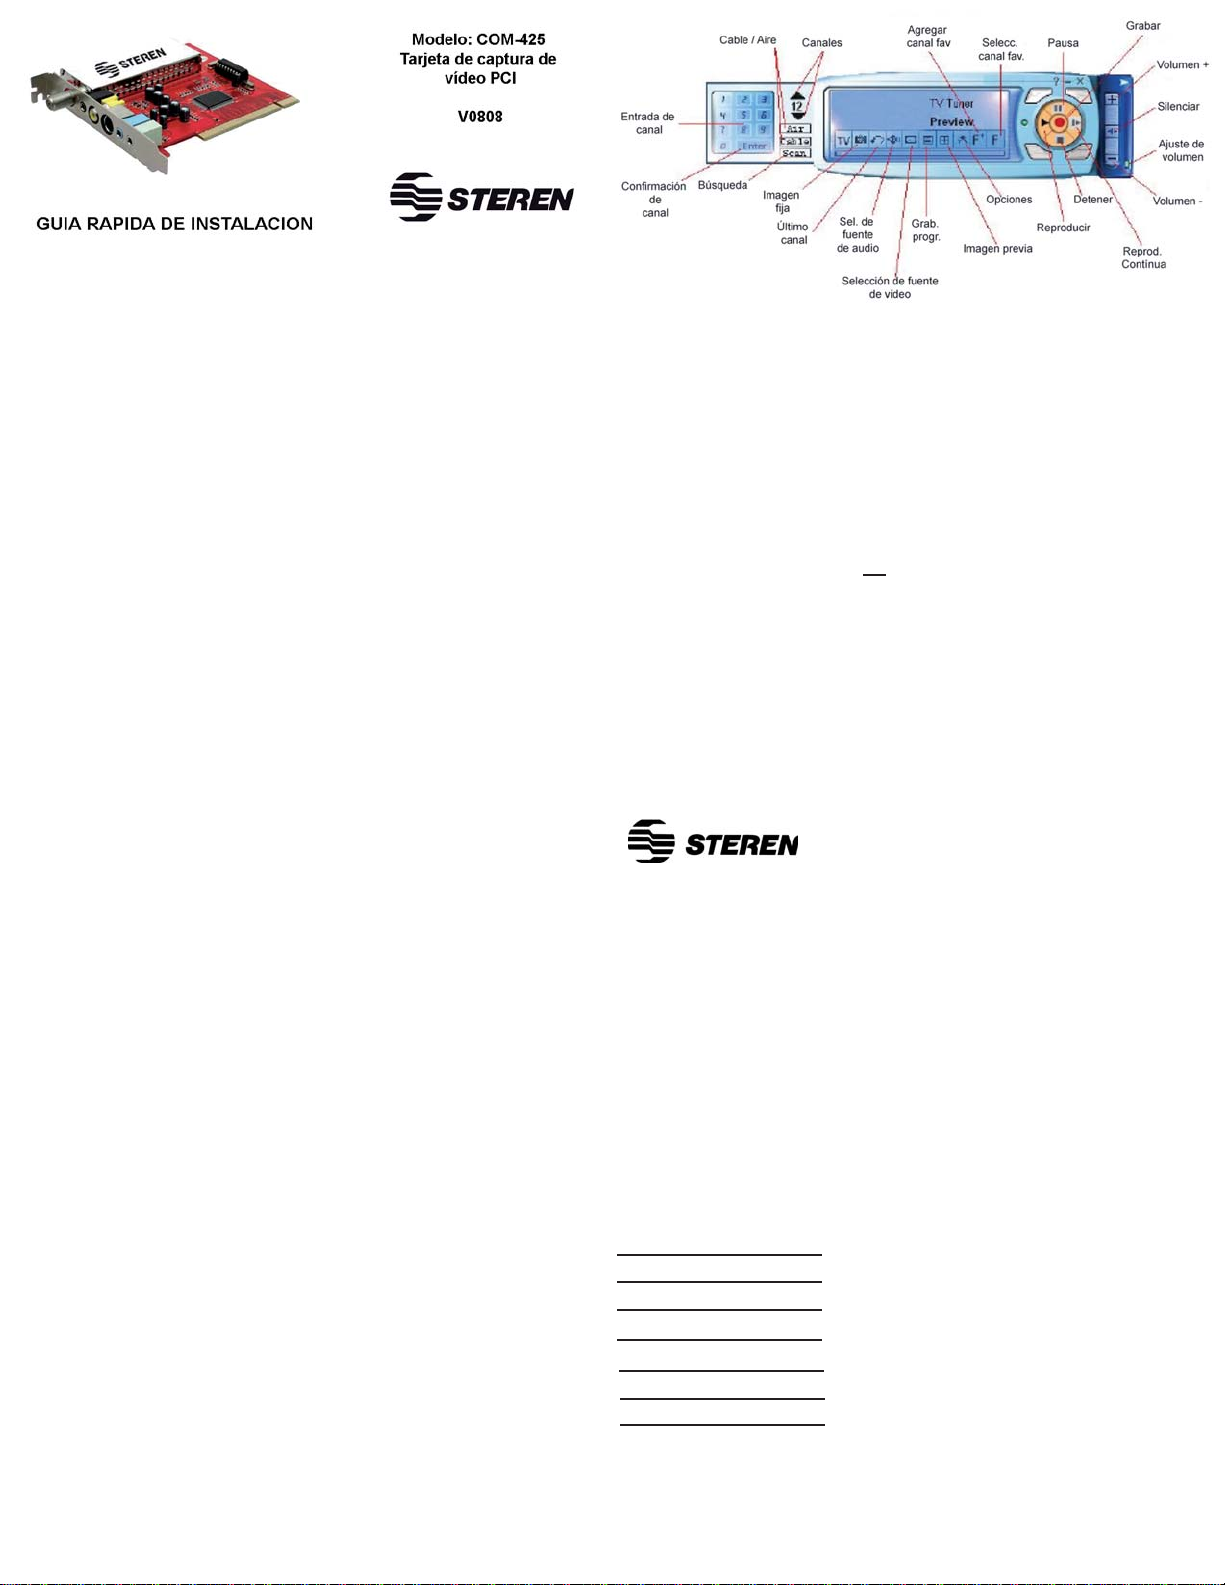
Presione Inicio >>> Programas >>> TV Champ >>> TV Champ, para iniciar el programa.
Ventana de vídeo
Presione el botón derecho del ratón sobre la ventana de vídeo para seleccionar un tamaño
preestablecido (320x240, 640x480, 7210x480, 720x576 y pantalla completa).
Entrada de canal
Permite seleccionar un canal de forma directa. Después de introducir el número del canal,
deberá presionar el botón de Enter para confirmar la selección.
Selección de fuente de vídeo
Seleccione entre las diferentes fuentes de vídeo disponibles:
Sintonizador de TV (TV tuner), Vídeo Compuesto (Composite video), S-Video.
Grabación programada
Utilice esta opción para grabar programas de televisión de manera programada, cuenta con
las siguientes opciones: Una vez (One time), Varios días (Several days) o cada semana
(Every week).
Opciones
Grabación (Record)
Permite seleccionar el formato de captura de vídeo: AVI / MPEG1 / MPEG2.
Color
Seleccione la opción para ajustar los parámetros de Brillo (Brightness), Contraste (Contrast),
Tinte (Hue), Saturación (Saturation), Nitidez (Sharpness).
Sintonizador de TV (TV tuner)
Permite seleccionar el sistema de vídeo: PAL D/K, PAL I, PAL B/G, NTSC M. Para México
utilice NTSC M.
Entrada de Vídeo (TV type)
Seleccione la fuente de vídeo: Televisión por Cable o televisión abierta.
Sintonización fina
Permite ajustar de forma manual la sintonización de un canal y obtener la mejor señal. Se
recomienda dejar que el sistema maneja este opción de forma automática.
ESPECIFICACIONES
Entrada: 12V - - -
Sistema de vídeo: NTSC / PAL / SECAM
Audio: Entrada y Salida de audio estéreo
Vídeo análogo: Una entrada de S-Vídeo
Una entrada de vídeo compuesto
TV: Entrada para cable coaxial de 75ohms
Captura de vídeo: MPEG 1 / 2
Formato de captura: AVI
Forma de imágenes fijas: BMP y JPG
Resolución: 720 x 576 a 25fps (PAL)
720 x 480 a 30fps (NTSC)
Dimensiones: 135 x 120 x 20mm
Peso: 231g
El diseño del producto y las especificaciones pueden cambiar sin previo aviso.
PÓLIZA DE GARANTÍA
Esta póliza garantiza el producto por el término de un año en todas sus partes y mano de obra, contra
cualquier defecto de fabricación y funcionamiento, a partir de la fecha de entrega.
CONDICIONES
1.- Para hacer efectiva la garantía, presente ésta póliza y el producto, en donde fue adquirido o en
Electrónica Steren S.A. de C.V.
2.- Electrónica Steren S.A de C.V. se compromete a reparar el producto en caso de estar defectuoso sin
ningún cargo al consumidor. Los gastos de transportación serán cubiertos por el proveedor.
3.- El tiempo de reparación en ningún caso será mayor a 30 días, contados a partir de la recepción del
producto en cualquiera de los sitios donde pueda hacerse efectiva lagarantía.
4.- El lugar donde puede adquirir partes, componentes, consumibles y accesorios, así como hacer válida esta
garantía es en cualquiera de las direcciones mencionadas
posteriormente.
ESTA PÓLIZA NO SE HARA EFECTIVA EN LOS SIGUIENTES CASOS:
1.- Cuando el producto ha sido utilizado en condiciones distintas a las normales.
2.- Cuando el producto no ha sido operado de acuerdo con el instructivo de uso.
3.- Cuando el producto ha sido alterado o reparado por personal no autorizado por Electrónica Steren S.A. de
C.V.
El consumidor podrá solicitar que se haga efectiva la garantía ante la propia casa comercial donde adquirió el
producto. Si la presente garantía se extraviara, el consumidor puede recurrir a su proveedor para que le
expida otra póliza de garantía, previa presentación de la nota de compra o factura respectiva.
DATOS DEL DISTRIBUIDOR
Nombre del Distribuidor
Domicilio
Producto
Marca
Modelo
Número de serie
Fecha de entrega
Producto: Tarjeta de captura de vídeo PCI
Mod.: COM-425
Marca: Steren
ELECTRONICA STEREN S.A. DE C.V.
Camarones 112, Obrero Popular, 02840, México, D.F.
RFC: EST850628-K51
STEREN PRODUCTO EMPACADO S.A. DE C.V.
Biólogo MaximIno Martínez No. 3408 Int. 3 y 4,
San Salvador Xochimanca, México,D.F. 02870,
RFC: SPE941215H43
ELECTRONICA STEREN DEL CENTRO,S.A.DE C.V.
Rep.del Salvador 20 A y B, Centro, 06000, México.D.F.
RFC: ESC9610259N4
ELECTRONICA STEREN DE GUADALAJARA,S.A.
López Cotilla No. 51, Centro, 44100, Guadalajara, Jal.
RFC: ESG810511HT6
ELECTRONICA STEREN DE MONTERREY, S.A.
Colón 130 Pte., Centro, 64000, Monterrey, N.L. RFC: ESM830202MF8
ELECTRONICA STEREN DE TIJUANA, S.A. de C.V.
Calle 2a, Juárez 7636, Centro, 22000,Tijuana, B.C.N.
RFC: EST980909NU5
En caso de que su producto
presente alguna falla, acuda al
centro de distribución más cercano
a su domicilio y en caso de tener
alguna duda o pregunta por favor
llame a nuestro Centro de Atención
a Clientes, en donde con gusto le
atenderemos en todo lo relacionado
con su producto Steren.
Centro de Atención a Clientes
01 800 500 9000


