genourob GNRB User manual

DIAGNOSIS
I
N
ST
RUM
E
N
T
FOR ANTERIOR LIGAMENT KNEE
I
NJUR
IES
INSTRUCTIONS FOR USE OF THE GNRB®

Certified Company ISO 13485 : 2016, NF EN ISO 13485 : 2016 by
LNE GMED
GNRB FT.02.008 O EN
ACKNOWLEDGEMENT
Thank you for having purchased this
G
NR
B
®
.
The GNRB® is a revolution in instrumental methods for measuring laxity of the knee. It is more
precise, reliable and consistent than other measuring instruments.
The device was designed in 2005, the result of an initiative by Dr Henri Robert and Stéphane
Nouveau. They noted that ACL injury screening was neither consistent, nor quantifiable, using
physical examinations and existing instrumental methods. Partial injuries were hard to detect.
With the support of the ESIEA (French Institute of Applied Electronics and Computing), they
designed and developed the GNRB®, which provides solutions to each of the drawbacks of other
existing measuring appliances. This device provides more precision and good measurement
repeatability. See Publication « Orthopaedics & Traumatology : Surgery & Research (2009) 95,
171-176 ».
In the light of current repair innovations in ACL reconstruction, this device has the advantage of
detecting partial injuries, enabling a single bundle to be repaired.
The device can be used in pediatrics for diagnosing knee sprains.
There have been several French (SOFCOT, SFA and SOO) and international publications (ESSKA
Porto 2008, ISAKOS OSAKA 2009) on this subject.
Again, thank you for purchasing this device, we welcome the opportunity of working with you.
Please feel free to send us the results of your tests, along with any comments and suggestion you
may have concerning the use of the GNRB®. This is all part of an ongoing progression to ensure
that our device meets as closely as possible the requirements of those who use it.
Stéphane NOUVEAU Henri ROBERT
Director Orthopaedic Surgeon

Certified Company ISO 13485 : 2016, NF EN ISO 13485 : 2016 by
LNE GMED
GNRB FT.02.008 O EN
S
UMMAR
Y
1.
I
N
T
R
O
DUC
TIO
N ___________________________________________________________________ 5
2. LIST OF MARKING SYMBOLS _________________________________________________________ 6
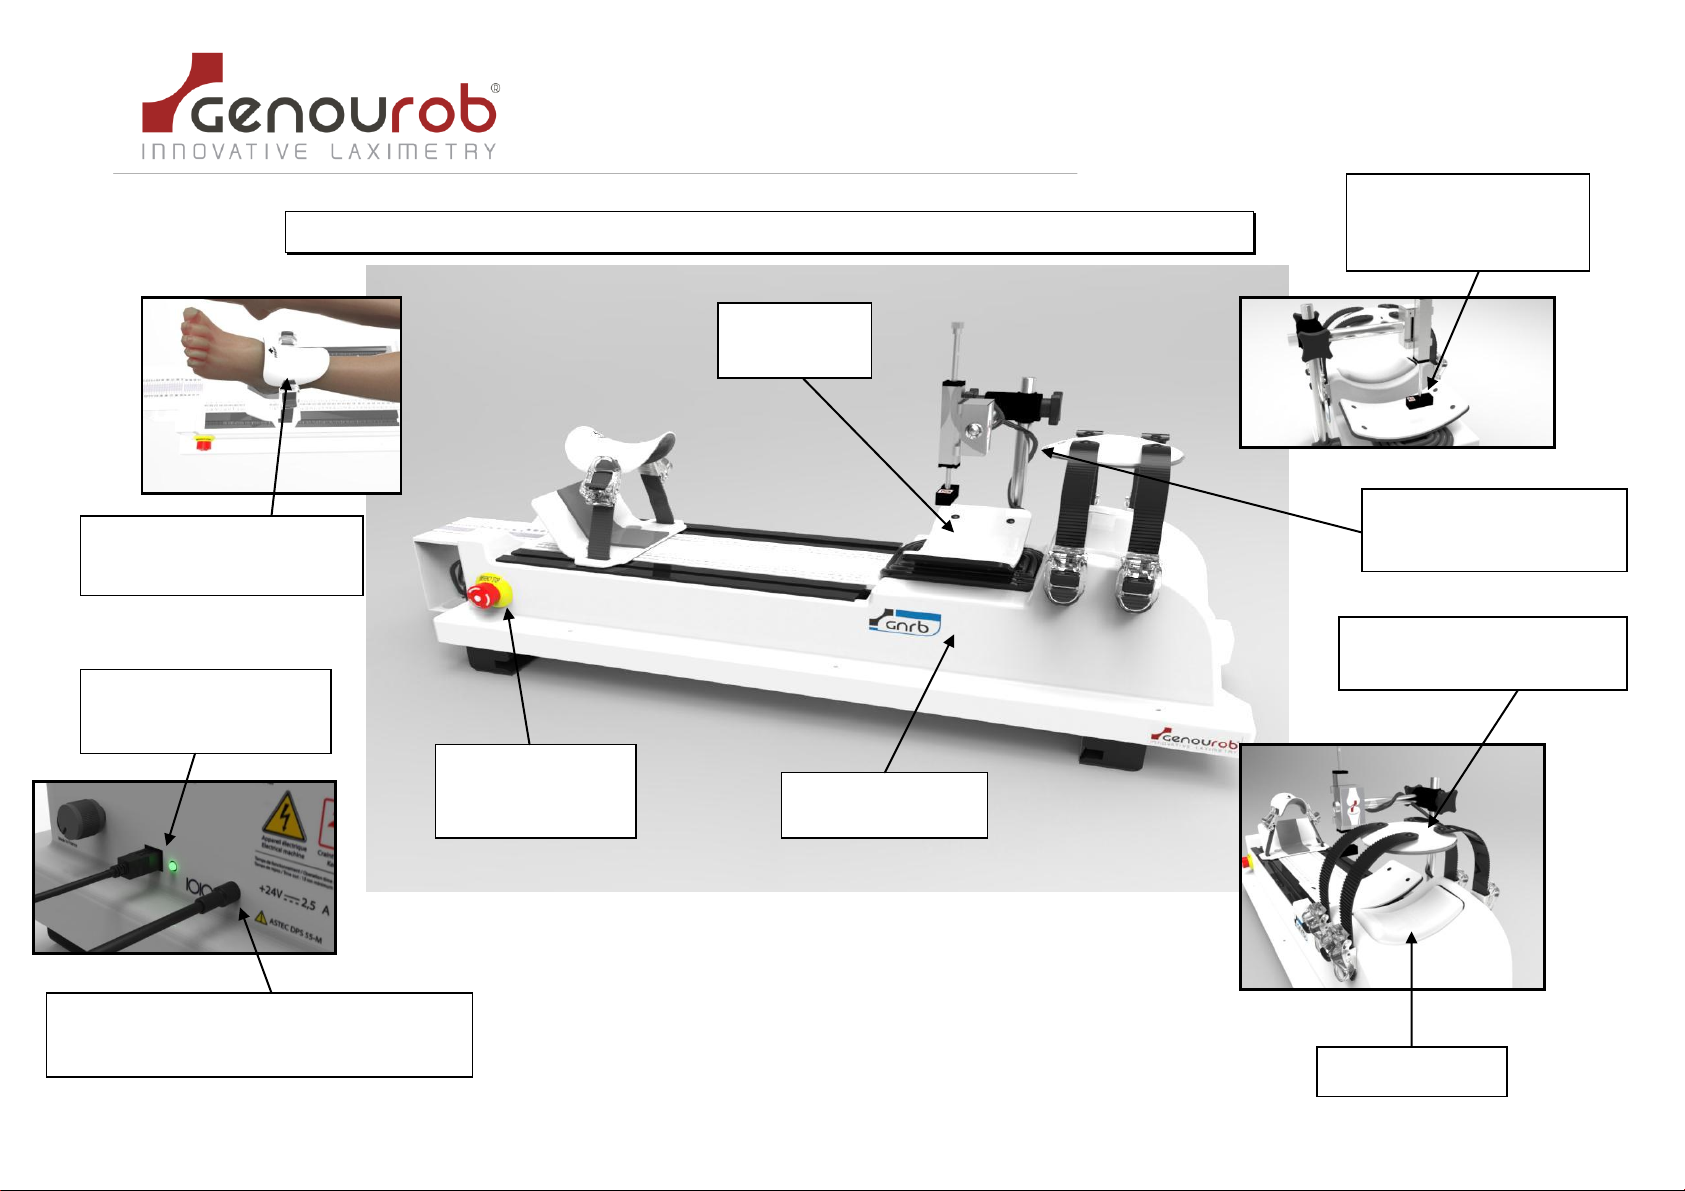
3. D
ES
CR
IPTIO
N _____________________________________________________________________ 7
4. GENERAL SAFETY INSTRUCTIONS _____________________________________________________ 8
5. INSTALLATION
G
U
I
D
E
_______________________________________________________________ 9
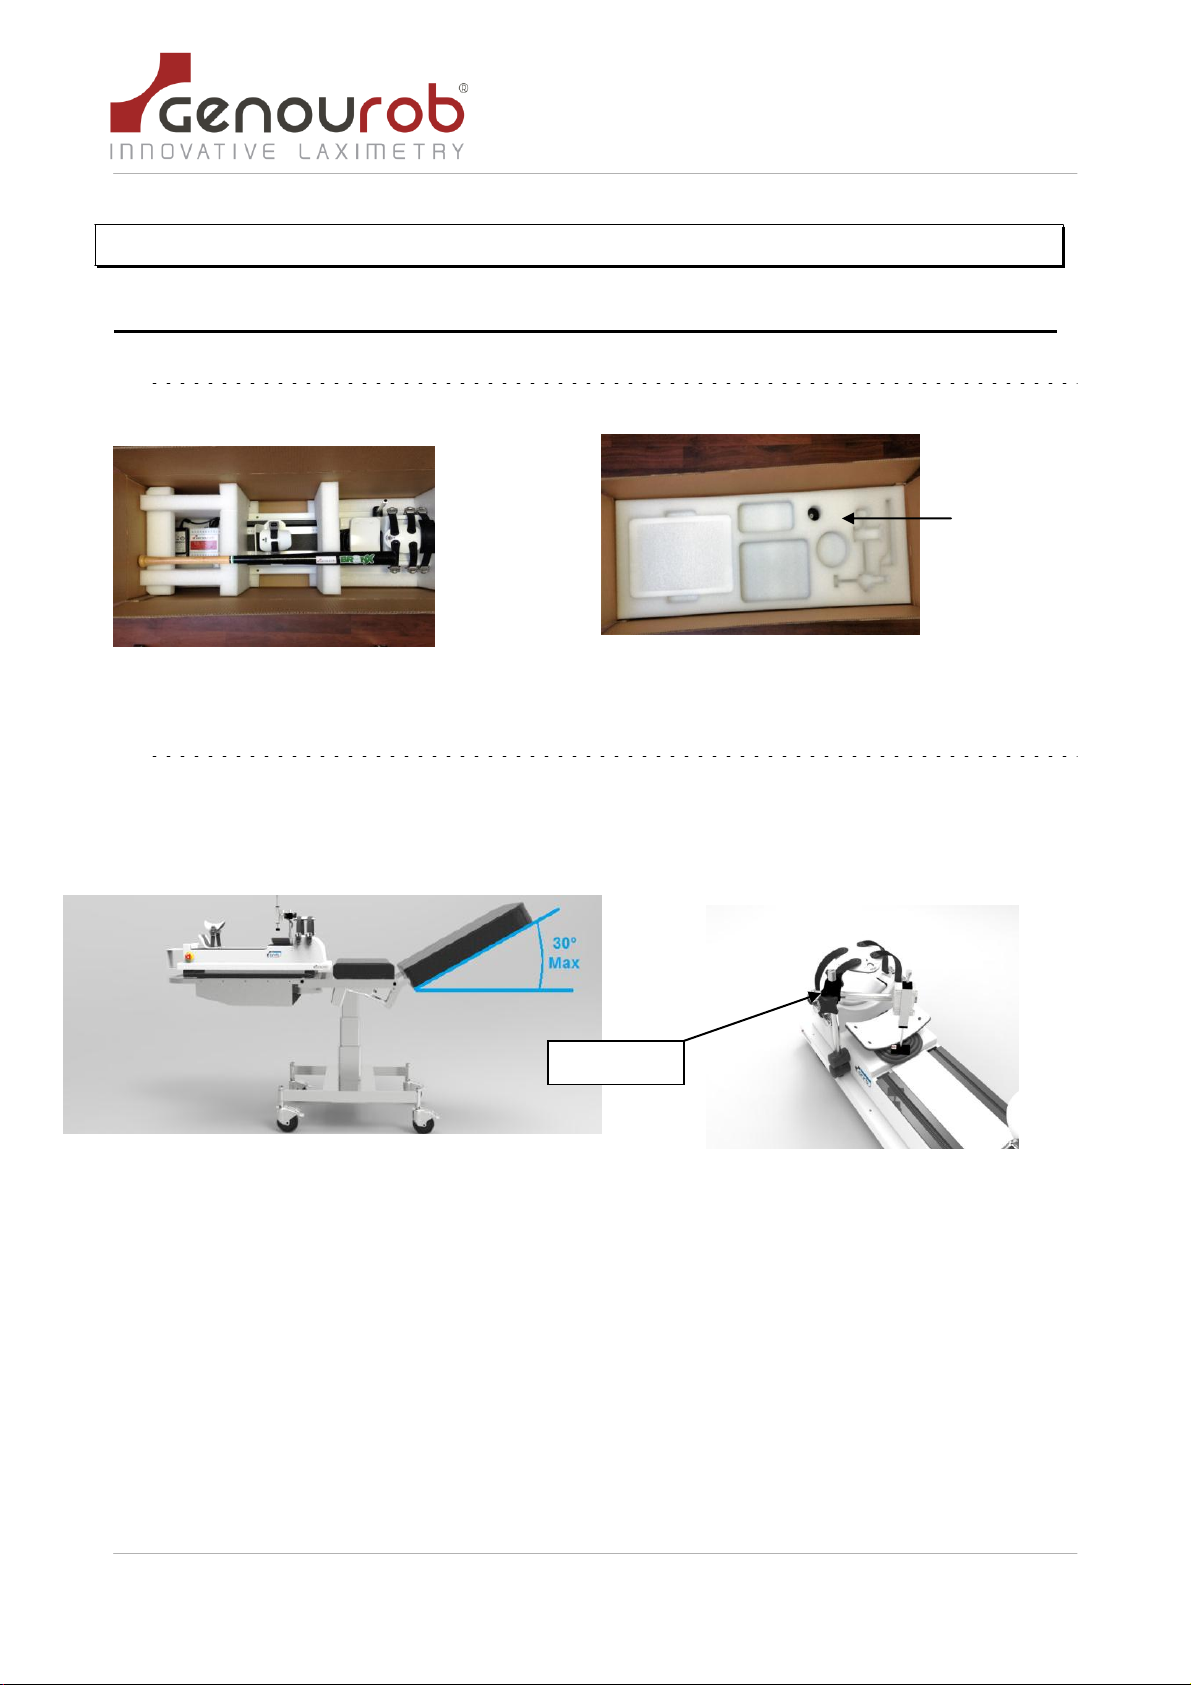
5.1.Installation of the GNRB® device__________________________________________________________ 9
5.1.1. Unpacking ________________________________________________________________________________ 9
5.1.2. Installation of the GNRB®__________________________________________________________________ 9
5.2.Connections _________________________________________________________________________ 10
6. USING THE GNRB® FOR THE FIRST
TI
M
E
______________________________________________ 11
6.1.Login/Password ______________________________________________________________________ 11
6.2. First time use________________________________________________________________________ 12
7. DESCRIPTION OF THE GNRB®
SOFTW
AR
E
______________________________________________ 13
7.1.Toolbar _____________________________________________________________________________ 13
7.2.Patient file tab _______________________________________________________________________ 13
7.2.1. Identity f
orm
_____________________________________________________________________________ 13
7.2.2. Medical
in
f
o
rmat
ion
______________________________________________________________________ 14
7.2.3. Additional examinations __________________________________________________________________ 15
7.3. GNRB test preparation tab _____________________________________________________________ 16
7.3.1.
S
ett
ing
s_________________________________________________________________________________ 16
7.3.2. Co
n
tr
ols
_________________________________________________________________________________ 16
7.3.3. GNRB status_____________________________________________________________________________ 17
7.3.4. Push force _______________________________________________________________________________ 17
7.3.5. Number of test measurements ____________________________________________________________ 18
7.3.6 Radiology Option ____________________________________________________________________________ 18
7.3.7. Contraction Option __________________________________________________________________________ 18
7.3.8. Data table _________________________________________________________________________________ 18
7.4.The results tab _______________________________________________________________________ 19
7.4.1. Selecting results_____________________________________________________________________________ 19
7.4.2. Graphs ____________________________________________________________________________________ 20
7.4.3. Differential Results __________________________________________________________________________ 21
7.5.Configuration tab _____________________________________________________________________ 22
7.5.1. Configuration_______________________________________________________________________________ 22
7.5.2 Print document in the PDF format_______________________________________________________________ 22
7.5.3. Information ________________________________________________________________________________ 24

Certified Company ISO 13485 : 2016, NF EN ISO 13485 : 2016 by
LNE GMED
GNRB FT.02.008 O EN
8. INSTALLATION OF THE GNRB® SOFTWARE ONTO A PC____________________________________ 26
9. INSTRUCTIONS FOR U
SE
___________________________________________________________ 28
10.
Calibration of the device __________________________________________________________ 33
11.
S
afety
in
str
u
ct
ion
s a
nd
p
reca
u
t
ion
s f
o
r
u
se ___________________________________________ 35
12. TRANSPORTING THE
G
NRB
®
_______________________________________________________ 37
13. MAINTENANCE AND R
E
C
Y
C
LI
N
G
____________________________________________________ 38
14. C
E
R
TIFI
CA
TIO
N
S- Manufacturing and marketing dates
__________________________________ 39
15. APPENDIX I : MANUFACTURER'S DECLARATIONS_______________________________________ 40

Certified Company ISO 13485 : 2016, NF EN ISO 13485 : 2016 by
LNE GMED
5
GNRB FT.02.008 O EN
1.
I
N
T
R
O
DUC
TIO
N
The GNRB® is a device that diagnoses total or partial ruptures of the anterior cruciate ligament of
the knee.
For years, we believed that the analysis of laxity at 134 N or at 250 N was enough to explain the
lesions or not, of the LCA. It seems very clear now that a dynamic analysis of the elasticity of the
capsulo-ligamentary complex is more relevant and it is that which the GNRB® allows by the
analysis of the slopes of resulting curves.
Some arthrometers had begun the analysis of the displacement curves but these devices had
the problem of a very bad consistency (manual traction, no parameter setting of the tightening…).
The GNRB® is a device which allows the diagnosis of total or partial ruptures of the anterior
cruciate ligament of the knee.
It has a number of advantages:
the device is non-invasive
it does not use X-rays or other dangerous techniques
it adapts to the morphology of each patient
it is easy to install and use
it produces reliable and repeatable results
its results are operator free
it is easy to transport and clean
the software is easy to use for beginners
The principle of the device is to apply pressure to the calf using an articulated mechanical system
and to record the displacement of the tibia for each force (from 0 to 300 N) via a sensor placed on
the ATT (Anterior Tibial Tuberosity).
A microprocessor controls the device and transfers the recorded data to a computer (the data is
recorded and analyzed using specially-designed software).
Measurements are performed on both legs and the diagnosis is obtained from comparing the two
sets of values and, above all, from the gradients of the curves obtained.
The installation tutorial provided on the following pages will help you set up your device quickly
and easily.
Detailed descriptions are included in the various chapters of the instruction manual.
Please read this instruction manual carefully. Follow safety instructions to ensure that your
G
NR
B
®
operates correctly. GENOUROB® cannot in any way be held responsible in the event of your failure
to comply with these instructions.

Certified Company ISO 13485 : 2016, NF EN ISO 13485 : 2016 by
LNE GMED
6
GNRB FT.02.008 O EN
2. LIST OF MARKING SYMBOLS
Selective sorting components
G
eneral safety
Warning
Keep dry
Type B electromagnetic device
Read instructions for use
Show where put
hands for the
transport
Fragile - handle with care
A
dmissible temperature range
Admissible humidity range
A
dmissible air pressure range
Indicates the direction of the position
of the knee and foot cups
Direct current
Alternating current
!

Certified Company ISO 13485 : 2016, NF EN ISO 13485 : 2016 by
LNE GMED
3. D
ES
CR
IPTIO
N
It is also composed by :
-An USB key for the GNRB software
-This instruction manual
-A PC together with its power supply cables and user manual
-A results interpretation guide
Pushed dish
Emergency stop
button
An electric jack
USB interface cable
(1.80m)
A displacement sensor
placed on the ATT
Adjustable straps for fixing
the patient’s patella
Displacement sensor
cable (0.3m)
Cable to connect the GNRB to the electric
power supply (2m) + mains power (1.70m)
Adjustable straps for fixing
the patient’s foot
Force sensors

Certified Company ISO 13485 : 2016, NF EN ISO 13485 : 2016 by
LNE GMED
8
GNRB FT.02.008 O EN
4. GENERAL SAFETY INSTRUCTIONS
You are working with a device that applies radio frequency energy and which is se
n
s
i
t
i
ve to
devices that transmit radio frequency energy. Please refer to the declaration ta
bl
es regarding
electromagnetic emissions and electromagnetic immunity in Appendix 1 of t
hi
s instruction
ma
nu
a
l.
You are working with an electrical
d
ev
i
ce
.
Incorrect use may cause electric s
ho
cks
.
Only the
Mascot power supply, Ref. ASTEC DPS55-M, supplied by GENOUROB® s
hould
be used for
supplying electric power to the
G
NRB
®
The level of protection against electric shocks of the parts applied to the
p
at
i
e
n
t (displacement
sensor, the curved support under the calf, the leg support and stops) classifies the GNRB® as a
type B
d
ev
i
ce
.
Use of accessories, sensors and cables other than those specified, with the exception of
sensors and cables sold by GENOUROB for the equipment or as spare parts for internal
components, can cause equipment emission levels to rise or fall.
The power cable must be connected to a 230 Volt-50 Hz mains supply.
To prevent risk of electric shock, this device must be connected to a supply network with fitted
earthing plug
It is forbidden to use the device with a damaged power supply unit or with bare connection
cables.
Do not dismantle the device: maintenance and calibration is to be performed by trained
GENOUROB® staff.
The GNRB® should not be used adjacent to or stacked with other equipment. If this is
unavoidable, you should first check that the GNRB® functions correctly like this.
The instructions in the installation
guid
eand instruction manual must be f
ollow
e
d exactly.

Certified Company ISO 13485 : 2016, NF EN ISO 13485 : 2016 by
LNE GMED
9
GNRB FT.02.008 O EN
5. INSTALLATION
G
U
I
D
E
5.1.Installation of the GNRB® device
5.1.1. Unpacking
(See first instructions for use)
5.1.2. Installation of the GNRB®
The GNRB® should be placed on an examination table so that the patient’s legs can be positioned
comfortably on the device. The patient must be able to lie down on the table and rest their head on
the support (optimal relaxation).
The GNRB® can also be placed on a floor mat as an alternative to a table.
Using the cross block screws, raise the displacement sensor to the highest point of the rod (up to
the cap) and pivot it vertically.
Do not knock or pivot the block located at the end of the sensor.
Cross block
Blocking foam

Certified Company ISO 13485 : 2016, NF EN ISO 13485 : 2016 by
LNE GMED
10
GNRB FT.02.008 O EN
5.2.Connections
Connect the power supply cable to the GNRB®, and then connect the PC to the device using the
USB cable.
Connect the power supply unit to the mains (230 V –50 Hz).
When
t
he GNRB® is powered a green ligh
t
shows.
When the connections are all made and the GNRB® is switched on, switch on the PC.
The front

Certified Company ISO 13485 : 2016, NF EN ISO 13485 : 2016 by
LNE GMED
11
GNRB FT.02.008 O EN
6. USING THE GNRB® FOR THE FIRST
TI
M
E
6.1.Login GNRB application
When the application is launched, the following window appears:
Only the button “Start GNRB” is activated and allows to login the application.
When you click on this button, the following window appears:
The default “Login” and “Password” are admin and admin. You may then create or remove
accounts via the configuration page of the application (see « 7.5.4. Account management »)

Certified Company ISO 13485 : 2016, NF EN ISO 13485 : 2016 by
LNE GMED
12
GNRB FT.02.008 O EN
6.2. First time use
When you switch on the GNRB for the first time, we recommend that you change the administrator
login and password. To do so, go into the “Account management”tab, create a new user by
entering their name and password, tick the administrator box and then confirm by clicking on the
“Add” button. You can then remove the initial administrator account by typing “admin” into the
“search for user” box and clicking on “delete”.
You can now close the application. The next time it is launched, the new administrator login must
be used.

Certified Company ISO 13485 : 2016, NF EN ISO 13485 : 2016 by
LNE GMED
13
GNRB FT.02.008 O EN
7. DESCRIPTION OF THE GNRB®
SOFTW
AR
E
7.1.Toolbar
Located at the top of the screen, the toolbar is used to launch the various commands listed
below. It also displays the ID, date, last name and first name of the selected patient.
To add a new patient.
To register a new patient or make changes to the file of an existing pa
t
ien
t.
T
o reload patient data stored in the database.
To permanently remove a patient from the database (this icon only appears once the first
patient has been registered).
Patient's identifier.
To search for and upload a patient from the database use the green “Load” button.
If some patients have the same last name and first name, after choosing the last name and
first name, the drop down menu gives you a list of the birth dates matching the name, then
you can choose the right patient.
7.2.Patient file tab
7.2.1. Identity f
orm
This section allows you to enter personal information about a patient and to store it in a database.

Certified Company ISO 13485 : 2016, NF EN ISO 13485 : 2016 by
LNE GMED
14
GNRB FT.02.008 O EN
To record a new patient, you have to complete « Last Name », « First Name » and
« Date of Birth ». The rest of the information is optional.
After creating a new patient file, having filled in at least the Last Name and First Name, register the
pa
t
ien
t
by clicking on
t
he “disk” icon on
t
he
t
oolbar
:
A unique ID is automatically attributed to the patient (this can be used for statistical studies, for
example).
To enter a new patient, click on the icon located on the toolbar.
To call up the file of a registered patient, you simply need:
to type their last name and first name in the relevant boxes located on the right-hand side of
the toolbar. Confirm by clicking on “Load”or,
to type the date of their last consultation (on the right of the name boxes) and to choose
from the list given by the drop down menu. Confirm by clicking on “Load”.
7.2.2. Medical
in
f
o
rmat
ion
This section is for recording the medical history of a patient.
The "Medical Practitioner" box is used for displaying the name of
t
he pra
ct
i
t
ioner
who is to use the GNRB®. This box is automatically filled by the name supplied in
the box “Default Specialist name” located in the configuration tab
The “General practitioner” is for entering the name of the doctor who re
f
erred
t
he
patient.
The “Medical History” chart is used to list the patient’s previous medical problems.
For this :
click on the 1st box of an empty line to enter the date in a MM/DD/YYYY
format (M: month / D: day / Y: year),
click on the 2nd box to add information about the Medical History.

Certified Company ISO 13485 : 2016, NF EN ISO 13485 : 2016 by
LNE GMED
15
GNRB FT.02.008 O EN
The MRI is for listing observations following an MRI. This chart is completed in
t
he
same way as for “Medical History”.
After having made changes to the “Medical History”or “MRI”charts of a patient,
you must remember to save the information by clicking on .
7.2.3. Additional examinations
IKDC:
These charts allow you to manually enter the results of the knee examinations. To enter test
results:
click on the 1st box of an empty line to enter the date in a MM/DD/YYYY format
click on the 2nd box to indicate if it is the left or the right knee
click on the following boxes to give the test results
After having made changes to the “IKDC”chart of a patient, you must remember
t
o
save t
h
e
in
f
o
rmat
ion
b
y c
li
ck
ing
on
Activity level:
These charts are to indicate the activity level on the date of the examination. To enter test results:
click on the 1st box of an empty line to enter the date in a MM/DD/YYYY format
click on the following boxes to give the activity level declared by the patient.
After having made changes to the “Additional examinations” chart of a patient,
you must remember to save the information by clicking on

Certified Company ISO 13485 : 2016, NF EN ISO 13485 : 2016 by
LNE GMED
16
GNRB FT.02.008 O EN
7.3. GNRB test preparation tab
This tab enables you to program and perform a test.
7.3.1.
S
ett
ing
s
Compulsory information:
Click on the correct button :
choose the right or left knee,
enter information about the state of the knee: healthy, pathological or operated.
In the box "Distance base-foot”, you must enter the distance between the patient’s foot and the
edge of the GNRB® (use the rule as a marker). This information is normally supplied during a
first test and subsequently acts as a reminder. When preparing the following test, the value
entered will appear in brackets next to the field.
7.3.2. Co
n
tr
ols
To connect the computer to the GNRB®, click on the “Connect” button.
O
nce
t
he
connection is established, the name of the port or the USB convertor to which the GNRB®
is connected appears on the right-hand side. The button is then grey and inoperative.
If this is not the case, the connection has failed. Check that the USB cable between the
computer and the GNRB® is correctly plugged in.
Click again on the connection button.
If the connection still fails, contact GENOUROB® by email on contact@genourob.com.
Click on "Start” to perform a test. A window then appears, summarizing
t
he test settings.
Confirm by clicking on “Yes” or cancel by clicking on “No”.
Click on "Calibration”to calibration test. 3 tests are performed to define a covariance. To be
displayed in the results table
The “Exit”button allows you to close down the application.

Certified Company ISO 13485 : 2016, NF EN ISO 13485 : 2016 by
LNE GMED
17
GNRB FT.02.008 O EN
7.3.3. GNRB status
Once connected to the GNRB, this window provides information about the status of the sensors, as
well as the previous and current patella pressure readings.
When the distance sensor is in place and correctly positioned on the pa
t
ien
t
(
t
he
metal rod must extend 5mm minimum and 25mm maximum), an “OK” message
appears on the relevant line.
If this is not the case, an “OFF”message appears.
Likewise, the device displays the force exerted by the calf on the plate.
If the ERROR message appears, the sensor is faulty. You should then contact the
GENOUROB® maintenance service.
Otherwise, it is in the “OK”position.
The test can only be started if the two functions described a
bo
ve are working correctly, with
the distance sensor OK and the calf se
n
s
o
r not displaying
E
RR
O
R
.
7.3.4. Push force
You can do the test for 4 different push force modes. TO change the force applied, click on the
arrow on the drop down menu:
The “100”mode enables you to perform tests up to 100 Newtons, whil
st
recording
displacements for the thresholds 100 N.
The “134”mode enables you to perform tests up to 134 Newtons, whil
st
recording
displacements for the thresholds 100 N and 134N.
The “150” mode enables you to perform tests up to 150 Newtons, whil
st
recording
displacements for the thresholds 100N, 134N, and 150N.
The “200” mode enables you to perform tests up to 200 Newtons, whil
st
recording
displacements for the thresholds 100N, 134N, 150N, and 200N.

Certified Company ISO 13485 : 2016, NF EN ISO 13485 : 2016 by
LNE GMED
18
GNRB FT.02.008 O EN
7.3.5. Number of test measurements
When a test is performed, one recording is made by default. You can, however, change the
position of the cursor shown above, to enable 1 or 3 measurements to be performed consecutively.
The average of these results is then transmitted to the software. In this configuration after 3
pressure cycles, the displacement will only be recorded for the last 2 cycles.
7.3.6 Radiology Option
When this option is enabled, the GNRB launch one push and the tibia is blocked in high position
during 5 s (time needed to take a radio).
7.3.7. Contraction Option
When this option is enabled, the muscular contraction is recorded during the test. Electrodes must
be placed on the patient.In the data table, a « C » appears at the end of the record line, to inform
the user that a muscular contraction has been recorded during the test and the result of the test can
be wrong.
7.3.8. Data table
The « Data table » allows you to immediately view the results of a test that has just finished. Only
measurements for the reference push forces at 134 N are visible.

Certified Company ISO 13485 : 2016, NF EN ISO 13485 : 2016 by
LNE GMED
19
GNRB FT.02.008 O EN
In the column S2 is the slope of curve of the test between 100 and the maximum pressure.
This slope is in µm per Newton. This is the gradient of the best-fit line.
7.4.The results tab
This Tab enables you to display, delete, print and export to Excel, the results of the tests recorded
in the database.
7.4.1. Selecting results
A test can be selected or deselected by ticking the corresponding box.
By default, the application selects and displays the last 4 saved tests. This number can be
changed in the configuration tab.
The “Display” button produces a graph with the ticked tests.
The "Delete” button: warning –this button permanently deletes all the data o
f
t
he
ticked tests. The deletion takes place both in the database and in the results
table. Deletion is irreversible.
The "Report PDF”button allows you to print the ticked tests and their graphs or
Calibration Table in the pdf file. This file is saved in the ‘C:\Documents\PDF
Genourob’.
When you click Report PDF, is it possible to write a comment : a
new windows with field comment appears and it is including in
t h e P D F b o t t o m , i f y o u c l i c k ‘ O K ’ .
Click on the button 'result / calibration' and then you can see the results of the tests or
the calibrations of GNRB tests.
“Export All.” : all results are exported in an Excel file

Certified Company ISO 13485 : 2016, NF EN ISO 13485 : 2016 by
LNE GMED
20
GNRB FT.02.008 O EN
7.4.2. Graphs
The graphs enable you to view the results of the test selected in the GNRB® table.
By default, the x axis shows the force exerted under the calf, whilst the y axis shows
the corresponding displacement.
It is possible to reverse the axes through the setup tab (See Setup tab chapter).
the curves in red shows the test results of pathological knee,
the curves in green shows the test results of a healthy knee,
the curves in blue, shows the test results of an operated knee,
the darker the curves, the older they are.
Several options are available by right-clicking on the graph.
In the menu which appears:
Copy allows you to copy the graph into the clipboard.
Save image under... allows you to save the graph.
Lay out... allows you to set the lay-out of the graph before printing.
Print... allows you to print the graph.
Display point values allows you to display the value of a point by poin
t
ing
t
he cursor at the
curve. (x,y) appears, with x representing the force and y the displacement.
Cancel zooms allows you to cancel previous zooms one by one.
Cancel all zooms allows you to cancel all previous zooms.
Reset scale allows you to return to the default scale.
Table of contents
Other genourob Medical Equipment manuals