manuals.online logo
Brands
  1. Home
  2. •
  3. Brands
  4. •
  5. Gerber
  6. •
  7. Plumbing Product
  8. •
  9. Gerber 49-730 User manual

Gerber 49-730 User manual

1
PREPARATION INSTRUCTIONS /INSTRUCCIONES
DE PREPARACIÓN /INSTRUCTIONS DE PRÉPARATION:
INSTALLATION / INSTALACIÓN /INSTALLATION
• WATER SUPPLY LINES MUST BE SIZED TO PROVIDE
AN ADEQUATE VOLUME OF WATER FOR EACH
FIXTURE.
DEBE EVALUARSE EL TAMAÑO DE LOS CONDUCTOS
DE ALIMENTACIÓN DE AGUA PARA OBTENER UN
VOLUMEN DE AGUA ADECUADO EN CADA APARATO
SANITARIO.
LES CONDUITES D’EAU DOIVENT ÊTRE DE LA BONNE
DIMENSION POUR FOURNIR LE VOLUME D'EAU ADÉ-
QUAT À CHAQUE APPAREIL.
• FLUSH ALL WATER LINES PRIOR TO INSTALLING
FLUSHOMETER.
ENJUAGUE TODOS LOS CONDUCTOS DE AGUA ANTES
DE INSTALAR LA VÁLVULA DE LIMPIEZA
AUTOMÁTICA.
RINCER TOUTES LES CONDUITES D’EAU AVANT
D’INSTALLER LE ROBINET DE CHASSE D’EAU.
Gerber Plumbing Fixtures LLC.
2500 Internationale Parkway, Woodridge, IL 60517, U.S.A.
(Sales Office/Oficina de ventas/Bureau de vente)
Toronto: 189 Earl Stewart Drive, Unit #5, Aurora, ON L4G 6V5, Canada
(CS & Tech/SC y Tec./SC et Tech)
Montreal: 4610 Bois Franc, Montreal, QC H4S 1A7, Canada
www.gerberonline.com 1-888-648-6466
®
P
R
O
F
E
S
S
I
O
N
A
L
P
E
R
F
O
R
M
A
N
C
E
GERBER
SAFETY TIPS
•
•
•
•
•
•
Caution: If you use soldering for the installation of this faucet, the seata
cartridges and washers will have to be removed before turning on the
flame. Damage to the cartridge and seats will occur if left intact while
soldering and will result in the warranty being void on these parts.
Cover your drain to avoid loosing parts.
CONSEJOS DE SEGURIDAD
Advertencia: Si usa soldadura para la instalación de este grifo, remueva los
componentes internos y las arandelas antes de encender la llama. Si no se
remueven, estas piezas se dañarán durante la soldadura, lo que resultará
en la anulación de la garantía para estas piezas.
Tape la boca del desagüe para prevenir la pérdida de piezas pequeñas.
CONSEILS DE SÉCURITÉ
Attention : Si vous effectuez l’installation de ce robinet par soudage, vous
devez enlever les èges de cartouche et les rondelles avant d’allumer la
flamme. La cartouche et les sièges seront endommagées s’ils sont laissés
en place lors du soudage, entraînant ainsi l’ annulatio de la garantie de
ces pièces.
Couvrez le drain à fin de ne pas perdre de pièces.
Shown
/ Mostrado
/ Illustré
49-730
49-731
49-733
Ruler
Regla
Règle
Driller
Taladradora
Perceuse
Marking pencil
Marqueur
Lápiz marcador
TOOLS REQUIRED:/HERRAMIENTAS NECESARIAS: /
OUTILS REQUIS:
Safetemp
™
Pressure Balance Tub And
Shower Faucet
Safetemp
™
Grifo de presión balanceada
para bañera y ducha
Safetemp
™
Robinet à régulateur de
pression pour bain et douche
Please note: For proper function, this valve has to be used with shower
heads rated at 2.0 GPM (7.57 LPM) or higher.
10/17
Thank you for buying GERBER products!
ID# Description Chrome
1 ....... Shower Assy. .................... Not Sold
2 ....... Shower Head ..................... 49-199
3 ....... Shower Arm ...................... 49-111-G
4 ....... Flange ............................... 92-021
5 ....... Delux Showerhead ............ Not Sold
6 ....... Slip Spout ......................... 98-241
......... Spout w/IPS ...................... 92-573
7 ....... Safetemp Escutcheon ........ 97-018
8 ....... Trim Sleeve ....................... 92-330
9 ....... Loop Hndl. Botton ............ 92-276
10 ..... Safetemp Handle ............... 97-020
11 ..... Hrdwtr. Hndl. Button ........ 94-211
12 ..... Hrdwtr. Handle Assy. ........ Not Sold
13 ..... Screw Package .................. 97-016
ID# Description Unfinished
14 ..... Cast Body w/IPS Connections ......................... Not Sold
15 ..... 1/2” MIPSx1/2”FIPS ........................................ Not Sold
16 ..... Cast Body w/Solder Connections .................... Not Sold
17 ..... 1/2”Cx1/2”C Stop / Solder .............................. Not Sold
18 ..... O-Ring ............................................................. 92-257
19 ..... Pressure Balance Cartridge S/A ....................... 97-014
20 ..... Pressure Balance Stem & Bonnet S/A ............. 97-022
21 ..... Safetemp Temperature Limit ............................ 92-294
22 ..... Bonnet for Pressure Balance Shower ............... 92-329
23 ..... 1/2” NPT Plug ................................................. 97-302
24 ..... Plug for Solder Connection ............................. 97-333
FLOWRATE (gpm)
PRESSURE (gpm)
GERBER SAFETEMP & HARDWATER
PRESSURE BALANCE VALVE
1.0
2.0
3.0
4.0
5.0
6.0
7.0
0.0 10 20 30 40 50 60 70 80 90 100
CAUTION:
Do not use scouring pads,
acid-based chemicals, or abrasive
cleaners to clean your faucet!
This will cause damage to the plated
or painted finishes!
TheAnatomyofYour Product
Be sure that you’re buying genuine GERBER replacement parts!
23
16 7
4
3
2
1
5
9
6
11
12
13
8
22
20
19
18
14
15 16 24
10
PLASTER
GUARD
21
17
1. Use a level, tape measure,
and pencil to locate center
lines of valve body, shower
arm, and tub spout.
2. Align the plaster guard
with the drawn lines and
trace an outline of the
plaster guard.
4. Cut out the traced plaster
guard outline 1/8” larger than the
original tracing. Use hole saws
and a fine-toothed handsaw to
remove wall material.
5. Mount valve body per rough-
in or thin wall application.
Attach water supply lines and
outlet lines. Attach plaster guard
for grouting tiles or other forms
of interior finishing.
6. Install the trim and hardware.
Flush the piping system for one
minute. Attach the spout and
showerhead.
Balance Instructions
Simplified:
Safetemp™Pressure
GERBER
Adjusting the Limit Stop:
The Limit Stop allows
you to control the amount of
HOT water so you can enjoy a
consistently safe water temperature.
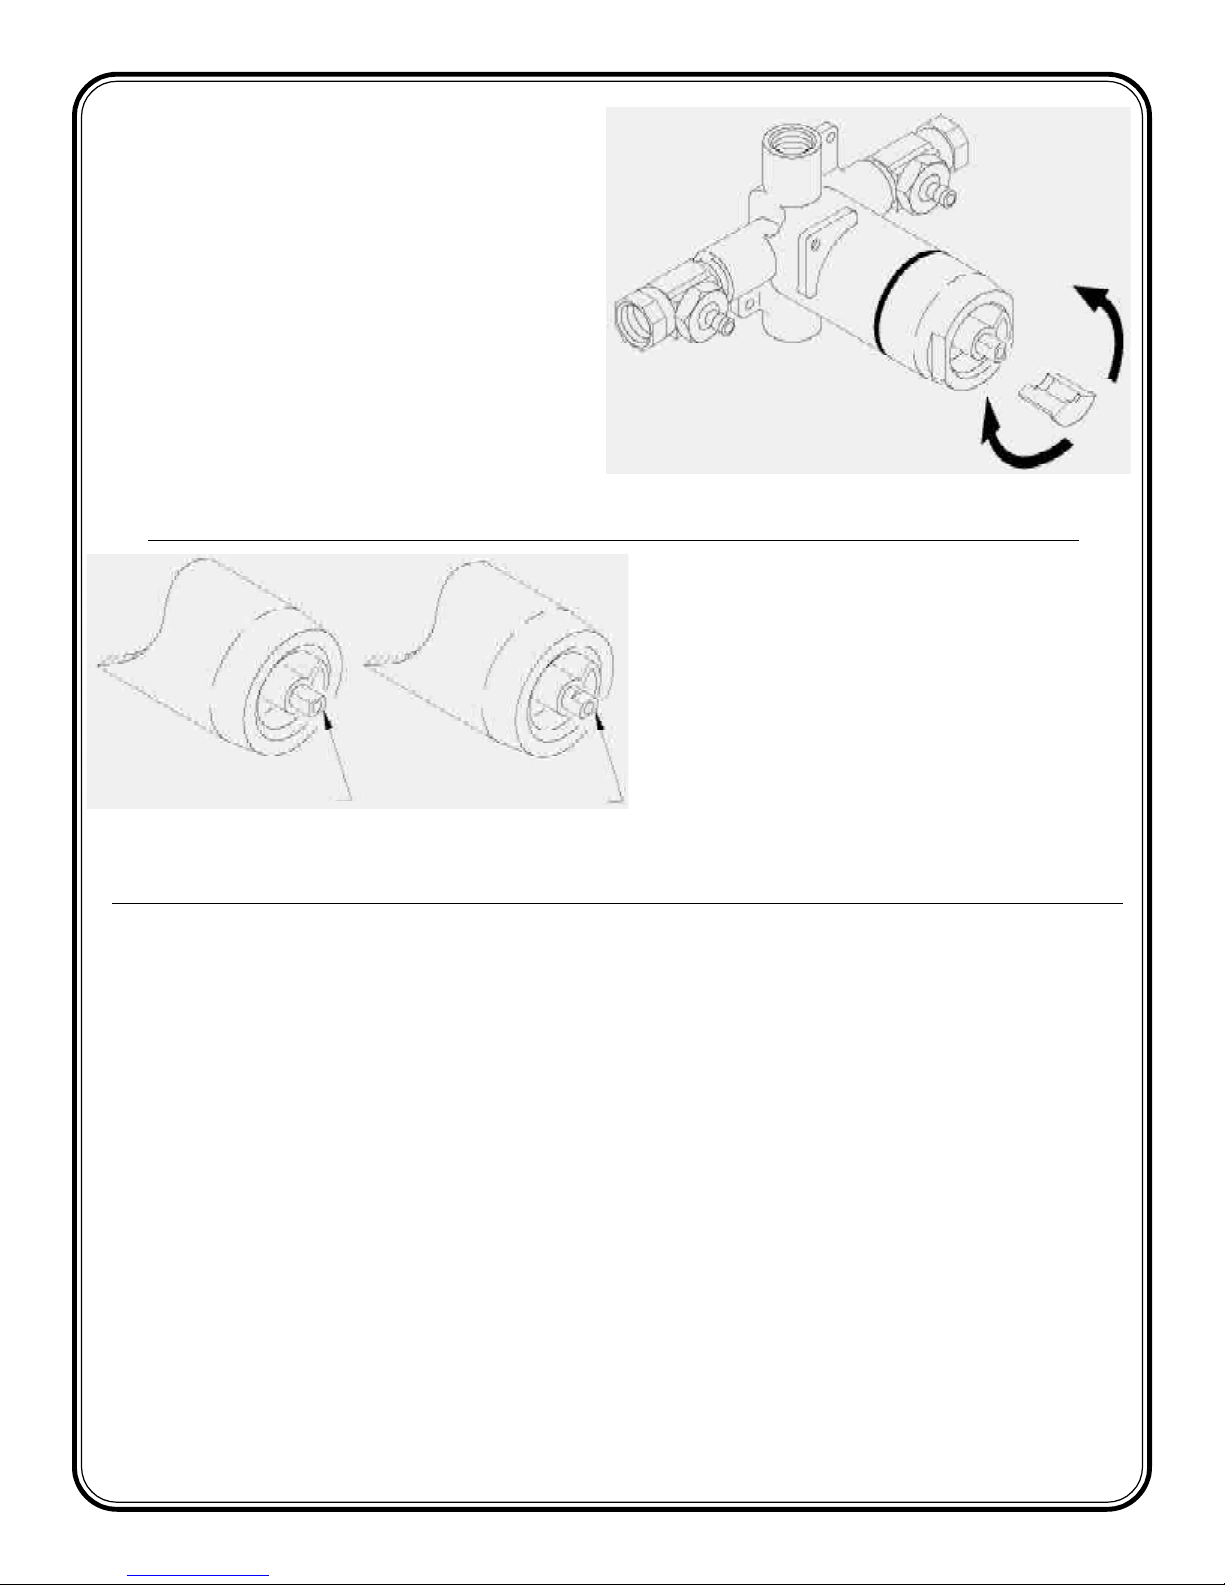
Back-to-Back Installationor
HOTand COLD water supply
inlets reversed
1. Remove the handle.
2. Rotate the brass stem 180° so that the
short flat side is UP.
3. Reassemble the handle.
4. Check the water temperature and reset
the limit stop if required.
Brass Stem rotated
180° for non-standard
water inlet configuration:
cold on left and hot on right
Brass Stem set to
standard water inlet
configuration: cold on
right and hot on left
LIMITED LIFETIME WARRANTY - CARTRIDGES
GPF warrants that the ceramic disc cartridge (the valve control of the faucet) will not leak or drip for as long as it is owned by the
original purchaser. If the ceramic disc cartridge malfunctions or proves defective upon inspection by GPF after the valve has been
returned, then GPF will repair or replace such part, at GPF's option, free of charge.
GPF warrants that the washerless or compression type cartridge (the valve control of the faucet) will not leak or drip for a period of
ten (10) years from the date of original purchase, as shown on the original consumer-purchaser's receipt. If the washerless or compres-
sion type cartridge malfunctions or proves defective upon inspection by GPF after the valve has been returned, during the 10-year
warranty period, then GPF will repair or replace such part, at GPF's option, free of charge. This Ten (10) Year Limited Warranty only
applies to repair or replacement of defective washerless or compression type cartridge
TWO (2) YEAR LIMITED WARRANTY ON OTHER PARTS
GPF warrants to the original consumer-purchaser of this product that for a period of two (2) years from the date of original purchase,
this product will be free from defects in material and workmanship under normal, reasonable use in accordance with product instruc-
tions. All mechanical faucets/fittings installed in accepted commercial installations carry a two (2) year limited warranty. All labor,
shipping, and freight costs and any other charges incidental to warranty and service are to be borne by the original consumer-purchas-
er.
As the exclusive remedy for any breach of the above warranties, GPF agrees, at GPF's option, to repair or replace this product or any
part thereof, which proves, upon inspection by GPF after such product is returned, to be defective in material or workmanship.
GPF will not be liable for any labor, shipping, freight, or any other costs or charges incurred in connection with removal or replacement
of the product or otherwise acting upon the above warranties, or for any costs associated with repair or replacement of any other
personal property, building or installation materials. Installation or use of the faucet or valve not in accordance with product instruc-
tions, or improper use, abuse or neglect of, or accident to, the faucet or valve, or moving the product from the location of its original
installation will void the above warranties.
If the Federal Consumer Product Warranties Act applies to the original purchaser of this product, then any implied warranties which
may be applicable under state law, such as any implied warranty of merchantability or any implied warranty of fitness for a particular
purpose, are limited with respect to the ceramic disc cartridge to twenty (20) years, washerless or compression type cartridge to ten
(10) years and with respect to all other parts to two (2) years.
The above warranties give you specific legal rights, and you may also have other rights which vary from state to state. Certain
federal and state laws may limit or disallow disclaimers of incidental or consequential damages and/or limitations on implied
warranties.
For Technical service, call 888-648-6466
There is a factory temperature preset which
can bechanged by removing the LIMIT STOP.
See theexploded assembly for identification.
Do not exceed 120° Fahrenheit!Local
Plumbing Code will specify the maximum
temperaturesettings for the LIMIT STOP.
1. Pull out the TEMPERATURE LIMIT STOP.
2. Rotate the limiter Counter-Clockwise for
COLDand Clockwise for HOT.
You may have to Seasonally adjust your limit
stop.1
. Due to seasonal climate temperature chang-
es youmay have to make minor adjustments
to the limitstop. During the summer months
readjust it for acooler setting and in winter
for a warmer setting.

This manual suits for next models

2

Other Gerber Plumbing Product manuals

Gerber 40-445-W User manual

Gerber

Gerber 40-445-W User manual

Gerber G0040500 User manual

Gerber

Gerber G0040500 User manual

Gerber C0-44-454 User manual

Gerber

Gerber C0-44-454 User manual

Gerber D224530 User manual

Gerber

Gerber D224530 User manual

Gerber D303257 User manual

Gerber

Gerber D303257 User manual

Gerber 43-010 User manual

Gerber

Gerber 43-010 User manual

Gerber Gerber 40-575 User manual

Gerber

Gerber Gerber 40-575 User manual

Gerber 40-010 User manual

Gerber

Gerber 40-010 User manual

Gerber D434437 User manual

Gerber

Gerber D434437 User manual

Gerber 43-040 User manual

Gerber

Gerber 43-040 User manual

Gerber 40-584 User manual

Gerber

Gerber 40-584 User manual

Gerber G0049234 User manual

Gerber

Gerber G0049234 User manual

Gerber G0043071 User manual

Gerber

Gerber G0043071 User manual

Gerber 43-431 User manual

Gerber

Gerber 43-431 User manual

Gerber D150557 User manual

Gerber

Gerber D150557 User manual

Gerber 40-188 User manual

Gerber

Gerber 40-188 User manual

Gerber Viper G0040167 Assembly instructions

Gerber

Gerber Viper G0040167 Assembly instructions

Gerber 49-274 User manual

Gerber

Gerber 49-274 User manual

Gerber D460134 User manual

Gerber

Gerber D460134 User manual

Gerber danze D304162 User manual

Gerber

Gerber danze D304162 User manual

Gerber 43-016 User manual

Gerber

Gerber 43-016 User manual

Gerber G0042116 User manual

Gerber

Gerber G0042116 User manual

Gerber G0041810 User manual

Gerber

Gerber G0041810 User manual

Gerber Danze D454058 User manual

Gerber

Gerber Danze D454058 User manual

Popular Plumbing Product manuals by other brands

DURAVIT P3 Comforts 720151 Mounting instructions

DURAVIT

DURAVIT P3 Comforts 720151 Mounting instructions

Kohler 8881T-VC01-BN installation instructions

Kohler

Kohler 8881T-VC01-BN installation instructions

DURAVIT XViu XV 7048 Mounting instructions

DURAVIT

DURAVIT XViu XV 7048 Mounting instructions

Gessi ORIGINI 66088 manual

Gessi

Gessi ORIGINI 66088 manual

ICO KONTOUR K4013E installation instructions

ICO

ICO KONTOUR K4013E installation instructions

Acorn MERIDIAN 3753-HLH Installation, operation and maintenance manual

Acorn

Acorn MERIDIAN 3753-HLH Installation, operation and maintenance manual

Brizo T71764 Series manual

Brizo

Brizo T71764 Series manual

Moen Kingsley 6101 Series Specifications

Moen

Moen Kingsley 6101 Series Specifications

Kohler LUSTRA installation instructions

Kohler

Kohler LUSTRA installation instructions

Moen 84576 Series manual

Moen

Moen 84576 Series manual

Elkay LKEC2031AS Installation & owner's manual

Elkay

Elkay LKEC2031AS Installation & owner's manual

Hans Grohe AXOR ShowerCollection 10650180 Assembly instructions

Hans Grohe

Hans Grohe AXOR ShowerCollection 10650180 Assembly instructions

Moen 69000 user guide

Moen

Moen 69000 user guide

SmartBidet SB-100R user manual

SmartBidet

SmartBidet SB-100R user manual

Tres Study Exclusive 26218003 instructions

Tres

Tres Study Exclusive 26218003 instructions

ADCA AE30 Installation and maintenance instructions

ADCA

ADCA AE30 Installation and maintenance instructions

Taymor ASTRAL 06-4029P installation instructions

Taymor

Taymor ASTRAL 06-4029P installation instructions

Laufen CITYPRO S Series manual

Laufen

Laufen CITYPRO S Series manual

manuals.online logo
manuals.online logoBrands
  • About & Mission
  • Contact us
  • Privacy Policy
  • Terms and Conditions

Copyright 2025 Manuals.Online. All Rights Reserved.