GET SX1 PRO 4T User manual

1EN
V.1
ECUs FOR 4-STROKE FUEL
INJECTED MX ENGINES
SX1 PRO 4T IT
EN
ES
FR
DE
PT
GUIDE
GUIDA
GUÍA
GUIDE
HANDBUCH
GUIA
INJ 2

2EN
THE FOLLOWING MANUAL AND PROCEDURES
REFER TO THE BASIC INSTALLATION OF GET
SX1 PRO KIT. CHECK THE SPECIFIC MANUAL
SECTION ON ATHENA.EU TO VERIFY IF YOUR
MACHINE REQUIRES A FURTHER SPECIFIC
PROCEDURE.
ENGLISH
Scan the QR code
https://www.athena.eu/en-us/corporate/get-instruction-manuals
A. WARNINGS FOR CORRECT USE
Read all the instructions and warnings carefully before using GET
SX1 PRO ECUs. Failure to read and/or observe the instructions
and warnings can lead to incorrect use of the device or its
malfunction, resulting in product damage and personal injuries.
SX1 PRO KIT IS INTENDED ONLY AND EXCLUSIVELY
FOR RACING USE.

3EN
SAFETY PRECAUTIONS
1. Follow the instructions described in this manual to prevent
vehicle damage.
2. Do not modify or replace the material supplied by GET.
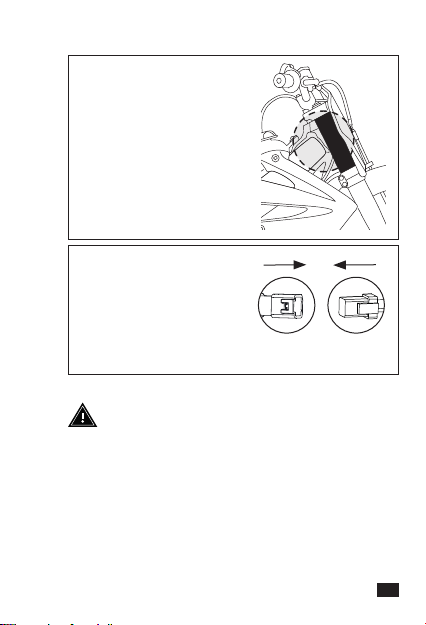
3. Always make sure that no installed part can interfere with
the hot parts of the engine, the steering components or with
the rider.
4. The product is not a toy. Keep it out of the reach of children
and/or animals as it contains small sized components that
could be swallowed.
5. Do not use the product for purposes other than those
specified in these instructions.
6. Do not use high pressure washers on the product.
IMPORTANT INFORMATION
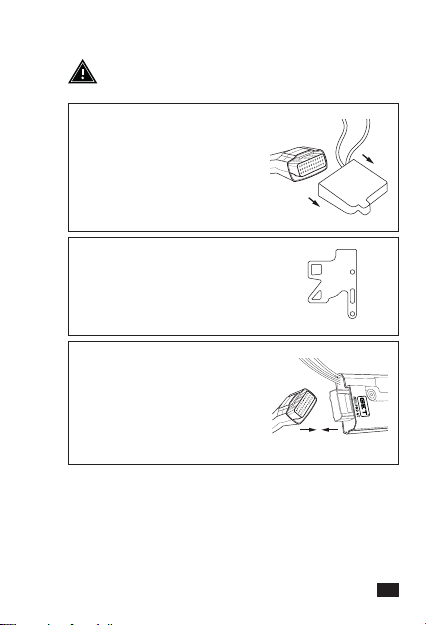
1. Always make sure that SX1 PRO ECU is properly installed and
functional prior to use.
2. Never expose the device to temperatures above 70°C/158°F.
3. Install it when the engine is cold.
4. SX1 PRO ECU may not work properly if the OEM TPS sensor
is damaged or modified.
5. The RPM limiter threshold of the SX1PRO maps is higher
than the standard ECU.
6. To make advanced level changes to the GET SX1 PRO
injection map, it is necessary to use GET Maya programming
software (sold separately).
7. If the bike does not start or the engine is irregular, be sure
that the GET SX1 Pro ECU chosen is compatible with your bike
model and year, verify that the ECU is properly connected and
perform a TPS calibration.
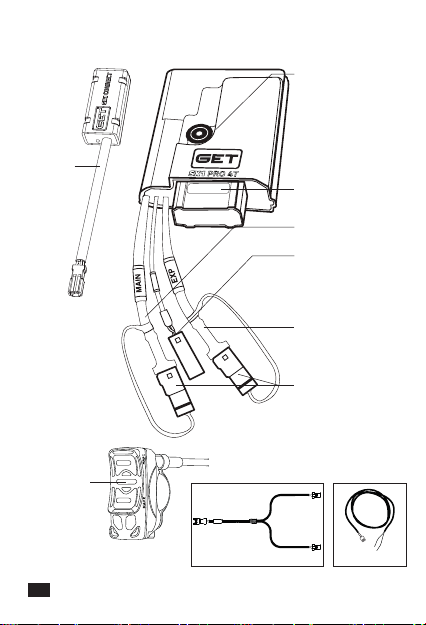
8.The GET ECU supports the connection of multiple devices, such
as SX1 CONNECT, SX1 CONTROLLER, LC-GPA, QUICKSHIFTER,
GPA SWITCH, SL-1 SMART LOGGER:
-to connect up to two devices, use the GL-264-AA harness
(included in the SX1 PRO kit).
-to connect up to four devices, use the GL-266-AA harness
(sold separately).

4EN
B. SX1 PRO 4T PRODUCT LAYOUT
SX1
Connect
SX1
Controller
INJ 2
Barometric Sensor
Wiring Connector
MAIN Connector
Second Injector
Connector
(depending on the
bike)
EXP connector
Protection Caps
ECU
LOTTO
RESET TPS CABLE
HARNESS GL-264-AA

5EN
SX1 PRO 4T is a fully programmable plug&play electronic
control unit. It’s the best solution for both standard and
modified engines.
MAIN FEATURES OF SX1 PRO:
• Get the best performance from your engine
The SX1 Pro kit is a racing kit developed to work perfectly on
standard engines, but also on motorcycles with racing exhaust
systems. This kit makes it possible to get the most out of all
engines without compromising their reliability.
• Easy to install and program
The SX1 Pro ECU is plug&play and does not require tools for
installation. Install it in minutes and get ready to hit the track.
• Two pre-installed racing maps
The SX1 Pro ECU comes with two reprogrammable maps
developed by the GET R&D department:
- Map 1: Racing
- Map 2: Racing with GPA “Traction Control” Level 5.
The SX1 PRO kit includes the SX1 CONTROLLER e SX1 CONNECT,
the essential tools to excel designed using the constant research
and development that GET carries out in major international
competitions.
SX1 CONTROLLER is an innovative multifunction handlebar
control that enables drivers to activate and manage a series of
advanced functions:
- Map selection
- GPA “Traction Control”
- Launch Control
- Quickshifter
- Engine overheating signal
The device is also equipped with LEDs that allow all this
information to be easily viewable, ensuring intuitive and
immediate control of the motorbike’s performance.
Features and display modes can be customized via WiFi using the
SX1 Connect module.

6EN
SX1 CONNECT is the most advanced WiFi module designed to
connect to the ECU to set mapping parameters directly from
a smartphone or tablet: you can safely modify injection map
parameters and advance settings through WiGET, the free GET
App, and professionally adjust all the specific data using Maya,
the GET programming software which lets you configure the
control unit completely.
Furthermore, you can use the integrated “Monitor” function to
view operating and diagnostic data in real time and the hours of
use of the control unit. You can also obtain information on the
status of the motorbike and schedule maintenance intervals.
The SX1 Pro Tuner kit, which includes only the GET SX1 Pro ECU,
instead presents a blank and fully customizable control unit to
allow maximum flexibility.
WiGET App

7EN
C. SX1 PRO INSTALLATION
1. Find the OEM ECU: check
in your motorbike’s workshop
manual where to find it. Press
the retainer clip of the OEM ECU
connector before pulling it: make
sure to remove the connector
without damaging it.
2. Place and fix the support bracket
(if included) to insert SX1 Pro.
3. Connect SX1 PRO to the OEM
connector. When supplied, use GET
adaptor connector. Make sure the
connector is properly plugged in,
and the retainer clip is fully engaged.
REMEMBER TO WORK UNDER SAFETY CONDITIONS
AND TO KEEP THE ENGINE TURNED OFF.
OEM

8EN
ATTENTION
D. INSTALLING ACCESSORIES
SX1 CONTROLLER INSTALLATION
1. Install the SX1
CONTROLLER on the
handlebar.
2. Connect the ECU connector
of the GL-264-AA harness
(included in the SX1 PRO
kit) to the MAIN cable of the
control unit.
3. Connect the SX1
CONTROLLER connector to
one of the two connectors
of the GL-264-AA harness
(included in the SX1 PRO kit).
•After installation, make sure that the wiring does not impede
the free movement of the handlebars in either direction or
interfere with the moving components of the motorcycle (for
example, the transmission) or inconvenience the rider (for
example, in the boot area).
•The unused connector of the GL-264-AA harness will later be
used to connect SX1 CONNECT (see the next point of the SX1
CONNECT INSTALLATION instructions).
•Consult the dedicated manual for instructions on how to
activate, set and adjust the functions of the SX1 CONTROLLER.
CONTROL
UNIT
SX1 CONTROLLER
ECU HARNESS
GL-264-AA
HARNESS
GL-264-AA

9EN
ATTENTION
INSTALLATION of SX1 CONNECT
1. Install SX1 CONNECT in a
well-protected point on the
motorcycle. Secure it with
clamps if you want to install
it on the upper part of the
front fork.
2. Connect the SX1 CONNECT
connector to the unused
connector of the GL-264-AA
harness.
•After installation, make sure that the wiring does not impede
the free movement of the handlebars in either direction or
interfere with the moving components of the motorcycle (for
example, the transmission) or inconvenience the rider (for
example, in the boot area).
•Consult the dedicated manual for a complete list of functions
and further details about SX1 CONNECT.
SX1 CONNECT HARNESS
GL-264-AA

10EN
E. ZERO TPS CALIBRATION for SX1 PRO 4T
Zero TPS calibration allows the ECU to correctly recognize when
the throttle is fully closed and ensure accurate readings of the
level of fuel injected into the combustion chamber. When installing
a new ECU or other accessories, such as a second injector, GET
recommends performing Zero TPS calibration.
ATTENTION: THE MINIMUM AND MAXIMUM TPS
VALUES ARE SAVED IF SIMILAR TO THE ORIGINAL
ONES, OTHERWISE SX1 PRO WILL DISCARD THE
VALUES BECAUSE IT WILL READ THEM AS INCORRECT.
REMEMBER TO WORK IN SAFE CONDITIONS AND TO
KEEP THE ENGINE TURNED OFF.
LATCH MODE
LATCH MODE is a feature that uses the OEM battery to keep
the motorcycle system powered, so it is possible to perform
operations such as ZERO TPS and calibrations via SX1 CONNECT
(if included) or computer, without keeping the engine running.
HOW TO ENABLE IT :
Briefly push the start button (for less than 1 second) of the
vehicle to activate the starter motor but not to turn the engine on.
HOW TO DISABLE IT :
The latch mode will be automatically turned off:
- 3 minutes after first pressing the starter button or after
the last communication to the ECU by SX1 CONNECT or
computer;
- after 10 minutes of continuous communication to ECU by
SX1 CONNECT or computer;
- when battery voltage is below 12 volts;
- when starting the engine.

11 EN
PROCEDURE
1. Remove the
protective caps and
connect the RESET TPS
cable (included in the box)
to SX1 PRO ECU“MAIN”
connector.
2. Enable the LATCH
MODE function. Connect
a fully charged 12V
battery to the “RESET
TPS” cable: first, connect
the red wire to the
positive (+) pole and then
connect the black wire to
the negative (-) pole.
2 1
3. Twist the throttle
completely forward to
make sure it is in closed
position during this
operation. Press and
hold the engine stop
button for 5 seconds or
until the SX1- turns the
fuel pump and the MIL
(Malfunction Indicator
Lamp) light on (when
present). By doing this
operation, the minimum
TPS value is saved.
5 sec.

12EN
4. Twist the throttle
completely in open
position. While keeping
it open, press and hold
the engine stop button
for 5 seconds or until the
SX1 turns the fuel pump
on and the MIL light on.
By doing this operation,
the maximum TPS value
is saved.
5. Wait for the Latch
Mode function to
deactivate. If a battery
was used in point 2,
disconnect its wires from
the “RESET TPS” cable,
starting from the black
wire (-) and then the red
wire (+).
1 2
6.Unplug the RESET TPS
connector from SX1PRO
main connector and start
the engine.
5 sec.

13 EN
F. SYMBOLS
G. DISPOSAL
We declare that this product supplied is compliant with
RoHS Directive 2011/65/EU amended by the Directive
2015/863/EU (RoHS3) relative to the Restriction of
the Use of Certain Hazardous Substances.
Pursuant to art. 26 of Legislative Decree no. 49 of 14
March 2014, “Implementation of Directive 2012/19/
EU on waste electrical and electronic equipment
(WEEE)”.
The crossed-out wheelie bin symbol displayed on a product or its
packaging indicates that when the equipment reaches the end of
its life cycle it must be disposed of separately from other waste for
purposes of treatment and recycling. Once such products reach the
end of their life cycle, users may dispose of them free of charge at
special municipal centers for the collection of waste electrical and
electronic equipment, or return them to the distributor under one of
the following arrangements:
- very small products, i.e. equipment with no external dimension
exceeding 25 cm, may be returned with no obligation to buy to
distributors whose sales areas dedicated to electrical and electronic
equipment exceed 400 m². Distributors with smaller sales areas are
not obliged to participate in this scheme.
- products of dimensions greater than 25 cm may be returned to
distributors under a “one for one” arrangement, i.e., the distributor is
only obliged to receive the product in return for the purchase of a new,
equivalent product, with one new product being purchased for every
waste product returned.
The separate collection and subsequent processing of products for
purposes of recycling, treatment and environmentally sound disposal
helps avoid potentially harmful effects on the environment and
human health and facilitates the reuse/recycling of the materials
contained in the products. Users abusively disposing of products are
subject to the penalties applicable under the respective legislation.

14EN
H. “RACE USE ONLY DISCLAIMER”
Due to the particular operative and environmental conditions
under which the “Race Use Only” Products operate during
competitions, such Products may be subject to use under
extreme conditions, which may exceed the project limits and
control as set by ATHENA. ATHENA shall not have any liability
whatsoever in connection with the use of the “Race Use Only”
Products under extreme conditions during the competitions, nor
shall any “Product liability” apply in such case.
Therefore “Race Use Only” Products are excluded from any
form of guarantee.
The “Race Use Only” Products are designed and manufactured
for competitive-sporting use. Therefore, the “Race Use Only”
Products shall not be used on public roads. ATHENA shall not
have any liability whatsoever in connection with the use of
the “Race Use Only” Products in violation of such limits. Any
alteration of or tampering with the “Race Use Only” Products
may endanger their safety.
ATHENA shall not have any liability whatsoever in connection
with Client’s failure to comply with the instructions given by
ATHENA and/or in connection with their inappropriate and/
or incorrect installation on vehicles and/or with the lack of or
incorrect maintenance of such Products, nor shall any “Product
liability” apply in such cases.

15 EN

16IT IT
IL SEGUENTE MANUALE E LE PROCEDURE SI
RIFERISCONO ALL’INSTALLAZIONE DI BASE DEL
KIT GET SX1 PRO. CONTROLLARE LA SEZIONE
DEL MANUALE SPECIFICO SU ATHENA.EU PER
VERIFICARE SE LA PROPRIA MOTO RICHIEDE
UN’ULTERIORE PROCEDURA SPECIFICA.
ITALIANO
Scannerizzare il
codice QR
https://www.athena.eu/en-us/corporate/get-instruction-manuals
A. AVVERTENZE PER UN USO CORRETTO
Leggere attentamente tutte le istruzioni e le avvertenze
prima di utilizzare le ECU GET SX1 PRO. La mancata lettura e/o
osservanza delle istruzioni e delle avvertenze può portare ad un
uso scorretto del dispositivoo alrelativo malfunzionamento,con
conseguenti danni al prodotto e lesioni personali.
IL KIT DELLA CENTRALINA SX1 PRO 4T È INTESO
SOLO ED ESCLUSIVAMENTE PER L’USO RACING.

17 IT
PRECAUZIONI DI SICUREZZA
1. Seguire le istruzioni descritte nel presente manuale per
evitare danni alla moto.
2. Non modificare o sostituire il materiale fornito da GET.
3. Assicurarsi sempre che nessun componente installato possa
interferire con le parti calde del motore, con i componenti dello
sterzo o con il pilota.
4. Il prodotto non è un giocattolo. Tenere fuori dalla portata
dei bambini e/o degli animali, poiché contiene componenti di
piccole dimensioni che potrebbero essere ingeriti.
5. Non utilizzare il prodotto per scopi diversi da quelli specificati
nelle presenti istruzioni.
6. Non utilizzare idropulitrici ad alta pressione sul prodotto.
INFORMAZIONI IMPORTANTI
1. Assicurarsi sempre che la centralina SX1 PRO sia
correttamente installata e funzionale prima dell’uso.
2.Mai esporre il dispositivo a temperature superiori a 70°C/158°F.
3. Installarla quando il motore è freddo.
4. L’ECU SX1 PRO potrebbe non funzionare correttamente se il
sensore TPS originale è danneggiato o modificato.
5. La soglia del limitatore di giri delle mappe SX1 PRO 4T è
superiore a quella delle centraline standard.
6. Per modificare a livello avanzato la mappa dell’iniezione
di GET SX1 Pro, è necessario utilizzare il software di
programmazione GET Maya (venduto separatamente).
7. Se la moto non parte o il motore è irregolare, assicurarsi che
la centralina GET SX1 Pro scelta sia compatibile con il modello e
l’anno della propria moto, verificare che la centralina sia collegata
correttamente ed eseguire una calibrazione TPS.
8.La centralina GET supporta la connessione di più dispositivi,
quali ad es. SX1 CONNECT, SX1 CONTROLLER, LC-GPA,
QUICKSHIFTER, GPA SWITCH, SL-1 SMART LOGGER:
-per la connessione fino a due dispositivi utilizzare il cablaggio
GL-264-AA (incluso nel kit SX1 PRO).
-per la connessione fino a quattro dispositivi utilizzare il
cablaggio GL-266-AA (venduto separatamente).

18IT
B. LAYOUT DEL PRODOTTO
SX1
Connect
SX1
Controller
INJ 2
Sensore
barometrico
Connettore al
cablaggio
Connettore MAIN
Connettore al
secondo iniettore
(a seconda della
moto)
Connettore EXP
Tappi di protezione
ECU
LOTTO
CAVO RESET TPS
CABLAGGIO GL-264-AA

19 IT
SX1 PRO è una centralina plug&play completamente
programmabile ed è la soluzione migliore sia per i motori di
serie sia per quelli modificati.
CARATTERISTICHE PRINCIPALI DI SX1 PRO:
• Ottieni le migliori prestazioni dal tuo motore
Il kit SX1 Pro è un kit racing sviluppato per funzionare
perfettamente su motori standard, ma anche su moto con
scarico racing. Questo kit permette di raggiungere il massimo
da tutti i motori senza comprometterne l’affidabilità.
• Facile da installare e da programmare
La centralina SX1 Pro è plug&play e non richiede strumenti per
l’installazione. Installala in pochi minuti e preparati a scendere
in pista.
• Due mappe racing preinstallate
La centralina SX1 Pro nasce con due mappe riprogrammabili
sviluppate dal reparto R&D GET:
- Mappa 1: Racing
- Mappa 2: Racing con GPA “Traction Control” (Controllo di
trazione) Livello 5.
Il kit SX1 PRO include SX1 CONTROLLER e SX1 CONNECT,
gli strumenti indispensabili per eccellere frutto dell’attività
di ricerca e sviluppo portata avanti da GET nelle maggiori
competizioni internazionali.
SX1 CONTROLLER è un innovativo comando multifunzione a
manubrio che permette di attivare e gestire una serie di funzioni
avanzate:
- Selezione mappe
- GPA “Traction Control” (Controllo di trazione)
- Launch Control
- Gestione Quickshifter
- Segnalazione surriscaldamento motore
Tutte queste informazioni sono facilmente visualizzabili grazie ai
LED integrati nel dispositivo, assicurando un controllo intuitivo e
immediato delle prestazioni della moto.
Le funzionalità e le modalità di visualizzazione possono essere
personalizzate via WiFi utilizzando SX1 CONNECT.

20IT
SX1 CONNECT è il modulo Wifi più evoluto per la connessione a
centralina e consente il settaggio dei parametri di mappatura
direttamente dallo smartphone/tablet: modifica in totale
sicurezza i parametri mappa di iniezione ed anticipo tramite
WiGET, l’App gratuita GET, e regola professionalmente tutti i dati
specifici utilizzando Maya, il software di programmazione GET
che permette la configurazione completa della centralina.
Inoltre, tramite la funzione “Monitor” integrata di SX1 CONNECT,
puoi visualizzare i dati di funzionamento e di diagnostica
in tempo reale, le ore di utilizzo della centralina, ottenere
informazioni sullo stato della moto e programmare gli intervalli
di manutenzione.
Il kit SX1 Pro Tuner, che comprende solo la centralina GET
SX1 Pro, presenta invece una centralina vuota e totalmente
personalizzabile per consentire la massima flessibilità.
WiGET App
Table of contents
Languages:
Other GET Motorcycle Accessories manuals
Popular Motorcycle Accessories manuals by other brands

R&G
R&G RGH0007BK Fitting instructions

Chicago Electric
Chicago Electric 91214 Owner's manual & safety instructions

Dynojet
Dynojet POWER COMMANDER FC installation instructions

Sharper Image
Sharper Image 207559 user guide

Sicame
Sicame CATU MO-185 Series manual

KTM Power Parts
KTM Power Parts 79612917000 quick start guide