Getac PS236 User manual

Rugged Mobile Computing Solutions
PS236
USER MANUAL

Dec. 2011
Trademarks
Google and Android are trademarks of Google Inc.
The Bluetooth word mark and logos are owned by the Bluetooth SIG, Inc.
All other brand and product names are trademarks or registered trademarks
of their respective companies.
Disclaimer
Specifications and manuals are subject to change without notice. Getac
assumes no liability for damage incurred directly or indirectly from errors,
omissions, or discrepancies between the device and the manuals.
Notes
Depending on the specific model purchased, the color and look of your
device and accessories may not exactly match the graphics shown in this
document.
The screenshots and other presentations shown in this document are for
reference only. They may differ from the actual screens and presentations
generated by the actual product.
Your device is based on Google’s open-source Android 2.2 operating system.
However, it does not include Google’s closed-source applications such as
Gmail, Google Maps, Android Market, etc.
For the latest version of the manual, please visit the Getac website
at www.getac.com.
Detailed instructions on using Android 2.2 are also provided in the User’s
Guide available from Google’s website. Note that not all applications and
features described in Google’s document are supported by your device.
Android Version

i
Table of Contents
Chapter 1 Getting Started .............................................................1-1
Identifying Hardware Components.......................................1-1
Front Components..............................................................1-1
Back Components ...............................................................1-5
Top Components ................................................................1-6
Bottom Components ..........................................................1-6
Getting Your Device Ready for Use .......................................1-7
Installing the SIM Card and Battery ..................................1-7
Connecting to AC Power and Charging the Battery........1-9
Performing the Initial Startup .........................................1-10
Using Options........................................................................1-11
Using an SD Card ..............................................................1-11
Using the Tether ...............................................................1-13
Using the Hand Strap .......................................................1-14
Chapter 2 Basic Skills .....................................................................2-1
Waking Up and Shutting Down.............................................2-1
Waking Up ..........................................................................2-1
Shutting Down....................................................................2-1
Navigating on the Screen.......................................................2-2
Using the Stylus ..................................................................2-2
Using the Keypad ...............................................................2-2
Home Screen ...........................................................................2-3
Extensions to the Home Screen .........................................2-3
Items on the Home Screen .................................................2-4
Customizing Your Home Screen........................................2-5
Using the Launcher .................................................................2-6

ii
Working with Menus..............................................................2-7
Options Menus....................................................................2-7
Context Menus....................................................................2-7
Status Bar.................................................................................2-8
Quick Contact..........................................................................2-9
Entering Information............................................................2-10
Using the Onscreen Keyboard .........................................2-10
Editing Text.......................................................................2-10
Searching Information..........................................................2-11
Locking the Screen................................................................2-12
Chapter 3 Getting Connected ........................................................3-1
Overview..................................................................................3-1
Types of Connections .........................................................3-1
Entering Airplane Mode .................................................... 3-1
Connecting to Mobile Networks............................................3-2
Mobile Network Status Icons.............................................3-2
Checking or Modifying Mobile Network Settings ...........3-2
Using Wi-Fi Networks .............................................................3-3
Turning Wi-Fi On or Off ..................................................... 3-3
Connecting to a Wi-Fi Network.........................................3-4
Managing Wi-Fi Settings.................................................... 3-4
Using the Bluetooth Function................................................3-5
Turning Bluetooth On or Off.............................................3-5
Pairing with a Bluetooth Device........................................3-6
Connecting to a Paired Bluetooth Device.........................3-7
Managing Bluetooth Settings ...........................................3-7
Connecting to VPNs ................................................................3-8
Adding a VPN......................................................................3-8
Connecting to a VPN ..........................................................3-8
Disconnecting from a VPN .................................................3-9
Connecting to a Computer via USB .......................................3-9
Adding an Account ...............................................................3-10

iii
Chapter 4 Placing and Receiving Calls ..........................................4-1
Opening the Phone Application ............................................4-1
Placing a Call ...........................................................................4-2
Dialing a Call .......................................................................4-2
Placing a Call from Contacts ..............................................4-2
Placing a Call from the Call Log.........................................4-3
Responding to a Call...............................................................4-4
Answering a Call.................................................................4-4
Declining a Call ...................................................................4-4
Ending a Call ....................................................................... 4-4
During a Call............................................................................4-5
Adjusting the Phone Volume.............................................4-5
Using Additional Functions................................................ 4-5
More Phone Operations .........................................................4-7
Using Call Log .....................................................................4-7
Reading or Sending Messages ...........................................4-8
Checking Your Voicemail ................................................... 4-8
Making an Emergency Call ................................................4-8
Dialing an International Call..............................................4-8
Configuring Phone Call Settings .......................................4-9
Chapter 5 Contacts and Calendar..................................................5-1
Contacts ...................................................................................5-1
Importing Contacts from Your SIM Card ..........................5-1
Adding a Contact................................................................5-2
Using Contacts List and Details..........................................5-3
Editing Contacts Details .....................................................5-4
Joining or Separating Contacts .........................................5-5
Calendar ..................................................................................5-6
Working with Different Views...........................................5-6
Viewing Event Details ........................................................5-9
Creating an Event ...............................................................5-9
Editing or Delete an Event...............................................5-10
Changing Calendar Settings ............................................5-10

iv
Chapter 6 Web and Communications............................................6-1
Browser.................................................................................... 6-1
Surfing the Web .................................................................6-1
Working with Bookmarks ..................................................6-2
Changing Browser Settings................................................6-3
Email ........................................................................................6-4
Opening Email and the Account Screen ...........................6-4
Reading and Responding to E-mail Messages.................. 6-5
Composing and Sending an E-mail ...................................6-6
Working with Account Folders.......................................... 6-7
Changing Email Account Settings .....................................6-7
Messaging................................................................................6-8
Reading and Responding to Messages ............................. 6-8
Composing and Sending Messages ...................................6-9
Changing Messaging Settings .........................................6-10
Chapter 7 Multimedia ....................................................................7-1
Camera and Camcorder..........................................................7-1
Taking Pictures....................................................................7-1
Shooting Videos..................................................................7-4
Gallery......................................................................................7-6
Viewing Pictures and Videos.............................................. 7-6
Working with Thumbnails .................................................7-7
Music........................................................................................7-8
Copying Music Files onto the SD Card ..............................7-8
Playing Music ......................................................................7-8
Add a Song to the Ringtone List .....................................7-10
Working with Playlists......................................................7-10
Chapter 8 Managing Your Device .................................................8-1
Managing Power..................................................................... 8-1
Low Battery Signals and Actions ....................................... 8-1
Power-Saving Tips...............................................................8-2
Settings ....................................................................................8-3
Wireless and Networks Settings ........................................8-3

v
Call Settings.........................................................................8-5
Sound Settings ....................................................................8-5
Display Settings...................................................................8-6
Location and Security Settings ..........................................8-7
Applications Settings..........................................................8-8
Accounts and Sync Settings................................................8-8
Privacy Settings ................................................................... 8-9
SD Card and Phone Storage Settings ................................8-9
Search Settings..................................................................8-10
Language and Keyboard Settings ...................................8-10
Voice Input and Output Settings.....................................8-11
Accessibility Settings.........................................................8-11
Date and Time Settings ....................................................8-12
About Phone.....................................................................8-12
Chapter 9 Caring and Maintenance ..............................................9-1
Resetting Your Device ............................................................9-1
Restoring Factory Default State.............................................9-2
Caring for Your Device ...........................................................9-3
Chapter 10 Regulatory Information..............................................10-1
Regulations Statements........................................................10-1
European Notice ...............................................................10-1
FCC Regulations ................................................................10-2
Safety Precautions.................................................................10-3
About Charging ................................................................10-3
About the Charger ...........................................................10-3
About the Battery.............................................................10-4
About the Radio Frequency Exposure.............................10-4

Getting Started 1-1
Chapter 1
Getting Started
This chapter introduces you to the external components of your device and
guides you through the process of setting up your device for use.
Identifying Hardware Components
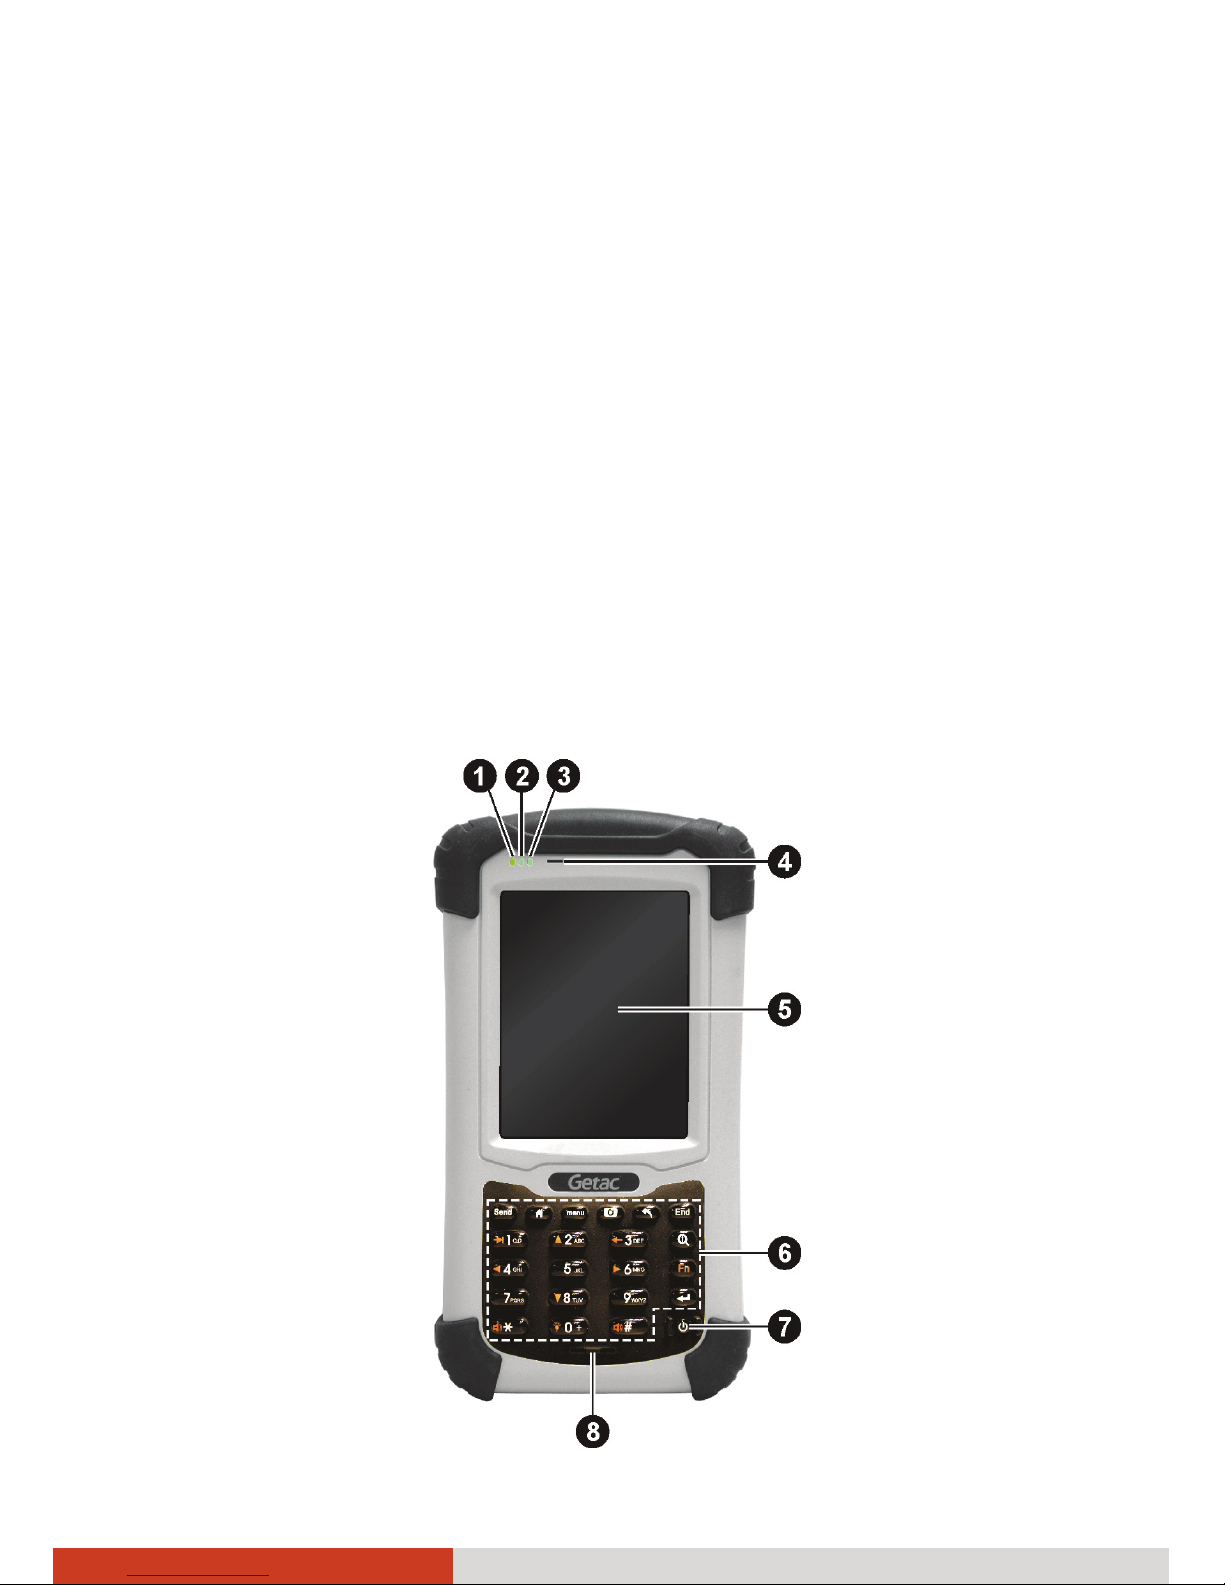
Front Components

1-2 1BGetting Started
Ref Component Description
nMobile Phone
Indicator
Flashes in blue to indicate that the phone function is
switched on.
oRF (Radio
Frequency)
Indicator
Flashes in blue to indicate that the Bluetooth radio is
on.
Flashes in amber to indicate that the Wi-Fi (wireless
network) radio is on.
Flashes in purple to indicate that the GPS receiver is
on.
If more than one module is switched on, the indicator
changes color in a cyclic way.
pCharge/
Notification
Indicator
Glows in amber to indicate that battery charging is in
progress.
Glows in green to indicate that the battery is fully
charged.
Glows in red to indicate that the battery power is
critically low (less than 10%).
Flashes in red to inform you of scheduled
appointments, alarms and reminders.
qEarpiece Serves as the phone earpiece during a call.
rTouch Screen Displays the output of your device and responds to
your tapping.
sKeypad Includes keys for numbers and specific functions. It
lights up when a key is pressed. (See the next section
for details.)
tPower Button Starts up your device.
Turns off or restores the screen.
Other manuals for PS236
5
Table of contents
Other Getac Cell Phone manuals


