gk-medizinmechanik GK Magic 2000 User manual


Copyright © 2018 - All content of this document, particularly texts, photo-
graphs and graphics, is protected by copyright. The copyright owner is, if not
explicitly marked otherwise, the company Georg Krämer GmbH & Co. KG, Neuhauser-
weg 14, A-4061 Pasching. All rights reserved, including the rights for repro-
duction, publication, editing and translation of both the whole document as
well as of any parts thereof.
Congratulations on your decision to purchase a GK
Bathtub. You have acquired an Austrian quality prod-
uct which will considerably ease the strain involved
in patient care.
Due to their advanced ergonomic design, GK Bathtubs
are simple and straightforward to use. In spite of
that, we would ask you to study the instructions
carefully before operating the bathtub. The detailed
information contained in this manual will facilitate
your practical work.
1

2
■ Contents
Intended use·················································································
3
For your safety ············································································
3
Components·················································································
4-5
Control panel overview ·································································
6
Functions ················································································
7-15
How the control panel works ···················································
7
Standby mode ··········································································
7
Activation card ······································································
7
Raising & Lowering the tub ·····················································
8
Opening & Closing the door ·····················································
8
Opening & Closing the drain ···················································
8
Filling the tub ······································································
9
Fill levels ············································································
9
Setting the temperature··························································
9
Temperature display tub fill & shower ··································
10
Temperature display tub························································
10
Shower··················································································
10
Underwater light ··································································
11
Shampoo & Bath additive························································
11
Time display ········································································
11
Hydromassage ········································································
12
Intensity setting for hydromassage·······································
12
Duration setting for hydromassage ········································
12
Sound & Vision ·····································································
13
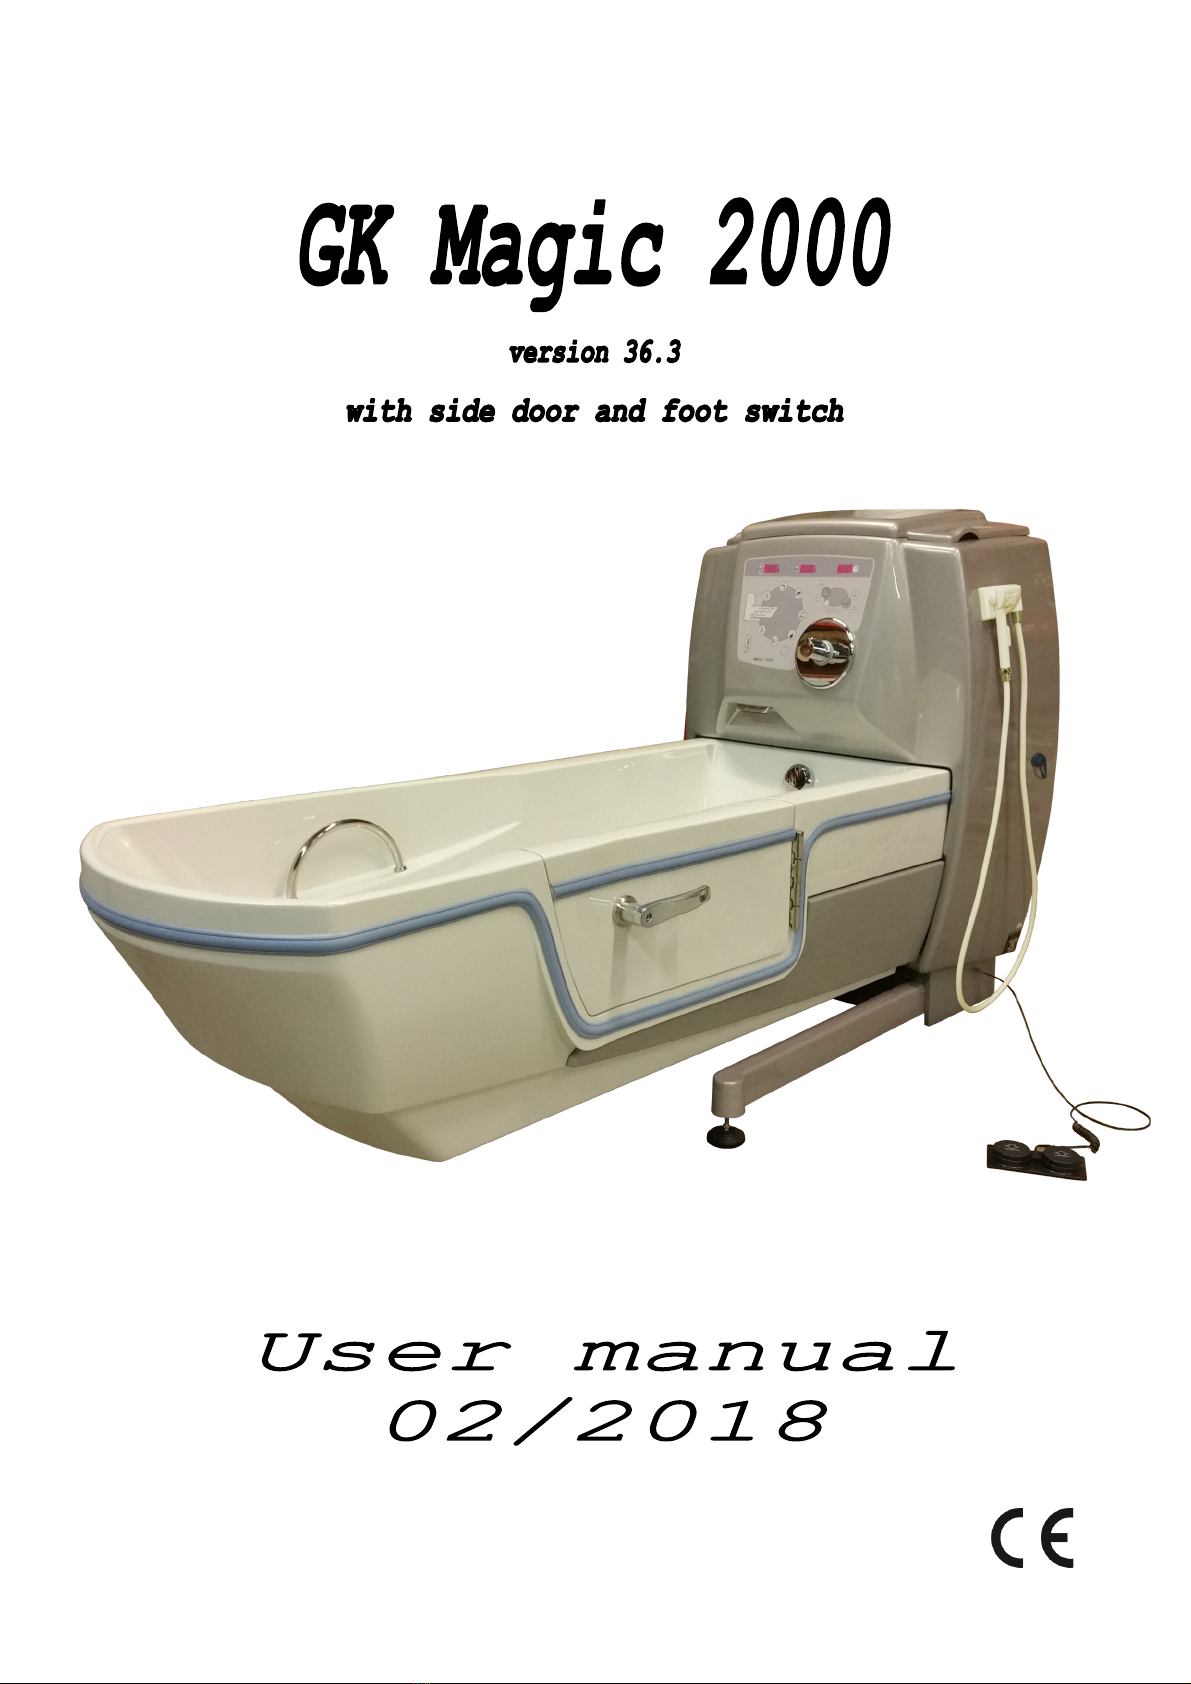
Disinfection ····································································14-15
Flowmeter ·······································································
14
Standard disinfection ················································14-15
Compulsory disinfection ·················································
15
The bathing cycle ···································································15-16
Troubleshooting ··········································································
17
Maintenance / Service·································································
18
Care & Cleaning ······································································19-20
Standards & Regulations······························································
20
Technical data ···········································································
21
Identification plate ··································································
22
Transport, Storage, Recycling ····················································
22
Contents

3
Intended use / For your safety
■ Intended use
Bathing system for bathing patients with restricted mobility in
care institutes and hospital wards. It is operated by healthcare
professionals. The possible height adjustment provides an ergo-
nomic working environment for the personnel and helps keeping
their spines healthy.
■ For your safety
Ensure that this bathing system is operated and maintained
only by trained personnel.
Always check the water temperature with your bare hand (also
when using the shower) before bringing the water in contact
with the patient.
Ensure that each client is assessed for its ambulatory capa-
bility, ensuring the client’s safety when entering and exiting
the bathing system (utilize handgrips, correct entry height,
correct client transferring device, etc.).
Never leave the patient unattended inside the bathtub.
Ensure that the equipment is thoroughly cleaned after every
use.
When using disinfection, protect your skin and eyes. Heed all
instructions on the disinfectant’s container and material
safety data sheet.
Always make sure that the device is supplied with power. It
may only be interrupted in emergency situations.
Ensure that there are no objects right next to the tub to en-
sure a safe up and down movement. Disregarding this instruc-
tion can cause bad injuries or damage the device.
Don’t place any objects on top of the device, since due to
movement or vibrations, they can fall off - also into the tub.
Adjustments and repairs must be carried out by authorized and
appropriately qualified persons only.
Caution: The safety rules and instructions in this operating
manual must be observed in order to ensure safe and
proper use of the equipment. All claims under guaran-
tee become void if these requirements are not met.

4
Components
■ Components
9
4
3
2
1
8
11
10
5
12
13
67
1. Disinfection
2. Lid
3. Shower
4. Control panel
5. Mixer
6. Shampoo & Bath additive dispenser
7. Fill in spout
8. Overflow
9. Hydromassage jets
10. Drain
11. Grab handle
12. Door with handle
13. Foot switch

5
Components
Flowmeter with con-
centration table
Hydromassage jet
Box for care and
disinfection liquids
USB port

6
Control panel overview
■ Control panel overview
1. Symbol Missing power supply
2. Symbol Tub fill temperature
3. Symbol Shower temperature
4. Display Tub fill & Shower temp.
5. Symbol Tub temperature
6. Display Tub temperature
7. Display Time
8. Button Up
9. Button Tub fill
10. Button Shower
11. Button Time +
12. Button Time -
13. Button Underwater light
14. Display Intensity
15. Button Intensity +
16. Button Intensity -
17. Button Bath additive
18. Button Shampoo
19. Button Disinfection
20. Button Hydromassage
21. Button Down
22. Button Minimum fill level
23. Button Middle fill level
24. Button Maximum fill level
25. Sensor Activation card
26. Button Back
27. Button Next
28. Button Play/Pause
29. Button Lights
1
2
3
4 5 6 7
8
9
10
14
13
12
11
18
17 16
15
21
20 19
24
22
25
23
26 27 28 29

7
Functions
■ Functions
How the control panel works
Generally we can say that a lit button signals the availability of
the corresponding function (with the exception of Sound & Vision -
for details see the corresponding chapter). When you press the
button you activate its function and the light starts flashing. To
stop the function, just press the button again. When there is no
backlight behind the button, then the function is not available at
the moment (for instance: disinfection is not available when the
tub is full).
Standby mode
If the tub is empty and for 10 minutes no function is activated
(or in case that the main switch of the bathtub has been switched
on), then the bathtub goes into standby mode. In this mode all
functions are deactivated (with the exception of Sound & Vision,
which gets “frozen” in the state which it is in at that moment)
and locked. Only the sensor “ACTIVATION CARD” is illuminated with
a green backlight.
The standby mode a) prevents unauthorized use of the bathtub and
b) helps to save energy since due to the deactivation of almost
all functions the bathtub uses less electricity.
In order to return to normal mode, please, use the activation card
(see next subchapter).
Activation card
To use the tub again when in standby mode, gently
swipe the magnetic activation card over the green
backlit sensor “ACTIVATION CARD”. After 12 seconds
the device should return back to normal mode.
Note: Optionally you can also reactivate the bathtub without
the activation card. This option can be set in program
mode. If it has been turned on, then you can reacti-
vate the bathtub by pressing any button. (In case that
the function behind the pressed button is available,
it will also get activated immediately, e.g. raising
and lowering.) This means that with this option turned
on, the standby mode only helps to save energy but
does not prevent unauthorized use of the bathtub.

8
Functions
Raising & Lowering the tub
The “UP” and “DOWN” buttons are used to raise or lower
the tub. The movement continues until the button is
released again. In the upper and lower end positions
the tub stops automatically. In the event of power
failure the bathtub can only be lowered, which is pow-
ered by the emergency battery. The movement is a bit
slower in this case than usual. Additionally the sym-
bol “MISSING POWER SUPPLY” is illuminated.
Alternatively to the buttons on the control panel the
tub can also be raised or lowered by means of the foot
switch. It works with air pressure and is connected to
the electronics through thin air filled plastic tubes.
The higher air pressure, when stepping on the switch,
activates the corresponding function on the electron-
ics (inside the casing). Thus, the foot switch is
separated from all electricity and may get wet without
concerns.
Note: The foot switch is not included with every bathtub as
it is an option.
Opening & Closing the door
The door in the side of the bathtub can be opened and
closed manually only. In order to open it the handle
must be turned clockwise. In order to close it,
counter-clockwise. From the open to the closed posi-
tion of the handle, a rotation of about 60-70° is nec-
essary (a bit less than a quarter of a circle).
Opening & Closing the drain
In order to close the drain, ensure that the drain
plug is in place. Then turn the chromed overflow
clockwise. In order to open it, turn the overflow
counter-clockwise. (It is not necessary to remove the
drain plug.)

9
Filling the tub
When you press the button “TUB FILL” the tub starts
filling. The button starts flashing and the symbol
“TUB FILL TEMPERATURE” lights up. The water now flows
into the bathtub until the set filling level (see
“Fill levels”) has been reached or the button is
pressed a second time. Once the set filling level is
reached the button is no longer illuminated until ei-
ther a higher filling level is chosen or water has
been drained. If you want to add more water after the
automatic stop, holding the button down for more than
2 seconds will continue filling until you release it,
despite it being dark. Of course you can also add more
water with the shower.
Fill levels
This device features three automatic fill levels, sav-
ing valuable caregiver time. The active one is indi-
cated by a lit button and can be changed by pressing
the new level for 1-2 seconds. The filling always
stops, when the water reaches the selected level.
Setting the temperature
You can set the temperature for tub fill and shower
continuously. To do that, turn the knob of the mixing
valve to the desired position. The used temperature
will be shown in the left display.
Note: For safety reasons the temperature is mechanically
limited to 38 °C (standard mixer). To override this
security appliance, press the button on the knob. Thus
it is possible to turn the knob further and set a
higher temperature.
Caution: When setting the temperature to a value above 38 °C,
set it back to 38 °C or lower as soon as possible! In
the meantime, while the temperature is overridden, use
extreme caution with the hot water.
Functions

10
Temperature display tub fill & shower
This display shows the current tub fill respectively
shower temperature when they are in use. If the tub
fill is active, the symbol “TUB FILL TEMPERATURE” is
illuminated additionally to the flashing button “TUB
FILL”. If the shower is active, the symbol “SHOWER
TEMPERATURE” is illuminated additionally to the flash
ing button “SHOWER”. If tub fill and the shower are
active at the same time, both will have the same tem-
perature since there is only one mixing valve. If none
of these two functions are active, then the display
remains empty.
Caution: Always check the water temperature with your bare hand
(also when using the shower) before bringing the water
in contact with the patient.
Note: The symbols next to the temperature displays only
serve as status indicators. You cannot activate any
functions with these.
Temperature display tub
This display shows the current tub water temperature
inside the tub starting from a water level of about 8
cm. If the water level is lower, then the display re-
mains empty. The symbol “TUB TEMPERATURE”, which is
illuminated when the display is active, should help to
avoid confusion.
Note: The symbols next to the temperature displays only
serve as status indicators. You cannot activate any
functions with these.
Shower
The shower can be used at any time (except during cer-
tain parts of the disinfection procedure). To do so,
simply take the white hand shower from its holder and
press the button “SHOWER”. The button starts flashing
and the symbol “SHOWER TEMPERATURE” lights up. Press
and hold the trigger on the hand shower’s handle to
begin showering. When you press the button “SHOWER”
again, the shower is deactivated and the pressure is
automatically taken out of the hose.
Functions

11
Functions
Underwater light
The underwater light, if installed (being an alterna-
tive to the “Vision” function), is available only when
the tub is filled with water at least up to the middle
level. Then the button “UNDERWATER LIGHT” lights up
and the function becomes available. By pressing the
illuminated button the underwater light is switched on
and the button starts flashing. The underwater light
slowly changes between 7 colours. (It cannot be fixed
to one colour.) By pressing the button again the un-
derwater light is switched off.
Shampoo & Bath additive
Both of these products, if installed, can be added
once the water level measures about 8 cm or more. Once
the device recognizes enough water in the tub, the
buttons “SHAMPOO” and “BATH ADDITIVE” are enabled and
illuminated. By pressing one of the buttons the corre-
sponding dispenser pump starts running for as long as
you hold the button. 5 seconds after each use the dis-
penser openings are automatically flushed with water
for 2 seconds.
Note: The tube for the shampoo has a red marking on its suc-
tion end - the tube for the bath additive a blue mark-
ing at the alike spot.
If there is no liquid coming out of the system, make
sure that both boxes are full. After installing a new
box it might take a while to get all the air out of
the tubes. You possibly have to use the function for a
longer period of time.
Time display
This display has two different usage cases. Firstly it
displays the remaining time for therapy (hydromassage
or ultra sound) and secondly it shows the remaining
contact time for compulsory disinfection. If none of
these functions is active, the display remains empty.

12
Functions
Hydromassage
The hydromassage therapy, if installed, is available
only when the tub is filled with water at least up to
the middle level. In this case, the button is enabled
and illuminated. By pressing the button the hydromas-
sage jets are activated. The therapy will last until
either the set time has elapsed (see “Duration setting
for hydromassage”) or the button is pressed again. If
thereafter some overall treatment time is still left
over, you can start the therapy again. After the full
overall treatment time has been used up, the button
will be darkened and disabled until the next bathing
cycle. The therapy always starts on minimum intensity
(see “Intensity setting for hydromassage”).
Caution: When a massage hose coupling is installed, then the
first jet, which contains the coupling for this op-
tion, will start with a time delay of approximately 10
seconds because of safety reasons.
Intensity setting for hydromassage
You can change the intensity for the hydromassage
therapy. It always starts with the minimum intensity.
To increase or decrease the value press either
“INTENSITY +” or “INTENSITY -”. When you reach the
maximum or minimum values, then the corresponding but-
ton will be disabled. The selected intensity will be
displayed on the LED bar.
Duration setting for hydromassage
Initially the duration of the treatment is set to 5
minutes (see “Time display”). You can change the value
by pressing either the button “TIME +” or “TIME -”.
When you reach the maximum or minimum values, then the
corresponding button will be disabled. The maximum
overall treatment duration is 20 minutes and can be
apportioned at will. (In program mode it can be
changed to a value between 10 and 45 minutes.)
Note: The time cannot be set to zero. To pause or prema-
turely stop the therapy press the function button
again.

13
Functions
Sound & Vision
The optional feature “Sound & Vision” can playback mu
sic files which are stored on a USB stick on speakers
build into the tub body. Furthermore, by means of LEDs
on different sides it can suffuse the water with light
in various colours.
If this feature is installed in your GK bathtub, then
the buttons “PLAY/PAUSE” and “LIGHTS” will flash
slowly in a rhythm of 3-4 seconds (ready mode).
Sound
First of all ensure that a USB stick with readable mu-
sic files (mp2, mp3, wma) is inserted into the USB
port (on the side of the console). When pressing the
button “PLAY/PAUSE” all the recognized music files
will be played back, sorted by name (and the button
starts to flash faster, about 1x/second). Furthermore,
the buttons “NEXT” and “BACK are enabled and illumi
nated continuously. When pressing these buttons the
player switches to the next or previous (press 2x)
track. After playing the last track playback continues
again with the first track.
The volume can be adjusted by pressing the buttons
“INTENSITY +” and “INTENSITY -”. (These buttons first
of all regulate the intensity of hydromassage/
ultrasound. Therefore, the music’s volume can only be
adjusted when these functions are not active.)
By pressing the button “PLAY/PAUSE” during playback,
it is paused (and the button starts to shine continu-
ously). When pressing it again, the playback contin-
ues. In case the pause exceeds 30 seconds, the player
resets itself to ready mode automatically. Thereafter,
a further playback would again start at the very be-
ginning. (In case the USB stick gets pulled during
playback or if it was not in the port at the start of
playback (the button still flashes about 1x/second),
then this “empty playback” must be “paused” before
(re-)starting a real playback.)
Vision
When pressing the button “LIGHTS”, the LED lights are
switched to “slow continuous colour change” mode (and
the button starts to flash faster, about 1x/second). -
When pressing the button “LIGHTS” again, the colour
currently visible in that moment is fixed (and the
button is illuminated continuously). - Pressing the
button a third time will switch back to ready mode and
the LED lights off.

14
Functions
Disinfection
Flowmeter
The flowmeter is used to adjust the mixture ratio be-
tween water and disinfectant. It is located at the
back of the console. It can only be calibrated during
a disinfection cycle while the disinfectant solution
is flowing. The table next to it should help you to
find the right value. Always follow the instructions
of the disinfectant manufacturer. The Flowmeter must
be calibrated after each connection of water tubes and
after changes in water pressure and after changing the
disinfectant’s composition. During use of the tub, pay
attention not to accidently alter its setting.
Standard disinfection
In order to be able to start the disinfection proce-
dure 1) there must be disinfectant inside its con-
tainer and 2) the tub must be empty. If both require-
ments are met, then the disinfection button lights up.
Note: If the disinfection container should be empty the dis-
infection button is flashing fast (~4x/sec.).
To start the disinfection procedure take the red hand
shower from its holder and press the disinfection but-
ton. The button is flashing now. Spray all internal
tub surfaces with the disinfectant solution.
Caution: Protect your skin and eyes from the disinfectant solu-
tion. Follow all the instructions of the disinfectant
manufacturer.
Thereafter press the button again and put the hand
shower back into its holder.
After the necessary contact time (according to the
disinfectant’s manufacturer’s specifications) the tub
must be rinsed thoroughly. To do so, take the white
hand shower from its holder and press the shower but-
ton. Rinse all internal tub surfaces thoroughly.
When you deactivate the shower any hydromassage jets
are activated briefly in order to remove the disinfec-
tant solution from them. Ensure that no disinfectant
solution residues are left behind inside the tub.
Note: For safety reasons the disinfection procedure - once
started - cannot simply be aborted.
During the whole disinfection procedure most other
functions are disabled, especially the tub fill.

15
Functions
Note: If the disinfectant runs out while spraying, the whole
procedure must be restarted after replacing its con-
tainer. Since the procedure cannot simply be aborted
and the tub fill being disabled, therefore - once the
disinfection procedure has been started - you cannot
fill the tub again without enough disinfectant. How-
ever, the standard disinfection can be skipped alto-
gether.
Compulsory disinfection
In case the bathtub was programmed for compulsory dis-
infection, then you 1) must perform a disinfection
procedure between two bathing cycles (it cannot be
skipped) and 2) you must wait until the preset minimum
duration for spraying and contact time has elapsed.
(The factory setting for the minimum duration is 20
minutes. It can be changed in program mode to a value
from 1 to 30.) The remaining duration is shown in the
time display. Before it has elapsed, you cannot rinse
the tub.
Other than that, the general procedure is identical to
the standard procedure.
Note: With this type of disinfection you cannot start a new
bathing cycle at all without enough disinfectant,
since the compulsory disinfection cannot be skipped in
between two bathing cycles and the procedure cannot be
finished without enough disinfectant.
■ The bathing cycle
Insert the drain plug into the drain. Close it.
Adjust the tub shorter according to the body length of the pa-
tient and put the pillow into the right position.
To start filling the bathtub, press the button “TUB FILL” and
select a pleasant fill temperature for the patient.
Caution: Always check the water temperature with your bare hand
(also when using the shower) before bringing the water
in contact with the patient.
Press the button “MINIMUM FILL LEVEL” for 12 seconds (until
it lights up). Thereby, the water flow stops automatically as
soon as the water level reaches up to close below the door-
step.

16
The bathing cycle
Once the water flow has stopped, help the patient into the
bathtub and close the door.
Caution: Never leave the patient unattended inside the bathtub.
Select the desired overall fill level and press the button
“TUB FILL” again in order to continue filling.
To add bath additive to the water (if installed available from
a water level of about 8 cm) press the button “BATH ADDITIVE”
for as long as you want to add more.
Bring the bathtub to a comfortable working height.
If you want to use the shower at any time during the bathing
cycle, simply pick up the white hand shower from its holder
and press the button “SHOWER”. To start showering press the
trigger on the hand shower.
To dispense shampoo (if installed) press the button “SHAMPOO”
for as long as you want more, while keeping your hand under
the shampoo dispenser.
If so desired by the patient, activate any available therapy
treatment. Choose a suitable intensity and duration and wait
until the time has elapsed.
To finish, turn the chromed overflow knob in counter clockwise
direction, in order to open the drain. Lower the bathtub and
help the patient out of the water. BEFORE opening the door, en-
sure that the water level has dropped below the doorstep.
Before you start a new bathing cycle you should thoroughly
clean the bathtub.

17
Troubleshooting
■ Troubleshooting
Tub fill doesn’t work even though the function is active and the
light is flashing.
Check all the sieves and valves for dirt. If the problem still ex-
ists, then the electronic has to be checked. Contact your GK rep-
resentative.
The temperature regulation doesn’t work properly.
The thermostatic mixer is adjusted at 3 bar water pressure at both
supplies. If you have different water pressure it may be necessary
to do a readjustment. If the water pressure is about right, possi-
bly the cartridge is defective and has to be changed.
Very little water runs into the tub.
If the hot and cold water supply pressure deviate too much from
each other, then the mixing valve cannot work properly.
Disinfection doesn’t work and the button is flashing very fast
(about 4x/sec.).
The disinfectant container is empty. Replace it with a full disin-
fection container.
Disinfection doesn’t work and the button is flashing very fast
(about 4x/sec.) even though the container is full.
The disinfection sensor is defective and has to be replaced.
All the functions are disabled except the “UP” and “DOWN” buttons.
Probably the tub is still in the disinfection cycle. Finish the
procedure properly.
No shampoo or bath additive is dispensed even though the button is
flashing when it is pressed.
If the corresponding box is not empty, then there probably is air
in the tubes. Press the corresponding button for a longer time.
The hydromassage/ultrasound button doesn’t light up (with hydro-
massage/ultrasound being installed) even though there is more than
enough water in the tub.
The fill level sensor is defective and has to be changed.
The tub fill does not stop automatically.
The fill level sensor is defective and has to be changed.
All the functions are disabled except the “DOWN” button and the
symbol “MISSING POWER SUPPLY” is lit.
No power supply detected. Try to solve this problem as soon as
possible since otherwise the emergency battery will be completely
emptied.

18
Maintenance / Service
■ Maintenance
Clean the bathtub after each bath (see chapter “Care & Clean
ing”).
Regularly (at your own discretion) monitor the fill level of
the disinfectant container (if installed).
Regularly (at your own discretion) monitor the fill level of
the shampoo and bath additive containers (if installed).
Once a month, check the sieves in the hand showers and clean
them if necessary.
Once a month, check the proper condition of the shower hose
and, if installed, of the disinfection shower hose, as well as
of any externally visible connections.
Once a month, check the bathtub for any cracks or other dam-
ages.
Caution: Should you notice any damage to the bathtub either
during maintenance or at any other time, then the
bathtub may not be used any further from that point
onward, until the damage has been assessed and, if
necessary, repaired.
■ Service
At least once a year a service or safety inspection in accordance
with Medical Device Directive (MDD) is mandatory.
Remember that GK service is unmatched in quality and also with
regards to warranty issues. GK will only consider itself li-
able for safety-related matters if repairs, modifications,
etc. are exclusively carried out by our service team or by
agents authorized by us.
In the event of problems occurring, clear and detailed information
about symptoms, type and serial number (see “Identification
plate”) will help us to respond promptly.

19
Care & Cleaning
■ Care & Cleaning
Always clean the plastic parts wet or damp but never dry.
Any product used to clean or disinfect your GK bath must be free
from any abrasive, alcohol & corrosive ingredients. Never use any
kind of customary glass cleansers, solvents (e.g. acetone) or
similar detergents or dilutions. Never use harsh or pointed uten-
sils, e.g. rough clothes, scrubbing sponges, scouring pads or any
tools. If you are in any doubt about your usual cleaning products
please contact your GK representative before use.
Caution: Any damage caused by unapproved / unsuitable products
will not be covered by the manufacturer’s warranty.
Dark grey and transparent plastic parts:
The dark grey and transparent plastic parts may only be cleaned
with a maximum of lukewarm water and, if needed, a mild dishwash-
ing soap. We especially recommend our special plastics intensive
cleanser (details on request). For these parts of the tub only use
very fine textured chamois leather or a microfiber cloth.
For the best care for these parts we recommend our special anti-
static plastics care product (details on request).
Remaining tub body parts:
For the other mostly white parts, after use always rinse the bath
tub thoroughly with the shower hose. Any dirt which adheres to the
bathtub surfaces must be removed with a soft sponge or cloth and,
if necessary, customary detergents (besides the above mentioned
restrictions).
We recommend using our approved shampoo and bath additive products
with your GK bath. Other products may cause more persistent dirt
being harder to clean.
We also recommend for you to polish the white bath tub body once a
month with car polish cream. This will give the bathtub a smooth,
water repellent surface and will make routine cleaning considera-
bly easier –it will also enhance the appearance of your GK bath.
Table of contents
Other gk-medizinmechanik Personal Care Product manuals

gk-medizinmechanik
gk-medizinmechanik GK PRIMUS 1000-HYD User manual

gk-medizinmechanik
gk-medizinmechanik GK Magic 3000 User manual

gk-medizinmechanik
gk-medizinmechanik GK Novum 1000 User manual

gk-medizinmechanik
gk-medizinmechanik GK Relax User manual

gk-medizinmechanik
gk-medizinmechanik GK Magic 1000 User manual

gk-medizinmechanik
gk-medizinmechanik GK Basic User manual

gk-medizinmechanik
gk-medizinmechanik GK Compact User manual

gk-medizinmechanik
gk-medizinmechanik GK Basic+ User manual

gk-medizinmechanik
gk-medizinmechanik Hera User manual

gk-medizinmechanik
gk-medizinmechanik GK PRIMUS 2000-HYD User manual