Glass Warehouse Nova 90SL User manual

Shower Enclosure
Installation Guide
Nova 90° Round Slider Shower Enclosure
90SL

K x2
x2
P
N x2
I
Q x2 R TS
J x5 x5
5mm
L x1 x1
6mm
M
O
4mm
BA C
DE F HG
Included in your purchase Shipped in 5 separate boxes
AReturn Panel
BFixed Panel
CSlider Panel
DSlider Panel Edge Strip
ESlider Panel Weather Strip
FFixed Panel Weather Strip
GShower Rod
HAluminum Floor Strip
ISlider Panel Handle
JFixed Panel Clips, Screws
& Wall Anchors
KFixed Panel Brackets
L Shower Rod Brackets, Screws
& Wall Anchors
MReturn Panel Shower Rod Bracket
NSlider Panel Stoppers
OFloor Bracket & Screw
PSlider Panel Rollers
QRoller Guides
RAluminum Floor Strip Cap
SRoller Adjustment Tool
TRubber Block set (various sizes)

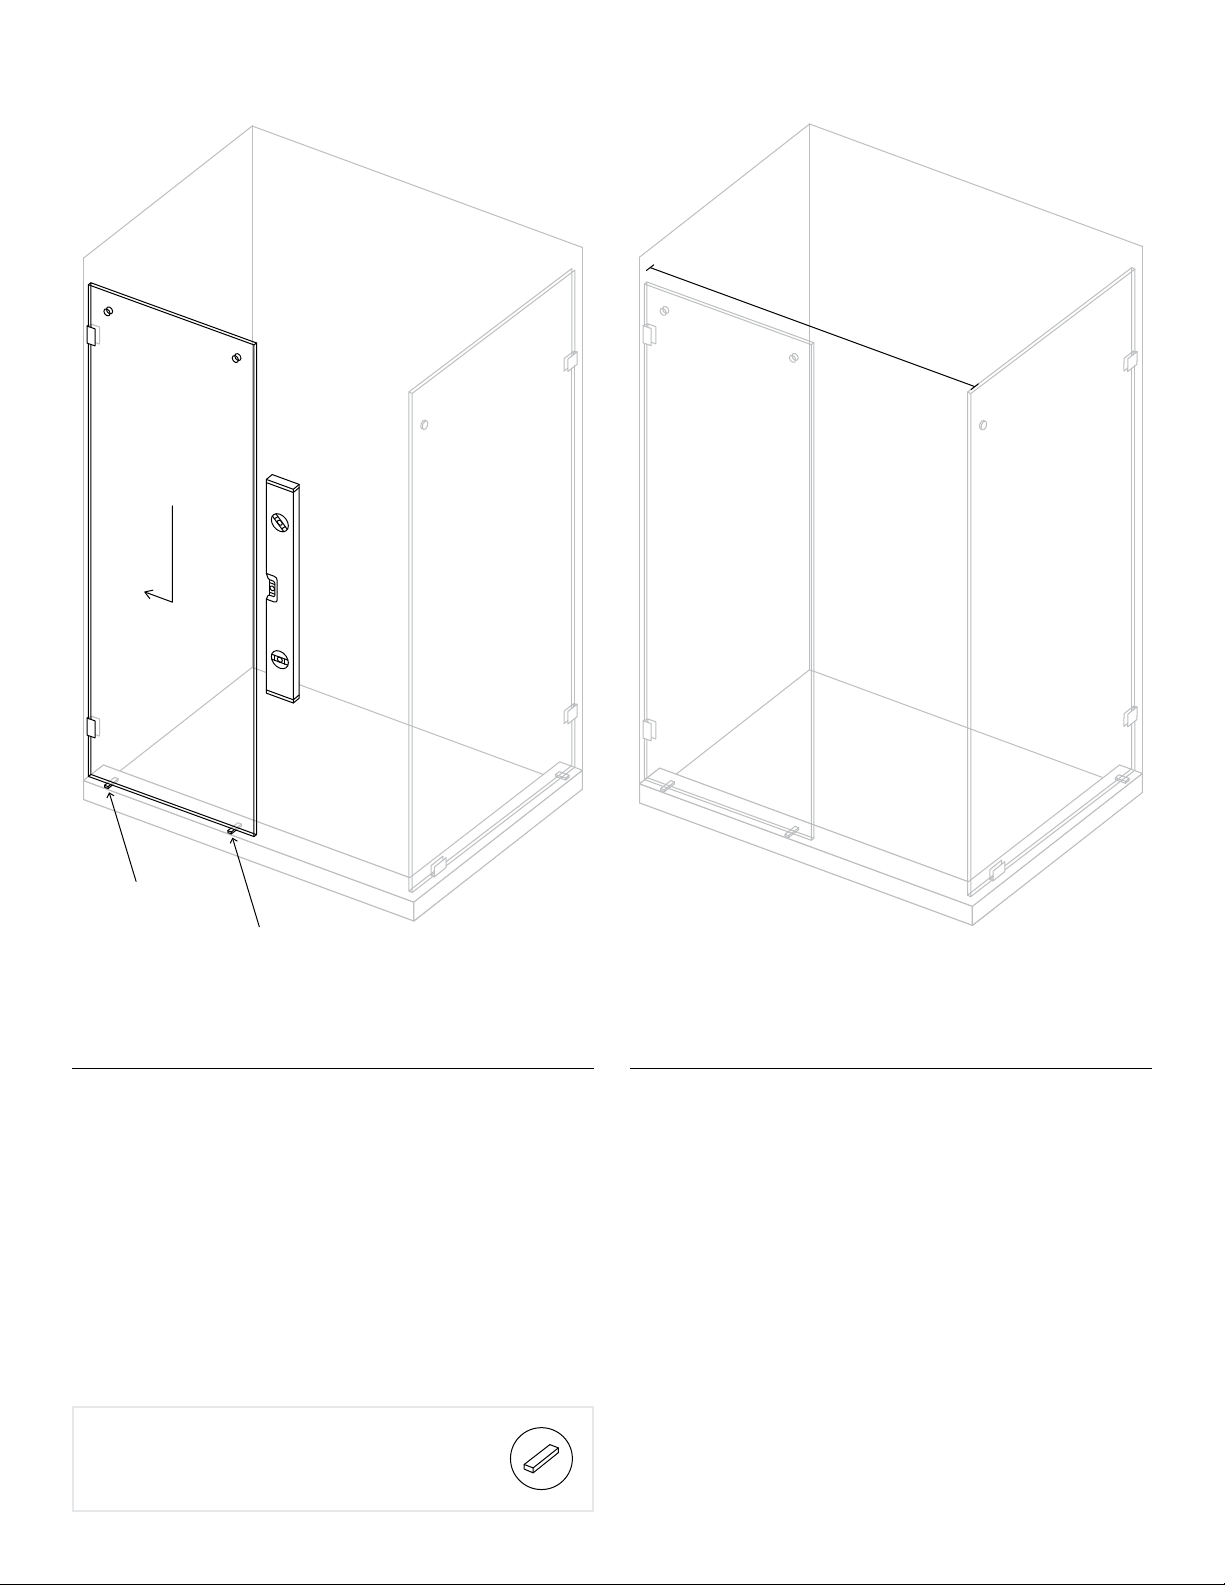
Caution: The most fragile parts of tempered glass panels are the corners. Therefore,
it is critical you have the rubber blocks in place so the glass never touches the tile
surface you are installing onto. Please make sure the glass is always on cardboard
packaging or rubber blocks while out of the packaging prior/during install. Rubber
block is provided in your hardware pack however you can use wood, cardboard or
other rubber products to protect against breakage.
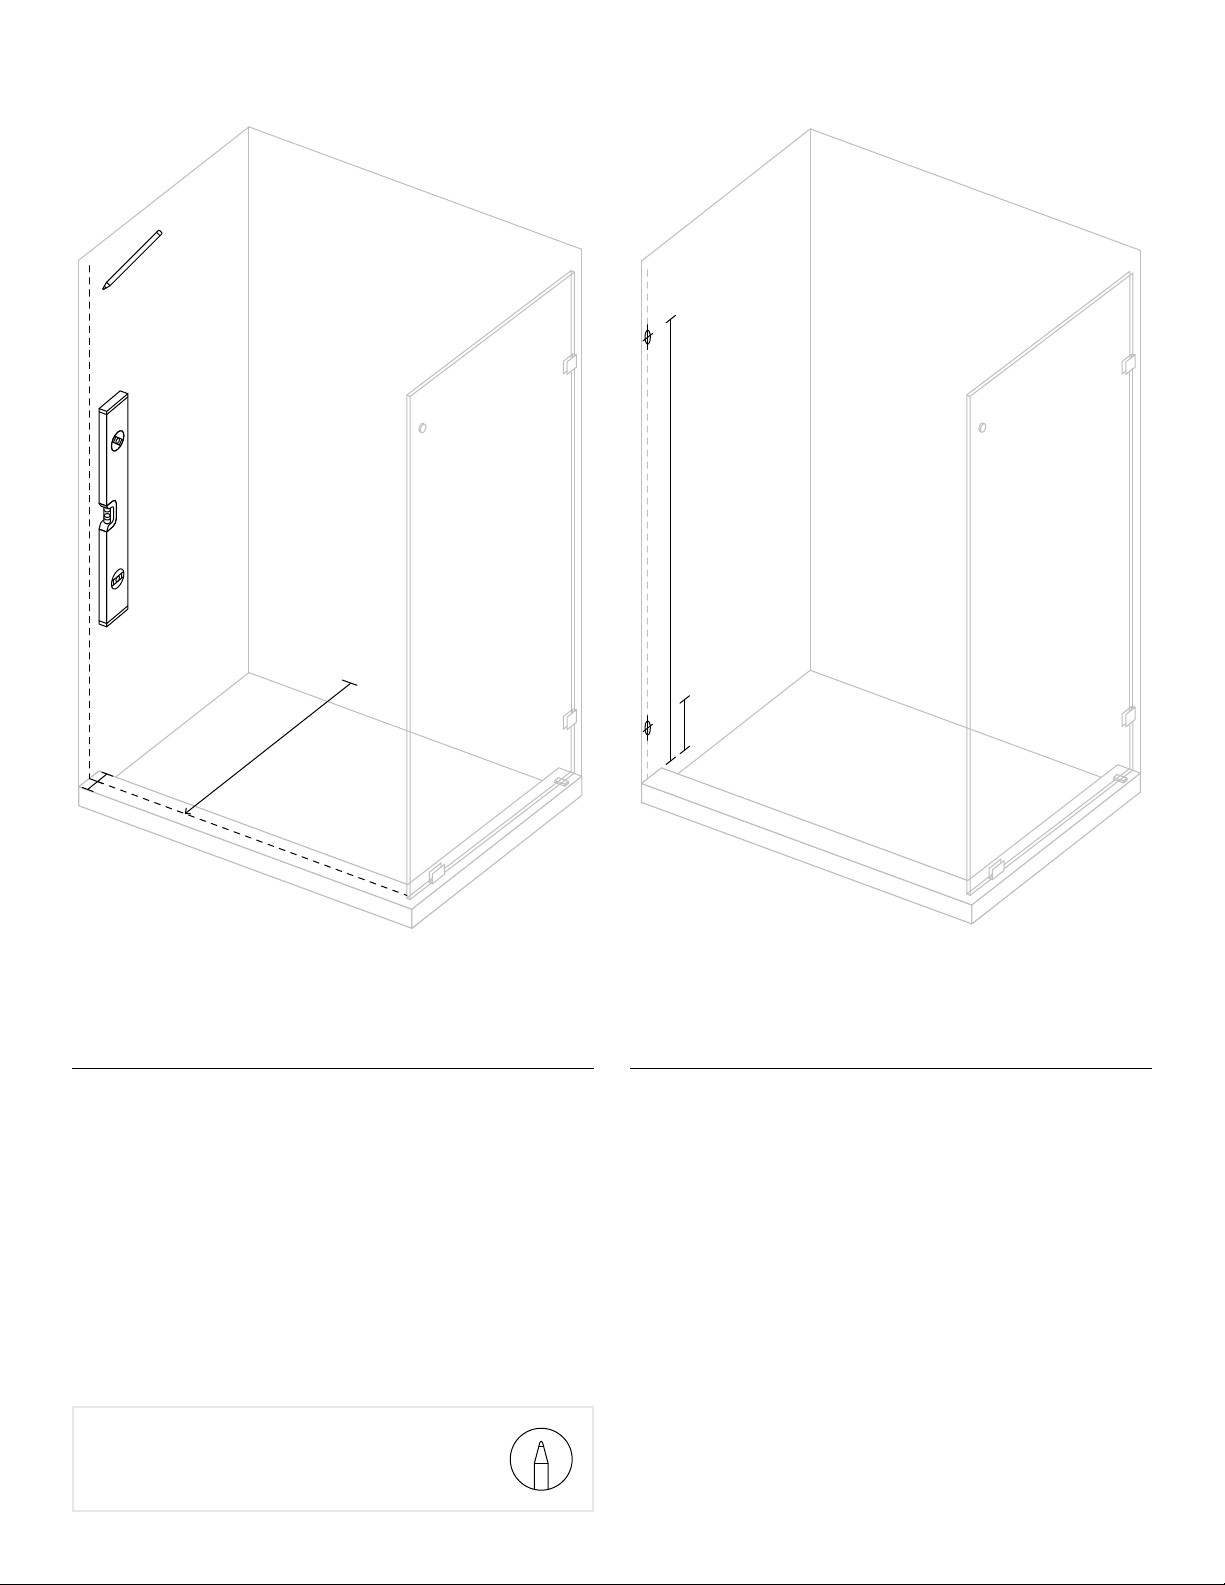
Aention installer: A light haze or smudging may be present on the coated glass
panels upon delivery. This is easily removed with denatured or isopropyl alcohol and
a good quality microfiber cloth, followed by a rinse of water. This can be done before
or aer installation.
If for any reason you are having trouble with installation, or if the size of
the product does not fit your designated space, please contact Glass
Warehouse directly and do not return this product to place of purchase.
We will be able to exchange the panels or parts to suit your opening.
GlassWarehouse takes pride in providing quality products and customer
service. We want to ensure your happiness with your purchase for years
to come. We have an extensive range of sizes, so no maer what your
measurements are, Glass Warehouse can supply the panel to fit!
If you have any questions, please do not hesitate to reach out to us.
Thank you again for choosing Glass Warehouse!
Best Regards,
The Team at Glass Warehouse
Glass Warehouse, LLC
(760) 536 3640
inquiries@glasswarehouse.us
Thank you
for your purchase.

Installation Guide
Tools required for install.
A B C D
1⁄8"
E
¼"
F H I J KG
ASilicone and caulking gun
BPower drill
CPhillips head screwdriver
DPencil
E⅛" tile drill bit
F¼" tile drill bit
G Hacksaw
HUtility knife
ILevel
JHammer
KTape measure
Note: Silicone is not provided and will need to be
purchased separately. We recommend using a clear,
mold resistant silicone which can be purchased at
your local hardware store.

Measure and mark the fixed panel location.
Use a level and mark a line up the wall and along the
floor. This is your center line for the clips. The two lines
in the diagram above represent equal measurements.
Please note that these instructions show the Fixed
Panel and Slider Panel on the le hand side and the
Return Panel on the right hand side, but this enclosure
is completely reversible and can be installed with the
Fixed Panel and Slider Panel on the right hand side.
01 02
Mark the three clip locations.
A70" from the floor, up the vertical line.
B8" from the floor, up the vertical line.
CMeasure width of fixed panel and subtract
3 ½" – measure this distance out from wall and
mark on floor.
Tip: We recommend using a pencil
so this can be easily removed.
These two measurements
need to be the same
8"
W– 3 ½" from outer edge
of glass width
70"

0403
Fix anchors and clips.
Using a hammer, carefully insert the green wall and
floor anchors. Trim any excess from the plug hanging
out of hole so your clips can sit flush to wall and floor.
Place clips over holes and drill in screws to secure the
clips. Make sure these are securely tightened.
Drill the holes for clips to fix to the wall and floor.
Using a ¼" tile drill bit, drill the three marked holes on
the wall and floor.
If the shower base is tiled, use the same ¼" tile drill bit to
drill the third hole on the shower floor.
If the shower base is fiberglass, use a ⅛" drill bit for the
floor hole. You will not use the green wall anchor but
rather screw the floor clip directly into fiberglass base.
Important: There is a stamp on the corner of all Glass Warehouse glass panels to certify it is
tempered safety glass. We recommend installing the Fixed Panel with the stamp in the corner
closest to the wall. Note: the stamp is baked on during the tempering process
and cannot be removed.

Set the Return Panel in place.
Place the ⅛" rubber block on the floor 3" from the wall.
Place a ⁄" rubber block inside the floor clip. Rubber
blocks are not required in the wall clips.
Carefully place the Return Panel on the rubber blocks
and slot it into the wall clips. Partially tighten screws.
Use a level on the outer-edge to ensure the fixed panel
is level and in line.
05
Tip: Use additional rubber blocks on
either existing blocks to raise/drop
the Fixed Panel if required.
Place Slider Panel inside shower.
Place Slider Panel inside the shower on cardboard
to protect the boom of door. Be sure to face handle
holes toward Return Panel. This will make it easier for
installation at later stage once Fixed Panel and bar has
been set in place.
06

07
Mark the threshold and Fixed Panel wall.
This model needs a minimum threshold of 2 ⁄" to be
installed properly. Measure the width of your Return
Panel minus ⁄" and mark it on the threshold. Draw a level
line up the wall at this point where the Fixed Panel
will be placed. You will need at least 2 5/8" threshold
width from this line to the inside of the showerenclosure.
Tip: We recommend using a pencil
so this can be easily removed.
Width of
Return Panel
minus 1/4"
08
Mark the holes to drill on Fixed Panel wall.
Along the drawn level line, mark 8" and 70" from floor.
8"
70"

10
Install Fixed Panel Wall Clips.
Place Wall Clips over holes and drill screws into
wall anchors to secure clips. Make sure these are
securely tightened.
09
Drill the holes for Wall Clips.
Using a ⁄" drill bit, drill holes and install the wall anchors.
Trim excess from the wall anchors hanging out of hole
with utility knife so your clips can sit flush to wall.
Important: Installer can use a 1/8" tile
drill bit to create pilot holes,
but this is optional.

11
Set the Fixed Panel in place.
Measure the width of the Fixed Panel and place the ⁄"
thick Rubber Blocks provided 3" in from each end where
the glass panel will sit on the tile/threshold. Gently
place the glass panel down on the Rubber Blocks and
slide glass into the Wall Clips. Check to make sure the
glass is level. If not, adjust by adding thinner ⁄" Rubber
Blocks to the blocks already on floor. Once level, tighten
the grub screws very tight on the Wall Clips.
Tip: Use additional Rubber Blocks on
either existing blocks to raise/drop
the fixed panel if required.
12
Measure width from wall
to Return Panel
Measure opening width.
Measure the opening width between the wall and your
Return Panel.

13
Measure and cut Shower Rod.
Shower
opening
width
Saw
here
1"
Important: You must cut rod at opposite
end from the Fixed Panel brackets.
Subtract 1" from the opening width measurement
(step 12) and then measure out this distance on the
Shower Rod. For example: Ifyour opening measurement
is 47" your rod length should be 46". Use a hacksaw and
cut your Shower Rod to the correct length.
14
Install the Return Panel Shower Rod Bracket.
Remove end cap of the Return Panel Shower Rod
Bracket and install in hole on Return Panel.
Panel
hole

15
Install the Fixed Panel Brackets on Shower Rod.
Install the brackets on Shower Rod into the holes on
the Fixed Panel. If the brackets do not line up perfectly
with the holes in the glass, you can loosen the allen bolt
on the bracket to adjust it side to side to suit the holes
in the glass.
Fixed Panel
16
Level Shower Rod and mark hole to drill.
Using a level, check Shower Rod is perfectly level from
one wall to the Return Panel. Once in correct position
mark the placement of Shower Rod Bracket on wall and
uninstall rod from Fixed Panel. Remove the wall bracket
from rod and mark the hole to be drilled on the wall.

17
Drill hole for Shower Rod Bracket.
Using ⁄" drill bit, drill hole and install wall anchor. Trim
excess from the wall anchor hanging out of hole with
utility knife.
18
Screw in flat fixing piece and Shower Rod Bracket.
On Fixed Panel side wall install only the round flat fixing
piece unscrewed from Shower Rod Bracket with rest of
bracket remaining on rod. This allows you to slide the
rod into one whole bracket on the Return Panel and
then screw remaining bracket on opposing wall.

20
Set Fixed Panel into Floor Bracket and mark hole.
Make sure both of the boom corners of the Fixed
Panel measure the same distance from the front of the
threshold tile (or fiberglass pan). Check panel is level
again. Loosen allen screw on boom of Floor Bracket
and rotate adjustable end which fits on Fixed Panel for
either le or right installation. Mark hole to drill for Floor
Bracket. Remove Floor Bracket before drilling.
19
Complete Shower Rod install.
Tighten Fixed Panel Brackets and tighten the screws on
Shower Rod Brackets.

21
Drill hole, install anchor and install Floor Bracket.
Using a ⁄" drill bit, drill hole and install anchor
(if necessary). Trim excess from the anchor with
utility knife. Fill this hole with a lile bit of silicone to
waterproof. Reinstall Floor Bracket, making sure
that the plastic insert is in place inside Floor Backet.
Screw Floor Bracket down to secure.
Important: When fixing floor clamp to
fiberglass shower base use a 1/8" drill bit
to pre-drill the hole and screw directly
into shower base. You will not use the
green anchor on shower base.
22
Install Sliding Panel Handle.
Carefully install the Slider Panel Handle on the Sliding
Panel. Be sure that Slider Panel is siing on folded
cardboard to avoid cracking or chipping.
Slider Panel Slider Panel

24
Install the Slider Panel.
Li the door and slowly lower the rollers onto the shower
rod. When lowering the panel be sure the boom of
Slider Panel slides into the floor bracket.
Important: Gently slide door from side
to side making sure it is not binding
anywhere along the boom. Check the
door is level and lines up evenly
with the wall.
23
Slider Panel
Install Sliding Panel Rollers.
Carefully install the Slider Panel Rollers on the Slider
Panel. Be sure that Slider Panel is siing on folded
cardboard to avoid cracking or chipping.

25
Level and adjust Slider Panel Rollers.
If Slider Panel is not level when hung from Rollers you
can use the Roller Adjustment Tool to level it up.
Slightly loosen the Allen bolt on back of Roller. Insert
Roller Adjustment Tool into the hole on the edge of the
roller backing plate and turn it to adjust level. Once
Slider Panel is level, tighten Allen bolt on back of Roller.
26
Install the Roller Guides.
Install Roller Guide clips on Slider Panel to prevent the
door from being able to come o rollers. Make sure
there's no more than a ⁄" gap between the guides and
the Shower Rod. The Roller Guides need to be almost
touching the Rod to insure that the sliding door is
completely secure.
Slider Panel

28
Install Aluminum Floor Strip and optional Cap.
Install Aluminum Floor Strip to prevent water leakage.
Measure distance from Floor Bracket to Return Panel
and cut Aluminum Floor Strip to fit. Apply a small bead
of silicone under strip for waterproofing and set in
place. If Aluminum Floor Strip is cut slightly short, apply
a small bead of silicone under Aluminum Floor Strip Cap
and place on top of cut end of Aluminum Floor Strip as
close to the Return Panel as possible.
Tape aluminum strip to floor surface using masking
tape and allow to dry for 24 hours.
27
Adjust Slider Panel Stoppers.
Important: Slide door gently when
testing door stops so as not to damage
the door or the fixed panel.
Adjust location of Slider Stoppers on Shower Rod to
ensure the Slider Panel does not touch the Return
Panel and the Slider Panel Handle does not touch
the Fixed Panel.

29
Trim Rubber Blocks.
Trim the Rubber Blocks under the Fixed Panel and
Return Panel with a utility knife so that they are flush
with the glass panel resting on top of them.
30
Apply silicone to seal Panels.
Apply silicone around the wall and floor surface of the
Fixed Panel and Return Panel. You need to silicone both
the inside and outside edges ensuring the gap between
glass and tile is completely sealed.
Once sealed, spray the silicone with water and use
a spatula (available in our Install Kit) to remove any
silicone residue.
Important: It is critical that the
silicone is given 24 hours to set
and cure.

31
Install Weather Strips.
Install the plastic weather strip on panels. The shortest
Weather Strip goes on the edge of the Fixed Panel.
The longest piece goes on the outer edge of the Slider
Panel near the handle. The mid-length piece goes on
the inside of the Slider Panel.
Once silicone has cured, you're done!
Please register your warranty using the instructions on
the back cover of this document.
Table of contents