Glen GL 4018 User manual

COLD PRESS SLOW JUICER
GL 4018
This GLEN Slow Juicer is fully warranted against any defect arising out of defective materials or faulty
workmanship for a period of two year from the date of purchase. Should any defect develop in this
product, the customer should bring the product to the nearest authorised service centre, where the
company undertakes to get the product repaired free of charge.
This warranty is not valid if :
lThe use and care instructions have not been followed.
lDefects are caused by accident, misuse, abuse or commercial use.
lThe repair work is carried out by persons not authorised by the company.
lAny modification or alteration of any nature is made in the product.
lNormal wear & tear of the product is not covered under warranty
lThe Bill/Cash memo and copy of warranty card is not presented.
lPlastic parts and strainers are not covered under warranty as they may break if not handle carefully.
Under no circumstances, whether based on limited warranty or otherwise shall the company be liable
for incidental, special or consequential damages. Use of product indicates acceptance by you of the
aforesaid terms and conditions.
WA RR AN TY
DEALER’S STAMP & SIGNATURE
PRODUCT NAME COLD PRESS SLOW JUICER GL 4018
SERIAL NO.
DATE OF PURCHASE
Imported & Marketed by/In case of customer complaints Contact Manager - Customer Support
Glen Appliances Pvt. Ltd., I-34, DLF Ind. Area, Phase-I, Faridabad, India.
Helpline : 0129-2254191
E-mail : [email protected] Website : www.glenindia.com
SPECIFICATIONS
Supply Voltage : 230 V AC 50 Hz
Power : 250 W
Rating : 20 min.
Speed : 34 RPM
Bowl Capacity : 500 ml
Net Weight : 8 Kg approx
Carton Dimensions : 420x290x345
(LxWxH) mm

IDENTIFY YOUR COLD PRESS SLOW JUICER GL 4018
S No.
Parts Name
Function
1
Dust Cover
Cover the juice cup assembly, prevent the dust in under
the condition of no use.
2
Pusher
For pushing the food.
3
Feeding Tube
Cover with feeding tube.
4
Squeezing Screw
Auger for squeezing the fruits and vegetables.
5
Strainer Assembly Fine
Fine strainer for fruits and vegetables.
6
Bowl
Juicer bowl.
7
Outlet Cap Assembly
Cap for regulating the juice flow.
8
Pulp Filter
For filtering the pulp.
9
Juice Container
Juice collecting container.
10
Basic Unit
The main motor unit.
11
Strainer Assembly Coarse
For more pulp in juice and leafy vegetables.
12
Cleaning Bruch
For cleaning the strainer hole.
13
Pulp Container
For collecting the pulp.
14
Power Cord
For Power connection.
PARTS NAME AND FUNCTION
USING YOUR SLOW JUICER
STRAINER
COARSE STRAINER
The bigger holes of the strainer produce thicker
juice when tender and soft fruits are extracted
such as strawberries, kiwis and tomatoes. It is
useful to extract more pulpy juice can also be used
for dry leafy vegetables and wheat grass.
FINE STRAINER
The smaller holes stainer used for all fruits and
vegetables when you need less pulp in the juice.
14
The juicer is also provided with a stainless steel
pulp filter on the Juice collector in case clearer
juice is required.

Assembling the Juicer
Place the juicing bowl onto the motor base with the
centre hub over shaft of base. When connecting
the juicing bowl to the motor base, ensure that the
3 holes in the bottom of the juicing bowl align with
the 3 lugs of the motor & rest properly.
Install strainer assembly (the triangle mark on the
strainer assembly must be aligned with the one on
the bowl marking triangle/unlock).
Arrow is at the top of the strainer and the arrow is
at front on bowl which is to align.
Align juice squeezing screw with the centre of
strainer assembly & then rotate a little and insert it
downward.
Strainer Assembly and Auger if not fixed properly
the feeding tube will not lock and the juicer will not
start, so fix the same properly.
Align the triangle on the feeding tube with the
unlock mark on the juicer bowl, then rotate
clockwise, align the triangle with the lock mark so
it, is completely locked. Otherwise it will not start.
Place the container on the both sides of juice outlet
and pulp outlet, put pusher on. The juicer is now
ready.
Do not put finger, spoon or chopsticks and other
things into the inlet of feeding tube.
Press Button“ON/OFF”when food is processed
and no more juice flow out. After the motor and
screw stop completely, take the juice cup away
from juice outlet and slag door.
Juice Outlet Cap Assembly
This is fixed & adjustable by sliding it can be
closed then juice collect in bowl & can be released
in one go & can also be used for mix juicing.
Fresh fruit juice is recommended to drink as soon
as possible, exposed to the air a long time, taste
and nutritional value will be affected.
ON
REV
BUTTON SWITCH FUNCTION
ON Press to start the juicer.
OFF To stop the juicer.
REV Press & hold if some thing
is stuck & you need to unclog.
IMPORTANT: If the juicing bowl and lid are not
correctly assembled, the juice press will not
operate. This is a safety feature.
ONCE ALL THE PARTS ARE ASSEMBLED
FIRMLY. THEN PLUG THE CORD INTO AN
ELECTRICAL OUTLET.
Do not pre-operate before adding materials or do
not operate with an empty bowl.
Using your juice press
Clean fruit and/or vegetables thoroughly, for
juicing. If juicing fruit with hard seeds, pit the fruit.
Remove any hard inedible skins, i.e. skin of
melons, pineapples and mangoes prior to juicing.
If citrus fruits are being used, remove the skin prior
to juicing.
For oversized pieces of fruit and/or vegetables, cut
the food into small pieces that fit into the feeding
tube and insert it through the feed tube.
Press the food pusher slowly down until all fruit or
vegetables have gone through the juice press. Do
not exert too much pressure on the pusher, as this
could affect the quality of the end result and it
could damage the unit.
Pull the
button up
JUICING FULL APPLE/ORANGE (medium size)
Pull the button up when to squeeze full apple,
orange & big ingredient. Put the fruit in centre & fill
to flip it into feeding tube.
Press down the button, and lock swivel bracket
when squeeze small volume of fruits such as
tomatoes cut pcs, peeled pomegranate etc., then
put the ingredients into feed inlet.
Press down
the button
base unit

Maintenance
Regular maintenance of your appliance will keep it
safe and in proper operational order.
Cleaning
Always ensure that the Juice Press is turned off
and the power cord is unplugged from the power
outlet before cleaning, disassembling or
assembling and storing the appliance.
Do not Immerse motor base in water or other
liquids.
PROBLEM
POSSIBLE
WHAT TO DO
No power to juicer.
Juicer not plugged in.
Check the juicer is plugged in.
Motor has stopped.
Bowl has been over filled with
material.
Press the reverse power button to try
and clear the clog.
May need to try this a few times.
Overuse has caused the motor to
shut down as a precaution to
overheating.
Switch off and let the motor cool
before using again.
Juicing bowl and lid are not
correctly assembled.
Assemble the juice press correctly.
Leaking from beneath
the bowl.
Silicon pad on base of bowl not
correctly inserted.
Make sure silicon pad on base of bowl
is correctly inserted.
Tan on the bowl, strainer
and cleaning brush.
Natural color from juicing
materials.
This is perfectly normal. to reduce
discoloration ensure you rinse and
clean the appliance immediately after
use.
Squeaking noise during
operation.
Juicing noise from squeezing
screw.
This is perfectly normal. Ensure you
do not overload the juicer.
Too much pulp is in
juice.
The strainer is damage.
Change to new one.
Whenever possible, rinse parts immediately after
each use, use the cleaning brush to thoroughly
clean the fine mesh holes of the strainer. Brush the
inside of the strainer under running water, holding
it up towards the light to ensure the fine mesh
holes are not blocked.
Use the cleaning brush provided with the Juice
Press. This brush has been specially designed to
clean the strainer. Simply place brush inside the
stainer and under running water twist the brush
left and right to remove the pulp from the strainer.
You will need to use the brush provided to clean
the inside of the strainer, this should also be done
under running water.
Trouble Shooting
Before you call for service review the trouble shooting tips first.
SAFETY PRECAUTIONS
The rating for model GL 4018 is 20 minutes. Do
not operate this appliance for more than the rating
period continuously. Allow to cool for 15 minute
and then resume operation.
Dishwasher Unsafe
Do not place the attachment parts in the
dishwasher violating the warning may cause
serious injuries or damage to the product.
Damage Check
Always check the appliance is in good working
order and that all removable parts are secure.
Check the power cord supply carefully for any cuts
or damage.
Store in a Safe Place
When not in use store your appliance and all its
accessories and instruction manual in a safe and
dry place.
Keep away from Children
do not let children to operate without supervision.
Disassemble after use:
Appliance should be unplugged and disassembled
after use.
• Do not put anything as a pusher (for
chopsticks, spoons etc.) other than pusher
itself.
• Remove any hard seeds or stones.
• Do not operate with wet hands
Tips for Juicing
Cut food items into small pieces for optimal
extraction.
Do not place ice or frozen fruit into the Juice Press.
Do not push the food down with excessive force.
The food pusher is designed to gently push food
down.
Insert food at a regular speed, allowing all the pulp
to be extracted. for maximum efficiency, do not
rush this process. When Juicing leafy greens or
wheat grass, It is suggested that you mix it with
fruits or other hard vegetables for optimal results.
Juice nuts only with other foods such as soaked
soybeans or liquids. The juice from fresh fruit and
vegetables is an important part of a balanced diet.
When selecting fruit and vegetables for juicing,
always select fresh and well ripened specimens.
Fresh fruit and vegetables carry more flavour and
juice than those that are not properly ripened. Juice
is best consumed when freshly made as this is
when its vitamin and mineral content is highest.
Your Juice Press can handle most varieties of fruit
and vegetables. If using fruit with hard inedible skin
(i.e. watermelons, pineapple, mangoes etc.)
always peel the skin before piacing in the Juice
Press. The skin of citrus fruit should also be
removed before fruit is placed in the Juice Press.
For better tasting citrus Juice, also remove the
inner white peel from the fruit, Fruit with stones or
hard seeds (i.e. mangoes, nectarines, apricots,
and cherries) should be pitted before juicing. A
small amount of lemon can be added.
The Juice Press is not suitable for juicing very hard
and starchy fruits or vegetables such as sugar
cane. when juicing fruit and vegetables of different
consistency it may help to juice different
combinations, i.e. juice soft fruit first, (i.e.
oranges) then follow with hard fruit (i.e. apples).
This will help you achieve maximum juice
extraction. If juicing herbs or leafy vegetables,
wrap them together to form a bundle before placing
in the Juice Press or combine them with other
ingredients for juicing.
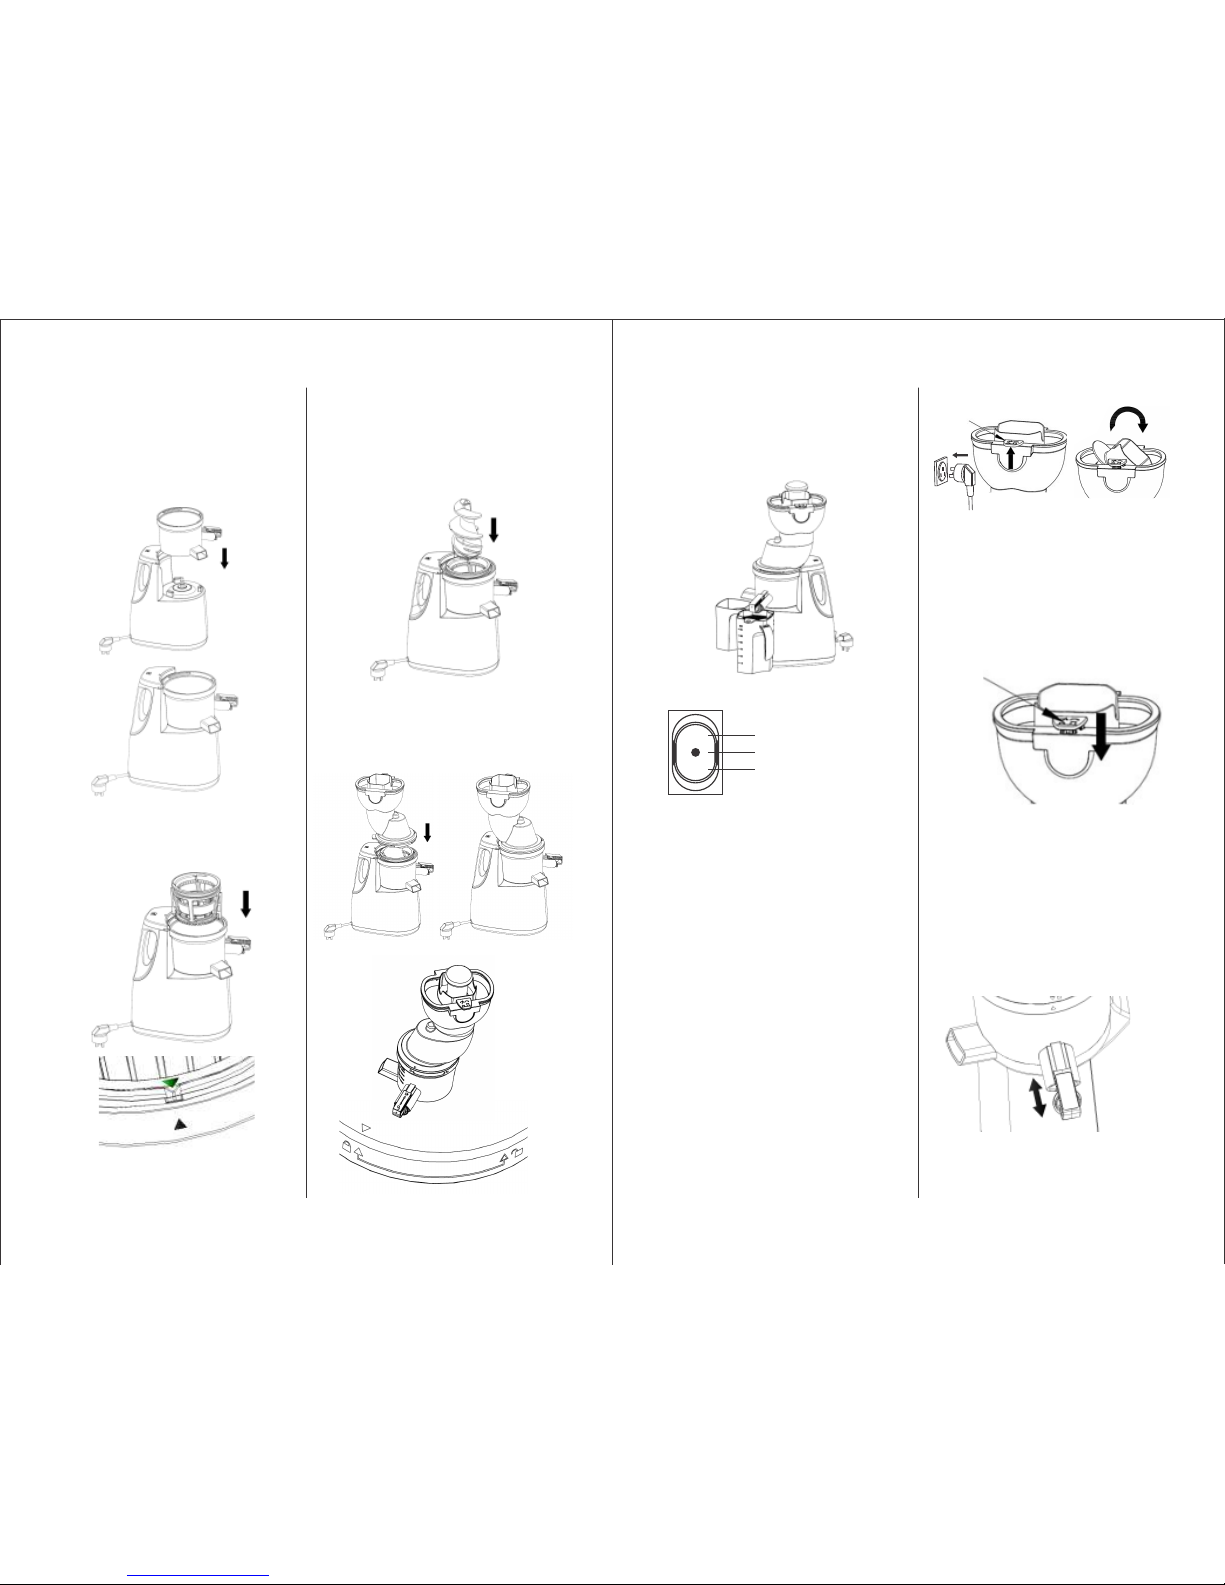
Note: The Juice Press will only function if all
parts have been assembled correctly the feeding
tube is in position.
Table of contents
Other Glen Juicer manuals