GB
20
General instructions on the
working method
appliance which enables you to
work the soil very comfortably.
With the appliance, you can
break out, crumble and loosen
the soil, weed, mix compost
under and fertilise a fruit and
vegetable garden in addition to
caring for the edges of your
lawn. The following instructions
for use should provide you with
tips and ideas with regard to the
correct handling of the appli-
ance. The appliance's steel
tongs work with oscillating rota-
tional movements at an angle of
90°. It achieves 760 of these
rotational movements forwards
and backwards in one minute.
The maximum working depth
amounts to 80 mm. It can be led
in the direction of plants and
between them without damaging
their roots.
Please ensure that you
only use the appliance
to work soil which does not
contain any stones.
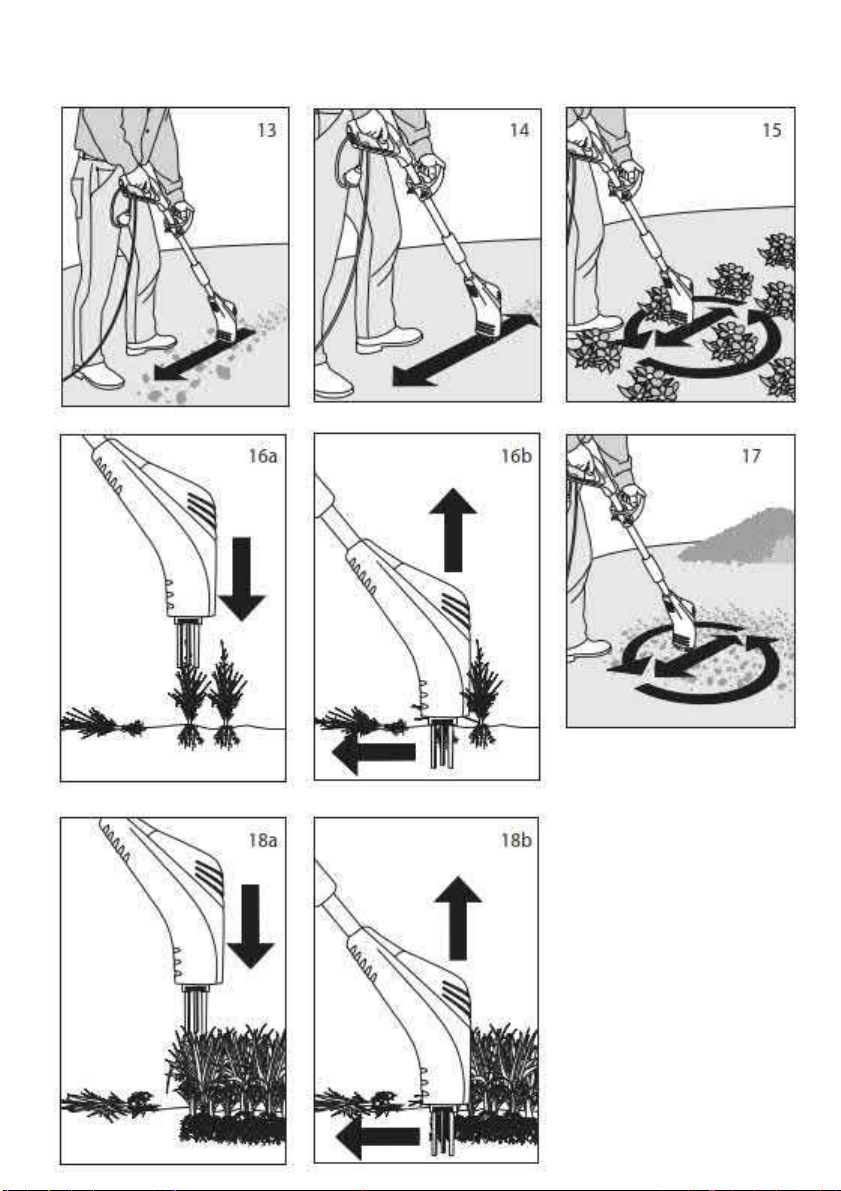
Breaking the soil out
(Fig. 13)
In spring, the soil must be broken
out if it is too compact. To do so,
the appliance is led in a drawing
motion. Insert the switched on
appliance in the soil away from
the body and pull it slowly in
your direction. If necessary, repeat
this working movement until you
have reached the required work-
ing depth and loosening extent.
Air, water and nutrients can pen-
etrate the soil once more and the
soil biology is activated.
Note:
If the soil has become extremely
hard so that you can only work
other commercially available
appliances), we recommend that
you initially loosen the soil with
the bar spade. To do so, insert
the bar spade in the soil and
move it slowly back and forth. In
order to thoroughly loosen the
soil, continue with the appliance
as described under Breaking the
soil out.
Crumbling the soil
(Fig. 14)
You can use the appliance to
easily and quickly prepare your
bed for the seeds. To do this, the
switched on appliance is slowly
moved back and forth. The seed
bed can be easily structured and
consistency. The best precondi-
tion for a successful development
of your sowings.
Note:
If the soil is heavily compacted,
it must be broken out before
crumbling. To do so, guide the
appliance in pulling working
movements as described under
Breaking the soil out.
Loosening the soil
(Fig. 15)
A regular loosening of the soil
reduces the development of
weeds and promotes the healthy
development of your plants.
Guide the switched on appli-
ance in your bed and around
your plants. The appliance can
be easily led in forwards, circu-
lar or pulling movements.
Also comfortably loosen under-
neath the shrubs. The appliance
works in a manner which cares
for the roots.
Note:
If the soil is compacted due to it
not being regularly loosened in
the past, it must be broken out
ance in pulling working move-
ments as described under Break-
ing the soil out.
Weeding
(Fig. 16 a/b)
Weeds divest your useful plants
of space. A regular removal of
weeds is important in order to
ensure that your plants can
switched on appliance, guide it
directly to above the weed
which is to be removed and
slightly submerge into the soil
with the appliance. Now pull the
appliance in your direction.
Remove the appliance again
and repeat the action if neces-
sary. Repeat this until the weed
has been loosened together with
its root. You now only have to
collect the removed weeds.
Mixing fertiliser and compost
under
(Fig. 17)
In order to ensure that your plants
receive nutrition, it is necessary
to regularly work fertiliser or
8. Working Correctly
(e.g. by tying the start button to
the guide handle).
Caution! The tool coasts.
Never lift or carry the
appliance when the motor is
running. When starting, ensure
that the steel tongs are at a suffi-
cient distance from your feet!
Caution! Working position
Always guide the appliance
with both hands (one hand on
the guide handle, the other on
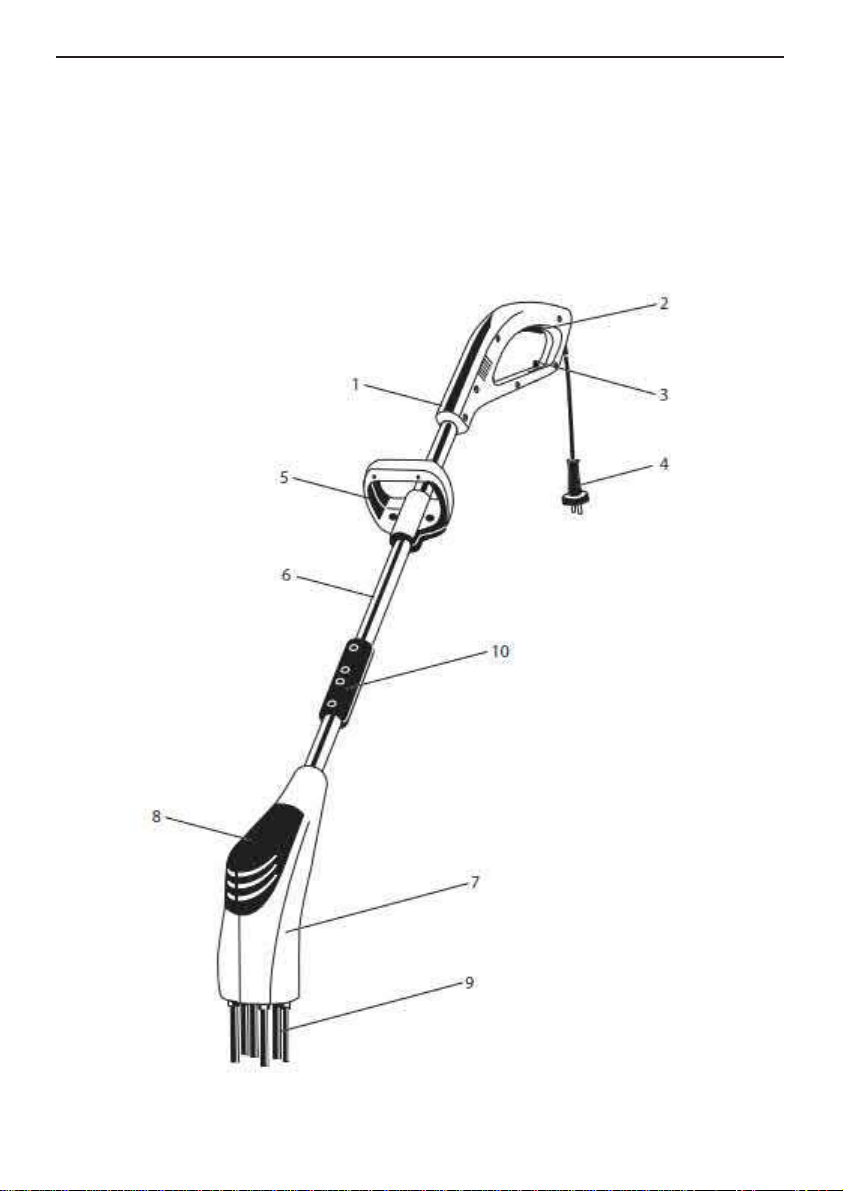
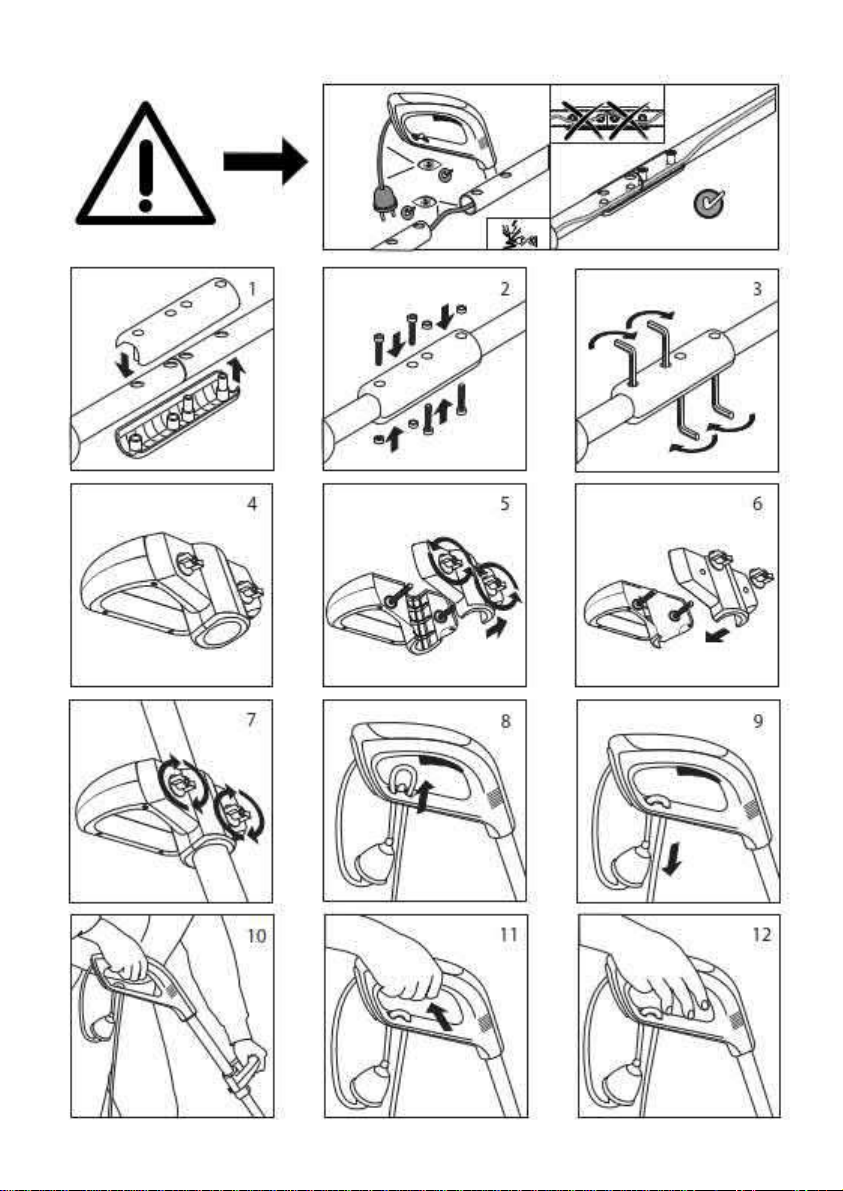
the intermediate handle (Fig.10).
https://www.kipogeorgiki.gr/
https://www.kipogeorgiki.gr/