GM-Racing 7156 Genius Race II 80R User manual

7156 Genius Race II 80R 7158 Genius Race 120R
GRAUPNER GmbH & Co. KG – Postfach 1242 – 73230 Kirchheim/Teck – www.graupner.de
Manual
CONTENTS:
1. Introduction..................................................................................................................01
2. Warnings ......................................................................................................................01
3. Connecting Motor - Battery.........................................................................................02
4. ESC Stick Position Setup............................................................................................03
5. User Mode Setup.........................................................................................................03
6. Error Descriptions.......................................................................................................05
7. Firmware Updates .......................................................................................................06
8. Specifications ..............................................................................................................07
9. Warranty .......................................................................................................................09

These operating instructions are part of this product. They contains important notes to the operation and
handling. Please take this into consideration when you pass on the product to third parties. Neglect of
the operating instructions and the safety instructions lead to expiring the warranty.
Graupner constantly work on the advancement of all remote control systems; changes of the scope of deli-
very in form, technology and equipment we must reserve ourselves therefore. Please have understanding
for the fact that from data and illustrations of this operating instructions no requirements can be derived.
Please keep these instructions for further reference!
1. INTRODUCTION
Congratulations for buying this state of the art brushless and brushed speed controller. It is adapted for
use with high efficient and powerful brushless motors.
Important notice: Please read this manual carefully before using your controller. Only then can you have
full profit of the potential of your controller, and avoid mistakes.
2. WARNINGS:
The controller‘s CE certificate doesn‘t unbind users from their obligation to use ultimate caution•
Should the motor refuse to start up, or after a crash, then you should immediately set the transmitter‘s•
control stick to the OFF position to avoid any overload to the controller.
Use only motors delivered by GM-Racing or Graupner which are designed for the intended range of•
voltages!
Use only high performance batteries by Graupner or GM-Racing. Using batteries with an increased•
internal resistance may lead to the destruction of the controller! Do never use a power supply.
Never leave your transmitter unattended when a battery is connected. In case of a deficiency this•
may cause an outbreak of fire on the model or its environment.
Neither the controller nor any other electronic components should ever come in touch with water.•
Protect the controller against dust, dirt, humidity, vibrations, or other dangerous elements (with the
exception of water-sealed controllers).
Never run the motor on a separate battery. This will destroy the controller or the motor, and leads to•
the loss of our warranty.
Never mix up polarities. Use plug systems which offer protection against wrong polarity. Avoid short-•
circuiting and blocking the motors.
All cables and connectors should have good insulation. Short-circuits may lead to the destruction•
of your motor.
This product isn‘t designed for use by children under the age of 14, it isn‘t a toy!•
Graupner-controllers are designed for use in battery-driven, radio-controlled models only, any other•
use is not permissible. Using this device on a passenger-carrying model is forbidden!
Motors, gears or gearboxes, and propellers are dangerous objects. Never keep next to or in front of•
the danger area of the drive!
Technical defects or failures of mechanical or electronic parts may lead to an unexpected start-up of•
the motor, with parts of it flying off, maybe causing severe injuries.
Always check the service range of transmission of your model first thing while it‘s still on the ground•
(hold the model tightly!). Try again with motor on and also with fast changes of the throttle stick.
Don‘t make any changes on the structure and design of your controller unless they are described•
in the manual!
Limited warranty: Graupner Ltd cannot survey the proper application of the mounting and using re-•
gulations, nor the working methods and conditions during the installation, use, operation, and servi-
cing of the controller. Therefore Graupner Ltd cannot take on any liability for any loss, damage, or
costs resulting from an incorrect use or operation of the product, or connected in any way with incor-
rect use or operation.
Only those components and accessory parts which have been recommended by us may be used.•
Use only genuine and matching Graupner connectors and accessory parts.
Make sure whenever you start connecting and operating the controller, that:•
01 Manual Genius Race

BATTERY ( - )
BLUE - MOTOR (A)
ORANGE - MOTOR (C)
BRUSHLESS
MOTOR
SENSOR
BATTERY ( + )
YELLOW - MOTOR (B)
BRUSHED
MOTOR
ORANGE - MOTOR (+)
YELLOW - MOTOR (+)
BLUE - MOTOR (-)
Brushed motor
forward -
reverse
Brushless
Motor
Brushed motor
forward only
BRUSHED
MOTOR
BATTERY ( - )
BATTERY ( + )
ORANGE - MOTOR (-)
YELLOW - MOTOR (-)
BLUE - MOTOR (-)
BATTERY ( - )
BATTERY ( + )
Manual Genius Race 02
your transmitter is the only one working on that frequency,•
is switched on,•
and has the throttle set to position “STOP”.•
Use only high-quality batteries by Graupner or GM-Racing. Cheap or old batteries with a high inter-•
nal resistance may lead to poor
performance or even to the destruction of the controller.•
3. CONNECTING MOTOR - BATTERY
This ESC can handle both brushless DC motor and brushed DC motor, therefore, you do need great
care when connecting the ESC with a motor to be used. (see the figure below for the correct configura-
tion between the ESC and a motor).

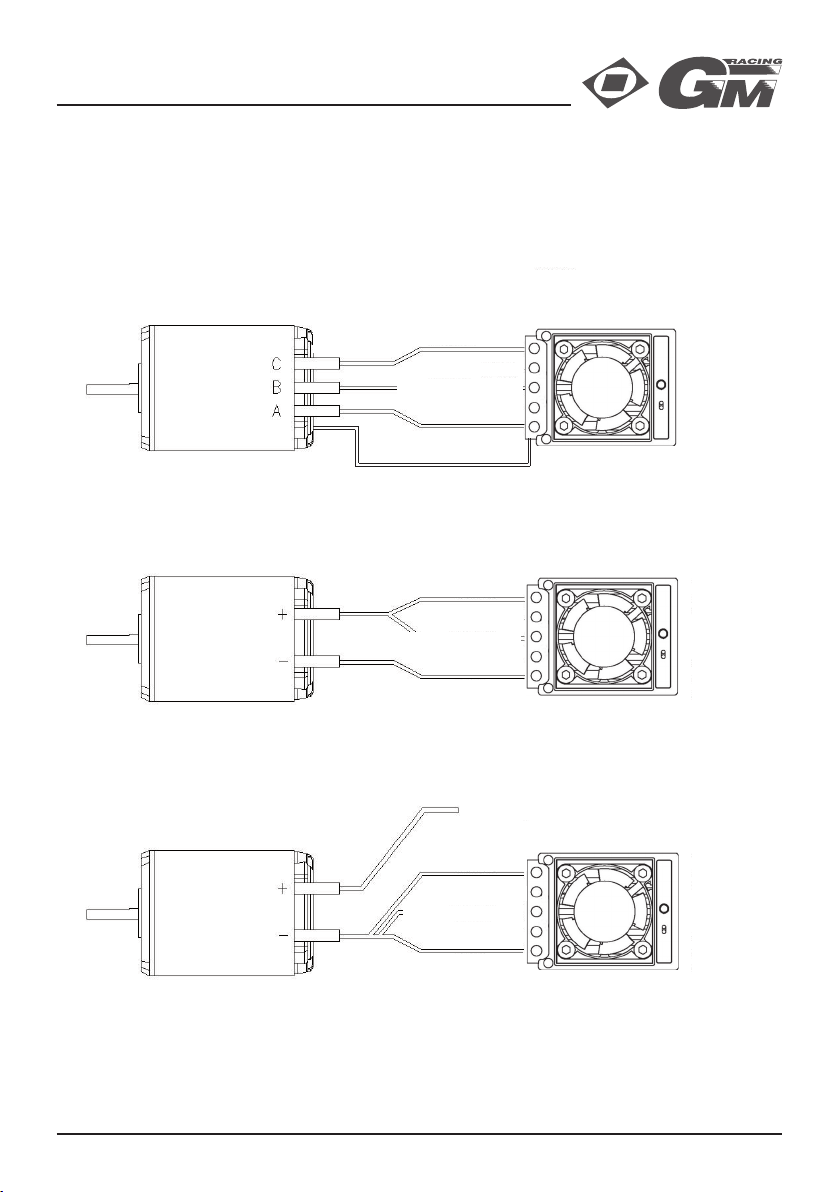
Note: when using a brushed DC motor, please ensure that the configuration between the ESC and the
motor must be in accordance with the selected application in the ESC ( one way-forward or two wayre-
versible). See the detailed configuration in the figure.
If soldering would be applied to the ESC over 5 seconds, it could damage the ESC.
4. ESC STICK POSITION SETUP
ESC-Sounds : Do, Re, Mi, Fa, So, La, Ti Do.
1. Turn on the transmitter.
2. Connect the power battery, and switch on the ESC.
3. If all connections are correctly completed, the motor should beep depending on the throttle stick
location.
Do, Re ~~ Do, Re, Mi : If the stick is at the neutral position,
Do, Re ~~ : If the stick is at other position instead of neutral position.
4. If you press and hold the setup button for over 1second, the Green LED should flash. At this time,
detach your hand from the button, then the Green LED should be ON and the motor should beep (So,
So, La, La, So, So sound) to indicate that the neutral position has been set.
5. Move the throttle stick to the full power position, then the red LED should be ON to indicate that the
full power position has been set.
6. Move back the throttle stick to the full reverse or full brake position, then the red and Green LEDs
should be ON to indicate that the full reverse or full brake position has been set.
7. Move the throttle stick to the neutral position, then the red and Green LEDs should flash alterna-
tively, and the motor should beep (So, Fa, Mi, Re, Do sound ), then the Green LED should be ON to
indicate that the ESC is now ready to be used.
Note 1: It is ONLY necessary to make this initial throttle setup again if you are using a different transmit-
ter or the settings have been changed.
Note 2: After switching on the ESC, the stick position setup COULD be done ONLY before a motor
turns.
Note 3: If full power position setting can not be done, pls change the Throttle reverse / Normal.
5. USER MODE SETUP
1. Turn on the transmitter.
2. Connect the power battery, and switch on the ESC.
3. If all connections are correctly completed, the motor should beep depending on the throttle stick
location.
Do, Re ~~ Do, Re, Mi : If the stick is at the neutral position,
Do, Re ~~ : If the stick is at other position instead of neutral position.
4. If you press and hold the setup button for over 1 second, the Green LED should flash for 2 seconds
then the red LED should immediately flash. At this time, detach your hand from the button, the motor
should beep (Mi, Re, Do, Re, Mi sound), the red LED should flash once constantly to indicate that the
ESC is now in the User mode setting.
Flashing repeatedly once enters the Motor type setting. 18 different program features can be set in
this controllers as below.
In the programmable mode, if the setup button is shortly pressed and detached, it comes out of the
programmable mode, the ESC is ready to be used.
1. Select Motor Type
2. Battery Type
3. Cut Off Voltage
4. Power Curve
03 Manual Genius Race

Manual Genius Race 04
5. Advance Timing - Timing 0° and motor type sensored = Zero Boost Modus, indicated by green LED
flashing in neutral
6. Acceleration
7. Start Power
8. Start Current Limit Function
9. Current Limit Function
10. Reverse Function
11. Reverse Delay
12. Max Reverse Amount
13. Neutral Width
14. Speed Mixing Brake
15. ABS Brake Function
16. Auto Brake Amount
17. Minimum Brake Amount
18. Maximum Brake Amount
19. Factory Setting
Every time the throttle stick is moved from the closed position to the full power position and again to the
closed position (closed > full power > closed is one cycle ) the program will change. The Red LED will
flash in accordance with the features as follows
1) Red LED flashes once ( Motor type setting available )
2) Red LED flashes twice ( Battery type setting available )
……
18) Red LED flashes 18 times (Maximum Brake Amount setting available )
19) Red LED flashes 19 times ( Factory setting available )
At the selected program function to be changed, if the throttle stick is stayed at the full power position
for over 4 seconds, the red and green LED should flash to indicate that you can now change an existing
parameter to a new parameter. In order to change the existing parameter, move the stick to the minimum
or lower position then again to the full power position.
The inside number of the brackets in the chart is the number of the LED flashing.•
The cutoff voltage in automatic mode is as like:•
- LiPo : 3.2 V per cell = 1S: 3.2 V, 2S: 6.4 V - autodetect number of cells•
- LiFe : 2S: 4.4 V•
- NiMh/ NiCd : 4-6 cells, the higher voltage between 3.0 V and 50% voltage when the switch is•
on.
After you select your wanted parameter, stay the throttle stick at the neutral position for over 4 seconds,
the red LED should flash and the motor should beep (Mi, Re, Do, Re, Mi sound) to indicate that the
selected parameter is stored at the ESC and other parameters can be selected.
After changing all parameters, if the button is shortly pressed, the ESC is now in standby mode. At this
stage, if you want to change another program parameter, repeat the procedure above, or if all settings
are complicated, turn off the speed controller.
The ESC status when the ESC is powered on through by the setup button.•
- If the ESC receives correct signals from a receiver, the motor should beep (Do and Re sound),
and if the throttle stick is at the neutral position at this time, the motor should beep ( Do, Re, and
Mi sound ) to indicate the ESC is now in the standby mode.
- If the ESC does not receive any signals from the receiver, the red LED should flash.
Note: Both stick position setting and programmable parameter setting can be ONLY proceeded
through by the setup button right after the ESC is turned ONLY before a motor turns.
The LED status during operation.•
Full Throttle : Red LED on
Neutral : Green LED on
Full Reverse or Full Brake : Both LED on
Error : Red LED flashes

6. Error description
No Signal: The red LED should be off for 1 second then flash. After 5 seconds, the red LED should be
OFF then waiting for the proper signal.
Low Battery: The red LED should be off for 1 second then double flashes repeatedly.
Sensor Error: it is automatically converted to sensorless mode, and you can check the error status
ONLY in the programmer.
High Temperature: The red LED should be off for 1 second then 4times- flashes repeatedly.
Under the ESC connected to the programmer, max speed, average speed, max temperature, and•
max currents can be seen on the screen of the programmer. Once the ESC is correctly connected
with the programmer, the previous traveling data is automatically removed. And, the after switching
on the ESC, if the throttle stick stays at the neutral position for over 5 seconds, the previous trave-
ling data is also automatically removed.
When doing factory setting, the motor type and stick position should stay as they are.
Please make sure the configuration between the ESC and the motor. Otherwise, it can damage the•
ESC. You do need great care, especially when change
05 Manual Genius Race
Sensorless Sensored Brushed Default
1 Motor Type Brushless Sensorless (1) / Brushless Sensored (2) / Brushed (3) Sensored
2 Battery Type LiPo (1) / LiFe (2) / NiMh (NiCd) (3) LiPo
3 Cut Off Voltage Auto (1) / 3,0 V ~ 6,5 V (0,1 V Step) Auto
4 Power Curve Soft (1) / Linear (2) / Hard (3) Linear
5 Advanced Timing 0`(1) ~ 25`(6) / 0 (1) ~ 10 (6) 25‘ / 10
6 Acceleration Lowest (1) / Low / Normal / High / Highest (5) Highest
7 Start Power Lowest (1) / Low / Normal / High / Highest (5) Lowest
8 Start Current Limiter OFF, 10% (2) ~ 100% (11) OFF
9 Current Limiter OFF, 10% (2) ~ 100% (11) OFF
10 Reverse Function One Way (1) / Two Way 1 (2) / Two Way 2 (3) Two Way (2)
11 Reverse Delay 0.2 s(1) / 0.5s / 0.8s / 1.3s / 1.8 s / 2.5 s (6) 2.5 s
12 M. Reverse Amount 20% (1) ~ 100%(9) 60%
13 Neutral Width Narrow (1) / Normal (2) / Wide (3) Normal
14 Speed Mixing Brake 0% (1) ~ 100% (11) 0%
15 A.B.S.-Brake OFF (1) / Weakest / Weak / Normal / Strong / Strongest (6) OFF
16 Auto Brake Amount 0 % (1) ~ 100% (11) 0%
17 Min. Brake Amount 0 % (1) ~ 100% (11) 30%
18 Max. Brake Amount 0 % (1) ~ 100% (11) 100%
19 Facory Setting All parameters to be initialized as factory default values (2)

Manual Genius Race 06
7. FIRMWARE UPDATES:
Firmware updates for the GM Genius ESC are transferred conjunction with a PC running Windows XP,
Vista or 7. For this you also require the USB interface, Order No. 7168.6, the adapter lead, Order No.
7168.6A and a Y-cable Order No. 3936.11 which are available separately.
The programs and files required for this are available from www.graupner.de in the Download area for
the corresponding products.
Install the Firmware Update Utility Graupner and the USB drivers on your computer. Check the system
requirements!
Disconnect the 3-pin cable of the ESC from the receiver. Then plug it into one jack of the Y-cable, into
the second jack of the Y-cable the adapter cable of the USB interface is connected. The male connector
of the Y cable remains free. Connect the controller to the power supply, but do not switch on.
Start the Graupner Firmware Update Utility.
Under [COM Port Setup] select the correct COM
port, i.e. the one to which the USB lead is connec-
ted. If you are not sure of this, press the button
„Search“ and select in the pop-up window „Silicon
Labs CP210x USB to UART Bridge“ and press „OK“.
Select Baud Rate: 19200. Under [Interface Type]
click on Signal 2:Vcc 3:Gnd.
Now click on the “Browse” button and select the fol-
der containing the previously loaded firmware file
ending in *.bin. If everything is correct, the file will
appear in the corresponding window.
The firmware files are encoded in product-specific
form, i.e. if you accidentally select a file which does
not match the product (e.g. transmitter update file
instead of ESC file), then the pop-up window “Pro-
duct code error” will appear, and you will not be able to start the update procedure.
Press the “Program” button in the software. Wait briefly until you see movement in the progress bar. This
make take up to five seconds, depending on the computer.
Press and hold the SETUP button of the ESC and
switch it ON.
After a few seconds the Status screen displays the message “Found target device…”; you can now
release the SETUP button, and the firmware update process commences.
If the device is not recognised, if the pop-up window “Target device ID not found” appears, or if the
process fails before 100% is reached, you must restart the update procedure. Repeat all the steps as

Genius Race II 80R Genius Race 120R
Motor Type Brushless and Brushed Brushless and Brushed
Voltage Range LiPo: 1-2 cell / LiFe: 2 cells / NICd &
NiMH: 4-6 cells
LiPo: 1-2 cell / LiFe: 2 cells / NICd &
NiMH: 4-6 cells
Frequency Sensored 2 KHz 2 KHz
Frequency Sensorless 32 KHz 32 KHz
Brushed Frequency 2 KHz 2 KHz
BEC 6.0 V / 3.0 A 6.0 V / 3.0 A
Continous Current 80 A 120 A
Peak Current 150 A 200 A
On-Resistance (at 25° C) 0.0012 Ω/Phase 0.00065 Ω/Phase
Updateable Firmware Yes Yes
Overtemp. Protection Yes Yes
Low Voltage Cut Off protection Yes Yes
Plugged Fan Optional Yes
Dimensions 30.6 x 33.8 x 23.6 mm 30.6 x 33.8 x 32.1 mm
Weight (with wires) approx. 80 g 100 g
8. SPECIFICATIONS:
07 Manual Genius Race
described above.
The Status display and the Progress bar show the
progress of the firmware update. The update is com-
pleted when the message “Complete…100%” or
“Complete!!” appears.
Switch off the ESC and connect it to the receiver
again.

EG Decleration of Conformity:
For the products
GM-GENIUS RACE 80R Order No. 7156
GM-GENIUS RACE 120R Order No. 7158
PROGRAMMER Order No. 7152 for GM-GENIUS RACE 80R, 120R
We confirm that the electromagnetic compatibility directives (2004/108/CE) are met.
Harmonized standards applied:
EN 61000-6-1
EN 61000-6-3
Graupner GmbH & Co. KG
Henriettenstr. 94-96
73230 Kirchheim/Teck
Managing Director Stefan Graupner
73230 Kirchheim/Teck, den 29.04.2011 Signature
Environmental Protection Notes
When this product comes to the end of its useful life, you must not dispose of it in the ordinary
domestic waste. The correct method of disposal is to take it to your local collection point for re-
cycling electrical and electronic equipment. The symbol shown here, which may be found on the
product itself, in the operating instructions or on the packaging, indicates that this is the case.
Individual markings indicate which materials can be recycled and re-used. You can make an important
contribution to the protection of our common environment by re-using the product, recycling the basic
materials or recycling redundant equipment in other ways.
Remove batteries from your device and dispose of them at your local collection point for batteries.
If you don’t know the location of your nearest disposal centre, please enquire at your local council of-
fice.
Manual Genius Race 08

Graupner-Zentralservice
Servicestellen / Service / Service après-vente
Italia
France UK
SverigeEspana
SchweizCeská Republika/Slovenská
Republika
Wir gewähren auf dieses Erzeugnis eine / This product is / Sur ce produit nous accordons une
24
Monaten
months
mois
Die Fa. Graupner GmbH & Co. KG, Henriettenstraße 94-96,
73230 Kirchheim/Teck gewährt ab dem Kaufdatum auf
dieses Produkt eine Garantie von 24 Monaten.Die Garan-
tie gilt nur für die bereits beim Kauf des Produktes vorhan-
denen Material- oder Funktionsmängel. Schäden, die auf
Abnützung, Überlastung, falsches Zubehör oder unsach-
gemäße Behandlung zurückzuführen sind, sind von der
Garantie ausgeschlossen. Die gesetzlichen Rechte und
Gewährleistunsansprüche des Verbrauchers werden durch
diese Garantie nicht berührt. Bitte überprüfen Sie vor ei-
ner Reklamation oder Rücksendung das Produkt genau
auf Mängel, da wir Ihnen bei Mängelfreiheit die entstan-
denen Unkosten in Rechnung stellen müssen.
Graupner GmbH & Co. KG, Henriettenstraße 94-96,73230
Kirchheim/Teck, Germany guarantees this product for a pe-
riod of 24 months from date of purchase. The guarantee
applies only to such material or operational defects witch
are present at the time of purchase of the product. Dama-
ge due to wear, overloading, incompetent handling or the
use of incorrect accessories is not covered by the guaran-
tee.The user´s legal rights and claims under garantee are
not affected by this guarantee. Please check the product
carefully for defects before you are make a claim or send
the item to us, since we are obliged to make a charge for
our cost if the product is found to be free of faults.
La société Graupner GmbH & Co. KG, Henriettenstraße
94-96, 73230 Kirchheim/Teck, Allemagne, accorde sur ce
produit une garantie de 24 mois à partir de la date d´achat.
La garantie prend effet uniquement sur les vices de fonc-
tion-nement et de matériel du produit acheté. Les dom-
mages dûs à de l´usure, à de la surcharge, à de mauvais
accessoires ou à d´une application inadaptée, sont ex-
clus de la garantie. Cette garantie ne remet pas en cau-
se les droits et prétentions légaux du consommateur.
Avant toute réclamation et tout retour du prouit, veuillez
s.v.p. cotrôler et noter exactement les défauts ou vices.
Garantie-Urkunde
Warranty certificate / Certificate de garantie
Übergabedatum
Date of purchase/delivery
Date de remise
Name des Käufers
Owner´s name
Nom de I`achateur
Straße, Wohnort
Complete adress
Domicie et rue
Firmenstempel und Unterschrift
des Einzelhändlers
Stamp and signature of dealer
Cachet de la firme et signature
du detailant
Graupner GmbH & Co. KG
Henriettenstrasse 94-96
D-73230 Kirchheim / Teck
Servicehotline
(+49) 01805 47 28 76
Montag - Freitag 7:30 -11:45
und 12:30 -16:00 Uhr
Anguera Hobbies
C/Terrassa 14
E 43206 Reus (Tarragona)
(+34) 97 77 55 32 0
Graupner Service France
Gérard Altmayer
86, rue St. Antoine
F 57601 Forbach-Oeting
(+33) 3 87 85 62 12
GiMax
Via Manzoni, no. 8
I 25064 Gussago
(+39) 30 25 22 73 2
Baltechno Electronics
P.O. Box 5307
S 40227 Göteborg
(+46) 31 70 73 00 0
Graupner Service Schweiz
Kirchweg 18
CH-5614 Sarmenstorf
(+41) 56 66 71 49 1
Graupner Service UK
Brunel Drive
GB, NEWARK, Nottingham-
shire
NG242EG
(+44) 16 36 61 05 39
RC Service Z. Hnizdil
Letecka 666/22
CZ-16100 Praha 6 - Ruzyne
(+42) 2 33 31 30 95
Kit Flammang
129, route d’Arlon
L 8009 Strassen
(+35) 23 12 23 2
Jan van Mouwerik
Slot de Houvelaan 30
NL 3155 Maasland VT
(+31)10 59 13 59 4
Garantie von
warrantied for
garantie de
CD-Electronics GmbH
Belgie/Nederland Luxembourg
7156 Genius Race II 80R
7158 Genius Race 120R
09 Manual Genius Race

Manual Genius Race 10
_________________________________________________________________________________
_________________________________________________________________________________
_________________________________________________________________________________
_________________________________________________________________________________
_________________________________________________________________________________
_________________________________________________________________________________
_________________________________________________________________________________
_________________________________________________________________________________
_________________________________________________________________________________
_________________________________________________________________________________
_________________________________________________________________________________
_________________________________________________________________________________
_________________________________________________________________________________
_________________________________________________________________________________
_________________________________________________________________________________
_________________________________________________________________________________
_________________________________________________________________________________
_________________________________________________________________________________

Graupner GmbH & Co. KG
Henriettenstraße 94 – 96
D-73230 Kirchheim/Teck
Germany
www.graupner.de
Änderungen sowie Liefermöglichkeiten vorbehalten. Lieferung durch den Fachhandel. Bezugsquellen
werden nachgewiesen. Für Druckfehler kann keine Haftung übernommen werden.
Specifications and availability subject to change. Supplied through specialist model shops only. We will
gladly inform you of your nearest supplier. We accept no liability for printing errors.
Sous réserve de modifications et de possibilité de livraison. Livraison uniquement au travers de maga-
sins spécialisés en modélisme. Nous pourrons vous communiquer l’adresse de votre revendeur le plus
proche. Nous ne sommes pas responsables d’éventuelles erreurs d’impression.
Con riserva di variazione delle specifiche e disponibilità del prodotto. Fornitura attraverso rivenditori
specializzati.Saremmo lieti di potervi indicare il punto vendita più vicino a voi. Si declina qualsiasi res-
ponsabilità per errori di stampa.
May 2011 - EN V1.0
This manual suits for next models
1
Table of contents
Other GM-Racing Controllers manuals
Popular Controllers manuals by other brands

Leadtek
Leadtek Turbidity manual

ACTUATECH
ACTUATECH RP10 instruction manual

Schweitzer Engineering
Schweitzer Engineering SEL-351P quick start

Parker
Parker 08R Series Installation and service instructions

Pratissoli
Pratissoli PNR1520 operating instructions

Extron electronics
Extron electronics MediaLink MLC Plus 84 Series user guide