GMC 1976 TRANSMODE User manual

4-1- '&3 Tk,
r2
,s
►
: w A
G tvv
~
'
c
ry t
r c'-_
X-7680
8
GM
C
197
6
TRANSMOD
E
OPERATING MANUA
L
EFFECTIVE WIT
H
VEHICLE IDENTIFICATION NUMBE
R
TZE336V100880 (23'
)
TZE366V100883 (26'
)
IMPORTANT' OPERATING, SAFETY AND MAINTENANCE INSTRUCTION
S
GMC
GM
Part No
. 2010488

A WORD TO GMC OWNERS
. .
.
This manual has been prepared to acquaint you with the operation an
d
maintenance of only the chassis and body components of your TransMod
e
Vehicle, and to provide important safety information
. It is supplemented b
y
convenient folders which provide additional information on vehicl
e
maintenance, emission control, and warranties
. We urge you to read thes
e
publications carefully and follow the recommendations to help assure th
e
most enjoyable and troublefree operation of your vehicle
.
When it comes to service, remember that your GMC MotorHome deale
r
knows your chassis and body components best and is interested in you
r
complete satisfaction
. Return to him for Guardian Maintenance Service an
d
any other assistance you may require
.
GMC Truck and Coach maintains a number of Zone Offices throughout th
e
country
. Should you have a problem that cannot be handled through norma
l
channels, follow the procedure presented in Section 6 of this manual unde
r
the heading, "Owner Assistance"
.
We would like to take this opportunity to thank you for choosing a GM
C
product—and assure you of our continuing interest in your motoring pleasur
e
and satisfaction
.
GMC Truck & Coach Divisio
n
FOR CONTINUING SATISFACTION, KEEP YOUR VEHICL
E
ALL GM
. GENERAL MOTORS PARTS ARE IDENTIFIED B
Y
ONE OF THESE TRADEMARKS
:
GM

GMC
TRANSMODE
VEHICL
E
Operating Manua
l
This manual should be considered a permanent part of the vehicle, an
d
must remain with the vehicle at time of resale
.
For vehicles sold in Canada, substitute the name General Motors o
f
Canada Limited, wherever the name GMC Truck and Coach Divisio
n
appears in this manual
.
All
information, illustrations and specifications contained in this manua
l
are based on the latest product information available at the time o
f
publication
. The right is reserved to make changes at any time withou
t
notice
.
GMC Truck & Coach Divisio
n
General Motors Corporatio
n
Pontiac, Michigan 4805
3
TABLE OF CONTENT
S
Section
Pag
e
1
Before Starting Your Vehicle
5
2
Starting and Operating Vehicle
1
0
Steering Column Controls
1
2
Floor Controls
1
7
Instrument Panel and Controls
1
9
3
In
Case of Emergency
3 3
4
Appearance Care
3
9
5
Service and Maintenance
45
6
Specifications, Owner Assistance, Index, Gas Station Information
67
1

IMPORTANT INFORMATIO
N
ON VEHICLE LOADIN
G
OVERLOADING
MAXIMUM FRONT AND REAR AXL
E
CAUTION
WEIGHTS (AS MANUFACTURED
)
The weight of the cargoload must b
e
properly distributed over both the fron
t
and rear axles, although not necessaril
y
evenly
. The (VIN) plate shows th
e
maximum weight that the front axle ca
n
carry (front GAWR) and the maximu
m
weight that the rear axle (rear GAWR) ca
n
carry
. The GVWR represents the maximu
m
permissible loaded weight of the vehicl
e
and takes into consideration the engine
,
transmission, frame, brake, axle and tir
e
capabilities
. Actual front and rear en
d
weights at the ground can only b
e
determined by weighing the vehicle
. Thi
s
can be accomplished through highway weig
h
stations or other such commercial facilities
.
For assistance in this regard, consult you
r
Vehicle Loading
(23'
Model
)
GVWR RATING 10,500 LBS
.
FRONT GAW
R
4,200 LBS
.
REAR GAW
R
7,000 LBS
.
/1
l
*FRONT CURB 3,800 LBS
.
*REAR CURB 3,100 LBS
.
I
REAR CARG
O
& PASS
. LOAD
3,900 LBS
.
400 LBS
.
TOTAL
4,200 LBS
.
TOTAL
7,000 LBS
.
MAXIMUM TOTAL WEIGHT AT GROUND 10,500 LBS
.
*Curb weight is the maximum weight of the vehicle (as manufactured by GMC
)
without driver, passengers, or cargo but does include fuel and coolant
.
FRONT CARG
O
& PASS
. LOA
D
The components of your vehicle ar
e
designed to provide satisfactor
y
service if the vehicle is not loade
d
in excess of either the Gros
s
Vehicle Weight Rating (GVWR) o
r
the maximum Front and Rear Gros
s
Axle Weight Ratings (GAWR's
)
specified on the vehicle identificatio
n
number (VIN) plate located behin
d
the
right
front
access
door
.
Overloading can create seriou
s
potential safety hazards and can als
o
shorten the service life of you
r
vehicle
. Your dealer can advise yo
u
concerning proper loading condition
s
of your vehicle
.
2

GVWR RATING 11,700 LBS
.
FRONT GVW
R
4,200 LBS
.
REAR GAW
R
7,500 LBS
.
'FRONT CUR
B
FRONT CARG
O
& PASS
. LOAD
3,800 LBS
.
400 LBS
.
4,200 LBS
.
TOTAL
MAXIMUM TOTAL WEIGHT AT GROUND 11,700 LBS
.
*Curb weight is the maximum weight of the vehicle (as manufactured by GMC
)
without driver, passengers, or cargo but does include fuel and coolant
.
Vehicle Loading
(26'
Model
)
dealer
. Care should also be exercised to se
e
that the cargoload is distributed on bot
h
sides of the centerline of the vehicle a
s
equally as possible
.
EFFECT ON WARRANT
Y
Your New Vehicle Warranty does not appl
y
to any part of your vehicle "which ha
s
been subject to misuse
.
"
Any part whic
h
fails because of overloading has bee
n
subject to misuse
.
ALLOWABLE LATERA
L
WEIGHT VARIATIO
N
The independent suspension on this vehicl
e
could be adversely affected by a
n
unbalanced load on either side of vehicle
.
The allowable front lateral weight variation is 25
0
pounds
. The allowable rear lateral weigh
t
variation is 600 pounds
.
VIN (Vehicle Identification Number) Plat
e
The vehicle identification number plat
e
shows the GVWR and the front and rea
r
GAWR's for the vehicle to which they ar
e
attached
.
Gross Vehicle Weight (GVW) is the weigh
t
of the vehicle itself, all items added to th
e
vehicle after it has left the factory, th
e
driver and all occupants, and everythin
g
Q
GENERAL MOTORS CORPORATION
0
WARRANTY MAY BE VOIDED IF WEIGHT EXCEEDS ANY OF RATINGS SHOWN
. GROS
S
VEHICLE WEIGHT INCLUDES WEIGHT OF BASE VEHICLE, ALL ADDED EQUIPMENT, DRIVE
R
AND PASSENGERS, AND ALL PROPERTY LOADED INTO OR ONTO VEHICLE
.
RATINGS IN POUNDS• AS MANUFACTURE
D
GROSS VEHICLE WEIGHT FOR THIS VEHICL
E
MAXIMUM FRONT END WEIGHT AT GROUN
D
MAXIMUM REAR END WEIGHT AT GROUN
D
VEHICLE IDENTIFICATION NO
.
Vehicle Identification Plat
e
3

that is loaded into (or onto) the vehicle
.
The GVW must not exeed the GVWR
an
d
the front and rear weights of the loade
d
vehicle must not exceed the front and rea
r
GAWR's
.
CAUTION
TIRE
S
It is important that the tires on you
r
vehicle be of the proper size, and b
e
properly inflated
. It is important to avoi
d
over-inflation as well as under-inflation
. Se
e
the SERVICE AND MAINTENANCE sectio
n
for proper tire inflation pressures
.
When using your vehicle to transpor
t
luggage or other cargo, it i
s
recommended that the articles b
e
secured in place
. This precautio
n
will help prevent such items fro
m
becoming dangerous projectiles in th
e
event of an accident
.
For continuing satisfaction keep your vehicle al
l
GM
. General Motors Parts are identified by on
e
of these trademarks
:
GM
V
Delc
o
4

SECTION
1
BEFORE STARTING YOUR VEHICL
E
DRIVER CHECKLIS
T
Before Entering Vehicl
e
I
.
See that windows, mirrors and lights ar
e
clean
.
2.
Visually note inflation condition of tires
.
3.
Check that area to rear is clear if abou
t
to back up
.
Before Driving Of
f
1.
Lock all doors
.
2.
Position seat
.
3.
Adjust inside and outside mirrors
.
4.
Fasten seat belts
.
5.
Check that warning bulbs light when ke
y
is turned to start position
.
6.
Release parking brake (and see tha
t
brake warning light turns off)
.
7.
Be sure you understand your vehicle an
d
how to operate it safely
.
REMINDER
: Always lock entrance doo
r
when driving for greater security in th
e
event of an accident, to help kee
p
children from opening door, and fo
r
greater security against entry b
y
unwelcome persons while momentaril
y
stopped
.
INSIDE REARVIEW MIRRO
R
Switch inside mirror to night position t
o
reduce glare from following headlights
.
To raise or lower mirror to achiev
e
desired field of view, grasp mirror an
d
exert sufficient pressure by pushing o
r
pulling up, down, or sideways
.
KEY
S
Two sets of keys are furnished with you
r
vehicle
. Each key has a different cros
s
section so that it can be inserted only i
n
certain locks
.
Key with Square
Head—For ignition switc
h
only
.
Key with Oval Head—For
door lock, glov
e
box and other locking compartments
.
The code number of each key i
s
stamped on the "knock out" plug in th
e
key head
. Your dealer removed these plug
s
and placed them with the spare set o
f
keys in the special key envelope that wa
s
given to you at the time of delivery
. Fo
r
your protection
:
•
Record the numbers on the key envelop
e
and discard the key plugs
.
•
Keep the key envelope in a safe plac
e
such as your wallet, NOT IN TH
E
VEHICLE
.
In the event the original keys are lost
,
duplicates can be made by your dealer o
r
Inside Rearview Mirror
n
5

Seat Track Mechanis
m
a
locksmith
using
the
key
cod
e
information
.
Be sure to lock the glove box an
d
remove the key from the vehicle wheneve
r
it is necessary to leave the ignition ke
y
with an attendant
.
SEAT
S
The driver and passenger seats in th
e
driver compartment may be adjusted to
suit an individual's preference (except dua
l
passenger seat)
. To move seat forward o
r
backward, simply release the seat lockin
g
lever located on the left side of the seat
.
Once released, exert slight body pressure i
n
the direction desired
. Release lever to loc
k
the seat in the desired position
.
The seats can be swiveled to provid
e
easy entrance and exit
. To turn swive
l
seat, release locking mechanism by movin
g
seat swivel lever, then turn seat
.
CAUTIO
N
After adjusting a manually
operate
d
seat, always use body weight t
o
push forward and backward on sea
t
to twist seat to assure that sea
t
adjusters and
swivel lock
hav
e
securely engaged
in
the ne
w
position
.
Motion
of
the
sea
t
indicates that latches are no
t
properly engaging
. If the seat is no
t
locked in position, the chance o
f
injury and/or the severity of injur
y
in the event of an accident could in
-
crease
. If this condition persists, take th
e
vehicle to your dealer for service
. D
O
NOT adjust the driver's seat swivel o
r
fore and aft mechanism while the vehicl
e
is moving
. The seat could move unexpect-
edly causing loss of control of th
e
vehicle
.
Seat Swivel Mechanis
m
6

Entrance Door Latc
h
ENTRANCE DOO
R
DOOR LATC
H
Door must be locked from outside th
e
vehicle by inserting the key into the doo
r
key lock and turning
. To unlock, turn i
n
the clockwise direction
. Reverse th
e
direction to lock
.
To lock door from inside vehicle, pus
h
the lock button DOWN
. To unlock an
d
open door from the inside, pull the loc
k
button UP and pull on inside door handle
.
LAP BELT
S
Your vehicle is equipped with lap belt
s
in the driver and front passenger seatin
g
position(s)
. It is recommended that whil
e
the vehicle is in motion, all occupant
s
remain seated and keep lap belts buckle
d
snugly at all times
.
The front outboard seating positions—hav
e
retractors
which are designed t
o
automatically take up excess webbing
.
•
Adjust seat to your satisfaction and si
t
erect and well back in the seat
.
•
In a single motion, pull webbing acros
s
lap far enough to permit inserting meta
l
latch plate end of lap belt into th
e
buckle, until a snap is heard
. If webbing
is not pulled out far enough to reac
h
the buckle, let the belt rewind into th
e
retractor to release lock mechanism, s
o
belt can be pulled out to the prope
r
length
.
• Position lap belt across lap as LOW O
N
HIPS as possible
. To reduce the risk o
f
sliding under the belt during an accident
,
adjust to a SNUG FIT by pulling bel
t
firmly across lap in direction of retracto
r
so it can take up slack
.
NOTE
: Take care not to let the lap bel
t
twist while it is being rewound into th
e
retractor
. The bulk of the twisted bel
t
may cause the retractor to jam so it wil
l
not rewind further, while at the same tim
e
the retractor's locking mechanism ma
y
prevent the belt from being withdrawn
. I
f
a belt should become jammed, you may b
e
able to release it by working the belt i
n
or out until the belt rewinds far enoug
h
to unlock
. If lap belt remains jammed o
r
other parts of the restraint system do no
t
operate properly take the vehicle to you
r
dealer for service
.
CAUTIO
N
A snug fit and a low
lap
bel
t
position are essential to lessen th
e
chance of injury in the event of a
n
accident, because this spreads th
e
7

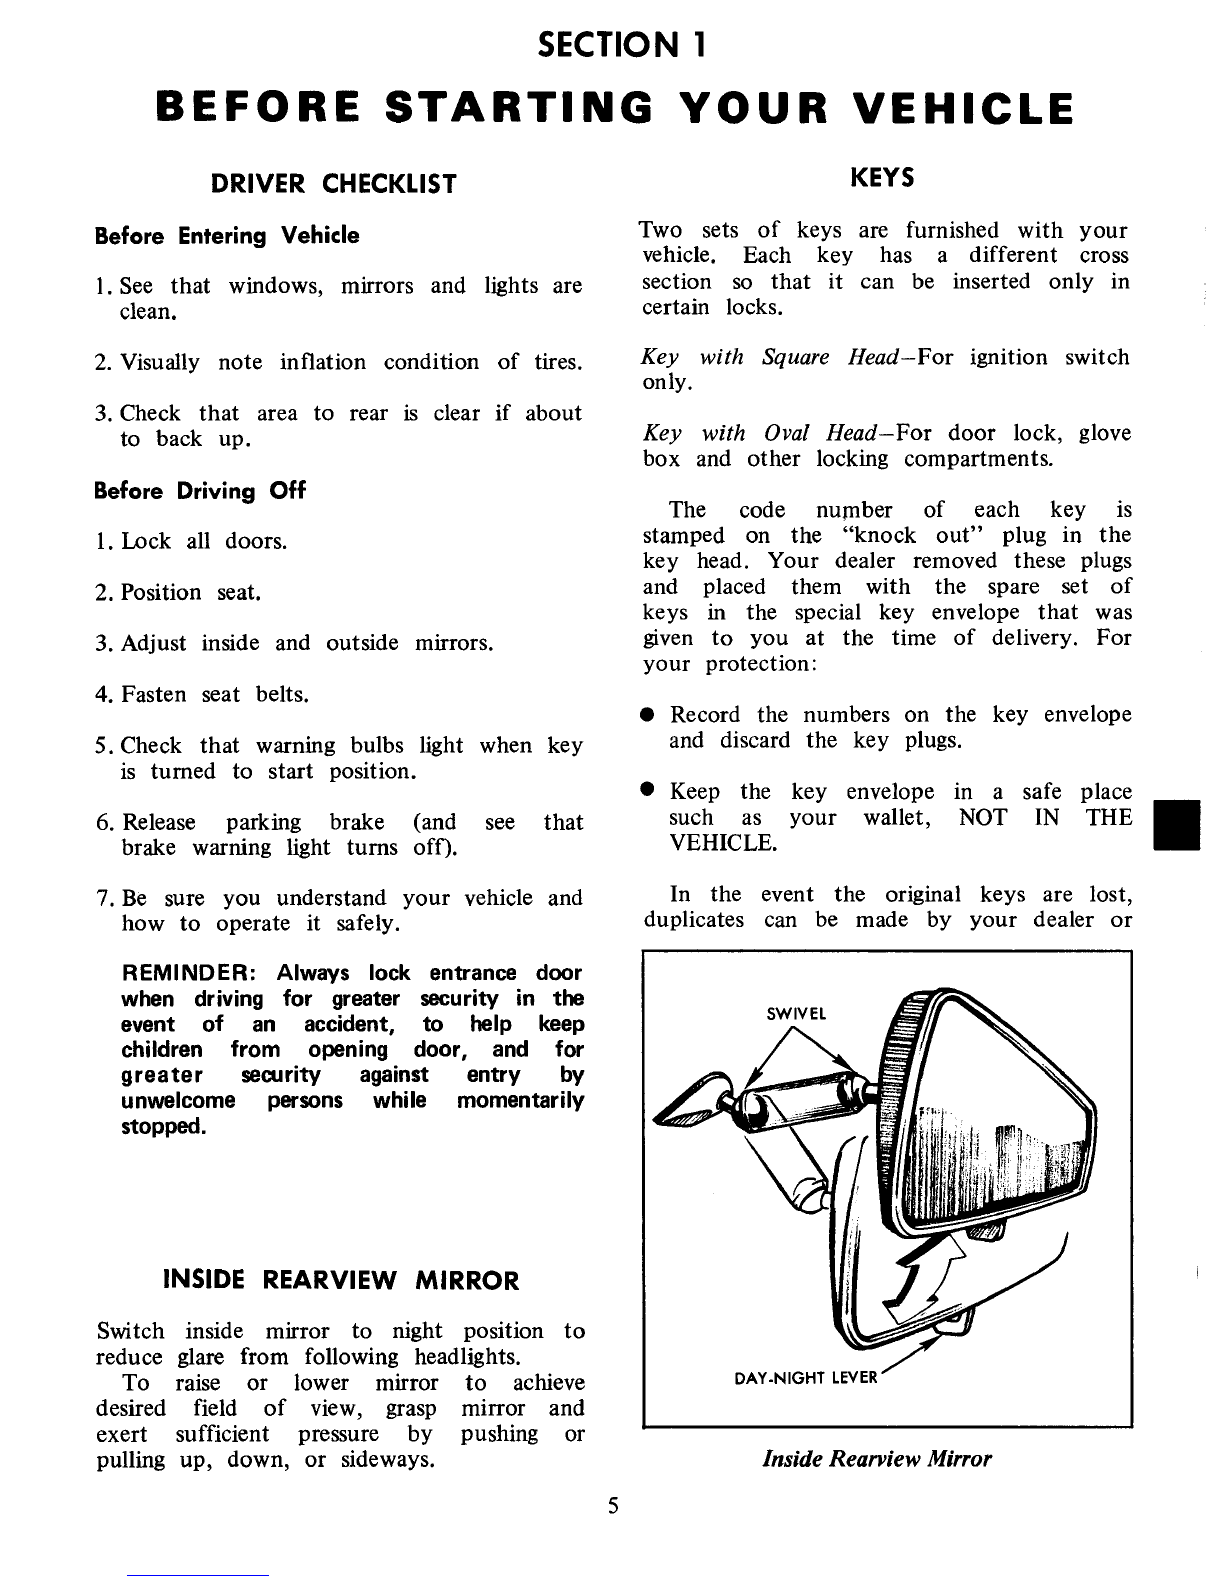
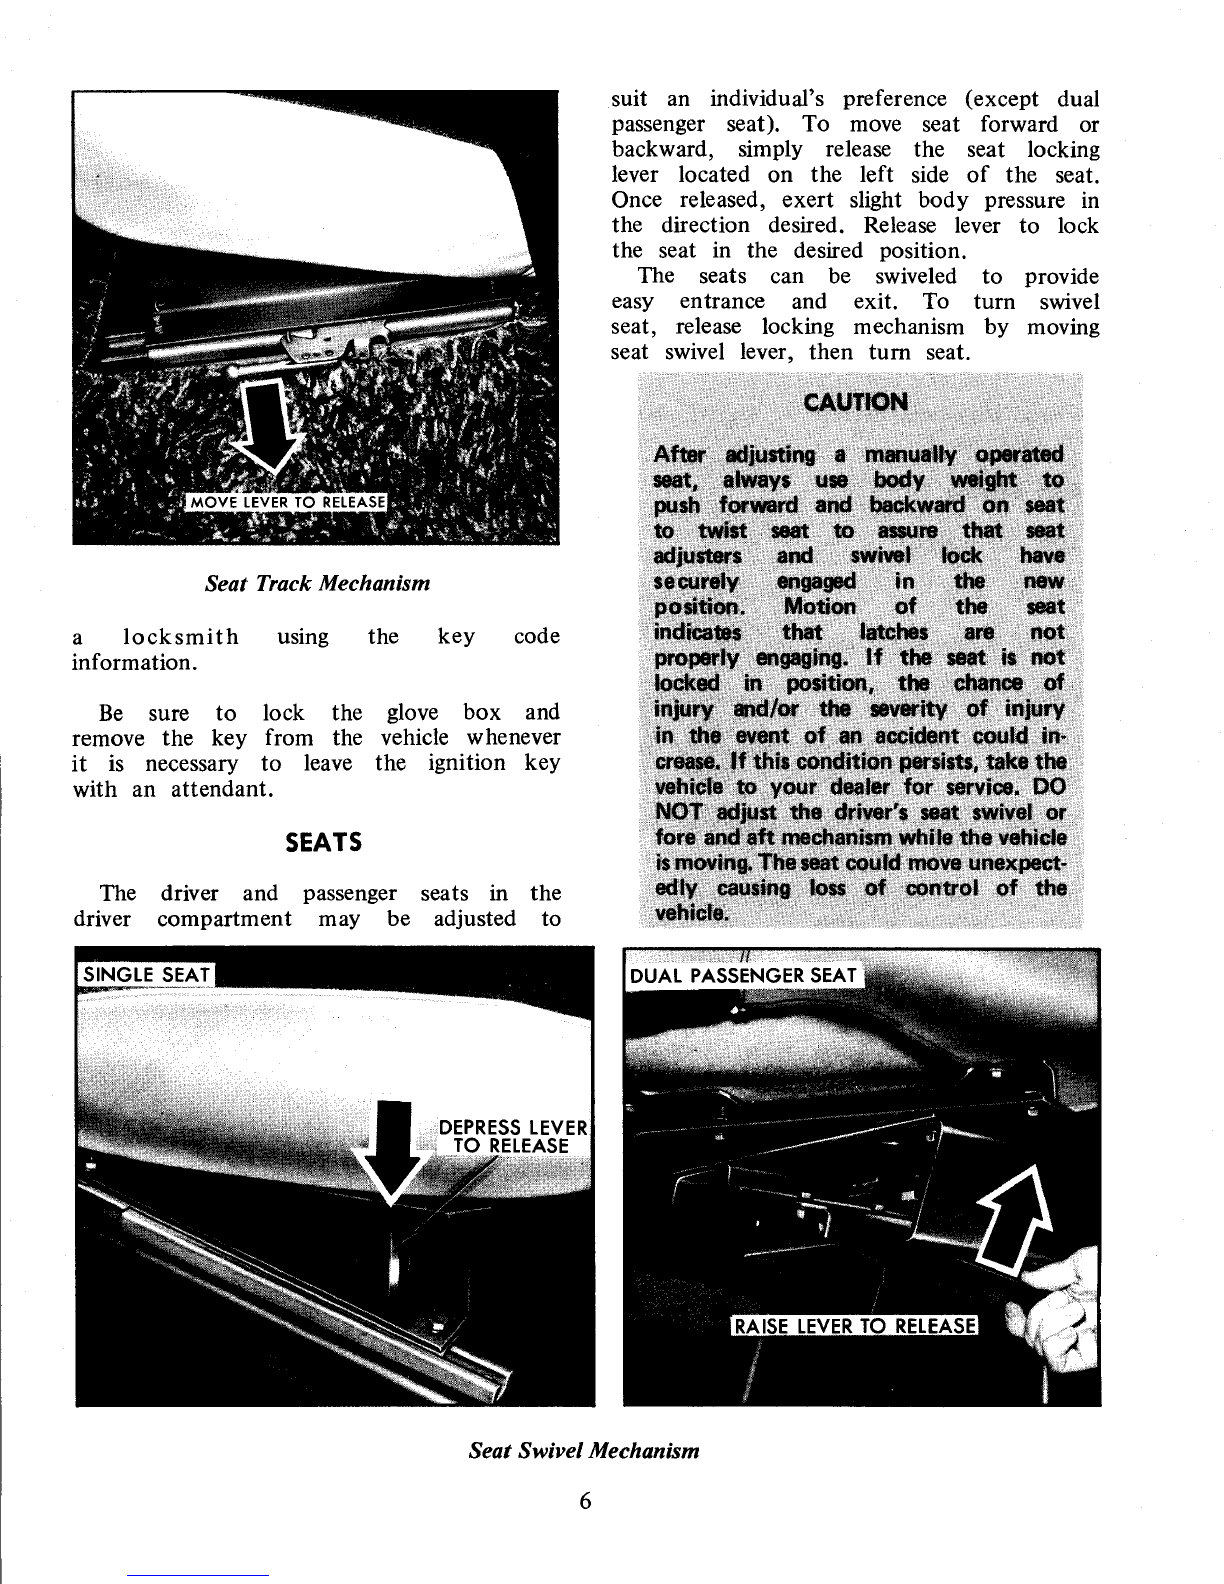
Lap Belt (Front Seating Position
)
force
exerted by the
lep belt in
a
collision over the strong hip bon
e
structure rather than across the sof
t
abdominal area
. To help lessen th
e
chance of injury in the event of a
n
accident
: Never use the same bel
t
for more than one person at
a
time
; avoid wearing belts in
a
twisted condition
; do not allow belt
s
or hardware to become damaged b
y
being pinched between the sea
t
structural (metallic) members or i
n
the door
.
Inboard seating position, front dua
l
passenger seat (if so equipped)—should
b
e
positioned and secured as above, an
d
adjusted to a SNUG FIT by pulling o
n
the end of the belt extending from the ad-
justable latch plate
.
•
To lengthen the lap belts at thes
e
seating positions, place adjustable latc
h
plate at right angle to the belt webbin
g
and pull on latch plate
; belt should the
n
slide easily through the adjustmen
t
feature
.
•
To unfasten seat belts, depress pus
h
button in center of buckle
.
• When no longer in use, front outboar
d
lap belts can be stowed by allowin
g
them to rewind into their retractors
.
LAP BELT INSPECTIO
N
•
Periodically inspect belts, buckles, latc
h
plates, retractors, and anchors for damag
e
that could lessen the effectiveness of th
e
restraint system
.
•
Keep sharp edges and damaging object
s
away from belts and other parts of th
e
restraint system
.
•
Replace belts if cut, weakened, frayed
,
or subjected to collision loads
.
•
Check that the anchor mounting bolt
s
are tight
.
•
Have questionable parts replaced
.
•
Keep belts clean and dry
.
•
Clean only with mild soap solution an
d
lukewarm water
.
•
Do not bleach or dye belts since thi
s
may severely weaken them
.
CHILD RESTRAIN
T
Children in vehicles should be restraine
d
to lessen the risk of injury in accidents, o
r
sudden stops
. In using any infant or chil
d
restraint system, read and comply with al
l
installation and usage instructions
.
All unused lap belts near the chil
d
should be stowed properly to help preven
t
them from striking the child in the even
t
of an accident
. Lap belts without storag
e
provisions should have buckles latched an
d
belts adjusted to remove slack
.
If a child is traveling in a vehicle no
t
equipped with an appropriate infant o
r
child restraint system, the followin
g
precautions should be taken
:
1
. Infants unable to sit up by themselve
s
should be restrained by placing them i
n
a covered padded bassinet place
d
crossways in the vehicle (widthwise) o
n
the seat
. The bassinet should be securel
y
restrained with the regular vehicle la
p
belts
.
8

2
. Children able to sit up by themselve
s
should be placed on a seat and la
p
belted
. Never allow a child to stand o
r
kneel on any seat or elsewhere in th
e
vehicle, once it is underway
.
TRAILER HAULIN
G
Towing a trailer will affect handling
,
durability and economy
. Maximum safet
y
and satisfaction depends upon proper us
e
of correct equipment and avoiding overload
s
and other abusive operation
.
The maximum loaded trailer weigh
t
which you can pull with your vehicl
e
depends on what special equipment ha
s
been installed
. GMC does not recommen
d
towing any trailer OVER 1,000 POUND
S
GROSS TRAILER WEIGHT
.
To assist in attaining good handling o
f
the Vehicle Trailer Combination, it i
s
important that the trailer tongue load b
e
maintained at approximately 10% of th
e
loaded trailer weight
. Tongue loads can b
e
adjusted by proper distribution of the loa
d
in the trailer, and can be checked b
y
weighing separately the loaded trailer and the
n
the tongue
.
The allowable passenger and cargo loa
d
(GVW) of this vehicle is reduced by a
n
amount equal to the trailer tongue load o
n
the trailer hitch
.
CAUTION
S
1.
Trailer brakes are required o
n
trailers
over
1,000 lbs
. loade
d
weight
.
2.
DO NOT tap into vehicle'
s
hydraulic brake
system i
f
operation
of the trailer
brak
e
system requires more than 0
.0
2
cu
: in
. of fluid displacement fro
m
the
vehicle's master cylinder
. Th
e
vehicle
'
s master cylinder flui
d
capacity will not be sufficient t
o
operate
both vehicle and traile
r
brakes
under
all
conditions
of
us
e
if
more
than
0
.02
cu
:
in
. of flui
d
displacement is required
.
3.
Whenever a trailer hitch i
s
removed, be certain to have an
y
mounting holes in underbod
y
properly sealed to prevent possibl
e
entry of exhaust fumes, dirt o
r
water
. (See "ENGINE EXHAUS
T
GAS CAUTION" in the followin
g
section
.)
OPERATION I
N
FOREIGN COUNTRIE
S
Your vehicle's engine is designed t
o
operate on unleaded fuel of approximatel
y
91
research octane number
.
If you plan to operate your vehicl
e
outside the continental limits of the Unite
d
States or Canada, there is a possibility tha
t
the best fuels available are so low i
n
anti-knock quality that excessive knockin
g
and serious engine damage may result fro
m
their use
. To obtain information on th
e
quality of fuels available in the countrie
s
in which you plan to travel write to GM
C
Truck & Coach Division, General Motor
s
Corporation, Pontiac, Michigan 48053 (or i
n
Canada write to General Motors of Canad
a
Limited, Owner Relations Department
,
Oshawa, Ontario), giving
:
•
The vehicle identification number (fro
m
plate attached to right side of das
h
panel or from the registration slip o
r
title)
.
•
The country or countries in which yo
u
plan to travel
.
It is recommended that you do no
t
operate your vehicle in any country no
t
having fuels meeting the requirements o
f
your vehicle's engine as these MAY CAUS
E
ENGINE DAMAGE for which GMC Truc
k
& Coach is not responsible under th
e
terms of the New Vehicle Warranty o
r
Emission Control Systems Warranty
.
9

SECTION
2
STARTING AND OPERATING VEHICL
E
ENGINE EXHAUST GAS CAUTIO
N
(CARBON MONOXIDE
)
Avoid inhaling exhaust gases because they contain carbon monoxide, which b
y
itself is colorless and odorless
. Carbon monoxide is a dangerous gas that ca
n
cause unconsciousness and is potentially lethal
.
If,
at any time, you suspect that exhaust fumes are entering the vehicl
e
from any source have the cause determined and corrected as soon as possible
.
If you must drive before the cause is corrected, drive only with ALL window
s
FULLY open and heating or cooling system adjusted for maximum ventilatio
n
(see below)
.
The best protection against carbon monoxide entry into the vehicle body is
a
properly maintained engine exhaust system, body and body ventilation system
.
It
is recommended that the exhaust system and body be inspected by
a
competent mechanic
:
•
Each time the vehicle is raised for lubrication or oil change
.
•
Whenever a change is noticed in
the
sound, alignment, or
appearance of th
e
exhaust system
.
•
Whenever the
exhaust system, underbody or rear of the vehicle is
damag
e
See your Maintenance Schedule folder for inspection procedure
.
To allow proper operation of the vehicle's ventilation system, keep front inle
t
grille clear of snow, leaves, or other obstructions at all times
.
Location of Holes in Kick-up Pane
l
10

OCCUPYING A PARKED VEHICLE WITH ENGINE RUNNING FOR A
N
EXTENDED PERIOD OF TIME IS NOT RECOMMENDED
.
Do not run engine in confined areas such as garages any more than neede
d
to move vehicle in or out of area
. When vehicle is stopped in a
n
UNCONFINED area with the engine running for any more than a short perio
d
of time, adjust heating or cooling system to force outside air into the vehicl
e
as follows
:
1
.On vehicles not equipped with automotive air conditioning, set fan t
o
medium or high speed and upper control lever to any position excep
t
"OFF
.
"
2
.On vehicles equipped with automotive Air Conditioning, set fan to mediu
m
or high speed and upper control lever to any position except "OFF"
.
The two rear windows (if so equipped) should be closed while driving t
o
avoid drawing dangerous exhaust gases into the vehicle through those openings
.
In addition, it is recommended that roof vent(s) be closed while driving
. If, fo
r
some reason, a rear window or roof vent must remain open for a period whil
e
driving, or electrical wiring or other cable connections to a trailer must pas
s
through the seal between them and the body, the following precautions shoul
d
be observed
.
• Close all windows
.
•
Adjust heating or cooling system to force outside air into the vehicle a
s
described in Step 1 or 2 above but with fan set at high speed
.
•Air vents in or under the instrument panel should be fully open
.
It is important that the inside engine cover be properly seated to preven
t
possible leakage of exhaust fumes into the vehicle through this opening
.
The kick-up panel at the rear of the floor (see illustration) contains hole
s
which may be utilized to facilitate access to the interior for installation o
f
certain interior equipment (i
.e
., access for wiring, plumbing, etc
.) The hole
s
should be plugged and sealed to avoid possible exhaust gas (carbon monoxide
)
intrusion into the interior of the vehicle
.
Whenever operating the optional motor-generator it is essential the left-rea
r
window (if so equipped) of the vehicle be kept closed to prevent possibl
e
entry of motor-generator exhaust gases into vehicle
. Inspect the motor-generato
r
exhaust system at vehicle lubrication intervals or when a change is noticed i
n
the sound, alignment, or appearance of the exhaust system or if it is damaged
.
Do not run motor-generator in a confined area, such as a garage
.
NOTE
: Particular care should be taken to prevent the possibility of carbo
n
monoxide exposure when the vehicle is modified for recreational or other usage
.
Additionally, some recreational vehicle appliances (such as lights, refrigerators
,
stoves, heaters) may generate carbon monoxide and should be used only i
f
there is adequate ventilation
.
11

STEERING COLUMN CONTROL
S
Steering Column Control
s
ANTI-THEFT STEERIN
G
COLUMN LOC
K
The anti-theft ignition switch, located o
n
the right side of the steering column, ha
s
five positions
:
Anti-Theft Steering Column Lock
• ACCESSORY—Permits operation o
f
electrical accessories when the engine i
s
not running
. To engage, push key in an
d
turn toward you (counterclockwise
.
)
•
LOCK—Normal parking position, lock
s
ignition and provides added thef
t
protection by preventing normal operatio
n
of steering wheel and shift controls
. Ke
y
cannot be turned to "LOCK" positio
n
and removed until transmission is place
d
in "PARK
.
"
•
OFF—Permits turning engine off withou
t
locking steering wheel and shift controls
.
•
RUN—Normal operating position
.
•
START—Permits engagement of starter
.
NOTE
:
The anti-theft steering column loc
k
is not substitute for the parking brake
.
Always set the parking brake when leavin
g
the driver's seat unattended
.
If difficulty is experienced in turning th
e
ignition key and lock knob to unlock th
e
ignition, attempt to turn the steering whee
l
as hard as possible in the direction th
e
wheels are turned
. At the same time tur
n
the ignition-lock knob in a clockwis
e
direction with as much effort as you ca
n
apply with your own hand
. Do no
t
attempt to use a tool of any kind t
o
apply additional force on the lock knob
,
as this could break the knob
.
PARKIN
G
When
leaving
the
driver's
sea
t
unattended
:
•
SET PARKING BRAKE
FIRST
.
(See
note on page 19
.
)
•
Place transmission selector lever in "PARK
.
"
•
Turn key to LOCK position
.
•
Remove key from steering column loc
k
(the buzzer will remind you)
.
•
Lock entrance door if leaving vehicle
.
A -
CRUISE
CONTROL
ENGAGE BUTTO
N
B - TURN
SIGNAL
LEVE
R
C - TILT-AWAY
STEERING WHEEL LEVE
R
D - IGNITION SWITC
H
E -
HORN
BUTTO
N
F - HAZARD
WARNING
FLASHER
BUTTO
N
G -
TRANSMISSION SELECTOR LEVER
12

1
3
NOTICE
: Do not leave your vehicle unattende
d
with the engine running. If the engine shoul
d
overheat while your vehicle is unattended, th
e
temperature warning light or gauge would g
o
unheeded which could result in extensiv
e
damage to your vehicle
.
STARTING ENGIN
E
1.
Apply the parking brake
.
2.
Place the transmission selector in
"P
"
or "N" ("P" is preferred)
. A starter safet
y
switch is designed to prevent starte
r
operation while the transmission selector i
s
in any drive position
. (If it is necessary t
o
re-start the engine with the vehicle moving
,
place the selector lever in "N"
.
)
3.
Depress accelerator pedal and activat
e
starter as outlined in the following, fo
r
different conditions
.
COLD ENGIN
E
Fully depress accelerator pedal an
d
slowly release
. With foot off the pedal
,
crank the engine by turning the ignitio
n
key to the "START" position— releas
e
when engine starts
. If engine starts bu
t
fails to run, repeat this procedure
. Whe
n
engine is running smoothly (approx
. 3
0
seconds) the idle speed may be reduced b
y
slightly depressing the accelerator pedal an
d
then slowly releasing
.
CAUTIO
N
Extended running of the engine (
5
minutes or more) without depressin
g
the accelerator pedal, could caus
e
damage to the engine or exhaus
t
system due to overheating
.
WARM ENGIN
E
Depress accelerator pedal about halfwa
y
and hold while cranking the engine
.
Transmission Shift Indicato
r
and Speedomete
r
EXTREMELY COLD WEATHER (BELOW 0° F
.
)
(-18° C
.) OR AFTER VEHICLE HAS BEE
N
STANDING IDLE FOR SEVERAL DAY
S
Fully depress and release accelerato
r
pedal two or three times before crankin
g
the engine
. With foot off the accelerato
r
pedal, crank the engine by turning the ke
y
to the start position—release key whe
n
engine starts
.
IF ENGINE FAILS TO START
:
•
First, fully depress and release th
e
accelerator pedal several times, the
n
remove foot from accelerator pedal an
d
crank engine
.
•
If engine still does not start, full
y
depress the accelerator pedal and hold t
o
the floor while cranking the engine
.
•
If the engine has been flooded wit
h
gasoline, it may start to run but no
t
have enough power to keep running
. I
n
this case, continue cranking with th
e
accelerator pedal fully depressed until th
e
engine cleans itself of excess gasoline an
d
runs smoothly
.
•
If engine doesn't crank properly due t
o
a discharged main battery (automotiv
e
battery), place the battery switch in th
e
"BAT BOOST" position
. Return th
e
switch to the "BAT NORMAL" positio
n
when engine starts
.

Turn Signal Leve
r
NOTE
: Do not continue cranking th
e
engine for more than 30 seconds at a tim
e
to prevent starter overheating
.
AUTOMATIC TRANSMISSIO
N
The transmission selector lever is located o
n
the right side of the steering column and th
e
shift indicator is located in the bottom sectio
n
of the speedometer cluster on the dash
.
•
"PARK"—Transmission lock when parkin
g
or while starting the engine
. Pull th
e
selector lever towards you to select o
r
release this position
. Never move th
e
selector lever to "PARK" position unles
s
the vehicle is completely stopped
.
"NEUTRAL" is the only other positio
n
in which your vehicle may be started
.
•
REVERSE "R"—For backing the vehicle
.
Bring the vehicle to a complete sto
p
before moving the selector lever int
o
Reverse
.
•
NEUTRAL "N"—The out-of-gear position
.
It is provided for starting a stalle
d
engine while the vehicle is in motion o
r
running the engine while standing wit
h
brake applied
. DO NOT COAST I
N
NEUTRAL
.
•
DRIVE RANGE "D"—The driving rang
e
for city and highway driving
. Thi
s
position permits the transmission t
o
operate through its complete range o
f
gear ratios and to select automaticall
y
the proper ratio for road and loa
d
conditions
.
• SUPER RANGE "S"—Used when supe
r
performance is needed for increase
d
acceleration in traffic, hill climbing, o
r
"Engine Braking" down-hill
. The selecto
r
lever may be moved from "D" to "S
"
and vice versa, under most operatin
g
conditions
.
"
SUPER" should not be use
d
at speeds above 75 MPH
.
•
LOW
"
L"—Available for heavy pullin
g
through mud or sand and for engin
e
braking when descending steep hills
. Th
e
selector lever may be moved to "L" a
t
any speed but the transmission will onl
y
shift automatically into Low range whe
n
the vehicle speed is under approximatel
y
40 MPH
. The transmission will no
t
upshift from Low range as long as th
e
selector lever is in the "L" position
.
CAUTIO
N
Before descending a steep or lon
g
grade, down a mountain or hillside
,
reduce speed and shift into a lowe
r
gear
. Use the lower gear ranges t
o
control vehicle speed
. Avoi
d
prolonged or frequent application o
f
the brakes which could caus
e
overheating and thus reduce brak
e
effectiveness
. Use caution whe
n
shifting into lower range or lowe
r
gear on slippery surfaces wit
h
vehicle moving—abrupt engine brakin
g
action could cause the front wheel
s
to skid, possibly leading to loss o
f
vehicle control
.
•
FORCED DOWNSHIFT—When additiona
l
acceleration is desired to pass movin
g
vehicles or to climb steep grades a
t
speeds between approximately 35 and 6
5
MPH, the transmission can b
e
downshifted by depressing the accelerato
r
pedal completely to the floor
. It is als
o
possible to obtain a forced downshift i
n
"DRIVE" range at speeds under 35 MP
H
by depressing the accelerator pedal par
t
way down
.
14

TURN SIGNAL AN
D
LANE CHANGE FEATUR
E
Whenever a right or left turn i
s
intended, when changing lanes, or whe
n
pulling away from the curb, use the tur
n
signals
.
•
FULL TURN—For normal turns, mov
e
the turn signal lever to position
"
A" fo
r
right turn and "B" for left turn
. Leve
r
will remain in position without manua
l
effort until the turn is completed, the
n
cancel automatically
.
•
LANE CHANGE—Move lever to th
e
detent position "C
"
for change to righ
t
lane or to "D" for change to left lane
.
Hold lever in position until lan
e
maneuver is completed, then release
.
Lever will return to "OFF" position
.
HAZARD WARNING FLASHE
R
For operation of hazard warning flasher, se
e
"In Case of Emergency" later in this manual
.
HORN CONTRO
L
The horn is actuated by depressing th
e
rectangular shaped GMC button located in th
e
center of the steering wheel
.
POWER STEERIN
G
If the steering system power assist fail
s
due to some malfunction, or because th
e
engine has stalled, the vehicle can still b
e
steered
. However, much greater effort i
s
required, particularly in sharp turns
.
TILT STEERING WHEEL
Tilt
Steering Whee
l
Cruise Control Leve
r
The tilt mechanism is operated by liftin
g
up on the small control lever, on the lef
t
side of the steering column just below th
e
directional signal lever, then moving th
e
steering wheel to the selected position an
d
releasing the lever
.
The tilt steering wheel can be tilted u
p
above normal position to provide additiona
l
room for entrance and exit as well a
s
selected driving positions above or belo
w
normal height
.
CRUISE CONTRO
L
The optional Cruise Control is a
n
automatic speed control system which i
s
designed to allow the vehicle to hold
a
15

selected speed of approximately 30 MPH o
r
higher—depending on engine limitations—thu
s
increasing comfort
and
economy
o
n
turnpikes,
and
other
non-congeste
d
highways
.
•
TO OPERATE—The Cruise Contro
l
engagement button is located in the en
d
of the turn signal lever
. Accelerate th
e
vehicle to the desired speed an
d
momentarily push in the engagemen
t
button,
take
your
foot
off
th
e
accelerator and
this speed will b
e
maintained
.
•
TO RESET AT A FASTE
R
SPEED—Accelerate the vehicle to th
e
desired higher speed, push in th
e
engagement button fully and releas
e
slowly
.
•
TO RESET AT A SLOWE
R
SPEED—Depress the engagement butto
n
fully and HOLD
. Allow vehicle to
decelerate
. When vehicle reaches desire
d
speed, release the engagement butto
n
slowly
.
•
FOR PASSING—You can increase you
r
speed by depressing accelerator pedal
.
When you remove your foot from th
e
pedal, the vehicle will slow down to th
e
cruising speed set prior to th
e
acceleration
.
•
TO DISENGAGE—Lightly
apply
the brak
e
pedal to disengage system
.
CAUTIO
N
DO NOT use the Cruise Control whe
n
conditions are not suitable for maintain-
ing a constant speed, such as in heav
y
or varying traffic, or on winding or slip-
pery roads
. With the Cruise Control en
-
gaged, removing foot from the accel-
erator pedal does not permit engin
e
speed to return to idle
.
16

FLOOR CONTROL
S
Vehicle Floor Control
s
POWER BRAKE SYSTE
M
This vehicle is equipped with a Dual Hy-
draulic Split System With Power Assist
. I
t
is also equipped with disc type brake
s
on the front wheels and drum type brake
s
on the tandem rear wheels
.
NOTE
:
Operation of the brake syste
m
warning light is covered (on page 21) (i
n
the section on "Instrument Panel an
d
Controls
.")
CAUTIO
N
Driving through deep water may we
t
the brakes and adversely affec
t
brake performance so that th
e
vehicle will not slow down at th
e
usual rate, and may pull to th
e
right or left
. Applying the brake
s
lightly will indicate whether the
y
have been so affected
. To dry the
m
quickly, lightly apply the brake
s
while maintaining a safe forwar
d
speed with an assured clear distanc
e
ahead until brake performanc
e
returns to normal
.
17

Parking Brake Contro
l
•
On your vehicle, if power assist to th
e
brakes is interrupted due to a stalle
d
engine or some malfunction, two o
r
more brake applications can normally b
e
made using reserve power
.
•
If the brake pedal is held down, th
e
system is designed to bring the vehicl
e
to a full stop on reserve power
.
However, the reserve power is partiall
y
depleted each time the brake pedal i
s
applied and released
. Do not pum
p
brakes when brake power assist has bee
n
interrupted, except when necessary i
n
order to maintain steering control o
n
slippery surfaces
.
•When reserve power is exhausted, th
e
vehicle can still be stopped by applyin
g
greater force to the pedal
.
SELF-ADJUSTING BRAKE
S
Brakes on this vehicle (except for th
e
Parking Brake) are self-adjusting, designe
d
to eliminate periodic adjustments
.
Drum brake adjustments are mad
e
automatically as the brakes are applie
d
while vehicle is moving backwards
.
Disc
brake
adjustment
is
mad
e
automatically with each brake application
.
• If excess brake pedal travel develops
,
drive alternately backward and forwar
d
several times and apply brakes firmly i
n
each direction
.
• See your dealer if normal pedal travel i
s
not restored, or if there is a rapi
d
increase in pedal travel, which could b
e
a sign of other brake trouble
. See you
r
dealer also if adjustment of the parkin
g
brake is required
.
NOTE
: "Riding The Brake" by restin
g
your foot on the brake pedal when no
t
intending to brake can cause abnormall
y
high brake temperatures, excessive linin
g
wear and possible damage to brakes i
n
addition to wasting gasoline
.
REMINDER
:
Front disc brakes have
a
built-in wear indicator that is designed t
o
make a high frequency, squealing, o
r
cricket-like warning sound when the lining
s
are worn to where replacement is required
.
The sound will occur intermittently o
r
continuously when wheels are rolling, bu
t
will disappear when the brake pedal i
s
applied firmly
. See also the various brak
e
checks listed in the maintenance schedul
e
folder
.
PARKING BRAK
E
•
To set parking brake, pull up the handl
e
located on the floor against the lef
t
wall, below the instrument panel
.
•
For increased holding power, first depres
s
regular brake pedal with the right foot
,
and hold it while setting the parkin
g
brake with left hand
.
•
To release parking brake push the handl
e
down
.
•
As a reminder, the "PARK BRAKE
"
reminder light is designed to come o
n
whenever the parking brake control i
s
not fully released, and the ignition i
s
on
.
•
Never drive vehicle with parking brak
e
set as this may overheat or otherwis
e
damage rear brakes
.
18
Other manuals for 1976 TRANSMODE
1
Table of contents
Other GMC Motorhome manuals

GMC
GMC 1976 TRANSMODE User manual

GMC
GMC 1975 Motorhome User manual

GMC
GMC X-7425 1973 User manual

GMC
GMC Royale User manual

GMC
GMC ZE06581 1976 Configuration guide

GMC
GMC 1976 ZEO 6083 User manual

GMC
GMC MOTORHOME 1978 User manual

GMC
GMC Motorhome 1976 User manual

GMC
GMC 1977 motorhome User manual

GMC
GMC Motor Home User manual