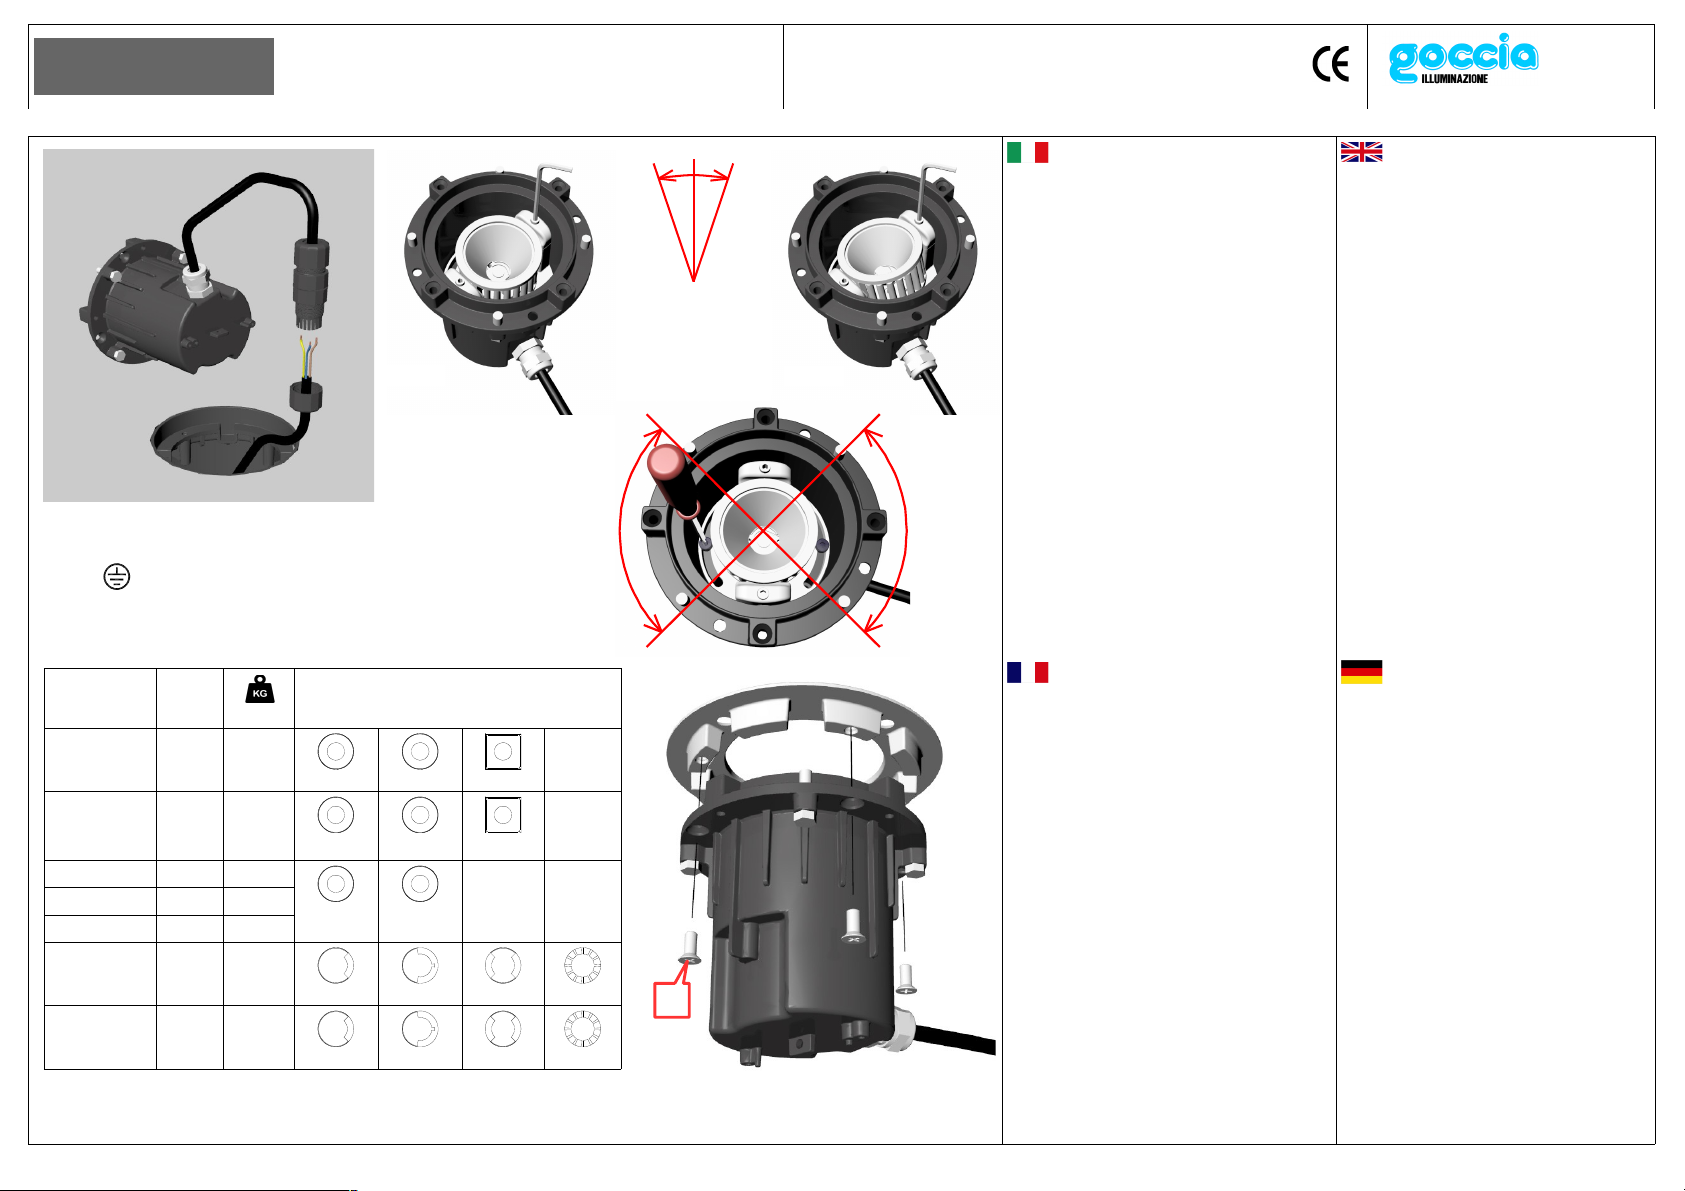
goccia PASSUM 1422 User manual

FIG. 1
COD. PASSUM T
MAX °C MAX.
FLANGE DISPONIBILI – AVAILABLE COVERS
1422 – 1424 –
1401 ≤ 40° 2000
1521 1522 1523
1432 – 1434 ≤ 40° 3500
1531 1532 1533
1442 ≤ 40° 3500
1541 1542
1443 ≤ 80° 3500
1444 ≤ 40° 3500
1427 ≤ 40° 2000
1525 152 1527 1529
143 ≤ 40° 2000
1535 153 1537 1539
1- non usato – not used – pas utilisé – unbenutzt
2 – L
3 – N
4 - GND
1422-1432 – / + 15°
1424 – / + 8°
1434 – / + 10°
1442 – / + 25°
1443 – / + 22°
1401 fissa -fixed
1422-1432 – / + 40°
1424-1434 – / + 30°
1442-1443 – / + 30°
1401 fissa -fixed
PASSUM
PASSUM UP
PASSUM SIDEWARDS
220-240V driver IN IK 10
IP 67 CRI 80 Pag1/2
cod. doc.91410
cod. 089141000
Gli apparecchi ai quali si riferisce la presente
istruzione richiedono lo stesso tipo di montaggio.
Il cablaggio con cavo H07RN-F è predisposto per
l'utilizzo del giunto a tenuta già cablato di fabbrica.
Devono essere installati solo nella cassaforma
corrispondente. (Vedere istruzioni della cassaforma)
COLLEGAMENTO ELETTRICO
Cablare il giunto in dotazione come in Fig. 1
NOTA: Non svitare mai il pressacavo
dell'apparecchio.
OTTICHE ORIENTABILI
A seconda del tipo di apparecchio le ottiche
possono essere basculanti e/o orientabili mediante
la rotazione della sorgente luminosa.
Fig. 2a – 2b: regolazione basculante. Allentare le
brugole indicate, orientare l'ottica e serrare di nuovo
le viti.
Fig. 3. Regolazione della rotazione, con il
medesimo metodo
ASSEMBLAGGIO
Installare la lampadina negli apparecchi non LED
-vedere elenco a pag 2
Effettuare un ciclo di funzionamento di almeno 30 –
40 minuti ad apparecchio aperto per allontanare
l'eventuale umidità dal vano ottico.
Chiudere l'apparecchio mediante la flangia
adeguata secondo la tabella, serrando a fondo e
uniformemente le viti a testa a croce A
Segue a pag. 2
Les appareils auxquels se réfèrent les instructions
présentes exigent le même type de montage.
Chacun appareil est équipée de câble (RN-F H07)
fourni l'usine et scellé à la glande. Ils doivent être
installés seulement dans le boîtier correspondant.
(Voir les instructions du boîtier)
BRANCHEMENT ÉLECTRIQUE
Câbler le joint fourni comme sur la Fig. 1
REMARQUE : Ne jamais dévisser le serre-câble de
l'appareil.
OPTIQUES ORIENTABLES
Selon le type d'appareil, les optiques peuvent être
basculantes et/ou orientables au moyen de la
rotation de la source lumineuse.
Fig. 2a – 2b : réglage basculant. Desserrer les vis à
six pans indiquées, orienter l'optique et serrer à
nouveau les vis.
Fig. 3. Réglage de la rotation avec la même
méthode.
Suite à la page 2
For the whole range of these lighting fittings is
required the same installation system.
Every fitting is supplied complete with H07RN-F
cable wired and sealed to the screw cable entry
directly by the factory. Such fittings must be
installed only in the in-ground boxes supplied by
Goccia – see the table supplied with the in-
ground box -
ELECTRICAL WIRING.
Connect the terminal block to the power – see
fig. 1-
WARNING: never unscrew the screw cable-entry.
ADJUSTABLE OPTICS.
You can orient the light by two different
regulations.
Fig. 2a- 2b. orient the light. Unscrew the two allen
screws, direct the lighting source and and fix
again.
Fig. 3. Rotate the lighting source and its optic by
the same system.
ASSEMBLING.
Insert the lamp for the items supplied without
lighting source – see list on page 2
Every time you are installing the fixture or you are
opening the for maintenance, allow the light to
work for 30-40’ at least in order to take away the
possible humidity inside.
Close together body and flange - see the table to
check the correct combination – by appropriate
tightening of the screws A.
Die Leuchten, auf die sich diese Anweisung
bezieht, sind auf die gleiche Weise zu montieren.
Jede Leuchte ist mit dem verdrahteten Kabel
geliefert (H07 RN-F) und von der Fabrik an der
Kabeleinführung gedichtet.
Sie sind ausschließlich zur Installation in den
entsprechenden Einbaukasten bestimmt. (Siehe
Anweisungen des Einbaukastens)
STROMANSCHLUSS
Das Stromkabel in der in Abb. 1 gezeigten
Reihenfolge an die Kabel der Leuchte
anschließen.
WICHTIG:Niemals die Kabeleinführung der
Leuchte abschrauben.
VERSTELLBARE OPTIKEN
Je nach Art der Leuchte können die Optiken
durch Drehen des Leuchtmittels schwenk- oder
verstellbar sein.
Abb. 2a – 2b: Einstellung der Schwenkung. Die
genannten Sechskantschrauben lockern, die
Optik verstellen und die Schrauben wieder
festziehen.
Abb. 3. Die Einstellung der Rotation erfolgt auf
dieselbe Weise
Weiter auf S. 2
FIG. 2b
FIG. 2a
FIG. 3
FIG. 4
A

PASSUM
PASSUM UP
PASSUM SIDEWARDS
220-240V driver IN IK 10
IP 67 CRI 80 Pag2/2
cod. doc.91410
cod. 089141000
COD. PASSUM LAMPADINE - LAMPS NOTE
1424 LED Gu10 max 5 W Max h = 57mm
1434 Gu 10 max 7-8 W - 230V Max h = 8 mm
1443 HQI 70W
1444 Dulux El 30W - 230V
– segue da pag.1
ALLINEAMENTO ORIZZONTALE
Questa operazione è importante per verificare che
l'effetto di luce desiderato sia effettivamente
ottenuto.
Deve essere fatta prima del fissaggio definitivo.
Effettuare la regolazione fine per l'allineamento
orizzontale, registrando le viti B, avendo cura le loro
teste tocchino tutte l'apposito alloggiamento della
cassaforma.
Prestare attenzione che anche la flangia di chiusura
non sia lontana dalla cassaforma.
La regolazione recupera giochi minimi e non
rimedia ad un posizionamento improprio della
cassaforma.
MONTAGGIO FINALE
Infilare l'apparecchio nella cassaforma e fissarlo
mediante le viti di chiusura
Conservare le istruzioni
ASSEMBLAGE
Installer l'ampoule dans les appareils non à LED -
voir la liste
Effectuer un cycle de fonctionnement pendant 30-
40 minutes avec l'appareil ouvert pour éviter la
formation de condensation.
Fermer l'appareil au moyen de la bride adéquate
selon le tableau, en serrant à fond et uniformément
les vis à tête en croix A. (Fig.4 à la page 1)
ALIGNEMENT HORIZONTAL
Cette opération est importante pour vérifier que
l'effet de lumière souhaité soit effectivement obtenu.
Elle doit être effectivement effectuée avant la
fixation définitive.
Effectuer un réglage minutieux pour l'alignement
horizontal, en réglant les vis B et en faisant
attention que toutes les têtes touchent le logement
prévu du boîtier.
Faire attention que la bride de fermeture ne soit pas
éloignée du boîtier.
Le réglage récupère des jeux minimums mais ne
résout pas un positionnement impropre du boîtier.
MONTAGE FINAL
Enfiler l'appareil dans le boîtier et le fixer au moyen
des vis de fermeture
Conserver les instructions
HORIZONTAL ALIGNMENT.
Make this regulation at the best to have the right
position and the right light direction.
Do this regulation before to block the lighting
body to the in-ground box.
Find the right position of the screws B. Be sure
the same screws will touch the base of the
in-ground box in its hollow housing.
Be careful the light body will be close to the in-
ground box.
NB: Such regulation allow to align perfectly the
fixture to the ground unless for inappropriate
In-ground location.
FINAL ASSEMBLING
Insert the light body in the in-ground box and
block it by the screws
Keep this instruction leaflet.
ZUSAMMENBAU
Bei Nicht-Led-Leuchten Birne einlegen - siehe
Übersicht
Um die Bildung von Kondenswasser zu
vermeiden einen 30-40 Minuten langen
Arbeitszyklus bei offener Leuchte vornehmen.
Die Leuchte mit dem passenden Flansch laut
Tabelle schließen und die Kreuzschrauben A
gleichmäßig festziehen (Abb. 4 S.1)
HORIZONTALE AUSRICHTUNG
Dieser Vorgang ist wichtig um zu überprüfen,
dass der gewünschte Lichteffekt wirklich erreicht
wurde.
Diesen Vorgang vor der endgültigen Fixierung
vornehmen.
Zur horizontalen Ausrichtung ist die
Feineinstellung erforderlich, dazu Schrauben B
so einstellen, dass die Kopfstücke alle das
Gehäuse des Einbaukastens berühren.
Darauf achten, dass auch der Flansch nicht zu
weit vom Einbaukasten entfernt ist.
Durch die Einstellung werden minimale
Spielräume ausgeglichen, nicht aber eine falsche
Positionierung des Einbaukastens behoben.
ENDGÜLTIGE MONTAGE
Die Leuchte in den Einbaukasten einführen und
mit den Verriegelungsschrauben fixieren
Anweisungen aufbewahren
FIG. 5
FIG.
OKNO NO
B
Lasciare il “sacchetto essiccante” all'interno dell'apparecchio
Always leave the “desiccant bag” inside the fixture
Toujours laisser le "sachet déshydratant" à l'intérieur de l'appareil
Den "Trockenmittelbeutel" immer in der Leuchte lassen
Le sorgenti luminose contenute in questi apparecchi devono essere sostituite
solo dal costruttoreo dal suo servizio di assistenza o da personale altrettanto
qualificato.
The light sources contained in these luminaires shall only be replaced by the
manufacturer or his service agent or a similar qualified person.
This manual suits for next models
9
Other goccia Lighting Equipment manuals