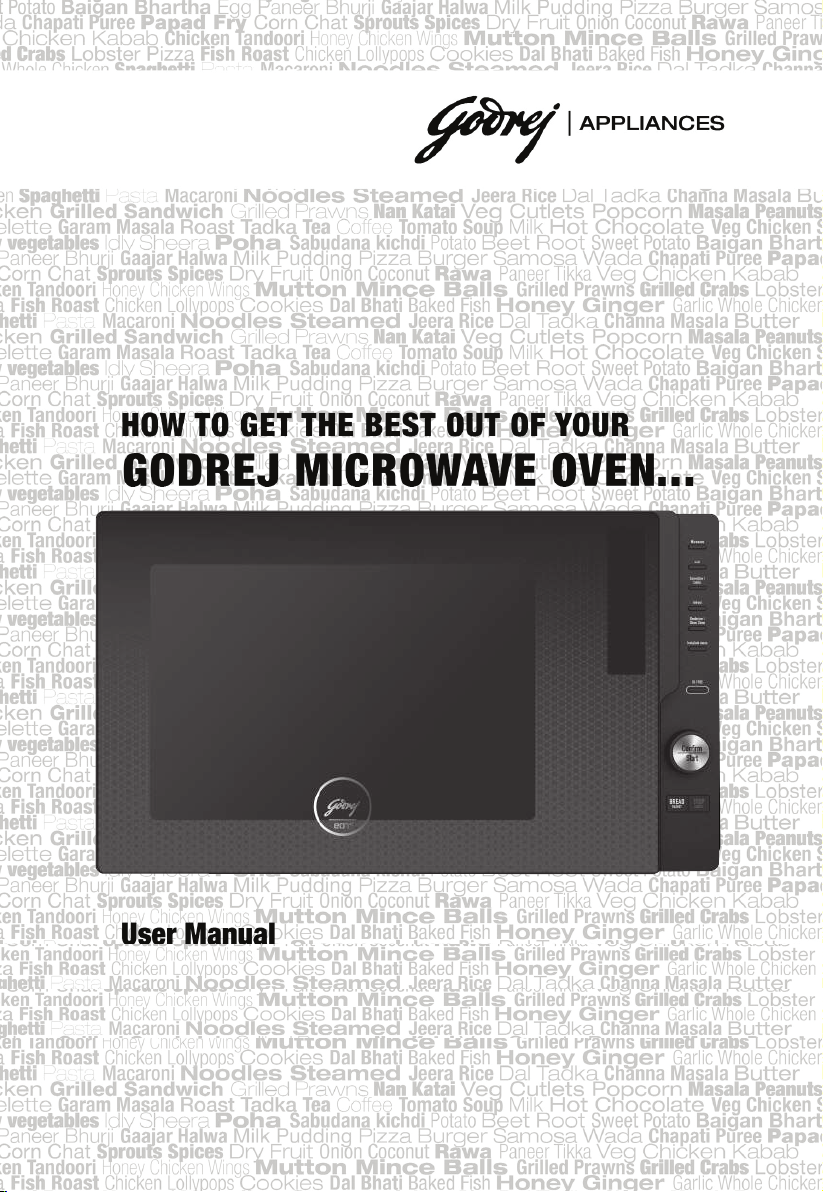
Godrej GME 730 CP1 QM User manual

GME 730 CP1 QM
30 Ltr. Microwave Convection

1

SPECIFICATIONS
2
Power Consumption:
Rated Microwave Output:
Oven Capacity:
Cooking Uniformity:
Net Weight:
Operating Frequency:
Product Dimensions: (W x H x D)
1100W (Grill)
2500W (Convection)
30L
2450MHz
230V~/50Hz, 1450W (Microwave)
900W
516 mm x 325 mm x 463 mm
Turntable system
18.20 Kg

3
TABLE OF CONTENT
PRECAUTIONS TO AVOID POSSIBLE EXPOSURE TO
EXCESSIVE MICROWAVE ENERGY 4
IMPORTANT SAFETY INSTRUCTIONS WARNING 5
TO REDUCE THE RISK OF INJURY TO PERSONS
GROUNDING INSTALLATION 8
CLEANING 9
UTENSILS 9
MATERIALS YOU CAN USE IN MICROWAVE OVEN 10
MATERIALS TO BE AVOIDED IN MICROWAVE OVEN 10
SETTING UP YOUR OVEN 11
TURNTABLE INSTALLATION 11
COUNTERTOP INSTALLATION 12
CONTROL PANEL 13
BASIC FUNCTIONS 14
VALID RECIPE NUMBERS FOR EACH AUTO COOK MENU 16
HOW ACM FUNCTIONS SHOULD WORK? 16
INSTACOOK MENU 17
TROUBLE SHOOTING 212
FREQUENTLY ASKED QUESTION 213
WARRANTY 214
BRANCHES ADDRESS 215

PRECAUTIONS TO AVOID POSSIBLE EXPOSURE TO
EXCESSIVE MICROWAVE ENERGY
(a) Do not attempt to operate this oven with the door open since this can result in
harmful exposure to microwave energy. It is important not to break or tamper
with the safety interlocks.
(b) Do not place any object between the oven front face and the door or allow soil or
cleaner residue to accumulate on sealing surfaces.
(c) WARNING: If the door or door seals are damaged, the oven must not be operated
until it has been repaired by a competent person.
ADDENDUM
If the apparatus is not maintained in a good state of cleanliness, its surface could be
degraded and affect the life span of the apparatus and lead to a dangerous situation.
4

5
IMPORTANT SAFETY INSTRUCTIONS WARNING
To reduce the risk of fire, electric shock, injury to persons or exposure to excessive
microwave oven energy when using your appliance, follow basic precautions,
including the following:
1. Read and follow the specific:"PRECAUTIONS TO AVOID POSSIBLE
EXPOSURE TO EXCESSIVE MICROWAVE ENERGY".
2. This appliance can be used by children aged from 8 years and above and
persons with reduced physical,sensory or mental capabilities or lack of
experience and knowledge if they have been given supervision or instruction
concerning use of the appliance in a safe way and understand the hazards
involved. Children shall not play with the appliance. Cleaning and user
maintenance shall not be made by children unless they are older than 8 and
supervised. Children less than 8 years of age shall be kept away unless
continuously supervised.
3. Keep the appliance and its cord out of reach of children less than 8 years.
4. If the supply cord is damaged, it must be replaced by the manufacturer, its
service agent or similarly qualified persons in order to avoid a hazard.( For
appliance with type Y attachment)
5. WARNING: Ensure that the appliance is switched off before replacing the lamp
to avoid the possibility of electric shock.
6. WARNING: It is hazardous for anyone other than a competent person to carry
out any service or repair operation that involves the removal of a cover which
gives protection against exposure to microwave energy.
7. WARNING: Liquids and other foods must not be heated in sealed containers
since they are liable to explode.
8. When heating food in plastic or paper containers, keep an eye on the oven due
to the possibility of ignition.
9. Only use utensils that are suitable for use in microwave ovens.
10. If smoke is emitted, switch off or unplug the appliance and keep the door closed
in order to stifle any flames.
11. Microwave heating of beverages can result in delayed eruptive boiling, therefore
care must be taken when handling the container.

6
12. The contents of feeding bottles and baby food jars shall be stirred or shaken and
the temperature checked before consumption, in order to avoid burns.
13. Eggs in their shell and whole hard-boiled eggs should not be heated in
microwave ovens since they may explode, even after microwave heating has
ended.
14. The oven should be cleaned regularly and any food deposits removed.
15. Failure to maintain the oven in a clean condition could lead to deterioration of the
surface that could adversely affect the life of the appliance and possibly result in
a hazardous situation.
16. The appliance must not be installed behind a decorative door in order to avoid
overheating. (This is not applicable for appliances with decorative door.)
17. Only use the temperature probe recommended for this oven.(for ovens provided
with a facility to use a temperature-sensing probe.)
18. The microwave oven shall not be placed in a cabinet unless it has been tested in
a cabinet.
19. The microwave oven must be operated with the decorative door open. (for
ovens with a decorative door.)
20. This appliance is intended to be used in household and similar applications such
as:
-staff kitchen areas in shops, offices and other working environments;
-by clients in hotels, motels and other residential type environments;
-farm houses;
-bed and breakfast type environments.
21. The microwave oven is intended for heating food and beverages. Drying of food
or clothing and heating of warming pads, slippers, sponges, damp cloth and
similar may lead to risk of injury, ignition or fire.
22. Metallic containers for food and beverages are not allowed during microwave
cooking.
23. The appliance shall not be cleaned with a steam cleaner.
24. The appliance is intended to be used freestanding.
25. The rear surface of appliances shall be placed against a wall.

7
26. Steam cleaner is not to be used.
27. Surface of a storage drawer can get hot.
28. Do not use harsh abrasive cleaners or sharp metal scrapers to clean the oven
door glass since they can scratch the surface, which may result in shattering of
the glass.
29. WARNING: The appliance and its accessible parts become hot during use. Care
should be taken to avoid touching heating elements. Children less than 8 years
of age shall be kept away unless continuously supervised.
30. During use the appliance becomes hot. Care should be taken to avoid touching
heating elements inside the oven.
31. WARNING: Accessible parts may become hot during use. Young children
should be kept away.
32. WARNING: When the appliance is operated in the combination mode, children
should only use the oven under adult supervision due to the temperatures
generated.
READ CAREFULLY AND KEEP FOR FUTURE REFERENCE

DANGER
Electric Shock Hazard Touching some of the internal components can cause
serious personal injury or death. Do not disassemble this appliance.
WARNING
Electric Shock Hazard Improper use of the grounding can result in electric shock. Do
not plug into an outlet until appliance is properly installed and grounded. This
appliance must be grounded. In the event of an electrical short circuit, grounding
reduces the risk of electric shock by providing an escape wire for the electric current.
This appliance is equipped with a cord having a grounding wire with a grounding
plug. The plug must be plugged into an outlet that is properly installed and
grounded.Consult a qualified electrician or serviceman if the grounding instructions
are not completely understood or if doubt exists as to whether the appliance is
properly grounded. If it is necessary to use an extension cord, use only a 3-wire
extension cord.
1. A short power-supply cord is provided to reduce the risks resulting from
becoming entangled in or tripping over a longer cord.
2. If a long cord set or extension cord is used:
1) The marked electrical rating of the cord set or extension cord should be at
least as great as the electrical rating of the appliance.
2) The extension cord must be a grounding-type 3-wire cord.
3) The long cord should be arranged so that it will not drape over the counter
top or tabletop where it can be pulled on by children or tripped over
unintentionally.
To Reduce the Risk of Injury to Persons Grounding Installation
8

UTENSILS
CAUTION
Personal Injury Hazard It is hazardous for anyone other than a compentent person
to carry out any service or repair operation that involves the removal of a cover which
gives protection against exposure to microwave energy.
See the instructions on "Materials you can use in microwave oven or to be avoided in
microwave oven." There may be certain non-metallic utensils that are not safe to use
for microwaving. If in doubt, you can test the utensil in question following the
procedure below.
Utensil Test:
1. Fill a microwave-safe container with 1 cup of cold water (250ml) along with the
utensil in question.
2. Cook on maximum power for 1 minute.
3. Carefully feel the utensil. If the empty utensil is warm, do not use it for microwave
cooking.
4. Do not exceed 1 minute cooking time.
9
Be sure to unplug the appliance from the power supply.
1. Clean the cavity of the oven after using with a slightly damp cloth.
2. Clean the accessories in the usual way in soapy water.
3. The door frame and seal and neighbouring parts must be cleaned carefully with
a damp cloth when they are dirty.
4. Do not use harsh abrasive cleaners or sharp metal scrapers to clean the oven
door glass since they can scratch the surface, which may result in shattering of
the glass.
5. Cleaning Tip---For easier cleaning of the cavity walls that the food cooked can
touch: Place half a lemon in a bowl, add 300ml (1/2 pint) water and heat on 100%
microwave power for 10 minutes. Wipe the oven clean using a soft, dry cloth.
CLEANING

Materials you can use in microwave oven
Utensils
Remarks
Aluminum foil Shielding only. Small smooth pieces can be used to cover thin parts of
meat or poultry to prevent overcooking. Arcing can occur if foil is too
close to oven walls. The foil should be at least 1 inch (2.5cm) away from
oven walls.
Follow manufacturer’s instructions. The bottom of browning dish must be
at least 3/16 inch (5mm) above the turntable. Incorrect usage may cause
the turntable to break.
Microwave-safe only. Follow manufacturer's instructions. Do not use
cracked or chipped dishes.
Always remove lid. Use only to heat food until just warm. Most glass jars
are not heat resistant and may break.
Heat-resistant oven glassware only. Make sure there is no metallic trim.
Do not use cracked or chipped dishes.
Follow manufacturer’s instructions. Do not close with metal tie. Make
slits to allow steam to escape.
Use for short–term cooking/warming only. Do not leave oven unattended
while cooking.
Use to cover food for reheating and absorbing fat. Use with supervision
for a short-term cooking only.
Use as a cover to prevent splattering or a wrap for steaming.
Microwave-safe only. Follow the manufacturer’s instructions. Should be
labeled "Microwave Safe". Some plastic containers soften, as the food
inside gets hot. "Boiling bags" and tightly closed plastic bags should be
slit, pierced or vented as directed by package.
Microwave-safe only. Use to cover food during cooking to retain
moisture. Do not allow plastic wrap to touch food.
Thermometers Microwave-safe only (meat and candy thermometers).
Wax paper Use as a cover to prevent splattering and retain moisture.
Browning dish
Glass jars
Glassware
Oven cooking
bags
Paper plates
and cups
Paper towels
Parchment
paper
Plastic
Plastic wrap
Dinnerware
Materials to be avoided in microwave oven
Utensils
Remarks
Aluminum tray
Food carton with
metal handle
Metal or metal-
trimmed utensils
Metal twist ties
Paper bags
Plastic foam
Wood
Metal shields the food from microwave energy. Metal trim may
cause arcing.
May cause a fire in the oven.
Plastic foam may melt or contaminate the liquid inside when exposed
to
high temperature.
Wood will dry out when used in the microwave oven and may split
or crack.
May cause arcing. Transfer food into microwave-safe dish.
May cause arcing and could cause a fire in the oven.
10

A) Control panel
B) Turntable shaft
C) Turntable ring assembly
D) Glass tray
E) Observation window
F) Door assembly
G) Safety interlock system
F
G
A
C B
ED
SETTING UP YOUR OVEN
Names of Oven Parts and Accessories
Remove the oven and all materials from the carton and oven cavity.
Your oven comes with the following accessories:
Glass tray 1
Turntable ring assembly 1
Instruction Manual 1
Hub (underside)
Glass tray
Turntable ring assembly
a. Never place the
glass tray
upside down. The glass
tray should never be restricted.
b. Both
glass tray
and
turntable ring assembly
must
always be used during cooking.
c. All food and containers of food are always placed
on the
glass tray
for cooking.
d. If
glass tray
or
turntable ring assembly
cracks or
breaks, contact your nearest authorized service
center.
Turntable Installation
Turntable shaft
Grill Rack( Can not be used in microwave
function and must be placed on the glass tray )
Grill tray( Cannot be used in microwave
function and must be placed on the grill rack)
11

20cm
30cm
20cm
min85cm
0cm
12
Remove all packing material and
accessories. Examine the oven for any
damage such as dents or broken door.
Do not install if oven is damaged.
1. Select a level surface that provide
enough open space for the intake
and/or outlet vents.
2. Plug your oven into a standard
household outlet. Be sure the
voltage and the frequency is the
same as the voltage and the
frequency on the rating label.
WARNING: Do not install oven over a
range cooktop or other heat-producing
appliance. If installed near or over a heat
source, the oven could be damaged
and the warranty would be void.
The accessible
surface may be
hot during operation.
(1) The minimum installation height is
85cm.
(2) The rear surface of appliance shall
be placed against a wall. Leave a
minimum clearance of 30cm above
the oven, a minimum clearance of
20cm is required between the oven
and any adjacent walls.
(3) Do not remove the legs from the
bottom of the oven.
(4) Blocking the intake and/ or outlet
openings can damage the oven.
(5) Place the oven as far away from
radios and TV as possible.
Operation of microwave oven may
cause interference to your radio or
TV reception.
Cabinet: Remove any protective film
found on the microwave oven cabinet
surface. Do not remove the light brown
Mica cover that is attached to the oven
cavity to protect the magnetron.
Countertop Installation
Installation

CONTROL PANEL
Microwave
Grill
Convection/Combi
Defrost
Deodorizer/Steam Clean
InstaCook menu
Oil Free
Confirm/Start
Stop/Cancel
Bread Basket
13

MICROWAVE:
BASIC FUNCTIONS
• Select Microwave option . It will display “PHI” (i.e. 100% power) on the 7 - segment
display.
• When the Microwave option is pressed twice, it will display “P90”(i.e. 90% power) on 7 -
segment display.
• After selecting the power level, set the time for which the microwave to be kept running
using the Knob.
• Press Confirm/Start Button in order to start the operation.
No. of Presses 1 2 3 4 5 6 7 8 9 10
Display PHI P90 P80 P70 P60 P50 P40 P30 P20 P10
Output Power 100% 90% 80% 70% 60% 50% 40% 30% 20% 10%
Grill:
• Press the Grill option once. It will display “Gr” on the 7 - segment display.
• Set the time for which the Grill to be kept running using the Knob.
• Press Confirm/Start Button in order to Start the operation.
Convection Preheat:
• Press Convection option once. It will display “Con ”. Select the mode by pressing
Confirm/Start.
• Select the temperature by rotating the Knob ranging from 140 to 230 as per the table below
and press Confirm/Start to select the required temperature
• Press Confirm/Start Button in order to Start the operation.
Set Temperature 140 150 160 170 180 190 200 210 220 230
Display 140 150 160 170 180 190 200 210 220 230
14

Convection
• Press the Convection option once. It will display “Con ” on the display screen. Press
Confirm/Start.
• Select the temperature by rotating the Knob ranging from 140 to 230 as per the table below
and press Confirm/Start to select the required temperature
• Set the time for which the Convection is to be kept running by using the Knob.
• Press Confirm/Start Button in order to start the operation.
Set Temperature 140 150 160 170 180 190 200 210 220 230
Display 140 150 160 170 180 190 200 210 220 230
COMBI
• When the Convection option is pressed twice , “Cbn” will be displayed on the screen. Press
Confirm/Start.
• Scroll to select any combination modes from C-1 to C-5 using the Knob as per the table.
Press Confirm/Start to select the required combination mode.
• Set the time by using the Knob.
• Press Confirm/Start Button in order to Start the operation.
Combination Mode Display Operation
Micro+Grill combo 1 C-1 30% Micro cooking and 70% Grill cooking
Micro+Grill combo 2 C-2 55% Micro cooking and 45% Grill cooking
Micro+Convection combo 1 C-3 Operating temp 160 degrees
Micro+Convection combo 2 C-4 Operating temp 190 degrees
Micro+Convection combo 3 C-5 Operating temp 220 degrees
Defrost:
• Press the Defrost option. Set the time for which the Defrost function needs to be kept
running using the Knob.
• Press Confirm/Start Button in order to Start the operation.
15

Deodorizer/Steam Clean:
• Press Deodorizer / Steam Clean once to select deodorizer option. It will display “dE” the
display screen
• Press Confirm/Start Button in order to start the operation. The microwave fan will run for 5
mins.
• Press the Deodorizer / Steam Clean option twice to display “SC” on the display screen.
• Press “Start” Button in order to start the operation. The microwave will run for 5 Minutes.
Menu Name No. of submenus
Oil Free oF 1 to 47
Bread Basket bb 1 to 23
Tadka/Curries tC 1 to 93
India’s Best Ib 1 to 94
International In 1 to 57
Barbecue bC 1 to 10
Breakfast/Snacks bS 1 to 60
Steam Cook/Fermentation SF 1 to 29
Paneer/Ghee/Curd PG 1 to 4
Kitchen Assistant AS 1 to 31
VALID RECIPE NUMBERS FOR EACH AUTO COOK MENU
HOW ACM FUNCTIONS WORK?
OTHER INSTACOOK MENUS
Oil Free
Bread Basket
• Select Oil Free option
• Select the recipe number using the Knob ranging from 1 to 47.
• Press Confirm/Start Button in order to Start the operation.
• Select Bread Basket option.
• Select the recipe number using the Knob ranging from 1 to 23.
• Press Confirm/Start Button in order to Start the operation.
• Press Instacook Menu.
• Scroll from (Tadka/Curries) tC to (Kitchen Assistant) AS using the Knob as per the table
• Press Confirm/Start to select the required Instacook menu.
• Select a valid submenu by using the Knob and press Confirm/Start.
16

INSTACOOK MENU
OIL FREE
Category
Recipe- Ingredients:
500 gr
OF1 CHICKEN LOLLY POPS
Chicken Wings
500 gms
Maida
3 tbsp
Eggs
3
Soya Sauce
1½ tbsp
Green Chilli Paste
2½ tsp
Ginger, Garlic Paste
2 tsp
Garam Masala
2 tsp
Pepper Powder
½ tsp
Chilli Sauce
1½ tbsp
Red Color (Optional)
Salt To Taste
Method of Preparation: "Marinate the chicken with the all ingredients for 1 hour. Arrange the marinate
chicken in a lightly greased crusty plate and then place the crusty plate on the mesh rack in the microwave
oven.
Select category OF1, enter recipe code and press
start. Turn once in-between.
Serve hot."
Category
Recipe-
Ingredients:
500 gr
OF2 MUTTON KABAB
Boneless Mutton, Minced
500 gms
Coriander Powder
2 tsp
Khus Khus Grinded
¾ cup
Cumin Powder
2 tsp
Curd
¾ cup
Garlic Paste
2 tsp
Ginger Paste
2 tsp
Onion Paste
¾ cup
Salt To Taste
Method of Preparation: "Apply ginger-garlic paste, coriander- cumins powder, khus khus, beaten curds, salt,
to the minced mutton and allow the mutton to marinate for about 2 hours. Make the meat into shape of
kebab, arrange the mutton kababs in a lightly greased crusty plate, and place the crusty plate on the mesh
rack in the microwave oven. Select category OF2, enter recipe code and press start.Serve hot."
17

Category Recipe- Ingredients: 500 gr
OF3 CHICKEN TANDOORI Chicken Breast Or Legs 500 gr
Red Chilli Powder
1½ tsp
Lemon Juice
1½ tsp
Yogurt
1 cup
Ginger Paste
1½ tsp
Garlic Paste
1½ tsp
Garam Masala Powder
1½ tsp
Oil 2 Tablespoons
1½ tsp
Chaat Masala
1½ tsp
Salt To Taste
Method of Preparation: "Marinate the chicken with the all ingredients for 3 hours. Arrange the marinate
chicken in a lightly greased crusty plate and place the crusty plate on the mesh rack in the microwave oven.
Select category OF3, enter recipe code and press start.Turn once in-between.
Serve hot."
Category Recipe-
Ingredients: 500 gr
OF4 LITTI
Wheat Flour 2½ cup
Yogurt 1½ cup
Salt To Taste
Filling
Sattu
2 cup
Ginger, Garlic Paste
1¾ tsp
Cloves
6
Green Chilies Chopped
1 tsp
Coriander Leaves Chopped
¾ cup
Ajwain
1¾ tsp
Onion Seeds
1¾ tsp
Salt To Taste
Lemon Juice
1¾ tsp
Method of Preparation: "Add salt and yogurt to the wheat flour and knead into a soft dough. Rest the dough
for some time.For the filling mix sattu with all filling ingredients. Now, Divide the dough into lemon sized balls
and spread them into small puris with your fingers. Place a portion of the filling mixture and once again roll
them into balls.
Arrange them on a lightly greased baking dish and place the baking dish on the mesh rack in the microwave
oven. Select category OF4, enter recipe code and press start. Turn once in -between.Serve Hot"
18

Category Recipe- Ingredients: 500 gr
OF5 BATI Whole Wheat Flour (Gehun Ka Atta)
2 cup
Semolina (Rava)
1 cup
Besan (Bengal Gram Flour)
3 tbsp
Milk
1½ cup
Melted Ghee
1 cup
Salt To Taste
Method of Preparation: ""Mix all the ingredients and knead into a firm dough and make round flatten shape
batis . Arrange batis in a lightly greased crusty plate and place the crusty plate on the mesh rack in the
microwave oven. Select category OF5, enter recipe code and press start. Turn once in- between.
Serve hot"
Category Recipe-
Ingredients:
500 gr
OF6 CHICKEN ROAST
Chicken
500 gms
Ground Black Pepper
2 tsp
Lemon Juice
2 tsp
Garlic
2 tsp
Thyme
2 tsp
Salt To Taste
Method of Preparation: "Take a mixing bowl. Add oil, chicken, salt, pepper, garlic, lemon, thyme and mix
well.Now, set it aside for 30 minutes to marinate. Arrange marinated chicken in a lightly greased crusty plate
and place the crusty plate on the mesh rack and in the microwave oven. Select category OF6, enter recipe
code and press start. Turn once in- between. Serve hot."
Category Recipe-
Ingredients:
500 gr
OF7 LEMON CHICKEN
Boneless Chicken Breast
500 gms
Garlic Paste
2 tsp
Grated
Lemon Zest
1¾ tsp
Lemon Juice
2 tbsp
Dried Oregano
1¾ tsp
Thyme Leaves
Few
Salt And Pepper To Taste
Method of Preparation: First, marinate the chicken with the all ingredients for 1 hour. Arrange the marinated
chicken in a lightly greased baking dish and place the baking dish on the mesh rack in the microwave oven.
Select category OF7, enter recipe code and press start. Turn once in-between. Serve hot.
19
Table of contents
Other Godrej Microwave Oven manuals

Godrej
Godrej GMX 20GA4 FKZ User manual

Godrej
Godrej GMX 20GA8 MLM User manual

Godrej
Godrej GME 20CM1 MJZ User manual

Godrej
Godrej GME 25GP1 MKM User manual

Godrej
Godrej GMX 30CA1 SIM User manual

Godrej
Godrej GME 730 CR1 PZ User manual

Godrej
Godrej GME 34CA1 MKZ User manual

Godrej
Godrej GME 728 CF1 PM User manual

Godrej
Godrej GME 734 CR1 PM User manual

Godrej
Godrej GME 728 CIP1 QM User manual