Golbong 2252-23 Specification sheet

1
en Operation and Installation Manual
VandalProof IP Dome Camera
Model: 2252-23/2252-30/2252-73

2
Welcome ...................................................................................................................................................................4
Product Overview ....................................................................................................................................................5
Hardware Installation ..............................................................................................................................................5
Using CMS5 for PC or Mac .....................................................................................................................................6
System Requirements ...........................................................................................................................................6
Installing Software .................................................................................................................................................6
Network connection and settings...........................................................................................................................7
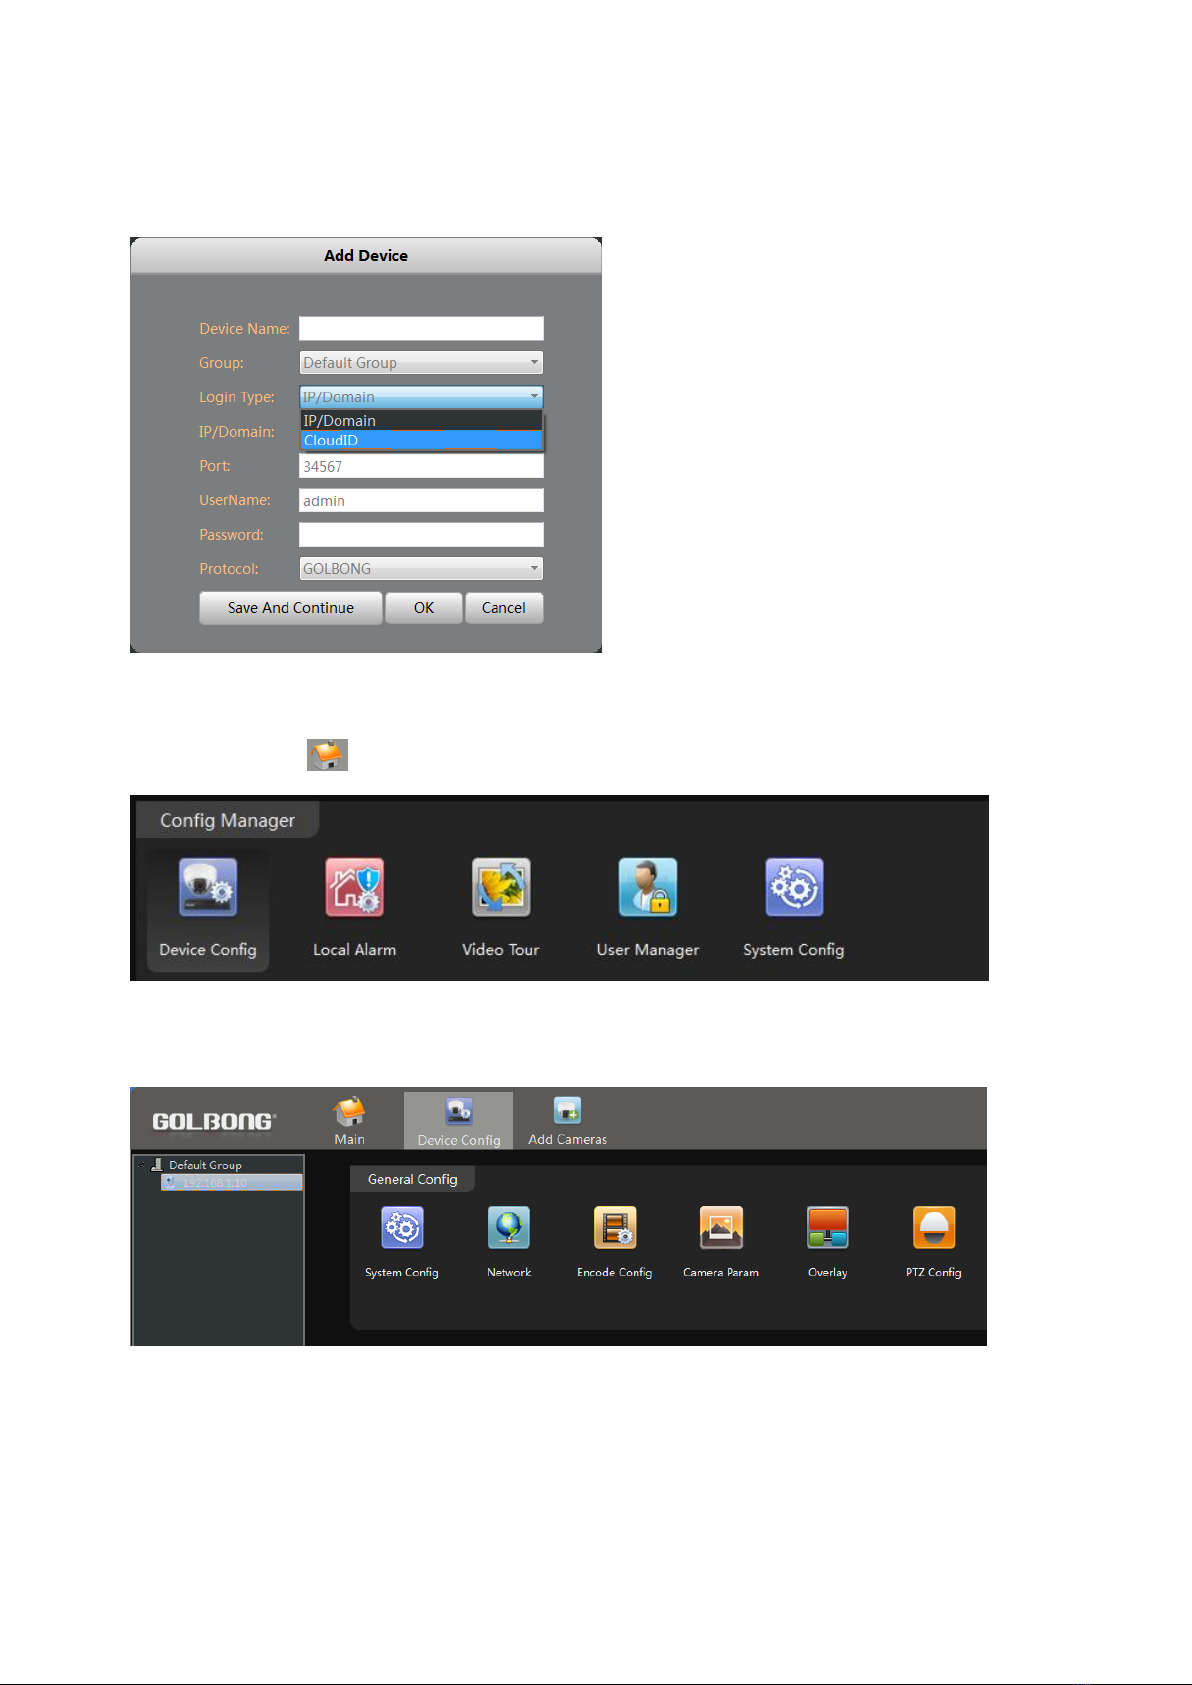
Connect to IP Camera .......................................................................................................................................7
Optional 1: What should you do when IP address get conflict? ........................................................................9
Optional 2: How to add the cameras to CMS5 outside of LAN .........................................................................9
Optional 3: How to Configure the network setting of the camera manually.....................................................10
Live Video............................................................................................................................................................11
Watch the live ..................................................................................................................................................11
Digital ZOOM ...................................................................................................................................................12
Activate the audio ( camera supports audio and connect to the audio pick-up only)......................................13
PTZ control (camera with motorized zoom lens only) .....................................................................................14
Change the Password of the Camera .................................................................................................................14
Set a new password for “admin” ......................................................................................................................14
Optional1: How to create an account for operator?.........................................................................................15
Recording live to your computer..........................................................................................................................15
Playback the video on your computer .................................................................................................................17
Recording live to TF memory card (cameras with microSD only) .......................................................................19
Format TF memory card..................................................................................................................................19
Turn on the TF memory card recording:..........................................................................................................20
Enable Motion recording..................................................................................................................................21
Enable network dis-connection recording........................................................................................................22
Optional: Enable External Alarm Detection Recording....................................................................................23
Playback the video from TF memory card (cameras with microSD only)............................................................24
Download the video to your computer hard drive (cameras with microSD only).................................................26
Upload snapshot or video to FTP server.............................................................................................................27
Setup the FTP server:......................................................................................................................................27
Enable the on-board storage recording...........................................................................................................28
Enable on Motion detection. ............................................................................................................................28
Optional: Enable FTP upload with external alarm input detection...................................................................29
Email notification..................................................................................................................................................30
Set email account ............................................................................................................................................30
Enable Snapshot..............................................................................................................................................31
Configure alarm event for email notification. ...................................................................................................32
Other options .......................................................................................................................................................35
Video View.......................................................................................................................................................35
Video Tour .......................................................................................................................................................36
Local Alarm......................................................................................................................................................37
Check the log...................................................................................................................................................38
Setting Camera Parameters ............................................................................................................................39
Installing a new Firmware................................................................................................................................41
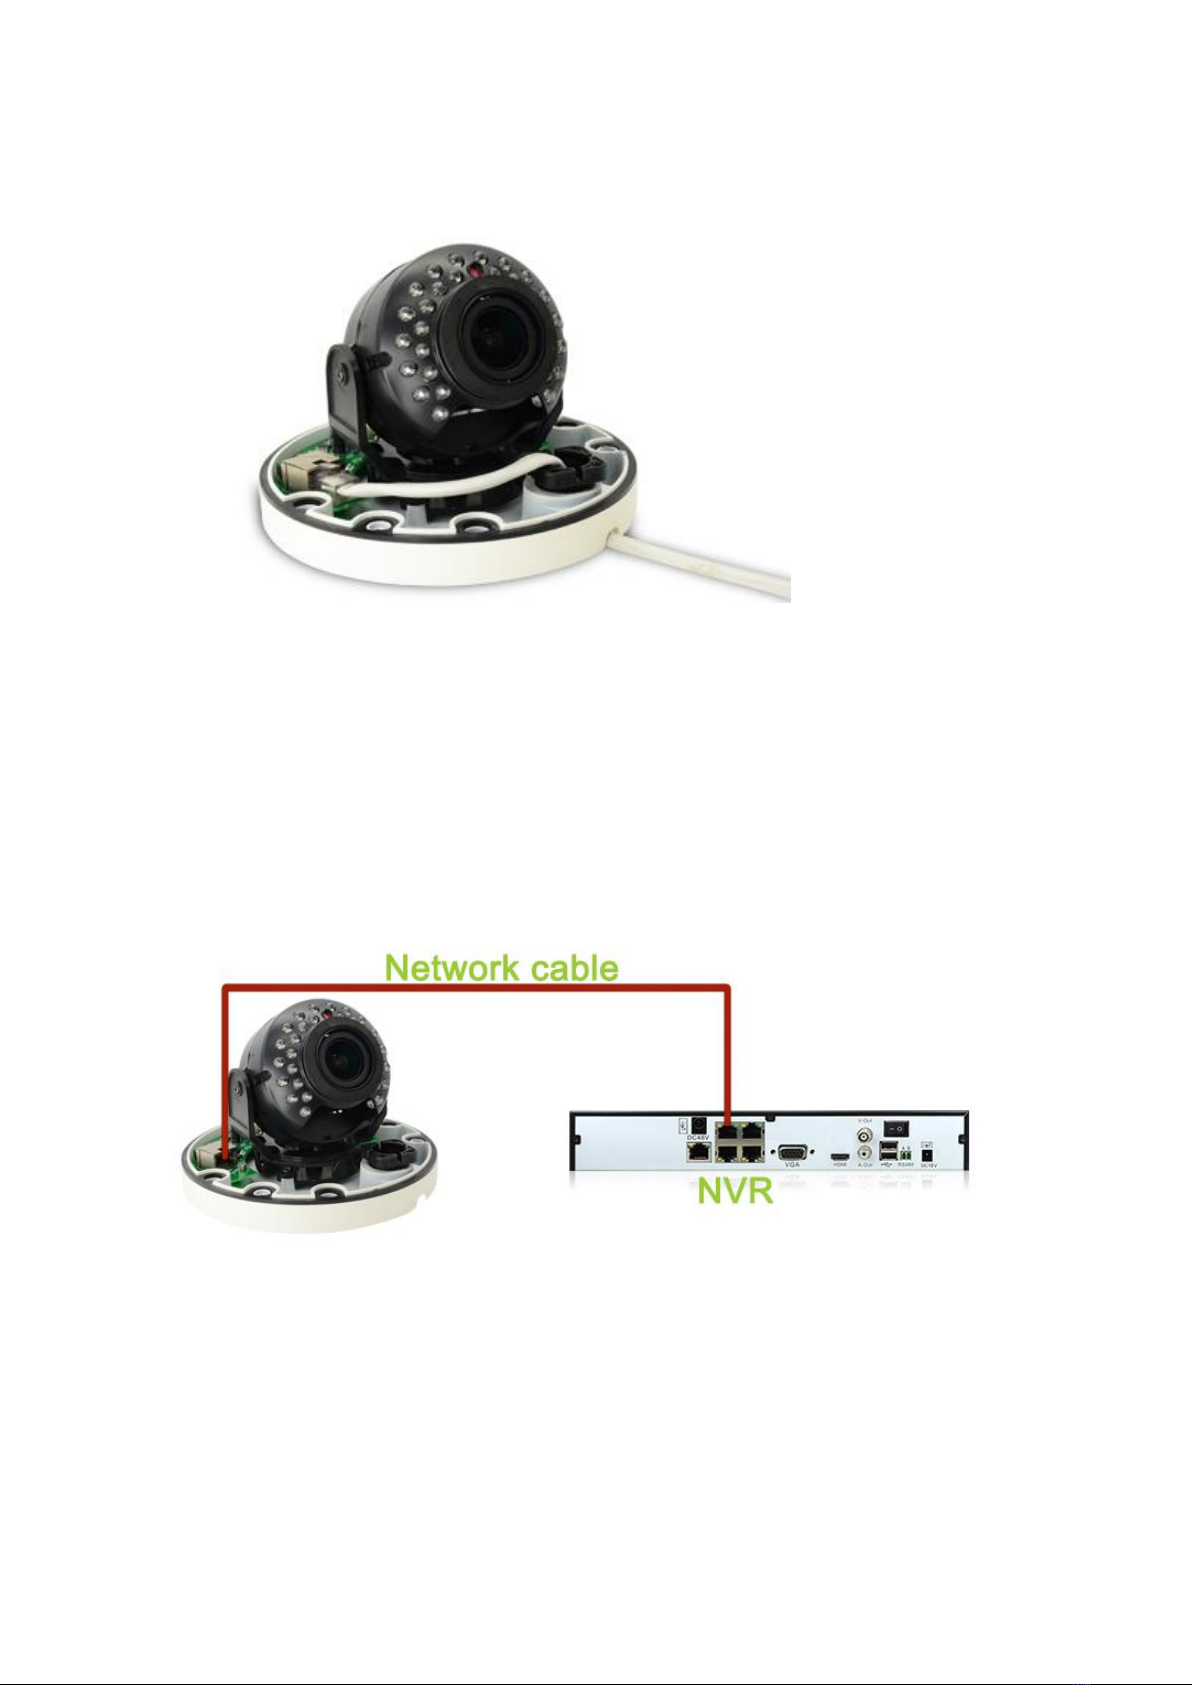
Connecting to an NVR/DVR ..................................................................................................................................42
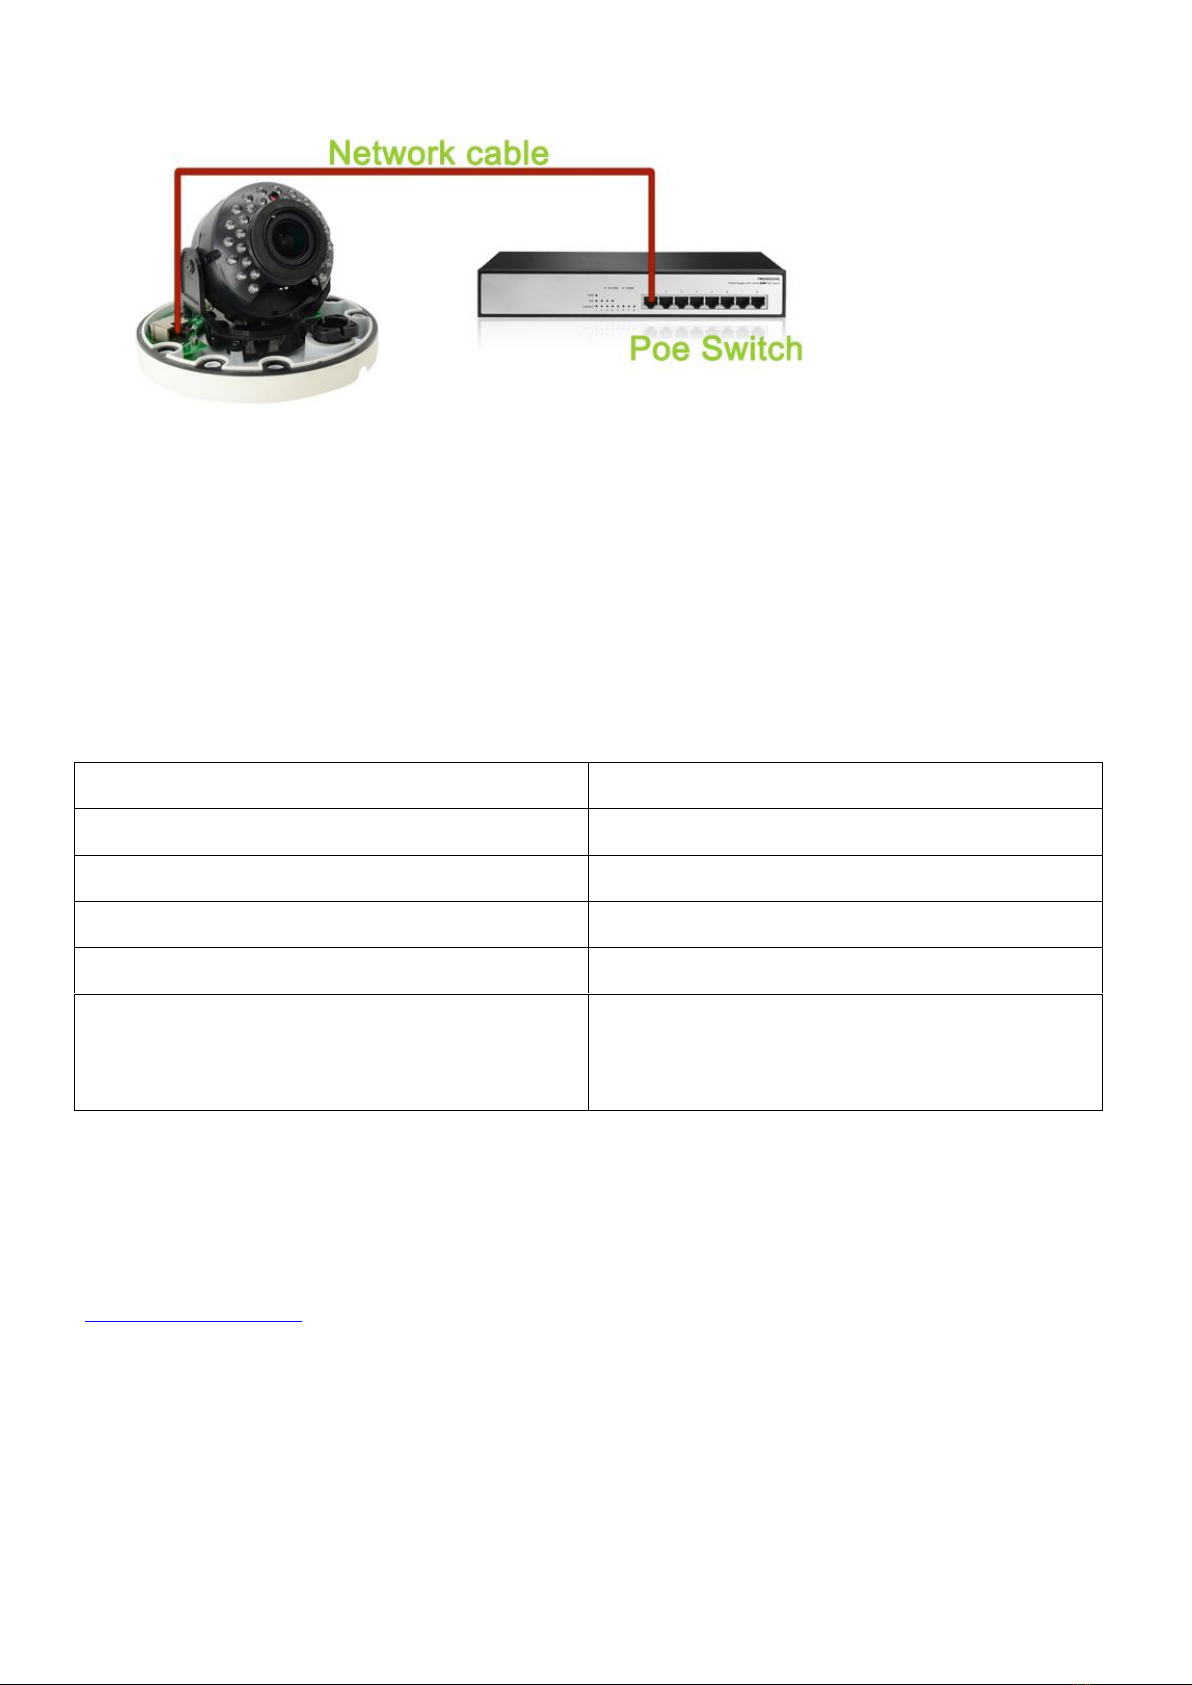
Connect your cameras to recorder..................................................................................................................42

3
Get the live.......................................................................................................................................................43
Set Camera Image Quality ..............................................................................................................................45
Optional: How to activate the audio in your NVR ............................................................................................46
Optional: Change the IP address of the camera from NVR. ...........................................................................47
Optional: Switch PAL/NTSC at front-end device video format ........................................................................48
Connecting to an Onvif Server.............................................................................................................................49
Discover the onvif port.....................................................................................................................................49
Connect to 3rd party VMS software (use Geovision as example) ................................................................49
Smartphone or Tablet Apps..................................................................................................................................54
Download app......................................................................................................................................................54
Registration..........................................................................................................................................................54
Connecting to your ip camera on an smart phone or tablet. ...............................................................................55
Live view interface ...............................................................................................................................................57
Optional1: How to change the video quality to adapt to low bandwidth network. ...............................................59
Set a Password for the Camera...........................................................................................................................60
Saving live stream to your smart phone ..............................................................................................................62
View snapshot at local files..................................................................................................................................63
Playback footage on TF memory card (cameras with microSD only) .................................................................64
Optional: How to enable the motion recording from your smart phone...............................................................66
Download footage from TF memory card (Cameras with microSD only)............................................................67
Enable Push Notification......................................................................................................................................68
Optional Receive the IP setting from your local network (DHCP) .......................................................................72
Web Browser connection......................................................................................................................................73
Checking your web browser security level ..........................................................................................................73
Access the camera over internet.........................................................................................................................76

4
Welcome
Thank you for purchasing GOLBONG IP network camera!
This user manual is designed to be a reference tool for the installation and operation of your IP camera.
Here you can find information about the camera's features and functions, as well as information to aid in
troubleshooting.
Many of the setup and installation sections below have corresponding videos on YouTube
To access the setup videos, please go to https://www.youtube.com/golbongtoday
For access to the quick start guide and other support information, go to
http://www.golbong.com/support.asp
To contact GOLBONG support, please do one of the following:
a. Visit http://www.golbong.com/contact-us.asp and use the email form
b. or Email GOLBONG Customer Support: [email protected]
Important Security Warning
In order to keep your GOLBONG camera secure and prevent unauthorized access, please make sure to
follow the steps below: Never use the default password for your camera. Always ensure that your
password is at least 8-10 characters long and contains a combination of lowercase characters,
uppercase characters as well as numbers.

5
Product Overview
Hardware Installation
Direct Connection to NVR
Connect cameras to the PoE Ports on the rear panel of the NVR using Cat5e or higher grade Ethernet
cable. The cameras will appear on the NVR without any additional configuration when the system
starts up.
Connect Cameras to Local Network
Option 1: Connect Cameras to Local Network, You can also connect your IP cameras to your local
network for flexible installations.

6
Using CMS5 for PC or Mac
System Requirements
CPU
Core 2 Duo 3.0GHz
Operating System
Windows™ 8/7/Vista
Memory
2GB
Video
512 MB of video memory and above
Network (LAN)
10/100 Base-T Network
Network (WAN)
1 Mbps upstream
High-speed Internet service is required to remotely
connect to your system.
Installing Software
Download the latest version of the windows PC software using the link below.
https://goo.gl/NHg7C3

7
Network connection and settings
Connect to IP Camera
1. Click icon CMS5, a dialog will appear. Key in the username and password to enter Main
console.
NOTE: The default username and password of the software is “admin”
If you want to revise the login username and password of the software, go to the “Main” click "User Manager"
, change the new password.
2. In the "Main" , Click “Add Cameras” to enter a new screen.
3. Click “IPV4 search”button. The available devices will display on the left screen.

8
4. Mark the checkbox in front of the IP address, click “Add ” button. The IP camera will move to
right.
5. Click the pen icon under “operation”, a new dialog pop up, name the camera, Click “OK”
to save.

9
NOTE: NO password required for camera/NVR in default. You can jump to page-11 to change camera’s
password.
NOTE: If you want to access the camera over internet, choose cloudID in “Login Type”
6. Once the software has connected the camera successfully, the “Status”will change to
“connected”
Optional 1: What should you do when IP address get conflict?
1. Mark the checkbox ”In order to login device, modify IP automatically” at the lower right corner.
NOTE: once you mark the checkbox, the software will change the IP camera automatically to avoid the
conflicts.
2. Return back to step 3. Click “IPV4 search” again. Following step 4 and step 5 until you add all
the camera successfully.
Optional 2: How to add the cameras to CMS5 outside of LAN.
1. Click “Manual Add” button at the lower right corner. A new dialog appear.
2. Name the camera, Choose the login type.
NOTE: if you didn’t configure the port forwarding in your router, you properly need to choose the cloudID in
login type.

10
3. Key in Static IP or cloudID
NOTE: You can mark down the cloudID when you connect the camera in the LAN
4. Key in password, and click “OK” to save.
Optional 3: How to Configure the network setting of the camera manually.
1. In the "Main" , Click “Device Config”, a new screen appear.
2. Select the camera from the list in the top left. All the icon will be activated with color
NOTE: If the icon remain black/white, check the connection status of your camera.
3. Click Network icon, a new screen will appear with “TCP/IP” setting.

11
4. Modify the IP setting. Click ”OK” to save
Important: The DNS should be configured correctly, otherwise the cloud connection and email
notification may not be working.
NOTE: If you don’t know you network setting, mark “enable DHCP” to receive the IP setting from
your local network. Click OK, the IP camera has to reboot to receive the correct IP setting from your
local network.
Live Video
Watch the live
1. In the "Main" ,. Click "Live" icon to enter live view interface.

12
2. Double click the camera in the devices list. CMS5 will start receiving the live.
NOTE: Double click the name again can close the video.
Digital ZOOM
1. Right the video you want to operate digital zoom on the screen, select “Digital Zoom”
2. Hold the left-button on mouse to selected area in red square. As shown below:

13
3. Release the mouse to zoom in.
4. Right click mouse again, uncheck “digital zoom” to close the zoom operation.
Activate the audio ( camera supports audio and connect to the audio
pick-up only)
1. In the live, Click headset icon“ ” on the top right corner to hear the voice from the IP camera.
Important: You need to enable the audio in the “encode” in order to record the footage with audio.

14
PTZ control (camera with motorized zoom lens only)
1. In the live, click the joystick icon on the top right window, a joystick panel appear
2. Click the panel button, you can pan/tilt/zoom with camera
Change the Password of the Camera
Set a new password for “admin”
1. In the "Main" , click ”Device Config”. Enter ”Tool Manager” on the right screen, A new
screen appear.
2. In the top left menu, select the camera for which you want to change the password.
3. Click “User Manager” on the top screen.

15
3. Click ”Modify Password”. A new screen pop up. Enter the old password and your new password.
Click “OK” to save.
Note: The default password is blank
Optional1: How to create an account for operator?
1. Click “Add User”, a new screen pop up.
2. Key in the Username, Password.
NOTE: Mark “Sharable” will allow more than one operator use the same account.
3. Allocate the authority to this account. Click “OK” to save
NOTE: Operator who login with account only can use the permissions what you ticked.
Recording live to your computer
1. In the "Main" , Click “Record Settings”

16
2. Mark the check box on the storage setting to select the storage disk from your PC computer.
3. Mark the checkbox to select “Record Schedule”
4. Mark the checkbox in front of “Enable Record”, Click “Apply” button to Save.
NOTE: this is the switch button to turn on/off recording.
5. Return to the live interface, double click camera on the list, CMS5 will start recording from the
live.
NOTE: the CMS5 only will start recording when it is receiving the live. Dis-connect the camera will turn off the
recording.
NOTE: The camera icon will turn back/white to blue when CMS5 is recording.
6. Click camera icon on top right windows to turn off the recording.

17
Playback the video on your computer
1. In the "Main" , Click “Playback” icon , a new screen appear.
2. Select the channel from the camera list in the upper right corner.

18
3. Select the time period in the lower right corner.
NOTE: It only can search footage within a single day.
4. Click “Search”. The search result will display as below.
5. Select the footage from the list, click play button , the software will start playing.
NOTE: Click“ ” can locate the files in the PC computer.
6. Choose the “Time” over “File” at the left corner, the time frame will appear.
7. Move the mouse to the time frame, time will display in white. Click the mouse, the software will
start playback the footage from this moment.
NOTE: the time in red is current playing time stamp.
Note:Mark the checkbox "Sync Play" can playback multi-channel at the same time

19
Recording live to TF memory card (cameras with microSD only)
Format TF memory card
1. In the "Main" , Enter “Device Config” and Click “Disk Manager”
2. Select the memory disk from the list
NOTE: Only the model with TF memory card slot, and the TF memory card is installed will display memory
information.
NOTE: Class 8 or higher TF memory card is required.
3. Click “Format” to erase all the data from the TF memory card.

20
Important: All the data will be erased with format operation.
NOTE: The TF memory card can not be viewed by windows PC directly.
Turn on the TF memory card recording:
1. In the "Main" , Click “Device Config” , Enter “Record Config”
2. Choose “Auto”, Click “OK” to save.
This manual suits for next models
2
Table of contents