Gold Note B-7 Ceramic User manual

B-7 Ceramic
HIGH-PRECISION TONEARM
USER MANUAL


INDEX
2
DESCRIPTION AND SPECIFICATIONS................................................................................................................
INSTALLATION...............................................................................................................................................
OVERVIEW AND ANTI-SKATING
.....................................................................................................................
VTA AND AZIMUTH
.......................................................................................................................................
WARRANTY AND SERVICE...............................................................................................................................
TROUBLESHOOTING...................................................................................................................................
IMPORTANT SAFETY INFORMATION.................................................................................................................
P. 3
P. 5
P. 6
P. 7
P. 8
P. 9
P. 10

A well designed tonearm should perform at its best with every cartridge while keeping things simple and effective, being easy
to install and use: add quality materials and elegant looks to the equation and you'll get an idea of the B-7 Ceramic.
Carefully hand made in Italy with only one purpose: make your cartridge dive deep into the vinyl and bring to life the most
natural and detailed music.
Inside the B-7 Ceramic you'll find four high precision micro ceramic ball-bearings manufactured in Germany by GRW:
these ball-bearings are treated singularly and sealed to preserve their integrity and extreme precision, a crucial factor to
enable noiseless functionality to let you enjoy every single nuance in your records.
B-7 Ceramic effective length of 242mm with 19mm overhang makes it easy to install on any turntable.
The Azimuth is adjustable through a pair of 2mm micro bolts to set up the shell perfectly.
The rear arm wand is dampened with silicon spacer to reduce unwanted vibrations and handles a finely machined Stainless
Steel counterweight to set up most phono cartridges (up to 15 gram mass).
The vertical ultra-low friction ceramic ball-bearings are pivoted through stainless steel bolts manually adjusted, the
horizontal movement is driven by two micro ball-bearings directly inserted in the main rectified pivot.
With a 23mm diameter arm shaft, the B-7 Ceramic can be secured on every turntable, improving performances and every day
pleasure.
DESCRIPTION AND SPECIFICATION
3

SPECIFICATIONS
Typology: 9” Ball Bearing Tonearm
Overhang: 19mm
Offset: 24°
Arm wand: Straight Titanium with 6 different sections
Inserting Plinth Shaft: 23mm
Dynamic effective mass: 10g
VTF: 0.176N (18g)
VTA: adjustable on collar
Lift: hydraulic
Anti-skating: wire 5 positions
Anti-skating force: from the center to the outside the effect is 0.5g each step = 0.5 - 1.0 - 1.5 - 2.0 - 2.5
Azimuth: adjustable on the headshell
CABLES
Internal cables: AWG36 Hyper Litz shielded 99,99% OFC
External cable supplied: 1,5m custom 4 pole DIN/RCA
DIMENSIONS AND WEIGHT
Effective length: 242 mm
Weight: 195g without counterweight
FINISHES
Shell and pivot: Black anodised Aluminium
Arm wand: titanium
Counterweight: Stainless Steel natural
Hydraulic lift board: Black
DESCRIPTION AND SPECIFICATION
4

INSTALLATION
5
STEP 1
Insert the tonearm into the arm collar on the turntable and block it with the hex-bolts on the collar while adjusting the
VTA (requires the cartridge to be already installed).
Insert the Phono Cable into the arm collar of the turntable as suggested in the picture. Insert the arm into the base and
then proceed to screw the 3 grains arranged on the external circumference at intervals of 120 °.
STEP 2
Connect the Phono Cable to the tonearm.
To align the female DIN connector of the tonearm to the male
DIN connector of the cable correctly refer to the ground slot.

1
2
3
4
1
2
3
+_
1-ANTI-SKATING nylon wire with bullet counterweight
3
2
4
- ANTI-SKATING adjustment bar
- TONEARM COUNTERWEIGHT: to set up the correct tracking force depending on the phono cartridge in use
- SHELL AZIMUTH ADJUSTMENT: to adjust the alignment of the tonearm head-shell (0,9mm Allen Wrench)
INSTALLING THE ANTI-SKATING SYSTEM
1- Slip the loop of the ANTI-SKATING nylon wire over the groove of the ADJUSTMENT BAR
2- Feed the wire through the loop of the SUPPORT HOOP
3- Adjust the ANTI-SKATING force choosing the correct groove on the ADJUSTMENT BAR
OVERVIEW AND ANTI-SKATING
6

VTA SETUP
To up or down the arm by correctly adjusting the VTA, use the
1.5 mm Allen key supplied by Gold Note and insert it in the three
holes on the arm board indicated by the arrows.
Allen-key 1,5 mm
Arm board
AZIMUTH
After the cartridge has been properly installed on the tone arm,
you can adjust the angle of the headshell with the supplied 0,9
mm Allen Wrench.
Setting a correct Azimuth will provide a better audio
performance.
Allen-key 0,9 mm
VTA AND AZIMUTH
7

WARRANTY
To validate the warranty is necessary to register the unit on the Gold Note internet web site within 15 days from the
purchase on the appropriate area of the web site: www.goldnote.it/warranty
If the unit is not registered correctly or has been purchased from a different country of the purchaser home address
the unit will not be covered by any warranty and the registration will be refused.
The warranty does not cover in any case: Tubes, Phono Cartridge Stylus and Batteries.
SERVICE
Every GOLD NOTE® product is the result of meticulous technological research, and consequently their correct
functioning is guaranteed. In spite of this it is possible that problems may emerge which non-specialist users cannot
resolve.
In this case, contact your dealer to be advised on how the fault can be solved.
Do not return any object directly to the factory or to the distributor without being authorised to do so.
In such cases both GOLD NOTE® and the distribution agents decline responsibility of any kind.
For more information please visit www.goldnote.it/service
PLEASE NOTE
Descriptions and technical characteristics may vary at any time and without notice.
WARRANTY AND SERVICE
8

TROUBLESHOOTING
FAQ
ACTION DESCRIPTION HOW TO ADJUST IT
CLEANING THE UNIT •Use EXTREME care and ONLY very soft cotton
cloth to clean the unit.
Any acid will irreversibly damage the unit fine
finishes.
Do not use any alcohol to clean the unit. Only
dry cloth is allowed.
SYMPTOM DESCRIPTION CAUSE REMEDY
SPEAKER HUMMING
PROBLEMS
• The tone arm is not correctly
Grounded.
The speakers hum
when the cable is
connected to the
Amplifier.
• The cartridge connectors are not
well inserted.
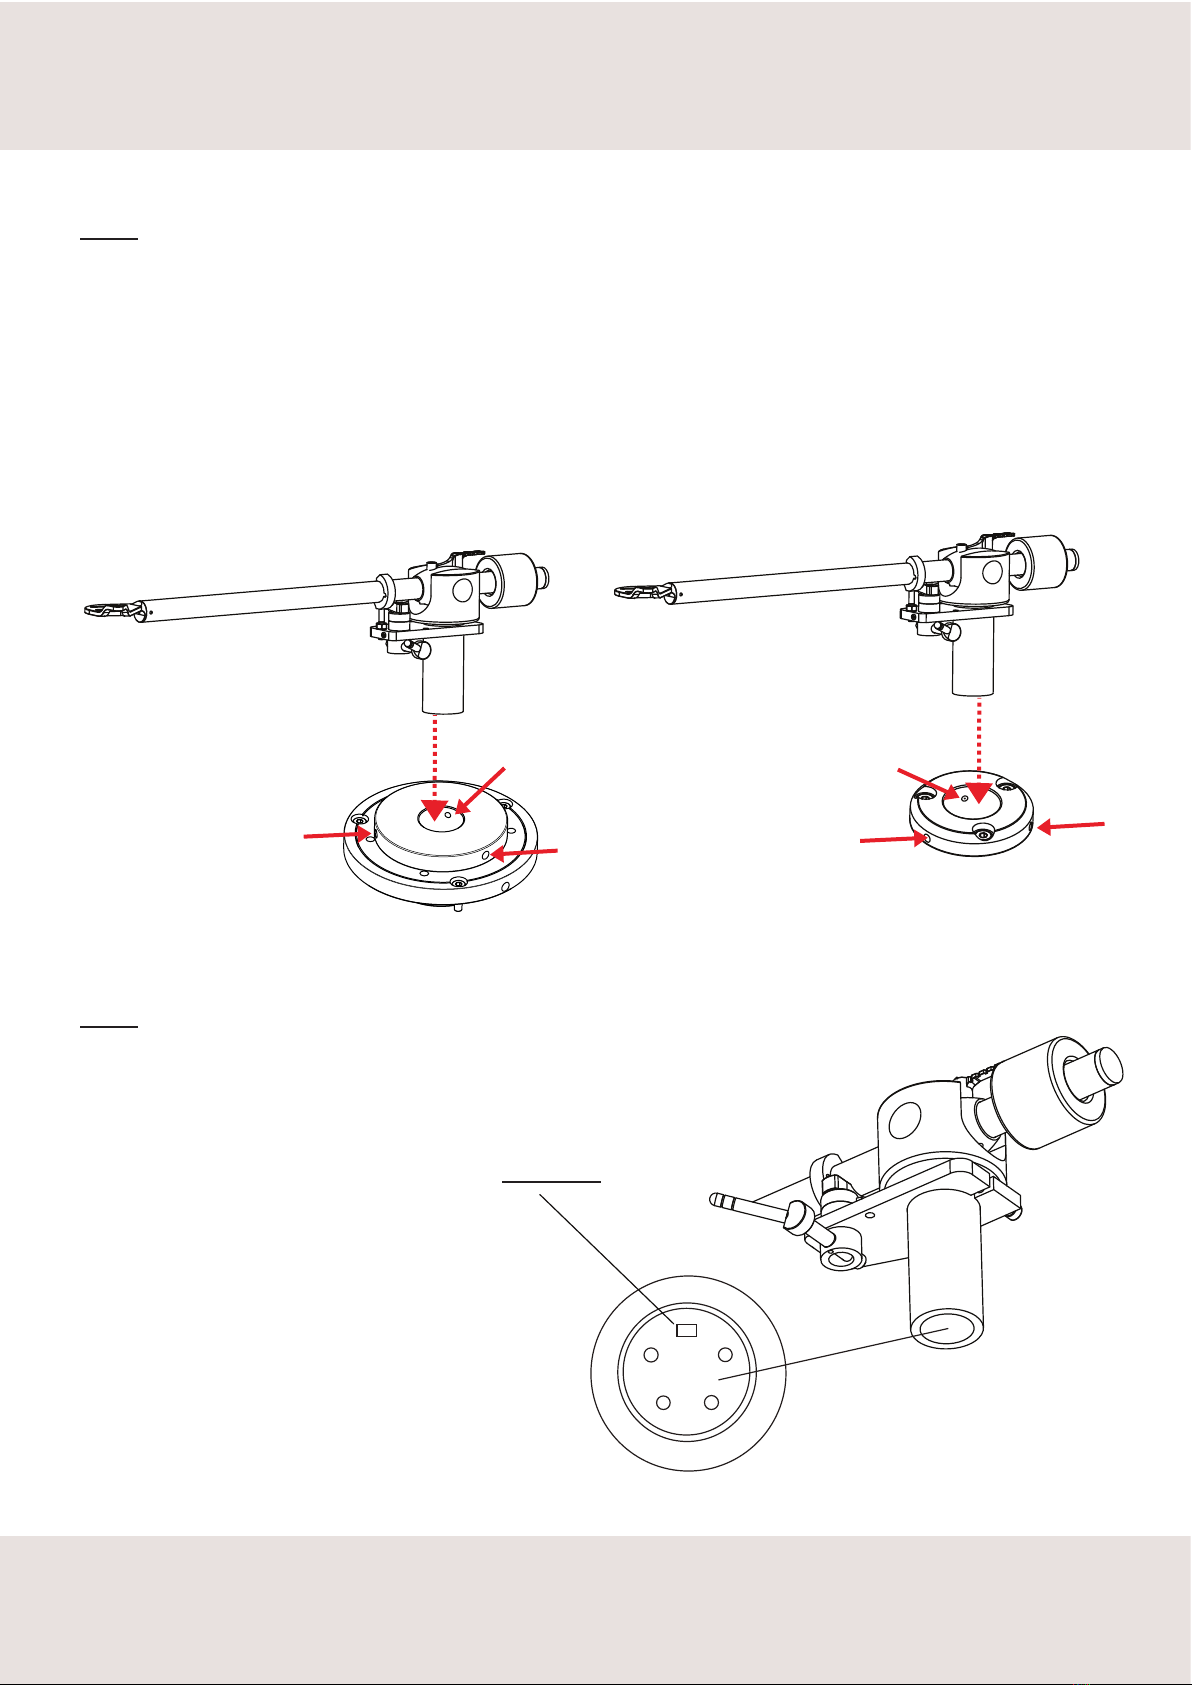
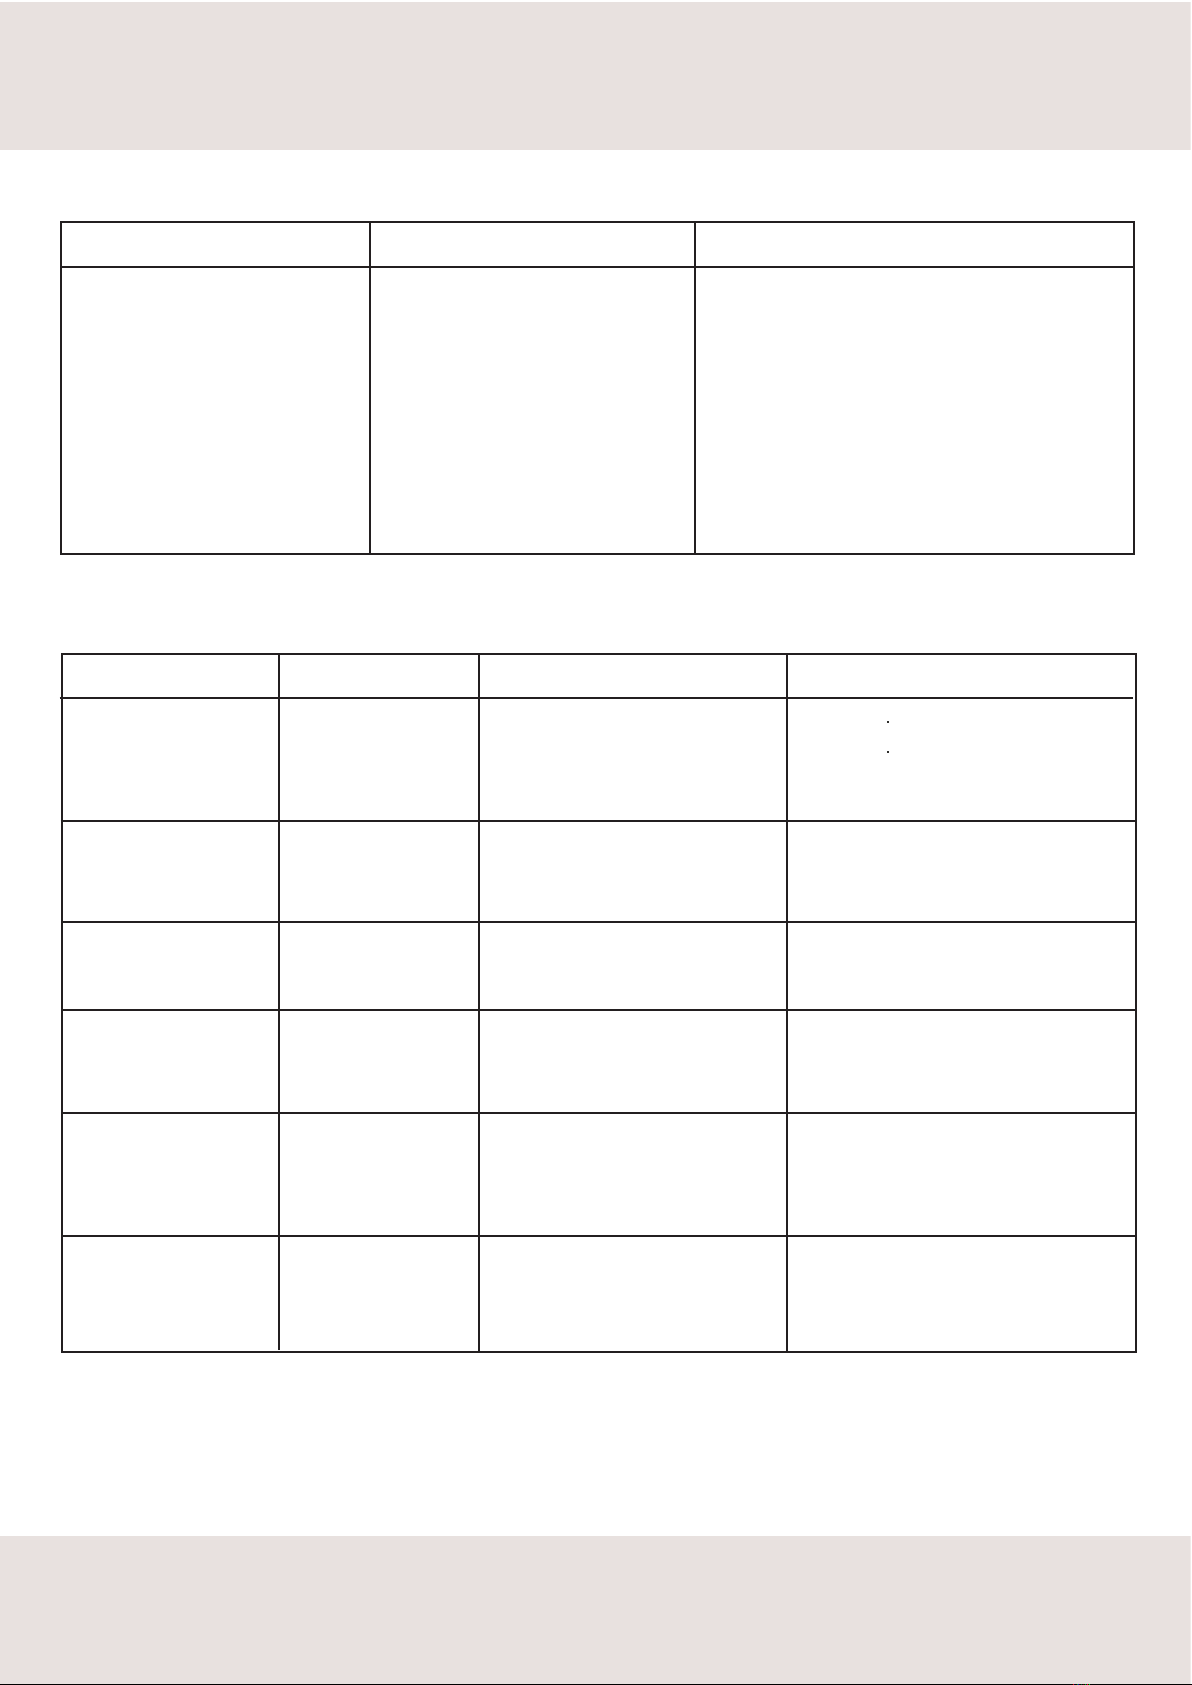
• The Ground DIN connector slots
do not touch each other.
• Verify the cartridge connectors
are well inserted.
• Be sure the DIN slot contacts touch
each other well.
• Adjust the Azimuth of the Head-Shell
with the supplied 0,9mm Allen Wrench
as described in the specific chapter of
this manual.
• The interconnect input and/or
output cables of the amplifiers are
not shielded.
• Be sure the Phono Cable DIN
Connector is well inserted in the tone
arm female DIN.
• Be sure to always use shielded
cables for the amp connections.
TONE ARM TRACKS BAD The Headshell is bent.
The Vertical Tracking
Angle of the arm is
Wrong.
• Adjust the VTA moving the arm shaft by
loosing the three hex-bolts placed on the
edge on the arm board collar with the
help of the 1,5mm Allen Wrench supplied.
FAQ & TROUBLESHOOTING
TROUBLESHOOTING
9
For spare parts visit the official Gold Note store at:
http://www.akamaiaudio.it/

CAUTION!
TO REDUCE THE RISK OF ELECTRIC SHOCK, DO NOT
REMOVE COVER (OR BACK). NO USER-SERVICEABLE PARTS
INSIDE. REFER ONLY TO QUALIFIED GOLD NOTE SERVICE
PERSONNEL FOR SERVICE
WARNING!
TO PREVENT FIRE OR SHOCK HAZARD, DO NOT EXPOSE
THIS APPLIANCE TO RAIN OR MOISTURE
Serial Number:
Model:
This appliance has a serial number located on the rear panel.
Please record the model and serial number and retain them for your records.
Do not disassemble any part of the product.
Do not use any part of the product for other purposes.
For service and problems of any kind, contact qualified Gold Note personnel.
Protect the product from rain, humidity and keep away from heat sources, electric and electronic motors etc.
The power Chord supplied must be used only on this unit.
Gold Note does not have responsibility for any improper use of this unit.
IMPORTANT SAFETY INFORMATION
10

1Read these instructions and store them.
2Heed all warnings.
3Follow the instructions.
4Do not use this apparatus near water.
5Clean only with a dry cloth.
6Do not block the ventilation openings and install in accordance
with the manufacturer's instructions.
7Do not install near heat sources such as radiators, heat
registers, stoves or other apparatus (including amplifiers) that
produce heat.
8Do not defeat the safety purpose of the polarized or
grounding-type plug: a polarized plug has two blades with one
wider than the other.
A grounding type plug has two blades and a third grounding
prong.
The wide blade or the third prong are provided for your safety.
If the provided plug does not fit into your outlet, consult an
electrician for replacement of the obsolete outlet.
• Do not expose this apparatus to drips or splashes.
• Do not place any objects filled with liquids, such as vases, on
the apparatus.
• Do not install this apparatus in a confined space such as a
book case or similar unit.
• The apparatus draws nominal non-operating power from the
AC outlet with its POWER or STANDBY/ON switch not in the ON
position.
• The apparatus should be located close enough to the AC
outlet so that you can easily grasp the power cord plug at any
time.
• The main plug is used as the disconnect device, the
disconnect device shall remain readily operable.
• If the product uses batteries (including a battery pack or
installed batteries), they should not be exposed to sunshine, fire
or excessive heat.
• Caution should be taken when using earphones or
headphones with the product because excessive sound
pressure (volume) from earphones or head- phones can cause
hearing loss.
9Protect the power cord from being walked on or pinched
particularly at plugs, convenience receptacles, and the point
where they exit from the apparatus.
10 Only use attachments/accessories specified by the
manufacturer.
11 Use only with the cart, stand, tripod, bracket, or table
specified by the manufacturer, or sold with the apparatus.
When a cart is used, use caution when moving the cart/
apparatus combination to avoid injury from tip-over.
12 Unplug this apparatus during lightning storms or when
unused for long periods of time.
13 Refer all servicing to qualified service personnel only.
Servicing is required when the apparatus has been damaged in
any way (such as when the power cord or plug is damaged, liquid
has been spilled or objects have fallen into the apparatus, the
apparatus has been exposed to rain or moisture) and in any
case when the apparatus does not operate normallyor has been
dropped.
IMPORTANT SAFETY INFORMATION
11

NOTES
12

NOTES
13

Other manuals for B-7 Ceramic
1
Table of contents
Other Gold Note Accessories manuals