GoodHome marlow User manual

marlow
5059340069135
Cam and Dowel Jig
POTI12959-01_200445_s1_Marlow Cam & Dowel Jig V4.indd 1 19/06/2020 12:59
V51020
BX220IM

EN Contents
PL Zawartość
FR Contenu
RO Cuprins
Safety 5
FR Sécurité 5
PL Bezpieczeństwo 6
RO Siguranță 7
Guarantee 5
FR Garantie 5
PL Gwarancja 6
RO Garanție 7
Use 12
FR Utilisation 12
PL Użytkowanie 12
RO Utilizare 12
Assembly 23
FR Assemblage 23
PL Montaż 23
RO Asamblare 23
POTI12959-01_200445_s1_Marlow Cam & Dowel Jig V4.indd 2 19/06/2020 12:59

x ?
EN IMPORTANT - Save these instructions.
This manual contains important safety
and operatinginstructions. Read all
instructions and follow them with each
use of this product.
FR IMPORTANT - Conserver ces instructions.
Ce manuel contient d’importantes
instructions liées àla sécurité et
au fonctionnement. Lire toutes les
instructions et les suivre àchaque
utilisation de ce produit.
PL WAŻNE — należy zachować tą
instrukcję. Niniejszainstrukcja obsługi
zawiera ważne informacje dotyczące
bezpieczeństwa i użytkowania. Należy
przeczytać wszystkie wytyczne i
zawsze stosować się do nich podczas
użytkowaniaproduktu.
RO IMPORTANT – păstrați aceste instrucțiuni.
Acest manual conține instrucțiuni
importante de siguranță și utilizare. Citiți
toate instrucțiunile și urmați-le la fiecare
utilizare a acestui produs.
POTI12959-01_200445_s1_Marlow Cam & Dowel Jig V4.indd 3 19/06/2020 12:59

EN Required Hardware – Sold Separately 5059340069128
FR Matériel requis – vendu séparément 5059340069128
PL Wymagane elementy montażowe – sprzedawane oddzielnie 5059340069128
RO Echipament necesar – Se comercializează separat 5059340069128
Ø8mm
Ø15mm
Ø8mm
J1
J2
D1
D2 D3
K1
22mm
35mm
25mm
18mm
POTI12959-01_200445_s1_Marlow Cam & Dowel Jig V4.indd 4 19/06/2020 12:59

EN Safety
PL Bezpieczeństwo
FR Sécurité
RO Siguranță 5
EN
Safety
The cam and dowel jig is a tool that enables the
user to create durable, accurate cam and dowel
storage and shelving furniture. The cam and
dowel jig is, specifically for use with 18mm thick
furniture boards and panels. All components
are self-contained, within the carry case. The
drill bits, hex key and stop collars are secured in
their respective position to prolong their use. For
domestic use only.
Guarantee
We take special care to select high quality
materials and use manufacturing techniques that
allow us to create products incorporating design
and durability. This Good Home product, has a
manufacturer’s guarantee of 5 years, against
manufacturing defects, from the date of purchase
(if bought in store) or date of delivery (if bought
online), at no additional cost for normal (non-
professional or commercial) household use.
To make a claim under this guarantee, you must
present your proof of purchase (such as a sales
receipt, purchase invoice or other evidence
admissible under applicable law), please keep
your proof of purchase in a safe place. For this
guarantee to apply, the product you purchased
must be new, it will not apply to second hand or
display products. Unless stated otherwise by
applicable law, any replacement product issued
under this guarantee will only be guaranteed until
expiry of the original period guarantee period.
This guarantee covers product failures and
malfunctions provided the product was used for
the purpose for which it is intended and subject
to installation, cleaning, care and maintenance
in accordance with the information contained in
these terms and conditions, in the user manual
and standard practice, provided that standard
practice does not conflict with the user manual.
This guarantee does not cover defects and
damage caused by normal wear and tear or
damage that could be the result of improper
use, faulty installation or assembly, neglect,
accident, misuse, or modification of the product.
Unless stated otherwise by applicable law, this
guarantee will not cover, in any case, ancillary
costs (shipping, movement, costs of uninstalling
and reinstalling, labour etc.), or direct and
indirect damage.
If the product is defective, we will, within
a reasonable time, replace parts.
Rights under this guarantee are enforceable in
the country in which you purchased this product.
Guarantee related queries should be addressed
to the store you purchased this product from.
The guarantee is in addition to and does not
affect your statutory rights.
FR
Consignes de sécurité
Le gabarit pour chevilles et cames est un outil
qui permet de poser des chevilles et cames
de manière durable et précise sur les meubles
de rangement et les étagères. Ce gabarit pour
chevilles et cames est spécialement conçu
pour une utilisation sur les panneaux et plaques
composants sont autonomes dans la mallette de
transport. Les forets, les clés mâles et les colliers
d’arrêt sont maintenus à leur position respective
pour prolonger leur durée de vie. Usage
domestique uniquement.
Garantie
Nous veillons tout particulièrement à sélectionner
des matériaux de haute qualité et à utiliser des
techniques de fabrication qui nous permettent
de créer des produits à la fois design et durables.
Ce produit Good Home s’accompagne d’une
fabrication, à compter de la date d’achat (en cas
d’achat en magasin) ou de la date de livraison (en
cas d’achat en ligne), sans coût supplémentaire
dans le cadre d’un usage domestique normal (non
professionnel et non commercial).
Pour déposer une réclamation au titre de cette
garantie, vous devez présenter votre preuve
d’achat (ticket de caisse, facture d’achat ou
toute autre preuve recevable en vertu de la loi
en vigueur). Conserver votre preuve d’achat
dans un endroit sûr. Pour que cette garantie
soit applicable, le produit que vous avez acheté
doit être neuf. La garantie ne s’applique pas aux
produits d’occasion ou aux modèles d’exposition.
Sauf indication contraire prévue par la loi en
vigueur, tout produit de remplacement fourni
au titre de la présente garantie ne sera garanti
POTI12959-01_200445_s1_Marlow Cam & Dowel Jig V4.indd 5 19/06/2020 12:59

EN Safety
PL Bezpieczeństwo
FR Sécurité
RO Siguranță
que jusqu’à expiration de la période de
garantie initiale.
Cette garantie couvre les défaillances et
dysfonctionnements matériels, sous réserve
que le produit ait été utilisé conformément à
l’usage pour lequel il a été conçu, qu’il ait été
installé, nettoyé et entretenu conformément
aux informations contenues dans les présentes
conditions générales ainsi que dans le manuel
d’utilisation, et conformément à la pratique
courante, sous réserve que cette dernière n’aille
pas à l’encontre du manuel d’utilisation.
Cette garantie ne couvre pas les défauts et
dommages causés par l’usure normale, ni les
dommages pouvant résulter d’une utilisation
non conforme, d’une installation ou d’un
montage défectueux, ou d’une négligence, d’un
accident, d’une mauvaise utilisation ou d’une
modification du produit. Sauf indication contraire
prévue par la loi en vigueur, cette garantie ne
couvre en aucun cas les coûts accessoires
(expédition, transport, frais de désinstallation
et réinstallation, main-d’œuvre, etc.), ni les
dommages directs et indirects.
Si le produit est défectueux, nous proposerons
des pièces de remplacement dans un
délai raisonnable.
Cette garantie est valable dans le pays où vous
avez acheté ce produit. Toute demande au titre
de la garantie doit être adressée au magasin où
vous avez acheté ce produit.
Cette garantie s’ajoute à vos droits statutaires,
sans les affecter.
PL
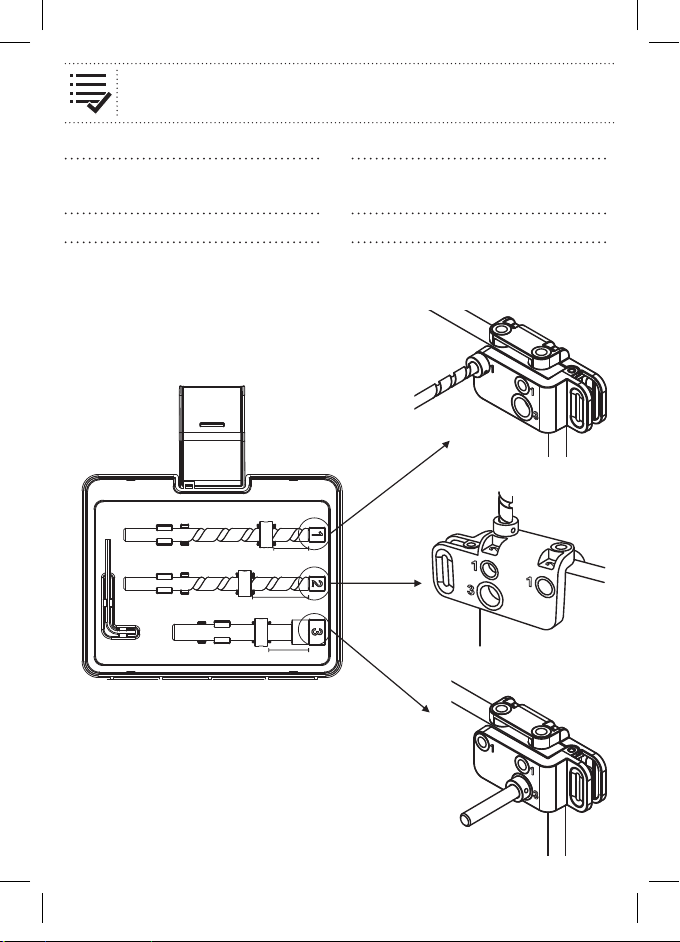
Instrukcje bezpieczeństwa
Szablon do montażu złączy mimośrodowych
to narzędzie, które pozwala użytkownikowi
tworzyć trwałe, precyzyjne półki i meble
do przechowywania łączone za pomocą
złączy mimośrodowych. Szablon do montażu
złączy mimośrodowych jest przeznaczony
specjalnie do płyt meblowych o grubości
18 mm. Wszystkie elementy znajdują się w
skrzynce do przenoszenia. Wiertła, klucz
imbusowy i kołnierze blokujące są zamocowane
w odpowiednich miejscach, aby wydłużyć
czas ich użytkowania. Wyłącznie do użytku w
gospodarstwie domowym.
Gwarancja
Przykładamy szczególną wagę do tego,
aby wybierać materiały wysokiej jakości
i stosować techniki produkcyjne, które
umożliwiają tworzenie wytrzymałych, a zarazem
atrakcyjnych produktów. Produkt marki Good
Home jest objęty gwarancją producenta przez
okres 5 lat od daty zakupu (zakup w sklepie) lub
dostawy (zakup przez Internet)
w przypadku normalnego (nieprofesjonalnego
lub niekomercyjnego) użytku domowego.
W celu zgłoszenia roszczenia w ramach
gwarancji należy przedstawić dowód zakupu
(np. paragon, fakturę lub inny ważny w świetle
prawa dokument). Dowód zakupu należy
przechowywać w bezpiecznym miejscu.
Gwarancja dotyczy wyłącznie produktów
zakupionych jako nowe, a nie dotyczy produktów
nabytych jako używane lub powystawowe.
Jeśli odpowiednie przepisy nie stanowią
inaczej, produkt zastępczy wydany na mocy
niniejszej gwarancji będzie objęty gwarancją
tylko do końca okresu obowiązywania
pierwotnej gwarancji.
Gwarancja obejmuje usterki i awarie, przy
założeniu, że produkt był używany zgodnie
z przeznaczeniem oraz zamontowany,
czyszczony, konserwowany i serwisowany
zgodnie ze standardowymi praktykami i
informacjami zawartymi powyżej, w instrukcji
obsługi oraz określonymi przez standardowe
sposoby postępowania, jeśli są one zgodne
z instrukcją obsługi.
Niniejsza gwarancja nie obejmuje wad ani
uszkodzeń wynikających z normalnego zużycia,
uszkodzeń będących skutkiem niewłaściwego
użytkowania, montażu lub złożenia, a także
zaniedbania, wypadku, używania niezgodnego
z przeznaczeniem lub modyfikacji produktu. Jeśli
lokalne przepisy nie stanowią inaczej, niniejsza
gwarancja nie obejmuje w żadnym przypadku
kosztów dodatkowych (dostawy, transportu,
demontażu oraz montażu, robocizny itp.) ani
strat bezpośrednich lub pośrednich.
W razie stwierdzenia uszkodzenia produktu
zobowiązujemy się wymienić jego części w
rozsądnym czasie.
Prawa wynikające z niniejszej gwarancji mają
zastosowanie w kraju, w którym zakupiono
produkt. Pytania dotyczące gwarancji
6
POTI12959-01_200445_s1_Marlow Cam & Dowel Jig V4.indd 6 19/06/2020 12:59

EN Safety
PL Bezpieczeństwo
FR Sécurité
RO Siguranță
należy kierować do sklepu, w którym
zakupiono produkt.
Niniejsza gwarancja jest dokumentem
dodatkowym, który nie ma wpływu na ustawowe
prawa konsumenta.
RO
Instrucțiuni de siguranță
Setul de șablon mobilă pentru ericsoane și
cepuri este o unealtă care permite utilizatorului
să creeze găuri durabile și precise pentru
ericsoane, cepuri și rafturi. Șablonul mobilă
pentru ericsoane și cepuri se folosește în
special cu plăci și blaturi groase pentru mobilier
de 18 mm. Toate piesele au propriul spațiu
separat în cutia de transport. Burghiele, cheia
hexagonală și colierele de blocare sunt fixate în
poziția respectivă pentru a le prelungi durata de
utilizare. Numai pentru uz casnic.
Garanție
Avem mare grijă să selectăm materiale de
înaltă calitate și să utilizăm tehnici de fabricare
care ne permit să creăm game de produse ce
încorporează design și durabilitate. Produsul
GoodHome are o garanție a producătorului de
5 ani pentru defectele de fabricație, de la data
cumpărării (dacă este cumpărat din magazin) sau
de la data livrării (dacă este cumpărat online),
fără cost suplimentar, pentru utilizarea casnică
normală (nu profesională sau comercială).
Pentru a face o solicitare în temeiul acestei
garanții, trebuie să prezentați dovada achiziției
(precum chitanța de vânzare, factura de
achiziție sau altă dovadă admisibilă potrivit legii
în vigoare); păstrați dovada achiziției într-un loc
sigur. Pentru ca această garanție să se aplice,
produsul pe care l-ați cumpărat trebuie să fie
nou; garanția nu se va aplica produselor la mâna
a doua sau mostrelor din magazin. Dacă nu se
specifică altfel în legile în vigoare, orice produs
înlocuitor livrat în baza acestei garanții va fi
garantat doar până la expirarea perioadei inițiale
de garanție.
Această garanție acoperă defecțiunile
produsului, cu condiția ca produsul să fi fost
utilizat în scopul prevăzut și să fi fost instalat,
curățat, îngrijit și întreținut în conformitate cu
informațiile cuprinse în acești termeni și condiții
și în manualul de utilizare, dar și cu practicile
standard, cu condiția ca practicile standard să
nu contrazică manualul de utilizare.
Această garanție nu acoperă defectele și
deteriorările provocate de uzura normală
și daunele care pot fi rezultatul utilizării
necorespunzătoare, instalării sau asamblării
defectuoase, neglijenței, accidentelor, folosirii
incorecte sau modificărilor aduse produsului.
Dacă nu se specifică altfel în legile în vigoare,
această garanție nu acoperă în niciun caz
costurile suplimentare (de transport, deplasare,
dezinstalare și reinstalare, manoperă etc.) sau
daunele directe și indirecte.
Dacă produsul este defect, vom înlocui piesele
într-un interval de timp rezonabil.
Drepturile acoperite de această garanție sunt
aplicabile în țara în care ați achiziționat produsul.
Întrebările legate de garanție trebuie adresate
magazinului de unde ați achiziționat produsul.
Garanția se adaugă la drepturile dvs. legale și nu
le afectează.
7
POTI12959-01_200445_s1_Marlow Cam & Dowel Jig V4.indd 7 19/06/2020 12:59

EN Before you start
PL Przed rozpoczęciem pracy
FR Avant de commencer
RO Înainte de a începe
EN
Each drill bit is numbered 1, 2 and 3. The number
corresponds to a matching numbered location
on the jig.
FR
Chaque foret est numéroté 1, 2 ou 3. Le numéro
correspond à un emplacement portant le même
numéro sur la scie sauteuse.
PL
Każde wiertło ma numer 1, 2 lub 3. Numer ten
odpowiada określonej lokalizacji na szablonie.
RO
Fiecare burghiu este numerotat cu 1, 2 și 3.
Numărul corespunde unei locații numerotate
corespunzătoare de pe dispozitivul de ghidare.
35mm
22mm
25mm
8
POTI12959-01_200445_s1_Marlow Cam & Dowel Jig V4.indd 8 19/06/2020 12:59

9
EN Before you start
PL Przed rozpoczęciem pracy
FR Avant de commencer
RO Înainte de a începe
A
B
C
Ø15mm
Ø8mm
Ø8mm
BB
AA
POTI12959-01_200445_s1_Marlow Cam & Dowel Jig V4.indd 9 19/06/2020 12:59

10
EN Before you start
PL Przed rozpoczęciem pracy
FR Avant de commencer
RO Înainte de a începe
EN
Mark AA panel (top, bottom and shelf) and BB
panel (side).
J1 will be used to drill top and bottom panels.
J2 will be used to drill shelf panels.
FR
Marquez les panneaux AA (inférieurs, supérieurs
et étagères) et les panneaux BB (latéraux)
Utilisez le gabarit J1 pour percer les panneaux
supérieurs et inférieurs. Utilisez le gabarit J2
pour percer les panneaux d’étagères.
PL
Oznacz płytę AA (górną, dolną i półkę) oraz
płytę BB (boczną).
Szablon J1 posłuży do nawiercania płyt górnych
i dolnych. Szablon J2 posłuży do nawiercania
płyt półek.
RO
Marcați panoul AA (sus, jos și raft) și panoul
BB (lateral).
Șablonul J1 va fi utilizat pentru a găuri panoul
superior și inferior. Șablonul J2 va fi utilizat
pentru a găuri panourile pentru rafturi.
J1
J2
POTI12959-01_200445_s1_Marlow Cam & Dowel Jig V4.indd 10 19/06/2020 12:59

11
EN Before you start
PL Przed rozpoczęciem pracy
FR Avant de commencer
RO Înainte de a începe
EN
Adjust the stop collar with the hex key (K1) for all
3 drill bits (D1, D2 & D3).
Clamp the wood to avoid any movement
while drilling.
FR
Réglez le collier d’arrêt avec la clé mâle (K1) pour
Fixez le bois pour éviter tout mouvement lors
du perçage.
PL
Dopasować kołnierz blokujący w odpowiednim
miejscu za pomocą klucza imbusowego (K1) do
wszystkich 3 wierteł (D1, D2 i D3).
Zacisnąć płytę, aby zapobiec jej ruchom
podczas wiercenia.
RO
Reglați colierul de blocare cu cheia hexagonală
(K1) pentru toate cele 3 burghie (D1, D2 și D3)
Prindeți lemnul cu cleme pentru a împiedica
mișcarea acestuia în timpul găuririi
22mm
35mm
25mm
K1
POTI12959-01_200445_s1_Marlow Cam & Dowel Jig V4.indd 11 19/06/2020 12:59

EN Use
PL Użytkowanie
FR Utilisation
RO Utilizare
EN
Drilling Corner
1. Place J1 on panel BB until all edges are
touching the wood.
2. Before turning on the drill, insert the drill
bit into the drill guide until the tip of the bit
touches the workpiece. Withdraw the bit
about 5mm.
3. Turn on the drill and drill holes ‘1’, withdrawing
the bit as necessary to clear the wood chips.
4. Stop drilling when the stop collar contacts
the drill guide. Wait until the drill stops
rotating to withdraw the bit.
FR
Angle à percer
1. Placez le gabarit J1 sur le panneau BB jusqu’à
ce que tous les bords touchent le bois.
2. Avant d’allumer la perceuse, insérez le foret
dans le guide jusqu’à ce que la pointe du
foret touche la pièce à usiner. Sortez le foret
d’environ 5mm.
3. Allumez la perceuse et percez les trous
dégager les copeaux.
4. Arrêtez de percer lorsque le collier d’arrêt
entre en contact avec le guide-foret.
Attendez que le foret cesse de tourner pour
le retirer.
PL
Wiercenie narożnika
1. Umieścić szablon J1 na płycie BB tak, aby
wszystkie krawędzie dotknęły drewna.
2. Przed włączeniem wiertarki należy wsunąć
wiertło do prowadnicy wiertła, aż końcówka
wiertła dotknie przedmiotu obrabianego.
Wysunąć wiertło na długość 5 mm.
3. Włączyć wiertarkę i wywiercić otwory
z oznaczeniem „1”, w razie konieczności
wycofując wiertło, aby usunąć wióry.
4. Zakończyć wiercenie, gdy kołnierz blokujący
dotknie prowadnicy. Poczekać, aż wiertło
przestanie się obracać, i wysunąć wiertło.
RO
Găurirea colțurilor
1. Așezați șablonul J1 pe panoul BB până când
marginile ating lemnul.
2. Înainte de a porni bormașina, introduceți
burghiul în ghidajul de găurire până când
vârful atinge piesa de lucru. Retrageți
burghiul aprox. 5 mm.
3. Porniți bormașina și realizați găurile „1”,
retrăgând burghiul cât este necesar pentru a
îndepărta așchiile.
4. Opriți găurirea atunci când colierul de
blocare face contact cu ghidajul de găurire.
Așteptați până când bormașina se oprește
pentru a retrage burghiul.
12
POTI12959-01_200445_s1_Marlow Cam & Dowel Jig V4.indd 12 19/06/2020 12:59

13
EN Use
PL Użytkowanie
FR Utilisation
RO Utilizare
BB
BB
BB
22mm
BB
J1
D1
01
02
POTI12959-01_200445_s1_Marlow Cam & Dowel Jig V4.indd 13 19/06/2020 12:59

14
EN Use
PL Użytkowanie
FR Utilisation
RO Utilizare
EN
1. Remove drill bit D1 and replace it with drill
bit D2.
2. Remove jig from panel BB and place onto
panel AA.
3. Drill ‘2’ holes using D2 and the same steps
as page 12.
FR
1. Retirez le foret D1 et remplacez-le par le
foret D2.
2. Retirez le gabarit du panneau BB et placez-le
sur le panneau AA.
3.
PL
1. Wyjąć wiertło D1 i zastąpić je wiertłem D2.
2. Zdjąć szablon z płyty BB i umieścić go na
płycie AA.
3. Wywiercić otwory z oznaczeniem „2” przy
użyciu wiertła D2, wykonując te same
czynności, które opisano na stronie 12.
RO
1. Scoateți burghiul D1 și înlocuiți-l cu
burghiul D2.
2. Scoateți dispozitivul de pe panoul BB
și așezați-l pe panoul AA.
3. Realizați găurile „2” utilizând burghiul D2
și urmând aceiași pași ca la pagina 12.
POTI12959-01_200445_s1_Marlow Cam & Dowel Jig V4.indd 14 19/06/2020 12:59

15
EN Use
PL Użytkowanie
FR Utilisation
RO Utilizare
AA AA
AA
AA
35mm
J1
D2
03
04
POTI12959-01_200445_s1_Marlow Cam & Dowel Jig V4.indd 15 19/06/2020 12:59

16
EN Use
PL Użytkowanie
FR Utilisation
RO Utilizare
EN
1. Remove drill bit D2 and replace it with drill
bit D3.
2. Check to ensure the jig is in the
correct position.
3. Drill ‘3’ hole using D3 and the same steps
as page 12.
FR
1. Retirez le foret D2 et remplacez-le par le
foret D3.
2. Vérifiez que le gabarit est bien positionné.
3.
PL
1. Wyjąć wiertło D2 i zastąpić je wiertłem D3.
2. Sprawdzić, czy szablon znajduje się we
właściwym położeniu.
3. Wywiercić otwór z oznaczeniem „3” przy
użyciu wiertła D3, wykonując te same
czynności, które opisano na stronie 12.
RO
1. Scoateți burghiul D2 și înlocuiți-l cu
burghiul D3.
2. Verificați dacă dispozitivul este în
poziția corectă.
3. Realizați gaura „3” utilizând burghiul D3 și
urmând aceiași pași ca la pagina 12.
AA
AA
25mm
D3
05
POTI12959-01_200445_s1_Marlow Cam & Dowel Jig V4.indd 16 19/06/2020 12:59

17
POTI12959-01_200445_s1_Marlow Cam & Dowel Jig V4.indd 17 19/06/2020 12:59

18
EN Use
PL Użytkowanie
FR Utilisation
RO Utilizare
01
EN
Drilling Shelf
1. Define the height you require your shelf and
mark a centre line.
2. Place J2 on panel BB until the edge is
touching the wood.
3. Position the centre of J2 on the centre of
the line.
FR
Étagère à percer
1. Définissez la hauteur de votre étagère et
tracez une ligne repère centrale.
2. Placez le gabarit J2 sur le panneau BB jusqu’à
ce que le bord touche le bois.
3. Positionnez le centre du gabarit J2 au centre
de la ligne.
PL
Wiercenie półki
1. Określić żądaną wysokość półki i zaznaczyć
linię środkową.
2. Umieścić szablon J2 na płycie BB, aż krawędź
dotknie drewna.
3. Ustawić środek szablonu J2 na środku linii.
RO
Găurirea rafturilor
1. Stabiliți înălțimea pe care doriți ca raftul să o
aibă și marcați o linie centrală.
2. Puneți șablonul J2 pe panoul BB până când
marginea atinge lemnul.
3. Poziționați centrul șablonului J2 pe
centrul liniei.
BB
BB
J2
POTI12959-01_200445_s1_Marlow Cam & Dowel Jig V4.indd 18 19/06/2020 12:59

19
EN Use
PL Użytkowanie
FR Utilisation
RO Utilizare
EN
1. Before turning on the drill, insert the drill
bit into the drill guide until the tip of the bit
touches the workpiece. Withdraw the bit
about 5mm.
2. Turn on the drill and drill holes ‘1’, withdrawing
the bit as necessary to clear the wood chips.
3. Stop drilling when the stop collar contacts
the drill guide. Wait until the drill stops
rotating to withdraw the bit.
FR
1. Avant d’allumer la perceuse, insérez le foret
dans le guide jusqu’à ce que la pointe du
foret touche la pièce à usiner. Sortez le foret
d’environ 5mm.
2. Allumez la perceuse et percez les trous
dégager les copeaux.
3. Arrêtez de percer lorsque le collier d’arrêt
entre en contact avec le guide-foret.
Attendez que le foret cesse de tourner pour
le retirer.
PL
1. Przed włączeniem wiertarki należy wsunąć
wiertło do prowadnicy wiertła, aż końcówka
wiertła dotknie przedmiotu obrabianego.
Wycofać wiertło na długość około 5 mm.
2. Włączyć wiertarkę i wywiercić otwory z
oznaczeniem „1”, wycofując wiertło w razie
potrzeby, aby usunąć wióry.
3. Zakończyć wiercenie, gdy kołnierz blokujący
dotknie prowadnicy. Poczekać, aż wiertło
przestanie się obracać, i wysunąć wiertło.
RO
1. Înainte de a porni bormașina, introduceți
burghiul în ghidajul de găurire până când
vârful atinge piesa de lucru. Retrageți
burghiul aprox. 5 mm.
2. Porniți bormașina și realizați găurile „1”,
retrăgând burghiul cât este necesar pentru a
îndepărta așchiile.
3. Opriți găurirea atunci când colierul de
blocare face contact cu ghidajul de găurire.
Așteptați până când bormașina se oprește
pentru a retrage burghiul.
02
BB BB
BB
22mm
D1
POTI12959-01_200445_s1_Marlow Cam & Dowel Jig V4.indd 19 19/06/2020 12:59

20
EN Use
PL Użytkowanie
FR Utilisation
RO Utilizare
EN
1. Remove drill bit D1 and replace it with drill
bit D2.
2. Remove jig from panel BB and place onto
panel AA.
3. Drill ‘2’ holes using D2 and the same steps
as page 12.
FR
1. Retirez le foret D1 et remplacez-le par le
foret D2.
2. Retirez le gabarit du panneau BB et placez-le
sur le panneau AA.
3.
PL
1. Wyjąć wiertło D1 i zastąpić je wiertłem D2.
2. Zdjąć szablon z płyty BB i umieścić na
płycie AA.
3. Wywiercić otwory z oznaczeniem „2” za
pomocą wiertła D2 i wykonać te same
czynności, które opisano na stronie 12.
RO
1. Scoateți burghiul D1 și înlocuiți-l cu
burghiul D2.
2. Scoateți dispozitivul de pe panoul BB și
așezați-l pe panoul AA.
3. Realizați găurile „2” utilizând burghiul D2 și
urmând aceiași pași ca la pagina 12.
POTI12959-01_200445_s1_Marlow Cam & Dowel Jig V4.indd 20 19/06/2020 12:59
This manual suits for next models
1
Table of contents
Popular Power Tools manuals by other brands

Draper
Draper StormForce PT141KSF instructions

Black & Decker
Black & Decker ASI400 Original instructions

Bomag
Bomag BPR 25/40 D Operating and maintenance instructions

EINHELL
EINHELL TE-CD 18/2 Li Original operating instructions

Graphite
Graphite 59G402 instruction manual

Hakko Electronics
Hakko Electronics FT-8004 instruction manual