Gordon 93782 User manual

®
3491 Mission Oaks Blvd., Camarillo, CA 93011
Visit ourWeb site at: http://www.harborfreight.com
Copyright 2006 by Harbor Freight Tools®. All rights reserved. No portion of this
instruction sheet or any artwork contained herein may be reproduced in any shape or form
For technical questions, please call 1-800-444-3353.
©
TO PREVENT SERIOUS INJURY,
READ AND UNDERSTAND ALL WARNINGS
AND INSTRUCTIONS BEFORE USE.
SAVE THIS MANUAL
You will need this instruction manual for the safety warnings and precautions, assembly,
operating, parts list and assembly diagram. Keep your invoice with this instruction manual.
Write the invoice number on this instruction manual. Keep this instruction manual and
invoice in a safe and dry place for future reference.
UNPACKING
When unpacking, check to make sure all the parts shown in the Parts List (page 5) are
included. If any parts are missing or broken, please call Harbor Freight Tools at the number
shown on this instruction manual as soon as possible.
without the express written consent of Harbor Freight Tools.
Due to continuing improvements,actual product may differ slightly from the product described herein.
ALL-IN-ONE CABLE TACKER
Model 93782
ASSEMBLY AND OPERATING INSTRUCTIONS

SKU 93782 For technical questions, please call 1-800-444-3353 PAGE 2
SAVE THESE INSTRUCTIONS
SAFETY WARNINGS AND PRECAUTIONS
1. Prior to using the Cable Tacker, make sure to read and understand all
instructions and safety precautions as outlined in the cable manufacturer’s
instruction manual.
2. Never point the Cable Tacker at yourself, other people, or animals. Keep this
product away from children.
3. Always wear ANSI approved safety impact eye goggles when using this
product. Also, make sure others nearby wear ANSI approved safety impact eye
goggles.
4. Dress properly. Do not wear loose clothing or jewelry as they can be caught up in
moving parts. Wear restrictive hair covering to contain long hair.
5. Do not use this product if under the influence of alcohol or drugs. Read
warning labels if taking presciption medicine to determine if your judgement or
reflexes are impaired while taking drugs. If there is any doubt, do not use this
product.
6. Replacement parts and accessories: This product must be repaired and serviced
by a qualified service technician only. When this product is serviced, only identical
replacement parts should be used. Use of any other parts will void the warranty.
Only use accessories intended for use with this product.
7. When not in use, keep the Cable Tacker stored in a clean, dry, safe location
out of reach of children and other unauthorized people.
8. Other than what is mentioned in this manual, all repairs and maintenance
must be performed only by a qualified service technician.
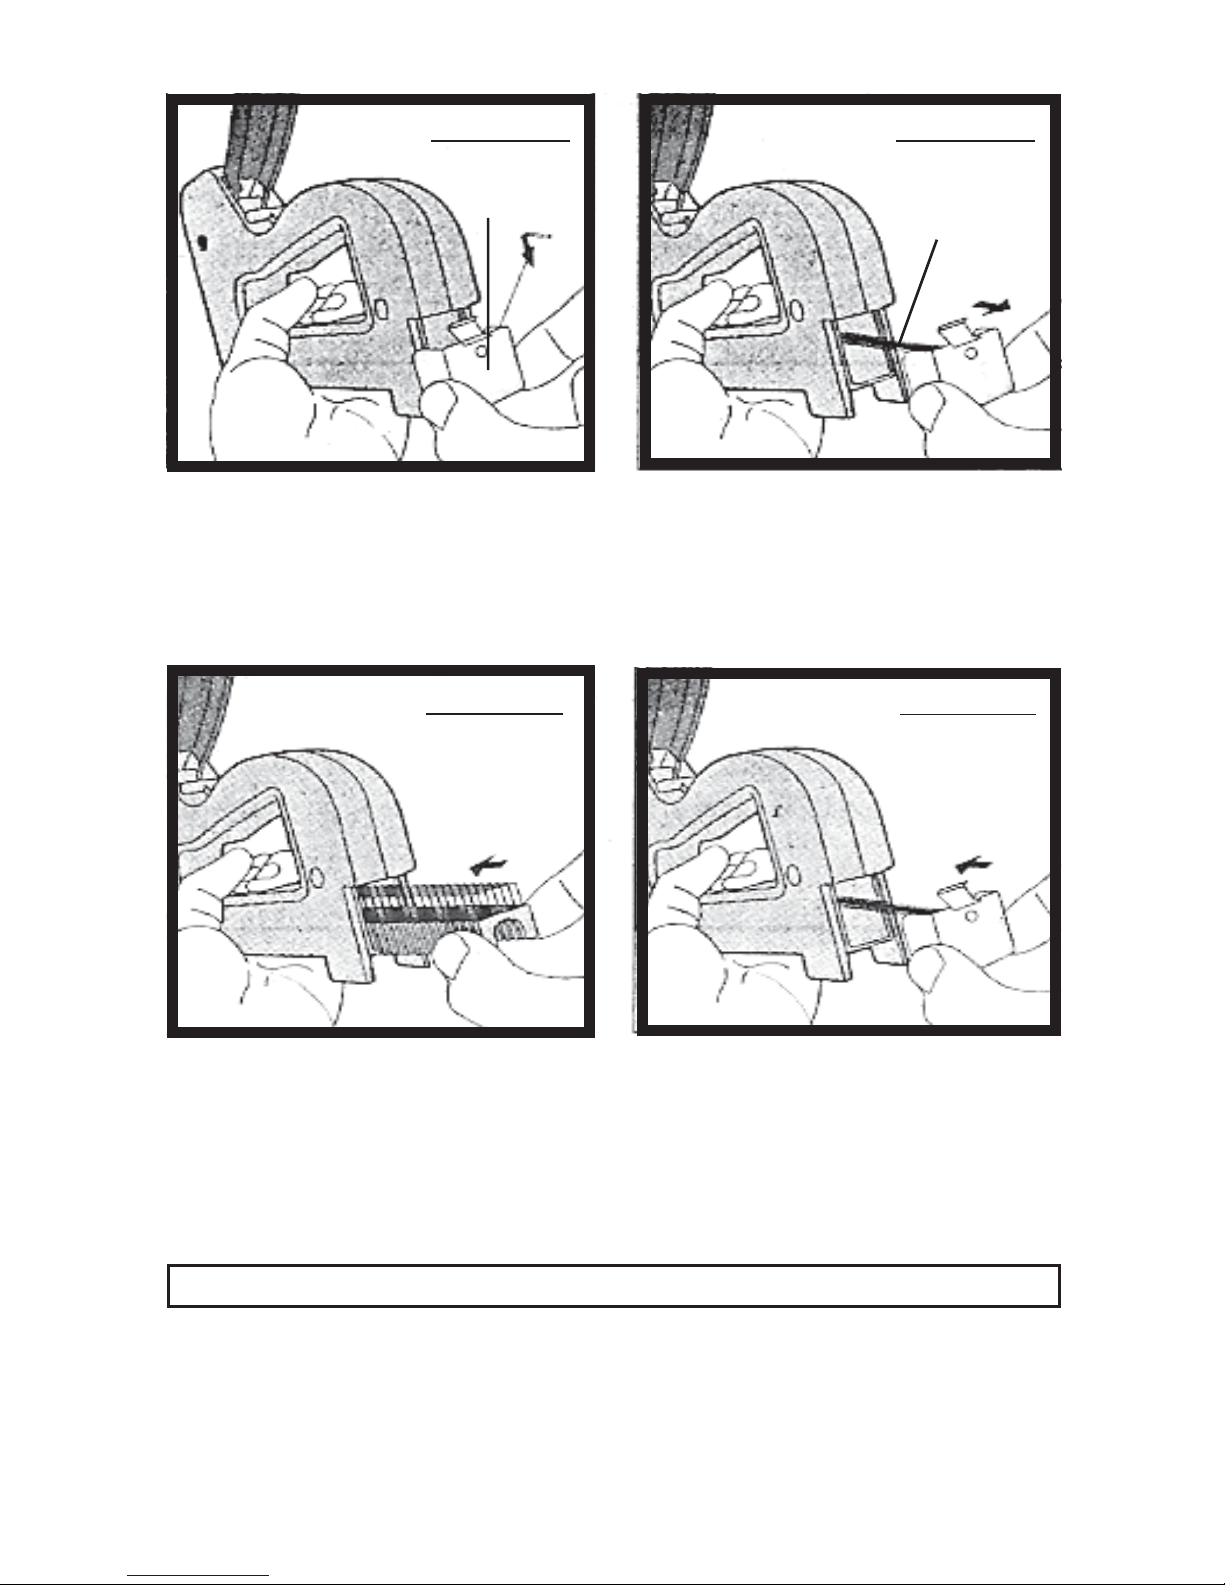
9. Avoid unintentional firing. Do not carry the Cable Tacker with your hand on the
Handle (16). Always assume the tool contains Staples (24, 25).
10. Fire Staples (24, 25) into an appropriate work surface only. Do not attempt to
fire Staples into surfaces too hard to penetrate. Do not drive Staples on top of other
Staples, or at too steep an angle. Staples can ricochet, causing personal injury.
Note: Only use the Cable Tacker when its body is placed against the workpiece;
never fire staples otherwise.
11. Do not fire Staples (24, 25) to close to the edge of a workpiece. They may split
the workpiece and fly free, causing personal injury.
12. Maintain labels and nameplates on the Cable Tacker. These carry important
information. If unreadable or missing, contact Harbor Freight Tools for a replacement.
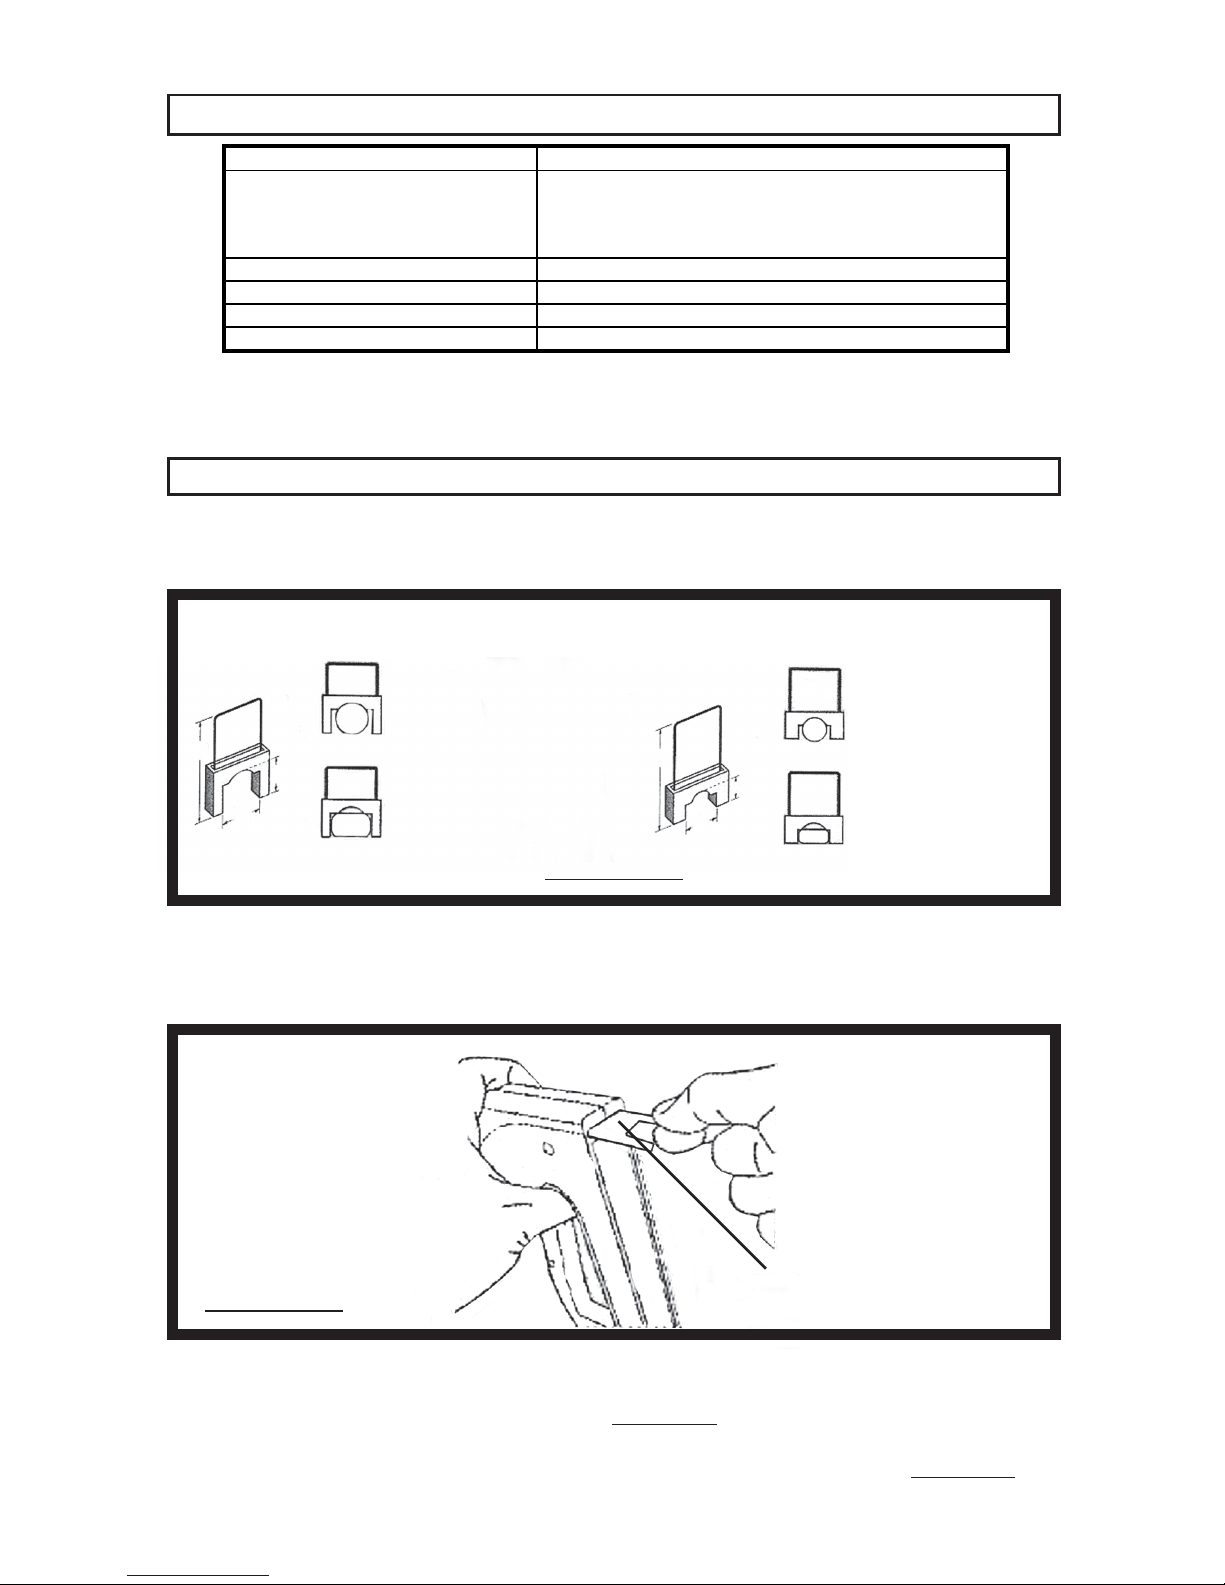
13. Do not attempt to use any other size or type of Staples with the Cable Tacker
other than those mentioned in this manual.
14. WARNING! The warnings and cautions discussed in this instruction sheet cannot
cover all possible conditions and situations that may occur. It must be understood by
the operator that common sense and caution are factors which cannot be built into
this product, but must be supplied by the operator.

PRODUCT SPECIFICATIONS
ASSEMBLY AND OPERATING INSTRUCTIONS
1. The Cable Tacker comes with two sizes of Staples (24, 25). Select the appropriate
size Staples for the dimensions of the cable or wire that is to be anchored. (See
Figure A.)
SKU 93782 For technical questions, please call 1-800-444-3353 PAGE 3
Item Description
Product Applications Designed to work with low voltage phone,
data, video, stereo, coax cables (cat 5, cat 6,
RG59, RG6) – up to 3/8” wide flat cable and
5/16” diameter round cable (see Figure A)
Required Staple Sizes Accepts Up To 5/8” H x ½” Crown Staples
Magazine Type Spring Loaded, Crown Magazine
Overall Dimensions 7” L x 1-1/4” W x 6” H
Net Weight 0.9 Lb.
5/8”
13/32”
1/4”
Round Cable
Diameter: 1/4” ~ 5/16”
Flat Wire
Height: 1/8” to 1/4”
Width: 3/8” & smaller
Round Cable
Height: 1/8” to 1/4”
Diameter
Flat Wire
Height: 1/16” to 1/8”
Width: Below 5/16”
5/8”
5/16”
5/32”
FIGURE A
3. Caution: Never touch the Handle while loading staples. To load the Cable Tacker,
push the Back Plate (18*) inward first. Then press downward to pull out the empty
Staple Feeder assembly. (See Figure C, next page.)
4. Pull the empty Staple Feeder assembly all the way out. (See Figure D, next page.)
2. Depending on the size of Staples (24, 25) selected, insert either the 1407R Pad (24) or
1405R Pad (25) into the Nose of the Cable Tacker. (See Figure B.)
FIGURE B
1407R (24) 1405R (25)
NOTE: In addition to the two sizes of Staples (24, 25) included with this product,
Harbor Freight Tools offers replacement staples sku 93976 and sku 94198.
1407R PAD (24)
OR
1405R PAD (25)

SKU 93782 For technical questions, please call 1-800-444-3353 PAGE 4
FIGURE E FIGURE F
7. To use the Cable Tacker, position the cable/wire against the work surface to which the
cable/wire is to be anchored. Place the Nose of the Cable Tacker over the cable/wire,
making sure the cable/wire is
between
the two nylon posts of the Staple (24, 25). Hold
the Cable Tacker firmly with both hands and squeeze the tool’s Handle (15). Continue
this procedure and fire additional Staples until the desired length of the cable/wire is
anchored to the work surface.
5. Load a strip of Staples (24, 25) into the tunnel of the Cable Tacker.
(See Figure E.)
6. Slide in the Staple Feeder assembly, and push the Staple Feeder assembly upward to
its locked position. (See Figure F.)
STAPLE
FEEDER
ASSEMBLY
FIGURE D
BACK PLATE
(18*)
FIGURE C
PLEASE READ THE FOLLOWING CAREFULLY
THE MANUFACTURER AND/OR DISTRIBUTOR HAS PROVIDED THE PARTS LIST AND ASSEMBLY DIAGRAM IN THIS
MANUAL AS A REFERENCE TOOL ONLY. NEITHER THE MANUFACTURER OR DISTRIBUTOR MAKES ANY
REPRESENTATION OR WARRANTY OF ANY KIND TO THE BUYER THAT HE OR SHE IS QUALIFIED TO REPLACE ANY
PARTS OF THE PRODUCT. IN FACT, THE MANUFACTURER AND/OR DISTRIBUTOR EXPRESSLY STATES THAT ALL
REPAIRS AND PARTS REPLACEMENTS SHOULD BE UNDERTAKEN BY CERTIFIED AND LICENSED TECHNICIANS, AND
NOT BYTHE BUYER. THE BUYER ASSUMES ALL RISKS AND LIABILITY ARISING OUT OF HIS OR HER REPAIRSTO THE
ORIGINAL PRODUCT OR REPLACEMENT PARTS THERETO, OR ARISING OUT OF HIS OR HER INSTALLATION OF
REPLACEMENT PARTS THERETO.

PARTS LIST AND ASSEMBLY DIAGRAM
Part # Description Qty. Part # Description Qty.
1 Body (Left) 1 14 Rivet 1
2 Body (Right) 1 15 Handle 1
3 Impact Plate 1 16 Handle Rubber 1
4* Staple Housing 1 17 Handle Spring 1
5 Staple Slot 1 18* Back Plate 1
8 Spring Plate 1 19 Plastic Immobile 1
9* Staple Bar 1 20 Immobile Plate 1
10* Staple Spring 1 21 E-Ring 1
11 Handle Spring 1 22 E-Ring 1
12 Pad (1405R) 1 23 Screw 5
12A Pad (1407R) 1 24 1407R Staple 50
13 Staple Slot Rivet 1 25 1405R Staple 50
NOTE: Parts #4, #9, #10, and #18 are available only as a complete assembly.
NOTE:
Some parts are listed and shown for illustration purposes only,
and are not available individually as replacement parts.
1
2
3
4*
5
8
9*
10*
18*
11
12
12A
20
16
13
14
17
15
23
21
19
22
24: 1407R Staples not shown.
25: 1405R Staples not shown.
SKU 93782 For technical questions, please call 1-800-444-3353 PAGE 5

SKU 93782 For technical questions, please call 1-800-444-3353 PAGE 6
WARRANTY CARD
Table of contents
Other Gordon Power Tools manuals
Popular Power Tools manuals by other brands

Clarke
Clarke Air CSG3KC Operating & maintenance instructions

red roo
red roo DHS9-5 Safety precautions and operating instructions

SBI Connectors
SBI Connectors Y35 user manual

Ingersoll-Rand
Ingersoll-Rand QA6 series Product information

Jet
Jet JAT-120 Operations & parts manual

EINHELL
EINHELL BT-JS 400 E Original operating instructions

Xiamen
Xiamen PENTODA RZPCL151CHR Assembly instructions

AL-KO
AL-KO MULTITOOL MT 40 Translation of the original instructions for use

Sieg
Sieg SX1P instruction manual

Worcraft
Worcraft CRH-S20LiE instruction manual

Powerfix Profi
Powerfix Profi Z29621 Operation and safety notes

Graco
Graco 244766 Instructions-parts list