manuals.online logo
Brands
  1. Home
  2. •
  3. Brands
  4. •
  5. GRAMMER OFFICE
  6. •
  7. Indoor Furnishing
  8. •
  9. GRAMMER OFFICE TIGER Series User manual

GRAMMER OFFICE TIGER Series User manual

106 20 58/7.05 /Fri
ACTIVE COMFORT WITH GLIDE-TEC
Bedienungsanleitung
Operating Instructions
Guide d’utilisation
Gebruiksaanwijzing
TIGER
SERIES
[]
Grammer Office ist eine eingetragene Marke
der SATO OFFICE GMBH
Jubatus-Allee 1
D-92263 Ebermannsdorf
Telefon +49 (0) 9438 - 949-0
Telefax +49 (0) 9438 - 949-40
www.grammer-office.com
[email protected]
54025_lang2_juli05 12.07.2005 10:44 Uhr Seite 2
0
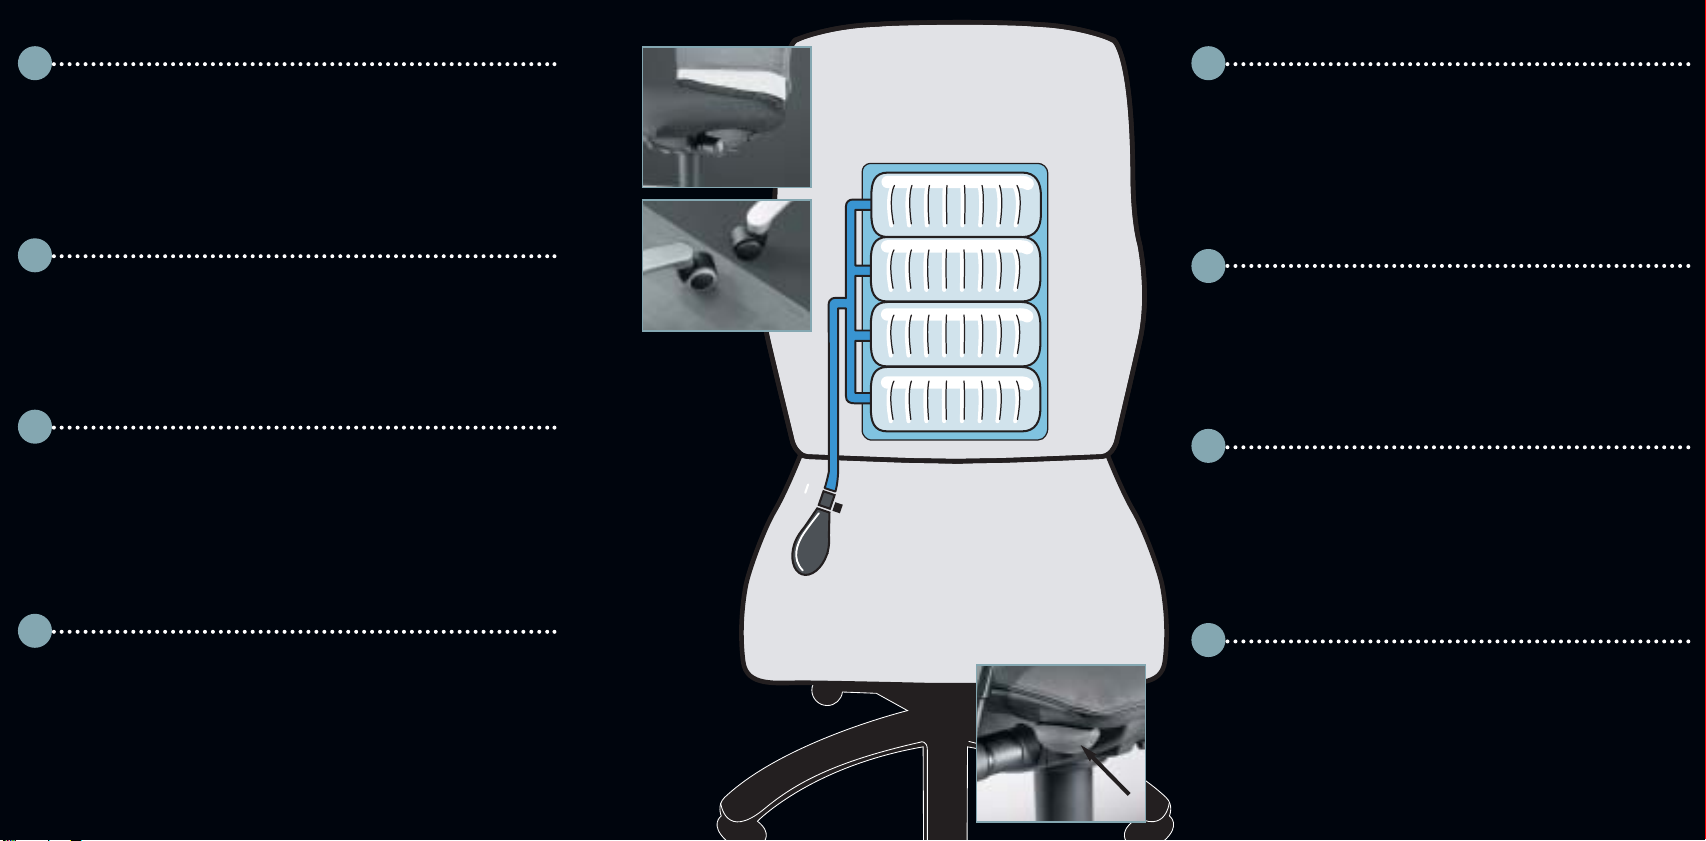
Wenn Ihr Stuhl ein individuell einstellbares Airshape-System (4-Kammer- Luftsystem) hat:
Achtung! Bedienung des Airshape-Systems nur bei arretierter Sitzposition.
Die Pumpe für das Airshape-System befindet sich auf der rechten Seite vorne unter
dem Sitz 8.
Durch mehrmaliges Zusammendrücken der Pumpe füllen Sie den 4-Kammer -
Airshape mit Luft. Wenn Sie den vorne in der Pumpe integrierten Knopf gedrückt hal-
ten, entweicht die Luft wieder aus dem AirShape.
Der AirShape ist optimal eingestellt, wenn Sie im Lendenwirbelbereich einen
angenehmen Gegendruck spüren. Je nach Sitzposition tauscht sich die Luft in den
vier Kammern aus, und sorgt somit für eine optimale Abstützung im
Lendenwirbelbereich.
If your office swivel chair has an individually regulated AirShape system (4 individual
air chambers):
Attention! Please only activate the AirShape system when you have fixed the mechanism.
The control for the AirShape is positioned in the seat cushion under the seat on the
right 8.
The air chambers can be filled with air by pumping the control continuously until the
correct pressure is found. By pushing / holding down the button integrated within the
control, the air pressure can be released.
Depending on your sitting position the air will move between the four chambers
giving optimum support for lumbar vertebrae (spine).
Si votre siège de bureau est doté d´un système AirShape, réglable individuellement
(4 coussins d´air indépendants):
Attention! N´actionnez l´Airshape que lorsque votre siège est bloqué en position
droite. La pompe de l´Airshape se trouve sous l’avant du siège, à droite 8.
Remplissez les quatres coussins d’air de l‘Air-Shape au moyen de plusieurs pressions
sur la pompe. Pour le dégonfler, tenez enfoncée la valve intégrée à l’avant de la pompe.
L’air Shape est réglé de manière optimale lorsque vous sentez un support agréable de
votre cambrure, dans le bas du dos.
Quelle que soit la position choisie, l’air s‘ajustera automatiquement dans les quatre
coussins d´air en fonction de votre courbure lombaire, pour vous apporter un soutien
maximum.
Als uw stoel een individueel regelbaar AirShape-systeem (4 individuele luchtkamers)
heeft:
Let op! Bedien het AirShape-systeem alleen als u de zitpositie vergrendeld hebt. Het be-
dieningsmechanisme van het Air Shape-systeem bevindt zich rechts onder de zitting 8.
Door meerdere keren indrukken van de pomp vult u het vierkamer Airshape-systeem
met lucht. Als u het aan de voorzijde geintegreerde knopje indrukt, laat u de lucht uit
het Air Shape-systeem ontsnappen.
De AirShape is optimaal ingesteld als u bij uw lendewervel een aangename tegendruk
voelt. Afhankelijk van de zitpositie verplaatst de lucht zich in de vier luchtkamers,
daarmee krijgt u een optimale ondersteuning van de lendewervel.
5
6
7
D
E
NL
F
8
D
GRAMMER Glide-Tec Mechanik | Den Bedienungshebel für die GRAMMER
Glide-Tec finden Sie rechts unter der Sitzfläche 1. Lösen Sie die
Transportsicherung, indem Sie den Hebel nach unten drücken, die Mechanik ist
nun offen für Ihren persönlich-dynamischen Sitzstil. Ziehen Sie ihn nach oben,
arretieren Sie die Sitzfläche in vorderster Position. Aber wir empfehlen Ihnen, die
Mechanik aufgrund des aktiven Sitzkomforts nicht zu arretieren.
Den Regler zur Gewichtseinstellung finden Sie vorne unter der Sitzfläche 2.
Drehen Sie ihn nach links, um eine leichte Einstellung zu erreichen; nach rechts
gedreht, wird die Mechanik schwergängiger.
Empfehlung: Schwere Einstellung ab Körpergewicht 80 kg.
GRAMMER Glide-Tec mechanism | The operating lever for GRAMMER Glide-Tec
is located on the right beneath the seat 1. By pushing the lever down, the trans-
port-security-lock will automatically release. The mechanism is now open for
your personal style of dynamic seating. Pull it upwards to lock the seat into the
front position. We recommend however not to lock the mechanism due to the
active seating comfort.
The weight adjustment regulator is located to the front beneath the seat 2. Turn
it to the left to obtain a light setting, or to the right to tighten the mechanism.
Recommendation: Use strong position above a weight of 80 kg.
Le mécanisme GRAMMER Glide-Tec | Vous trouverez le levier de commande du
GRAMMER GlideTec sous l´assise, à droite 1. Déverouillez la sécurité transport
en appuyant sur la manette vers l´arrière afin de trouver la position correspon-
dant le mieux à votre confort personnel. Actionnez-le vers le haut, bloquez
l´assise dans la position la plus avancée. Cependant, nous vous recommandons
de ne pas bloquer le mécanisme afin de profiter en permanence du confort actif
que procure le système Glide-Tec.
Vous trouverez le réglage en fonction du poids sous l’assise, à l’avant 2.
Tournez-le vers la gauche pour un réglage doux, vers la droite pour un réglage
plus dur.
Recommandation: Utiliser la position « fort » au-dessus de 80 kg.
GRAMMER Glide-Tec mechaniek | U vindt de bedieningshendel voor het GRAM-
MER Glide-Tec mechaniek rechts onder de zitting 1. U zet het mechaniek vrij
door de hendel naar beneden te drukken, het mechaniek is nu geopend voor uw
persoonlijk dynamische zitcomfort.
Als u de hendel omhoog trekt, zet u de zitting in de voorste stand vast.
U vindt de regelknop voor de gewichtinstelling vooraan onder de zitting 2. Draai
deze naar links om het instellen licht te doen verlopen, als u naar rechts draait
gaat het mechaniek zwaarder.
Aanbeveling: zwaar instellen vanaf een lichaamsgewicht van 80 kg.
E
F
NL
54025_lang2_juli05 12.07.2005 10:44 Uhr Seite 1
2
1
50623_kurz2_okt04 05.04.2005 10:43 Uhr Seite 1
D
Höhenverstellung der Sitzfläche
Zur stufenlosen Höhenverstellung der Sitzfläche ziehen Sie den
Bedienungshebel links unter der Sitzfläche nach oben 3.
Achtung!! Arbeiten bzw. Austausch an Gasfedern nur durch
eingewiesenes Personal.
Höhenverstellung der Armlehne (bei den Modellen 4 HA, 6 HA und
8 HA)
Durch Drücken des Hebels an der Innenseite der Armlehne lässt sich die
Armstütze in 8 Rasterpositionen einstellen 4.
Seat height adjustment
To raise or lower the height of the seat on an infinitely variable scale, pull
adjustment lever on the left side underneath the seat upwards 3.
Caution!! The pneumatic springs should be repaired or replaced by
trained personnel only.
Vertical adjustment of the armrests (models 4 HA, 6 HA and 8 HA)
Adjust the armrest into any of eight positions by pressing the handle on
the inner side of the armrest 4.
Réglage en hauteur de l’assise
Pour régler en continu la hauteur de l’assise, actionnez vers le haut le
levier qui se trouve à gauche, sous l’assise 3.
Attention!! Les lifts à gaz ne doivent être manipulés ou changés que par
des spécialistes.
Réglage en hauteur des accoudoirs (modèles 4 HA, 6 HA et 8 HA)
En appuyant sur la poignée qui se trouve sur la face interne de
l´accoudoir, vous pouvez régler l´accoudoir sur 8 positions 4.
Hoogteverstelling van de zitting
Om het zitvlak traploos in de hoogte te verstellen, moet de bedienings-
hendel links onder het zitvlak naar boven geduwd worden 3.
Belangrijk!! Vervanging van de gasveer uitsluitend door deskundig per-
soneel.
Hoogteverstelling van de armsteunen (voor de modellen 4 HA, 6 HA en
8 HA)
Door op de hefboom aan de binnenzijde van de armsteun te drukken,
kann men de armsteun in 8 posities instellen 4.
E
NL
F
50623_kurz2_okt04 05.04.2005 10:43 Uhr Seite 2
TIGER 8 HA
3
4
50623_kurz2_okt04 05.04.2005 10:43 Uhr Seite 3
Wechselbare Rückenlehnenbezüge
l
Sie können den Bezug der Rückenlehne mit
einem Klettverschluss vorn und zwei Druckknöpfen hinten öffnen und abziehen 5.
Zur Reinigung beachten Sie bitte die Wasch- und Pflegehinweise der jeweiligen
Stoffe, die Sie auf der Innenseite finden.
Rollen
l
Nach DIN EN 12 5 29 - lastabhängig gebremst - für textile Böden: Die Räder
der Rollen sind auf der gesamten Oberfläche gleichfarbig 7- für harte Böden: der
weiche Laufring ist andersfarbig 6.
Benutzerhinweis
l
Diesen Bürostuhl nur bestimmungsgemäß unter Beachtung der all-
gemeinen Sorgfaltspflicht benutzen. Bei Verwendung als Aufstiegshilfe, Sitzen auf
Armlehnen oder anderweitig, besteht Unfallgefahr.
Exchangeable backrest cover
l
A velcro fastener in the front and two snap tabs in the
back allow you to open and remove the cover on the backrest 5. When cleaning the
cover, please note the care and laundering instructions on the inside of the fabric.
Castors
l
As per DIN EN 12 5 29 – with load-controlled braking mechanism – for tex-
tile floors: the wheels of the castors are uni-coloured over the whole surface 7. – for
hard floors: the soft tread of the wheel is of a different colour 6.
Considerations for use
l
Only use this office swivel chair in accordance with the
intended by respecting the general duty of care. Danger of accident exists in the
case of use as an ascent assistance, sitting on armrests or other improper use.
Revêtements de dossier amovibles
l
Vous pouvez enlever le revêtement du dossier
en ouvrant la fermeture auto-agrippante sur le devant et les deux boutons-pression
à l´arrière 5. Pour le nettoyage, suivez s.v.p. les instructions de lavage et d´entretien
des tissus concernés, qui figurent sur l´envers.
Type des roulettes
l
Selon les normes DIN EN 12 5 29 – avec un mécanisme de
freinage contrôle en charge – pour moquettes: les roues des roulettes sont d’une
couleur unie sur toute la surface 7– pour sols durs: la partie souple de la roue est
d’une couleur différente 6.
Instructions d’utilisation
l
N’utilisez ce siège de bureau qu’en conformité avec les
consignes courantes d’utilisation. Un danger d’accident existe lors de toute utilisa-
tion anormale du siège, comme s’asseoir sur les accoudoirs, ou autre usage abusif.
Uitwisselbare rugleuning-overtrekken
l
U kunt de bekleidingshoes van de rugleuning
met een klittebandsluiting vooraan en twee drukknopen achteraan openen en afne-
men 5. Volg voor het schoonmaken de was- en onderhoudstips van de betreffende
stof op, welke u aan de binnenkant aantreft.
Wielen
l
Volgens DIN EN 12 5 29 – met drukgevoelige remmechaniek – voor zachte
vloeren: éénkleurige wielen 7– voor harde vloeren: 2-kleurige wielen 6.
Gebruiksaanwijzing
l
Deze bureaustoel alleen onder beachting van de algemene
zorgvoudsplicht gebruiken. Bij gebruik als opsteighulp, zitten op de armleggers en
dgl. bestaat gevaar voor ongelukken.
D
E
NL
F
50623_kurz2_okt04 05.04.2005 10:43 Uhr Seite 4

This manual suits for next models

1

Other GRAMMER OFFICE Indoor Furnishing manuals

GRAMMER OFFICE GLOBEline User manual

GRAMMER OFFICE

GRAMMER OFFICE GLOBEline User manual

GRAMMER OFFICE Sail / Plus GT User manual

GRAMMER OFFICE

GRAMMER OFFICE Sail / Plus GT User manual

GRAMMER OFFICE PUMA Series User manual

GRAMMER OFFICE

GRAMMER OFFICE PUMA Series User manual

GRAMMER OFFICE SAIL 7A User manual

GRAMMER OFFICE

GRAMMER OFFICE SAIL 7A User manual

GRAMMER OFFICE Sail GT User manual

GRAMMER OFFICE

GRAMMER OFFICE Sail GT User manual

GRAMMER OFFICE SOLUTION Series User manual

GRAMMER OFFICE

GRAMMER OFFICE SOLUTION Series User manual

Popular Indoor Furnishing manuals by other brands

Anova D1300 Assembly instructions

Anova

Anova D1300 Assembly instructions

Kvik SU869-060 Assembly

Kvik

Kvik SU869-060 Assembly

Bestar 120810-1176 Assembly instructions

Bestar

Bestar 120810-1176 Assembly instructions

Kompernass KH 4168 operating instructions

Kompernass

Kompernass KH 4168 operating instructions

Next 665101 Assembly instructions

Next

Next 665101 Assembly instructions

Tradecraft Specialties LOCOMV-7 instruction manual

Tradecraft Specialties

Tradecraft Specialties LOCOMV-7 instruction manual

Mocka Peyton Bed Queen Assembly instructions

Mocka

Mocka Peyton Bed Queen Assembly instructions

Teknik 5427430 manual

Teknik

Teknik 5427430 manual

Homelegance 194S4615-F1 Assembly instruction

Homelegance

Homelegance 194S4615-F1 Assembly instruction

GLITZHOME 2008600015 Assembly instruction

GLITZHOME

GLITZHOME 2008600015 Assembly instruction

LOXONE 100177 quick start guide

LOXONE

LOXONE 100177 quick start guide

VECELO KHD-XJM-ST09 Assembly instructions

VECELO

VECELO KHD-XJM-ST09 Assembly instructions

Cooper Lighting Neo-Ray 758 Specification sheet

Cooper Lighting

Cooper Lighting Neo-Ray 758 Specification sheet

Blanco 500-380 Specification sheet

Blanco

Blanco 500-380 Specification sheet

BRV BLC 30-06 Assembly instructions

BRV

BRV BLC 30-06 Assembly instructions

Whittier Wood 1346AFGACc Assembly instructions

Whittier Wood

Whittier Wood 1346AFGACc Assembly instructions

Avandeo DESTIN II manual

Avandeo

Avandeo DESTIN II manual

Regency ONRT4224 instructions

Regency

Regency ONRT4224 instructions

manuals.online logo
manuals.online logoBrands
  • About & Mission
  • Contact us
  • Privacy Policy
  • Terms and Conditions

Copyright 2025 Manuals.Online. All Rights Reserved.