Grandbeing MX0808-1011-001 User manual

Version: V1.0.0
User Manual
MX0808-1011-001
HDMI Matrix

Important Safety Instructions
Note:
In case of any content change, we are sorry for no further notice.
Warning:
To reduce the risk of fire, electric shock or product damage:
1. Do not expose this apparatus
to rain, moisture, dripping or
splashing and that no objects
filled with liquids, such as vases,
shall be placed on the apparatus.
6. Clean this apparatus
only with dry cloth.
2. Do not install or place this unit
in a bookcase, built-in cabinet or
in another confined space.
Ensure the unit is well ventilated.
3. To prevent risk of electric
shock or fire hazard due to
overheating, do not obstruct
the unit’s ventilation openings
with newspapers, tablecloths,
curtains, and similar items.
4. Do not install near any heat
sources such as radiators, heat
registers, stoves, or other
apparatus (including amplifiers)
that produce heat.
5. Do not place sources of naked
flames, such as lighted candles,
on the unit.
7. Unplug this apparatus
during lightning storms or
when unused for long
periods of time.
8. Protect the power cord
from being walked on or
pinched particularly at
plugs.
9. Only use attachments /
accessories specified by
the manufacturer.
10. Refer all servicing to
qualified service
personnel.

1
Table of Contents
Introduction....................................................................................................3
Overview...................................................................................................3
Features ...................................................................................................4
Package Contents ....................................................................................4
Specifications............................................................................................5
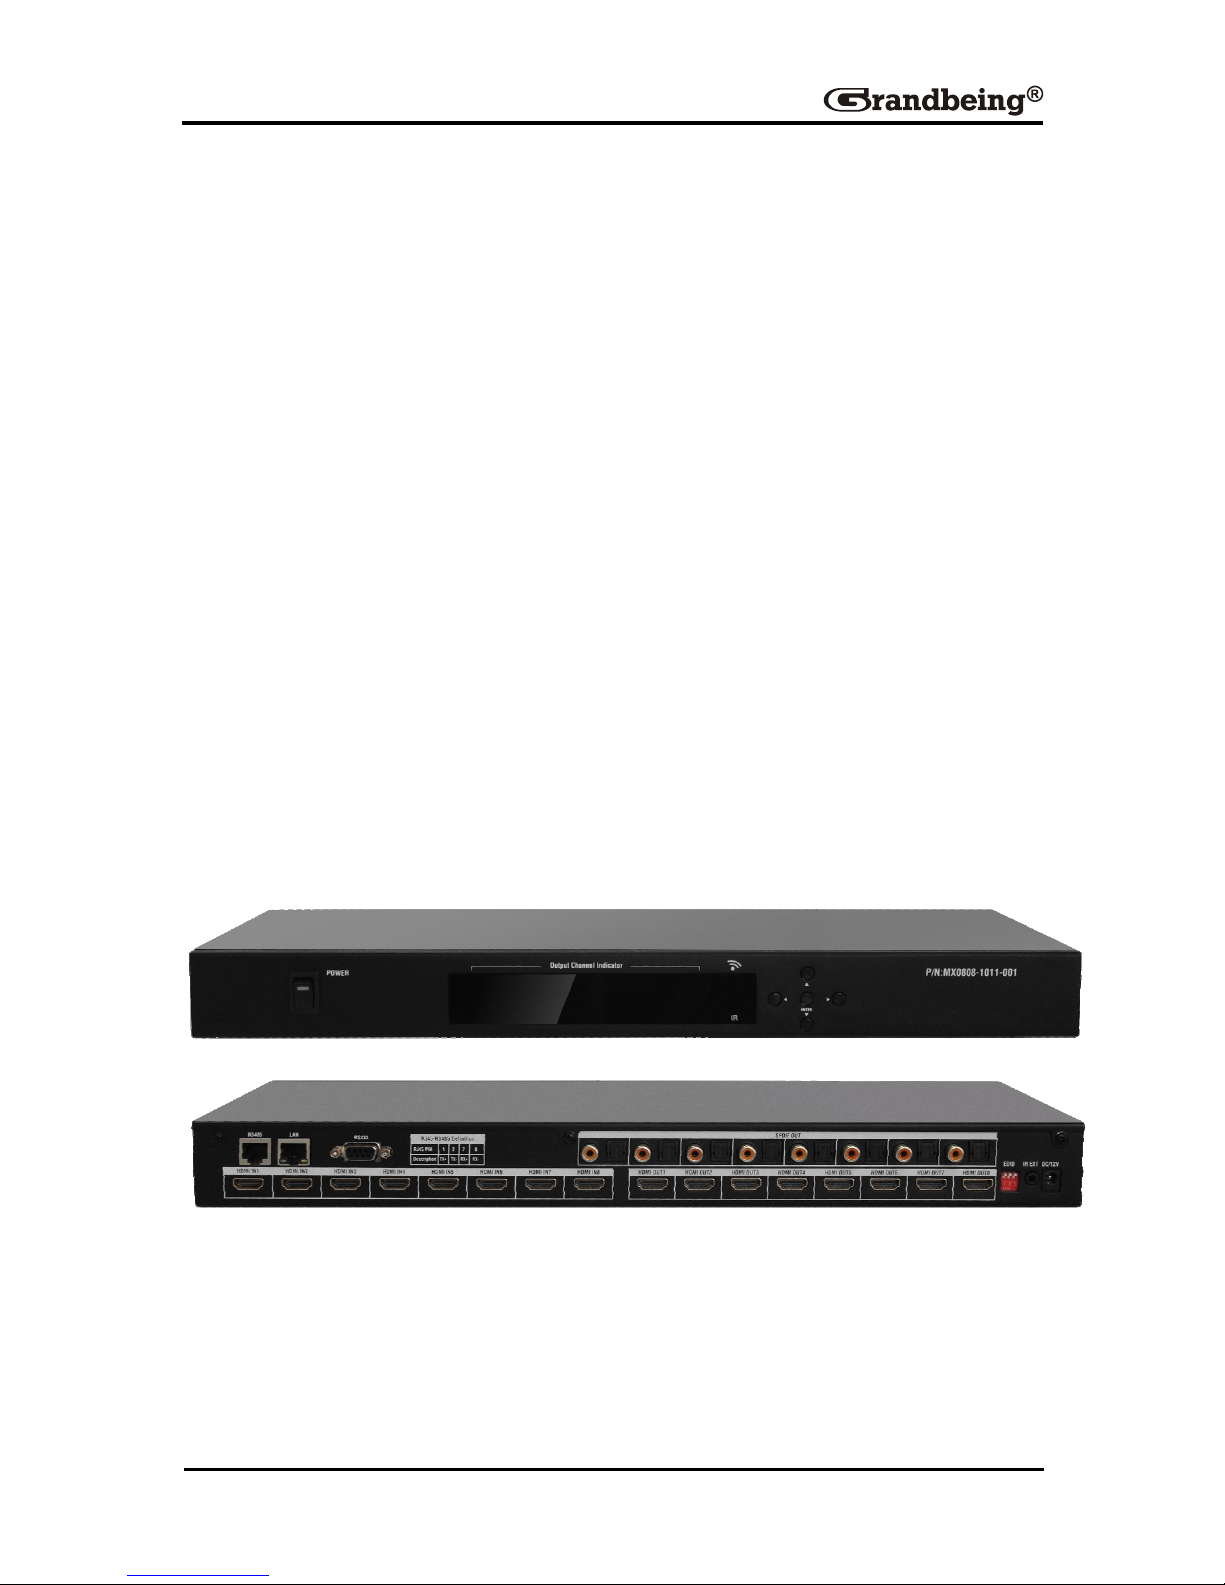
Panel ........................................................................................................7
Hardware Installation.....................................................................................9
Operation......................................................................................................10
Front Panel.............................................................................................10
Remote Control ......................................................................................11
Basic Remote Control...................................................................... 11
Advanced Remote Control ..............................................................13
RS232 Control........................................................................................14
Set Panel.........................................................................................15
Com Port Connect Status................................................................19
Message Window............................................................................20
Input/Output Switch.........................................................................21
Control Source code........................................................................23
Read Status Command ...................................................................24
Web Password Reset......................................................................24
LAN Control............................................................................................25
Telnet......................................................................................................26
EDID Management.................................................................................28
Troubleshooting...........................................................................................29
Product Service ...........................................................................................30
Maintenance...........................................................................................30
Provided Service ....................................................................................30
Mail-In Service........................................................................................30

2
Warranty.................................................................................................31
Warranty Limits and Exclusions..............................................................31
Glossary .......................................................................................................33

3
Introduction
Overview
MX0808-1011-001 is an 8-by-8 HDMI matrix. It allows any of the eight Input
Channels (HDMI) to be routed to any of the eight Output Channels (HDMI),
no matter the source is HDCP or not. Users can choose several different
ways to control the matrix: by using infrared, RS232, RS485, and LAN and
supplied remote control.
MX0808-1011-001 internal EDID library features default EDID configurations,
in addition to native EDID data for any output/display.
MX0808-1011-001 offers solutions for home, office, digital entertainment
center, control center, conference room, school and corporate training
environments.

4
Features
HDMI 1.4 compliant.
Allows up to eight HDMI audio/video devices to be independently
switched to eight HDMI monitors, HDTV’s or projectors
The eight output channels could show the same or different source
simultaneously no matter the source is HDCP or not
Reading and saving EDID function from displays
Supports high definition resolutions including: 3840 x 2160,
1080p@60Hz, 1080i, 720p and other standard video formats
Optical and RCA SPDIF Digital Audio Output extracted from HDMI input
or ARC (Audio Return Channel)
With extra infrared extension receiver
Five switching modes: front panel buttons, local IR, RS232, RS485 and
LAN
HDCP compliant
Package Contents
1 xHDMI Matrix MX0808-1011-001
1 xIR Remote
1 xCD
1 x 12V 5A DC Power Supply
1 x AC Power Cord
1 x USB to UART cable
2 x Mounting Ear
1 x IR Receiver

5
Specifications
Technical
Maximum Distance
15m
Maximum Pixel Clock
297MHz
Video Impedance
100ohm
Audio Output Impedance
75ohm
I/O Connections
8 x HDMI IN
8 x HDMI OUT
1 x RS485 Port
1 x RJ45 Port
1 x RS232
8 x SPDIF OUT
1 x IR EXT
1 x EDID switch
Power Supply
12V 5A DC,5.5mm
Power Consumption
40 Watts Max
Input Video Signal
1.2 volts p-p
Video Format Supported
DTV/HDTV:3840 x 2160/1080P/1080i/720P/
576P/480P/576i/480i
Audio Format Supported
DTS-HD 5.1/7.1, Dolby HD 5.1/7.1
Output Video
HDMI 1.4
Operating Temperature
32°F to 95°F (0°C to 35°C)
10% to 90%, non-condensing
Storage Temperature
-4°F to 140°F (-20°C to 70°C)
10% to 90%, non-condensing
ESD Protection
Human-body Model:
±8kV(Air-gap discharge)/±4kV(Contact
discharge)

6
General
Dimensions
200mmW ×40mmH × 400mmL
/14.9''W ×1.5''H ×17.3''L
Mass (Main unit)
2.3kg/5.0Lb
Certification
CE, FCC, RoHS

7
Panel
Front Panel
1 2 3 4
ID
Name
Description
1
Power
Turns on/off the device
2
Output Channel Indicator
Indicates input for output port 1~8
3
IR
IR receive window
4
Select and enter buttons
Selects the input port for output port

8
Rear Panel
1 2 3 4 5 6 7 8 9
ID
Name
Description
1
RS485 port
Connect to a RS485 device
2
LAN port
RJ45 port
3
RS232 port
Connect to a RS232 device
4
HDMI IN 1~8
Connect to HDMI sources
5
Optical Audio OUT 1~8
Connect to Audio system
6
HDMI OUT 1~8
Connect to HDMI sinks
7
DIP
DIP for Matrix setting
8
IR EXT
IR extension
9
Power
12V 5A DC power supply input

9
Hardware Installation
1. Connect HDMI source (such as a DVD player) to the
MX0808-1011-001.
2. Connect HDMI sink to MX0808-1011-001.
3. Connect AV receiver to Audio Output of MX0808-1011-001.
4. Connect the IR receiver to MX0808-1011-001 IR EXT ports.
5. Power on all the devices.
6. Use the remote to control the matrix, or using front panel, RS232, RS485
and LAN port to control.
TV
TV
TV
TV
TV
TV
TV
TV
DVD Player
DVD Player
DVD Player
DVD Player
DVD Player
DVD Player
DVD Player
DVD Player
PC AV Receiver
HDMI
Ethernet
Audio

10
Operation
Front Panel
The HDMI matrix can be manually controlled by using push buttons on its
front panel.
Step 1. Press the Left or Right button to select output channel, the
corresponding LED of the output channel will blink slowly.
Step 2. Press up or down button to choose the desired input channel.
Step 3. Press the Enter button to confirm the action. The LED stops blinking.

11
Remote Control
The HDMI matrix can be controlled by a remote as well.
Basic Remote Control
Remote Control at the Matrix end (locally)
Previous/next buttons
When using the remote control locally, i.e., pointed directly at the matrix, the
previous/next buttons are used to scroll between the input sources connected
to the matrix for each individual output display. For example, using the
previous/next button for 1 allows you to select the source to be set to display
1 manually. See below.

12
Matrix System Code Switch
In the event that two MX0808-1011-001 units are used side by side in the
rack, the matrix is capable of switching between two distinct IR System
Codes to allow control of either matrix individually via the handset.
System Code Switch
The default System setting is 0x00 but pressing the SYSTEM CODE button
on the handset THREE TIMES rapidly activates the alternative Matrix
SYSTEM CODE 0x4e, allowing control of the second unit. Pressing the
button three times again to revert back to 0x00 setting.
Note: changing the System Code is only necessary if you are using two
identical units within close range of the IR signal. If using in different parts of
the same room it is likely that you will not need to change the setting.
Remote control at the Display end (remotely)
When controlling the matrix remotely from the display side, the matrix
automatically detects which particular output location the user is in and only
allows the selection of sources 1-8 for that location using the button.
The right hand button will be deactivated.
For example. If you are in the Master Bedroom with a display connected to
output 3 of the matrix, the output zone is automatically detected so options
1-8 will correspond to sources 1-8 on the matrix. Press 1-8 to scroll
through your options as you would channels on a regular TV remote.

13
Advanced Remote Control
Please note, due to different method of control based on location, if you are
using a third party control system, learning the control from the IR is not
recommended as control will be limited to scrolling up/down between inputs.
For reference: the IR is NEC and possesses a carrier wave of 38 KHz with a
system code of 0x00.

14
RS232 Control
You can also control the matrix using the COM CTL software provided on the
disk included with your unit. This software offers further information on the
status of the system and greater control of settings.
The following figure shows COM CTL interface:

15
Set Panel
IP SET
Pressing this button, it gives access to IP functions to obtain and store IP
address.
Automatically obtain IP address is selected by default.
Or select Set static IP address to manually input the IP address, press OK
to store the IP address or Cancel to exit.

16
EDID SET
It allows user access to EDID settings that can be read, saved and recalled.
Step1. Select your output port in Port Select column.
Step2. Press Read to read EDID from the selected output port. The status
bar shows the progress.
Step3. Once completed, the EDID appears in the table bellowed.
Step4. Then select your input port and press Write to send the EDID to your
input.
Step5. Press Save as to save the EDID as a BIN file.
To write the EDID you previous saved, you can press Open to open the EDID,
then select input port, press Write to set EDID of this input port the same as
BIN file.

17
Setting
GUI Element
Description
Copy EDID Setting
Allows EDID to be copied to specific Inputs 1-8
from specific outputs 1-8.
Audio Control
Click CHANGE AUDIO SOURCE to choose the audio source

18
Then go to the corresponding tab to change the settings.
Table of contents
Other Grandbeing Matrix Switcher manuals