Graphy Tera Harz Cure User manual

1/ 25
Tera Harz Cure
User Manual

2/ 25
Contents
0. General Information ∙∙∙∙∙∙∙∙∙∙∙∙∙∙∙∙∙∙∙∙∙∙∙∙∙∙∙∙∙∙∙∙∙∙∙∙∙∙∙∙∙∙∙∙∙∙∙∙∙∙∙∙∙∙∙∙∙∙∙∙∙∙ 3
- Greetings
- Sign
1. Product Information ∙∙∙∙∙∙∙∙∙∙∙∙∙∙∙∙∙∙∙∙∙∙∙∙∙∙∙∙∙∙∙∙∙∙∙∙∙∙∙∙∙∙∙∙∙∙∙∙∙∙∙∙∙∙∙∙∙∙∙∙∙∙ 4
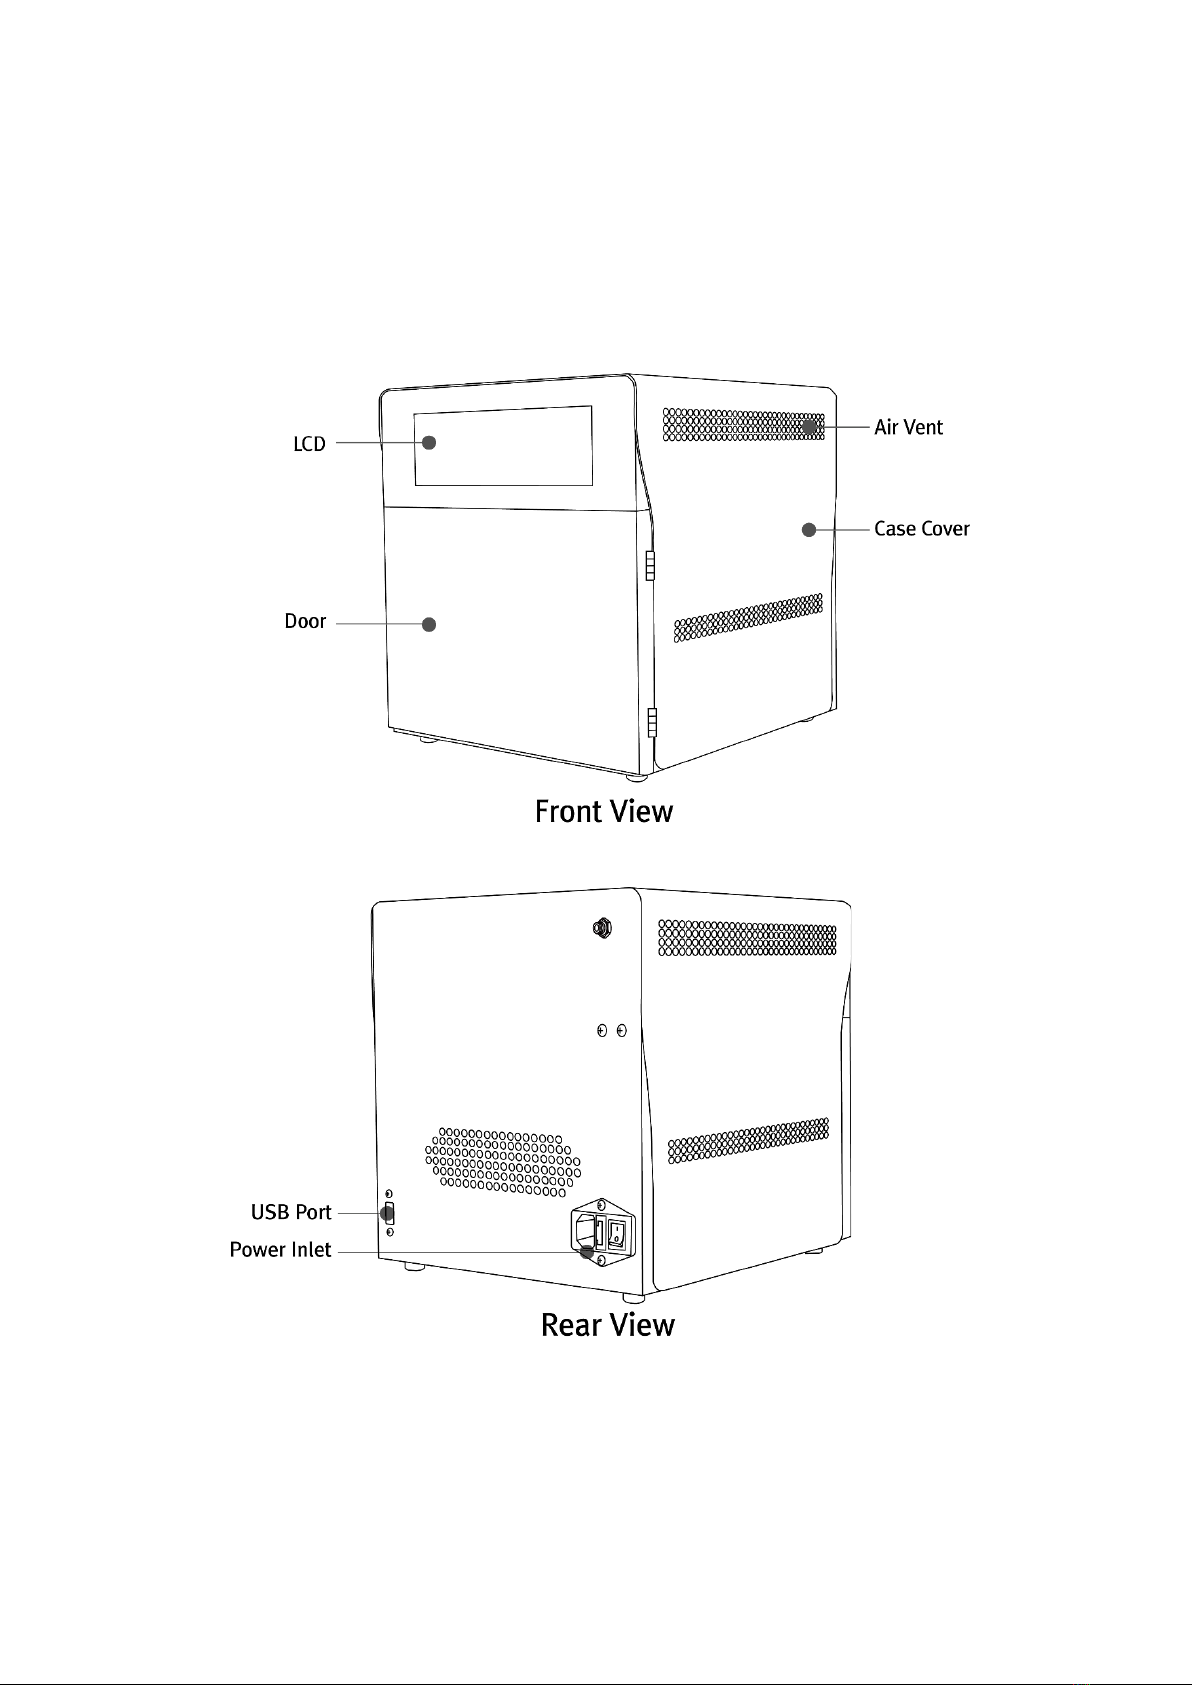
2. Parts Name ∙∙∙∙∙∙∙∙∙∙∙∙∙∙∙∙∙∙∙∙∙∙∙∙∙∙∙∙∙∙∙∙∙∙∙∙∙∙∙∙∙∙∙∙∙∙∙∙∙∙∙∙∙∙∙∙∙∙∙∙∙∙ 5
3. Basic Specification ∙∙∙∙∙∙∙∙∙∙∙∙∙∙∙∙∙∙∙∙∙∙∙∙∙∙∙∙∙∙∙∙∙∙∙∙∙∙∙∙∙∙∙∙∙∙∙∙∙∙∙∙∙∙∙∙∙∙∙∙∙∙ 7
4. Installation ∙∙∙∙∙∙∙∙∙∙∙∙∙∙∙∙∙∙∙∙∙∙∙∙∙∙∙∙∙∙∙∙∙∙∙∙∙∙∙∙∙∙∙∙∙∙∙∙∙∙∙∙∙∙∙∙∙∙∙∙∙∙ 8
- Component List
- Unpacking and Installing components
- Product Installation
5. User Interface ∙∙∙∙∙∙∙∙∙∙∙∙∙∙∙∙∙∙∙∙∙∙∙∙∙∙∙∙∙∙∙∙∙∙∙∙∙∙∙∙∙∙∙∙∙∙∙∙∙∙∙∙∙∙∙∙∙∙∙∙∙∙ 13
- Boot Screen
- Main Screen
- Progress Screen
6. Operation and Curing ∙∙∙∙∙∙∙∙∙∙∙∙∙∙∙∙∙∙∙∙∙∙∙∙∙∙∙∙∙∙∙∙∙∙∙∙∙∙∙∙∙∙∙∙∙∙∙∙∙∙∙∙∙∙∙∙∙∙∙∙∙∙ 16
- Normal Curing (without using a nitrogen generator)
- Nitrogen Curing
7. Intro video update ∙∙∙∙∙∙∙∙∙∙∙∙∙∙∙∙∙∙∙∙∙∙∙∙∙∙∙∙∙∙∙∙∙∙∙∙∙∙∙∙∙∙∙∙∙∙∙∙∙∙∙∙∙∙∙∙∙∙∙∙∙∙ 19
8. Precautions for use ∙∙∙∙∙∙∙∙∙∙∙∙∙∙∙∙∙∙∙∙∙∙∙∙∙∙∙∙∙∙∙∙∙∙∙∙∙∙∙∙∙∙∙∙∙∙∙∙∙∙∙∙∙∙∙∙∙∙∙∙∙∙ 22
- Compliance with equipment use
- Safety Instructions
9. Maintenance ∙∙∙∙∙∙∙∙∙∙∙∙∙∙∙∙∙∙∙∙∙∙∙∙∙∙∙∙∙∙∙∙∙∙∙∙∙∙∙∙∙∙∙∙∙∙∙∙∙∙∙∙∙∙∙∙∙∙∙∙∙∙ 24
10. Notification Message ∙∙∙∙∙∙∙∙∙∙∙∙∙∙∙∙∙∙∙∙∙∙∙∙∙∙∙∙∙∙∙∙∙∙∙∙∙∙∙∙∙∙∙∙∙∙∙∙∙∙∙∙∙∙∙∙∙∙∙∙∙∙ 25
11. Repair inquiry ∙∙∙∙∙∙∙∙∙∙∙∙∙∙∙∙∙∙∙∙∙∙∙∙∙∙∙∙∙∙∙∙∙∙∙∙∙∙∙∙∙∙∙∙∙∙∙∙∙∙∙∙∙∙∙∙∙∙∙∙∙∙ 25

3/ 25
0. General Information
□Greetings
Thank you for purchasing Graphy's Tera Harz Cure device. This device is to make the output
printed using a 3D printer into a fully cured state. Improper use or handling can cause hazards
and damage. Therefore, please read the user manual carefully and follow it. Always keep the
instruction manual within easy reach, and follow the safety instructions to prevent personal
injury and property damage.
□Sign
Danger
Hazards resulting in serious injury or death to the user
Warning
Hazards resulting in minor injury to the user
Caution
Conditions that may cause damage to the product or surroundings

4/ 25
1. Product Information
Tera Harz Cure is a product made to completely cure the output printed from a 3D printer using
UV LED. It is designed to minimize the variation of light quantity over a wide area by optimizing
the arrangement of UV LED irradiated on the curing surface, and it can be effectively cured with
high light quantity. Nitrogen Generator, which can be used exclusively for Tera Harz Cure products,
converts the compressed air from the air compressor into 95% or more nitrogen and supplies it
to the equipment. to cover the print with nitrogen to block oxygen on the surface, increase the
illuminance and physical properties of the print with high light intensity, and reduce water
absorption.

5/ 25
2. Parts Name
(Without Nitrogen Generator)

6/ 25
(With Nitrogen Generator)

7/ 25
3. Basic Specification
□ Tera Harz Cure
Properties
Description
Input Voltage
100-240VAC, 50/60Hz
Output Voltage
24V, 12.5A
Screen
7.9” TFT Touch LCD
Light Source
UV LED
LED Wavelength
405nm
LED power
200W
LED Energy Density(Max) (*)
280,000mJ/㎠
Irradiance of UV Light(Max) (*)
1,000mW/㎠
LED Warranty Time
1,000h
Operation Temperature
5-35°C
Curing Space
MAX. Ø180 x 65mm
Curing Time (Setting range)
1-60 min / 5-55 sec
Dimension
275 x 310 x 300mm
Weight
Unit : 8.7Kg, Box : 1.3Kg
(*)The LED energy density is the accumulated measurement result for 5 minutes using the
standard UV Meter of Graphy..
□ Nitrogen Generator (when added)
Properties
Description
Nitrogen purity at the outlet (maximum)
95% or more
Nitrogen flow rate at the outlet
3.5~4L/min
Dimension
275 x 310 x 310mm
Weight
Unit : 3.2Kg, Box : 0.3Kg
Power Source
Not needed
Air hose diameter
Ø6
Min. air pressure required at compressor
7Kgf/㎠≒ 7 bar ≒ 0.7Mpa or more
Min. air flowrate required at compressor
100L/Min or more
Min. air tank size required
10L or more

8/ 25
4. Installation
□ Component List (* mark : 2ea)
< Components of Tera Harz Cure with Nitrogen Generator >
< Components of Tera Harz Cure without Nitrogen Generator >

9/ 25
□ Unpacking and Installing components
Carton Box
Carton box dimension
(41x37x60cm)
Inside the carton box
(*) There is a shape that can be used as a handle on the Tera Harz Cure box. When lifting the Tera
Harz Cure from the outer box, insert your hand through the gap in the shape and take it out of the
box so that you can easily take the product out.

10 / 25
□ Product Installation
1) Avoid installing the product in an environment that may affect the operation of the product,
such as humidity, high heat, dust, wet places, and uneven floors.
2) Keep the product 10 cm away from the wall for effective cooling of the internal temperature.
(Side and rear)
3) Connect the power cable that meets the local standard to the rear of the product..
4) After turning on the power switch shown in the figure, the installation is complete when
the LCD screen comes on after about 20 seconds of booting time.

11 / 25
□ Nitrogen generator installation (when added)
Place the Nitrogen Generator on top of the
Tera Harz Cure and attach the Fix Bracket..
Attach the Hose Module as shown in the picture.
Push it all the way in to prevent air leakage.
Connect the air line after assembling the air
filter module with the included bolts as
shown in the picture.
Connect the compressed air hose coming from
outside as shown in the picture. (Ø6)
Nitrogen generator installation completed

12 / 25
Caution
In order to satisfy the nitrogen conditions generated by the Nitrogen Generator, the air
compressor must satisfy the following conditions.
Pressure : 7kgf/cm2(0.7Mpa) or more, Recommended : 8kgf/cm2 or more
Flow rate : 100L/min or more
If the air flowing into the nitrogen generator does not receive sufficient pressure, it will not
proceed when selecting Nitrogen curing.
Caution
In an environment where air lines are branched instead of using an air compressor alone,
sufficient nitrogen may not be injected during nitrogen hardening due to excessive use of air
from other devices.
If there is excessive moisture in the compressed air flowing into the nitrogen generator, the
nitrogen generator may be clogged and the nitrogen purity may decrease. To prevent moisture
from accumulating in the air filter, put a tissue on the drain part and press the drain part to
remove moisture. If possible, use of an air dryer is recommended..

13 / 25
5. User Interface
□ Boot Screen
After connecting the power cable to the back of the equipment and turning on the switch, wait
until the booting is finished as it takes about 20 seconds to boot. After booting, the screen
below will appear as a video..
(a) : Company and product name(Text)
(b) : Intro video
(c) : Instructions to touch anywhere on the screen
□ Main screen: setting and starting curing conditions
(a) : 5 pre-stored modes. After newly saving the settings for each mode, you can apply the
changed settings.
(b) : A function to save the curing conditions (minutes/seconds/levels/nitrogen hardening) that
are frequently used by users in a desired mode
(c) : Function to select Nitrogen curing or not

14 / 25
(d) : Curing time is displayed in minutes.
(e) : Curing time in (d) can be adjusted in units of 1 minute by pressing the arrow icons.
(f) : Curing time is displayed in seconds.
(g) : Curing time in (f) can be adjusted in units of 5 second by pressing the arrow icons.
(h) : Curing level is displayed (1~5)
(i) : Curing level in (h) can be selected by pressing the arrow icons.
(j) : Start curing.
□ Progress screen : Status screen at curing
(a) : Return to main screen. (Only when curing is stopped)
(b) : Control the action of curing. (Pause/Play/Stop buttons in sequence)
Pause: Curing is paused, and curing continues with the progress rate and remaining time.
Play: If you press it after pause, curing continues, and if you press it after stopping, it starts
again from the beginning with the set curing conditions.
Stop: Curing is stopped, and continues curing is not allowed.
(c) : Displays the current curing status. (UV operation/nitrogen injection/FAN operation/curing
level in sequence)
(d), (e) : Curing progress is shown as a pie graph (d) and percentage (e).
(f) : Remaining time
Caution
When nitrogen curing is performed, a separate progress rate is displayed during the
nitrogen injection confirmation time (default value is 5 minutes), and when the nitrogen
concentration in the chamber reaches the set value, curing starts, and the progress rate
and remaining time are reset by the time set in the curing condition.
(g) : Displays Left LED board temperature.

15 / 25
(h) : Displays Upper LED board temperature.
(i) : Displays Right LED board temperature.
(j) : Displays Curing chamber temperature.
Caution
Each temperature is the result of reading the position where the temperature sensor is
embedded, not the maximum temperature of the corresponding part. The displayed
temperature has an offset value proportional to the maximum temperature of each part,
and is used to protect the equipment.

16 / 25
6. Operation and Curing
□ Normal Curing (without using a nitrogen generator)
Open the door and put the curing object on the tray plate and put it into the equipment..
Caution
When placing it on the equipment, the protrusions and the grooves of the inner plate must
be aligned so that slippage does not occur during rotation at curing.
Intro page : Touch anywhere on the INTRO screen shown on the equipment's LCD.
Example)
8 aligners placement

17 / 25
Main page : Start curing by selecting the saved mode from the above screen or by selecting
minutes, seconds, LEVEL, and nitrogen curing.
Caution
When performing normal curing, make sure that the nitrogen curing option is disabled.
(Curing does not proceed when nitrogen curing is selected)
Progress Page : After checking that the time, level, and nitrogen curing set on the curing
progress screen are correct, wait until the curing machine is finished.
After the above operation is completed, open the door and take out the cured objects to
check the cured state.
Warning
If you hold the cured object or tray plate right after curing, you may get burned or other
injury to your hands due to the hot temperature during curing, so be sure to cool it
sufficiently or wear gloves before taking out the cured object.
Warning
If you open the door immediately after curing or during curing, the UV LED may not turn
off right away. To protect your eyes, open the door after checking whether the inside of the
chamber is lit while the door is closed.

18 / 25
Caution
If you want to proceed with the next curing immediately after curing is finished, the internal
temperature is high and the curing conditions may change slightly.
Use it after having enough cool-time or cooling the inside for a while using an air gun.
Caution
After curing is complete, clean the tray plate before use. The tray plate is a consumable
part, and it is recommended to replace it with a new part if the contamination of the bottom
surface has progressed to the point where it cannot be cleaned after long-term use.
□ Nitrogen curing (necessary to connect nitrogen generator)
When performing nitrogen hardening, make sure that the nitrogen hardening selection is
activated.
After selecting nitrogen curing, start curing after setting the same as normal curing.
When curing starts, nitrogen injection starts first with the sound of the solenoid valve opening,
and the progress page displays a graph and remaining time for nitrogen injection.
If the nitrogen ratio in the curing chamber reaches the set value within the time for pre-
nitrogen injection (default value is 5 minutes), the graph and remaining time are changed to
the curing time and restart.
Please read the precautions (p12) when installing the nitrogen generator.

19 / 25
7. Intro video update (add-on)
Tera Harz Cure standby screen image (intro video) can be changed according to the user's
preference. In order to update the intro video, the Updater S/W provided by Graphy Co., Ltd.
must be installed.
Caution
The resolution of the intro video (avi) must be 1280x400 for normal upload. If the resolution
is different or an error occurs during the upload phase, the intro video set at the factory will
be displayed.
1) Double-click the icon below to run the program.
2) Check the below screen.
3) Connect PC or laptop and Tera Harz Cure with USB to USB cable.
< Network connection setting window before cable connection >
4) After connecting, right-click on the created Ethernet to enter the Properties window.

20 / 25
5) At Properties, double-click Internet Protocol Version 4 (TCP/IPv4) to run it, and change it
to Use the following IP address (S).
Enter 192.168.0.10 in the IP address and press Tab to automatically enter the value in the
subnet mask..
Caution
If the currently assigned IP address (IP address in use) is 192.168.0.10, it does not matter if you
enter a number other than 10, and it is okay if the last digit is not '100'.
Table of contents
Popular 3D Printer manuals by other brands

Flashforge
Flashforge Creator 3 quick start guide

Wasp
Wasp 4070 ZX Original instructions

gCreate
gCreate gMax 2 PRO Unboxing and setup instructions

Dremel
Dremel Idea Builder 3D20-01 Operating/safety instructions

Ender
Ender Ender-3 V2 user manual

FLASHFORGE 3D PRINTER
FLASHFORGE 3D PRINTER Focus 8.9 quick start guide