GREAT PLANES ElectriFly TRITON2 User manual

Triton2 is the sequel to ElectriFly’s revolutionary Triton charger. In addition to all existing features found on the original, Triton2
includes several feature upgrades and improvements. Maximum charge current has been increased to 7A. The LCD now
includes a blue backlight for easy viewing even in poorly lit areas.T2 can handle LiPo packs having up to 5 cells wired in series.
The input lead has pre-installed banana plugs, and large alligator clips are included which can be mated directly to the banana
plugs for easy connection to different types of supply terminals. The rotating dial has been modified for easier control. Plus,
the instructions have been completely re-formatted for ease of use. All of this, while maintaining the same great quality and
performance that made Triton famous.
IT’S STRONGLY RECOMMENDEDTO READTHIS MANUAL ENTIRELY, AS IT CONTAINS IMPORTANT PROGRAMMING AND
SAFETY AND HANDLING INFORMATION. DAMAGE RESULTING FROM MISUSE OR MODIFICATION OF THIS CHARGER
WILLVOIDYOUR WARRANTY.
1. Connect Triton2 to a 12V DC power source. Observe proper polarity. (See page 3 for details)
2. Find the programming flowcharts included in the package.
3. At the default “Memory” screen, press BATTTYPE to find the screen which matches your battery type: NiCd, NiMH, LiPo/Li-
Ion, or Pb (lead-acid). (See page 4 for details)
4. Connect the proper charge adapter to the output banana jacks (See page 4 for a list of adapters). Connect the battery to
the charge lead, observing proper polarity.
5.To charge:
a. For NiCd and NiMH batteries see page 6.
b. For LiPo and Li-Ion batteries see page 9.
c. For lead-acid (Pb) batteries see page 10.
6.To discharge:
a. For NiCd and NiMH batteries see page 7.
b. For LiPo and Li-Ion batteries see page 10.
c. For lead-acid (Pb) batteries see page 11.
7. For cycling of NiCd and NiMH batteries see page 8.
QUICK REFERENCE GUIDE
INTRODUCTION
™
Computerized Charger, Discharger, Cycler
TABLE OF CONTENTS
Specifications and Features.................................................2
Important Warnings..............................................................2
Glossary of Terms................................................................3
Input Power – Connection, Protection, Limitations..............3
Controls and Output Connections........................................4
Determining Battery Type and Specifications ......................4
Menu Structure.....................................................................4
Getting Started – Main Menu and Battery Memories..........5
Charging, Discharging, Cycling NiCd or NiMH Batteries.....6
Selecting LiPo or Li-Ion Battery Type...................................9
LiPo Batteries – Balanced vs. Non-balanced.......................9
Charging and Discharging LiPo/Ion Batteries......................9
Charging and Discharging Pb Batteries.............................10
Setup Menu........................................................................11
Data View Screens – Charge, Discharge, Cycle Data.......12
Errors and Safety Features................................................13
Troubleshooting Guide .......................................................13
Maximum Power Chart.......................................................15

SPECIAL FEATURES
• NEVER attempttocharge incompatibletypes ofrechargeablebatteriesaspermanent damagetothe batteryandcharger couldresult.
• NEVER use automotive type battery chargers to power the charger.
• NEVER allow water, moisture or foreign objects into the charger.
• NEVER block the air intake holes or fan which could cause the charger to overheat.
• NEVER attempt to use batteries with more cells or total voltage than listed in the specifications
• NEVER leave the charger unattended while charging. Disconnect the battery and remove input power from charger
immediately if the charger becomes hot!! Allow the charger or battery to cool down before reconnecting.
• NEVER place the charger or battery on a flammable surface or near a flammable object while in use. Keep away from
carpets, wood, plastic, paper, cluttered workbenches, etc.
• NEVER overcharge batteries as permanent damage could result. Do not use a charge or discharge current rate which
exceeds the safe level of the battery. Do not attempt to charge or discharge a battery if it is hot.
• ALWAYS disconnect from power source when not in use.
• ALWAYS keep out of reach of children.
• ALWAYS connect the charge lead to the charger before connecting the battery to the lead. And ALWAYS disconnect the
battery from the charge lead BEFORE disconnecting the charge lead from the charger.Otherwise, if the ends of the charge
lead touch each other while the battery is still connected, a severe and dangerous short-circuit condition will result.
IMPORTANT WARNINGS
SPECIFICATIONS
2
•
Updated control dial and re-formatted instructions for
easier programming
•
Handles 1-5 lithium-polymer or lithium-ion cells in series
•
0.1 – 7.0A adjustable charge current
•
LCD includes a blue back-light
•
Banana plugs on input connector, and includes mating
gator clips
• Precision “zero deltaV” peak detection with adjustable
sensitivity for NiCd and NiMH batteries
• “Constant current / constant voltage” charge method for
Pb and LiPo/Ion batteries
• Fast charge thermal cutoff (GPMM3151 thermal probe
available separately)
•Top-off charge feature fully charges NiMHs without overheating
• 0–250mA adjustable trickle charge current (NiCd and NiMH only)
• 0.1–3.0A adjustable discharge current
• Adjustable discharge cutoff voltages for NiCd/MH (pre-set
voltages for Pb and LiPo/Ion).
• Perform 1 to 10 cycles (NiCd/MH only)
• Recall data for 10 full cycles
• Configure up to 10 batteries in memory for instant, easy
re-call and charger setup
• Displays input and output volts, peak charge volts, average
discharge volts, charge and discharge capacities, currents
and time, error messages
• Audible sound cues aid in programming and notification of
function changes.
•Warning messages for improper input voltage, poor connections,
unsuitable battery condition, reverse polarity on output
• Safety features include cool-off time delay, maximum NiMH
charge input, fast charge safety timer, current overload and
reverse polarity protection
• Built-in cooling fan, for better charge efficiency and
extends life of charger
• Small and lightweight, with a super-sturdy aluminum case
for rugged durability
Input voltage: 11.0–15.0V DC
Input connections: banana plugs with mating
gator clips
Number of outputs: one
Battery types, # cells: 1-24 NiCd/MH (1.2 - 28.0V)
1-5 LiPo or Li-Ion (3.6, 3.7,
7.2, 7.4, 10.8, 11.1, 14.4,
14.8, 18.0, and 18.5V)
6, 12, 24V Pb (2V per cell)
Fast charge current: 0.1-7.0A linear NiCd/MH
(0.1A step, 90W max.)
1C rating for LiPo/Li-Ion
Fast charge termination: “zero deltaV” peak detection
for NiCd/MH
“cc/cv” for Pb and LiPo/Ion
* optional thermal cutoff
Peak sensitivity: NiCd 5-20mV, NiMH 3-15mV
Peak delay at start: 0-60 minutes (NiCd/MH only)
Trickle charge current: 0 - 300mA (NiCd/MH only)
Fast charge safety timer: 0-990 minutes
* requires optional thermal probe – GPMM3151
NiMH max. charge cap: 0-9900mAh
NiMH top off charge: 0-1000mA
Thermal cutoff: * 50-150°F (10-65°C)
Discharge current: 0.1-3.0A (20W max.)
Discharge cutoff voltage: NiCd/MH 0.5-1.20V per cell
(0.9V/cell fixed during cycle)
LiPo/Ion fixed at 3.0V per cell
Pb fixed at 1.8V per cell
Cycle count: 1-10 cycles (NiCd/MH only)
Cycle time delay: 1-60 minutes
Battery memories: 10 memories
Programming controls: modified jog dial, 2 pushbuttons
Display type: 2 x 16 LCD with blue backlight
Audible indicators: 10 melodies, on/off
Output connectors: banana jacks
Case material: extruded aluminum
Cooling system: built-in fan
Current overload: solid state
Case size: 6.2 x 4 x 2 in (157x102x51mm)
Weight: 16.4 oz. (466g)

Amps (A): The unit of measure for charge or discharge current.
Milli-amps (mA): A unit of measure for current, being amps (A) multiplied by 1000 and listed as“mA”.So 2.5A is the same as 2500mA
(2.5 x 1000). Or, to convert mA to amps, divide the mA number by 1000. So 25mA is the same as 0.025A (25 divided by 1000). If a
current value is below 1.0A, the display will still show the current in amps, not milli-amps. For example, a current of 800mA will be
displayed as 0.8A. A current of 100mA will actually be shown as 0.1A, etc.
Capacity, milli-amp hours (mAh), and amp-hours (Ah): Charge energy stored by a battery is called capacity, which is defined as
how much current a battery can supply constantly over one hour of time.Most hobby batteries are rated for capacity in “mAh”or milli-
amp hours.A 650mAh battery can deliver 650mA of current for one hour (650mA x 1hr = 650mAh). A 3200mAh battery can deliver
3200mA (3.2A) of current for one hour (3200mA x 1hr = 3200mAh), etc. Very large batteries, such as lead-acid field batteries, are
usually rated in “Ah”or amp-hours. A “12V 7Ah” field battery can deliver 7 amps of current for one hour (7A x 1hr = 7Ah).
“C”rating: Capacity is also referred to as the “C” rating.Some battery suppliers recommend charge and discharge currents based on
the battery’s “C” rating.A battery’s “1C”current is the same number as the battery’s rated capacity number, but noted in mA or amps.A
600mAh battery has a 1C current value of 600mA, and a 3C current value of (3 x 600mA) 1800mA or 1.8A.The 1C current value for a
3200mAh battery would be 3200mA (3.2A), etc.
Triton2 only accepts DC input power which could come from a 12V power supply or 12V automotive battery. It’s best to use a clean
DC power source whose output is filtered to remove unwanted electrical noise.Do NOT use an automobile battery charger as a power
source.To achieve the absolute maximum output power, the input power source must be capable of delivering at least 10 amps of
current while maintaining 12 volts DC. If input power is below 11.0V or above 15.0V the display will show an “Input voltage” error, at
which time you should re-check the input to ensure adequate power is present.
The input power lead is located on the left side of the charger.
Note the unique set of alligator clip adapters that are included,
and the female banana jack built into the handle of each clip.If
your power source requires alligator clips, slide the banana plugs
on the input lead into the female jacks on the alligator clips
(matching colors of banana plugs and alligator clips). Securely
connect the charger’s red lead to the positive (+) terminal on the
power source, and the black lead to the negative (-) terminal.
WARNING! NEVER allow the red and black input connections
to touch each other while connected to 12V DC power. Failure
to do so could result in permanent damage to the power
source and the charger. It’s recommended to disconnect the
charger from input power when not in use.
Triton2 has a maximum overall power rating of 90 watts during charge, and 20 watts during discharge.If trying to charge or discharge
a battery which has over 12 volts the charger might deliberately limit the output current so not to exceed its maximum rated output
power. Refer to the “Maximum Power Chart” included for more details about current limitations for higher voltage batteries.
Triton2 is always on when connected to the power source (there isn’t any ON/OFF power switch).Therefore, disconnect the
charger from input power when not in use.T2’s input is protected from reverse polarity and overcurrent by solid state protective
circuits, and does not include a fuse. If you suspect an error occurred with the input power and T2 will not function properly
after correcting the input power problem, refer to the Troubleshooting Guide for details.
INPUT POWER - CONNECTION, PROTECTIONS & LIMITATIONS
GLOSSARY OF TERMS
3

It is always CRUCIAL to know your battery’s exact type, rated voltage and capacity!!
Failure to know these points is one
of the biggest reasons why batteries fail. A few short minutes learning the basics of battery care can easily prevent
unnecessary crashes (and lost money!). Carefully read your battery’s label and/or instruction sheet or consult your battery
supplier and determine:
1.Is the battery
type
nickel-cadmium (NiCd), nickel-metal hydride (NiMH), lithium-polymer (LiPo), lithium-ion (Li-Ion), or lead-acid (Pb)?
2.What is the battery’s
total rated capacity
? The mAh or Ah rating should be listed directly on the battery’s label. If not,
consult your battery supplier.
3.What is the battery’s
nominal rated voltage
? NEVER guess the rated voltage of a LiPo or Li-Ion battery! If not printed on
the battery’s label, consult your battery supplier or determine pack voltage as follows:
A. NiCd and NiMH:multiply the total number of cells in the pack by 1.2.A 6-cell pack will have a nominal voltage of 7.2 volts
(6 x 1.2). An 8-cell pack will have a nominal voltage of 9.6 volts (8 x 1.2), etc.
B. LiPo: multiply the total number of cells in the pack by 3.7.A 2-cell LiPo wired in series will have a nominal voltage of 7.4V
(2 x 3.7). A 3-cell LiPo wired in series will have a nominal voltage of 11.1 volts (3 x 3.7), etc.
C. Li-Ion: multiply the total number of cells in the pack by 3.6. A 2-cell Li-Ion wired in series will have a nominal voltage of
7.2 volts (2 x 3.6). A 3-cell Li-Ion wired in series will have a nominal voltage of 10.8 volts (3 x 3.6), etc.
Triton2 contains three different menus. Refer to the included flowcharts when programming the charger.
Main Menu: For setting battery type, charge and discharge currents and voltages, and cycling currents. Starting charge,
discharge, and cycles are done in this menu. Setting a battery memory is also done in the Main Menu.
Setup Menu: Various customizable features which support charge, discharge, and cycle are found in the Setup Menu, such
as safety timers, time delays, thermal probe temperature settings, peak detection sensitivity, etc.
Data View Menu: Results of charge, discharge, and cycle functions are displayed here, as well as input, output, peak charge,
and average discharge voltages and battery temperatures (See page 4).
MENU STRUCTURE
DETERMINING BATTERY TYPE & SPECIFICATIONS
CONTROLS & OUTPUT CONNECTIONS
4
NUMBER DESCRIPTION
GPMM3148......Charge Adapter - Banana plugs to Deans®
Ultra Male
GPMM3149........Charge Adapter - Banana plugs to Deans Micro
HCAP0101..........Futaba®J Tx and Rx charge leads, except 9VAP
HCAP0102.........Futaba J Tx and Rx charge leads, 9VAP only
HCAP0104.........Airtronics®/Sanwa Tx and Rx charge leads
NUMBER DESCRIPTION
HCAP0105.......JR Tx and Rx charge leads
HCAP0106.......Hitec®Tx and Rx charge leads
HCAP0108.........Charge leads, banana plugs to alligator clips
HCAP0110..........9V-style Tx connector, Futaba-J Rx charge lead
HCAP0310.......Banana Plugs (3 pair)
HCAP0320.......Heavy Duty Banana Plugs (2 pair)
• The THERMAL PROBE jack is ONLY used for connecting
an optional thermal probe (GPMM3151). Do NOT connect
batteries to this jack. Refer to the “Temperature Cut-off”
section of the Setup Menu.
• Use pre-assembled charge leads to connect batteries to the
banana jacks. See the following list of different ElectriFly and
Hobbico®brand charge leads which can be purchased
through many hobby retailers.
• Custom 32-character LCD with blue back-light.
• The MENU CHANGE button jumps between the Main and
Setup menus.
•The BATT TYPE button changes battery types in the Main Menu.
• Press BATT TYPE and MENU CHANGE simultaneously
to find the Data View Menu.
• The dial is used for scrolling through menus and adjusting
values on-screen; it acts like a pushbutton to confirm
items on-screen.

The Main Menu is where all main functions (charge, discharge, cycle) are located and started, as well as where to select the
battery type, charge, discharge, and cycle currents and voltages.When power is applied the first time,Triton2 will automatically
default to the “Memory (01) NiCd” screen shown on the left side of the Main Menu flowchart. It is strongly recommended to
have all flowcharts handy as it will greatly simplify and quicken the process of learning to use the charger.
1. ALWAYS connect the battery adapter lead to the charger BEFORE connecting the battery to the adapter. Make sure to observe
proper polarities for all connections, with the red positive (+) leads connected to each other, and the black negative (-) leads connected
to each other. WARNING! NEVER allow the positive and negative output connections to touch while a battery is connected.
Failure to do so could result in permanent damage to the battery and/or the charger and void your warranty.
2.Rotate the dial to move up and down a menu.To adjust values on-screen, press the dial and the adjustable feature will flash.
Rotate the dial to find desired value, then re-press the dial to confirm the selection. If a screen shows two adjustable values,
repeatedly press the dial to select the value to be adjusted.
3. BATTERY MEMORIES: If you don’t
wish to use a battery memory, skip to
step 4. Using the memories prevents
you from having to manually change
all settings each time you change
batteries. Once set, simply select the
memory number that matches the
corresponding battery. You can
customize any of the ten memories as
you wish, as explained in the diagram
at right.Or, you can use one of the ten
factory programmed memories if the
settings match your battery type. See
the included BATTERY MEMORY
CHARTS for the factory programmed
memories, and a blank chart where
you can record customized memory
settings. All memory settings will hold
even if power is removed, until they’re
changed again manually.
Note: You cannot start any charge,
discharge, or cycle function from the
memory screens. You must press
MENU CHANGE to confirm all
memory settings and move to the
appropriate “charge” screen for the
selected battery type.
4.SETTING BATTERY TYPE:If not using a memory, press BATT TYPE to find the battery type which EXACTLY matches your
battery. Referring to the Main Menu flowchart, select from NiCd, NiMH, LiPo (use this for Li-Ion batteries also – see the
“Selecting LiPo or Li-Ion Battery Type” section for details), and Pb (lead-acid).
5. STARTING CHARGE, DISCHARGE, OR CYCLE: Read the sections below for how to set values for the selected battery
type, and how to start charge, discharge, or a cycle.
• NEVER allow NiMH batteries to overheat, as this could adversely affect their performance. If this happens, disconnect the
battery from the charger immediately and allow to cool!
• NEVER deep cycle NiMH batteries as permanent damage could result.
• NEVER attempt to use the NiCd, Pb, or lithium functions with NiMH batteries.
• Store NiMH packs with some voltage remaining on the cells (refer to battery supplier).
CARE & HANDLING INSTRUCTIONS FOR NiMH BATTERIES
GETTING STARTED - MAIN MENU & BATTERY MEMORIES
5
Charge current
1.0A
Once all memory settings have been entered, press "MENU CHANGE" to confirm all settings. Triton2
will automatically jump to the appropriate "charge" screen for the selected battery type.
Dschg cutoff
Voltage 4.4V
Discharge current
1.5A
Battery capacity
650mAh
Total pack volts
4.8 volts
Battery type
NiCd
Memory (01) NiCd
4.8V / 650mAh
ROTATE DIAL
Press the dial, then rotate to select a memory (1-10). Re-press dial to
confirm memory selection.
IMPORTANT! Press, then rotate dial to find the EXACT battery type to
match your battery. Press dial to confirm.
Press, then rotate dial to find the voltage which EXACTLY matches the
nominal voltage shown on the battery pack. Press dial to confirm.
Press, then rotate dial to find the capacity value which MOST CLOSELY
matches the capacity shown on the battery pack. Press dial to confirm.
Press, then rotate dial to find the desired charge current. Refer to the
"NiCd and NiMH Charge and Discharge Current" chart for
recommendations. Press dial to confirm. (Screen not shown for lithium
batteries, as current will automatically be set to the battery's 1C value).
Press, then rotate dial to find the discharge current value. Refer to the
NiCd and "NiMH Charge and Discharge Current" chart to determine the
proper current. Press dial to confirm.
Press, then rotate dial to find the discharge cut-off voltage. Refer to the
"Discharge Cutoff Settings - NiCd and NiMH" chart on page 7 to
determine the proper voltage. Press dial to confirm. (Screen not shown
for lithium or lead-acid batteries.)
Memory Screens

1. In the Main Menu press BATT TYPE to find the “NiCd CHARGE” screen to charge a NiCd battery, or find the “NiMH
CHARGE” screen to charge a NiMH battery.
2.To change the charge current, press the dial to cause the value to flash.Rotate the dial to find the desired charge current (0.1 – 7.0
amps). See the included NiCd AND NiMH CHARGE AND DISCHARGE CURRENT CHART for recommended current settings.
Note that “0.2A” is the same as 200mA… “0.7A” is the same as 700mA, etc. Press the dial to confirm the selection. Note: Rotating
the dial fully to either direction will cause “auto” to show.See the “Notes” section below for details on the auto function.
3.To START PEAK CHARGE, press
and hold the dial for 2 seconds.
“BATTERY CHECK” will show while
T2 evaluates the condition of the
battery. If the battery is ready, peak
charge will start automatically at
which time you’ll see a screen like
shown at right.
WARNING! It is normal for NiCd and NiMH batteries to become warm during charge. Disconnect batteries IMMEDIATELY if they
become hot at any time! If batteries become overheated, it may be necessary to use a lower charge current in the future.Never attempt
to charge batteries at excessive rates, as permanent damage could result.
4.When peak charge is finished, the screen will show “END” and tones will sound for 10 seconds. The charger will
automatically go to trickle charge at this time (see the notes section below for details on trickle current).The battery is now
ready for use.To see details about input, output, or peak battery voltage, press BATT TYPE and MENU CHANGE buttons
simultaneously to see the DATA VIEW screens (see page 12).
CHARGING NiCd OR NiMH BATTERIES
6
NiMH Chg 03291
13.54V 3.2A 061m
Battery
Type
CHG =
charging
Output
Voltage
Charge
Current
Charge capacity: This is how much capacity (energy, in
"mAh") that has been delivered to the pack during charge.
When charge is finished, this number could be low if the
battery previously had some charge. For a battery which
previously had little or no charge, this number should be
higher (ideally within 10% of the battery's own mAh rating).
Elapsed charge time: This is the number of minutes the
battery has been on charge. When charge is finished, this
number could be low if the battery previously had some
charge. For a battery which previously had little charge,
this number should be larger.
Notes for charging NiCd and NiMH batteries:
• Lower current means it takes longer to charge but it’s less stressful on the batteries, tends to result in more fully charged batteries, and
helps to maximize the battery’s lifespan.
• Larger “sub-C” size cells can handle peak charge currents up to 5.0 amps with little heat generation. Smaller “A” and “AA” cells overheat
more easily and should be charged at much lower currents. Even smaller “AAA” and “N” cells should be charged at lower rates. Refer to
the NiCd AND NiMH CHARGE AND DISCHARGE CURRENTS table for recommended charge currents.
• A battery which is approaching or has reached full charge could become warm to the touch, but never get HOT. If overheated, the battery has
likely reached an overcharge condition and should be disconnected from the charger immediately!! Allow the battery to cool before use.And lower
the charge current setting for future charges.
• For packs having more than 12 volts, the actual amount of current delivered to the battery might automatically be limited so not to exceed
the charger’s maximum rated charge
power
of 90 watts
.
See the included MAXIMUM POWER CHART for details.
• To keep NiCd batteries in good operating condition, it’s a good idea to properly discharge them before charging on a regular basis.
• NiMH batteries have a self-discharge rate of about 20-25% (vs. 15% for NiCd). Always recharge NiMH batteries just prior to use.
• The “deltaV” peak detection method is used to charge NiCd and NiMH batteries up to 95-98% full charge. When peak charge ends, a
trickle charge current will automatically be delivered to the battery which is designed to help the battery safely reach 100% full charge.
Trickle charge is applied
only
after an individual peak charge (not after discharge or cycle), and will remain on until the pack is
disconnected.Trickle current is automatically set, based on the fast charge current setting as listed below:
Fast charge current Trickle current Fast charge current Trickle current
0-0.9A....................................0 4.0-4.9A ..............................200mA
1.0-1.9A.................................50mA 5.0-5.9A ..............................250mA
2.0-2.9A.................................100mA 6.0-7.0A ..............................300mA
3.0-3.9A.................................150mA
* Peak charge can be stopped manually by pressing the dial, or disconnecting the pack.
* In the “auto” current setting, T2 will automatically set the appropriate charge current based on the condition of the battery. It is NOT
recommended to use the “auto” function if charging smaller electric flight type NiCd / NiMH batteries (smaller than “AA” cells).

1.To discharge a NiCd battery, press BATT TYPE to find the “NiCd
CHARGE” screen, then rotate the dial to find the “NiCd DISCHARGE”
screen, and skip to step 3.
2.To discharge a NiMH battery, press BATT TYPE to find the “NiMH
CHARGE” screen, then rotate the dial to find the “NiMH
DISCHARGE” screen.
3. Discharge current and cutoff voltage can be adjusted in the
discharge screens.Press the dial, then rotate to adjust the discharge
current value as desired (0.1 – 3.0 amps). See the included NiCd
AND NiMH CHARGE AND DISCHARGE CURRENTS chart for
recommended discharge current settings. Note: Rotating the dial
fully to either direction will cause “auto” to show. See the “Notes”
section below for details on this auto function.
4. Press the dial to cause the discharge cutoff voltage to flash.This
will be the voltage of the entire pack (not per cell) when discharge
will end.Rotate the dial to find the desired value, then re-press the
dial to confirm. See the DISCHARGE CUTOFF SETTINGS –
NiCd & NiMH chart at right for recommended cutoff voltage
settings. To measure how much TIME a battery can realistically,
safely power a transmitter or receiver, it’s recommended to use
the “1.1V per cell” settings. Otherwise, to measure a battery’s
ability to hold its manufacturer’s rated capacity, or to measure how
much time a battery can realistically power an electric motor, use
the “0.9V per cell” settings. Note: Rotating the dial fully to either
direction will cause “auto” to show.
See the “Notes” section below for
details on this auto function.
5.To START DISCHARGE, press and
hold the dial for 2 seconds.“BATTERY
CHECK”will show briefly asT2 checks
the condition of the battery. Discharge
will start automatically if the battery is
in suitable condition, at which time
you’ll see a screen like shown at right.
6.When discharge is finished, the screen will show “END” and tones will sound for 10 seconds.The battery can now be re-
charged, or disconnected from Triton2.To see details about input, output, or average discharge voltages, press BATTTYPE
and MENU CHANGE buttons simultaneously to see the DATA VIEW screens (see page 12).
DISCHARGING NiCd OR NiMH BATTERIES
7
1
2
3
4
5
6
7
8
9
10
11
12
13
14
15
16
17
18
19
20
21
22
23
24
1.2V
2.4V
3.6V
4.8V
6.0V
7.2V
8.4V
9.6V
10.8V
12.0V
13.2V
14.4V
15.6V
16.8V
18.0V
19.2V
20.4V
21.6V
22.8V
24.0V
25.2V
26.4V
27.6V
28.8V
-
-
-
4.4V
5.5V
-
-
8.8V
-
-
-
-
-
-
-
-
-
-
-
-
-
-
-
-
0.9V
1.8V
2.7V
3.6V
4.5V
5.4V
6.3V
7.2V
8.1V
9.0V
9.9V
10.8V
11.7V
12.6V
13.5V
14.4V
15.3V
16.2V
17.1V
18.0V
18.9V
19.8V
20.7V
21.6V
# cells
in the
pack
Rated
pack
voltage
Normal Cutoff
Voltage
(0.9V per cell)
Cutoff Voltage
Tx and Rx batts
(1.1V per cell)
DISCHARGE CUTOFF SETTINGS - NiCd & NiMH
Notes about discharging NiCd and NiMH batteries:
• Some transmitters might contain a diode in their charge circuit which could prevent the Tx battery from being discharged through the radio’s charge jack,
causing a “No battery” error to show. It’s best to remove the battery from the Tx and connect it directly to Triton2 for discharging (see page 4 for a list of
adapters).
• For more accurate discharge readings, it’s better to use a current which can discharge the pack in 1 or 2 hours.
• The maximum discharge current is 3 amps. For packs having more than 6 volts, the actual amount of discharge current might automatically be limited so
to not exceed the charger’s maximum rated discharge
power
of 20 watts. See the included MAXIMUM POWER CHART for details.
• For batteries which are used in high current applications such as driving electric motors (not for Tx or Rx batteries), it’s best to discharge down to 0.9V
per cell in the pack as shown in the DISCHARGE CUTOFF SETTINGS – NiCd & NiMH table. When discharged at high current, a battery’s voltage will
drop more rapidly and this 0.9V discharge cutoff will allow Triton2 to more realistically simulate how long the battery will last during real use. Do NOT
attempt to discharge cells to voltages lower than recommended.
• For transmitter and receiver batteries, it’s best to discharge down to 1.1V per cell in the pack as shown in the DISCHARGE CUTOFF SETTINGS – NiCd & NiMH
table.This will allow Triton2 to more accurately measure how many minutes a battery might SAFELY power a transmitter or receiver during actual use.
• After discharge, compare the final capacity measurement displayed to the capacity rating listed on the battery’s label. If a battery provides less than 70%
of its rated capacity it may need to be replaced. Additional cycles can be attempted to try and revive the battery, but if capacity measurements fail to
improve the battery should be replaced.
• Discharge can be stopped manually by pressing MENU CHANGE, or disconnecting the pack.
• In the “auto” current setting, T2 will automatically set the appropriate discharge current based on the condition of the battery. It is NOT recommended to
use the “auto” function if charging smaller electric flight type NiCd / NiMH batteries (smaller than “AA” cells).
• There are two main reasons why someone would want to discharge a battery. First, to see if the battery is holding its rated capacity (see the CYCLING
NiCd AND NIMH BATTERIES section). Or, to see how much capacity remains in the battery after a flying session. This can help you gauge how much
energy your flight system is requiring from your battery.
• In the “auto” voltage setting T2 will automatically detect the number of cells in the battery, and then discharge the battery to 0.9V per cell in the pack.
Discharge current may vary when in auto mode, which is normal.
Output
Voltage
NiCd dsch 00760
8.14V 0.5A 091m
Discharge
Current
Battery
Type
DSCH =
discharging
Discharge capacity: This is how much energy (capacity, in
"mAh") the battery delivered during discharge. When
discharge ends, this number could be low if the battery
previously had little charge. For a battery which
previously had been fully charged, this number should
ideally be within 10% of the battery's own mAh rating.
Elapsed discharge time: This is the number of minutes the
battery has been on discharge. When discharge is
finished, if the battery previously had little charge, this
number should be low. For batteries which previously had
been fully charged this number should be larger.

Battery “cycling”is the process of fully charging and then discharging a battery to a pre-determined cutoff point (or vice-versa).
Cycling is recommended only for NiCd and NiMH batteries (never for lithium or lead-acid batteries). Triton2 can perform
anywhere from one to ten cycles consecutively, as follows:
1. Decide if you want the battery to be discharged first (preferred if the battery is used often), or charged first (sometimes preferred if
the battery is new or has not been used for some time). Refer to the main menu flowchart and proceed.
2. To cycle a NiCd battery, press BATT TYPE to find the “NiCd CHARGE” screen. Rotate the dial to find either the “NiCd CHG TO
DSCH” or “NiCd DSCH TO CHG” screen (depending if you want to charge or discharge first) and skip to step 4.
3.To cycle a NiMH battery, press BATT TYPE to find the “NiMH CHARGE” screen. Rotate the dial to find the “NiMH CHG TO
DSCH” or “NiMH DSCH TO CHG” screen (depending if you want to charge or discharge first).
4. Two current values will show – one for
charge (Chg), and one for discharge
(Dsch). Press the dial to cause the first
current value to flash. It’s very important
to note whether this is the charge (Chg)
or discharge (Dsch) current! Rotate the
dial to find the current you want. Press,
then rotate the dial to select the other
current value, and press the dial again to
confirm both settings. See the NiCd AND
NiMH CHARGE AND DISCHARGE
CURRENT CHART for recommended
charge and discharge currents.
5. To set the number of times the battery will be
cycled, press the dial until “1X” starts to flash.
Rotate the dial to adjust the cycle count as desired
(“1X” to cycle one time, “10X” to cycle ten times,
etc.). Press the dial to confirm the cycle count.
6. To START CYCLING, press and hold the dial for 2
seconds. “BATTERY CHECK” will show briefly, and
cycling will start if the battery is in suitable condition, at
which time you’ll see a screen like shown at right.
7. When all cycling is finished, “END” will show on-
screen. To see details about input, output, peak
charge, average discharge voltages, and capacity
values for all cycles performed, press BATT TYPE
and MENU CHANGE buttons simultaneously to
see the DATA VIEW screens (see page 12).
WARNING!! NEVER ATTEMPT TO CARE FOR LITHIUM-POLYMER (LiPo) OR LITHIUM-ION (Li-Ion) CELLS IN THE
SAME WAY AS OTHER BATTERY TYPES! LiPo and Li-Ion cells are much more sensitive and volatile than NiCd, NiMH or
lead-acid batteries. Misuse and overcharge can quickly result in LiPo/Ion cells getting hot and/or swelling, which could lead to
VIOLENT EXPLOSION AND/OR FIRE and serious personal injury and property damage. Do not mistake LiPo cells for other
lithium-based cell types (such as lithium-metal), as different lithium hybrids have different care and handling characteristics as
well. All “lithium” based batteries types are NOT exactly the same.
• NEVER leave lithium batteries unattended during charge.
• NEVER place lithium batteries on combustible surfaces during charge, such as wooden or plastic workbenches, paper,
carpet, cluttered areas, etc.
• NEVER attempt to use the NiCd, NiMH, or Pb functions with lithium batteries.
• NEVER continue to charge or use LiPo/Ion cells if they start to swell, become overly warm to the touch, or if they do not charge
within the specified charging time.Failure to follow this guideline could cause the battery to become hot, and explode or ignite!!
• NEVER discharge Li-Ion cells lower than 2.5V per cell.
• LiPo/Ion cells have an 8% self discharge rate, meaning they can hold charge very well. Thus, there is no need to trickle
charge LiPo/Ion cells. No cycling of lithium batteries is needed.
• LiPo/Ion cells should be charged about once per year at a minimum to prevent over-discharge.
• LiPo/Ion batteries should be stored with about 30%-50% of capacity.
• If LiPo/Ion cells leak fluid, rinse the affected area well with water and seek immediate medical care.
IMPORTANT CARE & HANDLING INSTRUCTIONS FOR LITHIUM-POLYMER BATTERIES
CYCLING NiCd OR NiMH BATTERIES
8
Notes for cycling NiCd and NiMH batteries:
• Periodic cycling of NiCd batteries (once every month or two) can be beneficial in keeping them in
good operating condition. Excessive cycling (more than once monthly) will unnecessarily shorten
the lifespan of the battery.
• A short time delay can be set to occur in-between the charge/discharge functions to allow the battery to
cool.This delay period can be adjusted from 1-60 minutes in the Setup Menu (see page 12).
• During cycle mode, the discharge cutoff voltage for NiCd and NiMH batteries is FIXED (not
adjustable) at 0.9V per cell.
• See the notes sections for NiCd/NiMH charge and NiCd/NiMH discharge for detailed information
regarding charges and discharges.
• Cell manufacturers note three main benefits of cycling NiCd and NiMH batteries:
1. Battery maintenance: NiCd batteries benefit the most from regular cycling to help keep them
in good operating condition, and is recommended once monthly. NiMH batteries do not
require as much cycling.
2. Determining battery condition: NiCd and NiMH batteries are rated by how much charge
energy or “capacity” they can store compared to their rated capacity. A battery that can
supply only a small fraction of its rated capacity is likely reaching the end of its useful life and
may need to be replaced.
3. Breaking-in batteries: new NiCd and NiMH batteries may need to be broken-in before they
will perform to their specifications. Older batteries which have been unused for an extended
length of time may require to be broken-in again to regain their usefulness. Repeated cycling
is the best way to revive such batteries.
CHARGE PORTION OF CYCLE
Charge
Capacity
Minutes
on charge
Charge
indication
Output
Voltage
Cycle
Number
Charge
Current
C>D 01 02712mAh
9.63V 1.0A 163min
DISCHARGE PORTION OF CYCLE
Discharge
Current
Output
Voltage
Discharge
Capacity
Minutes
on dsch
D>C 01 02712mAh
9.63V 1.0A 163min
Discharge
indication
Cycle
Number

Triton2 can handle lithium-polymer (LiPo) and lithium-ion (Li-Ion) battery types. While similar in many ways, there are some
slight differences in these two battery types. Setting Triton2 for the proper lithium type is necessary for safety, and will result
in better performance for your packs.
1.The default setting is for Triton2 to handle LiPo batteries (based on 3.7V per cell, with a maximum charge voltage of 4.2V
per cell). If you will be using LiPo batteries only, skip the remainder of this section.
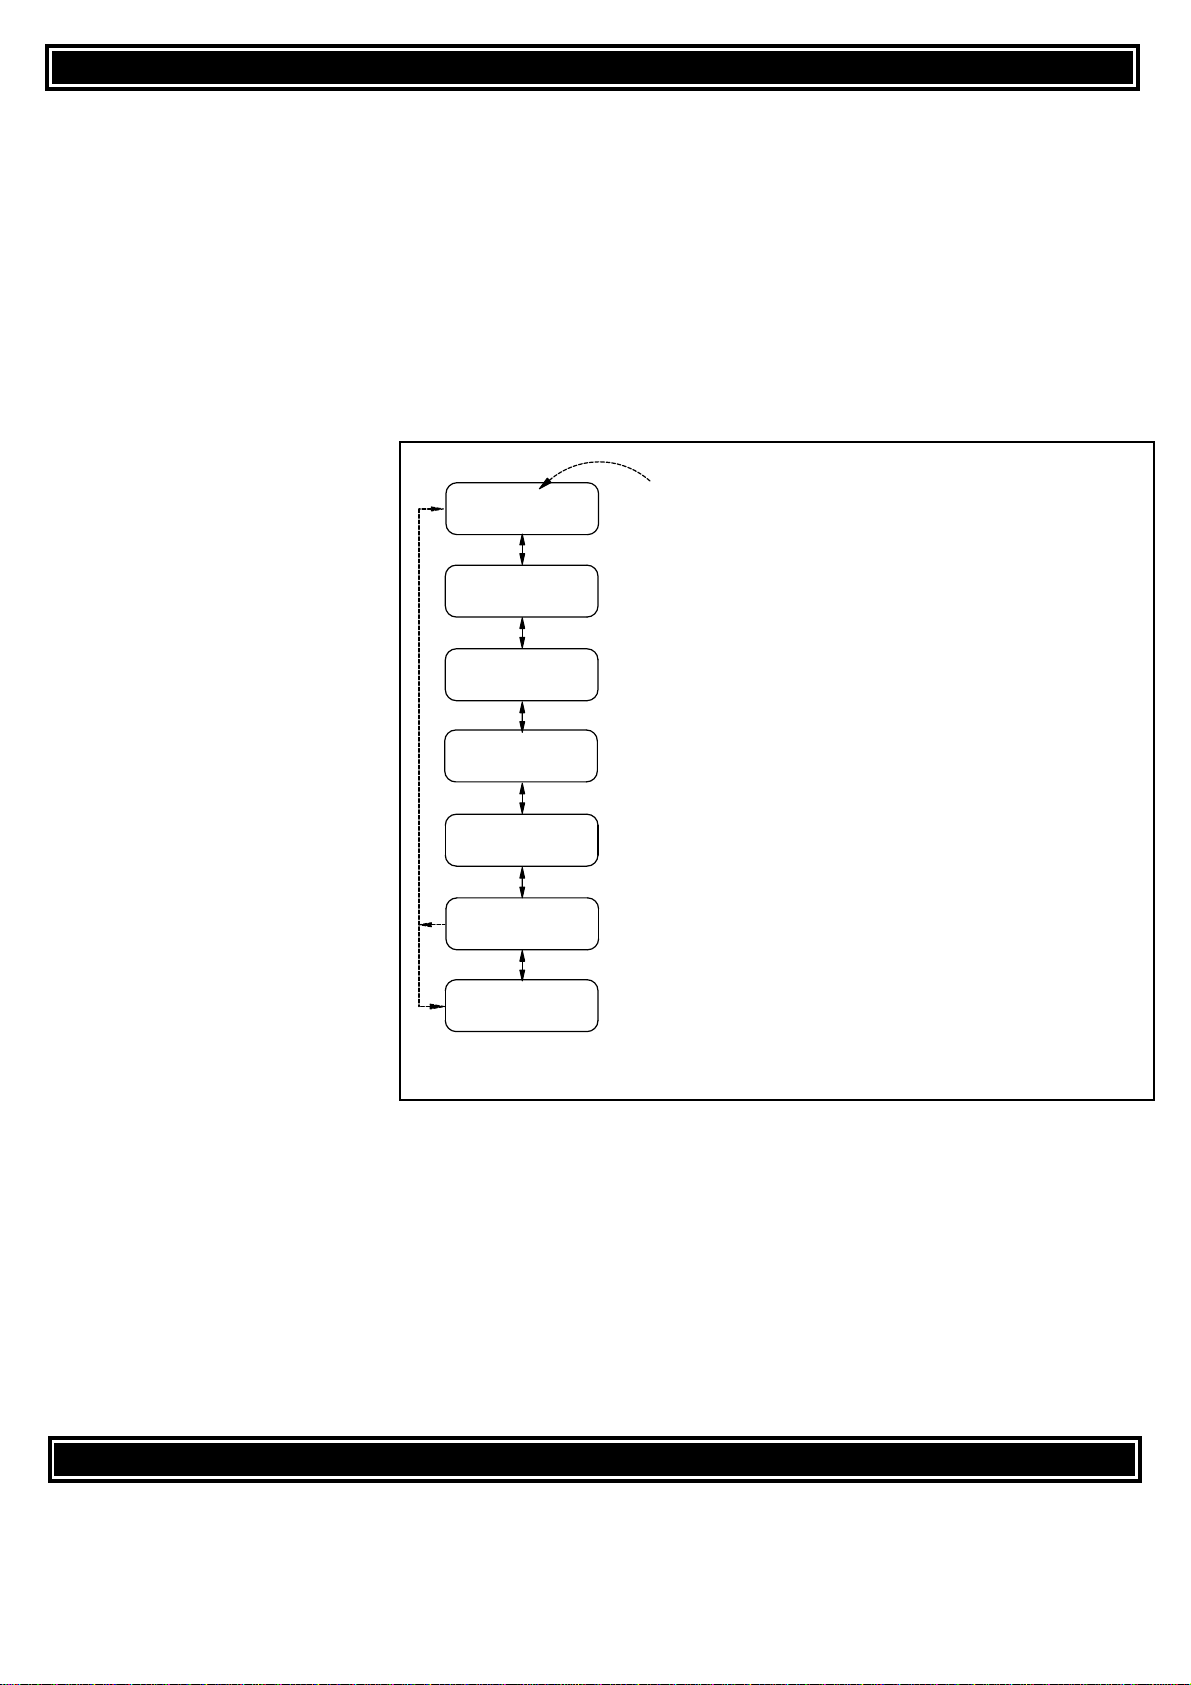
2.To change T2 to handle Li-Ion batteries, press BATT TYPE to find the “LiPo CHARGE” screen as shown on the main menu
flowchart. Rotate the dial to find the “Lithium type” screen.
3. Press, then rotate the dial to find the “Li-Ion” option.
4.Press the dial to confirm the new selection. All screens and settings relating to lithium batteries will now be set for lithium-ion cells
(based on 3.6V per cell, and a maximum charge voltage of 4.10V per cell). Rotate the dial to find the “Li-Ion CHARGE” screen.
LiPo packs are commonly available in two different assembly/wiring configurations: wired for balancing, and for non-balancing.
It is very important to know exactly which types of packs you have before proceeding. Consult your battery supplier if you
are unsure if your battery is or is not wired for balancing, and whether it has a built-in safety circuit.
NON-BALANCED packs are wired so that all cells are charged at the same time, regardless of the condition of individual cells.
These types of packs have a charge lead with two wires that are connected to the first and last cell in the pack. Sometimes
these packs might have a built-in charge safety circuit, as do many ElectriFly brand packs (with SafeCharge™), which prevents
cells in the pack from being overcharged. But this is NOT the same thing as “balancing”.
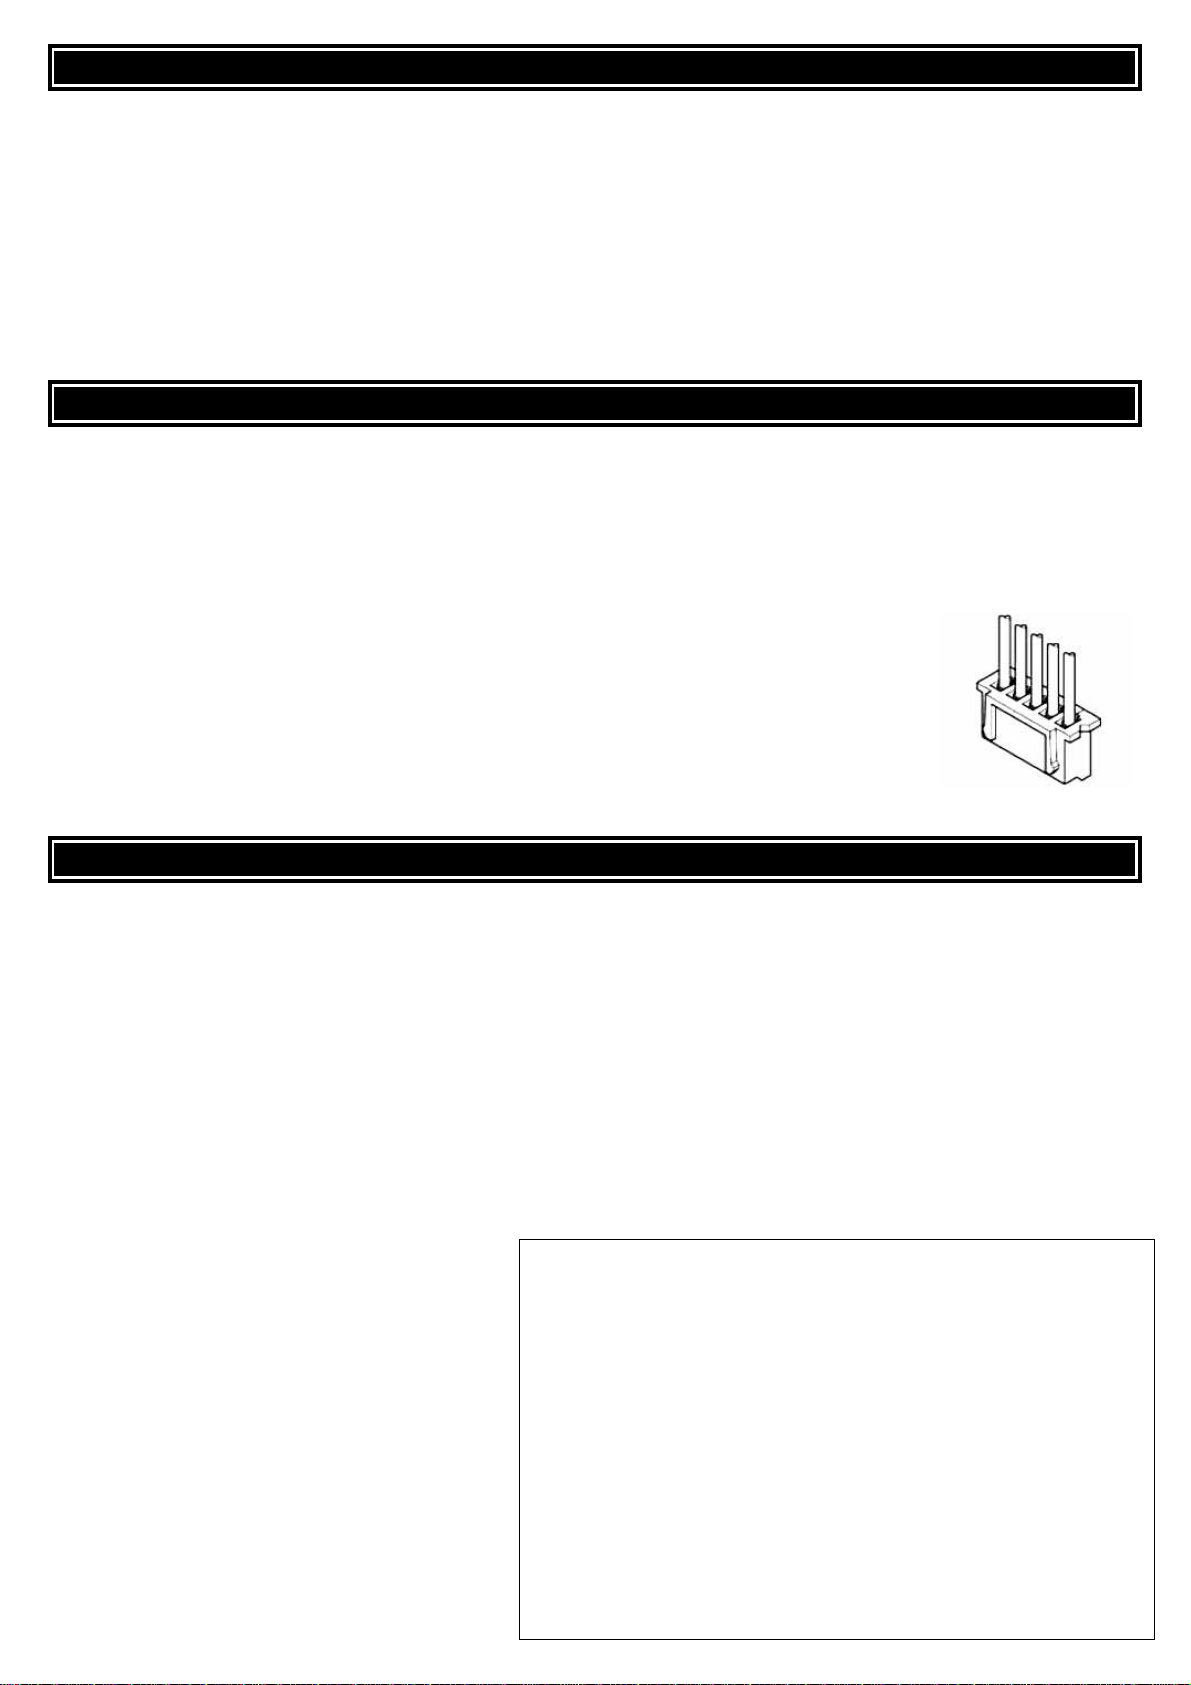
Packs wired for BALANCING normally have a unique connector which has more than two wires
going to the cells inside. Each wire is connected to individual cells inside the pack, by which a
charger or discharger can monitor the voltage of every cell individually and control whether each
cell should be charged or discharged. All ElectriFly brand packs which are wired for balancing
have a plug like shown at right. Packs wired for balancing MUST be charged with a LiPo charger
that is capable of balancing, or by using a LiPo charger with a LiPo cell balancer such as the
Equinox™LiPo Cell Balancer (GPMM3160) from ElectriFly.
WARNING! Always follow the instructions below when charging LiPo/Ion batteries! LiPo/Ion batteries should NEVER get warm
anytime during charge! Disconnect batteries IMMEDIATELY if they become excessively warm or hot at any time, and refer to the
Troubleshooting Guide in the rear of this manual for details. LiPo/Ion cells are much more dangerous than NiCd or NiMH batteries,
and pose a significant FIRE HAZARD which can result in causing bodily harm and/or permanent damage to the cells and the
surrounding environment.It is STRONGLY RECOMMENDED to useT2’s temperature cutoff function when charging lithium batteries!
When used with the optionalThermal Probe (GPMM3151), this feature adds a high level of safety to the entire charging process.Refer
to the “Temperature Cut-Off” section in the Setup Menu for details on how to use this feature.
1. Press BATT TYPE to find the “LiPo CHARGE” screen (or “Li-Ion CHARGE” screen if you selected that lithium type).
2.Two values MUST be properly set in this charge screen. One value is the battery’s rated
capacity
(default is “350mAh”).
Press, then rotate the dial to find the capacity value that most closely matches the capacity rating marked on your battery.
You will not set the actual charge current value for lithium batteries.Instead, Triton2 will automatically set the charge current
level based on this capacity setting (see notes section below for details).
3. Press the dial to cause the voltage value to flash.
This is the nominal rated voltage for the entire
pack. Rotate the dial to set this voltage to the
EXACT nominal voltage rating shown on your
pack. Press the dial to confirm both settings.
WARNING!! LiPo and Li-Ion batteries are very
sensitive and volatile!! NEVER enter a capacity or
voltage number that is higher than the value specified
for your battery! Failure to follow this warning can
cause permanent damage to your battery, charger
and surroundings in the form of FIRE!
4.To START CHARGE, press the dial for 2
seconds. “BATTERY CHECK” will show briefly,
and Triton2 will start charging if the battery is in
suitable condition.
CHARGING LiPo OR Li-Ion BATTERIES
LiPo CONFIGURATIONS-BALANCED VS. NON-BALANCED
SELECTING LiPo OR Li-ION BATTERY TYPE
9
Balancing connector
Notes about charging LiPo and Li-Ion batteries:
•Triton2 automatically sets the charge current based on the battery’s 1C rating. Therefore, it is very
important to enter the battery’s exact rated capacity (in mAh) in the programming. For example, if a
capacity of 600mAh is enteredTriton2 will set the charge current at 0.6A (600mA). For a capacity setting
of 2500mAh, the charge current will be set to 2.5A (2500mA). If you do not change the factory default
battery capacity value, Triton2 will charge the battery as if it’s rated at 350mA (0.35A).
• LiPo and Li-Ion batteries are charged using the “constant current / constant voltage” process
(cc/cv). Constant current is delivered during the first part of fast charge. As the battery reaches a
pre-set voltage (4.0V for Li-Ion, 4.1V for LiPo),Triton2 shuts off constant current and starts to apply
a constant voltage. As the battery’s voltage equalizes to the output voltage of the charger, the
charge current will drop to approx. 1/10 of the charge current setting, at which time all charging
will stop automatically as the battery is fully charged.
• During charge, it’s possible that current to the battery might NOT reach the full value as set in the
programming.This is because Triton2 constantly monitors the condition of the battery and makes
sure not to deliver more current than the battery can handle at any given time. This is normal.
• LiPo/Ion batteries do not need trickle charge, and therefore no such function exists.
• For LiPo/Ion batteries rated at 11.1V or greater, the actual amount of current delivered to the
battery might be limited due to the charger’s 90 watt max. power rating. This is normal, due to
various possible circumstances such as the condition of the battery, limitations of the input power
source, charge connector, etc.
• For safety reasons, fast charge of LiPo/Ion batteries will automatically stop if the actual amount of
capacity delivered to the battery reaches 110% of the capacity setting entered in point 2.
• Charge can be stopped manually by pressing MENU CHANGE or disconnecting the pack.

5.When finished charging, the screen will show “END” and tones will sound for 10 seconds.The battery should now be ready
for use. Triton2 will display details about the charge data for your battery, including charge capacity, elapsed charge time,
etc.To see details about input, output, maximum battery voltage and temperature, press BATT TYPE and MENU CHANGE
buttons simultaneously to see the DATA VIEW screens (see page 12).
1. At the “LiPo CHARGE” screen (or “Li-Ion CHARGE” screen if you selected that lithium type), rotate the dial to find the “LiPo
DISCHARGE” screen (or “Li-Ion DISCHARGE screen).
2.Two values can be adjusted on this discharge screen. Press the dial to cause the discharge current value to flash. Rotate
the dial to change this value (0.1 – 3.0 amps).To determine if a LiPo or Li-Ion battery can deliver its rated capacity, set this
current to the C÷ 5 value. For example, for a battery rated at 2100mAh, set this current to (2100 ÷ 5) = 420mA, or “0.4A”.
3. Press the dial to cause the discharge cutoff voltage value to flash. This is the total pack voltage where Triton2 will stop
discharging, and is based on 3.0V per cell.The cutoff voltage should be set to 3.0V for a 1-cell battery, 6.0V for 2-cell packs,
9.0V for 3-cell packs, 12.0V for 4-cell packs, and 15.0V for 5-cell packs. Rotate the dial to adjust this value as needed, then
press the dial to confirm both settings.
4.To START DISCHARGE, press the dial for 2 seconds.“BATTERY CHECK” will show briefly, andTriton2 will start discharging
if the battery is in suitable condition.
5. When discharge is finished, the screen will show “END” and
tones will sound for 10 seconds. The battery can now be re-
charged, or disconnected fromTriton2.To see details about input,
output, and average discharge voltages and capacity, press BATT
TYPE and MENU CHANGE buttons simultaneously to see the
DATA VIEW screens (see page 12).
Never attempt to care for lead-acid (Pb) batteries in the same way as other battery types! Lead-acid batteries commonly used
in R/C hobby field boxes require unique care and handling methods as they contain different characteristics than other battery types.
• Do not attempt to use the NiCd, NiMH, or lithium functions on Pb batteries.
• Do not exceed 14.7V maximum charge voltage for batteries rated at 12V.
• Pb batteries have a self-discharge rate of 5-10%, meaning they hold charge very well. Thus, there is no need to trickle
charge Pb batteries. No cycling of Pb batteries is needed.
• Do not leave Pb batteries in the full discharge condition, which could cause the battery to lose its ability to regain full charge.
1. Press BATT TYPE to find the “Pb CHARGE” screen.
2.Two values can be adjusted on the Pb charge screen. Press the dial to cause the charge current value to flash. Rotate the
dial to change this value (0.1 – 7.0 amps). For 12V 7Ah (7000mAh) lead-acid field batteries, a slow charge current value of
C÷10 is recommended, which would be (7000 ÷ 10) = 700mA or “0.7A”. A faster charge current value of C÷3 can be used,
which would be (7000 ÷ 3) = 2333mA or “2.3A”.
3. Press the dial to cause the voltage value to flash. This is the nominal rated voltage of the entire battery. Set this voltage to
the voltage printed on your battery. Most hobby field batteries have a nominal rated voltage of 12.0V. Rotate the dial to find
the voltage value which matches that listed on your battery.
Press the dial to confirm both settings.
4. To START CHARGE, press the dial for 2 seconds.
“BATTERY CHECK” will show briefly, and Triton2 will start
charging if the battery is in suitable condition.
5.When finished charging, the screen will show “END”and tones
will sound for 10 seconds. The battery should now be ready for
use. To see details about input, output, and maximum battery
voltage, press BATT TYPE and MENU CHANGE buttons
simultaneously to see the DATA VIEW screens (see page 12).
CHARGING LEAD-ACID BATTERIES (Pb)
CARE & HANDLING INSTRUCTIONS FOR LEAD-ACID BATTERIES (Pb)
DISCHARGING LiPo OR Li-Ion BATTERIES
10
Notes about discharging LiPo and Li-Ion batteries:
• The maximum discharge current is 3 amps.For batteries having more than 6
volts, the actual amount of discharge current might automatically be limited so
to not exceed the charger’s maximum rated discharge
power
of 20 watts.See
the included MAXIMUM POWER CHART for details.
• Discharge can be stopped manually by pressing MENU CHANGE, or
disconnecting the pack.
Notes about charging Pb batteries:
• Lead-acid (Pb) batteries are charged using the “constant current / constant voltage”
process (cc/cv) as explained in the section for lithium batteries. However, the
charger will determine the battery is full when output current drops to approximately
90mA and will automatically stop charging at that time. The cutoff voltage for Pb
batteries is also different from lithium batteries.
• Lead-acid batteries do not need trickle charge, and therefore no such feature exists.
• Lead-acid batteries have a nominal voltage of 2.0V per cell.For most field batteries,
even though you cannot see any individual “cells”, there are 6 cells internally. At
2.0V per cell, this makes a total field battery voltage of 12V.
• For lead-acid batteries rated at 12V or greater, the actual amount of current
delivered to the battery might be limited due to the charger’s 90 watt max. charge
power rating. This is normal, due to various possible circumstances such as the
condition of the battery, limitations of the input power source, charge
connector/connection, etc.

1. At the “Pb CHARGE” screen, rotate the dial to find the “Pb DISCHARGE” screen.
2.Two values can be adjusted on this discharge screen. Press the dial to cause the discharge current value to flash, then rotate the
dial to change this value (0.1 – 3.0 amps). To determine if the battery can deliver its rated capacity, set this value to the battery’s
capacity (in mAh) divided by 20.So, for a 7Ah battery, set this current to (7000mAh ÷ 20) = 350mA or “0.4A”.
3.Press the dial to cause the voltage value to flash.This is the battery’s minimum discharge cutoff voltage, based on 1.8V per
cell.Since most hobby batteries have a nominal voltage of 12.0V (6 cells), the proper discharge cutoff voltage would be (1.8V
x 6) 10.8V. Rotate the dial to adjust this value if necessary. Refer to the “notes” section below for a list of discharge cutoff
voltages for lead-acid batteries of other voltages. Press the dial to confirm both settings.
4.To START DISCHARGE, press the dial for 2 seconds.“BATTERY CHECK” will show briefly, andTriton2 will start discharging
if the battery is in suitable condition.
5.When discharge is finished, the screen will show“END” and
tones will sound for 10 seconds. The battery can now be re-
charged, or disconnected from Triton2. To see details about
input, output, and average discharge voltages, press BATT
TYPE and MENU CHANGE buttons simultaneously to see
the DATA VIEW screens (see page 12).
Several customizable features which support the charge, discharge, and cycle functions are found in the Setup Menu, such as safety
timers, time delays, thermal probe temperature settings, peak detection sensitivity, and others. IT IS NOT NECESSARYTO CHANGE
ANYTHING INTHE SETUP MENU. All factory default settings in the Setup Menu allow Triton2 to be safe to operate without making
any adjustments. If you do not wish to customize features in the Setup Menu, skip to the next section.
Refer to the Setup Menu flowchart included. Note that this menu is divided into four sections, for NiCd, NiMH, LiPo (or Li-Ion) and Pb
batteries.Press the MENU CHANGE button to find the “Buzzer” screen, which is the first screen at the top of the Setup Menu.Rotate
the dial to move up/down through all screens.To adjust any function, press the dial, rotate to the desired setting, and press the dial to
confirm the selection.
1. BUZZER:Tones can sound to indicate functions have started or ended.Ten different melodies can be selected, from “Melody 1” to
“Melody 10”.“Buzzer Off” will turn the tones off.
2. SAFETY TIMER: IF for some reason the charger does not
recognize a battery has reached full charge, a backup safety
timer is built-in to automatically stop charge after a certain time.
This protects a battery from reaching a dangerous overcharge
condition.Set a safety time in minutes, which ranges from “No
time limit”to“990 minutes”.See the “SafetyTimer Calculations”
section at right for how to calculate a safety time limit. The
“Time limit over” error message will show if this timer activates
during charge. Do NOT assume the battery has reached full
charge if this occurs – especially if the battery is not even
slightly warm to the touch. If the battery is not reaching full
charge, in the future it may be necessary to increase the safety
timer minutes so the battery can reach full charge.
3. TEMPERATURE SCALE: When using the optional Thermal
Probe, temperatures can be measured and displayed in degrees
Fahrenheit (°F) or Celsius (°C).To change the setting, press the
dial, rotate, then press the dial again to confirm the setting.
4.TEMPERATURE CUT-OFF:This optional safety feature is highly recommended when using LiPo/Ion batteries and requires the
use of an optionalThermal Probe (GPMM3151).Set the maximum temperature the battery should be allowed to reach during charge
or discharge.The temperature range is 50-150o F (10-65o C). No battery should ever get HOT during charge. A maximum setting of
100oF (37oC) is recommended for LiPo/Ion batteries.Connect the probe to the charger (see page 4) and the battery. Start charge or
discharge. If the battery reaches the set temperature, charge or discharge will automatically stop and the “Batt.T too high” error will
show.Discharge will automatically resume when battery temperature reduces to a safe level.Do not connect a temperature sensor to
the charger if temperature monitoring will not be used.
SETUP MENU
DISCHARGING LEAD-ACID BATTERIES (Pb)
11
Notes about discharging Pb batteries:
• The maximum discharge current is 3 amps. Maximum power dissipation
during discharge is 20 watts which might cause discharge currents to
automatically be limited for packs having a voltage of over 6 volts. This
is normal.
•The proper discharge cutoff voltage for batteries with a nominal rated
voltage of 6V is 5.4V, and 24V batteries should be discharged to 21.6V.
Safety Timer Calculations
For NiCd and NiMH batteries, divide the battery’s rated capacity (mAh) by the fast charge
current setting (A). Take that result, and DIVIDE BY 11.1. Set this number of minutes in
the safety timer screen.If the charger stops charge at this time limit, approximately 150%
of the battery’s rated capacity will have been delivered to the battery. For example:
NiCd battery’s Fast charge Safety timer
rated capacity current setting calculated setting
1500mAh 2.5A (1500divided by2.5)= 600, divided by 11.1 =54 minutes
3800mAh 2.3A (3800dividedby2.3)=1652,divided by11.1=149minutes
1000mAh 0.9A (1000dividedby0.9)=1111,divided by11.1=100minutes
For LiPo, Li-Ion, and Pb batteries, divide the battery’s rated capacity (mAh) by the fast
charge current setting (A). Take that result, and DIVIDE BY 15.1. Set this number of
minutes in the safety timer screen. If the charger stops charge at this time limit,
approximately 110% of the battery’s rated capacity will have been delivered to the battery.
For example:
LiPo battery’s Fast charge Safety timer
rated capacity current setting calculated setting
2100mAh 1.8A (2100dividedby 1.8)=1166.67,dividedby15.1=77minutes
900mAh 0.6A (900 divided by 0.6) = 1500, divided by 15.1 = 99 minutes
3200mAh 3.0A (3200dividedby 3.0)=1066.67,dividedby15.1=70minutes

The following features apply to NiCd and NiMH batteries only:
5. PEAK DELAY AT START: At the beginning of charge the voltage of NiCd and NiMH batteries can be somewhat unstable.
This could cause the peak detection circuitry to accidentally stop charge far too early, which would cause the battery to NOT
become fully charged. This peak delay function will temporarily turn off the peak detection circuit only during the very early
stages of charge to prevent this from happening.Select the number of minutes to temporarily shut off the peak detector at the
beginning of charge. A 3 to 5 minute delay is usually enough. Setting a delay time of 0 minutes turns this function off.
Note: Charge current will likely be lower than the setting during this time, which is normal.
6. DELAY BETWEEN CHARGE/DISCHARGE: This is a time delay designed to allow a battery to cool between charge and
discharge portions of a cycle. Select from 1 to 60 minutes. If the battery becomes too warm during a cycle, increase the
number of minutes on this screen to a higher value.
7. PEAK SENSITIVITY: When peak charging NiCd/MH batteries, Triton2 should see the battery’s voltage increase to a
maximum level – or “peak”.Then, the battery’s voltage should actually drop very slightly.When the charger sees this, it should
stop charge completely.You can customize how closely Triton2 will try to detect this peak, which is called “peak sensitivity”.
This value is set in milli-volts per cell in the pack. A higher mV number can result in less precise peak detections. A lower
mV number can result in more precise peak detections, but very low values (under 5mV) can sometimes result in erratic
operation (depending on the quality of the input power source, input and output connections, battery, etc.). Recommended
settings are 8-10mV for NiCd batteries, and 5-8mV for NiMH batteries.
The following features apply only to NiMH batteries:
8. NiMH MAX. CHARGE INPUT:This is another backup safety feature to protect NiMH packs.During charge, IF peak voltage
is not detected and the safety timer has not expired, this function will automatically stop charge when the amount of capacity
delivered to the battery matches the value set in this screen.Setting this number to 110% of the rated capacity of your battery
is recommended. For a 650mAh battery, 110% would be (650 x 1.1) 715mAh.The 110% value of a battery rated at 1800mAh
would be (1800 x 1.1) 1980mAh, etc. Setting a value of 9900mAh will effectively turn this feature off.
9.TOP-OFF CHARGE:When peak charge ends, delivering another short burst of charge will help to quickly maximize a NiMH
battery’s voltage before trickle charge starts.T2 will deliver the amount of current set in this screen for 20 minutes only before
trickle charge starts. Set this screen to somewhere near 7% of the current set in the “NiMH CHARGE” screen. For example:
if the “NiMH CHARGE” current is set at 3.5 amps, set this screen to (3.5A x 0.07 = 0.245A) 200mA or 300mA. If the “NiMH
CHARGE” current is set to 850mA, set this screen to (850mA x 0.07 = 59mA) 100mA, etc. It’s not critical to set this value with
extreme accuracy.This feature can be turned off by setting this screen to “None”.“Top-off” will show on the display during top-
off charge, and “END” will show when complete (now in trickle charge).
Triton2 keeps track of various type of data in the Data View Menu as shown below, which can be viewed at any time.
WHILE a charge, discharge, or cycle is occurring, press BATT TYPE to find the Data View screens. Press MENU CHANGE
to return to the Main Menu.
BEFORE OR AFTER a charge,
discharge, or cycle, press BATT
TYPE and MENU CHANGE
simultaneously to find the DataView
screens. Press MENU CHANGE to
return to the Main Menu.
To view capacity data for more
than one cycle, rotate the dial to
find the “Chg / Dsch” screen. The
number on the top line is the
cycle number. To view data for
any cycle, press the dial, then
rotate to find the cycle number
you wish to view. On the bottom
line, capacity measurements in
mAh are shown on the left for the
charge portion of the cycle, and
on the right for the discharge
portion of the cycle.
Press MENU CHANGE anytime
to return to the Main Menu.
DATA VIEW SCREENS - CHARGE, DISCHARGE & CYCLE DATA
12
Data View Menu
PRESS DIAL
& ROTATE
ROTATE DIAL
Input Output
12.00V 11.50V
Peak Ave Dsch
24.35V 21.25V
Chg / Dsch (01)
12345 / 12345mAh
Chg / Dsch (02)
12345 / 12345mAh
Chg / Dsch (10)
12345 / 12345mAh
CYCLE
NUMBER
CHARGE
CAPACITY
DISCHARGE
CAPACITY
CHARGE CAPACITY: The amount of capacity (mAh) delivered to the battery during any one
charge period (or charge portion of a cycle) is shown at left.
DISCHARGE CAPACITY: The amount of capacity (mAh) drained from the battery during any
one discharge period (or discharge portion of a cycle) is shown at right.
CYCLE NUMBER: While in the "Chg / Dsch" screen, press, then rotate the dial to find the
cycle number you wish to view data for.
PEAK: The highest or "PEAK" battery voltage measured during charge is shown at left.
AVE DSCH: The average voltage of the battery as recorded and calculated over the course
of one discharge, shown at right.
BATTERY CONDITION: Keeping track of these voltages over time can help to evaluate a
battery's overall condition as it ages. A battery's peak and average voltage levels will
gradually decrease as it reaches the end of its usefulness.
INPUT: The voltage measured at the charger's input, shown on the left.
OUTPUT: The voltage measured at the charger's output, shown at right.
Bat. Temperature
+10°F
BAT. TEMPERATURE: shows the present temperature of the battery. "No Sensor" shows
when thermal probe is disconnected.
* Press MENU CHANGE to
return to the Main Menu.

A built-in cooling fan helps to keep the charger cool during operation.This will help extend the service life of the charger, and
allow it to function more accurately and efficiently. The fan does NOT function at all times. The fan functions (1) during
discharge, (2) during charge, if the temperature inside the charger exceeds 122°F, if the charge output power exceeds 30
watts, or the charge current exceeds 2.5A, or if charging batteries which have 1-3 cells, (3) if the internal temperature of the
charger exceeds 212°F it will stop all charge or discharge functions until the temperature drops below 158°F – but the fan
should continue to run until the temperature drops below 113°F.CAUTION: Do not block the vent holes for the cooling fan.
Failure to do so could cause the charger to overheat and possibly cause permanent damage.
Triton2 uses solid-state circuitry to protect against potential damage which could be caused by short-circuit or reverse polarity
conditions. If power is connected backwards to Triton2’s input, the screen might turn black and no other operation will occur, but the
charger will be protected from damage.Re-check all input connections to make sure it is connected properly.The following warning /
error messages are designed to show on-screen to protect the charger and battery from damage due to improper connection, input
voltage, etc. These messages will be accompanied by loud tones on the buzzer. When any message appears, refer to the
corresponding problem and solution explanation. Press MENU CHANGE to clear the warning.
PROBLEM:Display does not work or turns black when connected to power.Check power supply for proper power.Check input
connections for proper contact, making sure it’s not connected backwards.
PROBLEM:Charger doesn’t recognize battery. Make sure battery is not connected backwards. Check for faulty connection or
wiring. Perhaps there is a defective cell in the pack, in which case the pack should be replaced.
PROBLEM: Does not automatically stop charge after a reasonable amount of time. Charge current too low. Safety timer not
short enough. Internal problem might exist. Disconnect battery IMMEDIATELY and contact Hobby Services.
PROBLEM: Battery voltage low after charge is completed. Make sure charge current setting isn’t too low. Battery might be
defective and require replacement.Check to see if the backup safety timer expired before full charge was reached.For lithium
batteries, make sure the battery capacity value entered in the programming matches the rated capacity of the battery.
PROBLEM:Will not lock into discharge mode. An improper discharge voltage was entered for the battery. Adjust the battery
voltage in the discharge screen to match the number of cells in the pack. Tx might have a diode in charge circuit, in which
case it’s best to connect the battery to the charger directly (outside of the Tx). Battery might be defective and require
replacement. Battery might already be discharged.
PROBLEM:Low mAh readings after discharge.Batteries might not have been fully charged prior to discharge.Batteries might
have been old or unused for an extended period of time, which may require additional cycles to see if capacity improves.
Battery might be defective and require replacement. Discharge current setting might be too high, and should be lowered. An
improper discharge voltage was entered for the battery. Adjust the battery voltage to the proper value for the battery. Battery
might already be discharged.
PROBLEM: LCD and/ or controls do not function properly. Input power might be connected backwards, and require re-
connection. Contact Hobby Services for further details.
TROUBLESHOOTING GUIDE
ERROR INDICATIONS & SAFETY FEATURES
COOLING FAN
13
ERROR PROBLEM AND SOLUTION
Input voltage..When input voltage is under 11.0V or
over 15V.
No battery........When a battery is not detected at the
charger’s output.
Open circuit.....When a battery becomes disconnected while
a function is in progress.
Overheating.....All functions will pause when the temperature
inside the charger exceeds 212°F (100°C).
Functions will automatically resume after the
charger has cooled to 158°F (70°C).
Time limit.........When the time in the charge “Safety timer”
screen has expired.
ERROR PROBLEM AND SOLUTION
Batt.V too high.........When the battery’s voltage setting in the
charger is too low. It may take up to 5
minutes for this error to show.
Batt.V too low...........When the battery’s voltage setting in the
charger is too high. It may take up to 5
minutes for this error to show.
Batt.T too high.......When the temperature of the battery
exceeds the setting in the “Temp. cut-
off” screen.
Reverse polarity ....When a battery is connected to the
output in reverse.
Communication .......When an internal error occurs with the
charger’s calibration logic.

Great Planes warrants this product to be free from defects in materials and workmanship for a period of one (1) year from the
date of purchase. During that period, Great Planes will, at its option, repair or replace without service charge any product
deemed defective due to those causes.You will be required to provide proof of purchase (invoice or receipt). This warranty
does not cover damage caused by abuse, misuse, alteration or accident. If there is damage stemming from these causes
within the stated warranty period, Great Planes will, at its option, repair or replace it for a service charge not greater than 50%
of its then current retail list price. Be sure to include your daytime telephone number in case we need to contact you about
your repair. This warranty gives you specific rights.You may also have other rights, which vary from state to state.
1-YEAR LIMITED WARRANTY - *U.S.A. & CANADA ONLY
14
For service on your Great Planes product, warranty or non-
warranty, send it post-paid and insured to:
HOBBY SERVICES
3002 N. Apollo Drive, Suite #1
Champaign, Illinois 61822
*For warranty and service information if purchased outside the
USA or Canada, see the additional warranty information insert
(if applicable) or ask your retailer for more information.
www.greatplanes.com
www.ElectriFly.com

15
MAXIMUM CHARGE POWER = 90 Watts
At 12V input, current set to 7A, charge
current automatically limited as follows:
Voltage (V) Current (A) Watt (W)
1.00-12.00 7.00 90
13.00 6.92 90
14.00 6.43 90
15.00 6.00 90
16.00 5.63 90
17.00 5.29 90
18.00 5.00 90
19.00 4.74 90
20.00 4.50 90
21.00 4.29 90
22.00 4.09 90
23.00 3.91 90
24.00 3.75 90
25.00 3.60 90
26.00 3.46 90
27.00 3.33 90
28.00 3.21 90
29.00 3.10 90
30.00 3.00 90
31.00 2.90 90
32.00 2.81 90
33.00 2.73 90
34.00 2.65 90
35.00 2.57 90
36.00 2.50 90
37.00 2.43 90
38.00 2.37 90
39.00 2.31 90
40.00 2.25 90
MAXIMUM DISCHARGE POWER = 20 Watts
At 12V input, current set to 3A, discharge
current automatically limited as follows:
Voltage (V) Current (A) Watt (W)
1.00-6.00 3.00 20
7.00 2.86 20
8.00 2.50 20
9.00 2.22 20
10.00 2.00 20
11.00 1.82 20
12.00 1.67 20
13.00 1.54 20
14.00 1.43 20
15.00 1.33 20
16.00 1.25 20
17.00 1.18 20
18.00 1.11 20
19.00 1.05 20
20.00 1.00 20
21.00 0.95 20
22.00 0.91 20
23.00 0.87 20
24.00 0.83 20
25.00 0.80 20
26.00 0.77 20
27.00 0.74 20
28.00 0.71 20
29.00 0.69 20
30.00 0.67 20
31.00 0.65 20
32.00 0.63 20
33.00 0.61 20
34.00-40.00 <0.60 20
MAXIMUM POWER CHART
The Triton 2 may not deliver full charge current on batteries which are greater than 12.0V or LiPo,
Li-Ion or Pb batteries during the constant-voltage portion of charge mode.This normal.

16
ENTIRE CONTENTS © Copyright 2006 Made in Korea GPMZ0004 for GPMM3153
Table of contents
Other GREAT PLANES Batteries Charger manuals