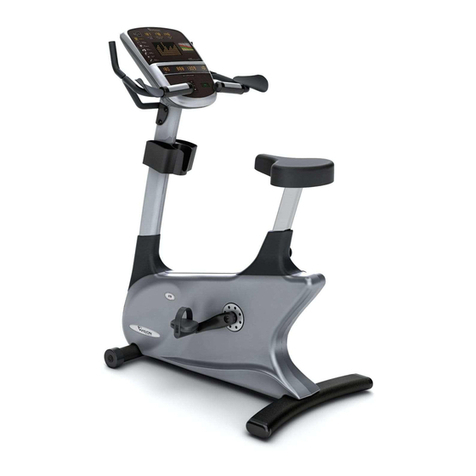
GREEN SERIES FITNESS 6000 Upright User manual

Owner's Manual
GERERATOR
COMMERCIAL BIKE

1
TABLE OF CONTENTS
SAFETY INSTRUCTIONS ------------------------------------------------------------------------ 2-3
TECHNICAL SPECIFICATIONS ---------------------------------------------------------------- 4
UNPACKING & ASSEMBLY --------------------------------------------------------------------- 5-12
WARM UP & COOL DOWN ---------------------------------------------------------------------- 13
OPERATION------------------------------------------------------------------------------------------ 14
PANEL CONTROL --------------------------------------------------------------------------------- 15-16
PROGRAM ------------------------------------------------------------------------------------------- 17-21
PREVENTATIVE MAINTENANCE-------------------------------------------------------------- 22-23

2
SAFETY PRECAUTIONS
Dear Customer,
Thank you for your purchasing our products. This product has been designed and
manufactured for studio use, even though we go to great efforts to ensure the quality of each
product, occasional error, and/or omissions do occur. In any event should you find this
product to be defective or missing parts please contact us.
IMPORTANT: Read all instructions and warnings before assembly and operation.
‧Only one person at a time should use this equipment. If dizziness, nausea, chest pains, or any
other abnormal symptoms are experienced while using this bike trainer, stop the workout at
once.
‧Always use this exerciser on a clear and level surface. Do not use outdoors or near water.
‧Don't insert any object into any openings.
‧Before using this equipment to exercise, always do stretching exercises to properly warm up.
‧Advice to replace defective components immediately and keep the equipment out of use
until repair.
‧This product is designed for adults. Please ensure that children only use it under the supervision of an
adult.
‧Consult your physician before starting a workout or training program. Have your doctor
review your training and diet programs to advise you of a workout routine you should
adopt.
‧Make sure that all bolts and nuts are tightened when equipment is in use. Periodic
maintenance is required on all exercise equipment to keep it in good condition.
‧Warning: incorrect/ excessive training can cause health injuries. Stop using the home exerciser
when feeling uncomfortable.
‧Turn off the power after using.
‧If the power cord is damaged, it must be replaced by the manufacturer or its service
agent or a similarly qualified person in order to avoid a hazard.
‧Operation and maintenance: Always remove the adaptor when you do not use the
equipment to prevent the reach of the children. Do not use the adaptor if it is wear or
damage found on the jacket of the wire.

3
SAFETY PRECAUTIONS
CONSULT A PHYSICIAN IMMEDIATELY
Warning: before starting any exercise program consult your physician. This is especially important for
individuals over the age of 35 or persons with preexisting health problems. Read all instructions before
using any fitness equipment. We assume no responsibility for personal injury damage sustained by or
through the use of this product.
How often you exercise:
You should exercise three to four times a week to improve your cardiovascular and muscle
fitness.
How hard you exercise:
Intensity of exercise is reflected in your heart rate. Exercise must be sufficiently rigorous to
strengthen your heart muscle and condition your cardiovascular system.
Only your doctor can prescribe the target training heart range for you. Before starting any
exercise program consult your physician.
How long you exercise:
Sustained exercise conditions your heart, lungs and muscles. The longer you are able to
sustain exercise within your target heart range, the greater the aerobic benefits. To begin
maintain 2~3 minutes of steady, rhythmic exercise, then check your heart rate.
Care and Maintenance
‧The commercial exerciser should not be used or stored in a moist area because of possible
corrosion.
‧Check at least every 4 weeks that all connecting elements are tightly fitted and in good condition.
‧In case of repair please ask your dealer for advice.
‧Replace defective components immediately and/or keep the equipment out of use until repair.
‧Only use original spare parts for repair.
‧Use a damp cloth to clean the commercial exerciser and avoid the use of aggressive detergents
when
cleaning the bike.
‧After exercising, immediately wipe of the sweat; perspiration can ruin the appearance and proper
function of the commercial exerciser.
‧A warning notice to the effect that the safety level of the equipment can be maintained only if it is
Examined regularly for damage and wear ,e.g. ropes, pulleys, connection points.
‧Special attention to components most susceptible to wear.
‧Always check before use and maintain regularly to make sure the safety of the equipment.
‧Be careful and check the easily wearing components like the bearing of he pedals to prevent
dangers.MAX.
‧MAX. user weight: 135 kg (297 Ibs )

4
TECHNICAL SPECIFICATIONS
SPECIFICATIONS:
Length: 102 cm
Width: 69cm
Weight of product: 40 kgs (88 Ibs)
Program:6 preset programs , Fitness Test ,HRC*4
Standard features: 8*16dot matrix HR receive
Resistance System:PMS(Perment Magnet System)
Power source:Built-in generator & rechargeable battery 12V-1.2AH

5
UNPACKING & ASSEMBLY
Parts
#3-10
#3-12
#3-1
#3-3
Main frame / 1pc
Console upright Tube / 1pc
Handlebar X 1pc
Console set X 1pc
Front stabilizer X
1pc
Rear stabilizer X 1pc
Pedal set X 1set
#2-1
#4-9
#4-1
6
#4-1
#4-2
#4-7
#4-8
#4-6
#4-12
#4-18
#4-5
#4-13
Rear stabilizer cover X
1set
Upright tube cover, right
/ left x1 set
Arms cover x1 set

6
UNPACKING & ASSEMBLY
Hardware kit
X 6
(Arms cover& Rear
stabilizer)
M4*12mm
X 1
Allen wrench
(6mm)
X 1
Allen wrench
(5mm)
M15/M15
M4*20mm
X 2
(Arms cover)
#4-14
#4-17
X 1
M8*20mm
X 1
(handlebar)
#4-3
M8*65mm
X 2
(handlebar)
#4-10
M8 curve
X 2
(handlebar)
#4-11

7
UNPACKING & ASSEMBLY
Unpacking your bike where will be using it. Being careful not to damage. Place your bike on a level flat
surface. It is recommended that you place a protective covering on your floor.
Step1: assembly Front、Rear Stabilizer with main frame.
1).Using 4pcs M4*12mm screw,fixing rear stabilizer with rear stabilizer cover.
2).Using 2pcs M8*20mm screw and Washer,fixing front stabilizer with main frame.
3).Using 2pcs M8*20mm screw and washer,fixing rear stabilizer with main frame.
X1
X1
X 1set
M8*20mm
X 4
#4-1
#4-2
#4-18
#4-3
X 4
X 4
M4*12mm
#4-4
#4-17
M8

8
UNPACKING & ASSEMBLY
Step2: Assembly upright tube cover, right / left with handle bar post
1).Using wrench, fixing pedal set with crank set.
X1 set
#4-7
#4-8

9
UNPACKING & ASSEMBLY
Step3: Assembly console mast with main frame
1).put handle bar post into main frame,connected upper console wire and lower console wire.
2).Using 4pcs of M8*20mm screw 、washer and S washer,fixing handle bar post and main
frame.
3).Put left and right upright tube cover into main frame.
#2-1

10
UNPACKING & ASSEMBLY
Step4: Assembly handle bar set with console mast
1).Put handle bar into handle bar post,Using 1pc of M8*20mm and 2pcs of M8*65mm screw,
fixing handle bar with handle bar post.
#4-9
X1
X1se
t
M8*20mm
#4-6
#4-5
#4-3
#4-19
#4-4
M8
M8
X 4
X 4
X 4

11
UNPACKING & ASSEMBLY
Step5: Assembly arms cover with handle bar.
1).Using 2pcs of M4*12mm and M4*20mm screw,fixing the arms under cover on the handle bar
2).Fixing the armrest cover on the handle bar.
X 1
M8*20mm
X 1
X 2
M8*65mm
X 2
M8 curve
#4-3
#4-10
#4-11

12
UNPACKING & ASSEMBLY
Step6: Assembly console with handle bar post
1).Put the console into handle bar post,connected upper console wire with lower console
wire.
2).Using 4pcs of M5*15mm screw,tighten all screws.
X 2
M4*12mm
X 1
X 1
X 2
M4*20mm
#4-12
#4-13
#4-14
#4-17

13
WARM UP & COOL DOWN
A successful exercise program consists of a warm up, aerobic exercise, and a cool down.
Warming up is an important part of your workout, and should begin every session. It prepares
X 4
M5*15mm
X 1
Upper handle pulse wire
Upper console wire
Lower console wire
Lower handle pulse wire
#4-16
#4-15

14
your body for more strenuous exercise by heating up and stretching out your muscles. At the
end of your workout, repeat these exercises to reduce sore muscle problems. We suggest the
following warm-up and cool-down exercises:
HEAD ROLLS
Rotate your head to the right for one count, feeling the stretch up the left
side of your neck. Next rotate your head back for one count, stretching
your chin to the ceiling and letting your mouth open. Rotate your head to
the left for one count, and finally, drop your head to your chest for one
count.
Repeat this action for several times.
SHOULDER LIFTS
Lift your right shoulder up
toward your ear for one count.
Then lift your left shoulder up
for one count as you lower
your right shoulder.
Repeat this action for several times.
SIDE STRETCHES
Open your arms to the side and
continue lifting them until they
are over your head. Reach your
right arm as far upward toward
the ceiling as you can for one
count. Feel the stretch up your
right side. Repeat this action with
your left arm.
INNER THIGH STRETCH
Sit with the soles of your feet together with your knees pointing outward. Pull your
feet as close into your groin as possible. Gently push your knees toward the floor.
Hold for 15 seconds.
Repeat this action 3-5 times.
HAMSTRING STRETCHES
Keep your right leg straight and the left foot on the floor; try to stretch your right
hand toward the toe, hold this posture for 15 seconds.
Relax, then repeat the action for left leg.
OPERATION
QUADRICEPS STRETCH
With one hand against a wall for
balance, reach behind you and
pull your right foot up. Bring your
heel as close to your buttocks as
possible. Hold for 15 seconds and
repeat with left foot up.
CALF/ACHILLES STRETCH
Step your right foot in front of your
body. Lean against a wall with
your arms and stretch your left foot
backward your body. Bend
forwards your right foot, and
slightly push your buttock toward
to the wall for 15 seconds.
Repeat the action with front left
foot and rear right foot for another
15 seconds.

15
A. After assembly, the rear stabilizer can be adjusted to accommodate slightly uneven ground. Turn
the adjustment knobs on the ends of the rear foot caps to level the rear stabilizer to the floor.
B. The transportation wheels on the front foot caps allow for easy manoeuvring. Simply pull back on
the handle bars until the wheels touch the floor. Then roll the unit to a desired location.
Draw
C. The seat pillar can be adjusted to personal preference. Loosen the seat pillar fixing tube.
Retighten the fixing tube.
PANEL CONTROL

16
Display & Keys
Dot-matrix, display program profiles & message
Message window
PANEL CONTROL

17
Display function
Dispaly
Defination
Time
Displays time remaining or total time.
Calories
Displays calories burned.
Heart Rate
Displays hand grip and wireless Heart Rate reading.
Distance
Displays total distance KM/Mi.
RPM
Displays pedaling RPM.
Watts
Displays consuming watt.
Mets
Displays the multiple of rest.
Level
Displays current resistance level L1~L16
※Calories & Heart Rate for reference only.
Key function
Key
Function
Start
Quick start or program start.
▲
Adjust workload up.Adjust value when program setting.
Select program
▼
Adjust workload down.Adjust value when program setting.
Select program
Display
RPM←→Watt Calories←→Distance
Time←→Mets Level←→Heart Rate
Enter
Confirm value entered.
Rest
Reset back to idle mode while pause
Progarm
Select program directly
Keypad
Set value
PROGRAM

18
PROGRAMS DESCRIPTION
1. QUICK START
1.1 To pedal over 30 rpm to wake up and initial the system to idle mode, press『START』to quick
start.
1.2 Press shift UP or DOWN to exercise level by 1 level or press quick Level Key to change level.
1.3 Stop pedaling will pause the system, stop pedaling over 30 seconds system will auto shut down.
2. Target
2.1.Press『Target』key to enter the program.
2.1.1. Set time:use shift up or down device to set time then press『ENTER』to next settings.
2.1.2. Set weight: use shift up or down device to set weight then press『ENTER』to next settings.
2.1.3. Set age: use shift up or down device to set age then press『ENTER』to next settings.
2.1.4. Set distance: use shift up or down device to set distance then press『ENTER』to next
settings.
2.1.5. Set calories: use shift up or down device to set calories then press『START』to begin
workout.
2.2.Beginning the workout:
2.2.1. If either, Time, Distance and Calories are set the program will count down. Once the
preset value reaches 0 the program will end. If no goal is set the program will not end
unless manually stopped.
3. Preset program:
3.1.There are 5 preset programs, ROLLING, VALLEY, FAT BURN, INTERVAL, RANDOM. Press
their own program key to enter the program.
3.1.1. Set time:use shift up or down device to set time then press『ENTER』to next settings.
3.1.2. Set weight: use shift up or down device to set weight then press『ENTER』to next settings.
3.1.3. Set age: use shift up or down device to set age then press『ENTER』to next settings.
3.1.4. Set workout level: use shift up or down device to set level 1~5(For RANDOM program will
change the profile randomly. Press 『START』to begin workout.
3.2.Beginning the workout:
3.2.1. The resistance level will change automatically according to the program settings, the
resistance level will change every 2 minutes per segment if the time is in count up mode,
if time is entered during setup then the segment time=set time / 16. You can use any
speed or incline key to change speed or incline during your workout.
3.2.2. The program will end when the counter reaches 0.
3.2.3. Preset program profiles:
P1=ROLLING、P2=VALLEY、P3=FAT BURN、P4=INTERVAL、P5= RANDOM

19
P
SEG
1
2
3
4
5
6
7
8
9
10
11
12
13
14
15
16
P1
LEVEL 1
4
6
8
8
6
4
4
6
8
8
6
4
4
6
8
6
LEVEL 2
5
6
8
9
9
8
6
6
7
9
8
7
6
6
7
8
LEVEL 3
7
8
9
10
10
8
8
6
8
10
10
9
8
6
8
10
LEVEL4
9
10
11
13
10
8
11
13
10
9
8
10
11
13
10
9
LEVEL5
11
13
15
15
13
11
11
13
15
15
13
11
11
13
15
12
P2
LEVEL 1
8
8
6
6
4
4
2
2
2
2
4
4
6
6
8
8
LEVEL 2
9
6
5
4
3
2
2
4
6
6
7
10
10
11
11
12
LEVEL 3
11
10
10
8
7
6
5
4
3
3
5
5
7
10
10
13
LEVEL4
13
12
12
10
9
8
6
6
6
7
8
9
10
12
12
14
LEVEL5
15
15
12
12
10
10
8
8
8
8
10
10
12
12
15
15
P3
LEVEL 1
2
2
4
4
6
6
8
8
8
8
6
6
4
4
2
2
LEVEL 2
3
5
5
7
8
9
10
10
11
12
10
10
7
6
3
3
LEVEL 3
5
6
7
7
9
10
10
12
12
12
10
10
8
8
5
5
LEVEL4
6
6
8
8
11
11
13
14
14
12
10
10
9
8
6
6
LEVEL5
8
8
10
10
12
12
15
15
15
15
12
12
10
10
8
8
P4
LEVEL 1
2
4
8
4
2
2
4
8
4
2
2
4
8
4
2
2
LEVEL 2
3
5
8
6
1
1
5
7
6
3
3
3
6
6
4
3
LEVEL 3
5
7
9
9
6
5
4
4
4
6
7
8
10
8
6
6
LEVEL4
7
8
10
10
12
12
10
10
8
8
10
12
12
10
8
8
LEVEL5
8
10
15
10
8
8
10
15
10
8
8
10
15
10
8
8
PROGRAM
Other manuals for 6000 Upright
1
Table of contents
Other GREEN SERIES FITNESS Exercise Bike manuals

GREEN SERIES FITNESS
GREEN SERIES FITNESS CIR-RB7000E-G1 User manual

GREEN SERIES FITNESS
GREEN SERIES FITNESS CIR-RB6000-G1 User manual

GREEN SERIES FITNESS
GREEN SERIES FITNESS CIR-RB7000-G1 User manual

GREEN SERIES FITNESS
GREEN SERIES FITNESS CIR-UB7000-G1 User manual

GREEN SERIES FITNESS
GREEN SERIES FITNESS CIR-RB7000-G User manual