GreenWorks PWG401 User manual

PWG401
EN OPERATOR MANUALPOWER CLEANER
ES MANUAL DEL OPERADOR
FR MANUEL DE L’UTILISATEUR
www.greenworkstools.com
XXXX
XXXX

1 Description......................................... 2
1.1 Purpose.............................................................. 2
1.2 Product overview...............................................2
1.3 Packing list........................................................ 2
2 General power tool safety
warnings............................................. 2
3 Risk levels...........................................2
4 Recycle................................................3
5 Installation......................................... 3
5.1 Unpack the machine.......................................... 3
5.2 Install the spray wand........................................ 3
5.3 Install the nozzle................................................3
5.4 Install the battery pack.......................................4
5.5 Remove the battery pack................................... 4
5.6 Use the self-siphon hose.................................... 4
5.7 Use the garden hose...........................................4
6 Operation........................................... 5
6.1 Use the power cleaner........................................5
6.2 Adjust the spray nozzle......................................6
6.3 5-in-1 Nozzle..................................................... 6
6.4 Install the soap applicator.................................. 6
7 Maintenance ......................................7
8 Store the machine..............................7
9 Troubleshooting................................. 7
10 Technical data....................................8
11 Limited warranty.............................. 8
12 Exploded view....................................9
1
English EN

1 DESCRIPTION
1.1 PURPOSE
The machine is used to used to clean vehicles, boats,
buildings, porches, decks, bicycles, and outdoor furniture.
For residential use only, not for professional use, and for
operation at temperature above 32°F (0°C).
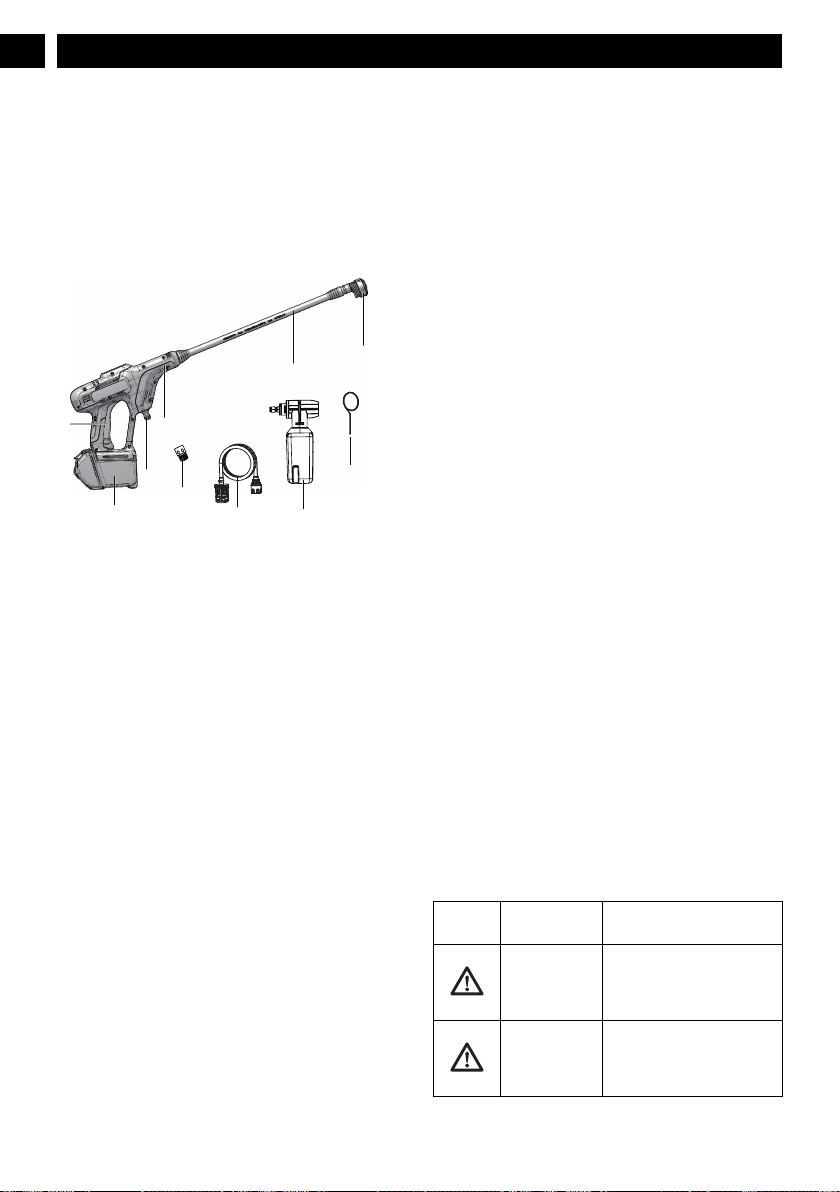
1.2 PRODUCT OVERVIEW
1
2
3
4
5
6
89
7
10
15-in-1 spray nozzle
2Spray wand
3Front handle
4Water inlet
5Battery compartment
6Trigger
7Garden hose adaptor
8Self-siphon hose
9Soap applicator
10 Spray tip cleaning
tool
1.3 PACKING LIST
• Main machine
• Detergent tank
• 5-in-1 spray nozzle
• Water inlet connector
• Gun wand
• Self-siphon hose
• Spray tip cleaning tool
• Operator manual
2 GENERAL POWER TOOL
SAFETY WARNINGS
• Read all the instructions before using the product.
• To reduce the risk of injury, close supervision is
necessary when a product is used near children.
• Know how to stop the product and bleed pressure quickly.
Be thoroughly familiar with the controls.
• Stay alert – watch what you are doing.
• Do not operate the product when fatigued or under the
influence of alcohol or drugs.
• Keep operating area clear of all persons.
• Do not overreach or stand on unstable support. Keep
good footing and balance at all times.
• Follow the maintenance instructions specified in the
manual.
• Risk of Injection or Injury– DO NOT DIRECT
DISCHARGE STREAM AT PERSONS.
• Read all safety warnings and instructions. Failure to
follow the warnings and instructions may result in electric
shock, fire and/or serious injury.
• Prevent unintentional starting. Ensure the switch is in the
off-position before connecting to battery pack, picking up
or carrying the appliance. Carrying the appliance with
your finger on the switch or energizing appliance that
have the switch on invites accidents.
• Disconnect the battery pack from the appliance before
making any adjustments, changing accessories, or storing
appliance. Such preventive safety measures reduce the
risk of starting the appliance accidentally.
• When battery pack is not in use, keep it away from other
metal objects, like paper clips, coins, keys, nails, screws
or other small metal objects, that can make a connection
from one terminal to another. Shorting the battery
terminals together may cause burns or a fire.
• Do not use a battery pack or appliance that is damaged or
modified. Damaged or modified batteries may exhibit
unpredictable behavior resulting in fire, explosion or risk
of injury.
• Do not expose a battery pack or appliance to fire or
excessive temperature. Exposure to fire or temperature
above 265°F may cause explosion.
• Follow all charging instructions and do not charge the
battery pack or appliance outside of the temperature range
specified in the instructions. Charging improperly or at
temperatures outside of the specified range may damage
the battery and increase the risk of fire.
• Have servicing performed by a qualified repair person
using only identical replacement parts .This will ensure
that the safety of the product is maintained.
• Do not modify or attempt to repair the appliance or the
battery pack (as applicable) except as indicated in the
instructions for use and care.
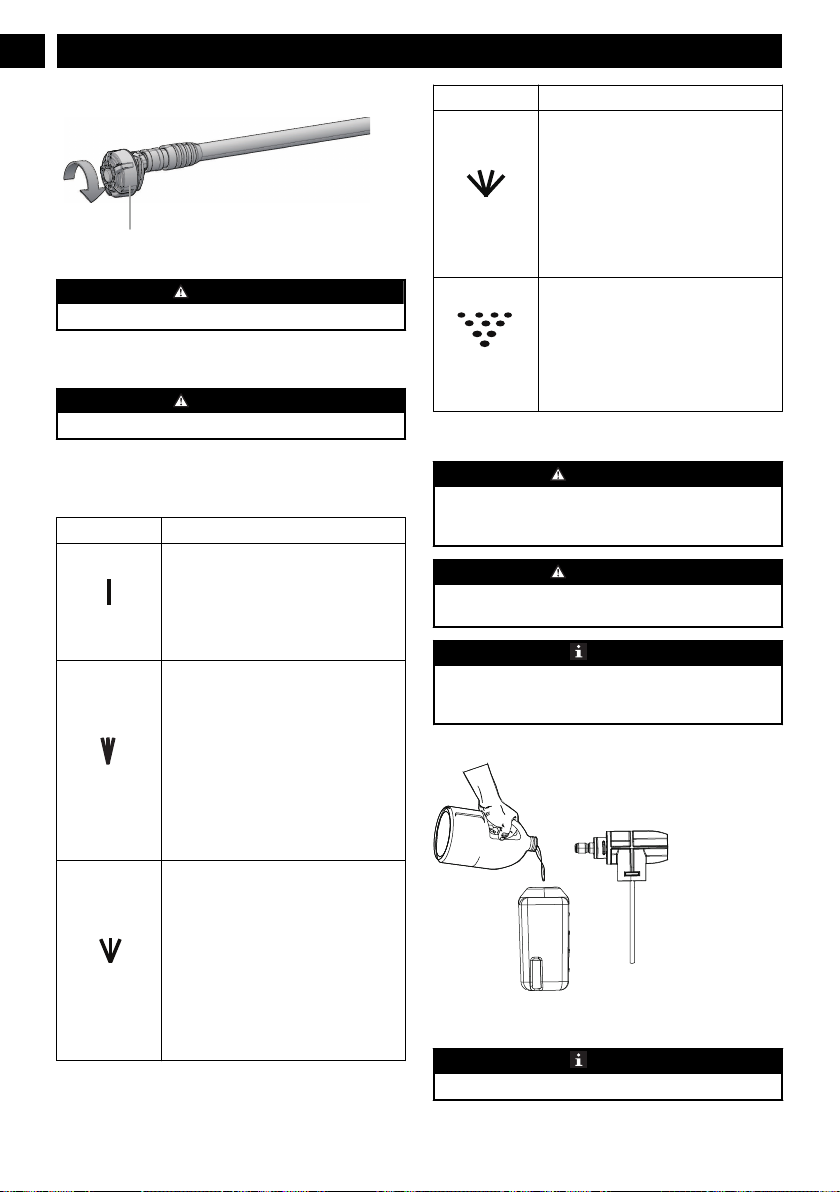
3 RISK LEVELS
The following signal words and meanings are intended to
explain the levels of risk associated with this product.
SYM-
BOL
SIGNAL MEANING
DANGER Indicates an imminently haz-
ardous situation, which, if not
avoided, will result in death
or serious injury.
WARNING Indicates a potentially hazard-
ous situation, which, if not
avoided, could result in death
or serious injury.
2
English
EN

SYM-
BOL
SIGNAL MEANING
CAUTION Indicates a potentially hazard-
ous situation, which, if not
avoided, may result in minor
or moderate injury.
CAUTION (Without Safety Alert Sym-
bol) Indicates a situation that
may result in property dam-
age.
4 RECYCLE
Separate collection. You must not discard
with usual household waste. If it is necessa-
ry to replace the machine, or if it is no more
use to you, do not discard it with household
waste.
Separate collection of used machine and
packaging let you recycle materials and use
them again. Use of the recycled materials
helps prevent environmental pollution and
decreases the requirements for raw materi-
als.
At the end of their useful life, discard batter-
ies with a precaution for our environment.
The battery contains material that is danger-
ous to you and the environment. You must
remove and discard these materials separate-
ly at a location that accepts lithium-ion bat-
teries.
5 INSTALLATION
5.1 UNPACK THE MACHINE
WARNING
Make sure that you correctly assemble the machine before
use.
WARNING
• If parts of the machine are damaged, do not use the
machine.
• If you do not have all the parts, do not operate the
machine.
• If parts are damaged or missing, contact the service
center.
1. Open the package.
2. Read the documentation provided in the box.
3. Remove all the unassembled parts from the box.
4. Remove the machine from the box.
5. Discard the box and packing material in compliance with
local regulations.
5.2 INSTALL THE SPRAY WAND
2
Tab
3
1. Push the end of the spray wand (2) into the gun handle
(1).
2. Turn the spray wand (2) counter-clockwise until the tabs
lock into position.
5.3 INSTALL THE NOZZLE
①1
11
2
Click
③②
WARNING
Before you change the nozzle:
1. Pull the spray gun trigger to release water pressure.
2. Lock the trigger safety button on the gun.
3. Stop the mahcine.
WARNING
Do not point the spray wand (2) at your face or others'.
1. Pull back the quick-connect collar (7) on the spray wand
(2).
2. Install the nozzle (1) onto the spray wand (2).
3. Release the quick-connect collar to attach the nozzle (1).
3
English EN

5.4 INSTALL THE BATTERY PACK
12
1. Pull back on the hinge lock lever (12).
2. Unhook the hinge (12) from the battery door (13).
12
13
14
3. Open the battery door (13).
4. Align the lift ribs on the battery pack with the grooves in
the battery compartment.
5. Push the battery pack into the battery compartment until
the battery pack locks into place.
6. When you hear a click, the battery pack is installed.
7. Close the battery door (13) and lock the hinge (12).
5.5 REMOVE THE BATTERY PACK
1. Push and hold the battery release button (14) .
2. Remove the battery pack from the machine.
5.6 USE THE SELF-SIPHON HOSE
1. Add water to the bucket.
2. Insert one end of the self-siphon hose (8) into the water
inlet coupler (4).
4
8
3. Put the other end of the self-siphon hose into the bucket
(not included).
NOTE: The siphon kit can also be used in any fresh water
source: Swimming Pool, Pond, Lake, or River.
5.7 USE THE GARDEN HOSE
For easy operation, please use a self-coiling garden hose (not
provided).
4
English
EN

WARNING
When you operate the self-coiling hose, make sure that the
hose has no blockage.
WARNING
• The water supply must come from the water main
• Do not use hot water
• Do not use water from ponds or lakes
WARNING
Follow the local regulations when you connect the garden
hose to the water supply. Direct connection through a
receiver tank or backflow preventer is usually permitted.
CAUTION
Inspect the filter in the water inlet connector before you
connect the garden hose
• If the filter is damaged, do not use the machine until the
filter is replaced.
• If the filter is dirty, clean the filter.
NOTE
The garden hose adaptor is used to connect the garden hose
(not provided) to your machine.
1. Push the garden hose adaptor (7) onto the water inlet
coupler until it is tight.
7
2. Uncoil the garden hose.
3. Install and tighten the end of the garden hose to the water
inlet connector.
4. Turn the water supply off.
8
7
6 OPERATION
WARNING
Make sure that all the connections are tight and have no
leakage before operation.
6.1 USE THE POWER CLEANER
NOTE
For safe control, keep your hands on the power cleaner at
all times.
6
15
1. Push the lock-out button (15) into the slot, pull and hold
the trigger (6) to start the machine.
2. Release the trigger (6) to stop water flow through the
spray nozzle.
3. Push out the lock-out button to lock the trigger.
5
English EN

6.2 ADJUST THE SPRAY NOZZLE
1
WARNING
Before you adjust the spray nozzle:
• Pull the spray gun trigger to release water pressure.
• Stop the machine.
WARNING
Do not point the spray wand at your face or others’.
1. Rotate the spray nozzle to adjust the spray setting (1).
6.3 5-IN-1 NOZZLE
Mode APPLICATION
0
O
Stream mode (0° )
• The 0 degree mode provides a
straight line of spray. It provides the
highest amount of pressure. It is best
used for removing hard, stuck-on
grime or dirt.
15O
Narrow fan mode (15° )
• This mode provides high versatility
with 15 degree angle. It provides ade-
quate pressure to remove dirt from
surfaces, but is designed to not dam-
age many surfaces. This mode is de-
signed for “sweeping” foliage or deb-
ris given its wide angle. This mode is
versatile due to its wide area of
cleaning and strong pressure applica-
tion.
25O
Narrow fan mode (25° )
• This mode provides high versatility
with 25 degree angle. It provides ade-
quate pressure to remove dirt from
surfaces, but is designed to not dam-
age many surfaces. This mode is de-
signed for “sweeping” foliage or deb-
ris given its wide angle. This mode is
versatile due to its wide area of
cleaning and strong pressure applica-
tion.
Mode APPLICATION
40O
Wide fan mode (40° )
• The white 40 degree tip, referred to
as the “fan” tip creates the widest
area of cleaning with relatively low
pressure. This mode is best used for
light or delicate cleaning applica-
tions. It is recommended for light
cleaning on wood decks and other
soft or delicate surfaces.
SHOWER
Watering mode
• The mode is used for watering appli-
cation. Watering is applied under low
pressure high volume for optimum
performance. Watering cannot be ap-
plied under high pressure with this
machine.
6.4 INSTALL THE SOAP APPLICATOR
WARNING
Do not use household detergents, acids, alkalines, bleaches,
solvents, flammable material, or industrial grade solutions,
which can do damage to the pump.
WARNING
Do the instructions on the solution bottle to prepare
detergent.
NOTE
If it is necessary, use a funnel to prevent the spill of
detergent. Clean and dry the spilled detergent when you fill
it.
1. Pour the detergent into the soap applicator.
2. Install the soap applicator onto the gun wand.
3. Turn clockwise the gun to tighten.
NOTE
Do not let detergent dry on the surface to prevent streaks.
6
English
EN

①②③9
2
11
7 MAINTENANCE
WARNING
Before repairs and maintenance, please remove the battery
pack from the machine.
• Before each use, please check the machine and parts for
damage. If you find any damage to the machine or parts,
please stop using the machine and contact the supplier or
manufacturer to replace the parts.
• Remove the filter cover first. Then remove the dirt on the
filter, rinse the parts with clean water, and finally put the
cover back.
8 STORE THE MACHINE
• Please wipe the body with a soft brush or clean cloth. Do
not use water, solvents or polishing agents. Keep the
machine in a safe, dry place, out of reach of children. Do
not place other objects on the machine.
• When storing the machine and accessories, take care to
prevent frost.
9 TROUBLESHOOTING
PROBLEM POSSIBLE
CAUSE
SOLUTION
The machine is
started, self-pri-
ming valve or the
pressure is insuffi-
cient.
The machine is too
high from the wa-
ter source.
Reduce the ma-
chine to less than
5 feet from the
water source.
Water pipe filter is
blocked
Remove the water
pipe filter and
clean up debris
with water
Bad connection
between equip-
ment water pipe
and machine
Check and rein-
stall the water pipe
The water pipe
connection is
loose and the rub-
ber pad is missing
Tighten the water
pipe connection
with a wrench, and
contact the service
center to purchase
a rubber gasket
The pump, water
pipe or other ac-
cessories are fro-
zen
Use after thawing
The siphon hose is
kinked
Straighten the si-
phon hose
Multi-function
nozzle is leaking
The nozzle spray
mode does not ro-
tate in place
Make sure the
nozzle mode icon
and the indicator
line are aligned
The nozzle fixing
nail is loose
Tighten with a hex
wrench
The outlet pres-
sure suddenly in-
creased
The multi-function
nozzle is blocked
Update new noz-
zle
Water flows out
after the machine
is turned off
Water remains in
the pump after the
machine is shut
down
Drain the water
completely before
storing
The detergent tank
cannot spray deter-
gent
The detergent tank
is blocked
Wash with water
7
English EN

PROBLEM POSSIBLE
CAUSE
SOLUTION
The machine
doesn't work
The battery pack is
not installed prop-
erly
Reinstall the bat-
tery pack
The battery pack is
out of power
Replace with a
new battery pack
or charge the bat-
tery pack
The battery pack is
defective
Replace the bat-
tery pack
Machine pressure
is not continuous
The pump sucked
in air
Check whether the
water pipe inter-
face and water
pipe of the ma-
chine are well con-
nected
The machine is in
low pressure mode
Normal state, no
need to adjust
The machine stops
automatically
The battery pack is
out of power
Replace with a
new battery pack
or charge the bat-
tery pack
The multi-function
nozzle is blocked
and the current
protection is acti-
vated
Remove the noz-
zle and turn it on,
if the machine
works normally,
replace with a new
nozzle
10 TECHNICAL DATA
Rated Voltage 24V; Cordless, battery
powered
Max. Pounds Per Square Inch
Pressure
600 PSI
Max. Gallons Per Minute 0.8 GPM
Maximum Inlet Water Temper-
ature
104 °F (40 °C)
Cleaning Units 480 C.U.
Weight 4.32 lbs. (1.96 kg)
Battery Mode BAG701/BAG702/
BAG708/BAG709/
BAG710/BAG711/
BAG714/
BAG715/29842/2902702
and other BAG series
Charge Mode 29972/2903102/CAG801/
CAG817/CAG812 and oth-
er CAG series
Double-insulated construc-
tion.
11 LIMITED WARRANTY
YEAR
ANS
AÑOS
LIMITED WARRANTY
GARANTIE LIMITÉE
GARANTÍA
LIMITADA
3
Greenworks hereby warranties this product, to the original
purchaser with proof of purchase, for a period of three (3)
years against defects in materials, parts or workmanship.
Greenworks, at its own discretion, will repair or replace any
and all parts found to be defective, through normal use, free
of charge to the customer. This warranty is valid only for
units which have been used for personal use that have not
been purchased or rented for industrial/commercial use, and
that have been maintained in accordance with the instructions
in the owners’ manual supplied with the product when new.
ITEMS NOT COVERED BY WARRANTY:
1. Any part that has become inoperative due to misuse,
commercial use, abuse, neglect, accident, improper
maintenance, or alteration; or
2. The unit, if it has not been operated and/or maintained in
accordance with the owner's manual; or
3. Normal wear;
4. Routine maintenance items such as lubricants, blade
sharpening;
5. Normal deterioration of the exterior finish due to use or
exposure.
HELPLINE:
Warranty service is available by calling our toll-free helpline
at 1-888-909-6757.
TRANSPORTATION CHARGES:
Transportation charges for the movement of any power
equipment unit or attachment are the responsibility of the
purchaser. It is the purchaser’s responsibility to pay
transportation charges for any part submitted for replacement
under this warranty unless such return is requested in writing
by Greenworks.
USA address: Canadian address:
Greenworks Tools Greenworks Tools Canada, Inc.
P.O. Box 1238 P.O. Box 93095, Newmarket,
Ontario
8
English
EN

Mooresville, NC 28115 L3Y 8K3
12 EXPLODED VIEW
1
4
2
56
3
7
No. Part No. Description Qty.
1 xxxxx 5-in-1 spray nozzle 1
2 xxxxx Spray wand assy 1
3 xxxxx Water inlet connector assy 1
4 xxxxx Power Cleaner assy 1
5 xxxxx Self-siphon hose assy 1
6 xxxxx Detergent tank 1
7 xxxxx Spray tip cleaning tool 1
9
English EN
Table of contents
Other GreenWorks Ultrasonic Jewelry Cleaner manuals
Popular Ultrasonic Jewelry Cleaner manuals by other brands

Powerfix Profi
Powerfix Profi KH 710 operating instructions

Mi-T-M
Mi-T-M AW-7020-8002 Operation instructions

Apollo Seiko
Apollo Seiko BRC-2000 Operation manual

Sinbo
Sinbo SS 4034 instruction manual

Wilson Electronics
Wilson Electronics 9506-2200 Operating instructions & service manual

Coline
Coline 34-1313 manual