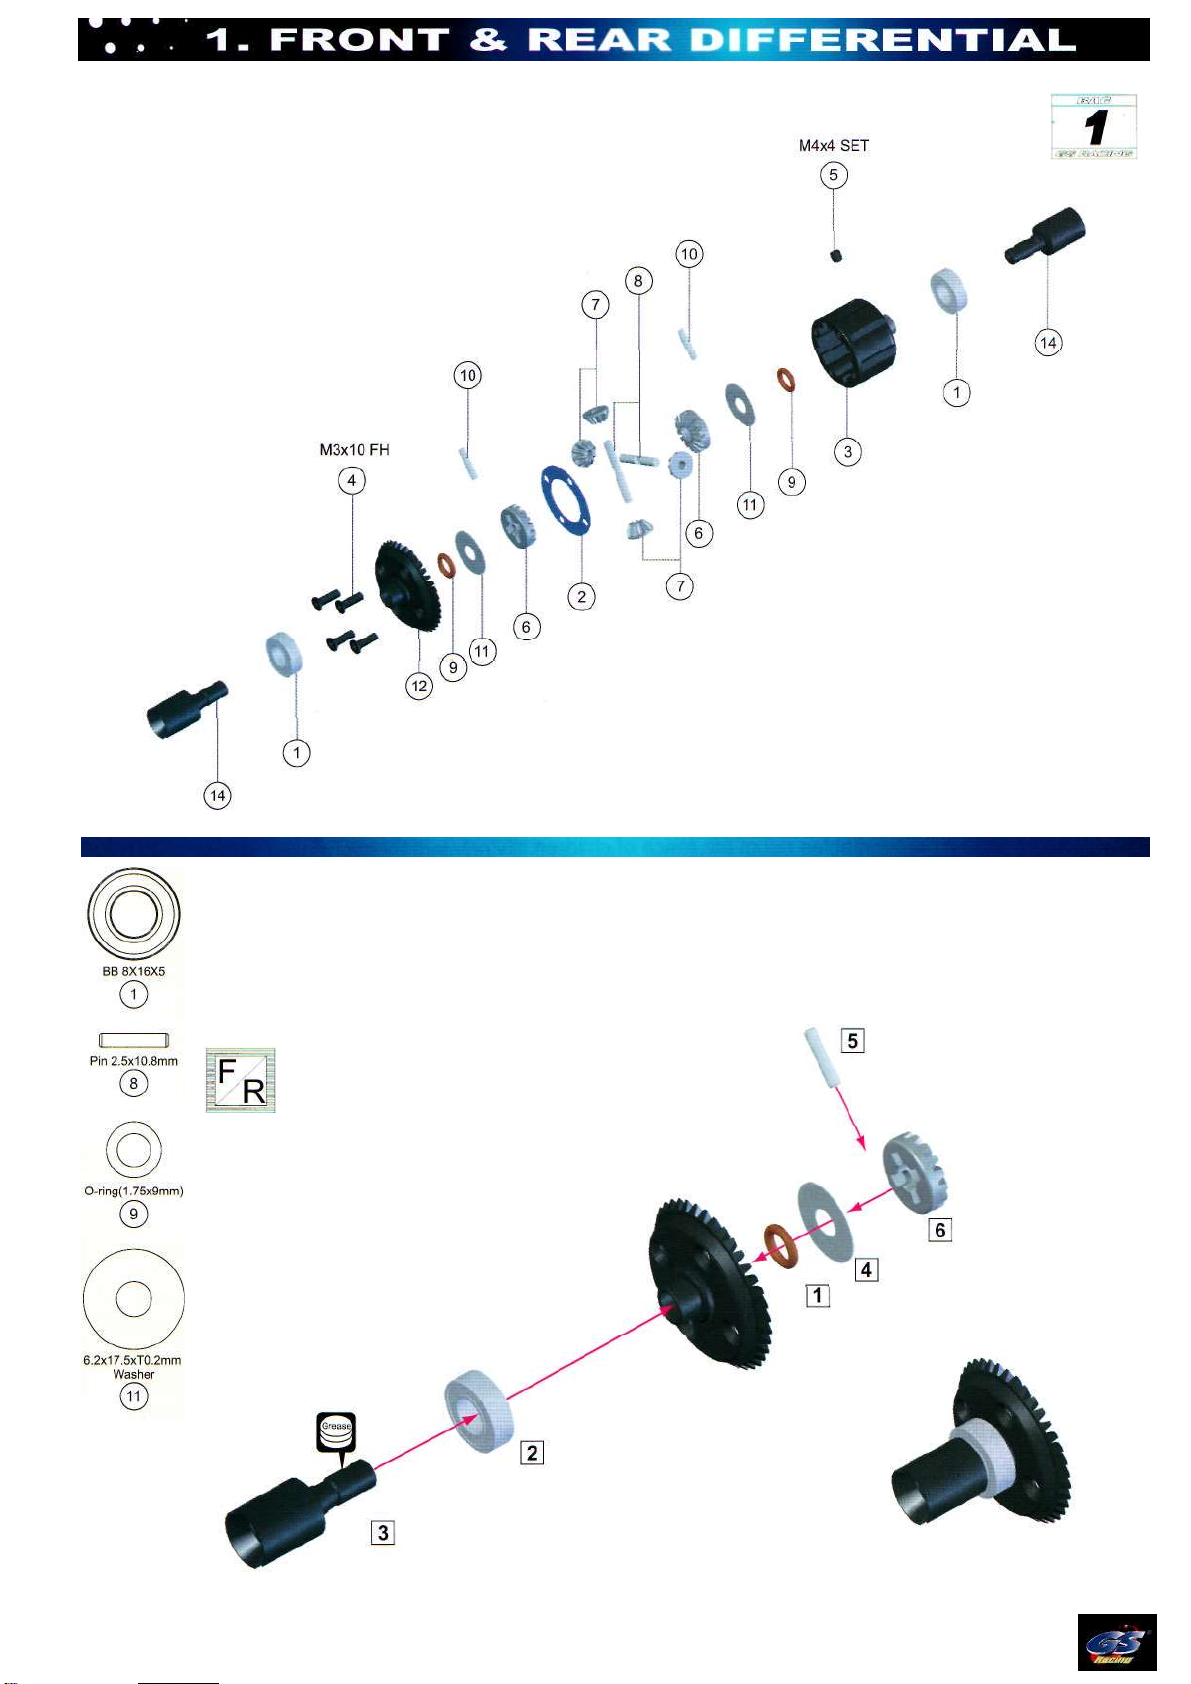
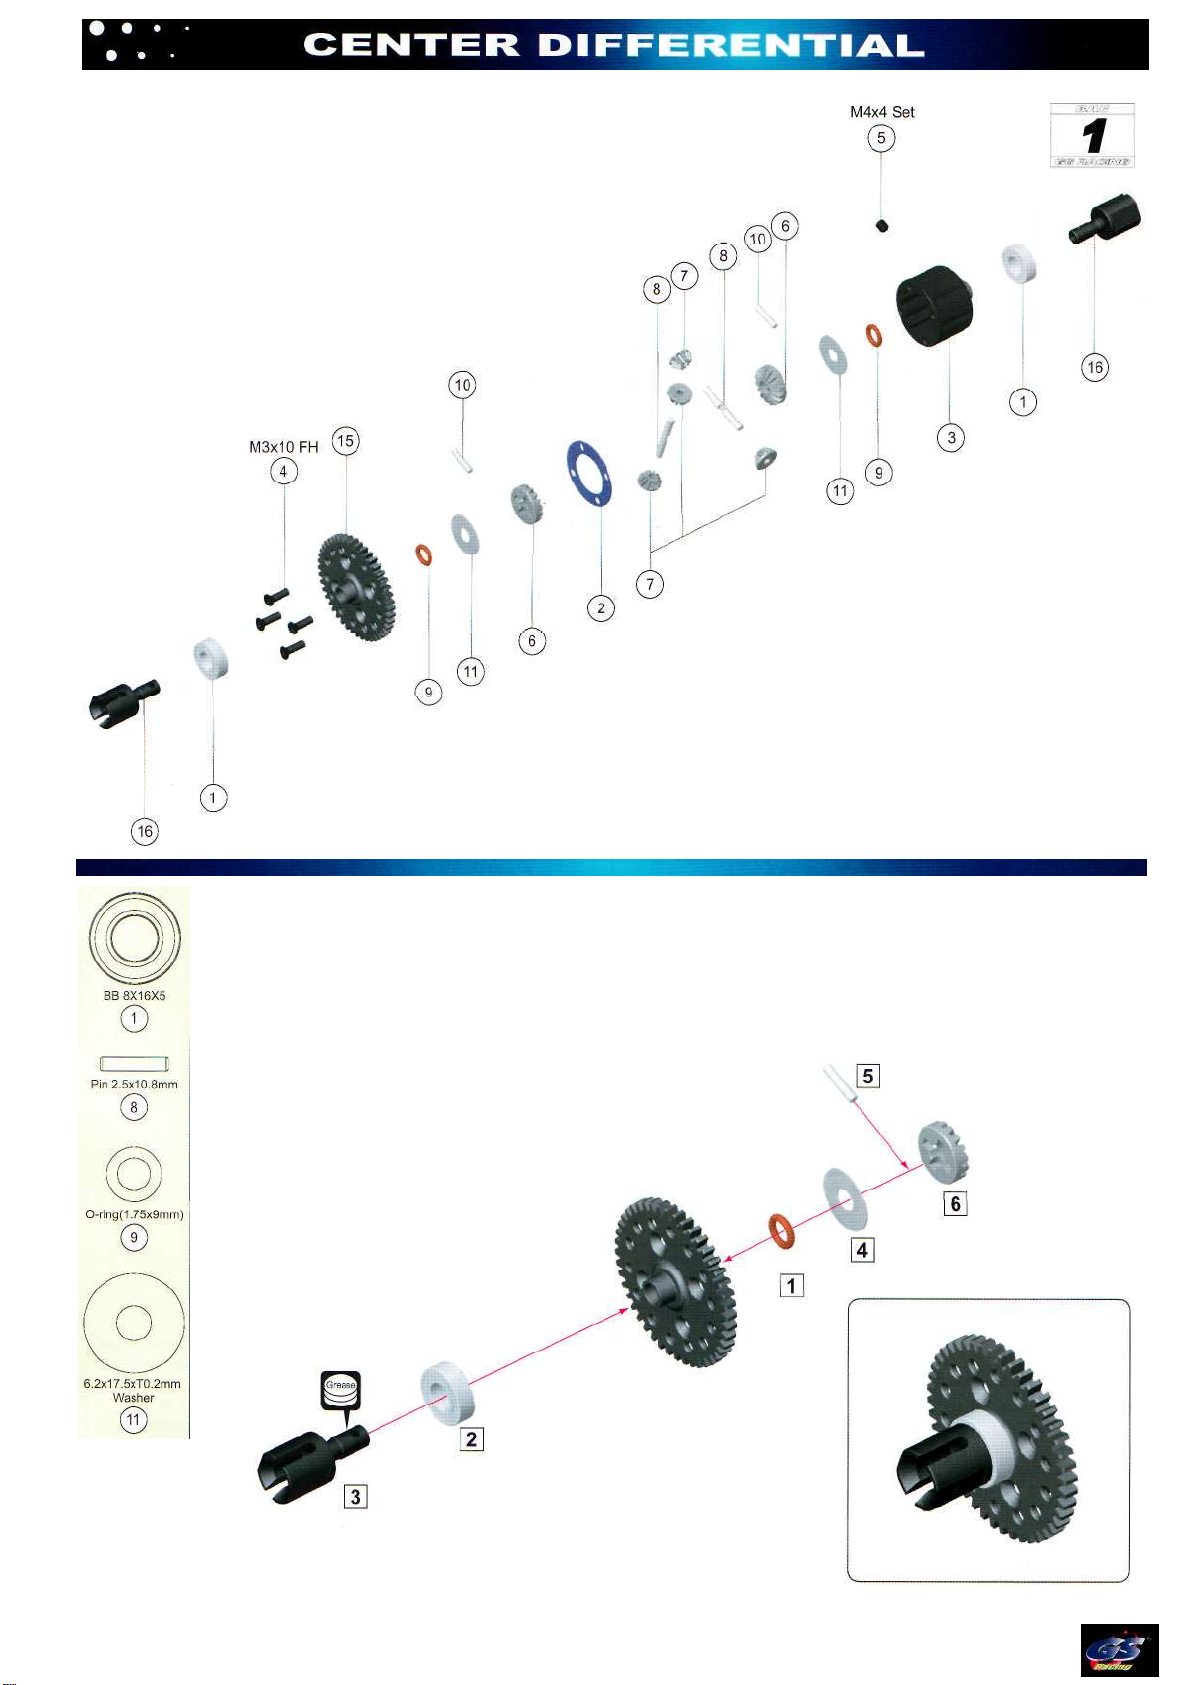
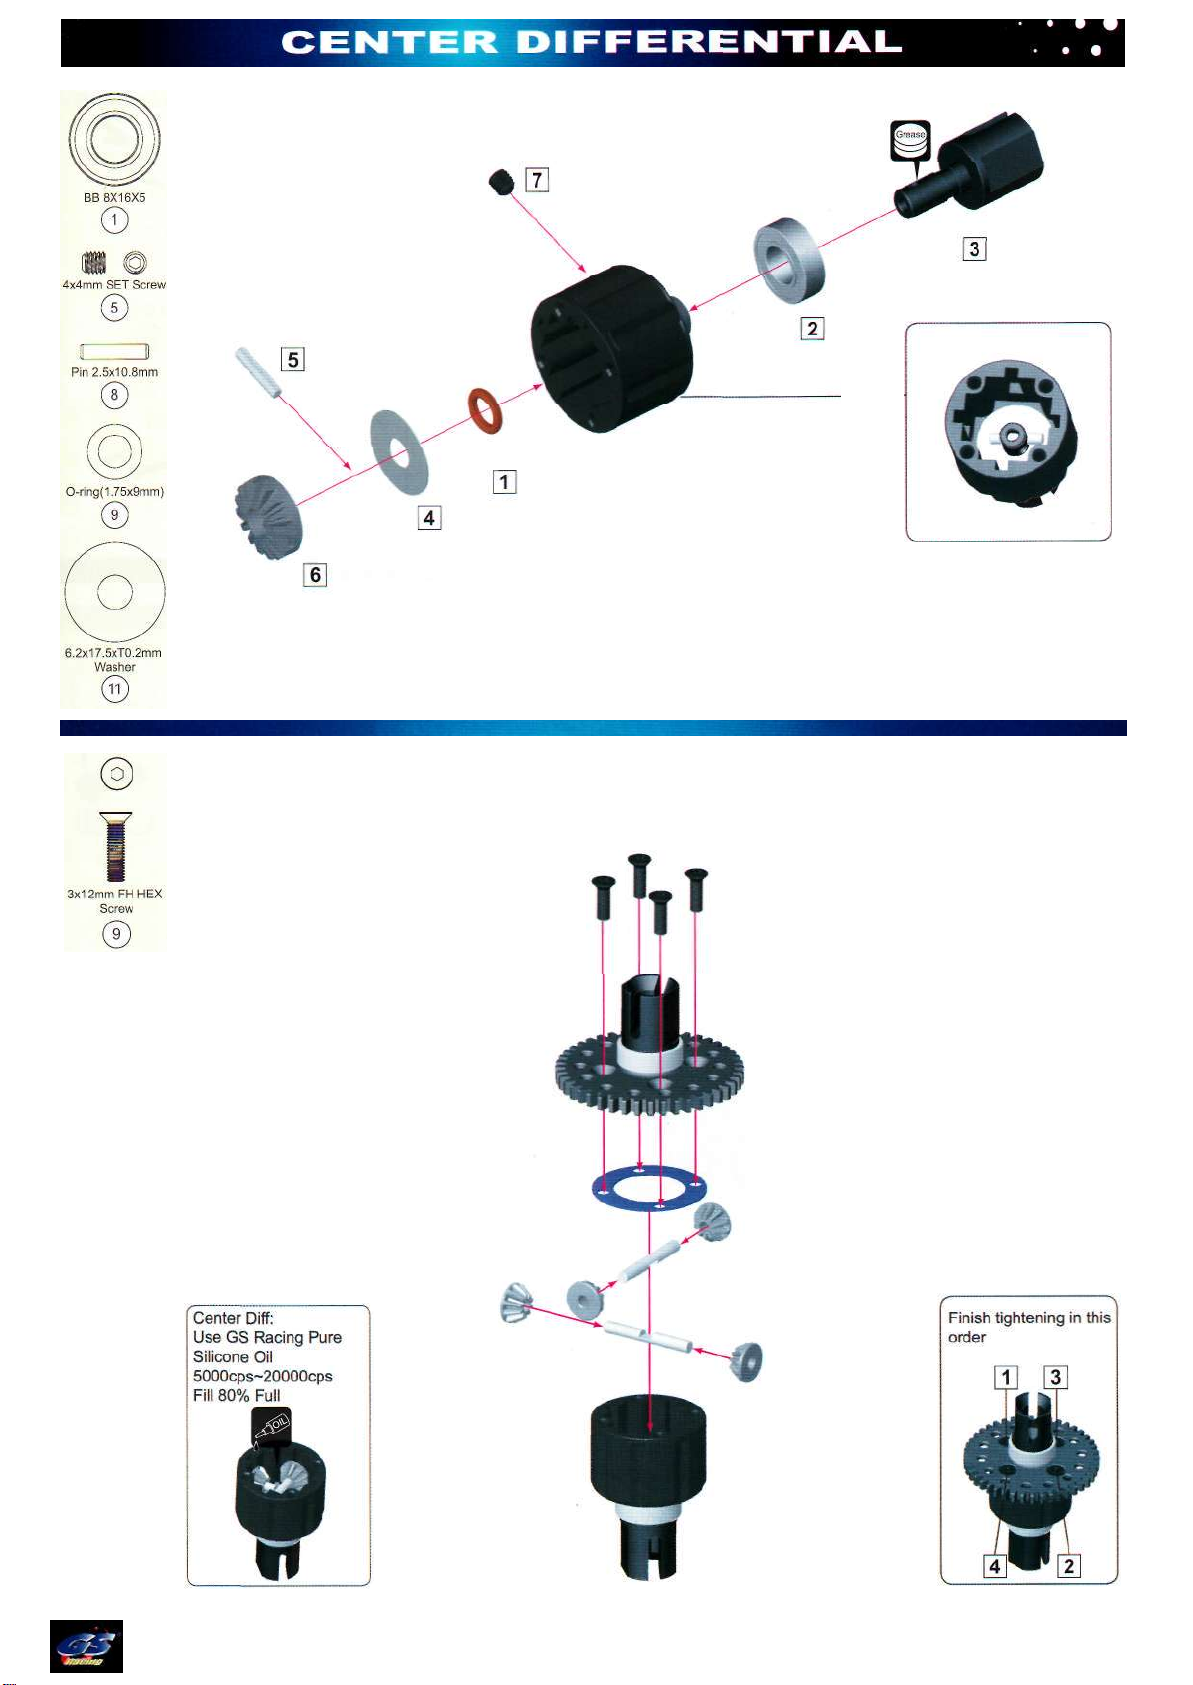
GS Racing STORM CL-1 User manual


CongratulationsonyourpurchaseofthenewGSRacingSTORMCL-1Kit.TheSTORM
CL-1representsa newgenerationof1/8thoffroadbuggies.Usingyearsofexperience
andfeedbackfromourraceteamandstaff,westartedwitha cleansheetofpaperand
designeda wholenewbuggyfromthegroundupfortheseriouscompetitionracer.
Pleasereadthismanualthoroughlyandbuildthecarourwayfirst.Thebaselinesetupis
builtintotheassemblysteps. Takingthetimetostudy,reference,andunderstandyour
STORMCL-1manualandthebuildingstepsincluded,isthekeytoensurethemaximum
performanceandlongevityfromyournewbuggy.Updates,setups,andproductnewswill
bepostedonourwebsite,socheckoften.
Asalways,ifyoushouldeverhaveanyquestionsorneedhelpwithyourSTORMCL-1,
pleasefeelfreetocontactourofficialGSRacingdealersanddistributors,astheywillbe
happytohelpyou.Youmayalsocontactusatanytimeforthemostuptodateinformation
andsupport.
Goodluckandgoodracing!

1.ToolsRequiredforBuildingandMaintenance:
ToolsIncluded:
WARNING!
•Donotusea powerscrewdrivertoinstallscrewsintonylonorplasticmaterials.
•Thefastrotationspeedcanheatupthescrewsbeinginstalled.
•Theycanthenbreakthemoldedpartsorstripthethreadsduringinstallation.
2.AdditionalItemsNeededforOperation:
•RadioSystem(FMrecommendedwithhighspeed/torqueservos)
•8 AAsizeBatteries(ForTransmitter)
•Ni-CdBatteryPack(5-CellHumpType)
•GlowFuelandFuelBottle
•StarterBox(GSRacingTurboStarterRecommended.)
•12-VoltBatteryorTwo6-Cell7.2-VoltBatteryPacksforStarterBox
•.21GlowPoweredRearExhaustR/CRacingEngineandExhaust(GSR21PBXandGSProXTuned
Piperecommended)

1.Ifyoufindanyproblemsregardingpartsorpackaging,pleasecontactyourlocaldealeroryourGS
RacingDistributor.Ifyoueverhaveanyquestions,pleasefeelfreetocontactyourGSRacing
distributor.
2.Thefollowingaresymbolsusedthroughoutthisinstructionmanual:
3.Theassemblyisarrangedsothatyouwillfinisheachbagbeforeyougotothenextone.Sometimes
youwillhavepartsremainingattheendofa bag.Thesewillbecomepartofthenextbag.
4.Weareconstantlyupdatingpartstoimproveourproducts.Thesechanges,ifany,willbenotedin
supplementarysheetslocatedina partsbagorinsidethebox.Checktheboxbeforeyoustartand
eachbagasitisopened.Whena supplementisfound,attachittotheappropriatesectionofthe
manual.
5.Thecirclednumbersinthedrawingsarekeynumbers.Thesenumbersaretobeusedtoquicklyfind
thepartnameanditem(part)numberinthebackofthemanual.
6.Whenwerefertoleftandrightsides,wearereferringtothedriver'spointofviewfrominsidethe
buggy.
7.Experiencedracerspayspecialattentiontosmalldetails.Twosuchdetailsaremakingsureallparts
arebind-freeandmakingsureallscrewsarecleanofmanufacturingoil.Asyoubuildthecaryouwill
beaskedtomakesureparts"rotatefreely"or"movefreely".Thisisveryimportantandshouldnotbe
overlooked.Nearlyallthescrewssuppliedwiththisandmostotherr/ccarshavea verythincoatof
oilonthem.Often,thisoilcancausea screwtocomelooseprematurely.Taketimetowipecleanall
screws.Youmayalsousea lighterorotherflame(usecaution,minorsuseadultsupervision)toburn
offthisoil.

Introduction
CongratulationsandthankyouforchoosingtheGSRacingStormCL-1gaspoweroff-roadbuggy.This
manualcontainsallthebasicinstructionstofinishassemblyof,andbreakin,operation,andmaintenance
ofyourSTORMCL-1.Itiscriticalthatyoureadalltheinstructionsinthis,andany/allaccompanying
guides,inordertooperateyourmodelcorrectlyandavoidseriousdamage.Yourhobbydealercannot,
underanycircumstances,accepta modelforreturnorexchangethathasbeenrun.Wehavetakenthe
timetobuildyourtruckwithourbestsetup,takethetimetofollowourinstructionstoensurewinning
resultswithyourSTORMCL-1.IfyoushouldeverhaveanyquestionsorneedhelpwiththisoranyGS
product,pleasefeelfreetocontactourofficialGSRacingdealersanddistributors, astheywillbehappy
tohelpyou.Goodluckandgoodracing!
SafetyPrecautions
Thisisa highperformanceradiocontrolledmodelwhichneedstobeoperatedwithcautionandcommon
sense.Failuretooperateyourmodelina safeandresponsiblemannercouldresultinpersonalinjury
and/orpropertydamage.Itisyourresponsibilitytoreadandfollowallsafetyprecautions.TheSTORM
CL-1isnotintendedforchildrenundertheageof14withoutadultsupervision.GSRacingshallnotbe
heldliableforanylossordamages,whetherdirect,indirect,actofnature,arisingfromtheabuseor
misuseofthisproductoranyotherproductrequiredwhileoperatingthismodel.
•Fuelcanbedangerousisimproperlyhandled.Followallofthemanufacturer'ssuggestions.
•Alwayskeepfuelina coolareaandneverusenearflame,sparks,orwhilesmoking.
•Keepfuelandotherflammablesoutofthereachofchildren.
•Alwaysrunyourmodelina wellventilatedareaoutdoors.Neverrunyourmodelindoors.
•Allpartsoftheengineandexhaustcanbecomeextremelyhotduring,andafteruse.Becarefulnotto
touchthesepartsespeciallywhenrefueling,ormakingrepairs.
•Thismodelcreateshighlevelsofnoise.Useearprotectionisyoufindnoiseobjectionable.
•Thismodeliscontrolledbya radiofrequencythatisvulnerabletointerferencefrommanyoutside
sources.
Thisinterferencecancausea lossofcontrolsoitisnecessarytooperatethismodelinanopenarea
toavoidpersonal,orpropertydamage.Alwaysensurenooneisusingyourfrequencybeforeturningon
yourradioormodel.
•Read,understand,andfollowtheinstructionincludedwithyourradiogear.
•Neveroperateyourmodelnearpeopleorproperty.Thespeedofthismodelhasthepotentialfor
injuryandordamagetopeopleandorproperty.
Neveruseanythingotherthanmodelcarfuel.
Neveroperatethemodelwitha lowbattery.Iftheresponsebecomesslow,stopimmediatelyandreplace
batteries.
Neverrunthemodelwithouta cleanandproperlyinstalledaircleaner.
Neverrunthemodelleanorallowtheenginetooverheat.

ExplodedViewwithKeyNumbers
Front/RearConicalGear:Slidethebearingovertheoutputshaftofthefront/rearconicalgear.Apply
alightcoatofgreasetothemaleportionofthefront/reardiffoutdriveandinsertitthroughthespurgear.
Applya verylightcoatofgreasetotheo-ring,thenslideitovertheshaftoftheoutdriveandseatitinthe
spurgear.Slidetheshimontheshaftandovertheo-ring.Insertthepinthroughtheholeintheshaftof
theoutdrive.Checktomakesuretheoutdriverotatesfreely.Ifitdoesnot,makesuretheo-ringis
properlyseatedand/orapplya bitmoregreasetotheo-ring.Slidethelargebevelgearoverthepin.
Repeatforsecondconicalgear.
ASSEMBLED VIEW

Usetweezerstoinsertpin
Front/RearDiffAssembly:Inthisstepyouwillassemblethediffcasesforboththefront andrear
differentials.Slidethebearingontotheoutputshaftofthediffcase.Applya lightcoatofgreasetothe
maleportionofthefront/reardiffoutdriveandinsertitthroughthediffcase.Applya verylightcoatof
greasetotheo-ring,thenslideitovertheshaftoftheoutdriveandseatitinthediffcase.Slidetheshim
ontheshaftandovertheo-ring.Insertthepinthroughtheholeinthediffcaseandthroughtheholein
theshaftoftheoutdrive.Checktomakesuretheoutdriverotatesfreely.Installthesetscrewinthe
holeinthediffcaseandtightenuntiljustunderflushwiththeoutsideofthediffcase.Slidethelarge
bevelgearoverthepin.Slideoneofthesmallbevelgearassembliesintothegroovesofthediffcase
andoverthelargebevelgear.Youmayneedtorotatetheoutdrivetoallowthe
smallbevelgearassemblytoseatproperly.Checktomakesureallparts
rotatesmoothandareproperlyseated.Repeatforseconddiffcase.
FRONTDIFFERENTIAL REARDIFFERENTIAL

ExplodedViewwithKeyNumbers
CenterSpurGear:Slidethebearingovertheoutputshaftof thecenterspurgear.Applya lightcoatof
greasetothemaleportionofthelongcenterdiffoutdriveandinsertitthroughthespurgear.Applya very
lightcoatofgreasetotheo-ring,thenslideitovertheshaftoftheoutdriveandseatitinthespurgear.
Slidetheshimontheshaftandovertheo-ring.Insertthepinthroughtheholeintheshaftoftheoutdrive.
Checktomakesuretheoutdriverotatesfreely.Ifitdoesnot,makesuretheo-ringisproperlyseated
and/orapplymoregreasetotheo-ring.Slidethelargebevelgearoverthepin.
ASSEMBLEDVIEW

Usetweezerstoinsertpin
CenterDifferential:FillthecenterdifftojustabovethesmallbevelgearswithGSRacingPure
SiliconeDiffOil.Rotatetheoutdrivetoallowtheoiltosettle,thenifneeded,addmoreoiltobringoil
leveljustabovethesmallbevelgears.Placethegasketoverthediffcase,lininguptheholes.Placethe
centerspurgearassemblyoverthegasket,againlininguptheholes.Attachthespurgearassembly
using3x10mmFHscrews.Tightenthescrews
overtighten!Checktomakesuretheout
disassembleandcheckforimproperly
buggy,forhighbitetrackconditionsorfor
maytryusing10000cpsoil.
ina crosspatternuntilfirmlysnug,donot
drivesrotatesmoothly.Ifthereisanybinding,
seatedparts.Afterbuildinganddrivingyour
increasedpowerandresponsiveness,you

ExplodedViewwithKeyNumbers
Slide2 Shims(63)ontoeachdiffoutdrivenexttothebearing.Install2 bearings(1)intoBulkhead-B
(18),1 insideand1outside.Slidethesmallpiniongear(13)intoBulkhead-B.Applypressuretothe
piniongearandfixthefrontcenteruniversal(45)usingthe5x4mmSetScrew(60).Applythreadlocking
compoundtothesetscrew.Applya lightcoatofgreasetothelargeCrownGearonthediff,andinstall
thediffintoBulkhead-B.FitBulkhead-Ausing2pcs3.5x25mmRH/ST.Makesurethethinshimsseat
properlyanddonotbend.Markthisgearboxasfront.Repeattheprocessusingthereardiff,thelonger
universalreardriveshaft(91),andmarkthegearboxasrear.Shims:Thegearmeshshouldbetight
withoutbinding.Testfitnessofthediffwithbothshimsonthegear-sideofthediffandifthediffturns
freelywithoutbindingcontinuetonextstep.Ifthediffbindsanddoesnotturnfreely(itwillmakea
grindingorcrunchingsoundwhenspun),removea shimfromthegearsideofthediffandreassemble.
Ifthecrowngeardoesnotmakeenoughcontactwiththepiniongear(itwillmakea clickingsound),add
ashimtothegearside.Repeatuntilyouaresatisfiedthatyouhavethebestgearmeshpossible.

ExplodedViewwithKeyNumbers
Slide2 Shim(63)ontoeachdiffoutdrivenexttothebearing.Install2 bearings(1)intoBulkhead-B
(18),1 insideand1outside.Slidethesmallpiniongear(13)intoBulkhead-B.Applypressuretothe
piniongearandfixthefrontcenteruniversal(45)usingthe5x4mmSetScrew(60).Applythread
lockingcompoundtothesetscrew.Applya lightcoatofgreasetothelargecrownGearonthediff,
andinstallthediffintoBulkhead-B.FitBulkhead-Ausing2pcs3.5x25mmRH/ST.Makesurethe
thinshimsseatproperlyanddonotbend.Markthisgearboxasfront.Repeattheprocessusingthe
reardiff,thelongeruniversalreardriveshaft(91),andmarkthegearboxasrear.Shims:Thegear
meshshouldbetightwithoutbinding.Testfitthediffwithbothshimsonthegear-sideofthediffand
ifthediffturnsfreelywithoutbindingcontinuetonextstep.Ifthediffbindsanddoesnotturnfreely
(itwillmakea grindingorcrunchingsoundwhenspun),removea shimfromthegearsideofthediff
andreassemble.Ifthecrowngeardoesnotmakeenoughcontactwiththepiniongear(itwillmake
aclickingsound),adda shimtothegearside.Repeatuntilyouaresatisfiedthatyouhavethebest
gearmeshpossible.

ExplodedViewwithKeyNumbers
RearSwayBar:Placetherearswaybarinthegroovesof
theBulkhead-A.Placetheswaybarplateoverthesway
bar,lininguptheholesintheplate
withtheholesintheBulkhead-A.
Fastentheswaybarplatetothe
Bulkhead-Ausingtwo3x8FH/STscrews.
The3x4setscrewsshowninthediagramare
usedtoholdtheswaybarinplace,butshould
notbetightenedtothepointofcausingthe
swaybartobind.Someracerschoosenot
tousethesesetscrews.Check
tomakesuretheswaybarrotates
freely.Fastentheswaybar
mountsusingthe3x3mmset
screwsontotheswaybar.
RearSuspension:AllSTORM
CL-1areusingnone-clipsuspension
system.Inserttheanti-squatinserts,circlesideup,intotheanti-squat
mount.WesuggestusingthekeyNo.31inserts.Slidethehingepinsintothe
anti-squatmountandslidethelowerarmassembliesoverthehingepins.Insert
therearsuspensionmountinserts,circlesideout,intotherearsuspensionmount.We
suggestusingthekeyNo.31inserts.Slidethemount,withtheinsertsattachedoverthehingepins.
RearLowerArms:Therearlowerleftandrightarmsonthe
STORMCL-1arenotidenticalandcannotbeusedoneither
side.Threada 4x12mmsetscrewthroughtheholeon
thetaboftheinsideofthearm.Tightenituntilit
sticksout1.5mmbelowthearm.Thisis
thereardownstop
adjustment.

ExplodedViewwithKeyNumbers
RearHubCarrierAssembly:TherearhubsontheSTORMCL-1arethesameleftandright.
Pusha 24x15x5bearingintotheinsideofthehubandan8x16x5bearingintotheoutsideofthe
hub.Slidea CVDthroughthebearings.Slidea wheelhubovertheaxle,lininguptheholesinthe
axleandwheelhub.Pushthe3mmpinthroughthehubandaxle.Fastenthepininplacewitha
5x5mmsetscrew.Repeatforotherhub.Checktoensurewheelaxlespinsfree.Iftheaxlehasan
excessiveamountofslop,disassembleandinstallan8x16x0.5mmwasherbetweenthebearing
andthewheelhub.

Lineupthehubassemblywiththelowerarm.Slidethe2 same
degreeinsertsintothehubfirst(0-0,1-1,1.5-1.5,2-2)andslide
therearlowerhingepinthrough,securingitwiththe3x8
BHscrewtostopthehingepin.Notethe
directionofthehubin
relationtothedown
stopscrew.The
wheelbasecanbe
adjustedusingthevarious
inserts.Asa startingpoint,
installa 3mminsertbehindthehub
anda 1mminsertinfrontofthehub.
Someracerswillcutthe"ears"offof
theseinsertsafterinstallingthem.Check
forbindingandrepeatforotherside.Note
directionofsetscrewandhubforoppositearm.
WingStay:Attachtheupperwingstaystothewingstaysand
the2 upperwingpostsusingfour3x16mmscrewsusingthe
upperholeasa startingpoint.The1 lowerwingpostsusing
four3x14mmscrewsusingtheupperholeasa startingpoint.
Usingthebottomholewillanglethewinghigher
resultinginincreasedreartractionand
decreasedsteering.
RearUpperArm:Threadtwo8.8mmballendsontothe50mmturnbuckle.
Notethatthethreaddirectiononthesideoftheturnbucklewiththegroove
isanopposite(lefthand)tighteningthread.Allturnbucklesusedinthe
STORMCL-1arelikethis.Repeatforsecondupperarm.Thegap
betweentheballendsshouldbe30mm.Snapthe8.8x9mm
ballstudsintooneendoftheupperarms.Attachtheupper
armstotheshocktower.Checktomakesurethearms
rotatefreely.Slidetheotherendofthearmsintothe
hubcarriersandfastenthemthroughthe
outsideupperholesusing3x23mmCap
screwsand3mmlocknuts.

ExplodedViewwithKeyNumbers
FrontLowerArms:Thefrontlowerleft
armsontheSTORMCL-1arenotidenticalandcannotbe
usedoneitherside.Threada 4x12mmsetscrewthroughthe
holeonthetaboftheinsideofthearm.Tightenituntilitsticksout
2.5mmbelowthearm.Thisisthereardownstopadjustment.
FrontSwayBar:Placethefront sway
barinthegroovesoftheBulkhead-A.
Placetheswaybarplateovertheswaybar,lininguptheholesintheplatewith
theholesintheBulkhead-A.FastentheswaybarplatetotheBulkhead-Abyusingtwo
3x8FH/STscrews.The3x4setscrewsshowninthediagramareusedtoholdthesway
barinplace,butshouldnotbetightenedtothepointofcausingtheswaybartobind.Some
racerschoosenottousethesesetscrews.Checktomakesuretheswaybarrotatesfreely.Fasten
theswaybarmountsusingthe3x3mmsetscrewsontotheswaybar.
Tightenscrews
equally

ExplodedViewwithKeyNumbers
SteeringKnuckles:Slidethe14mmpivotballsintotheknuckles,andpullthemthroughuntil
theyareproperlyseated.Placethe14mmpivotballcups,cupsidefirst,overthepivotballs.Place
thepivotballnutsintotheknucklesandcarefullytighten.Asyoutightenthenuts,checktomake
surethepivotballcupsdonotslideoutofplace.Continuetotightenuntilsnug.Checktheplayof
thepivotballagainstthepivotballcupandnut.Ifthepivotballshavetoomuchplay/slop,continue
totightenthepivotballnut.Repeatthisuntilthepivotballsbindslightlythenbackoffthenutabout
1/8turn.Slidethesmallandlargebearingsintotheknuckles.Slidethefront universaldriveshafts
throughthebearingsandattachwheelhubswithpinandsetscrew.Ifthedriveshafthastooan
excessiveamountofslop,disassembleandinstallan8x16x0.5mmwasherbetweenthebearing
andthewheelhub.Install6.8mmballstudsinhole.

FrontUpperArms:ThefrontupperleftandrightarmsontheSTORMCL-1arenotidenticalandcan
notbeusedoneitherside.Insertthefront shocktowerinserts,circlesidemiddle,intothefront shock
tower.WesuggestusingthekeyNo.32inserts.Slidethehingepinsintothefront shocktowerandslide
theupperarmassembliesoverthehingepins.Insertthefront upperarmholderinserts,circleside
middle,intothefrontupperarmholder.WesuggestusingthekeyNo.32inserts.Slidetheholder,with
theinsertsattachedoverthehingepins.
Slidethepivotballwashers,conesidefirst,overthethreadedportionofthepivotballs.Begintighteningthe
pivotballsintotheupperandlowerarms.Rotatebetweentheupperandlowerpivotballsaboutevery3
turns,andmakesurethedogboneendsofthefront driveshaftsenterthediffoutdrives.Tightenuntilthe
washersaresnugagainstthearm.

ExplodedViewwithKeyNumbers
MainChassisRearEnd:Attachtherear-end
assemblyusingfour4x18mmFHscrews,three
3x10mmFHmachinethreadscrews,makesure
therearcenterdriveshaftisplacedintherear
outdriveofthecenterdiff
MainChassisFrontEnd:Attachtherear-end
assemblyusingfour4x18mmFHscrews,make
surethefront centerdriveshaftisplacedinthe
frontoutdriveofthecenterdiff.


ServoSaverAssembly:Slidefour6x10x3mmball
bearingsintothebellcranksasshown.
Slidetheservosavershaftsthrough
thebellcranks.Placetheservosaver
assemblyunderthefrontsupport
plate,lininguptheholesintheplate
withtheholesinthebellcranks.
Insertandtightenthe3x10
machinethreadscrewsthrough
theplateandintothebellcranks.
Connectthesteeringlinkagesto
thesteeringknuckles.Checkfor
smoothmovementofsteeringassembly.
Table of contents
Other GS Racing Motorized Toy Car manuals

GS Racing
GS Racing Vision RTR User manual

GS Racing
GS Racing Storm CL-1 Pro RTR User manual

GS Racing
GS Racing Sut Evolution RTR User manual

GS Racing
GS Racing SUTCE Operating and maintenance manual

GS Racing
GS Racing Storm User manual

GS Racing
GS Racing Storm CLX E Pro User manual

GS Racing
GS Racing Storm Unlimited Truck Championiship Edition User manual

GS Racing
GS Racing Vision RTR User manual

GS Racing
GS Racing Storm User manual

GS Racing
GS Racing Storm Pro User manual