GS CI-7100 User manual

Contents
3
Warning & Safety..........................................................................................................................4
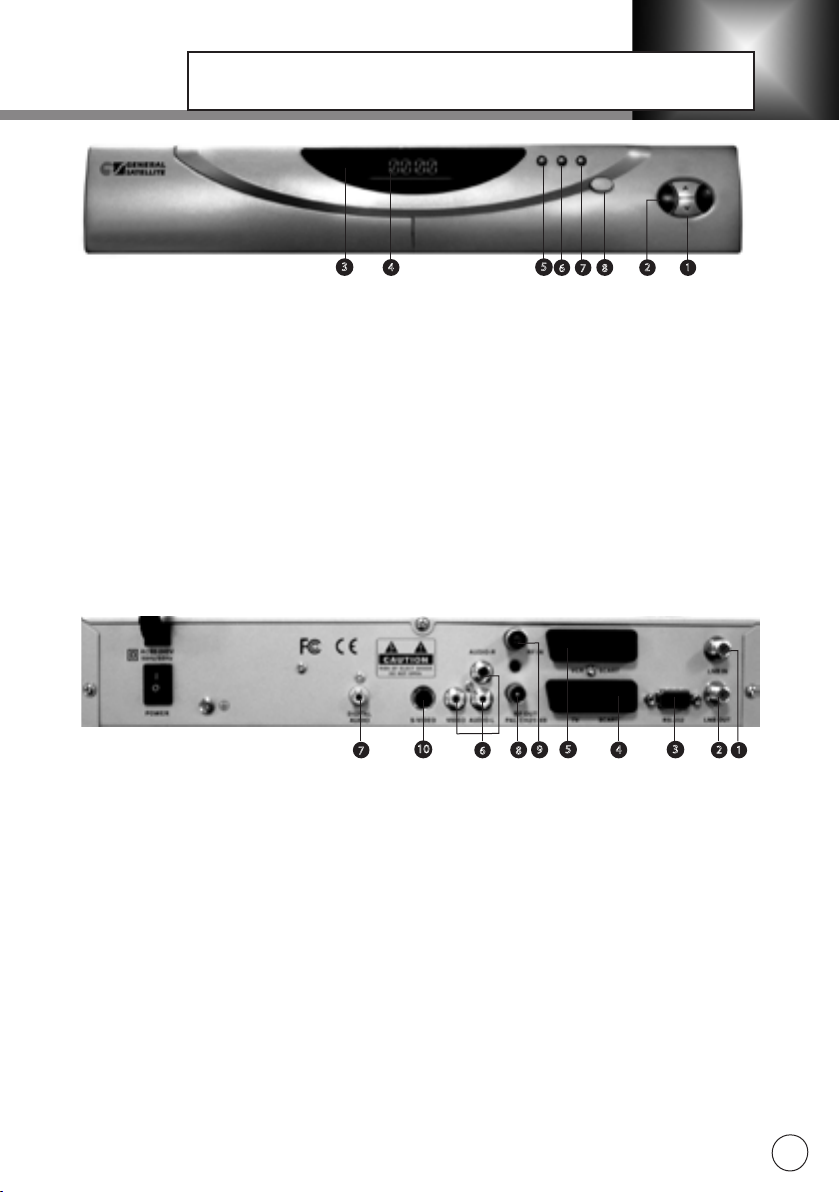
Front Panel And Rear Panel Of The Set-Top Box........................................................................5
STB Connections...........................................................................................................................6
Satellite services only............................................................................................................. 6
Satellite services with Hi-Fi system.........................................................................................6
TV with terrestrial & satellite services................................................................................... 6
Other Equipment Connection.......................................................................................................7
Satellite antenna with DiSEqC 1.0......................................................................................... 7
Satellite antenna with DiSEqC 1.2......................................................................................... 7
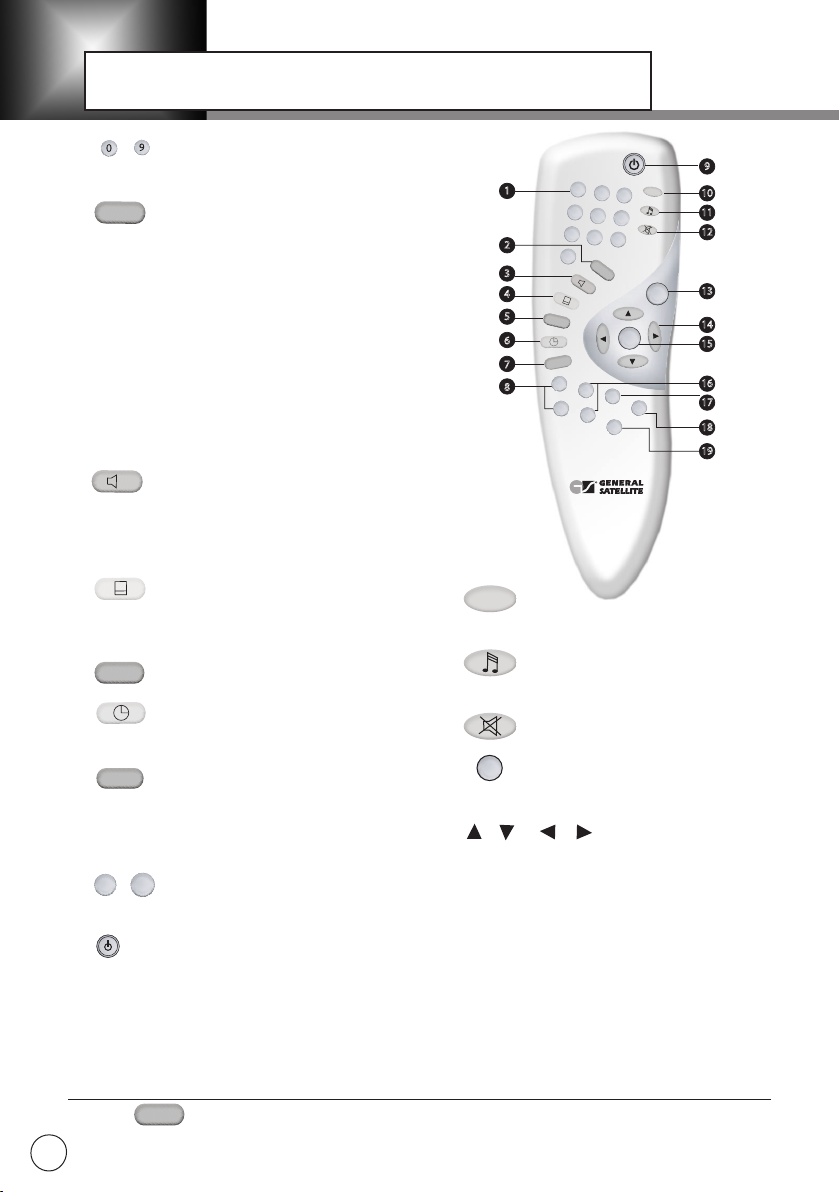
Remote Control Unit.....................................................................................................................8
Guide to Functions ..................................................................................................................10
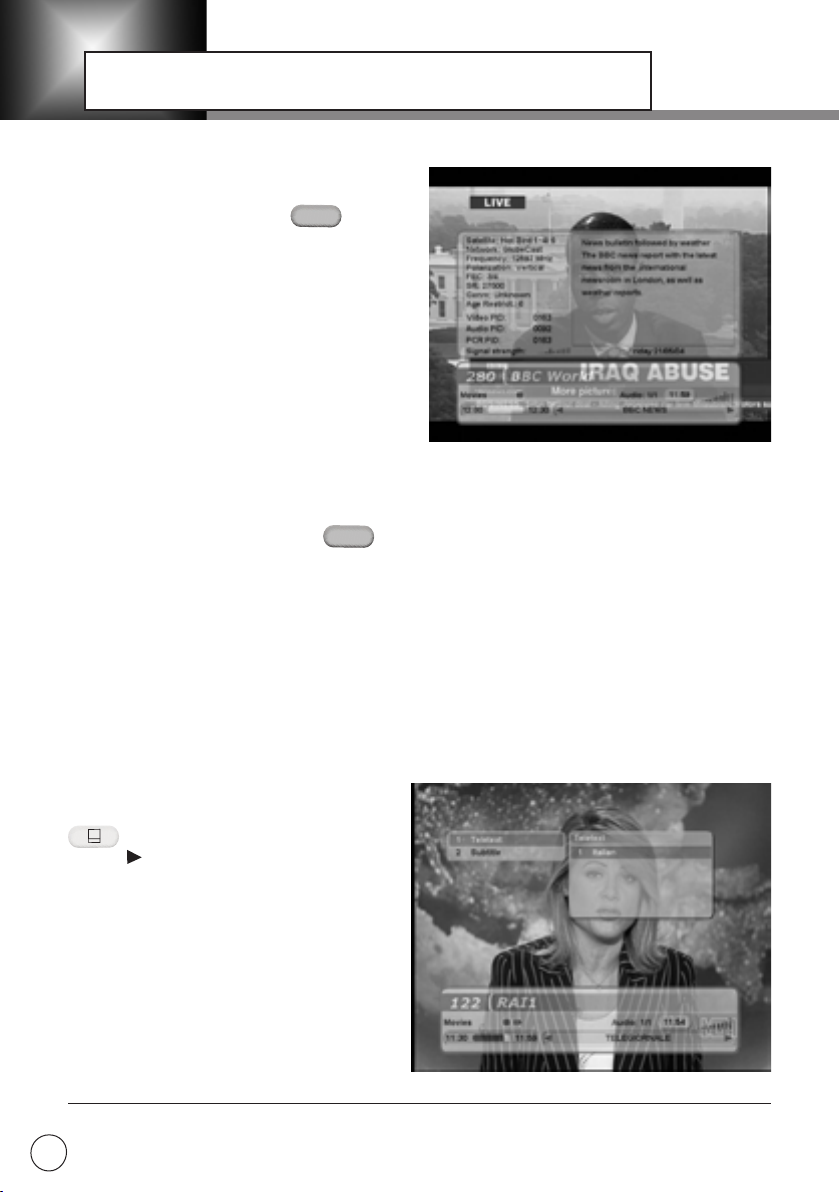
Information banner............................................................................................................... 10
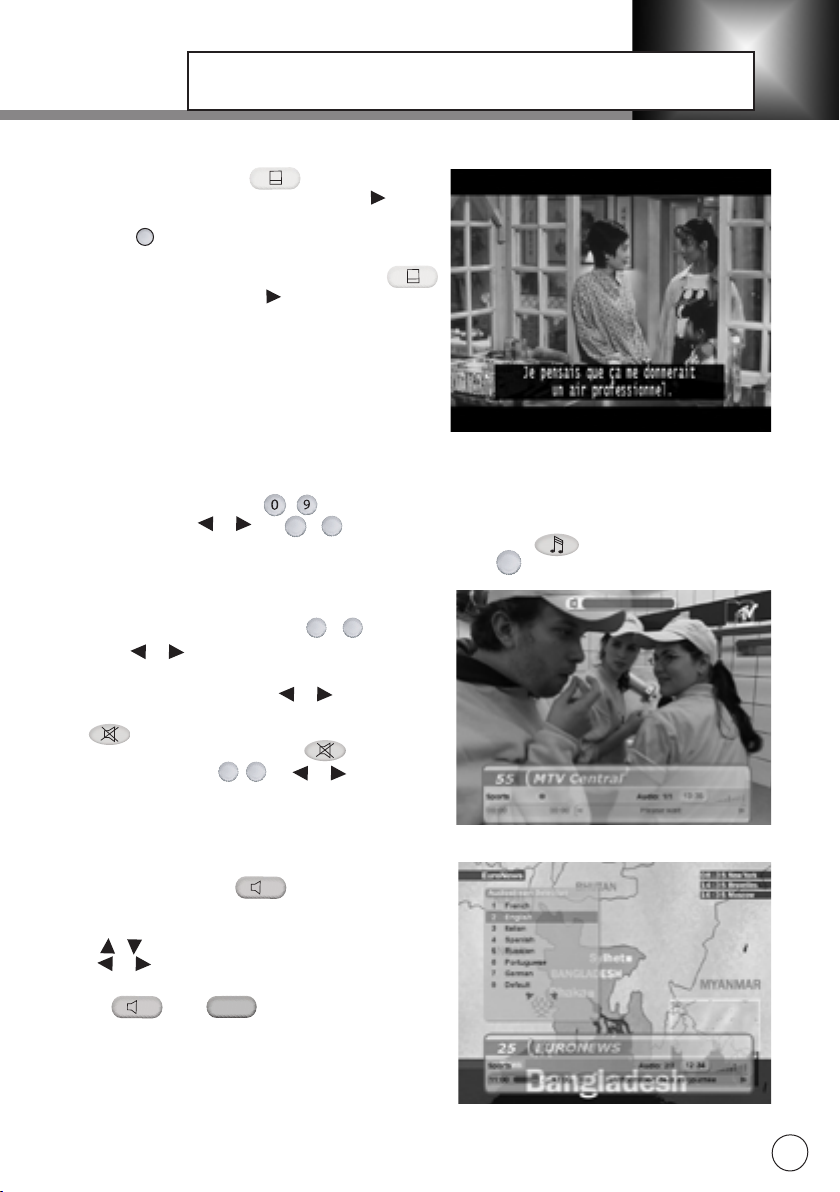
Teletext.................................................................................................................................10
Subtitles .............................................................................................................................. 11
Changing services.................................................................................................................11
Volume Control.................................................................................................................... 11
Soundtrack............................................................................................................................11
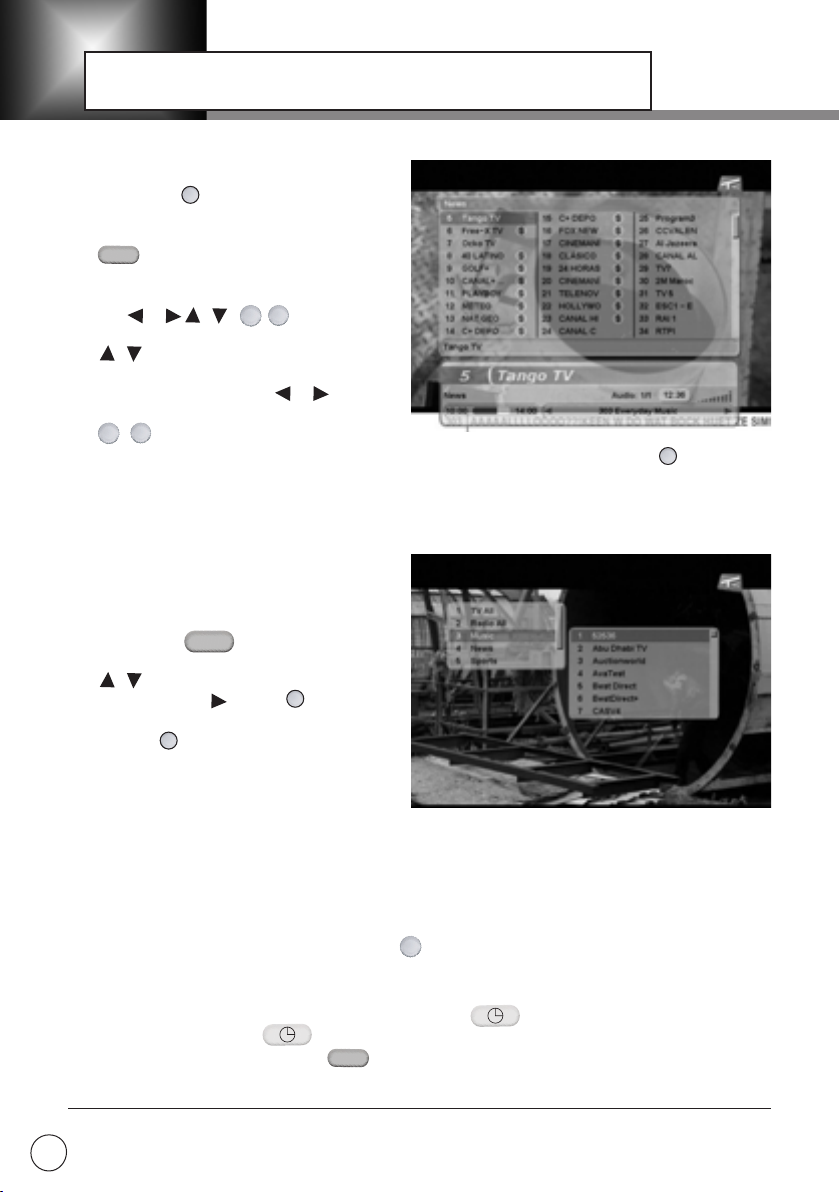
Service List........................................................................................................................... 12
Favorite list...........................................................................................................................12
Information Call/Help............................................................................................................12
Current Time.........................................................................................................................12
Main Menu Guide........................................................................................................................13
Full-screen menu.................................................................................................................. 13
On-screen display menu.......................................................................................................13
Keyboard...............................................................................................................................14
Installation..................................................................................................................................15
Antenna Setup......................................................................................................................15
Satellite Setup.......................................................................................................................17
Language Setup....................................................................................................................18
A/V Output Setup.................................................................................................................18
Other Settings.......................................................................................................................19
PID Editing............................................................................................................................19
Service Searching....................................................................................................................... 20
Automatic Search..................................................................................................................20
Manual Search...................................................................................................................... 21
Service Organizing......................................................................................................................22
Service Editing......................................................................................................................23
Network Organizing...............................................................................................................23
Data Tranfer................................................................................................................................24
Conditional Access / Default settings.......................................................................................26
TV Guide.....................................................................................................................................27
Parental Control (PIN).................................................................................................................28
Timer Setup................................................................................................................................29
Games.........................................................................................................................................30
Set-Top Box Status / Troubleshooting Guide............................................................................31
Specification................................................................................................................................32

This STB has been manufactured to satisfy international safety standards. We recommend you to
address to the qualified service personnel for installation of the set-top box and satellite system.
However if you have decided to install the system by yourself, please, learn the manual properly.
Please read the following safety precautions carefully.
MAIN SUPPLY: 190 - 250V AC 50/60Hz. Make sure your main supply satisfies the standard.
OVERLOADING: Do not overload a wall outlet, extension cord or adapter as this may result in fire
or electric shock.
LIQUIDS: Keep liquids away from the STB, do not expose the STB to rain or moisture.
FOREIGN INTERFERENCE:
Coins, insects and other small stuff may get into slots and damage the STB or may result in fire.
CLEANING: Disconnect the STB from the wall outlet before cleaning.
Use a light damp cloth (no solvents) to dust the STB.
VENTILATION: The slots on the top of the STB must be left uncovered to allow proper airflow to
the unit.
Do not stand the STB on soft furniture or carpets.
Do not expose the STB to direct sunlight or place it near a heater.
Do not stack other electronic equipment on the top of the STB.
ATTACHMENTS: Do not use any attachments that are not recommended for use with the STB as these
attachments may cause a hazard or may damage the STB.
CONNECTION TO THE SATELLITE DISH LNB:
Disconnect the STB from the mains supply before connecting or disconnecting the cable from the
satellite dish. Failure to do so can damage the lnb .
CONNECTION TO THE TV:
Disconnect the STB from the mains before connecting or disconnecting the cable from the TV set or
video-recorder. FAILURE TO DO SO CAN DAMAGE THE TV/VR/STB.
GROUNDING: the LNB must be grounded by the system for the satellite dish. The system must
comply with SABS 061.
LOCATION : Place the STB indoors (on hard surface) in order to prevent exposure to lightning, rain
or sunlight.
TO REDUCE THE RISK OF ELECTRIC SHOCK, DO NOT REMOVE THE COVER (OR BACK). THERE ARE
NO USER SERVICEABLE PARTS INSIDE. REFER ALL SERVICING TO QUALIFIED SERVICE PERSONNEL.
Warning :
Please do not insert metal or any other alien substance into the slots for the Modules and Smart
Cards.
Doing so can cause damage to the STB and reduce its life span.
WARNING & SAFETY
4

1.BUTTONS “CH“
Press to adjust services down and up.
2.BUTTONS “VOL“
Press to increase or decrease the volume.
3.STANDBY LED(RED)
Indicates that the STB is in standby mode.
OPERATING LED(GREEN)
Indicates that the STB is operating
4.Four-valued indicator
5.BUTTON MENU
Press to display the Main Menu on the screen or return to the screen from a sub menu
screen.
6.BUTTON ESC
Press to return to the previous menu and screen.
7.BUTTON OK
This button is used to select the item on the menus.
8.BUTTON POWER
Switches on and switches off the STB. Moves STB from Standby to Operating mode and back.
1.LNB IN
Use to connect an antenna.
2.LNB OUT
Use when connecting to another STB.
3.RS-232C
Use when connecting to your PC.
4.TV SCART
For the audio/video input on the TV.
5.VCR SCART
For the VCR.
6.AUDIO/VIDEO OUTPUT
Audio/video signal for HI-FI system and TV.
7.DIGITAL AUDIO
Output for connection to a digital amplifier.
8.RF OUTPUT
Use to connect a RF signal from your STB to RF(ANT) input jack on your TV.
9.RF INPUT
Use to connect a general Aerial Antenna and CABLE jacks to a RF input jack on the STB.
10.S-VIDEO
Output for connection with TV.
FRONT PANEL AND REAR PANEL OF THE SET-TOP BOX
5
1
2
8
7
6
5
4
3
1
2
8
76543
10 9

There are several ways of connecting the STB to your existing Audio/TV system.
We recommend using one of the following set-ups for best results:
1.Connect one end of the 21-pin SCART cable
to the TV SCART connector on the STB and
the other end to the SCART socket on your
TV. You can also connect TV to the STB by the
SVHS cable.
2.If you do not have an SVHS and a SCART con-
nector on your TV you can connect the STB to
RF IN connector on your TV by the RF cable.
3.Connect the coaxial cable from the LNB to
the LNB IN socket on the STB.
1.1, Connect an AUDIO L,R sockets on the back
of the STB to the input socket on your Hi-Fi sys-
tem. Also you can connect Digital Audio socket
to the input socket on your Hi-Fi system.
2.Connect S-VIDEO socket on the STB to the
input socket on your TV.
3.Connect the coaxial cable from the LNB to
the LNB IN socket on the STB.
1.Connect one end of the RF lead to the RF
OUT connector on the STB and the other end
to the RF IN connector on your TV.
2.Connect one end of the RF lead to the RF IN
connector on the STB and the other end to the
connector on your TV antenna.
3.Connect the coaxial cable from the LNB to
the LNB IN socket on the STB.
SATELLITE SERVICES ONLY
SATELLITE SERVICES WITH HI-FI SYSTEM
TV WITH TERRESTRIAL & SATELLITE SERVICES
STB CONNECTIONS
6

DiSEqC — provides STB interaction with other equipment. To transmit commands it uses particu-
lar 22 kHz signal and interval combinations.
The STB supports DiSEqC 1.0 and DiSEqC 1.2
SATELLITE ANTENNA WITH DISEQC 1.0
You can connect a single satellite antenna directly to the set-top box. DiSEqC 1.0 allows multiple
antennas to be connected to the STB simultaneously. If you have two or more fixed antennas or
LNBs, you can use a DiSEqC 1.0 switch.
1. Connect the coaxial cable from the first LNB to the LNB 1 or LNB A input connector of the
DiSEqC switch.
2. Connect the coaxial cable from the second LNB to the LNB 2 or LNB B input connector of
the DiSEqC switch.
3. Do the same for other LNBs.
4. Connect one end of a coaxial cable to the RF OUT connector of the DiSEqC switch and the
other end to the LNB IN socket on the STB.
SATELLITE ANTENNA WITH DISEQC 1.2
DiSEqC 1.2 - controls the motorized system.
1. Connect the coaxial cable from the LNB of your motorized system to the LNB IN socket on the
STB and the other to the “REC” or “STB” connector on the DiSEqC 1.2 motor.
2. Connect the coaxial cable from the LNB to the LNB IN connector on the DiSEqC 1.2 motor.
Please, note: the motorized system can have different configurations. For more details, please,
refer to its manual.
OTHER EQUIPMENT CONNECTION
7

1 ~ NUMERIC BUTTONS
Press to select a service and enter any digital
information.
2 INFORMATION
Displays the information banner on the screen.
Press this button while watching a service and
the following information will be displayed on
the screen: current time, the name and the
number of the service, the quantity of sound-
tracks, the quality of the signal.
Press the button again to get the broadened
information banner, containing the following
information: satellite, transponder, rate and
etc. of the service, the description of the pro-
gram. To close the information banner press
the button once more.
3 SOUNDTRACK
Press to display the soundtrack list for the
current service. Press this button to get the
soundtrack mode and the list of available au-
dio services.
4 TELETEXT /SUBTITLE
Press to display teletext**.
Press to display/to close the subtitle language
list for the current service.
5 UHF
Press to set favorite service list Menu.
6 TIME
Press to display the current time in the top left
corner of the screen.
7 EXIT
Press to return to the previous menu and
screen or to leave Main Menu. Pressing the
button during Service searching stops the
process.
8 / VOLUME UP/DOWN BUTTONS.
Press to increase (V+) or decrease (V-) the
volume.
9 STANDBY
Press to switch between Operation and Stand-
by modes.
Attention! In Standby mode some STB joints
are under the voltage.
** Press to leave the mode.
REMOTE CONTROL UNIT
i
?
UHF
EXIT
V+ V-
EXIT
1
9
10
11
12
13
14
15
16
17
18
19
2
3
4
5
6
7
8
1 2 3
4 5 6
7 8 9
0
EXIT
OK
TV/SAT
MENU
?
i
UHF
NUMERIC BUTTONS
STANDBY
TV / SAT
TV /
RADIO
MUTE
MENU
CURSOR
OK
P+ /
P-
HELP
EPG
RCL (Recall)
INFORMATION (RED)
SOUNDTRACK
(GREEN)
SUBTITLE
(YELLOW)
UHF (BLUE)
TIME
(WHITE)
EXIT
V+ / V-
V+
V-
P+?
P-
RCL
EPG
8
10 TV/SAT (switch through SKART)
Press to switch between «Terrestrial/Satellite
TV modes.
11 TV/RADIO
Press to switch between Satellite TV and Radio
modes.
12 MUTE
Press to temporarily cut off the sound.
13 MENU **
Press to display the Main Menu on the screen
or return to the current service.
14 CURSORS
Press to move the highlighted bar in the serv-
ice list, to select options on the menus, to
switch between services or increase and de-
crease the audio volume, to change the menu,
to select the soundtrack mode etc.
TV/SAT
MENU
/
/ /

15 OK
Press to display the service list**.This button is used to select and verify the chosen item in the
menus.
16 / Programme up/down buttons.
Press to select the next (P+) or previous (P-) service. Press to move up or down pages in the
service list.
17 HELP *
Press to display the help box on the screen any time during the work with STB. Additional and
clarifying information.
18 EPG **
Electronic Programme Guide button displays the TV/Radio programme guide.
19 RCL (Recall)
Press to select the service that was previously viewed.
Service choice inversion in the menu «Organizing Services»
Please note: The design of the Remote Control Unit may be changed without advance notice.
REMOTE CONTROL UNIT
OK
P+
P-
?
EPG
RCL
9
** Press to leave the mode
EXIT
* This button may not be equipped in some SW versions

The details of service and event are automati-
cally displayed on the I-Plate in the bottom of
the screen when pressing the button or
changing services.
In the bottom information box the following infor-
mation is displayed:
– Current time
– Service name
– Service number
– Favourite group name
– Subtitle symbol, teletext symbol, digital sound
(AC3) symbol, scrambling service symbol , radio
symbol , lock symbol
– Signal quality bar.
– The number of the current soundtracks, the
quantity of soundtracks
– The name of the program*
– Time of the beginning/end of the program
After the second press on the red button the broadened information box, containing the
following information, is displayed in the center of the screen:
– Satellite Name
– Network Name
– Frequency, Polarization, FEC, Symbol Rate (SR)
– Video/Audio/PCR PID of the Service
– Program Genre
– Age Limit
– Current Date
– Program Description
– Signal Strength Scale
INFORMATION BANNER
TELETEXT
The STB has the integrated teletext decoder.
To activate it press the yellow button
, select “teletext” in the list and
press . In this list select the language
for teletext. You can operate the teletext using
colour and digital buttons of the RCU.
The STB supports teletext in VBI-mode(Vertical
Blanking Interval). Receiving teletext in this
mode is possible if your TV has a teletext
decoder. You can switch to teletext mode
through your TV’s RCU.
Please, note: this function is available if op-
erator provides the teletext service
GUIDE TO FUNCTIONS
i
i
10
* See TV Guide

SUBTITLES
Press the yellow button to display subtitles
on the screen, select ‘Subtitles’ and press . In the
appeared list select a desirable language for subtitles
and press . From the moment image will be accom-
panied by subtitles.
To cancel subtitles press the yellow button ,
select ‘Subtitles’ and press . In the appeared list
select Exit.
In Subtitles mode Time is not displayed on the
screen.
Please, note: this function is available if operator
provides the subtitle service.
You can change services in several ways:
Press the Numeric buttons ~ ) on the remote control unit.
Press the buttons or / .
To switch between TV and Radio services, press the TV/Radio ( ) button.
To select the previously viewed service, press the Recall ( ) button.
CHANGING SERVICES
VOLUME CONTROL
To adjust the volume level, use / or
buttons. buttons work either in the screen
menu mode or service viewing mode. In the OSD
menu mode you cannot use buttons.
To temporarily mute the volume, press the Mute
button.
To cancel mute, press the Mute button again
or press the buttons / or .
SOUNDTRACK
If you want to change the audio language of the current
service, press the Green button.
The on-screen menu will be displayed on the top left side
of the screen.
Use buttons to select the soundtrack.
Use buttons to select left, right, mono or stereo
output audio mode.
Press or buttons again to cancel the
menu.
You can change output audio mode from the menu: “Instal-
lation” – “System Settings” – “AV Output Setup” - “Audio
Output” - select left, right, mono or stereo output audio
mode.
GUIDE TO FUNCTIONS
OK
/
P+
P-
V+ V-
?
/
?
EXIT
11
V+ V-
RCL
Please, note: this function is available if operator provides the service.
/
/
/
/

To display the current service list on the
screen use the button. You can look
through the list in the common or broadened
modes. To change the current mode press
the button. The top field contains the
name of the current list, the bottom field
contains the full name of the chosen service.
Use the / buttons to
select a service.
Use buttons to move the cursor to
the next/previous service in the list. In the
broaden mode you can use buttons
to move up or down columns in the list and
use / buttons to move up or down pages in the list. The scroll bar on the right of the
screen demonstrates the location of the chosen service in the general list. Press button to
view the chosen service.
FAVORITE LIST
Default quantity of Favourite lists is 4. Organ-
ize Favourites you can in the menu: “The
Main Menu” – “Organazing Services”.
To display the list of Favourits on the screen
press the blue button on the Remote
Control in the view mode.
Use buttons to move in the list. To
open the list press . Press button to
view the chosen service.
If you press while you are in the list the
latest service in the list or the first service in
the list will be switched on.
INFORMATION CALL /HELP*
To get information about the STB work press . Information is available in the menu mode
CURRENT TIME
To call the Clock in the viewing mode press the white button on the Remote Control.
To cancel the Clock press button again.
Also you can press the red button on the Remote control to get current time from the
information box.
* This function may not be equipped in some SW versions
GUIDE TO FUNCTIONS
OK
/
OK
UHF
OK
OK
?
i
SERVICE LIST
12
i
P+
P-
/
/
P+
P-
All TV and All Radio lists are obligatory and created after Search. If you delete any of them you
will lose the whole Favourite lists content.
Please, note: maximum quantity of Favorites is 30.
/
/

STB installation, service search and editing, control of the service access and etc. are carried out
through the taken up Menus. There are two types of menus: full-screen and OSD menus.
FULL-SCREEN MENU
To select items of the menu use buttons. To
verify your choice use button. To cancel/return to
the previous level use button.
Items of the menu may be:
– Buttons for moving to the next level of the menu.
– Entry field. To enter information use ~ buttons,
to verify press button or buttons, to
cancel press button.
– Drop-down lists. To open the list press button,
to move in the list use buttons, to verify your
choice press button, to cancel press button.
You can also select the element in the list using
buttons.
Please, note: drop-down list may function as entry
field.
– Context help field. It contains information about op-
tions (choice from the list, value input etc.) for every
item of the Menu.
– Functional buttons bar. It contains 4 color buttons,
which are similar to ones on the Remote Control. If
the button is active it is brightly highlighted and has a
name (change, rename etc.), if the button is not active,
it is dark and has not a name.
Most functions of the STB demand PIN code*.
OSD Menus are special menus for service, soundtrack
selecting etc. This menus are described in the re-
spective issues.
Main Menu includes:
– Installation - provides access to service search, in-
formation about services, system settings and etc.
– TV Guide - provides date and time information
about programmes of every service.
– PIN Code - provides parental code set, age limit.
– Timer - you can adjust time parameters or set
timer for events.
– Games – provides access to games “Tetris” and
“Life”.
–STB status – provides information about the model of the STB, hardware, software and database
versions.
MAIN MENU GUIDE
/
OK
EXIT
OK
/
EXIT
/
OK
ON-SCREEN DISPLAY MENU
13
OK
* See Parental PIN Code
/
EXIT
/

You can use keyboard to enter any information,
i.e. services, groups, satellites, networks names.
To enter a letter/symbol move the cursor using
buttons till necessary letter/symbol
and press . To save the input name press the
green button, to remove one symbol press
the red button, to change the сodetable
press the blue button (the chosen language
will appear in the right top corner of the screen),
to leave without saving press the grey but-
ton.
Default language for keyboard is the language of
the user interface.
MAIN MENU GUIDE
/
OK
?
i
UHF
EXIT
KEYBOARD
14
/

Antenna Setting Menu allows to correspond the
following parameters to the antenna number:
– LNB type
– DiSEqC input
– 22 KHz Tone
– LNB power
– Motorized system
Using the red button on the Remote
Control you can completely delete data of the
antenna with its services.
To add a new antenna choose in the list of anten-
nas “New” and press the yellow button,
and after that enter new antenna parameters.
It is possible to connect 4 antennas to the STB, using DiSEqC 1.0, and 8 antennas, using “22
KHz” switch.
LNB TYPE
Select LNB type (single, dual, universal1, universal 2).
Single LNB low frequency can be 5150, 9750, 10600, 10750, 11475MHz.If the required LNB
Frequency is not available, then enter the frequency manually using the Numeric buttons (0~9).
Dual LNB low and high frequency can be 5150, 9750, 10600, 10750, 11475MHz.If the re-
quired LNB Frequency is not available, then enter the frequency manually using the Numeric
buttons (0~9).
When you select Universal 1 it switches between 9750 and 10600MHz automatically. The
“22KHz Tone” setting is unnecessary. (Disabled)
22KHZ TONE
Used for two or more antennas or LNBs.
DiSEqC INPUT
If you use several antennas or LNBs, connected to the STB with DiSEqC switch, in this item
you have to select parameters for DiSEqC A-D (1-4) or TonBurst A B.
For correct operating with multiswitch system, supporting DiSEqC 2.0, or analogue operating
(0/22 KHz, 13/18 volt, tone impuls) it is imperative:
– Either give DiSEqC-switch combination - DiSEqC A, DiSEqC B etc.;
– Or give analogue operating combination - TonBurst A, TonBurst B.
To change operating from DiSEqC for analogue do what recommended for particular switch.
Please, note: DiSEqC 2.0 is controlled similar to DiSEqC 1.0.
LNB POWER
On/off LNB power.
MOTORIZED SYSTEM
If you use Motorized System for antenna operating with DiSEqC 1.2, set “On” in this item. The
Motorized System is used to set the DiSEqC 1.2 motor by Eutelsat specification.
INSTALLATION
i
ANTENNA SETUP
15

For Positioner setup to satellite you should:
– Select a satellite, from wich you’re going to
search the services.
– Select a transponder. STB will search the
satellite, using data of the chosen transponder.
Please, note: You must be sure that the cho-
sen transponder has sufficient signal power in
your region and high symbol rate.
After that press the blue button (signal
search) and select the direction for the an-
tenna, using buttons (West or East).
The antenna will automatically start moving to
the selected direction, until find the signal of
the chosen transponder. As soon as the signal
is found, it is necessary to adjust it manually
to get the best quality of the signal. For it
move the cursor to buttons
and pressing and holding the button /
try to get maximum value in signal strength/quality scales.
– Press the green button to save the position.
If satellite position was saved in the STB before, than press the yellow button and enter
the number of the position. Press to verify your choice. After you select Service Search the
box Automatic Search will open.
ADDITIONAL POSITIONER SETUP
To enable eastern/western limit for antenna set the antenna in the outermost eastern/western
position. After that in the menu “Additional positioner setup” select the limit (eastern/western)
and press the green button. To disable the limit press the red button.
To move antenna in the initial position select “Move to Zero” and press the green but-
ton.
Command “re-count/evaluate” is individual for every positioner (the green button). *
Please, note: It is possible to combine the DiSEqC switch and motorized antenna, operated by
the DiSEqC 1.2 in the set-top box.
POSITIONER SETUP
* This function may not be equipped in some SW versions
INSTALLATION
UHF
?
i
?
16
OK
?
?
/

The menu “Satellite setup” allows you to select
the desired satellite from the list, add a new
satellite, delete a satellite or rename a satellite,
change it’s parameters and information about its
orbital position. You can also change parameters
of transponders or add new transponders.
SATELLITE NAME
Satellite names are listed in alphabetical order.
If the name of the desired satellite is absent in
the list, please select the “New” option (last string
in the list) and press the yellow button on
the Remote Control. In the list of satellites a New
Satellite will appear. To change its name press the blue button. Using a keyboard input the
name. You can change any satellite name this way.
ORBITAL POSITION
To enter the desired orbital position go to the “Orbital Position” option.
Type the desired position of the satellite using the digital ~ buttons in “xxx . x” format (4 symbols).
After typing the 4th symbol, a list consisting of 2 variants of direction (“W” or “E” ) will appear. Verify
your choice. Orbital Position must be within 0 - 180 degrees.
TRANSPONDER
This option contains a list of transponders of the selected satellite. Every transponder has such param-
eters as: Frequency, polarization, Symbol Rate, FEC.
Attention: To have opportunity for editing the list of transponders or their parameters it is necessary to
switch on the Expert mode in menu “Installation” – “System settings” – “Other settings” – “Installation
Mode” - Expert.
FREQUENCY
Enter the frequency of the transponder. Frequency must be within 3400-12750 MHz.
POLARISATION
Select polarization type: vertical, horizontal, left, right.
SYMBOL RATE
Select symbol rate. Enter optional using ~ buttons.
FEC
Select parameter for errors correction from: 1\2, 2\3, 3\4, 5\6, 7\8.
* See Keyboard
INSTALLATION
UHF
SATELLITE SETUP
17

This menu allows to select the desired language for
the screen menu and soundtrack language.
MENU LANGUAGE
Select a language for the menu or banner OSD in
this mode. You can select desired language for the
STB menu.
AUDIO LANGUAGE
You can select the default language for audio when
changing services, if the chosen language is pro-
vided.
SUBTITLE LANGUAGE
You can select the language for subtitles in the Subtitle Menu. To call subtitles in the viewing
mode press the yellow button, select “Subtitles” and press . In the appeared list select
the desired language for subtitles and press . Now the image is accompanied by subtitles.
* This function may not be equipped in some SW versions
A/V OUTPUT SETUP
“A/V Output Setting” Menu allows to adjust:
– Video output
– Audio output
– Screen mode
– Display format
– UHF channel
– TV Standard
– SPDIF – digital audio output
VIDEO OUTPUT
Set the desired video output mode from the TV
SCART (RGB or CVBS).
AUDIO OUTPUT
Set the desired audio output mode from the TV SCART, SPDIF and RCA jacks (stereo, mono,
left, right).
SCREEN MODE
Select the desired format of the screen (4:3 or 16:9)
DISPLAY FOTMAT*
Select the format in which the video will be displayed on screen. When your TV set is 4:3 and
video source is 16:9, the STB will display in Letter-box or Centre mode as selected. When your
TV set is 16:9 and video source is 4:3, the STB will display in the Pillar-box or Full mode as
selected.
UHF CHANNEL
Select a UHF channel (21-69).
TV STANDARD
Set TV standard, supported in your TV (PAL B/G, PAL D/K, PAL I, SECAM).
SPDIF
Digital audio output (SPDIF) on/off.
INSTALLATION
OK
LANGUAGE SETUP
18

“Other Settings” menu includes:
– Transparency
– Color Scheme
– Info box display time
– Power on mode
– Installation mode
OSD TRANSPARENCY
Set desirable type of image transparency of infor-
mation banner, service list box, time box. You can
choose from 0 to 70 % with 10% step-size.
OSD COLOR SCHEME
Allows to select one of four kinds for the colour menu design.
INFO BOX DISPLAY TIME
Set the time of the information box display on the screen. The time ranges from 0 to 30 sec-
onds.
POWER ON MODE
Power on mode – after STB is on it stays in standby mode. To start the STB move it in power
on mode using button.
INSTALLATION MODE
Beginner – this mode locks the ability to edit the List of Satellites and Transponders and PID.
Expert - this mode unlocks the ability to edit the List of Satellites and Transponders and PID
PID EDITING
Service PID is automatically renewed from the satel-
lite. To enter abnormal PID value or cut off auto
renewal from a satellite you should:
– Select “Expert” in the Installation Mode.
– Start viewing mode of the service, where you
need to change PID (select soundtrack if there are
several audio PIDs).
– Call broaden information banner with double click
on button.
– Press . Edit PID.
– To save the changes press button. From this
moment PID are displayed in red and not automati-
cally renewed from the satellite.
To return default setting (auto renewal from a satellite) enter EDIT PID mode, press the green
button and verify your choice by pressing button.
INSTALLATION
i
OK
?
OK
OTHER SETTINGS
19

There are 2 search modes: Auto and Manual.
AUTOMATIC SEARCH
Before beginning an auto search it is necessary to
setup the following parameters:
– Select the target antenna or create a new one.
Press the blue button to change the existing
antenna or to create a new one.
– Select the satellite. The STB will search services
using the list of transponders for the selected satel-
lite. Press the blue button to edit the list of
transponders.
– You can select “Yes” or “No” mode in Skip Scram-
bled menu.
– Select the Search type (Quick; Network; Full).
Quick search – search among the transponders of the STB base.
Network search - search among the transponders of the STB base and in the stream.
Full search - search among the transponders of the STB base and among the frequencies in the
stream. The value of the polarization and FEC are being selected from all possible range/variants.
Symbol Rate value is being selected from the special range saved in the STB memory. Range of
symbol rates may by manually corrected. To add a new symbol rate select “New”, press the yel-
low button and enter your value. To edit a value simply enter a new one. Use the
red button to delete a value of symbol rate.
– Select Start Search and press OK.
While searching, the following are displayed on the screen: the scale of progress, two lists in
black colour (of found services) and in gray colour (of existing services) and both TV and Radio.
If the service that is found is already on the general list it will not be added again.
As the search stops the Save plate with the number of services found will appear.
If you press the button during the search process, searching of services will stop and
you can save the services that have been located.
SERVICE SEARCHING
UHF
i
EX
IT
UHF
20

MANUAL SEARCH
Before beginning a manual search it is necessary to
setup the following parameters:
– Select the number of the antenna or create a
new one.
– Enter the frequency of the transponder.
– Select transponder polarization type (vertical, hori-
zontal, left, right, auto).
– Enter symbol rate.
– Select parameter for error correction from: 1\2,
2\3, 3\4, 5\6, 7\8, auto.
If the transponder exists and the data are correct,
the box on the bottom of the screen shows the
quality and the level of the signal.
– Select “Start Search” menu.
While searching, the following are displayed on the screen: the scale of progress, two lists in
black colour (of found services) and in gray colour (of existing services) and both TV and Radio.
If the service that is found is already on the general list it will not be added again.
As the search stops the Save plate with the number of services found will appear.
If you press the button during the search process, searching of services will stop and you
can save the services that have been located.
If necessary, set additional searching parameters: skip scrambled, network search, audio, video,
PCR PID in the “Additional” menu.
ADDITIONAL
NETWORK SEARCH
During the network search the STB searches among the transponders saved in its memory and
adds information of transponders found in the stream.
Attention: This function is carried out if the transponder can get information about the frequency
of the other transponder from the digital stream. Search will be continued on the other trans-
ponder besides the transponder specified by the user.
SKIP SCRAMBLED
Automatic Skip all scrambled services during the search. You can select Yes if you prefer the
STB to save FTA services.
VIDEO PID/AUDIO PID/PCR PID
You can enter PID(Video/Audio/PCR) values manually. This mode is necessary when you search
for a signal that has abnormal service Information tables.
SERVICE SEARCHING
EXIT
21

SERVICE ORGANIZING
* See Keyboard
The “Service Organizing” Menu allows you to organ-
ize favourite lists, filter and add, select, delete,
rename, lock, move and sort in alphabetical order
all of the services.
Default quantity of lists is 6: TV All, Radio All, Mu-
sic, News, Sports, Movies. TV All and Radio All are
obligatory and contain all TV and Radio services
from the base. If you try to delete these lists all
services will be deleted from the base, but lists will
stay. You cannot rename these lists.
You can rename, filter and add services, select,
lock, move, sort in alphabetical order and delete
(use the red button) the rest of the lists.
To add programs into a favourite list you should
select the list and press . In the list of all
programs select the necessary ones and press ok to move them into the list of favourites by
pressing . To move all services into the favourite list press the blue button.
To make the selection process easier you can use the yellow button (sort the pro-
grammes in alphabetical order) or the red button (filter).
Using the filter you can select programs with particular parameters: satellite, frequency, network,
type (TV, Radio), type of code (FTA, Scrambled, Viaccess, Videoguard , etc.) To highlight services
press the red button, to reset filter parameters press the green button.
To create a new list in “Service Organizing” menu press the yellow * button. Type a
name for the list of favourites using the keyboard.
SERVICE ORGANIZING
?
OK
UHF
i
OK
i
i
22
This manual suits for next models
1
Table of contents
Other GS Set-top Box manuals