GTCOM LanguageBox User manual

Please read this manual carefully before using the product and keep it properly
An Intelligent Conference Solution

Product List
Main machine 1
Microphone 2 Power adaptor 1
Remote control 1 HDMI cable 1 AA battery 4
(incl. a charging cable)
(incl. A and B)

Common Operations
1.Connection
Connect to the display device, computer, video or audio device according
to the needs for projection screen or data storage. Insert the external
storage device and set up a wired or wireless network.
2.Start-up
Connect the device to the power supply unit and press the power switch.
The device will start up with the indicator showing red light.
3.Switch Signal Source
After start-up, the signal source will intelligently show to have been
switched to the HDMI source.
Main Machine
Microphone
matrix receiver
USB interface
HDMI output
HDMI input
Network cable
interface
Audio input
Audio output
Power interface
Indicator
RJ45
HDMI
IN
HDMI
OUT
USB
LINE
IN
LINE
OUT
DC
IN
PWR
KEY
Louver
Power switch
HDMI1
Signal source
AV
TV
HDMI1
HDMI2

4.Select Operating Mode
Select lecture, multilingual, caption or dialogue mode according to the
display needs of the source text, target text, videos and images.
5.Custom Settings
Setting options are available for display, connection, storage location,
synchronous conference, translation, customer termbase and sensitive
termbase, which can be customized by the user.
6.Start/End the Service
After the setting, click “Start Service”, the user can speak or input au-
dio or video, and the system will project the source text, target text, video
or computer screen according to the settings.
During the service, the user can set the display of the main interface,
switch the language, magnify the source text or the target text, pause,
clear the screen, end the service, or enter the mobile conference room.
7.File Storage/Export
Export the audio and text les after the service.
8.Shutdown
Press the power switch, and the device will turn o with the indicator o.

Connection
1.Display Device
Connect the HDMI OUT of the main machine with display devices such as
projector, display or smart TV with an HDMI cable.
2.Computer/Multimedia/Video Device
Connect the HDMI IN of the main machine with video devices such as
laptop or camera for the projection of computer or videos (caption
mode only).
After start-up, click “Settings > Connection > Video input” and select
HDMI or Camera, and projection will be enabled.
3.Audio Device
Connect LINE IN with audio devices such as sound console for audio
input, or use a wireless microphone or the built-in microphone matrix.
After start-up, click “Settings > Connection > Audio input” and select
the corresponding audio input device. Blue indicator on indicates the
successful connection with wireless microphone A, while green indicator
on indicates the successful connection with wireless microphone B.
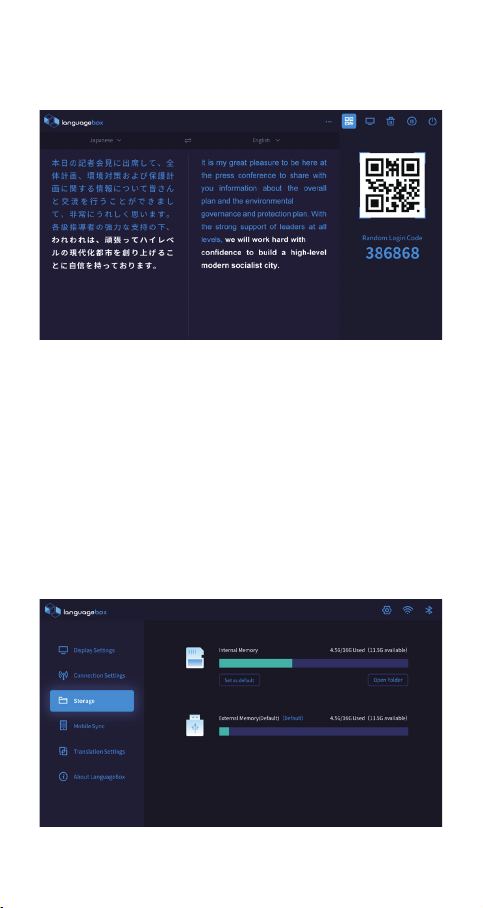
4.External Storage Device
The system applies internal storage by default. If you need an external
device to store your conference files, insert a USB flash disk or other
external device before start-up, and after start-up, open the “Device >
Storage location” interface and set “External storage” as default.
5.Network Connection
(1) Wired network
Insert the network cable to connect the wired network.
(2) Wireless network
After start-up, set the wireless network connection in “Settings >
Connection > Network connection”.

Select Operating Mode
The system features operating modes such as lecture, multilingual,
caption, and dialogue.
1.Lecture
The source text and the target text can be displayed on the same screen
in two columns, which can be adopted for single-person lectures. The
mode is suitable for conferences or lectures where the screen needs to
display the source text and a single-language translation.

2.Multilingual
The source text and the target text of two languages can be displayed on
the same screen, which can be adopted for single-person lectures. The
mode is suitable for conferences or lectures where the screen needs to
display the source text and translations in two dierent languages.
3.Caption
The source text and the target text can be displayed on the computer
projection screen or at the bottom of the video as captions, which
can be adopted for conferences or lectures where the screen needs to
display the source text and a single-language translation in real time
during computer or video projection.

4.Dialogue
The source text and the target text can be displayed in dialogue boxes,
which can be adopted for conference speeches or dialogues where the
source and target texts are displayed in syntagmas.
5.Monolingual Full Screen
Under the lecture or multilingual mode, select and click the source
text or any target text column in the service interface, then the
corresponding content can be displayed in full screen, which can
be adopted for conferences or lectures where only one primary
language is used for communication.

Start/End the Service
1.Start the Service
Select and click “Start Service” or the “Start Conference”
button in the App to start the service. And the screen will display
the graphic and text information in the established mode.
2.Service Settings
(1) Language
Click the language name in the language column to select the language
of the source and target texts.
Click the switch icon in the language column to switch the language of
the source and target texts.
(2) Shortcut Buttons
Click“ ”in the upper right of the interface to end the current service.
Click“ ”in the upper right of the interface to pause the current service.
Click“ ”in the upper right of the interface to restart the service.
Click“ ”in the upper right of the interface to empty the current interface.
Click“ ”in the upper right of the interface to enter the interface of
display settings.
3.Mobile Conference Room
Click“ ”in the upper right of the interface, scan the QR code and enter
the random code to access to the mobile conference room, where you
can switch the languages and check the conference content in real time.

The QR code icon will appear only after you click “Settings >
Synchronous Conference” and enable the synchronous conference.
4.File Storage/Export
Click “Settings > Storage > Open the File Catalog” to enter the “File
Manager” to check the stored conference audio and text files. The
system applies internal storage by default.
If you need to export the files, please insert external storage devices
such as a USB ash disk. When it is loaded, select the les in the “File
Manager” and click “Edit-Copy”; return to the device list, open the
external storage device and click “Edit-Paste” to complete the export.
The File Manager menu shows from left to right: Select, Edit, Sort, Return,
and View.

Settings
Click“ ”in the upper right of the interface to enter the interface of settings.
1.Display
You can set the font size and color (the fixed characters after speech
recognition), highlight color (the characters displayed in real time during
speech recognition), text area width, line space, watermark, logo, etc. of
the source and target texts.

2.Connection
You can set the network connection, video input and audio input devices
in the connection settings interface. The system supports connection
of audio devices such as wireless microphone, analog audio input, and
microphone matrix.
3.Storage Location
Select internal or external storage location for the conference content.
The default is internal storage. An external storage device can be
connected to export the audio and text files of the conference. If you
set an external storage device as the default location, please ensure the
device is successfully loaded and has sucient space.

4.Synchronous Conference
Enable or disable the function of synchronizing the conference
content to your cellphone. When you enable synchronous
conference, there will be a QR code of the mobile conference
room in the upper right of the main interface; when you disable
the function, there will not be any QR code and you won’t be
able to enter the mobile conference room.
5.Translation
(1) Text Display
Enable or disable the functions of dynamic text modication and real-
time machine translation, and set the language for speech recognition
and multiple languages for machine translation.

(2) Customization Management
The system supports matching with customer termbase and synchronous
update of sensitive terms. Log in the account and click “Match” to
match the termbase. Click “Synchronous update” and select “Sensitive
termbase”, and then the sensitive terms will be replaced by “**”.
6.About the Machine
The version information, device ID code, Bluetooth address, and
customer service phone number are provided. Operations such as
version updating, restoring factory settings, and selecting system
languages are also available.

Instructions on Conference Termbase
Management
1.Register and Log in
Register an account on the conference termbase management platform
(term.yeekit.com/languagebox) and log in the main interface to manage
and maintain the termbase.
2.Create a Termbase
Click “Create a termbase”, fill in the termbase name, language
direction, associated applications, term description, etc., add and upload
the termbase le, and click “OK” to create the termbase.
3.Search the Termbase
Enter the content to be searched in the search box of termbase name,
and click “Search” to search the termbase.
4.Associated Application
You can enable or cancel the association with relevant termbase. The
system will invoke and match the associated termbase in priority.
5.Enable the Application
Turn on the “Enable” switch and you can invoke and match the
relevant termbase information.
6.Download the Termbase
Click“ ”to download the termbase.
7.Delete the Termbase
Click“ ”and click “Yes” in the pop-up box to delete the termbase.

Instructions for the Mobile App
1.Download the Mobile “Remote Control” App
Download the “Remote Control” App from the application store to your
cellphone or Pad.
2.Enable Bluetooth
Enable Bluetooth on your Pad, cellphone or other smart device.
3.App Connection
(1) “Allow” Bluetooth Connection
Click“ ”in the upper right of the main interface and a prompt will pop
up saying “An application is trying to enable Bluetooth to detect your
device within 300 seconds”. Click “Allow”.
(2) Bluetooth Pairing
Open the App, click the Bluetooth icon in the interface and click “Scan”
to scan nearby devices. Pair the Bluetooth according to the name and
connect the corresponding device.
4.Mobile Remote Control
When the App is successfully connected, check the settings and conduct
remote control in the App.

Cellphone interface
Pad interface

Wi-Fi (2.4G), RJ45 Internet access
Product Specications/Parameters
Product name: LanguageBox
Manufacturer: Global Tone Communication Technology Co., Ltd.
Item Parameters
Specications 170 mm 170 mm 67 mm
Operating system Android 7.1
Network support
USB interface USB interface
Video input HDMI IN
Video output HDMI OUT
Audio input
Built-in microphone matrix; input with USB
microphone and wireless microphone (2
microphones)
Audio output 3.5mm audio output
Bluetooth Dual-mode Bluetooth
Sound card Built-in digital USB, analog audio sound card
Power +12V/2A
Languages for
speech recognition/
machine translation
Simplified Chinese, English, Spanish, Japanese,
Portuguese, Korean, French, German, Arabic,
Russian, etc.
Software features
Real-time machine translation, speech
recognition, image and text projection
Smart shorthand and le storage export
Conference content synchronized to cellphone
Uploading and updating of sensitive termbase
Matching and management of customer termbase
Others
Remarks
The product version will be constantly updated.
The hardware is subject to the real object, and the
software interfaces and features are subject to the
actual eects.

Suggestions
To ensure the accuracy of information recording and translation in
the device, please guarantee the denition of the network signal. Turn
off other wireless devices when using the wireless network. Before
connecting audio input devices, ensure the connecting cables are intact
and the external devices are in normal condition.
Precautions
◎ Please use original or manufacturer-approved accessories. Any
accessory that is not approved by the manufacturer may impact the
device performance, damage your device or cause personal damage.
◎ Please keep children or pets away from the device.
◎ Please keep the device from any liquid to prevent damage to it.
◎ Please do not operate the device with wet hands to avoid electric shock.
◎ Please do not keep the device in a low-temperature environment to
avoid damage to the circuit board.
◎ Please do not keep the device in high-temperature environment to
avoid reduction in its service life, damage to the batteries or melting
of accessories.
◎ Please do not place the device near any combustible or explosive
liquid, gas or object.
◎ Please do not throw or hit the device to avoid damage to the circuit board.
◎ Please do not clean the device with dry cloth or cloth prone to static electricity.
◎ Please do not paint the device to avoid any impact on normal operation.
Disclaimer
◎ GTCOM will not assume any economic or legal responsibility for any
promise made by the dealers that is not publicly guaranteed by us.
◎ This manual has been prepared to be as accurate and complete as
possible, but there is no guarantee for any errors or omissions that
may occur.
◎ The software and hardware of the product is subject to the modication by
GTCOM without prior declaration.
◎ GTCOM reserves the right of nal interpretation for this manual.

FCC Warning:
This equipment has been tested and found to comply with the
limits for a Class B digital device, pursuant to part 15 of the FCC
Rules. These limits are designed to provide reasonable
protection against harmful interference in a residential
installation. This equipment generates, uses and can radiate
radio frequency energy and, if not installed and used in
accordance with the instructions, may cause harmful
interference to radio communications. However, there is no
guarantee that interference will not occur in a particular
installation. If this equipment does cause harmful interference
to radio or television reception, which can be determined by
turning the equipment o and on, the user is encouraged to
try to correct the interference by one or more of the following measures:
• Reorient or relocate the receiving antenna.
• Increase the separation between the equipment and receiver.
• Connect the equipment into an outlet on a circuit dierent from
that to which the receiver is connected.
• Consult the dealer or an experienced radio/TV technician for help.
Caution: Any changes or modications to this device not
explicitly approved by manufacturer could void your authority to
operate this equipment.
This device complies with part 15 of the FCC Rules. Operation is
subject to the following two conditions: (1) This device may not
cause harmful interference, and (2) this device must accept any
interference received, including interference that may cause
undesired operation.
FCC
To comply with FCC RF exposure compliance requirements,this grant
isapplicable to only mobile configurations. The antennas used for this
transmittermust be installed to provide a separation distance of at
least 20 cm from allpersons and must not be co-located or operating in
conjunction with any otherantenna or transmitter.
Table of contents