manuals.online logo
Brands
  1. Home
  2. •
  3. Brands
  4. •
  5. Gtech
  6. •
  7. IP Phone
  8. •
  9. Gtech GTSIMF01 User manual

Gtech GTSIMF01 User manual

Popular IP Phone manuals by other brands

Cortelco C62 VoIP Phone user guide

Cortelco

Cortelco C62 VoIP Phone user guide

VanillaIP Polycom IP300 user manual

VanillaIP

VanillaIP Polycom IP300 user manual

Yealink Yealink SIP-T22P Quick installation guide

Yealink

Yealink Yealink SIP-T22P Quick installation guide

Viking SR-IP product manual

Viking

Viking SR-IP product manual

Yealink VP59 Teams user guide

Yealink

Yealink VP59 Teams user guide

Panasonic KX-UT133-B Administrator's guide

Panasonic

Panasonic KX-UT133-B Administrator's guide

Avaya one-X 9600 Series overview

Avaya

Avaya one-X 9600 Series overview

AVA Enterprises B179 Installation and administration guide

AVA Enterprises

AVA Enterprises B179 Installation and administration guide

Cisco Unified 7900 Series System guide

Cisco

Cisco Unified 7900 Series System guide

Polycom SoundPoint IP 450 datasheet

Polycom

Polycom SoundPoint IP 450 datasheet

Cisco SPA-500 Series user guide

Cisco

Cisco SPA-500 Series user guide

IPitomy IP290 user manual

IPitomy

IPitomy IP290 user manual

Polycom SoundPoint IP 650 user guide

Polycom

Polycom SoundPoint IP 650 user guide

Proximus Maestro 3016 IP quick start guide

Proximus

Proximus Maestro 3016 IP quick start guide

Polycom IP 450 user guide

Polycom

Polycom IP 450 user guide

Fanvil X4 user manual

Fanvil

Fanvil X4 user manual

Snom 320 quick start guide

Snom

Snom 320 quick start guide

Avaya Integral 5 R3.0 user guide

Avaya

Avaya Integral 5 R3.0 user guide

manuals.online logo
manuals.online logoBrands
  • About & Mission
  • Contact us
  • Privacy Policy
  • Terms and Conditions

Copyright 2025 Manuals.Online. All Rights Reserved.

GTECH GTSIMF01
Desktop Wireless Phone
USER GUIDE
IMPORTANT NOTICE
The GTECH Fixed/GSM small business system is not a mobile phone. As such
please note the following in relation to the operation of the equipment.
1. This product has been designed to receive incoming calls on the fixed line
network and make outgoing calls on a GSM network. Whilst the device
can receive incoming calls on the mobile number certain functions such
as SMS Alphanumeric address, Call Waiting / Hold, Call Barring, and
Multi-party call is not available.
2. In accordance with Australian and International regulatory standards.the
user should operate the device whilst remaining a distance of 25 cm from
the main phone unit.
Table of Contents
General Information 1-2
Getting Started 3-12
Using the Phone 13-31
IMPORTANT INFORMATION ON SAFE AND EFFICIENT OPERATION,
READ THIS INFORMATION BEFORE USING YOUR PHONE.
Safety
Exposure to Radio Frequency (RF) Energy
Your phone contains a transmitter and a receiver. When it is ON, it receives and
transmits RF energy. When you communicate with your phone, the system
handling your call controls the power level at which your phone transmits.
RF Energy Interference/Compatibility
Nearly every electronic device is susceptible to RF energy interference from
external sources if inadequately shielded, designed, or otherwise configured for RF
energy compatibility. In some instances your phone may cause interference.
Medical Devices
Radio signals transmitted from the unit may cause interference to hearing
aids.
It is recommended that if you have a pacemaker fitted you check with a
medical expert before using this product.
Other
Radio signals transmitted from the unit may cause interference to electrical
equipment, such as TV’s, Microwave, Computers etc. It is recommended that
the unit be placed at least one meter away from such appliances.
Cleaning
Make sure the unit is off and the charger is not plugged in before cleaning the
unit.
Use a damp cloth or anti-static wipe to clean. Never use household polish as
this may damage the product.
1
Environmental
Only use the power supply suitable for the GTECH range. Using an
unauthorized power supply will invalidate your warranty and may damage the
telephone.
Do not expose unit to direct sunlight.
Do not expose the unit to fire, explosive or other hazardous conditions.
Declaration of Conformity
We declare under our sole responsibility that the product detailed in this
manual, and in combination with our accessories, conform to the essential
requirements of the European Union Directive 1999/5/EC Radio and
Telecommunications Terminal Equipment Directive 3.1(a).
3.1(b) and 3.2., the Radio Communications Standard (Electro-magnetic
Radiation Human Exposure) 2003, and the Australian Communications and
Media Authority Section 376 of the Telecommunications Act 1997.
Technical Information
Dimensions (W x D x H)
200mm x 175mm x 65mm
Weight
Less than l.5kg
Mounting Mode
Desktop or Wall Mounted
Input Voltage
AC: 220V , 50Hz DC:5V l000mA
Standby Time: 24Hrs Talk Time: 3Hrs
Battery
Type: Li-ion
Voltage:5V Capacity :1000mAh
Ambient Temperature
- l0°C - 40°C
Storage Temperature
-20°C - 70°C
Relative Humidity
10% - 95%
Working Frequency
GSM 850/900/1800/1900 Mhz
2
General Information
General Information
Introduction to your GTSIMF01 (Fixed and Mobile Small Business System)
Welcome
Congratulations on your new purchase. Before you start using your GTSIMF01,
make sure the On/Off switch is in the Off position. Do NOT turn the phone until the
following has been completed.
Getting Started
Check the contents of the box, you should have the following.
Base Unit Hand Piece Curly Cord Antenna Cordless Handset
Cordless Cradle Power Adapter (5V) Cordless Handset Battery
Base Unit Battery Base Unit Power Adapter (9V) Quick Reference Guide
User Manual (CD)
3
Setting up the Base Unit
Remove the GTSIMF01 from the box, and proceed as follows:
WARNING!!!!! IMPORTANT INFORMATION ON SAFE AND EFFICIENT OPERATION
OF THE GTSIMF01, PLEASE READ AND COMPLY WITH THE FOLLOWING
INFORMATION BEFORE USING YOUR PHONE.
Please note, failure to follow the following steps can result in damage to the phone
and therefore void any warranty on the product.
1. On/Off Switch
2. Power Port
3. PSTN Line In
4. Phone Extension
5. USB Port
6. Upgrade Port
7. Handset Connection
8. Antenna Connection
Before commencing make sure the phone is in the Off position, and the
telephone line is unplugged.
4
Getting Started
Getting Started
Handset Connection
Connect the hand piece to the handset connection on the left hand side
of the phone. (Fig 1(7))
4
Antenna Installation
Screw on the antenna into the antenna socket on the right hand side of
the phone See Fig 1(8). (Important!! Failure to do so will result in
irreparable damage to the circuitry, and will void any warranty)
SIM Card And Backup Battery Installation
Make sure you turn off the phone and disconnect from telephone line before
installing the SIM or Battery.
Turn the phone over and open the battery cover to locate the SIM card
slot.
5
Insert the SIM into the SIM card slot.
Connect the backup battery by clipping the connector into the pins
provided.
Replace the battery cover when done
Warning: New batteries for the units are shipped partially charged. Before you
start using the GTSIMF01, you will need to charge the batteries for up to 14
Hours.
External Power Adapter
Insert the power adapter into the power port labeled DC 5V, and plug it
into a power source.. See Fig 1(2).
Turning the phone On
Turn the switch to the ON position, the display lights up, and the phone
begins to search for the appropriate network.
Turning the phone Off
Turn the switch to the OFF position, the display goes off, and the phone is
now off.
6
Getting Started (Base Unit)
1. LCD DISPLAY
2. IN USE INDICATOR
3. POWER LIGHT INDICATOR
4. FLASH
Press to disconnect from a call.
5. MUSIC
In Standby Mode, press to access and set ring tones.
6. TRANS
Press to transfer incoming calls to cordless handsets
7
7. MENU/OK
In Standby Mode, press to access the Menu or move to the next screen.
8. PB/EXIT
In Standby Mode, press to access the Phone Book. In Menu Mode press
to go to the previous screen.
9. NAVIGATION KEYS
Used to navigate through the menus.
10. SET
In Standby Mode, press to access Phone Settings, in Menu Mode, press to
save settings.
11. REJ
In Standby Mode, press to reject an incoming call.
12. WRITE Msg
In Standby Mode, press to compose a message.
13. INBOX
In Standby Mode, press to access messages
14. 0
In Standby Mode, press to toggle case.
15. SEND/RD
In Standby Mode, press to access previously dialed calls. In Menu Mode
press to dial a number.
16. SPEAKER
In Standby Mode, press to receive or make calls
17. INT
In Standby Mode press to page cordless handsets
18. DEL
In Menu Mode, press to delete a character at a time
8
Getting Started (Base Unit)
1. SPEAKER
2. LCD DISPLAY
3. NAVIGATION KEYS (Up Arrow)
Used to navigate through the menus
4. MENU
In Standby Mode, press to access the Menu or move to the next screen.
5. DIAL/SPEAKER
To initiate a dial or switch to speaker mode.
6. NAVIGATION KEYS (Down Arrow)
Used to navigate through the menus
9
7. REDIAL
In Standby Mode, press to redial the last number.
8. INT
In Standby Mode, press to use the intercom. In Menu Mode press to
transfer call to another handset.
9. KEYPAD
Used to dial numbers or send text messages.
10. MICROPHONE
11. SEND
In Menu Mode press to dial a number.
12. DISCONNECT
Press to hang up or disconnect a call.
13. BACK
Press to delete a character at a time,
14. ON CHARGE INDICATOR
15. POWER PORT (7.5V)
10
Getting Started (Cordless Handset)
Setting up the Cordless Handset
Backup Battery Installation
Turn the cordless handset over and slide the battery cover to remove.
Connect the backup battery by clipping the connector into the pins
provided.
Replace the battery cover when done.
External Power Adapter
Insert the power adapter into the power port at the back of the cordless
handset cradle, labeled DC 9V and plug it into a power source.
Place the cordless handset into the cradle to charge.
Register your Cordless Handsets
A Base Unit can have up to 4 registered Cordless Handsets.
To register a cordless handset to a base unit, you need to pair the devices.
Base Unit
1. In Idle Mode, Press Menu/OK and then 3 to proceed to the Phone Settings
screen.
2. Use the  buttons to locate Handset Function and press Menu/OK to
proceed.
3. Use the  buttons to locate Register and press Menu/OK to proceed. The
screen will display Register…, and the base unit is ready to pair.
Handset
1. In Idle Mode, press MENU to proceed.
2. Use the  buttons to locate SETUP and press Menu to proceed.
3. Use the  buttons to locate REGISTER and press Menu to proceed.
4. Use the  buttons to locate NEW REGISTER and press Menu to proceed.
5. Use the keys to select from BASE UNIT 1 or BASE UNIT 2 and press
MENU to proceed.
11
6. Enter 1234 as the
7. INPUT PIN and press MENU to proceed.
8. The screen will flash REGISTER, and will attempt to pair with the Base Unit. If
the Base Unit displays Success, and the Handset has a long prolonged beep,
the Handset has paired successfully.
9. Follow the same procedure if you have multiple Handsets.
You are now ready to connect the telephone line and start using your new
GTSIMF01 phone.
12
Getting Started (Cordless Handset)
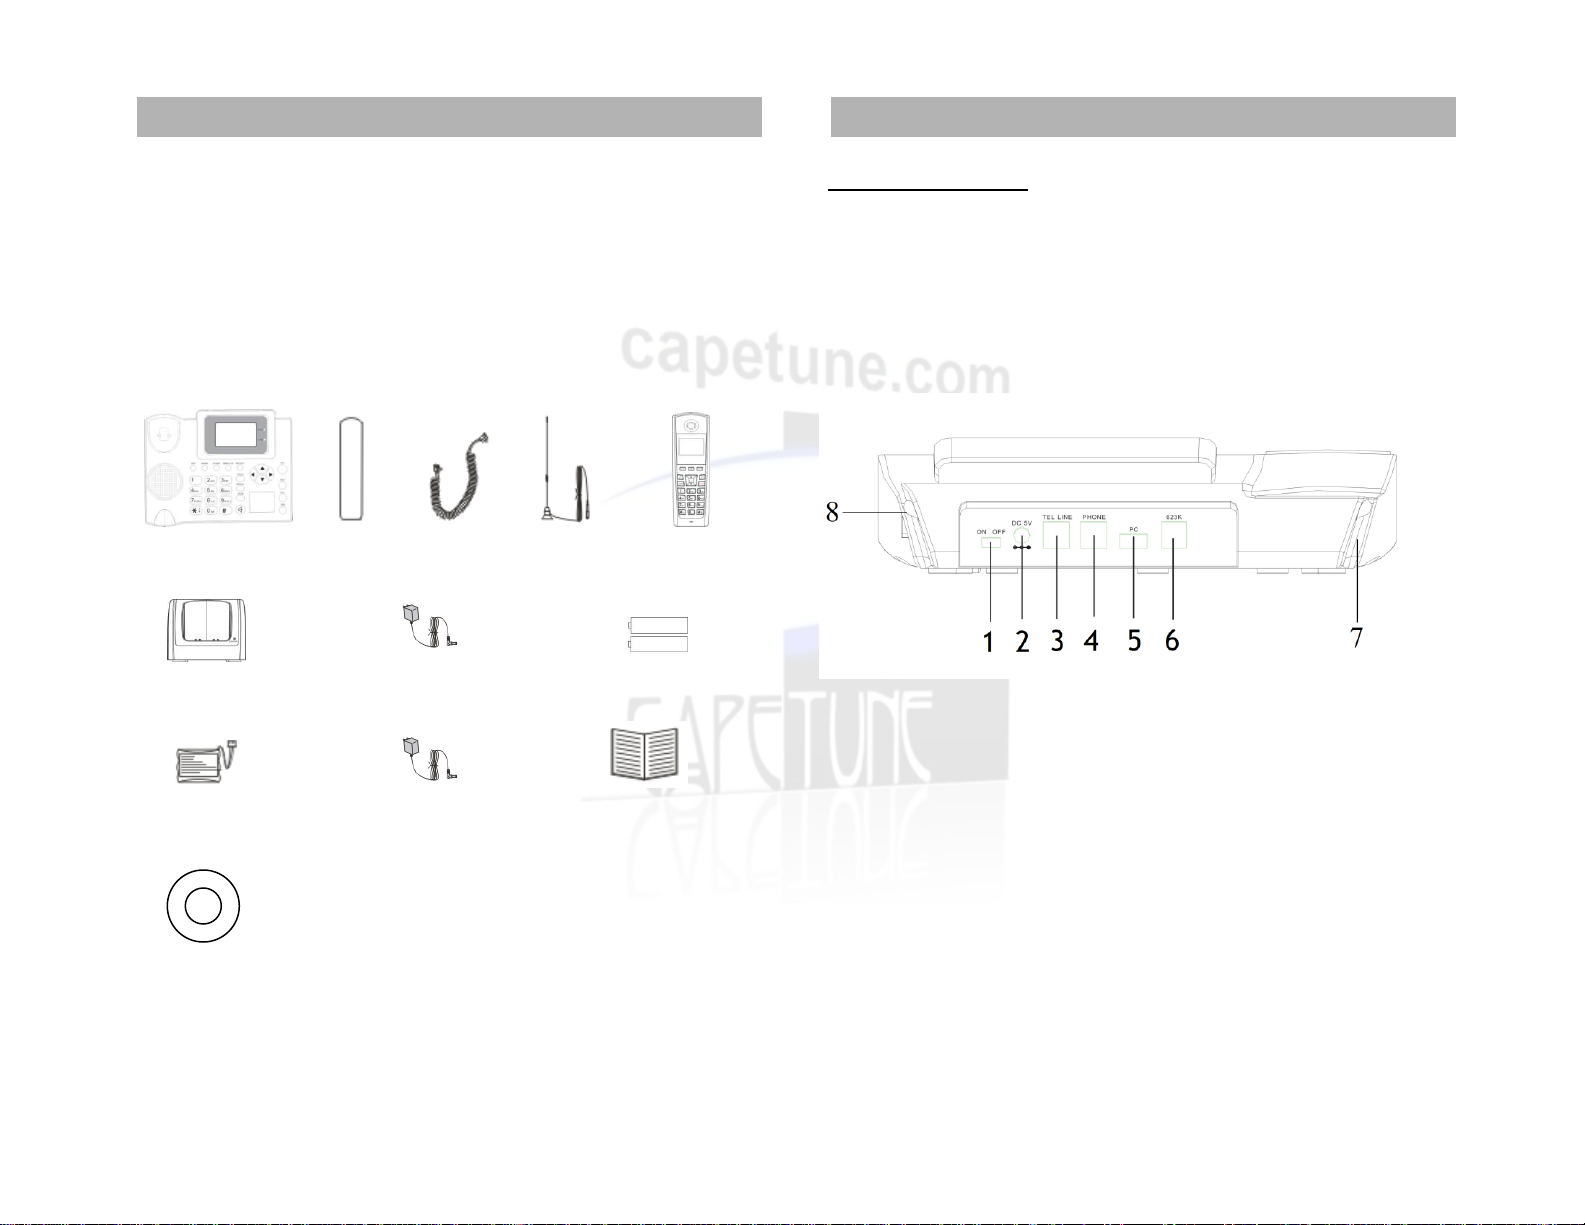
Basic Operations for Base Unit
Making Calls
Making an External Call via GSM (Mobile Network)
Pick up the hand piece or press the, and dial the number. Press SEND/RD, or wait
3 seconds for the call to connect.
Making an External Call via PSTN (Land Line)
Pick up the hand piece, press * followed by the number. Press SEND/RD, or wait 3
seconds for the call to connect.
Transferring an External Call to a Cordless Handset
Press the TRANS key followed by the Cordless Handset Number you wish to
transfer to, the display shows PAGE H<nb>, and the call is transferred.
Making an Internal Call
Press the INT Key followed by the cordless handset number i.e. (1,2,3 or 4) the
display will show PAGE H<nb>. Pick up the hand piece, and wait for the cordless
handset to be answered.
Ending a Call
Hang up the hand piece or Press the FLASH button to end the call.
Answering a Call
When you receive a call, the phone rings, and the display shows the incoming call
number. Pick up the hand piece or press the button to receive the call.
Redial
Pick up the hand piece and press the SEND/RD button, the last number dialed will
be redialed
13
Receiving more than one call at a time (Call Waiting)
If you are using the PSTN (Landline) and you have an incoming call on the
GSM(Mobile) Network, you will hear a beep at intervals to notify you of the
incoming call, and the display on the Base Unit will show TALK. Press the Menu/OK
button to pick up the call. The PSTN(Landline) call will go on hold, and the display
on the Base Unit will now change to show SWITCH. Press Menu/Ok at anytime to
switch between the two calls.
Handset Receiver Volume
During a call, you can adjust the volume of the handset receiver by pressing ◄(-) to
reduce the volume or (+)►to increase it.
Speakerphone Calls
Making a call using the Speakerphone
To make a call using the Speakerphone, press the button, the speaker icon is
displayed, and you hear your call over the loudspeaker.
Receiving a call using Speakerphone
To receive a call using the Speakerphone, press the button, the call is then
transferred to the loudspeaker.
Switching to the Speakerphone during a call
During a call press the button, the speaker icon is displayed, and you hear your
call over the loudspeaker. To switch the Speakerphone off, and return to the hand
piece at anytime, just pick up the hand piece, or press the button again to end
the call.
Basic Operations For the Cordless Handset
Making an External Call via GSM (Mobile Network)
Enter the number you wish to dial, and press to initiate the call.
Making an External Call via PSTN (Land Line)
Enter * followed by the number you wish to dial, and press to initiate the call.
14
Using the Phone
Using the Phone
Transferring an external call from one handset to another handset
Press the INT key followed by the Cordless Handset Number you wish to transfer
to, and wait for the call to be answered. The display shows INTERCOM H<nb>. Once
the called handset is answered, you press and the call is transferred.
Three Way Conference Call
Press the INT key followed by the Cordless Handset Number you wish to
conference in, the display shows INTERCOM H<nb>. Once the called handset is
answered, you press the INT key again to have a Three Way Conference. Press
at anytime to exit the Three Way Conference.
Receiving a Call
When you receive a call, the cordless handset will ring, and the display will light up,
with the word “RINGING”. Pick up the cordless handset from the cradle and press
to answer.
Ending a Call
To end a call press .
Handset Receiver Volume
During a call, you can adjust the volume of the cordless handset by pressing to
increase it or to reduce it.
Speakerphone Calls
Making a call using the Speakerphone
To make a call using the Speakerphone, press the button, the speaker icon is
displayed, and you hear your call over the loudspeaker.
Receiving a call using Speakerphone
To receive a call using the Speakerphone, press the button, the call is then
transferred to the loudspeaker.
Switching to the Speakerphone during a call
During a call press the button to switch to the loudspeaker.
15
Menu Operations (Base Unit)
Names
You can store up to 100 names and numbers in the Phone Book, names can be up
to 16 characters long and numbers up to 30 digits. Press PB/EXIT to proceed to the
Search option in the Names screen.
Search
1. Press Menu/OK to proceed.
1. To search for an entry in the Phone Book, you can input a name and press
Menu/OK. If more than one entry appears, you can use the  buttons to
traverse through the entries to find the one you want.
2. Press Menu/OK again and you will be presented with the following options.
Call
Send Message
Edit Name
Edit Number
Delete
Call
1. Press OK to call the entry selected, the display shows Calling…., and the
number is dialed.
Send Message
1. Press OK to send a message to the entry selected.
2. Enter a message of up to 512 characters and press Menu/OK.
Edit Name
1. Select the Edit Name option and press Menu/OK to proceed.
2. Use DEL to delete any incorrect characters, and then◄or to move through
the characters then enter new ones using the keypad and press Menu/OK to
save and exit.
16
Using the Phone
Using the Phone
Quick Reference Guide