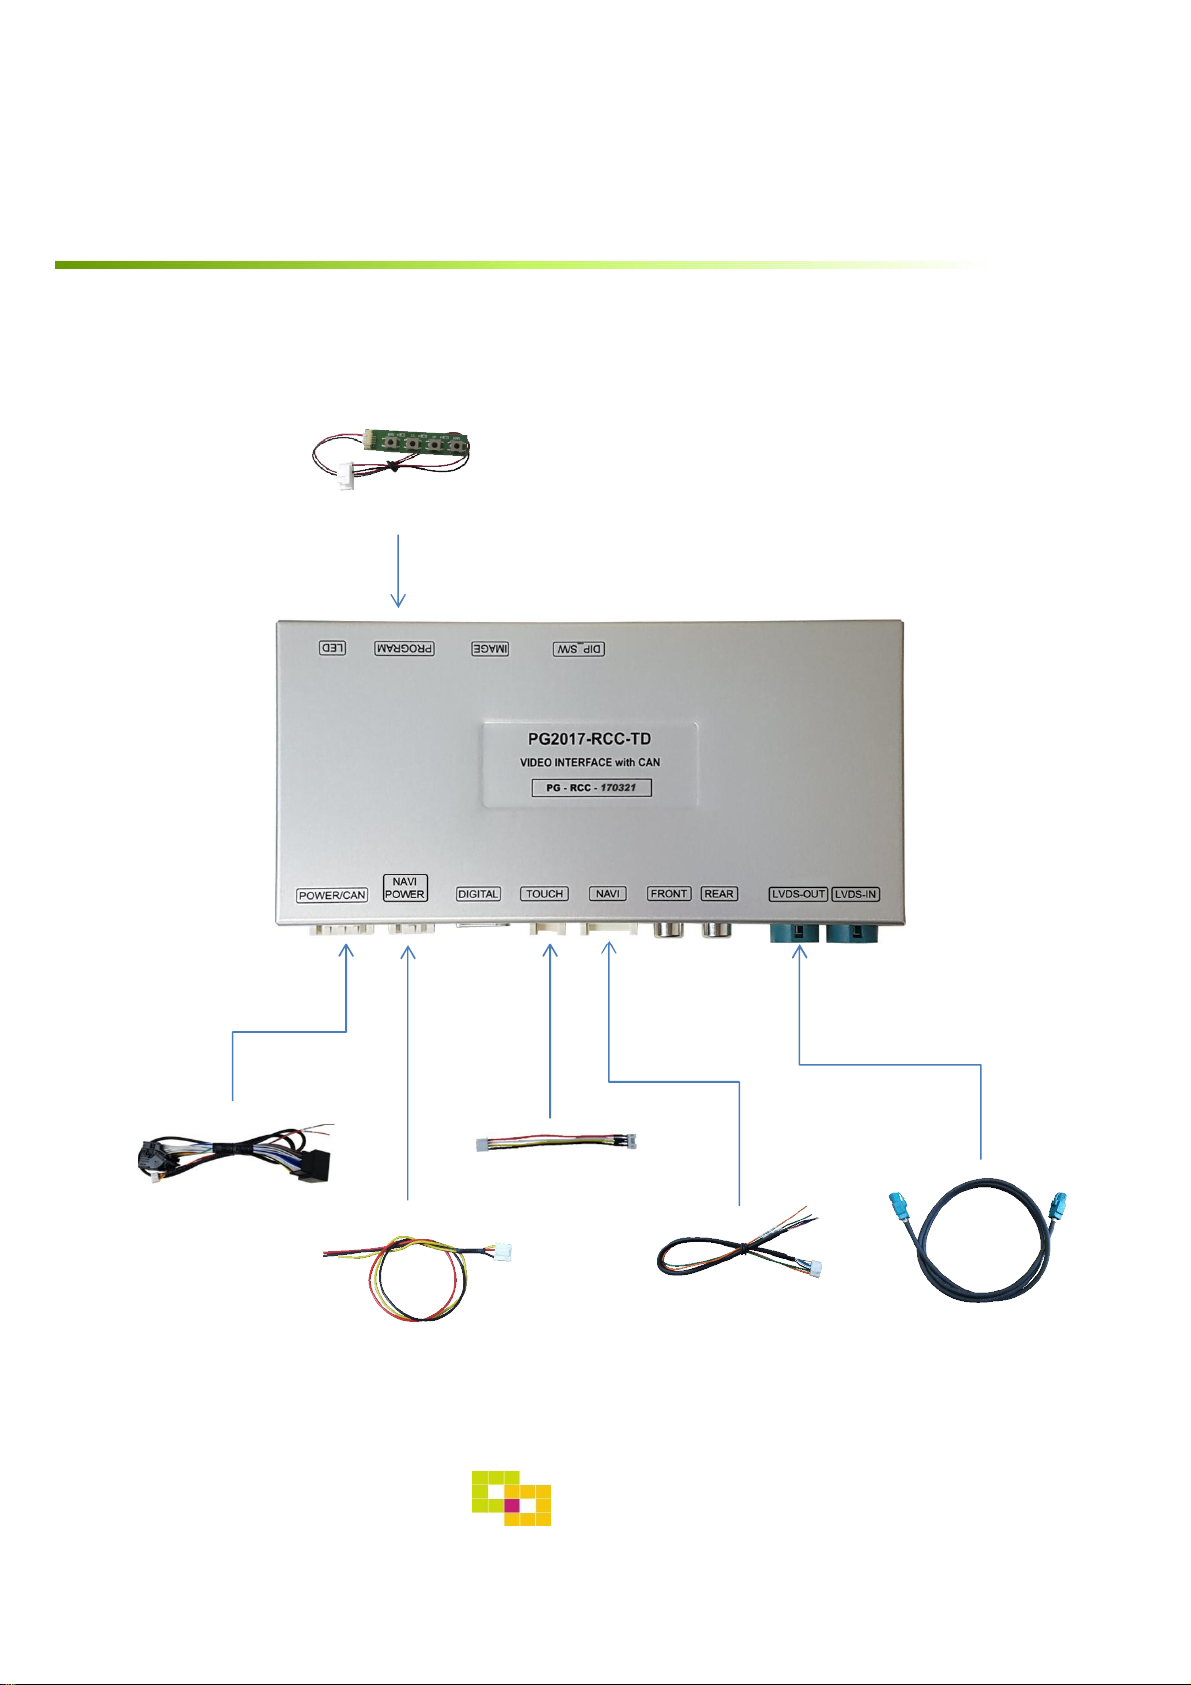
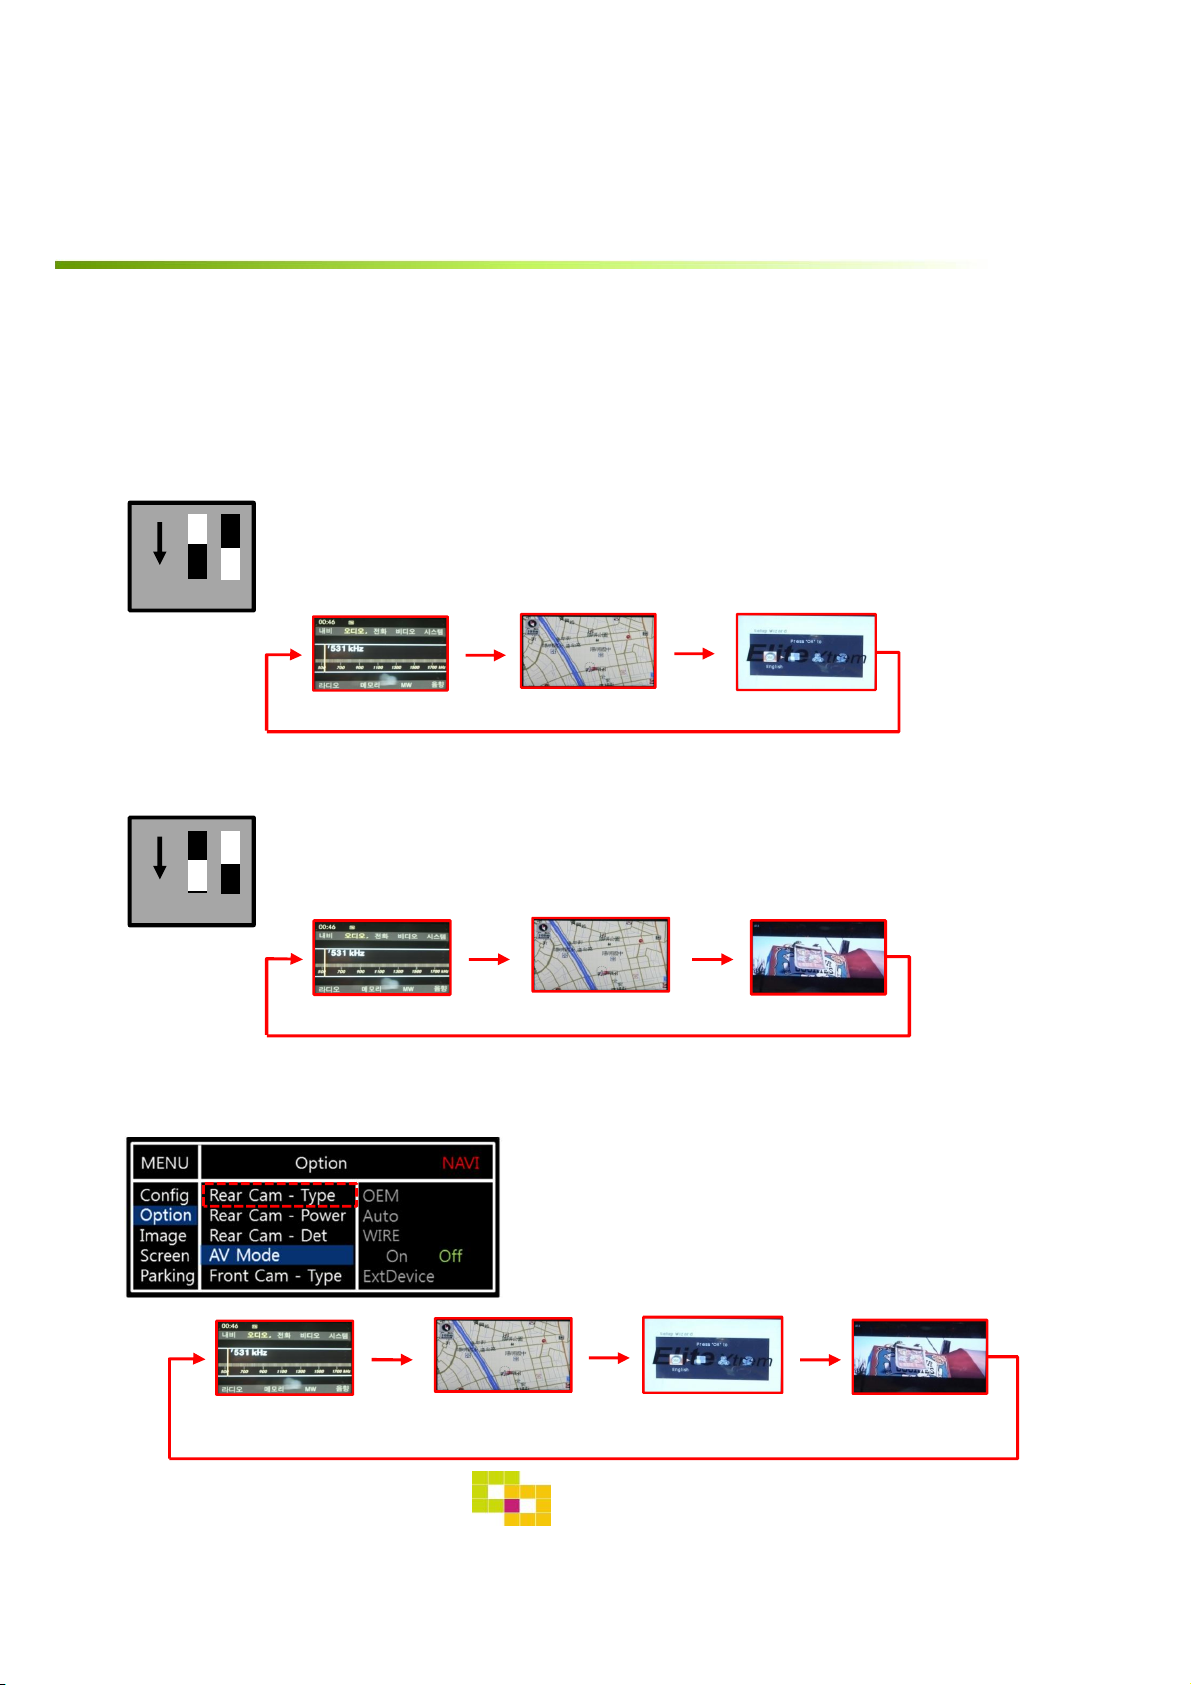
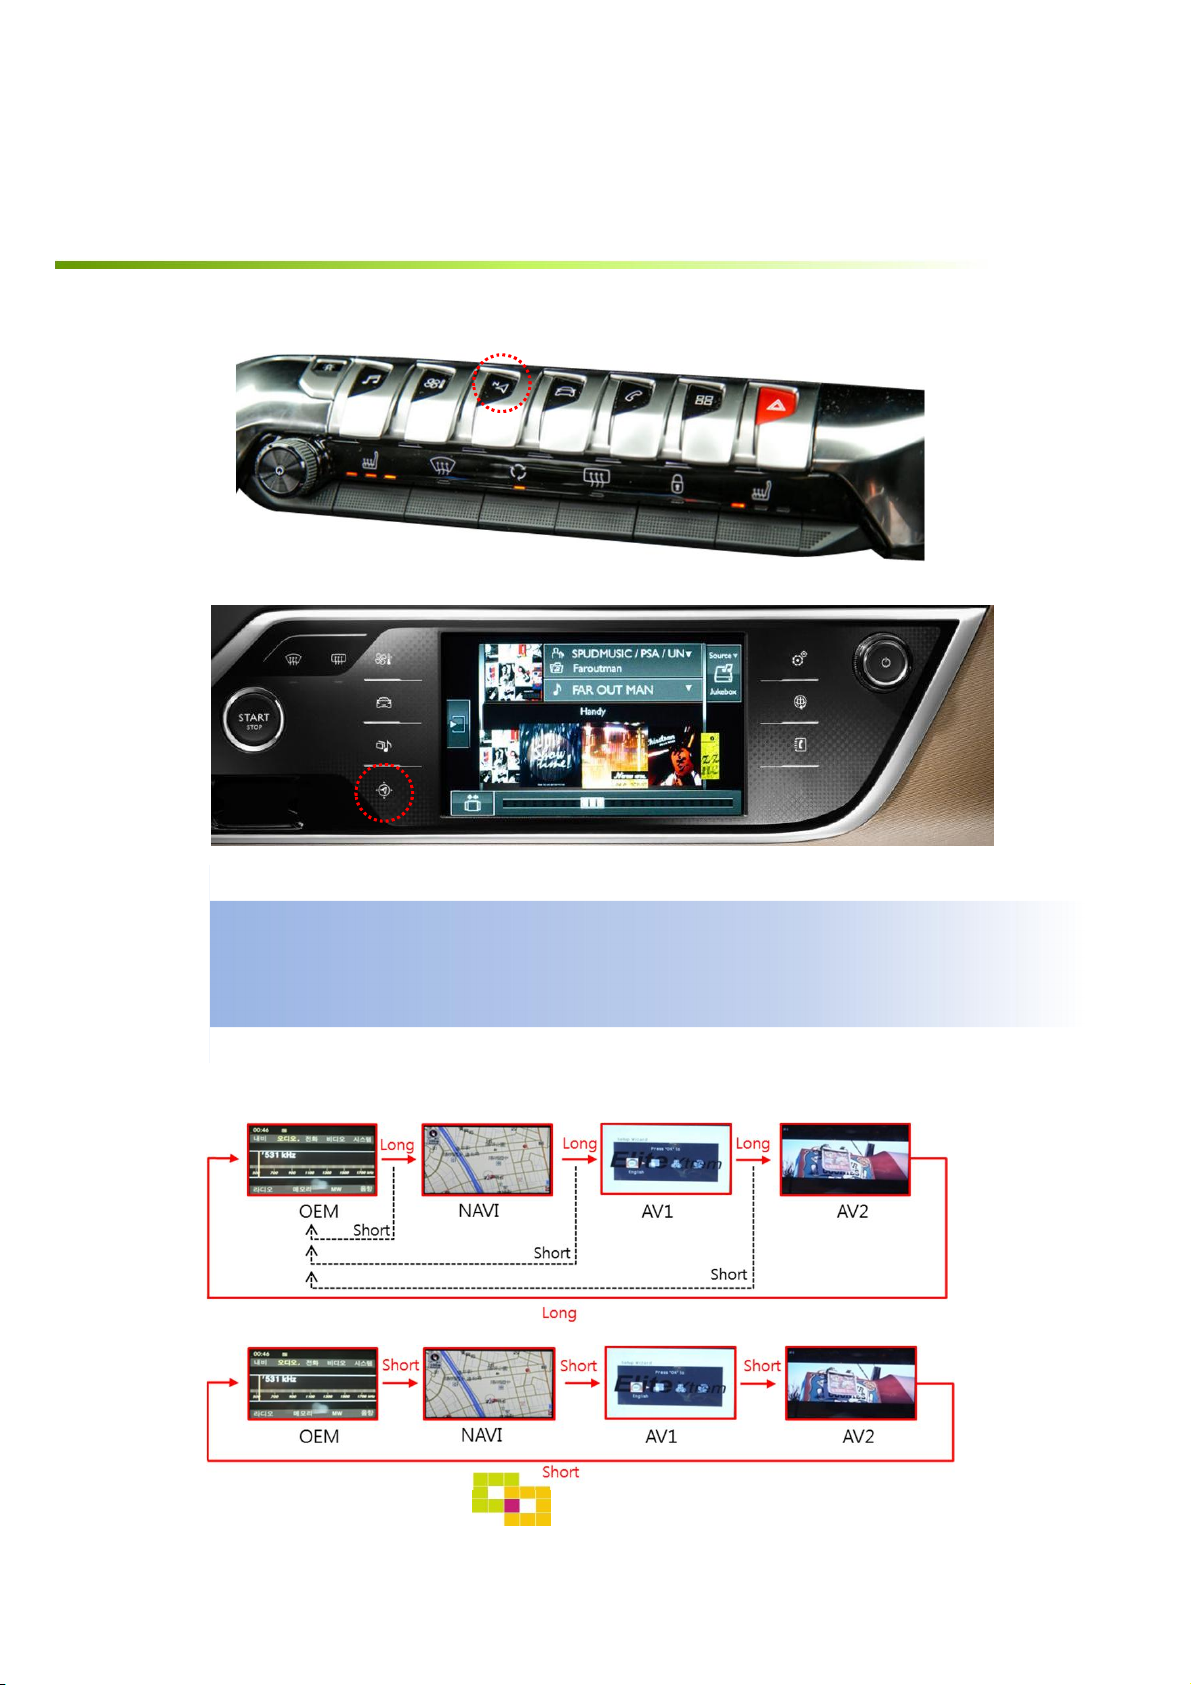
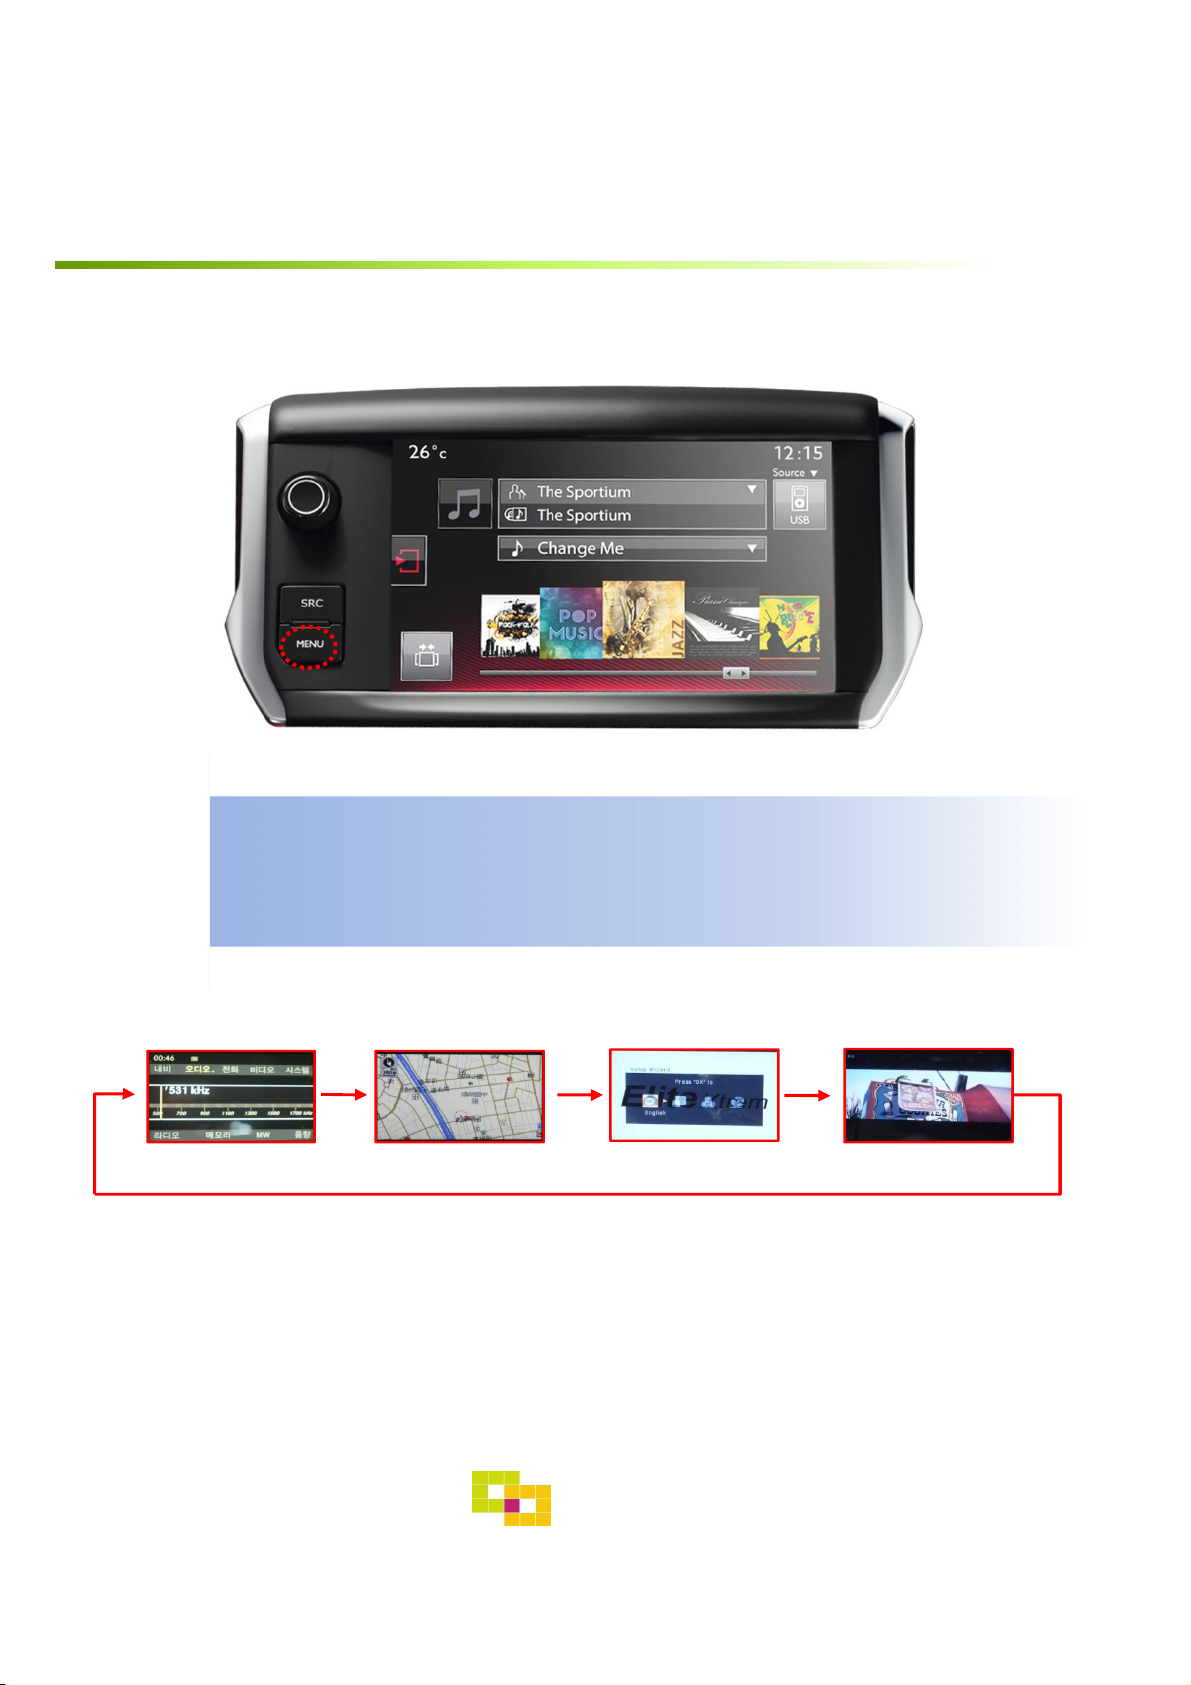
GU Electronic PEUGEOT2017 RCC TD User manual

1
Instruction Manual
PEUGEOT2017 RCC TD for PEUGEOT

GU Electronic
INDEX
Specifications
1. Main Spec. ----------------------------------
2. Diagram -------------------------------------
3. Components --------------------------------
4. Exterior --------------------------------------
Settings
1. Dip Switch ----------------------------------
2. Original button -----------------------------
3. Touch(DVD, DTV control) -------------------
4. Key board -----------------------------------
5. OSD Menu ----------------------------------
Installation
1. LVDS Installation ---------------------------
2. Caution -------------------------------------
2
3
4
5
6
7
9
12
14
14
22
23
2

GU Electronic
Specification
1. Main spec.
1-1 Input Spec. (MULTI VIDEO INTERFACE)
- 1 x CVBS(REAR CAMERA) Input. (Rear camera source)
- 1 x CVBS(FRONT CAMERA) Input. (Front camera source)
- 1 x Analog RGB Input (Navigation System output)
- 1 x Digital RGB Input (Navigation System output)
- 1 x LVDS Input. (Car Command System)
1-2 Output Spec.
- 1 x LCD Output (LCD Operation)
1-3 Power Spec.
- Input Power : 8VDC ~ 24VDC
- Consumption Power : 12Watt, Max
1-4 Switch Input mode
- Possible to switch input mode through original button
2. Features
- Possible to register IR code of DVD/DTV
- Display dynamic PAS(Parking assistance system)
- Easy installation by Jack by jack
3

GU Electronic
Specification
2. Diagram
4
INTERFACE
Scaler
(PIP)
MCU
LVDS
TX
CAR
COMMAND
SYSTEM CAN
EEPROM
CAN
RECEIVER
LVDS
TX
CAR
TFT-LCD
LVDS
RX
RELAY
REAR CAMERA
POWER
REAR CAMERA
LVDS
LVDS
RGB
NAVIGATION
SYSTEM
FRONT CAMERA
LVDS
NAVIGATION
SYSTEM LVDS RGB888

GU Electronic
Specification
3. Components
5
Power Cable 1EA
LVDS Cable 1 EA
RGB NAVI Cable(7pin) 1EA
Touch Cable(KD-900) 1EA
OSD Board 1 EA
NAVI Power Cable(300mm) 1 EA

Specification
4. Exterior
168 mm
22 mm
6
83 mm
GU Electronic
*NAVI Connect
① R DATA (Red)
②G DATA (Green)
③B DATA (Blue)
④SYNC (White)
⑤GND (Black)
⑥DVB-T IR (Green)
⑦DVD IR (Orange)
①②③④⑤⑥⑦
*Touch Connect
① Y-
②X
③Y+
④X+
① ② ③ ④
*POWER Connect
①ACC (Yellow)
②REAR PWR (Red)
③CAN-H (Orange)
④CAN-L (Green)
⑤REAR DET (Brown)
⑥GND (Black)
①②③④⑤⑥
*Navi Connect
① BATTERY
②ACC
③N.C
④GND
① ② ③ ④

Settings
1. Dip Switch
* ON : DOWN , OFF : UP
NO. Function Selection
1 NAVI ON : Skipping NAVI
OFF : Display
2 AV1 (DVB-T) ON : Skipping Video
OFF : Display
3 AV2 (DVD) ON : Skipping Video
OFF : Display
4,5 N.C
6
Car Model
OFF : 2017 Peugeot 3008,
2017 Citroen C4 PICASSO
7OFF : 2017 Peugeot 3008,
2017 Citroen C4 PICASSO
8ON : 2017 Peugeot 3008
OFF : 2017 Citroen C4 PICASSO
* Example
2017 Peugeot 3008 2017 Citroen C4 PICASSO
GU Electronic 7
2017 Peugeot 208

8
GU Electronic
※ Possible to use “Front, Rear” input as video input for DTV, DVD (DTV, DVD UI ICON
appears only in Front input)
ON 2 3
NAVI
OEM DTV(AV1)
ON 2 3
NAVI
OEM DVD(AV2)
•FRONT
•REAR
“RearCam-Type” should be set as “OEM” and
“AV Mode” should be set as “ON” in OSD Menu
when video device is connected to Rear input
No.2: Off / No.3: On
DVB-T UI On/Off (Refer to P16)
(Dip no.3 should be ON (Skip) Otherwise AV2 screen will appear)
No.2: On / No.3: Off
DVD UI On/Off (Refer to P16)
((Dip no.2 should be ON (Skip) Otherwise AV1 screen will appear.)
- AV1 Setting – For DTV
- AV2 Setting – For DVD
- AV Setting – For DTV or DVD
Settings
1. Dip Switch- DVB-T, DVD Setting
NAVI
OEM DTV(AV1)
or DVD(AV2)
AV
(DTV or DVD)

9
Settings
2. Original button Peugeot 3008, PICASSO (Switching Mode)
※ The screen is switched in order as the pictures below
GU Electronic
2017 Citroen C4 PICASSO
2017 Peugeot 3008
Long Press or Short Press : Switching Mode
※ You can choose the Switching mode type
(Long Press or Short Press ) from the OSD Menu (P.17)
- Long Press
- Shot Press

10
Settings
2. Original button Peugeot 208 (Switching Mode)
NAVI AV1 AV2OEM
※ The screen is switched in order as the pictures below
※ Possible to set the use of MENU buttons ON or OFF in OSD menu (P.16)
Long Press : switching mode
GU Electronic
2017 Peugeot 208

11
Settings
2. Original button – Steering Wheel (Switching Mode)
GU Electronic
NAVI AV1 AV2OEM
※ The screen is switched in order as the pictures below
※ Possible to set the use of SRC button ON or OFF in OSD menu (P.16)
Long Press : switching mode
2017 Peugeot 208
2017 Peugeot 3008
2017 Citroen C4 PICASSO

12
Touch OEM screen in any mode more than 7sec.
For calibration
(This function can be activated only one time
after switching mode)
Touch the “+” correctly
- DVB-T/DVD Control
Press Touch (Anywhere) Press Icon
DVB-T
DVD
Settings
GU Electronic
3. Touch screen – Touch calibration

13
Settings
3. Touch screen – DVD, DTV control
•DTV – Please contact a supplier in advance for using this function
[Button type-1] [Button type-2]
•DVD
※ Calibration : Touch any point of screen more than 7sec to start a touch calibration
[Power] [Search] [Up] [Down]
[Power] [Menu]
[Return][USB]
[Stop]
[DVD up]
[Play/pause]
[Power]
[MIC]
[Rewind]
[Play Previous
chapter]
[DVD down]
[FF]
[Play Next
chapter]
※ To use this function, It is necessary to offer the remote IR code to manufacturer
or setting OSD IR – Ctrl(P. 21)
GU Electronic

Settings
4. OSD Key board
5. OSD Menu
※Press “MENU” button on Key board
14
GU Electronic
① MENU :Activating OSD Menu
② SEL :Selection
③ Up :Moving upward (Increasing value)
④ Down :Moving downward (Decreasing value)
MENU SEL UP DOWN
①②③ ④
Config - NAVI-RGB : Setup for the type of NAVI-RGB
Config - DVB-T(DMB) : Setup for the type of DVB-T(DMB)
Config - DVD : Setup for the type of DVD
Reset : Reset all value

15
Settings
5. OSD Menu
※Press “MENU” button on Key board
Option
•RearCam-Type : Setup for rear camera
ExtDevice - External rear camera
OEM - Original camera
•RearCam-Power : Setup for Rear VCC wire in power cable
ON - +12V out always (current consumption : 200mA)
AUTO - +12V out in rear mode only (200mA)
OFF - Power OFF
•RearCam-Det : Setup for Rear detection
CAN - By CAN
WIRE - by rear cam detect wire
OFF - Rear detection OFF
•AV Mode : Change “Rear” input as Video input
ON – Video input (Rearcam TYPE in OSD menu should be “OEM”)
OFF – Rear input
•FrontCam-Type : Setup for front camera
ExtDevice - External rear camera
OEM - Original camera
GU Electronic

16
Settings
5. OSD Menu
※Press “MENU” button on Key board
Option
•FrontCam-RcvOpt
: Selecting time of displaying Front camera before switching to RGB,
DVD, OEM from Rear
•Steering Wheel Btn : Setting for Steering wheel button (Switching Mode)
ON - ON
OFF – OFF
•Button : Setting for Original Button (Peugeot 208 Switching Mode)
ON - ON
OFF – OFF
•UI DVB-T(DMB) : Setting UI ICON - ON or OFF
•UI DVD : Setting UI ICON - ON or OFF
OEM
NAVI
AV1(DVB-T)
AV2(DVD)
REAR FRONT
OEM
NAVI
AV1(DVB-T)
AV2(DVD)
Select time of display
1~30 second
GU Electronic

17
Settings
5. OSD Menu
※Press “MENU” button on Key board
Option
•NAV Btn : Setting for Original Button (Peugeot 3008, PICASSO Switching Mode)
SHORT - Short Press
LONG - Long Press
OFF - OFF
•NAVI COM (N.C)
•Reset : Reset all value
GU Electronic

18
MENU IMAGE NAVI
Config
Option
Image
Screen
Parking
Brightness
Contrast
Color- RED
Color- GREEN
Color- BLUE
50
50
50
50
25
MENU Screen NAVI
Config
Option
Image
Screen
Parking
Horizontal
Vertical
Scale X Up
Scale X Down
Scale X Up
50
50
50
50
50
MENU IMAGE Rear
Config
Option
Image
Screen
Parking
Brightness
Contrast
Saturation
Hue
Sharpness
50
50
50
50
25
- NAVI(RGB) Image / Screen
- DVD, DVBT, NAVI-AV, REAR, FRONT Image
Settings
GU Electronic
5. OSD Menu
※Press “MENU” button on Key board
Image
Screen
Image

Settings
- Parking guide line ON/OFF
Selecting a use of packing guide line
(OSD Menu – Parking – Line display – ON
or OFF)
19
Parking line “ON”
MENU SEL UP DOWN
Left Right Down
UP
- Adjust the position of Parking guide line
Possible to adjust the position of line
by Keypad in Horizontal / Vertical menu
※ Pressing this Horizontal / Vertical menu,
The OSD screen automatically disappears.
Please adjust from the parking line Screen.
- Warning Language for rear screen
Selecting a type of language (OSD Menu – Parking – Warning Lang)
5. OSD Menu
※Press “MENU” button on Key board
GU Electronic

20
- OSD
- IR – Ctrl (p.21)
- Utility
•Utilityy– INTERFACE SOFTWARE
•OSD – Horizontal
•OSD – Vertical
•OSD – Display : Setting time for displaying OSD menu
•OSD – Transparency
•OSD – Language : Setting language of ODS menu
GU Electronic
Settings
5. OSD Menu
※Press “MENU” button on Key board
- 170612
Table of contents
Other GU Electronic Automobile Accessories manuals

GU Electronic
GU Electronic LandRover 2016-TD User manual

GU Electronic
GU Electronic PCM-31-171026 User manual

GU Electronic
GU Electronic ML-2012-180720 User manual

GU Electronic
GU Electronic AUDI R PAS D User manual

GU Electronic
GU Electronic BM09 DS PAS T User manual

GU Electronic
GU Electronic Porsche CDR3.1 TD User manual
Popular Automobile Accessories manuals by other brands

Segvator
Segvator Segvator Installation & operator's manual

Whelen Engineering Company
Whelen Engineering Company SAK45 installation guide

AUTOTECH
AUTOTECH 10.525.1028GK-1028K installation instructions

Iqua
Iqua Snake 2 HHF-601 Specifications

Thule
Thule 938 Installation

iSimple
iSimple SoundByteX ISCH73 owner's manual