Gude 40065 Wiring diagram

DRUCKLUFT-
MEISSELHAMMER-SET
#40065
©Güde GmbH & Co. KG - Birkichstrasse 6 - D-74549 Wolpertshausen - Deutschland
Deutsch DE 3
Originalbetriebsanleitung
English GB 7
Translation of original operating instructions
Français FR 11
Traduction du mode d’emploi d’origine
Čeština CZ 15
Překlad originálního návodu k provozu
Slovenčina SK 19
Preklad originálneho návodu na prevádzku
Nederlands NL 23
Vertaling van de originele gebruiksaanwijzing
Italiano IT 27
Traduzione del Manuale d’Uso originale
Magyar HU 31
Az eredeti használati utasítás fordítása

1
1
2
34
5
6
7
89
2
2

DE Lesen Sie bitte diese Bedienungsanleitung sorgfältig durch, bevor Sie das Gerät in Betrieb nehmen.
A.V. 2 Nachdrucke, auch auszugsweise, bedürfen der Genehmigung. Technische Änderungen vorbehalten.
Abbildungen beispielhaft! Dies ist eine Originalbetriebsanweisung.
DE
Sie haben technische Fragen? Eine Reklamation? Benötigen Ersatzteile oder eine Bedienungsanleitung?
Auf unserer Homepage www.guede.com im Bereich Service helfen wir Ihnen schnell und unbürokratisch weiter. Bitte helfen Sie uns Ihnen
zu helfen. Um Ihr Gerät im Reklamationsfall identifizieren zu können benötigen wir die Seriennummer sowie Artikelnummer und Baujahr. Alle
diese Daten finden Sie auf dem Typenschild. Um diese Daten stets zur Hand zu haben, tragen Sie diese bitte unten ein.
Seriennummer: Artikelnummer: Baujahr:
Tel.: +49 (0) 79 04 / 700-360 Fax: +49 (0) 79 04 / 700-51999 E-Mail: [email protected]
Kennzeichnungen auf dem Gerät
Erklärung der Symbole
In dieser Anleitung und/oder auf dem Gerät werden folgende Symbole verwendet:
Produkt ist mit den ein-
schlägigen Normen der
Europäischen Gemein-
schaft konform
Warnung/Achtung Vor Gebrauch Bedie-
nungsanleitung lesen
Augen- und Gehörschutz
tragen Schutzhandschuhe tragen
Betriebsdruck Schlagzahl Anschlussgewinde Luftverbrauch Meißellänge
Gewicht
Abfall nicht in die Umwelt
sondern fachgerecht ent-
sorgen.
Vor Nässe schützen
Verpackungsmaterial aus
Pappe kann an den dafür
vorgesehen Recycling-
Stellen abgegeben werden.
Packungsorientierung O-
ben
Vorsicht zerbrechlich
Bestimmungsgemäße Verwendung
Der Druckluft-Meißelhammer ist ein Gerät für den handwerklichen Einsatz und eignet sich zum:
Trennen oder Schneiden von Blechen, zum Abschlagen von Bolzen und zum Einschlagen von Löchern. Jede andere Verwendung
ist zweckentfremdet.
Gerätebeschreibung
1. Rückholfeder
2. Drücker
3. Regulierschraube
4. Luftanschluss
5. Zylinder
6. 5 Einzelmeißel
7. Ölflasche
8. Anschlussnippel
9. Miniöler
Allgemeine Sicherheitshinweise
Die Bedienungsanleitung muss vor der ersten Anwendung des Gerätes ganz durchgelesen werden. Falls über den Anschluss und
die Bedienung des Gerätes Zweifel entstehen sollten, wenden Sie sich an den Hersteller (Service-Abteilung).
UM EINEN HOHEN GRAD AN SICHERHEIT ZU GARANTIEREN, BEACHTEN SIE AUFMERKSAM FOLGENDE HINWEISE:
•Nach dem Entfernen der Verpackung kontrollieren, dass das Gerät und alle seine Teile in einwandfreiem Zustand sind.
•Explosionsgefahr! Nicht in explosionsgefährdeten Bereichen arbeiten. Den angegebenen Betriebsdruck nicht überschreiten
(siehe Technische Daten). Nur Energie Druckluft verwenden. Achten Sie auf elektrische Leitungen, Gasleitungen, Kraftstoff-
leitungen und Tanks.
3

•Wegschleudern der Meißel möglich! Achten Sie immer auf einen festen Sitz der Meißel. Kein Leerlaufbetrieb. Während
des Betriebs ist das Berühren des Meißels verboten!
•Halten Sie den Arbeitsbereich sauber und aufgeräumt! Unordentliche Arbeitsplätze und Werkbänke erhöhen die Gefahr
von Unfällen und Verletzungen.
•Lassen Sie keine Fremden an die Maschine! Besucher und Zuschauer, vor allem Kinder sowie kranke und gebrechliche
Personen, sollten vom Arbeitsplatz fern gehalten werden.
•Sorgen Sie für die sichere Aufbewahrung von Werkzeugen! Werkzeuge, die nicht gebraucht werden, müssen an einem
trockenen, möglichst hoch gelegenen Platz aufbewahrt oder unzugänglich verwahrt werden.
•Verwenden Sie nur zugelassene Teile! Verwenden Sie bei Wartung und Reparatur nur identische Ersatzteile. Wenden Sie
sich für Ersatzteile an ein zugelassenes Service Center.
•Warnung! Die Verwendung von Zubehör und Anbauteilen, die nicht ausdrücklich in dieser Bedienungsanleitung empfohlen
werden, kann die Gefährdung von Personen und Objekten nach sich ziehen.
•Arbeitskleidung! Immer Schutzbrillen oder einen entsprechenden Augenschutz, einen Gehörschutz, Schutzhandschuhe
und eine Staubmaske tragen. Keine weiten Kleidungsstücke oder Schmuck tragen, da diese sich in den Bauteilen verfangen
können. Den Druckluftstrahl nie auf den eigenen Körper oder auf andere Personen oder Tiere richten. Fremdkörper können
vom Luftstrom sehr stark beschleunigt und zu gefährlichen Geschossen werden.
•Aufmerksamkeit! Umsichtig arbeiten und den gesunden Menschenverstand benutzen. Das Gerät bei Müdigkeit nicht benut-
zen und wenn der Benutzer unter der Einwirkung von Alkohol, Drogen oder Arzneimittel steht, die Müdigkeit verursachen
können.
•Defekte und undichte Bauteile kontrollieren! Falls eine Schutzvorrichtung oder sonstige Bauteile beschädigt worden sind,
so muss das Gerät vor der Wiederinbetriebnahme kontrolliert werden, um sicherzustellen, dass ein sicherer Betrieb gewähr-
leistet ist. Alle beschädigten Bauteile müssen vom Kundendienst repariert, ersetzt oder, wie im Bedienungshandbuch be-
schrieben, ausgewechselt werden.
•Ausschließlich Originalersatzteile verwenden! Bei der Verwendung von Ersatzteilen von anderen Herstellern verfällt der
Gewährleistungsanspruch und kann zu Funktionsstörungen des Gerätes führen. Die Originalersatzteile sind bei den Ver-
tragshändlern erhältlich.
•Wartungs-, Reparaturarbeiten oder Werkzeugwechsel! Druckluftschlauch trennen und das Gerät drucklos machen.
•Stolperfalle! Druckluftschläuche, die über den Boden geführt werden vermeiden bzw. beachten.
•Brandgefahr! Funkenbildung kann Brände auslösen. Je nach Materialverarbeitung können Funken entstehen, die Bränd-
herde oder Schwelbrände auslösen können.
•Verboten! Das Berühren des Meißels während des Betriebs.
Gewährleistung
Die Gewährleistung erstreckt sich ausschließlich auf Mängel, die auf Material- oder Herstellungsfehler zurückzuführen sind.
Bei Geltendmachung eines Mangels im Sinne der Gewährleistung ist der original Kaufbeleg mit Verkaufdatum beizufügen.
Von der Gewährleistung ausgeschlossen sind unsachgemäße Anwendungen, wie z. B. Überlastung des Gerätes, Gewaltanwen-
dung, Beschädigungen durch Fremdeinwirkung oder durch Fremdkörper. Nichtbeachtung der Gebrauchs- und Aufbauanlei-
tung und normaler Verschleiß sind ebenfalls von der Gewährleistung ausgeschlossen.
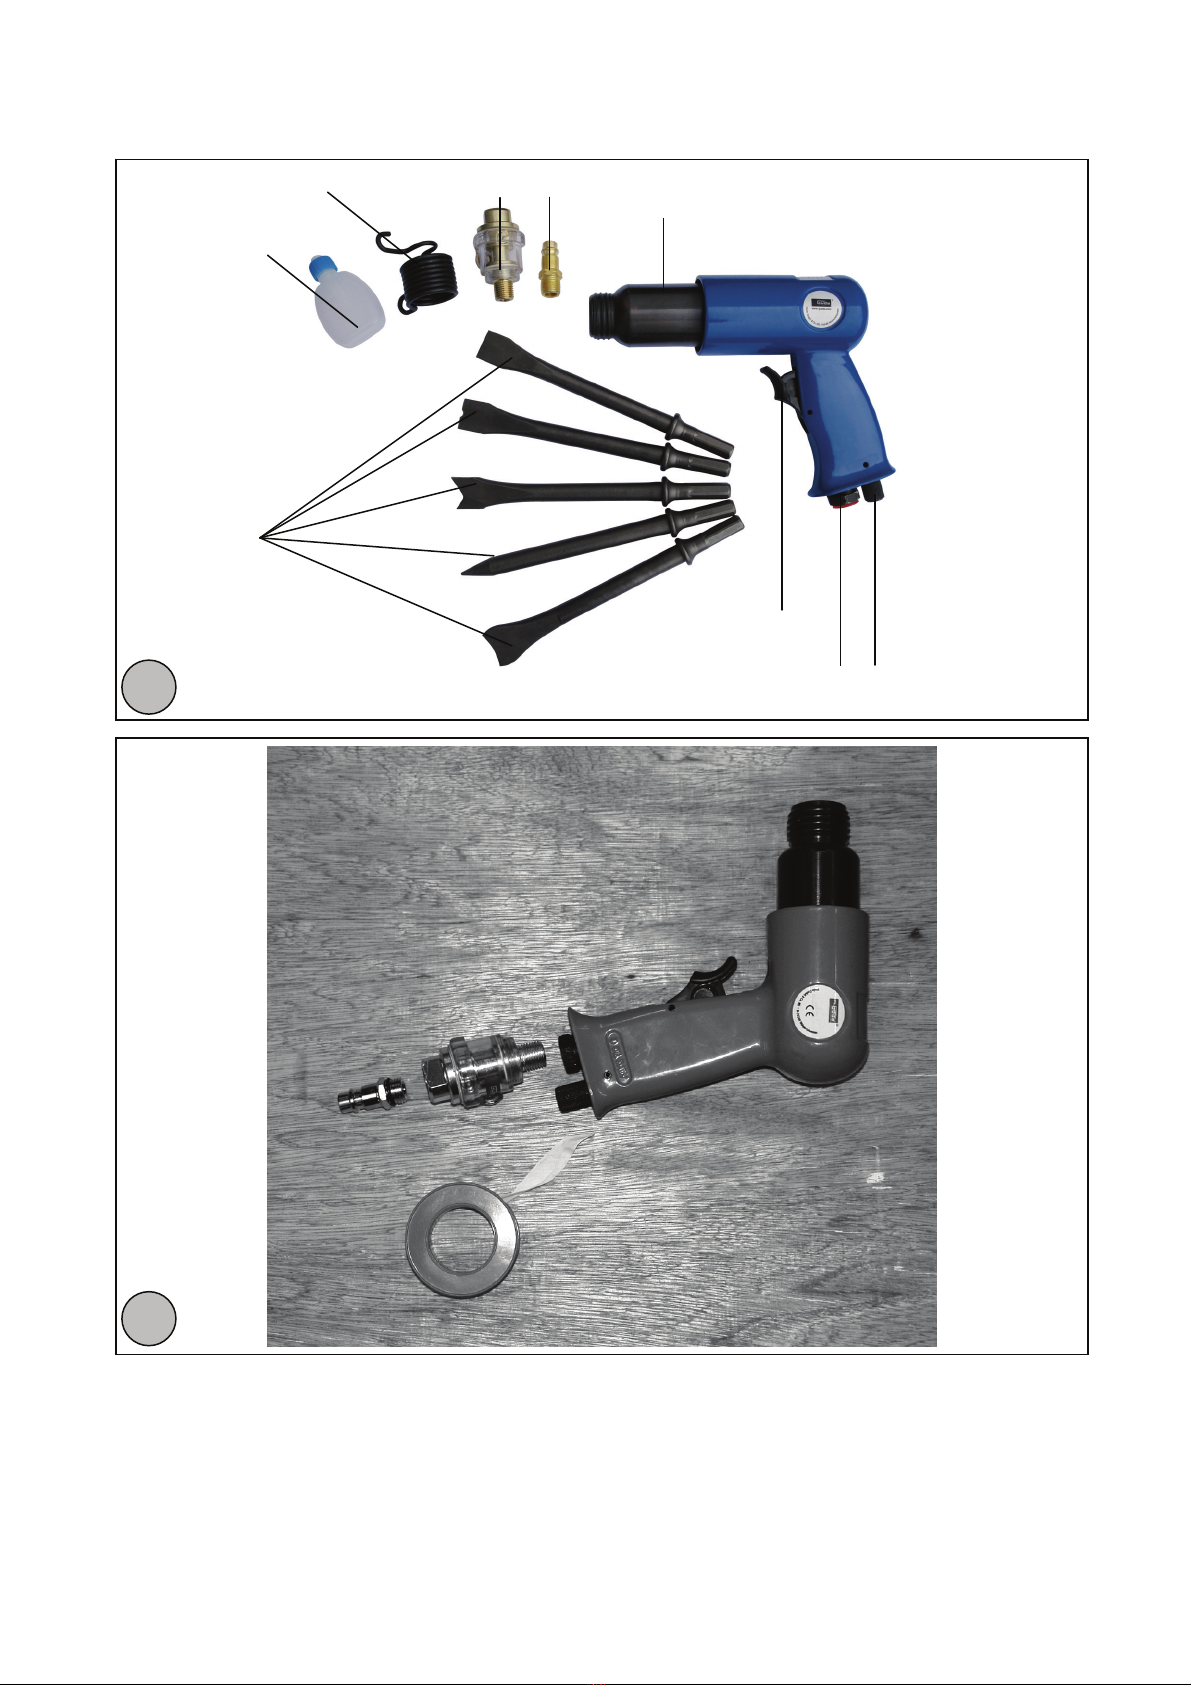
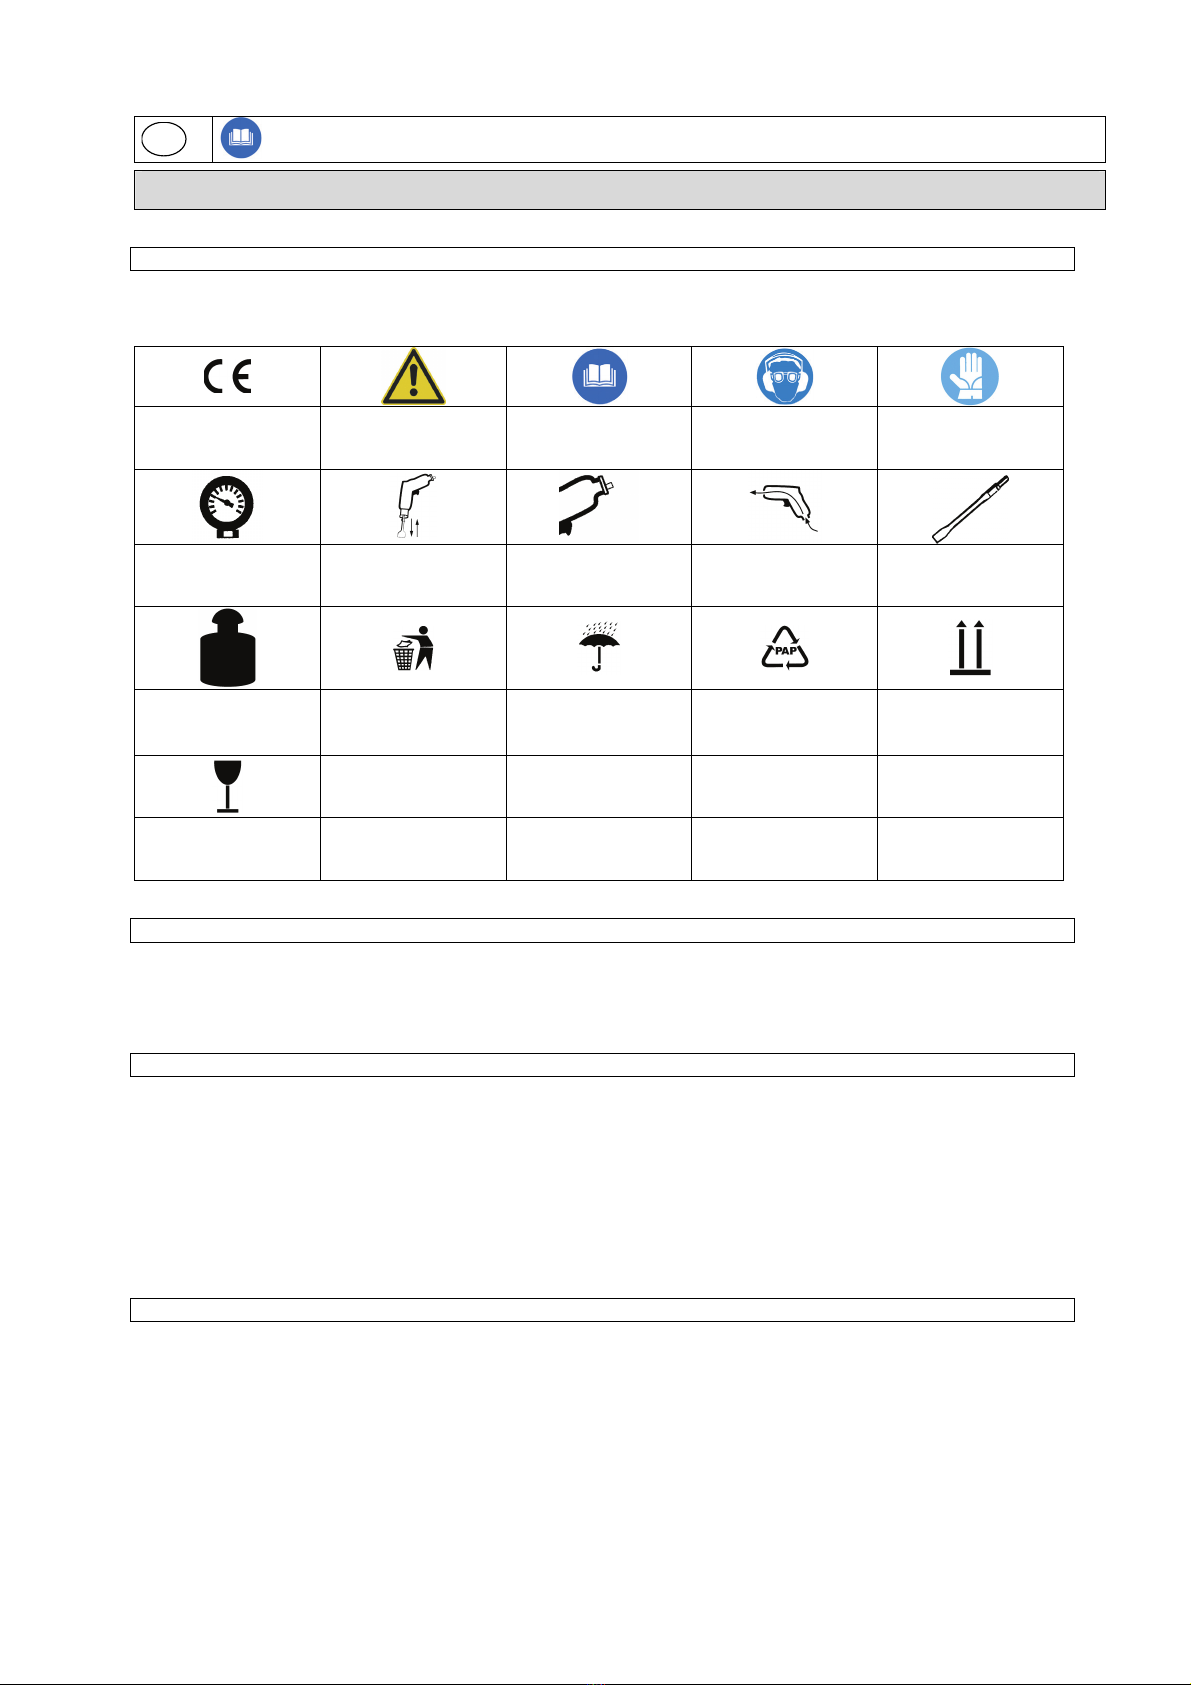
Montage (Abb. 1+2)
1. Wickeln Sie das Gewinde des Miniölers (Abb. 1/9) mit Teflonband ein und schrauben Sie dann den Miniöler (Abb. 1/9) in den
DL-Anschluss (Abb. 1/4).
2. Nun schrauben Sie den Anschlussnippel (Abb.1/8) in den Miniöler (Abb. 1/9).
Betrieb
Richten Sie das rotierende Ende des Werkzeuges niemals gegen sich selbst oder gegen andere Personen.
•Den gewünschten Meißel in einsetzen.
•Das Gerät mit dem Luftzufuhrschlauch verbinden.
•Werkzeug auf das zu bearbeitende Objekt aufsetzen.
•Drücker (Abb. 1/2) betätigen.
Technische Daten
Anschlußgewinde: ¼ ”
Betriebsdruck: 6 bar
Luftverbrauch: 350 l/min.
Schlagzahl: 3000/min.
4

Wartung und Pflege
Die Wartung darf nur von unterwiesenen Personen durchgeführt werden.
Die Einhaltung der hier angegebenen Wartungshinweise sichert für dieses Qualitätsprodukt eine lange Lebensdauer und einen
störungsfreien Betrieb. Trennen Sie das Gerät bei Wartungs- und Pflegearbeiten von der Druckluftquelle. Für eine dauerhaft ein-
wandfreie Funktion Ihres Druckluftwerkzeuges ist eine tägliche Reinigung und eine regelmäßige Schmierung unerläßlich. Ver-
wenden Sie hierfür nur spezielles Druckluftöl. Wir empfehlen Ihnen hierfür unser Druckluft-Spezialnebelöl #40060.
Folgende Möglichkeiten stehen Ihnen in Sachen Schmierung zur Auswahl:
a) über einen Nebelöler
Eine komplette Wartungseinheit beinhaltet einen Nebelöler (z.B. den Güde Druckluft Nebelöler ¼“ SB #41080) und ist am
Kompressor angebracht.
b) über einen Leitungsöler
In unmittelbarer Nähe des Werkzeuges (ca. 50 cm Abstand) wird ein Leitungsöler (z.B. den Güde Druckluft Nebelöler #41086)
installiert, der das Werkzeug ausreichend mit Öl versorgt.
c) von Hand
Ist bei Ihrer Anlage weder eine Wartungseinheit noch ein Leitungsöler vorhanden, so müssen vor jeder Inbetriebnahme des
Druckluft- Werkzeuges 3-5 Tropfen Öl in den Druckluftanschluß gegeben werden. War das Druckluft- Werkzeug mehrere Ta-
ge außer Betrieb, müssen Sie vor dem Einschalten 5-10 Tropfen Öl in den Druckluftanschluß geben. Lagern Sie Ihre Druck-
luftwerkzeuge/ -geräte nur in trockenen Räumen.
Achtung:
Gelegentlich Feder Position 1 wechseln
Störung – Ursache - Behebung
Störung Ursache Behebung
Luftregulierung ist zu niedrig eingestellt. Luftregulierung höher einstellen.
Meißel abgenutzt. Ersetzen Sie den Meißel.
Der Arbeitsdruck (Fließdruck) ist zu ge-
ring.
Den Arbeitsdruck (Fließdruck) erhöhen.
Beachten Sie dabei den maximalen Ar-
beitsdruck.
Kompressorleistung zu klein. Verwenden Sie eine andere Leistungs-
größe.
Schlauchdurchmesser zu klein. Verwenden Sie den richtigen
Schlauchdruchmesser.
Der Meißelhammer arbeitet nicht ord-
nungsgemäß
Das Umlenkventil ist verschlissen. Wenden Sie sich an den Hersteller oder
an einen autorisierten Servicepartner.
Service
Sie haben technische Fragen? Eine Reklamation? Benötigen Ersatzteile oder eine Bedienungsanleitung?
Auf unserer Homepage www.guede.com im Bereich Service helfen wir Ihnen schnell und unbürokratisch weiter. Bitte helfen Sie
uns Ihnen zu helfen. Um Ihr Gerät im Reklamationsfall identifizieren zu können benötigen wir die Seriennummer sowie Artikel-
nummer und Baujahr. Alle diese Daten finden Sie auf dem Typenschild. Um diese Daten stets zur Hand zu haben, tragen Sie die-
se bitte unten ein.
Seriennummer:
Artikelnummer:
Baujahr:
Tel.: +49 (0) 79 04 / 700-360
Fax: +49 (0) 79 04 / 700-51999
E-Mail: [email protected]
5

EG-Konformitätserklärung
EC Declaration of Conformity
Hiermit erklären wir, Güde GmbH & Co. KG
We herewith declare, Birkichstraße 6, 74549 Wolpertshausen, Germany
Dass die nachfolgend bezeichneten Geräte aufgrund ihrer Konzipierung und Bauart so-
wie in der von uns in Verkehr gebrachten Ausführungen den einschlägigen, grundle-
genden Sicherheits- und Gesundheitsanforderungen der EG-Richtlinien entsprechen.
That the following Appliance complies with the appropriate basic safety and health requirements of
the EC Directive based on its design and type, as brought into circulation by us.
Bei einer nicht mit uns abgestimmten Änderung der Geräte verliert diese
Erklärung ihre Gültigkeit.
In a case of alternation of the machine, not agreed upon by us, this declaration will loose its valid-
ity.
Bezeichnung der Geräte: - Druckluft-Meisselhammer-Set
Machine desciption:
Artikel-Nr.: - 40065
Article-No.:
Einschlägige EG-Richtlinien: - 2006/42 EG
Applicable EC Directives:
Angewandte harmonisierte
Normen: - EN ISO 12100:2010
Applicable harmonized - EN 792-1: 2000+A1:2008
Standard:
Datum/Herstellerunterschrift: 30.06.2014
Date/Authorized Signature:
Angaben zum Unterzeichner: Hr. Arnold, Geschäftsführer
Title of Signatory:
Technische Dokumentation
Technical Documentation
Angaben zum Unterzeichner: J. Bürkle FBL, QS
Title of Sinatory:
6

GB Please read carefully the following Operating Instructions before putting the appliance into operation
A.V. 2 Any reprints, even partial, are subject to approval. Technical changes reserved.
Illustrative pictures! Translation of original operating instructions.
Signs on Unit
Meaning of Symbols
Symbols shown below are used throughout this manual and/or on the unit:
Product compliance with
respective EU standards Warning/Caution Read instruction manual
before use
Wear goggles and ear pro-
tectors Use protection gloves
Operating pressure Number of strokes Connecting thread Air consumption Knife length
Weight
Wastes to be disposed of
in a professional manner
not to harm the environ-
ment.
Keep away from moisture Cardboard packaging to be
collected for recycling.
The package should be
held upwards
Fragile
Using the appliance as designated
The pneumatic cutter is an appliance for craft purposes that is ideal for:
sheet metal cutting or shearing, rivet head removing or perforating. Any other use is considered a use in conflict with the appliance
designation.
Appliance description
1. Return spring
2. Button
3. Adjusting screw
4. Air connection
5. Cylinder
6. 5 cutters
7. Oil bottle
8. Clutch
9. Mini oil can
General safety instructions
These Operating Instructions need to be read thoroughly before using the appliance for the first time. If any doubts regarding the
appliance connection and operation arise, please contact the manufacturer (service department).
TO ENSURE A HIGH SAFETY LEVEL, PLEASE FOLLOW CAREFULLY THESE INSTRUCTIONS:
•After removing the package, check whether the appliance and all other parts are in a perfect condition.
•Risk of explosion! Do not work in an explosive environment. Do not exceed the specified operating pressure (see Technical
specifications). Compressed air should be used as the only source of energy. Pay attention to electric lines, gas conduits,
fuel lines and tanks.
•Risk of knife being thrown off! Make always sure the knives are fitted appropriately. No idle cycle. Touching the knife is
prohibited when the appliance is running!
•Keep the place of your work clean and tidy! Mess in the place of your work and work-table increases the risk of accident
and injury.
7

•Do not let other persons get near the appliance! Keep visitors and bystanders, especially children, ill persons and physi-
cally poor persons, in a safe distance from the place of your work.
•Make sure tools are kept safely! Tools you are not using need to be kept in a dry place that is elevated or inapproachable,
if possible.
•Approved parts to be used only! Identical spare parts to be used only for servicing and repairing. For spare parts please
contact an authorised service centre.
•Caution! Using accessories and assembling parts not explicitly recommended in these Operating Instructions may result in
putting persons and items at risk.
•Working clothes! Protective glasses or appropriate eye and hearing protection aids, protective gloves and a dust mask must
always be worn. Do not wear loose clothes or jewels as they could get entangled into moving parts of the appliance. Never
aim the compressed air current at your body or other persons or animals. The air current can strongly accelerate foreign mat-
ters that consequently become dangerous bullets.
•Attention! Work deliberately and use common sense. Do not use the appliance when you are tired or under the influence of
alcohol, drugs or pharmaceuticals that may make you tired.
•Check the perfect condition and tightness of the appliance parts! If any protection component or other parts of the appli-
ance have been damaged, these components/parts must be checked before putting the appliance into operation to ensure
safe operation. All damaged parts need to be repaired or replaced in a service centre or replaced as described in the Operat-
ing Instructions.
•Original spare parts to be used only! Should spare parts of any other manufacturer be used, claims arising from the war-
ranty will expire. Using such spare parts may lead to appliance failures. Original spare parts can be obtained through contract
dealers.
•Servicing, repairs or replacement of tools! Disconnect the compressed air hose and depressurise the appliance.
•Risk of trip! Avoid compressed air hoses laid on the floor. Be careful if there is no other option.
•Risk of fire! Sparking may cause fire. Depending on the processed material, there might be sparking with sparks being the
cause of centre of fire or smouldering.
•Prohibited! Touching the knife when the appliance is running.
Guarantee
The guarantee solely covers inadequacies caused by material defect or manufacturing defect.
Original payment voucher with the sales date needs to be submitted for any claim in the guarantee period.
The guarantee does not cover any unauthorised use such as appliance overloading, use of violence, damage as a result of any
unauthorised interference or caused by foreign items. Failing to follow the operating and assembly instructions and common wear
are also not included in the guarantee.
Assembly (pic. 1+2)
1. Entwine the mini oil can thread (pic. 1/9) with a Teflon band and then screw the mini oil can (pic. 1/9) in the compressed air
connection (pic. 1/4).
2. Now screw the clutch (pic.1/8) in the mini oil can (pic. 1/9).
Operation
Never aim the rotating end of the appliance at yourself or other persons.
•Insert the required knife in the appliance.
•Connect the appliance with the air intake hose.
•Fit the tools to the processed item.
•Press the button (pic. 1/2).
Technical specifications
Connecting thread: ¼ ”
Operating pressure: 6 bar
Air consumption: 350 l per minute
Number of strokes: 3,000 per minute
8

Servicing and maintenance
Servicing may only be provided by trained persons.
Long operating life and failure-free operation of this high-quality product will be provided by following the servicing instructions
specified in this manual. Disconnect the appliance from the compressed air source for servicing and maintenance purposes. To
ensure permanent failure-free operation of the appliance, everyday cleaning and regular lubrication need necessarily be provided.
For that, special pneumatic oil must be used only. Our special pneumatic oil for oil-fog lubricators #40060 is recommended.
The following options are available for lubrication purposes:
a) using an oil-fog lubricator
The full maintenance unit includes an oil-fog lubricator (e.g. Güde ¼“ SB #41080 lubricator) and is placed on the compressor.
b) using a pipeline grease box
A grease box (e.g. Güde #41086) sufficiently supplying the appliance with oil is installed on the pipeline in the immediate vi-
cinity of the appliance (distance of app. 50 cm).
c) manually
If no maintenance unit or pipeline grease box is available for your appliance, 3 - 5 oil drops must be added to the compressed
air connection every time you are going to put the pneumatic appliance into operation. If the pneumatic appliance has been
out of operation for a couple of days, 5 – 10 oil drops must be added to the compressed air connection before starting the ap-
pliance. Keep the pneumatic tools and appliance in dry spaces.
Caution:
Replace the spring (pos. 1) from time to time
Failure – cause - removal
Failure Cause Removal
Air control is set to a too low value. Set the air control to a higher value.
Knife is worn out. Replace the knife.
Operating (hydraulic) pressure is too
low.
Increase the operating (hydraulic) pres-
sure while respecting the maximum op-
erating pressure value.
Too low output of the compressor. Use a compressor of different output.
Too small diameter of the hose. Use a hose of appropriate diameter.
Cutter not working properly
Bypass valve is worn out. Contact the manufacturer or an author-
ised service partner.
Service
Any technical questions? Complaint? Do you need spare parts or operation manual?
Go to our website www.guede.com and the section Service will help you quickly and without bureaucracy. Please, help us to
help you. In order to identify your device in case of complaint, please indicate serial number, order number and year of manufac-
ture. All information is available on the product label. To have all information always at hand, put them down.
Serial number:
Order number:
Year of manufacture:
Phone: +49 (0) 79 04 / 700-360
Fax: +49 (0) 79 04 / 700-51999
9

EG-Konformitätserklärung
EC Declaration of Conformity
Hiermit erklären wir, Güde GmbH & Co. KG
We herewith declare, Birkichstraße 6, 74549 Wolpertshausen, Germany
Dass die nachfolgend bezeichneten Geräte aufgrund ihrer Konzipierung und Bauart so-
wie in der von uns in Verkehr gebrachten Ausführungen den einschlägigen, grundle-
genden Sicherheits- und Gesundheitsanforderungen der EG-Richtlinien entsprechen.
That the following Appliance complies with the appropriate basic safety and health requirements of
the EC Directive based on its design and type, as brought into circulation by us.
Bei einer nicht mit uns abgestimmten Änderung der Geräte verliert diese
Erklärung ihre Gültigkeit.
In a case of alternation of the machine, not agreed upon by us, this declaration will loose its valid-
ity.
Bezeichnung der Geräte: - PNEUMATIC CUTTER - SET
Machine desciption:
Artikel-Nr.: - 40065
Article-No.:
Einschlägige EG-Richtlinien: - 2006/42 EC
Applicable EC Directives:
Angewandte harmonisierte
Normen: - EN ISO 12100:2010
Applicable harmonized - EN 792-1: 2000+A1:2008
Standard:
Datum/Herstellerunterschrift: 30.06.2014
Date/Authorized Signature:
Angaben zum Unterzeichner: Hr. Arnold, Geschäftsführer
Title of Signatory:
Technische Dokumentation
Technical Documentation
Angaben zum Unterzeichner: J. Bürkle FBL, QS
Title of Sinatory:
10

FR Avant de mettre l’appareil en marche, lisez attentivement le mode d’emploi
A.V. 2 Toute réimpression, même partielle, nécessite une approbation. Modifications techniques réservées.
Images d’illustration! Traduction du mode d’emploi d’origine
FR
Vous avez des questions techniques ? Une réclamation ? Vous avez besoin de pièces détachées ou d’un mode d’emploi ?
Nous vous aiderons rapidement et non bureaucratiquement par l’intermédiaire de nos pages web www.guede.com dans la rubrique Ser-
vice. Aidez-nous afin que nous puissions vous aider. Pour qu’il soit possible d’identifier votre appareil en cas de réclamation, nous avons be-
soin de renseignements suivants : numéro de série, numéro de commande et année de fabrication. Vous trouverez tous ces renseignements
sur la plaque signalétique. Pour avoir ces renseignements toujours à portée de main, veuillez les noter ci-dessous.
Numéro de série : Numéro de commande : Année de fabrication :
Tél.: +49 (0) 79 04 / 700-360 Fax: +49 (0) 79 04 / 700-51999 E-Mail: [email protected]
Indications sur l’appareil
Explication des symboles
Dans la notice et/ou sur l’appareil figurent les symboles suivants:
Produit répond aux normes
correspondantes de la CE Avertissement/attention Lisez la notice avant
l’utilisation.
Portez un casque. Portez
des lunettes de protection.
Portez des gants de pro-
tection
Pression de service Nombre de chocs Filetage de raccordement Consommation d’air Longueur du burin
Poids
Liquidez les déchets de
manière à ne pas nuire à
l’environnement.
Protégez de l’humidité
Déposez l’emballage en
carton au dépôt pour recy-
clage.
Sens de pose
Attention - fragile
Utilisation de l’appareil en conformité avec sa destination
Le burineur pneumatique est un appareil destiné à l’utilisation artisanale et convient :
à la découpe ou au cisaillement de tôles, au dérivetage, au perçage de trous. Toute autre utilisation est considérée comme
contraire à la destination de l’appareil.
Description de l’appareil
1. ressort de retour
2. bouton
3. vis de réglage
4. raccord d‘air
5. cylindre
6. 5 burins
7. burette d‘huile
8. raccord
9. mini-burette
Consignes générales de sécurité
Avant la première utilisation, il est nécessaire de lire entièrement le mode d’emploi. Si vous avez des doutes en ce qui concerne le
branchement ou la manipulation, contactez le fabricant (service après-vente).
AFIN D’ASSURER UN GRAND DEGRÉ DE SÉCURITÉ, RESPECTEZ LES CONSIGNES SUIVANTES :
•Après le déballage, contrôlez si l’appareil et toutes ces pièces sont en parfait état.
•Danger d’explosion ! Ne travaillez pas dans un milieu explosif. Ne dépassez pas la pression de service indiquée (voir ca-
ractéristiques techniques). Utilisez comme énergie uniquement l’air comprimé. Faites attention aux conduites électriques,
conduites de gaz, tuyaux d’alimentation et réservoirs.
11

•Danger d’éjection du burin ! Veillez à toujours bien fixer les burins. Sans marche à vide. Défense de toucher le burin lors-
que l’appareil est en marche !
•Maintenez votre lieu de travail propre et dans l’ordre ! Le désordre sur le lieu de travail et l’étable augmente le danger
d’accident et de blessures.
•Empêchez l’accès à l’appareil aux tierces personnes. Éloignez les visiteurs, les spectateurs, en particulier les enfants, les
personnes malades ou faibles, de votre lieu de travail.
•Assurez un rangement sûr des outils. Rangez les outils que vous n’utilisez pas à un endroit sec, si possible en hauteur ou
fermez-les de façon à ce qu’ils soient inaccessibles aux autres personnes.
•Utilisez uniquement des pièces approuvées ! Utilisez lors de l’entretien et les réparations uniquement des pièces déta-
chées identiques. Si vous avez besoin de pièces détachées, contactez un atelier de réparations agréé.
•Avertissement ! L’utilisation d’accessoires et montage de pièces non recommandées explicitement dans ce mode d’emploi,
peuvent représenter un danger pour des personnes et locaux.
•Tenue de travail ! Portez toujours des lunettes de protection ou des accessoires de protection des yeux correspondants,
une protection auditive, des gants de protection et un masque anti-poussières. Ne portez pas de vêtements larges ni bijoux
pouvant s’accrocher aux parties mobiles de l’appareil. Ne dirigez jamais le jet d’air comprimé vers votre corps ou vers
d’autres personnes ou animaux. Le jet d’air peut fortement accélérer la vitesse de déplacement d’objets qui devienne par
conséquent des projectiles dangereux.
•Soyez attentifs. Faites attention à ce que vous faites. Utilisez le bon sens. N’utilisez pas l’appareil si vous êtes fatigués.
N’utilisez pas l’appareil après avoir consommé de l’alcool, des drogues ou des médicaments réduisant la capacité de
concentration.
•Contrôlez le parfait état et l’étanchéité des pièces de l’appareil ! En cas d’endommagement du dispositif de protection ou
d’autres pièces de l’appareil, il est nécessaire de contrôler ces pièces avant la remise en marche de l’appareil, afin d’assurer
le fonctionnement sûr de l’appareil. Toutes les pièces endommagées doivent être réparées ou remplacées par un service
après-vente ou remplacées selon la description figurant dans le mode d’emploi.
•Utilisez uniquement les pièces détachées d’origine. L’utilisation de pièces détachées en provenance d’autre fabricant en-
traîne la perte des droits émanant de la garantie. L’utilisation de telles pièces détachées peut engendrer des pannes de
l’appareil. Vous pouvez vous procurer les pièces détachées d’origine auprès des commerçants contractuels.
•Entretien, réparations ou remplacement d’outils ! Débranchez le tuyau d’air comprimé et dépressurisez l’appareil.
•Danger de trébuchement ! Évitez que les tuyaux d’air comprimé court sur le sol. S’il n’y a pas d’autre solution, soyez très
attentifs.
•Danger d’incendie ! Les étincelles peuvent provoquer un incendie. En fonction du matériau travaillé, il y a un risque
d’apparition d’étincelles. Ces étincelles peuvent être à l’origine de la création d’un foyer d’incendie.
•Interdiction ! Il est interdit de toucher le burin lorsque l’appareil est en marche.
Garantie
La garantie concerne exclusivement les imperfections provoquées par le défaut du matériel ou le défaut de fabrication.
En cas de réclamation pendant la durée de la garantie, il est nécessaire de joindre l’original du justificatif d’achat avec la date
d’achat.
La garantie n’inclut pas une utilisation incompétente telle que surcharge de l’appareil, utilisation de la force, endommagement par
intervention étrangère ou objets étrangers. Le non respect du mode d’emploi et du mode de montage ainsi que l’usure normale ne
sont pas non plus inclus dans la garantie.
Montage (fig. 1+2)
1. Enroulez la bande de téflon autour du filetage de la mini-burette (fig. 1/9), puisse vissez la mini-burette (fig. 1/9) dans le rac-
cord d’air comprimé (fig. 1/4).
2. à présent, vissez le raccord (fig.1/8) dans la mini-burette (fig. 1/9).
Fonctionnement
Ne dirigez jamais l’extrémité en rotation de l’appareil vers vous ou vers d’autres personnes.
•Insérez le burin souhaité dans l’appareil.
•Raccordez le l’appareil au tuyau d’air comprimé.
•Placez l’outil sur l’objet usiné.
•Appuyez sur le bouton (fig. 1/2).
Caractéristiques techniques
Filetage de raccordement : ¼ ”
Pression de service : 6 bars
Consommation d’air : 350 l/min.
Nombre de chocs : 3000/min.
12

Entretien et soins
L’entretien doit être réalisé uniquement par des personnes formées.
Le respect des consignes indiquées dans ce mode d’emploi permet d’assurer à ce produit de qualité une longue durée de vie et
un fonctionnement fiable. Avant de procéder à l’entretien et aux soins, débranchez l’appareil de la source d’air comprimé. Pour
que votre appareil fonctionne parfaitement, il est nécessaire de le nettoyer tous les jours et de le graisser régulièrement. Utilisez
pour cela uniquement de l’huile pneumatique spéciale. Nous vous recommandons notre huile pneumatique spéciale pour grais-
seurs par brouillard #40060.
Vous avez les possibilités de graissage suivantes :
a) À l’aide du graisseur par brouillard
L’unité d’entretien complète contient un graisseur par brouillard (par exemple, graisseur Güde ¼“ SB #41080), placé sur le
compresseur.
b) À l’aide du graisseur sur la tuyauterie
Un graisseur est placé à proximité immédiate de l‘appareil (à environ 50 cm) sur la tuyauterie (par exemple, graisseur Güde
#41086), alimentant l’appareil suffisamment en huile.
c) À la main
Si votre appareil n’est pas équipé d’une unité d’entretien ou d’un graisseur sur la tuyauterie, il est nécessaire d’appliquer 3 à 5
gouttes d’huile dans le raccord d’air comprimé avec chaque mise en marche de l’appareil pneumatique. En cas de mise hors
service de l’appareil pendant plusieurs jours, il est nécessaire d’appliquer 5 à 10 gouttes d’huile dans le raccord d’air compri-
mé avant la mise en marche. Stockez vos outils et appareils pneumatiques dans des pièces sèches.
Attention :
Remplacez occasionnellement le ressort (art. 1)
Panne – cause - suppression
Panne Cause Suppression
L’air est réglé sur une valeur trop basse. Réglez l’air à une valeur plus grande.
Burin usé. Remplacez le burin.
Pression (hydraulique) de travail trop
basse.
Augmentez la pression (hydraulique) de
travail. Respectez la pression de travail
maximale.
Puissance du compresseur trop basse. Changez de compresseur.
Diamètre du tuyau trop bas. Utilisez un tuyau avec diamètre adéquat.
Burineur ne travaille pas correctement.
By-pass usé. Contactez le fabricant ou un partenaire
agréé.
Service
Vous avez des questions techniques ? Une réclamation ? Vous avez besoin de pièces détachées ou d’un mode d’emploi?
Nous vous aiderons rapidement et sans bureaucratie inutile par l’intermédiaire de nos pages Web www.guede.com dans la ru-
brique Service. Aidez-nous pour que nous puissions vous aider. Pour identifier votre appareil en cas de réclamation, nous avons
besoins du numéro de série, numéro de produit et l’année de fabrication. Toutes ces informations se trouvent sur la plaque signa-
létique. Pour avoir ces informations toujours à porté de main, veuillez les inscrire ici :
Numéro de série:
N° de commande:
Année de fabrication:
Tél.: +49 (0) 79 04 / 700-360
Fax: +49 (0) 79 04 / 700-51999
13

Déclaration de conformité de la CE
EC Declaration of Conformity
Nous déclarer, Güde GmbH & Co. KG
We herewith declare, Birkichstraße 6, 74549 Wolpertshausen, Germany
Déclarons par la présente que l’appareil indiqué ci-dessous répond du point de vue de sa
conception et construction, ainsi que de sa réalisation mise sur le marché, aux exigences
fondamentales correspondantes des directives de la CE en matière de sécurité et de santé.
That the following Appliance complies with the appropriate basic safety and health requirements of
the EC Directive based on its design and type, as brought into circulation by us.
Cette déclaration perd sa validité après une modification de l’appareil sans notre approba-
tion préalable.
In a case of alternation of the machine, not agreed upon by us, this declaration will loose its valid-
ity.
Désignation de l’appareil: - BURINEUR PNEUMATIQUE - SET
Machine desciption:
N° de fabrication: - 40065
Article-No.:
Directives de la CE appliquées: - 2006/42 EC
Applicable EC Directives:
Normes harmonisées utilisées: - EN ISO 12100:2010
Applicable harmonized - EN 792-1: 2000+A1:2008
Standard:
Date/Signature du fabricant: 30.06.2014
Date/Authorized Signature:
Informations sur le Signataire: Monsieur Arnold, agent commercial
Title of Signatory:
Documentation technique:
Technical Documentation :
Informations sur le Signataire: J. Bürkle FBL, QS
Title of Sinatory:
14

CZ Dříve než uvedete přístroj do provozu, pročtěte si prosím pečlivětento návod k obsluze.
A.V. 2 Dotisky, a to i částečné, vyžadují schválení.Technické změny vyhrazeny. Ilustrační obrázky! Překlad originálního
návodu k provozu.
Označení na přístroji
Vysvětlení symbolů
V tomto návodu a/nebo na přístroji jsou použity následující symboly:
Produkt odpovídá
příslušným normám EU Výstraha/ pozor Před použitím si přečtěte
návod k obsluze
Používejte ochranná
sluchátka. Používejte
ochranné brýle.
Používejte ochranné
rukavice
Provozní tlak Počet úderůPřípojný závit Spotřeba vzduchu délka nože
Hmotnost
Odpad zlikvidujte odborně
tak, abyste neškodili
životnímu prostředí.
Chraňte před vlhkem
Obalový materiál z lepenky
lze odevzdat za účelem
recyklace do sběrny.
Obal musí směřovat
nahoru
Pozor - křehké
Používání přístroje v souladu s jeho určením
Pneumatický sekáčje přístroj pro řemeslnické použití a hodí se pro:
řezání nebo stříhání plechů, odstraňování hlav nýtů, prorážení otvorů. Každé jiné použití se považuje za použití v rozporu
s určením stroje.
Popis stroje
1. vratná pružina
2. tlačítko
3. regulační šroub
4. přípojka vzduchu
5. válec
6. 5 sekáčů
7. láhev na olej
8. spojka
9. miniolejnička
Všeobecné bezpečnostní pokyny
Tento návod k obsluze je třeba před prvním použitím přístroje kompletněpročíst. Pokud by vznikly pochyby ohlednězapojení a
obsluhy stroje, obraťte se na výrobce (servisní oddělení).
ABY BYL ZARUČEN VYSOKÝ STUPEŇBEZPEČNOSTI, DODRŽUJTE POZORNĚNÁSLEDUJÍCÍ POKYNY:
•Po odstranění obalu zkontrolujte, že přístroj a všechny jeho součásti jsou v bezvadném stavu.
•Nebezpečí výbuchu! Nepracujte ve výbušném prostředí. Nepřekračujte uvedený provozní tlak (viz technické údaje). Jako
energii používejte pouze stlačený vzduch. Dávejte pozor na elektrická vedení, plynovody, palivová potrubí a tanky.
•Může dojít k odhození nože! Dbejte vždy na pevné usazení nožů. Bez chodu naprázdno. Za provozu je zakázáno se
dotýkat nože!
•Své pracovištěudržujte v čistotěa uklizené! Nepořádek na pracovišti a pracovním stole zvyšuje nebezpečí úrazu a
poranění.
•Nepouštějte ke stroji cizí osoby! Návštěvníky a diváky, především děti, nemocné a tělesněslabé osoby udržujte
v bezpečné vzdálenosti od svého pracoviště.
•Zajistěte bezpečné uložení nářadí! Nářadí, které nepoužíváte, je nutno uložit na suchém, pokud možno vysoko položeném
nebo nepřístupném místě.
15

•Používejte pouze schválené součásti! Při údržběa opravách používejte pouze identické náhradní díly. Potřebujete-li
náhradní díly, obraťte se na autorizovanou opravnu.
•Výstraha! Používání příslušenství a montáž dílů, které nejsou v tomto návodu k obsluze výslovnědoporučeny, může mít za
následek ohrožení osob a objektů.
•Pracovní oděv! Noste vždy ochranné brýle nebo odpovídající pomůcky na ochranu zraku, pomůcky na ochranu sluchu,
ochranné rukavice a protiprachovou masku. Nenoste široký oděv ani šperky, mohly by se Vám zachytit do pohyblivých
součástí stroje. Paprskem tlakového vzduchu nikdy nemiřte na vlastní tělo ani na jiné osoby nebo zvířata. Proud vzduchu
může velmi silnězrychlit cizí tělesa, která se tak stanou nebezpečnými střelami.
•Pozornost! Pracujte s rozvahou a používejte zdravý rozum. Přístroj nepoužívejte při únavěa jste-li pod vlivem alkoholu,
drog nebo léků, které mohou způsobit únavu.
•Kontrolujte bezvadný stav a těsnost součástí stroje! Došlo-li k poškození ochranného zařízení nebo jiných součástí
stroje, je nutno před opětovným uvedením stroje do chodu tyto součásti zkontrolovat, aby byl zajištěn bezpečný provoz.
Všechny poškozené součásti je nutno nechat opravit nebo vyměnit v servisu nebo je vyměnit podle popisu v příručce k
obsluze.
•Používejte výhradněoriginální náhradní díly! Při používání náhradních dílůod jiných výrobcůzanikají nároky plynoucí ze
záruky. Používání takových náhradních dílůmůže vést k poruchám funkce přístroje. Originální náhradní díly dostanete u
smluvních obchodníků.
•Údržba, opravy nebo výměna nástrojů! Odpojte hadici na stlačený vzduch a přístroj odtlakujte.
•Nebezpečí klopýtnutí! Vyhněte se vedení hadic na stlačený vzduch po podlaze. Není-li jiná možnost, buďte pozorní.
•Nebezpečí požáru! Jiskřením může vzniknout požár. V závislosti na opracovávaném materiálu může dojít k jiskření, přičemž
jiskry mohou být příčinou vzniku ohniska požáru nebo tlecího požáru.
•Zakázáno! Dotýkat se nože za provozu.
Záruka
Záruka se vztahuje výhradněna nedostatky způsobené vadou materiálu nebo výrobní vadou.
Při reklamaci v záruční doběje třeba přiložit originální doklad o koupi s datem prodeje.
Do záruky nespadá neodborné použití jako např. přetížení přístroje, použití násilí, poškození cizím zásahem nebo cizími
předměty. Nedodržení návodu k použití a montáži a normální opotřebení rovněž nespadá do záruky.
Montáž (obr. 1+2)
1. Závit miniolejničky (obr. 1/9) oviňte teflonovou páskou a pak zašroubujte miniolejničku (obr. 1/9) do přípojky tlakového
vzduchu (obr. 1/4).
2. Nyní zašroubujte spojku (obr.1/8) do miniolejničky (obr. 1/9).
Provoz
Rotujícím koncem přístroje nikdy nemiřte na sebe ani na jiné osoby.
•Do přístroje vložte požadovaný nůž.
•Přístroj spojte s hadicí pro přívod vzduchu.
•Nářadí nasaďte na obráběný objekt.
•Stiskněte tlačítko (obr. 1/2).
Technické údaje
Přípojný závit: ¼ ”
Provozní tlak: 6 bar
Spotřeba vzduchu: 350 l/min.
Počet úderů: 3000/min.
Údržba a péče
Údržbu smějí provádět pouze proškolené osoby.
Dodržováním zde uvedených pokynůpro údržbu zajistíte tomuto jakostnímu výrobku dlouhou životnost a bezporuchový provoz.
Při údržběa péči přístroj odpojte od zdroje tlakového vzduchu. Pro trvale bezvadnou funkci Vašeho pneumatického přístroje je
nezbytné jeho každodenní čištění a pravidelné mazání. K tomu používejte pouze speciální pneumatický olej. Doporučujeme náš
speciální pneumatický olej pro mlhové přimazávače #40060.
Při mazání máte tyto možnosti:
a) pomocí mlhového přimazávače
Kompletní údržbová jednotka obsahuje mlhový přimazávač(např. přimazávačGüde ¼“ SB #41080) a je umístěna na
kompresoru.
b) pomocí maznice na potrubí
V bezprostřední blízkosti přístroje (ve vzdálenosti cca 50 cm) se instaluje na potrubí maznice (např. maznice Güde #41086),
která přístroj dostatečnězásobuje olejem.
c) ručně
Nemáte-li u svého zařízení údržbovou jednotku ani maznici na potrubí, je nutno před každým uvedením pneumatického
přístroje kápnout 3 – 5 kapek oleje do přípojky tlakového vzduchu. Byl-li pneumatický přístroj několik dní mimo provoz, je
nutno do přípojky tlakového vzduchu kápnout před zapnutím 5 – 10 kapek oleje. Své pneumatické nářadí a přístroje ukládejte
v suchých prostorách.
16

Pozor:
Příležitostněvyměňte pružinu (pol. 1)
Porucha – příčina - odstranění
Porucha Příčina Odstranění
Regulace vzduchu je nastavena na příliš
nízkou hodnotu.
Nastavte regulaci vzduchu na vyšší
hodnotu.
Opotřebený nůž. Vyměňte nůž.
Příliš nízký pracovní (hydraulický) tlak. Zvyšte pracovní (hydraulický) tlak. Při
tom respektujte maximální pracovní tlak.
Příliš nízký výkon kompresoru. Použijte kompresor o jiném výkonu.
Příliš malý průměr hadice. Použijte hadici o správném průměru.
Sekáčřádněnepracuje
Obtokový ventil je opotřebený. Obraťte se na výrobce nebo na
autorizovaného servisního partnera.
Servis
Máte technické otázky? Reklamaci? Potřebujete náhradní díly nebo návod k obsluze?
Na naší domovské stránce www.guede.com Vám v oddílu Servis pomůžeme rychle a nebyrokraticky. Prosím pomožte nám
pomoci Vám. Aby bylo možné Váš přístroj v případěreklamace identifikovat, potřebujeme sériové číslo, objednací číslo a rok
výroby. Všechny tyto údaje najdete na typovém štítku. Abyste měli tyto údaje vždy po ruce, zapište si je prosím dole.
Sériové číslo:
Objednací číslo:
Rok výroby:
Tel.: +49 (0) 79 04 / 700-360
Fax: +49 (0) 79 04 / 700-51999
17

Prohlášení o shoděES
EC Declaration of Conformity
Tímto prohlašujeme my, Güde GmbH & Co. KG
We herewith declare, Birkichstraße 6, 74549 Wolpertshausen, Germany
že koncepce a konstrukce níže uvedených přístrojův provedeních, která uvádíme do
oběhu, odpovídá příslušným základním požadavkům směrnic ES na bezpečnost a hygienu.
That the following Appliance complies with the appropriate basic safety and health requirements of
the EC Directive based on its design and type, as brought into circulation by us.
V případězměny přístroje, která s námi nebyla konzultována, ztrácí toto prohlášení svou
platnost.
In a case of alternation of the machine, not agreed upon by us, this declaration will loose its valid-
ity.
Označení přístrojů: - PNEUMATICKÝ SEKÁČ- SOUPRAVA
Machine desciption:
Číslo výrobku: - 40065
Article-No.:
Příslušné směrnice ES: - 2006/42 EC
Applicable EC Directives:
Použité harmonizované
normy: - EN ISO 12100:2010
Applicable harmonized - EN 792-1: 2000+A1:2008
Standard:
Datum/podpis výrobce: 30.06.2014
Date/Authorized Signature:
Údaje o podepsaném: Hr. Arnold, Geschäftsführer
Title of Signatory:
Technická dokumentace:
Technical Documentation
Údaje o podepsaném: J. Bürkle FBL, QS
Title of Sinatory:
18

SK Skôr ako uvediete prístroj do prevádzky, prečítajte si, prosím, starostlivo tento návod na obsluhu.
A.V. 2 Dotlač, a to i čiastočná, vyžaduje schválenie. Technické zmeny vyhradené. Ilustračné obrázky! Preklad originálneho
návodu na prevádzku.
Kennzeichnungen auf dem Gerät
Erklärung der Symbole
In dieser Anleitung und/oder auf dem Gerät werden folgende Symbole verwendet:
Produkt zodpovedá
príslušným normám EÚ Výstraha/pozor Pred použitím si prečítajte
návod na obsluhu
Používajte ochranné
okuliare. Používajte
ochranné slúchadlá.
Používajte ochranné
rukavice
Prevádzkový tlak Počet úderov Prípojný závit Spotreba vzduchu dĺžka noža
Hmotnosť
Odpad zlikvidujte odborne
tak, aby ste neškodili
životnému prostrediu.
Chráňte pred vlhkom
Obalový materiál z lepenky
je možné odovzdaťza
účelom recyklácie do
zberne.
Obal musí smerovaťhore
Pozor - krehké
Používanie prístroja v súlade s jeho určením
Pneumatický sekáčje prístroj na remeselnícke použitie a hodí sa na:
rezanie alebo strihanie plechov, odstraňovanie hláv nitov, prerážanie otvorov. Každé iné použitie sa považuje za použitie v
rozpore s určením stroja.
Popis stroja
1. vratná pružina
2. tlačidlo
3. regulačná skrutka
4. prípojka vzduchu
5. valec
6. 5 sekáčov
7. fľaša na olej
8. spojka
9. miniolejnička
Všeobecné bezpečnostné pokyny
Tento návod na obsluhu je potrebné pred prvým použitím prístroja kompletne prečítať. Ak by vznikli pochyby o zapojení a obsluhe
stroja, obráťte sa na výrobcu (servisné oddelenie).
ABY BOL ZARUČENÝ VYSOKÝ STUPEŇBEZPEČNOSTI, DODRŽUJTE DÔKLADNE NASLEDUJÚCE POKYNY:
•Po odstránení obalu skontrolujte, či prístroj a všetky jeho súčasti sú v bezchybnom stave.
•Nebezpečenstvo výbuchu! Nepracujte vo výbušnom prostredí. Neprekračujte uvedený prevádzkový tlak (pozrite technické
údaje). Ako energiu používajte iba stlačený vzduch. Dávajte pozor na elektrické vedenia, plynovody, palivové potrubia a
tanky.
•Môže dôjsťk odhodeniu noža! Dbajte vždy na pevné usadenie nožov. Bez chodu naprázdno. Počas prevádzky je
zakázané sa dotýkaťnoža!
•Svoje pracovisko udržujte v čistote a upratané! Neporiadok na pracovisku a pracovnom stole zvyšuje nebezpečenstvo
úrazu a poranenia.
19

•Nepúšťajte k stroju cudzie osoby! Návštevníkov a divákov, predovšetkým deti, choré a telesne slabé osoby udržujte
v bezpečnej vzdialenosti od svojho pracoviska.
•Zaistite bezpečné uloženie náradia! Náradie, ktoré nepoužívate, je nutné uložiťna suchom, pokiaľmožno vysoko
položenom alebo neprístupnom mieste.
•Používajte iba schválené súčasti! Pri údržbe a opravách používajte iba identické náhradné diely. Ak potrebujete náhradné
diely, obráťte sa na autorizovanú opravovňu.
•Výstraha! Používanie príslušenstva a montáž dielov, ktoré nie sú v tomto návode na obsluhu výslovne odporúčané, môže
maťza následok ohrozenie osôb a objektov.
•Pracovný odev! Noste vždy ochranné okuliare alebo zodpovedajúce pomôcky na ochranu zraku, pomôcky na ochranu
sluchu, ochranné rukavice a protiprachovú masku. Nenoste široký odev ani šperky, mohli by sa vám zachytiťdo pohyblivých
súčastí stroja. Lúčom tlakového vzduchu nikdy nemierte na vlastné telo ani na iné osoby alebo zvieratá. Prúd vzduchu môže
veľmi silne zrýchliťcudzie telesá, ktoré sa tak stanú nebezpečnými strelami.
•Pozornosť! Pracujte s rozvahou a používajte zdravý rozum. Prístroj nepoužívajte pri únave a ak ste pod vplyvom alkoholu,
drog alebo liekov, ktoré môžu spôsobiťúnavu.
•Kontrolujte bezchybný stav a tesnosťsúčastí stroja! Ak došlo k poškodeniu ochranného zariadenia alebo iných súčastí
stroja, je nutné pred opätovným uvedením stroja do chodu tieto súčasti skontrolovať, aby bola zaistená bezpečná prevádzka.
Všetky poškodené súčasti je nutné nechaťopraviťalebo vymeniťv servise alebo ich vymeniťpodľa opisu v príručke na
obsluhu.
•Používajte výhradne originálne náhradné diely! Pri používaní náhradných dielov od iných výrobcov zanikajú nároky
plynúce zo záruky. Používanie takýchto náhradných dielov môže viesťk poruchám funkcie prístroja. Originálne náhradné
diely dostanete u zmluvných obchodníkov.
•Údržba, opravy alebo výmena nástrojov! Odpojte hadicu na stlačený vzduch a prístroj odtlakujte.
•Nebezpečenstvo potknutia! Vyhnite sa vedeniu hadíc na stlačený vzduch po podlahe. Ak nie je iná možnosť, buďte
pozorní.
•Nebezpečenstvo požiaru! Iskrením môže vzniknúťpožiar. V závislosti od opracovávaného materiálu môže dôjsťk iskreniu,
pričom iskry môžu byťpríčinou vzniku ohniska požiaru alebo tlejúceho požiaru.
•Zakázané! Dotýkaťsa noža za prevádzky.
Záruka
Záruka sa vzťahuje výhradne na nedostatky spôsobené chybou materiálu alebo výrobnou chybou.
Pri reklamácii v záručnej lehote je potrebné priložiťoriginálny doklad o kúpe s dátumom predaja.
Do záruky nespadá neodborné použitie, ako napr. preťaženie prístroja, použitie násilia, poškodenie cudzím zásahom alebo
cudzími predmetmi. Nedodržanie návodu na použitie a montáž a normálne opotrebenie tiež nespadá do záruky.
Montáž (obr. 1+2)
1. Závit miniolejničky (obr. 1/9) oviňte teflonovou páskou a potom zaskrutkujte miniolejničku (obr. 1/9) do prípojky tlakového
vzduchu (obr. 1/4).
2. Teraz zaskrutkujte spojku (obr.1/8) do miniolejničky (obr. 1/9).
Prevádzka
Rotujúcim koncom prístroja nikdy nemierte na seba ani na iné osoby.
•Do prístroja vložte požadovaný nôž.
•Prístroj spojte s hadicou na prívod vzduchu.
•Náradie nasaďte na obrábaný objekt.
•Stlačte tlačidlo (obr. 1/2).
Technické údaje
Prípojný závit: ¼"
Prevádzkový tlak: 6 bar
Spotreba vzduchu: 350 l/min.
Počet úderov: 3 000 / min.
20
Table of contents
Languages:
Other Gude Cutter manuals